1
Logicube NETConnect™ User’s Manual
Logicube, Inc.
Chatsworth, CA 91311
USA
Phone: 818 700 8488
Fax: 818 700 8466
Version: 1.2
MAN-NETConnect
Date: 04/01/2011
I
NETConnect ™ User’s Manual
Limitation of Liability and Warranty Information
Logicube Disclaimer
LOGICUBE IS NOT LIABLE FOR ANY INCIDENTAL OR CONSEQUENTIAL DAMAGES,
INCLUDING, BUT NOT LIMITED TO PROPERTY DAMAGE, LOSS OF TIME OR DATA
FROM USE OF A LOGICUBE PRODUCT, OR ANY OTHER DAMAGES RESULTING
FROM PRODUCT MALFUNCTION OR FAILURE OF (INCLUDING WITHOUT LIMITATION,
THOSE RESULTING FROM: (1) RELIANCE ON THE MATERIALS PRESENTED, (2) COSTS
OF REPLACEMENT GOODS, (3) LOSS OF USE, DATA OR PROFITS, (4) DELAYS OR
BUSINESS INTERRUPTIONS, (5) AND ANY THEORY OF LIABILITY, ARISING OUT OF OR
IN CONNECTION WITH THE USE OR PERFORMANCE (OR FROM DELAYS IN
SERVICING OR INABILITY TO RENDER SERVICE ON ANY) LOGICUBE PRODUCT.
LOGICUBE MAKES EVERY EFFORT TO ENSURE PROPER OPERATION OF ALL
PRODUCTS. HOWEVER, THE CUSTOMER IS RESPONSIBLE TO VERIFY THAT THE
OUTPUT OF LOGICUBE PRODUCT MEETS THE CUSTOMER’S QUALITY REQUIREMENT.
THE CUSTOMER FURTHER ACKNOWLEDGES THAT IMPROPER OPERATION OF
LOGICUBE PRODUCT AND/OR SOFTWARE, OR HARDWARE PROBLEMS, CAN
CAUSE LOSS OF DATA, DEFECTIVE FORMATTING, OR DATA LOADING. LOGICUBE
WILL MAKE EFFORTS TO SOLVE OR REPAIR ANY PROBLEMS IDENTIFIED BY
CUSTOMER, EITHER UNDER WARRANTY OR ON A TIME AND MATERIALS BASIS.
Warranty
LOGICUBE PROVIDES A BASIC ONE-YEAR PARTS AND LABOR WARRANTY FOR ALL
OF ITS PRODUCTS (EXCLUDING CABLES, ADAPTERS AND OTHER “CONSUMABLE”
ITEMS). A TWO-YEAR EXTENDED WARRANTY IS ALSO AVAILABLE FOR AN ADDED
COST. TELEPHONE AND EMAIL SUPPORT IS AVAILABLE FOR THE LIFE OF THE
PRODUCT AS DEFINED BY LOGICUBE.
I
NETConnect ™ User’s Manual
LIMITATION OF LIABILITY
RoHS Certificate of Compliance
LOGICUBE PRODUCTS COMPLY WITH THE EUROPEAN UNION RESTRICTION OF
THE USE OF CERTAIN HAZARDOUS SUBSTANCES IN ELECTRONIC EQUIPMENT,
ROHS DIRECTIVE (2002/95/EC).
THE ROHS DIRECTIVE PROHIBITS THE SALE OF CERTAIN ELECTRONIC
EQUIPMENT CONTAINING SOME HAZARDOUS SUBSTANCES SUCH AS
MERCURY, LEAD, CADMIUM, HEXAVALENT CHROMIUM AND CERTAIN FLAMERETARDANTS IN THE EUROPEAN UNION. THIS DIRECTIVE APPLIES TO
ELECTRONIC PRODUCTS PLACED ON THE EU MARKET AFTER JULY 1, 2006.
II
Logicube NETConnect™ User’s Manual
Table of Contents
LOGICUBE NETCONNECT™ USER’S MANUAL .............................................................................I
LIMITATION OF LIABILITY AND WARRANTY INFORMATION ................................................I
LOGICUBE DISCLAIMER ..........................................................................................................................I
WARRANTY ...........................................................................................................................................I
ROHS CERTIFICATE OF COMPLIANCE .....................................................................................................II
TABLE OF CONTENTS......................................................................................................................III
1. INTRODUCTION TO THE LOGICUBE NETCONNECT.............................................................. 1
INTRODUCTION ..................................................................................................................................... 1
SPECIFICATIONS .................................................................................................................................... 1
FEATURES ............................................................................................................................................. 2
USING THIS GUIDE ................................................................................................................................. 2
SYSTEM DESCRIPTION ............................................................................................................................ 3
2. GETTING STARTED ........................................................................................................................ 4
NETCONNECT OVERVIEW ..................................................................................................................... 4
Network Protocols ............................................................................................................................ 4
Network Protocols ............................................................................................................................ 5
File Protocols ................................................................................................................................... 5
The Front Panel................................................................................................................................ 5
CONNECTING NETCONNECT TO THE FORENSIC DOSSIER TRAY ........................................................... 6
CONNECTING NETCONNECT TO THE MPFS ........................................................................................ 8
3. CONNECTING NETCONNECT TO A NETWORK....................................................................... 9
CONFIGURING NETCONNECT ................................................................................................................ 9
CONNECTING AS A NAS......................................................................................................................... 9
CONFIGURING NETCONNECT TO TRANSFER DATA USING FTP OR CIFS ................................................. 11
Connecting to NETConnect using Telnet via Windows XP: .............................................................. 12
Connecting to NETConnect using Telnet via Windows Vista or Windows 7: ..................................... 13
SAMPLE FTP CONFIGURATION ............................................................................................................. 14
SAMPLE CIFS CONFIGURATION ............................................................................................................ 15
PUSHING DATA ................................................................................................................................... 16
CONNECTING TO NETCONNECT USING ISCSI ....................................................................................... 16
Connecting to NETConnect via iSCSI using Windows 7 ................................................................... 17
4. ADMINISTRATIVE FUNCTIONS ................................................................................................ 22
ADMINISTRATIVE FUNCTIONS .............................................................................................................. 22
CONFIGURING THE MACRO COMMAND – STEP BY STEP......................................................................... 22
CONFIGURING USERS – STEP BY STEP .................................................................................................. 23
PUSHING DATA TO A PC OR SERVER USING CIFS – STEP BY STEP.......................................................... 24
PUSHING DATA VIA A FTP – STEP BY STEP ........................................................................................... 26
III
NETConnect ™ User’s Manual
TABLE OF CONTENTS
VERIFICATION ..................................................................................................................................... 27
Installing the server side script........................................................................................................ 28
Enabling Verification – Step-by-step: .............................................................................................. 29
FORMATTING, ERASING, OR WIPING (DOD M-5220.22M)..................................................................... 30
Disk Management through the Macro command.............................................................................. 30
Disk Management through the Disks menu ...................................................................................... 32
COMMAND LINE INTERFACE MENUS .................................................................................................... 33
RESTORING ALL SETTINGS TO FACTORY DEFAULTS.............................................................................. 38
APPLICATION NOTES REGARDING PUSH PERFORMANCE........................................................................ 39
INTRODUCTION ................................................................................................................................... 39
JUMBO FRAMES ................................................................................................................................... 39
PREREQUISITES ................................................................................................................................... 39
ENABLING JUMBO FRAMES .................................................................................................................. 40
NetConnect ..................................................................................................................................... 40
Windows ......................................................................................................................................... 40
Linux .............................................................................................................................................. 41
FTP SERVER TUNING .......................................................................................................................... 41
FTP Server Destination Drive File Format (Linux).......................................................................... 43
FTP Server Destination Drive File Format (Windows) .................................................................... 43
5. LIVE ACQUISITION...................................................................................................................... 45
OVERVIEW .......................................................................................................................................... 45
CREATING A LIVE ACQUISITION USB FLASH DRIVE ............................................................................. 45
Software and Hardware Requirements............................................................................................. 45
Step-By-Step Live Acquisition USB Creation ................................................................................... 46
PERFORMING A LIVE ACQUISITION ....................................................................................................... 48
6. SOFTWARE UPDATING INSTRUCTIONS ................................................................................. 51
LOGICUBE NETCONNECT SOFTWARE UPDATING PROCEDURES ............................................................. 51
LOADING NEW SOFTWARE THROUGH A RECOVERY USB FLASH DRIVE .................................................. 51
LOADING NEW SOFTWARE THROUGH FTP............................................................................................ 52
VERIFYING THE SOFTWARE .................................................................................................................. 53
7. CREATING A RECOVERY USB FLASH DRIVE........................................................................ 54
OVERVIEW .......................................................................................................................................... 54
CHECKLIST ......................................................................................................................................... 54
THIRD PARTY SOFTWARE INSTALLATION ............................................................................................. 55
7-Zip Installation ............................................................................................................................ 55
Image Writer for Windows (Win32 Disk Imager) ............................................................................. 56
CREATING THE USB RECOVERY FLASH DRIVE ...................................................................................... 56
Section I – Preparation ................................................................................................................... 56
Section II – Extracting the recovery image....................................................................................... 57
Section III – Writing the image to a USB flash drive ........................................................................ 58
Section IV – Installing the DOM to the USB flash drive ................................................................... 61
USING THE RECOVERY USB FLASH DRIVE ............................................................................................ 61
8. FREQUENTLY ASKED QUESTIONS ........................................................................................... 63
9. INDEX.............................................................................................................................................. 64
IV
Logicube NETConnect™ User’s Manual
1. Introduction to the Logicube NETConnect
Introduction
Congratulations on your purchase of the Logicube
NETConnect™ network connectivity module.
The Logicube NETConnect is designed to work in
conjunction with the Logicube Forensic Dossier and
MPFS. The NETConnect provides the convenience of
allowing multiple investigators to access a single set
of case files, streamlining the analysis process by
allowing broad access either locally or remotely to the
evidence data post capture.
Specifications
1
Power Requirements
TBD
Power Consumption
>170 Watts
Operating Temperature
10°to 35°C (50°to 95°F)
Relative Humidity
10%- 80%
Net Weight
2lbs 11oz
Dimensions
10.5” x 8.3” x 2.5”
Agency Approvals
RoHS compliant
NETConnect ™ User’s Manual
INTRODUCTION
Features
• Works seamlessly with the Forensic Dossier and
MPFS
• Uses CIFS, NFS, FTP file access protocols
• 10/100/1000 Gigabit Ethernet interface
• Supports Windows, Mac, and Linux operating
systems
• Data transfer rate approaching 7 GB/min
(depending on your network infrastructure
performance)
• Network protocols supported include ARP, IP,
UDP, TCP, HTTP, ICMP, BOOTP/DHCP, DNS,
MDNS, Telnet, and iSCSI
• NETConnect can be configured as a “client” for a
network file system or as an actual network file
system server or NAS
• Allows you to “push” or transfer evidence data to
pre-defined network destinations, verify network
transfer, format and wipe drives
• Administrative functions allow users to establish
user names, passwords, manage access control,
maintain credentials, set destination IP addresses
and domain names
• Convenient “Macro” feature allows users to easily
initiate preconfigured commands from the control
panel of NETConnect
Using this guide
This user guide is made up of 8 sections:
• Introduction
• Getting Started
• Connecting NETConnect to a Network
• Administrative Functions
• Software Updating Instructions
• Creating a Recovery USB Flash Drive
• Frequently Asked Questions
• Index
2
Logicube NETConnect™ User’s Manual
INTRODUCTION
System description
The complete Logicube NETConnect system includes
the following:
• The Logicube NETConnect unit
• A 5’ CAT-6 Ethernet (network) cable
• A DVD containing Users Manual, and Software
NOTE: Please contact Logicube Technical Support at
(818) 700-8488 X3 if any of the above pieces are
missing.
NETConnect ™ User’s Manual
3
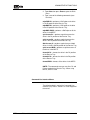
2. Getting Started
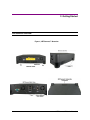
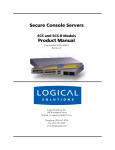
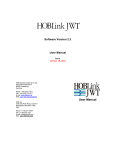
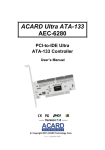
NETConnect Overview
Figure 1, NETConnect™ Overview
4
NETConnect ™ User’s Manual
GETTING STARTED
Network Protocols
The NETConnect supports the following Network
Protocols
•
ARP
•
IP
•
UDP
•
TCP
•
HTTP
•
ICMP
•
BOOTP/DHCP
•
DNS
•
MDNS
•
Telnet
•
iSCSI
File Protocols
The NETConnect supports the following file access
protocols;
• CIFS
• NFS
• FTP
The Front Panel
The NETConnect has a front panel that has two
buttons and three LEDs:
• Start button – This button is used to start the
Macro push process. More information can be
found in Section 3 under the “Pushing Data”
section.
• Cancel button – The cancel button stops the
current process (e.g. config commit or push)
• Power LED – When this LED is solid, the
NETConnect has completed its boot-up sequence.
When this LED is blinking, the NETConnect is still
going through its boot-up process
• Ready LED – When this LED is solid, the
NETConnect is ready. When this LED is blinking,
the NETConnect is still processing the last
command
NETConnect ™ User’s Manual
5
GETTING STARTED
• Error LED – This LED will light up when the
NETConnect encounters an error. You can find
more information on the error by using the status
command via the Command Line Interface.
Connecting NETConnect to the Forensic Dossier tray
The NETConnect can be attached to the Forensic
Dossier tray or the MPFS allowing easy access to the
hard drives used either with the Forensic Dossier tray
or the MPFS.
To connect the NETConnect to the Forensic Dossier
tray, follow the instructions below:
1. Ensure that power and all cables attached to the
Dossier have been disconnected.
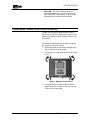
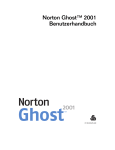
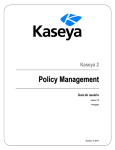
2. Turn the tabs on each corner of the unit as shown
in Fig. 1:
Figure 1, Opening corner latches.
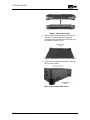
3. Lift the top half of the Forensic Dossier off the
bottom of the unit as shown in Fig. 2 and set the
Forensic Dossier top aside.
6
Logicube NETConnect™ User’s Manual
GETTING STARTED
Figure 2, Lifting head off unit.
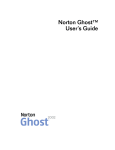
4. Set the NETConnect on top of the Dossier tray
and make sure the NetConnect underside
connector aligns with the Forensic Dossier tray’s
connector as shown in Fig. 3:
Figure 3. NETConnect Underside Connector
5. Close the front and back side latches to lock the
NETConnect in place.
Figure 4. Front & back side latches
NETConnect ™ User’s Manual
7
GETTING STARTED
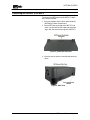
Connecting NETConnect to the MPFS
To connect the NETConnect to the MPFS™, follow
the instructions below:
1. Ensure that power and all cables attached to the
MPFS® have been disconnected.
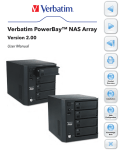
2. Set the NETConnect on top of the MPFS™ and
make sure the NetConnect underside connector
aligns with the connector on top of the MPFS™.
Figure 5, Underside Connector
3. Close the corner latches to lock the NetConnect in
place.
Figure 6, Side View
8
Logicube NETConnect™ User’s Manual
3. Connecting NETConnect to a Network
Configuring NETConnect
This chapter describes the two ways the NETConnect
is used and how NETConnect can be configured.
The NETConnect can act as a NAS (Network
Attached Storage) out of the box. Computers on the
same network can connect to the NETConnect and
copy data stored in the attached Forensic Dossier tray
or the attached MPFS. Multiple users can mount the
drives to their workstation to immediately start working
with the data or copy files to any location including
their local drive, CD, DVD, USB drive, a shared
directory or another network drive location.
Computers can also connect to the NETConnect and
push the data to a shared folder on any computer or
server on the same network using the CIFS, NFS, or
FTP file protocols (these protocols allow a user on a
client computer to access files over a network).
Administrators can configure NETConnect using a
network protocol such as Telnet ( a network protocol
available and built-in to most Windows Operating
Systems). Once data is “pushed” to the network
location it can be viewed from any workstation on the
network, copied from the network to the workstation’s
local drive or to any other directory on the same
network.
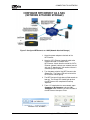
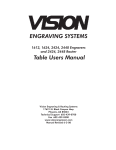
Connecting as a NAS
These instructions show how to connect to the
NETConnect from a PC on the same network. With
this type of connection, you will be able to connect to
the NETConnect and copy data from the attached
Dossier tray or MPFS to the PC you are using.
9
NETConnect ™ User’s Manual
CONNECTING TO A NETWORK
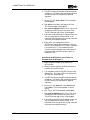
Figure 7. Configure NETConnect as a NAS (Network Attached Storage)
1. Attach the power adapter to the back of the
NETConnect.
2. Attach a CAT-6 Ethernet (network) cable to the
network connector in the back of the
NETConnect. Attach the other end of the CAT-6
Ethernet (network) cable to your network (consult
with your IT department if you need assistance in
connecting to your network).
3. Turn the power switch of the NETConnect to the
ON position. The Power LED on the front of the
NETConnect should light up.
4. The NETConnect will take about 45-60 seconds to
boot up. The Ready LED should light up when
the NETConnect has completed its boot-up
sequence.
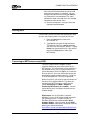
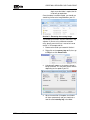
5. From a PC attached to the same network, open
Computer or My Computer and type \\NC000XXXXX where XXXXX is the serial number of
the NETConnect then press Enter.
Windows Vista / Windows 7
10
Windows XP
Logicube NETConnect™ User’s Manual
CONNECTING TO A NETWORK
6. The drives inside the Dossier Tray or MPFS
should appear in the window.
7. To access the contents of the drive, double-click
on any of the folders. A login window should
appear. Login with the username guest and the
password guest.
8. From you can copy any or all the files to your
computer by either using the Drag-and-drop
method in Windows or using the Copy & Paste
method. You can also simply view the files in this
state. The files are write protected.
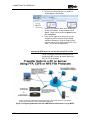
Configuring NETConnect to transfer data using FTP or CIFS
These instructions show how to connect to and
configure the NETConnect to transfer data using
CIFS or FTP file protocols.
Figure 9. Configuring Network Push with a NETConnect with Dossier Tray or MPFS
NETConnect ™ User’s Manual
11
CONNECTING TO A NETWORK
PREREQUESITES:
To push data to a PC or server on the same network,
there is information required that may only be
available from your Systems Administrator, Network
Administrator, or IT department. The following
information is required:
a. A Telnet client.
b. The IP address or name of the destination
computer or server (where you want to push
the data to).
c. Whether or not the computer or server is
connected to a domain (if using CIFS).
d. The shared folder’s name (if using CIFS).
e. A username and password that has access to
the shared folder (or FTP username and
password).
NOTE:
Windows XP has a built-in Telnet client. If you are
using Windows Vista or Windows 7, you must install
Telnet manually as it is not installed by default. This
may require assistance from your IT department. You
can also use any other Telnet program of your choice.
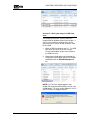
Installing Telnet in Windows Vista or 7:
By default, Telnet is not installed with Windows, but
you can install it by following the steps below.
1. Click Start > Control Panel and select either
Programs & Features (for Vista) or Programs
(for Seven).
2. Click Turn Windows features on or off. If you are
prompted for an administrator password or
confirmation, type the administrator password or
provide confirmation (for assistance with
administrator passwords, check with your IT
department).
3. In the Windows Features dialog box, select the
Telnet Client check box.
4. Click OK. The installation might take several
minutes.
Connecting to NETConnect using Telnet via
Windows XP:
1. Attach the power adapter to the back of the
NETConnect.
2. Attach a network cable (CAT 6 type) to the RJ45
connector in the back of the NETConnect.
3. Turn the power switch of the NETConnect to the
ON position. The Power LED on the front of the
NETConnect should light up.
12
Logicube NETConnect™ User’s Manual
CONNECTING TO A NETWORK
4. The NETConnect will take about 60-120 seconds
to boot up. The Ready LED should light up when
the NETConnect has completed its boot-up
sequence.
5. On your PC, click Start > Run. The Run window
should appear.
6. Type telnet in the Open: field and press Enter.
The Telnet window should appear.
7. Type open nc-000xxxxx where xxxxx is the serial
number of the NETConnect, then press Enter.
The NETConnect login screen should appear.
8. If you were assigned a login ID and password, use
your assigned login ID and password. If no
credentials were assigned, you can log in with the
username it and the password it.
9. At this point, you should connect to the
NETConnect and be able to configure it to push
the files via the network or FTP using a Command
Line Interface (CLI). See the Administrative
Functions section below for more information on
how to configure the NETConnect to push via
network or FTP.
Connecting to NETConnect using Telnet via
Windows Vista or Windows 7:
1. Attach the power adapter to the back of the
NETConnect.
2. Attach a network cable to the RJ45 connector in
the back of the NETConnect.
3. Turn the power switch of the NETConnect to the
ON position. The Power LED on the front of the
NETConnect should light up.
4. The NETConnect will take about 60-120 seconds
to boot up. The Ready LED should light up when
the NETConnect has completed its boot-up
sequence.
5. On your PC, click Start and in the Search field,
type Telnet. Telnet should appear in search
results.
6. Click Telnet. The Telnet window should appear.
7. Type open nc-000xxxx where xxxxx is the serial
number of the NETConnect, then press Enter.
The NETConnect login screen should appear.
8. If you were assigned a login ID and password, use
your assigned login ID and password. If no
credentials were assigned, you can log in with the
username it and the password it.
NETConnect ™ User’s Manual
13
CONNECTING TO A NETWORK
9. At this point, you should connect to the
NETConnect and be able to configure it to push
the files via the network or FTP using a Command
Line Interface (CLI). See the Administrative
Functions section below for more information on
how to configure the NETConnect to push via
network or FTP.
Sample FTP configuration
Below is an example of a series of commands that
can be used to setup the NETConnect to push via
a FTP:
1. Using a Telnet program, login to the
NETConnect with the following credentials (or
log in with any username and password with
an itgroup):
Username: it
Password: it
2. Configure terminal – brings you to the
configure terminal menu.
3. push ftp 1 – brings you to the push FTP
menu.
4. path 192.168.1.150 or path hostname – sets
the path to connect to an FTP server with the
IP address 192.168.1.150 or an FTP server
with the hostname specified.
5. user logicube – sets the username “logicube”
to login to the FTP server specified in the Path
command.
6. password logicube – sets the password of
the user specified.
7. enable yes – sets this mode as enabled so it
can be used to push data.
8. exit – brings you up one menu back to the
configure terminal menu.
9. macro – brings you to the macro menu.
10. delete 1 – deletes the first macro set by
default.
11. add 1 push FTP – sets the first macro to push
via FTP.
12. config commit – commits or saves the
changes you have made so that the changes
are saved even after turning the unit off.
NOTE: Using the “config commit” command will
take a few seconds to save. The Ready light in
14
Logicube NETConnect™ User’s Manual
CONNECTING TO A NETWORK
front of the NETConnect panel will light up solid
green when the process is complete. You can
also go to the top level menu and type status to
see if the process has completed. The “status”
command is found in the root menu. Use the exit
command to move up one menu.
13. Start the push process using one of the two
methods mentioned above.
Sample CIFS configuration
Below is an example of a series of commands that
can be used to setup the NETConnect to push via
a network:
1. Using a Telnet program, login to the
NETConnect with the following credentials (or
log in with any username and password with
an itgroup):
Username: it
Password: it
2. configure terminal – brings you to the
configure terminal menu.
3. mount cifs 1 – brings you to the mount cifs
menu.
4. Path 192.168.1.150/mysharedfolder – sets
the path to connect to the PC or server with
the IP address 192.168.1.150 and the shared
folder named mysharedfolder.
5. user logicube – sets the username “logicube”
to login to the PC specified in the Path
command.
6. password logicube – sets the password of
the user specified.
7. enable yes – sets this mode as enabled so it
can be used to push data.
8. exit – brings you up one menu back to the
configure terminal menu.
9. macro – brings you to the macro menu.
10. delete 1 – deletes the first macro set by
default.
11. add 1 push CIFS – sets the first macro to
push via CIFS.
12. config commit – commits or saves the
changes you have made so that the changes
are saved even after turning the unit off.
NOTE: Using the “config commit” command will
take a few seconds to save. The Ready light in
NETConnect ™ User’s Manual
15
CONNECTING TO A NETWORK
front of the NETConnect panel will light up solid
green when the process is complete. You can
also go to the top level menu and type status to
see if the process has completed. The “status”
command is found in the root menu. Use the exit
command to move up one menu.
13. Start the push process using one of the two
methods mentioned above.
Pushing Data
Once the NETConnect has been configured to push data,
you can start the push process using one of two ways:
1. Press the Start button in front of the
NETConnect, or
2. Type exit twice to go to the top level menu.
The top level menu has a macro command
you can use to start the push process. Typing
macro from the top level menu is the same as
pressing the Start button in front of the
NETConnect.
Connecting to NETConnect using iSCSI
The iSCSI (Internet Small Computer System
Interface) protocol can be used to connect to the
NETConnect. This will allow the user to see drives in
the attached Dossier Tray as a physical drive in its
native data format. Drives will appear as a Hard Disk
Drive on their PC. Users can then either analyze the
data directly or copy the data to their PC. The drives
in the attached Dossier Tray are write protected.
When using iSCSI, you can only view the contents of
the drives in the attached Dossier Tray when you
connect to the NETConnect as a NAS (See the
section Connecting as a NAS in Chapter 3.
Connecting NETConnect to a network). You will
not be able to “push’ the contents of the drives to a
network location.
Requirement: An iSCSI initiator is required.
Windows 7 has an iSCSI initiator already installed in
the Operating System. For other versions of
Windows, Microsoft has a downloadable iSCSI
Software Initiator. You can search for the iSCSI
Software Initiator at Microsoft’s Download Center by
pointing your Internet browser to
http://www.microsoft.com/downloads/en/default.aspx.
16
Logicube NETConnect™ User’s Manual
CONNECTING TO A NETWORK
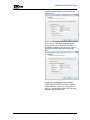
Connecting to NETConnect via iSCSI using
Windows 7
1. Click Start > Control Panel.
2. If you are viewing the Control Panel by
Category, click System and Security,
then Administrative Tools. If you are
viewing the Control Panel by Large or
Small icons, click Administrative Tools.
3. Double-click iSCSI Initiator.
4. A message may appear stating the iSCSI
service is not running. If this message
box appears, click OK.
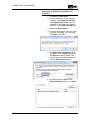
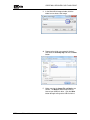
5. The iSCSI Initiator Properties window
will appear. In the Targets tab, type the
NC-000XXXXX (where XXXXX is the
serial number of the NETConnect) then
click the Quick Connect button.
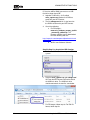
6. The NETConnect will appear in the
Discovered targets section as Inactive.
7. Highlight the NETConnect entry and click
the Connect button.
NETConnect ™ User’s Manual
17
CONNECTING TO A NETWORK
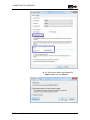
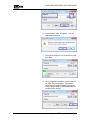
8. The Connect To Target window will
appear. Click the Advanced button.
9. In the Advanced Settings window, place
a check mark on Enable CHAP log on
and in the Name field, type IT and in the
Target secret field, type itpassword12.
When finished, click the OK button.
Note: The password for the “it” user account
for an iSCSI connection is different than the
password for the “it” user account in all other
sections of this manual.
18
Logicube NETConnect™ User’s Manual
CONNECTING TO A NETWORK
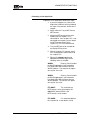
10. This will bring you back to the Connect To
Target window. Click the OK button.
NETConnect ™ User’s Manual
19
CONNECTING TO A NETWORK
11. This will bring you back to the iSCSI Initiator
Properties screen. The Status of the
NETConnect should now say Connected. Click
the OK button to close this window.
20
Logicube NETConnect™ User’s Manual
CONNECTING TO A NETWORK
12. The attached Dossier Tray will appear in Windows
and will be assigned a drive letter. A drive letter will
be assigned for each drive attached to either the
Dossier Tray. You can now view, analyze, or copy the
files from each write protected drive.
NETConnect ™ User’s Manual
21
4. Administrative Functions
Administrative Functions
The NETConnect can be administered via a Command
Line Interface (CLI) using a Telnet program. At each
menu level, you can type help then press the Enter key
to see the available commands. You can also type
show to show the current configuration (if available).
See Chapter 3. Connecting NETConnect to a Network
for instructions on how to connect to NETConnect using
Telnet.
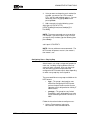
Configuring the Macro Command – Step by Step
The macro command is used to “push” or copy
data to a PC attached to the same network the
NETConnect is attached to. You can also enable
the Verify setting as well as manage the disks on
the attached Dossier Tray or MPFS (DoD wipe,
format, or erase).
1. Using a Telnet program, login to the
NETConnect. Once connected to the
NETConnect, log in with the following
credentials:
Username: it
Password: it
2. Type configure terminal and press Enter to
go to the configuration menu.
3. Type macro and press Enter to go to the
macro menu.
NOTE: The default macro (macro 1) is set to push
via FTP and verify the files (push FTP VERIFY).
22
NETConnect ™ User’s Manual
ADMINISTRATIVE FUNCTIONS
4. If the you want to change the push method (for
example, you want to use CIFS instead of
FTP), you will need to delete macro 1. You can
delete the macro 1 by typing delete 1 then
pressing Enter.
5. Add a macro by using the following syntax:
Add 1 [push {CIFS, NFS, FTP}
[VERIFY]|delete|[format,erase,dodwipe] {D1D4,JBOD}]
NOTE: The macro commands are case sensitive.
For example, if you want to push using CIFS and
you want to verify the data, type the following (then
press Enter):
add 1 push CIFS VERIFY
NOTE: You can add more macro commands. The
NETConnect will process macro 1, then macro 2,
then macro 3, etc.
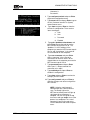
Configuring Users – Step by Step
Administrators can setup a unique configuration for
each user, including assigning different levels of
access for each username. Users can then login
with their own username and password and
configure the NETConnect or push data, depending
on which user group they are assigned to.
There are two different user groups available on the
NETConnect:
•
itgrp – This group is designed for users
who will be configuring the NETConnect
and use the push feature and for System
Operators and is designed to be used by IT
administrators.
•
guestgrp – This group has very limited
functionality and is designed for users who
will be connecting to the NETConnect as a
NAS.
Follow the instructions below to configure users:
1. Using a Telnet program, login to the
NETConnect. Once connected to the
NETConnect ™ User’s Manual
23
ADMINISTRATIVE FUNCTIONS
NETConnect, log in with the following
credentials:
Username: it
Password: it
2. Type configure terminal and press Enter to
go to the configuration menu.
3.
Type user and press Enter to go to the user
configuration menu.
4. Type show and press Enter to show the
current list of configured users.
5. To add a user, type add # username
usergroup then press Enter where # is the
user number you want to use, username is the
name of the user, and usergroup is the group
you would like them to be in.
For example, if you want a user named
John Doe with a login of “jdoe”, in the 3rd
user slot and in the IT group, type add 3
jdoe itgroup and press Enter.
6. Type show and press Enter to review the
changes you have made.
7. Type config commit and press Enter to save
the changes even after turning off the
NETConnect. If you do not perform this step,
the next time you turn on the NETConnect, this
user will not be able to login.
NOTE: Using the “config commit”
command will take a few seconds to
save. The Ready light on the
NETConnect control panel will light up
solid green when the process is
complete. You can also go to the top
level menu and type status to see if the
process has completed. The “status”
command is found in the root menu.
Use the exit command to move up one
menu.
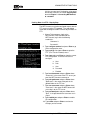
Pushing Data to a PC or Server using CIFS – Step by Step
In order to configure NETConnect to push data to a PC
or server on the same network using CIFS protocol,
follow these steps:
1.
24
Using a Telnet program, login to the
NETConnect. Once connected to the
NETConnect, log in with the following
credentials:
Logicube NETConnect™ User’s Manual
ADMINISTRATIVE FUNCTIONS
Username: it
Password: it
2. Type configure terminal and press Enter
to go to the configuration menu.
3. Type mount cifs 1 and press Enter to go to
the cifs (Common Internet File System)
network mount menu.
4.
Type show and press Enter to show the
current cifs configuration. There are four
items to configure:
a. Path
b. User
c.
Password
d. Enabled
5.
Type path //ipaddress/sharedname and
press Enter to enter the path where the
NETConnect will push the files to. The
“ipaddress” is the IP address of the
computer you want the NETConnect to push
files to, and “sharedname” is the name of
the shared folder on that computer.
6.
Type user username and press Enter
where “username” is the name of an
authorized user who has access to the
shared folder on the computer you want the
NETConnect to push files to.
7. Type password pass and press Enter
where “pass” is the password of the
username set in step 6.
8. Type enabled yes and press Enter to
enable this configuration.
9. Type show and press Enter to review the
changes you have made.
10. Type config commit and press Enter to
save the changes even after turning off the
NETConnect.
NOTE: Using the “config commit”
command will take a few seconds to
save. The Ready light on the
NETConnect control panel will light up
solid green when the process is
complete. You can also go to the top
level menu and type status to see if the
process has completed. The “status”
command is found in the root menu.
Use the exit command to move up one
menu.
NETConnect ™ User’s Manual
25
ADMINISTRATIVE FUNCTIONS
11. You can now “push” the data by using one of
the two ways found in the section Pushing Data
found in Chapter 3. Connecting NETConnect
to a network.
Pushing Data via a FTP – Step by Step
The NETConnect can also be configured to push data to
FTP server using the FTP protocol. The steps below
show how to configure the NETConnect to push data via
FTP:
1. Using a Telnet program, login to the
NETConnect. Once connected to the
NETConnect, log in with the following
credentials:
Username: it
Password: it
2. Type configure terminal and press Enter to go
to the configuration menu.
3. Type push ftp 1 and press Enter to go to the
FTP (File Transfer Protocol) menu.
4. Type show and press Enter to show the current
FTP configuration. There are five items to
configure:
a. Host
b. Path
c.
User
d. Password
e. Enabled
5. Type host hostname and press Enter where
“hostname” is the name of the FTP server you
want the NETConnect to connect to.
6. Type path pathname and press Enter where
“pathname” is the name of the path of the
upload folder on the FTP site.
7. Type user username and press Enter where
“username” is the name the NETConnect will
use to log in to the FTP server.
8. Type password pass and press Enter where
“pass” is the password of the username set in
step 6.
9. Type enabled yes and press Enter to enable
this configuration.
10. Type show and press Enter to review the
changes you have made.
26
Logicube NETConnect™ User’s Manual
ADMINISTRATIVE FUNCTIONS
11. Type config commit and press Enter to save
the changes even after turning off the
NETConnect. If you do not perform this step,
the next time you turn on the NETConnect, this
user will not be able to login.
NOTE: Using the “config commit”
command will take a few seconds to
save. The Ready light on the
NETConnect control panel will light up
solid green when the process is
complete. You can also go to the top
level menu and type status to see if the
process has completed. The “status”
command is found in the root menu.
Use the exit command to move up one
menu.
12. You can now “push” the data by using one of
the two ways found in the section Pushing
Data found in Chapter 3. Connecting
NETConnect to a network.
Verification
When pushing or copying the data from the Dossier
Tray or MPFS via NETConnect, the data pushed or
copied can be verified. Verification can be set in
the configure terminal menu under the macro
command.
When Verify is set in the macro command with the
push setting, the NETConnect will copy or push the
data from the attached Dossier Tray or MPFS to the
location specified. After each file is pushed or
copied, the files will be verified one of two ways:
•
Remote verification – If the files pushed or
copied are DD files, NETConnect will
perform a server side script that will
compute the MD5 hash for each file that
was copied. NETConnect will then
compare that value with the MD5 value
stored on the log file in the Dossier Tray or
MPFS that was created during the capture.
Note: This method will only work if the
original capture was performed on the
Dossier using the DD Image settings with
the Verify settings set to File+V. For more
information on Dossier settings, please
refer to the section Special Settings for
NETConnect ™ User’s Manual
27
ADMINISTRATIVE FUNCTIONS
DD Image Mode in Chapter 3 of the
Dossier’s User’s Manual
Important note: This method will also
require the installation of a script on the
computer where the files are being pushed
or copied to. See the section Installing the
server side script in this chapter for stepby-step instructions on how to install this
script.
•
Read back verification – If the files
pushed or copied are E01 files or DD files
without file verification (if the capture was
performed on the Dossier using the DD
Image settings and the Verify settings were
set to anything except for File+V), the
NETConnect will perform a byte-by-byte
comparison of each file.
Installing the server side script
NOTE: The installation of the server side script is
meant for Systems Administrators or your IT
department.
The server side script is a python script found on
the NETConnect DVD and requires that a python
interpreter be installed on the computer where the
files are pushed or copied to.
1. Download python 2.7 from
http://www.python.org. Do not download python
version 3.x. You can download the 32-bit or 64bit versions for Windows, depending on the
Operating System installed on the computer
you will be pushing or copying data to.
2. Install the python interpreter using the default
installation options.
3. Copy xmlrpc_threaded_hash_server.py from
the NETConnect DVD to any folder on the
computer where you will be pushing or copying
the data to.
4. Create a shortcut of the command prompt
(cmd.exe) and place it in the startup folder (for
example:
C:\Users\Username\AppData\Roaming\Microso
ft\Windows\Start Menu\Programs\Startup)
5. Right-click on the Command Prompt shortcut
and go to Properties. The Command Prompt
Properties window should appear.
28
Logicube NETConnect™ User’s Manual
ADMINISTRATIVE FUNCTIONS
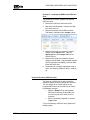
6. Go to the Shortcut tab and in the Target field,
type the following (note there is a space after
/K):
%windir%\system32\cmd.exe "C:\Python27\python.exe /K
C:\script\xmlrpc_threaded_hash_server.py 9999 D:\upload"
NOTE: Change C:\script to the location where you
copied the xmlrpc_threaded_hash_server.py file
in step 3. Also, change D:\upload to the directory
or folder you will be pushing or copying data to.
7. Test the script by running the shortcut you
created in the Startup folder. A Command
Prompt window should appear and show:
Servicing port:9999
At root directory: D:\Upload
(where D:\Upload will be the directory or folder you
will be pushing or copying data to)
8. Reboot the computer and the script should start
automatically on every reboot. You will see the
command prompt window appear letting you
know the script is ready to run.
Enabling Verification – Step-by-step:
1. Using a Telnet program, login to the
NETConnect. Once connected to the
NETConnect, log in with the following
credentials:
Username: it
Password: it
2. Type configure terminal and press Enter to go
to the configuration menu.
3. Type macro and press Enter to go to the macro
menu.
NOTE: The default macro (macro 1) is set to push
via FTP and verify the files (push FTP VERIFY).
4. If the you want to change the push method (for
example, you want to use CIFS instead of
FTP), you will need to delete macro 1. You can
delete the macro 1 by typing delete 1 then
pressing Enter.
5. Add a macro by using the following syntax:
NETConnect ™ User’s Manual
29
ADMINISTRATIVE FUNCTIONS
NOTE: The macro commands are case sensitive.
For example, if you want to push using CIFS and
you want to verify the data, type the following (then
press Enter):
Add 1 [push {CIFS, NFS, FTP}
[VERIFY]|delete|[format,erase,dodwipe] {D1D4,JBOD}]
For example, if you want to push using FTP, and
you want to verify the data, type the following (then
press Enter):
Add 1 push FTP VERIFY
You should see a confirmation showing:
Command=’push FTP VERIFY’
NOTE: You can add more macro commands. The
NETConnect will process macro 1, then macro 2,
then macro 3, etc.
Formatting, Erasing, or Wiping (DoD M-5220.22M)
Disk management which includes formatting,
erasing, or wiping drives (conforming to the
Department of Defense M-5220.22M standards) is
available through the NETConnect. There are two
ways of performing disk management:
- Through the macro command
- Through the disks menu
Disk Management through the Macro command
After pushing or transferring the data from the
Dossier Tray or MPFS via NETConnect, the drives
in the Dossier Tray or MPFS can be formatted,
erased, or wiped (conforming to the Department of
Defense M-5220.22M standards). These three
options can be set in the configure terminal menu
under the macro command.
delete – This function simply deletes the data in the
destination drive in the Dossier Tray (or JBOD
drives in an MPFS).
format - This function formats the destination drive
in a Dossier Tray (or JBOD drives in an MPFS) with
a single FAT32 partition. Performing this function
30
Logicube NETConnect™ User’s Manual
ADMINISTRATIVE FUNCTIONS
formats the drive(s) by zeroing the first and second
FAT of the drive(s).
erase – This function erases the destination drive in
a Dossier Tray (or JBOD drives in an MPFS) with a
single FAT32 partition. Performing this function will
perform a single pass erase of the drive(s).
dodwipe – This function performs a seven pass
wipe of the destination drive in a Dossier Tray (or
JBOD drives in an MPFS). This method conforms to
the DoD M-5220.22M standard.
To set any one of these 3 functions, follow these
steps:
1. Using a Telnet program, login to the
NETConnect. Once connected to the
NETConnect, log in with the following
credentials:
Username: it
Password: it
2. Type configure terminal and press Enter to go
to the configuration menu.
3. Type macro and press Enter to go to the macro
menu.
4. Delete the current macro by typing delete 1 then
press Enter.
5. Add a macro by using the following syntax:
Add 1…N [push {CIFS, NFS, FTP}
[VERIFY]|delete|[format,erase,dodwipe] {D1D4,JBOD}]
Typically there is already one macro set up (for
example “push FTP VERIFY”). You can add a
second macro to perform a format, erase, or DoD
Wipe after the push and verify are complete.
Here are some examples:
add 2 dodwipe JBOD
add 2 format D1
When the macro command is run or the Start
button is pressed, the NETConnect will run each of
the macros in order (1, 2, etc.). If your first macro
NETConnect ™ User’s Manual
31
ADMINISTRATIVE FUNCTIONS
was to push via FTP and the second macro is to
format D1, it will push via FTP first, then format D1.
NOTE: The commands are case sensitive. D1 and
D2 are used with the Dossier Tray. When using
MPFS, JBOD is used.
Disk Management through the Disks menu
The drives in the Dossier Tray or MPFS can be
formatted, erased, or wiped (conforming to the
Department of Defense M-5220.22M standards).
These three options can be set in the root menu
under the disks command.
wipedod – This function performs a seven pass
wipe of the destination drive in a Dossier Tray (or
JBOD drives in an MPFS). This method conforms to
the DoD M-5220.22M standard.
quickerase – This function erases the destination
drive in a Dossier Tray (or JBOD drives in an
MPFS) with a single FAT32 partition. Performing
this function will perform a single pass erase of the
drive(s).
format32 - This function formats the destination
drive in a Dossier Tray with a single FAT32
partition. Performing this function formats the
drive(s) by zeroing the first and second FAT of the
drive(s).
NOTE: At this time, the Format32 function for
Dossier Tray will only format D1 or D2, but not
both.
formatJBOD – This function formats the drives in
the MPFS with a single FAT32 partition per drive.
Performing this function formats the drive(s) by
zeroing the first and second FAT of the drive(s).
To perform any one of these 3 functions, follow
these steps:
1. Using a Telnet program, login to the
NETConnect. Once connected to the
NETConnect, log in with the following
credentials:
Username: it
Password: it
32
Logicube NETConnect™ User’s Manual
ADMINISTRATIVE FUNCTIONS
2. Type disks then press Enter to go to the Disks
menu.
3. Type in one of the following commands (case
sensitive):
wipeDOD D1 – performs a DoD wipe on the drive
in the D1 position of the Dossier Tray.
wipeDOD D2 – performs a DoD wipe on the drive
in the D2 position of the Dossier Tray.
wipeDOD JBOD – performs a DoD wipe on all the
drives in the MPFS.
quick erase D1 – performs a quick erase on the
drive in the D1 position of the Dossier Tray.
quick erase D2 – performs a quick erase on the
drive in the D2 position of the Dossier Tray.
Quick erase all – performs a quick erase of both
drives in the D1 and D2 position of the Dossier Tray
quick erase JBOD – performs a quick erase on all
the drives in the MPFS.
format32 D1 – formats the drive in the D1 position
of the Dossier Tray.
format32 D2 – formats the drive in the D2 position
of the Dossier Tray.
formatJBOD – formats all the drives in the MPFS.
NOTE: The commands are case sensitive. D1 and
D2 are used with the Dossier Tray. When using
MPFS, JBOD is used.
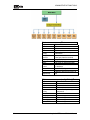
Command Line Interface Menus
The following details each of the Command Line
Interface (CLI) menus. Below is a visual diagram of
the menus.
NETConnect ™ User’s Manual
33
ADMINISTRATIVE FUNCTIONS
Root menu – username_IT>
help
quit
logout
exit
Show available commands
Disconnect
Disconnect
Exit from current mode
Show a list of previously run
commands
history
configure
terminal
show log
disks
status
macro
clean children
version
upgrade ftp
Configure from the terminal
Logging display
Disk management
Get status of background jobs
Run macro commands defined
in database
Cancel all background tasks
Show version of all components
Upgrade software with means of
ftp
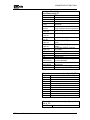
Disks menu – username(config-Disks)_IT>
help
quit
logout
exit
history
yes
quick erase
wipeDOD
format32
formatJBOD
34
Show available commands
Disconnect
Disconnect
Exit from current mode
Show a list of previously run
commands
Confirmation form
Disks management
Disks management
Disks management
Disks management
Logicube NETConnect™ User’s Manual
ADMINISTRATIVE FUNCTIONS
Configure Terminal menu –
username(config)_IT>
help
quit
logout
exit
Show available commands
Disconnect
Disconnect
Exit from current mode
Show a list of previously run
commands
history
interface
ethernet
mount cifs
mount nfs
push ftp
export cifs
export nfs
Export iscsi
log file
macro
network
user
config commit
config default
config show
upgrade ftp
[0..N]; Configure ethernet interface N
[1..N]; Configure cifs network mount
N
[1..N]; Configure nfs network mount
N
[1..N]; Configure ftp push destination
N
[D1,D2,D3,D4,JBOD]; Configure cifs
export
[D1,D2,D3,D4,JBOD]; Configure nfs
export
[D1,D2,D3,D4,JBOD]; Configure
iscsi export
Configure file logging
Edit macro definition
Edit network settings
Manage users
Commit configuration changes to
persistent database
Revert back to factory default
configuration
Show current configuration
Configure upgrade via FTP
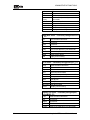
Ethernet menu – username (config-eth0)_IT>
help
quit
logout
exit
history
config
address
mask
gateway
mtu
show
Show available commands
Disconnect
Disconnect
Exit from current mode
Show a list of previously run commands
+[static | dhcp]
+ip address
+network mask
+gateway address
+mtu size
display current setting
Mount cifs menu – username(config-mountcifs-1)_IT>
help
NETConnect ™ User’s Manual
Show available commands
35
ADMINISTRATIVE FUNCTIONS
quit
logout
exit
history
path
user
password
enable
show
Disconnect
Disconnect
Exit from current mode
Show a list of previously run
commands
Set network path
Set user for mount
Set password
Enable mount setting
display current setting
Mount NFS menu – username(config-mount-nfs1)_IT>
help
Show available commands
quit
Disconnect
logout
Disconnect
exit
Exit from current mode
history
Show a list of previously run commands
path
Set network path
enable
Enable mount setting
show
Display current setting
FTP menu – username(config-push-ftp-1)_IT>
help
Show available commands
quit
Disconnect
logout
Disconnect
exit
Exit from current mode
history
Show a list of previously run commands
host
Set ftp server
path
Set ftp path
user
Set ftp user
password
Set ftp password
show
Display current setting
Export cifs menu – username(config-exportcifs-JBOD)_IT>
36
help
Show available commands
quit
Disconnect
logout
Disconnect
exit
Exit from current mode
history
Show a list of previously run commands
Logicube NETConnect™ User’s Manual
ADMINISTRATIVE FUNCTIONS
share
Name of network share
access
Access restrictions
enable
Enable the export
show
Display current setting
Export nfs menu – username(config-exportnfs-JBOD)_IT>
help
Show available commands
quit
Disconnect
logout
Disconnect
exit
Exit from current mode
history
Show a list of previously run commands
access
Access restrictions
enable
Enable the export
show
Display current setting
Macro menu – username(config-macro)_IT>
help
Show available commands
quit
Disconnect
logout
Disconnect
exit
Exit from current mode
history
add
Show a list of previously run commands
+1..N [push {CIFS,NFS,FTP}
[VERIFY]|delete|[format,erase,dodwipe]
{D1-D4,JBOD}]
delete
+1..N
show
Show macro definitions
Network menu – username(confignetwork)_IT>
NETConnect ™ User’s Manual
help
Show available commands
quit
Disconnect
logout
Disconnect
exit
Exit from current mode
history
Show a list of previously run commands
hostname
+hostname
nameserver
+ip
domain
+domain name
show
Show network settings
37
ADMINISTRATIVE FUNCTIONS
User menu – username(config-user)_IT>
help
Show available commands
quit
Disconnect
logout
Disconnect
exit
Exit from current mode
history
Show a list of previously run commands
add
+1..N USER GROUP PASSWD
del
+1..N
show
Show users
Upgrade FTP menu – username(configupgrade-ftp)_IT>
help
quit
logout
exit
history
host
file
user
password
show
Show available commands
Disconnect
Disconnect
Exit from current mode
Show a list of previously run commands
Set upgrade ftp server
Set upgrade file
Set ftp user
Set ftp password
Show upgrade configuration
Restoring All Settings to Factory Defaults
There are two ways to reset the NETConnect to have all
settings restored to its factory defaults:
1. Reset button
a. In the back of the NETConnect,
below the fan on the right side, there
is a small, recessed button. Press
and hold the reset button until the
Ready LED blinks (about 5
seconds).
b. Release the reset button and wait
for the Ready LED to turn solid
green.
2. Command Line Interface
a. Login to the NETConnect with the
following credentials (or log in with
38
Logicube NETConnect™ User’s Manual
ADMINISTRATIVE FUNCTIONS
any username and password
belonging to the itgroup):
Username: it
Password: it
b. Go to the configure terminal menu.
c.
Type config default and press
Enter. You can check the status of
this process by typing exit and
pressing Enter, then typing status
and pressing Enter from the root
menu.
Application Notes Regarding Push Performance
Introduction
Testing has shown that FTP protocol is leaner and faster
than either network file systems like NFS or CIFS. The
guidelines below may further maximize the network
throughput and achieve near gigabit Ethernet speed for
the uploads.
Jumbo Frames
Modern gigabit NIC typically offers capabilities of
increasing the packet payload size, which it
typically referred to as 'Jumbo Frames'. The
reason for introducing this feature is that LAN
environments are typically near loss-free as
opposed to WAN where packet loss is far more
frequent. Therefore, if operating in a LAN
environment, enabling jumbo frames is
preferable since the increased packet size has
the benefit of less overhead per packet
assuming that packet loss is negligible.
The standard payload size is 1500 bytes/packet,
and jumbo frames are usually available in
increments of 1k, i.e. 2k,3k,...9k etc.
The NetConnect NIC offers maximum Jumbo
Frame of 6000 bytes/packet. A common term for
payload size is 'MTU size'
Prerequisites
•
NETConnect ™ User’s Manual
Upload server has to be reasonably fast in
general, i.e. mid-range workstation of today.
39
ADMINISTRATIVE FUNCTIONS
•
•
•
•
Upload server has to be equipped with a NIC
capable of 6K MTU size or larger, i.e. MTU size.
Destination drive for upload should preferably
not be the OS drive, but a dedicated drive solely
for upload purposes.
Destination drive should be fast, i.e. equivalent
of the speed of the popular Seagate 7200.12
500G, which boasts maximum rated speed up to
125 MB/s for sequential access.
The NetConnect-Tray configuration is faster
than NetConnect-MPFS due to the JBOD
interface found on MPFS, therefore one would
use the first configuration for maximum
throughput.
Enabling Jumbo Frames
NetConnect
1. Bring up a Telnet CLI.
2. Enter the configuration menu with 'configure
terminal' command.
3. Enter the ethernet configuration menu with
'interface ethernet 0'.
4. Now enter the command 'mtu 6000' and verify
with 'show' and exit back one step with 'exit'.
5. Commit the change with 'config commit'.
Windows
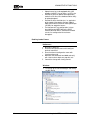
1. First bring up the 'Device Manager' and identify
the NIC device
40
Logicube NETConnect™ User’s Manual
ADMINISTRATIVE FUNCTIONS
2. Open up Properties for the NIC device and
change to the 'advanced' tab. Scroll down the
list of advanced options and identify the entry
that defines either Jumbo Frames or MTU Size
and set it to 6k or above.
Linux
1. Start a root shell or make use of the 'sudo'
command in the following
2. Verify current MTU size with the 'ifconfig'
command, typically you'll see 1500 as MTU size
3. Change the MTU size with 'sudo ifconfig eth0
mtu 6000' and verify with 'ifconfig'
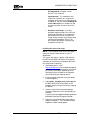
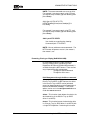
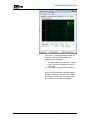
FTP Server Tuning
Depending on which FTP server used and its
feature set, it may or may not be possible to fine
tune the FTP server for the purpose of
maximizing throughput.
NETConnect ™ User’s Manual
41
ADMINISTRATIVE FUNCTIONS
For instance, if fluctuating network speeds are
noticed as seen in the picture above, the
following can be attempted:
1. Increase the buffer sizes for the FTP server.
Exactly how to do this depends on the FTP
server used.
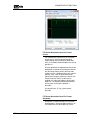
2. Try another, faster, destination hard drive.
Ideally near flat line network utilization speeds
should be noticed, as seen below. This means
that network is used to the max and hard drive
can keep up with the network throughput.
42
Logicube NETConnect™ User’s Manual
ADMINISTRATIVE FUNCTIONS
FTP Server Destination Drive File Format
(Linux)
The standard file system for Linux is currently
ext3 or ext4. It seems to be the prevailing
understanding that ext4 performs better than
ext3. It is therefore recommended to use ext4 or
possibly xfs.
A further performance improvement that can be
attempted is to format the ext4 partition without
the 'journaling' feature, which some consider
unnecessary for a dedicated drive only used for
uploads. Also, since we know that the files
upload are all of quite significant size each, the
'extent' feature for the file system can be
enabled as it helps and improves dealing with
large files. The following formatting command
can be used, assuming the partition is
/dev/sdb1:
$ sudo mkfs.ext4 -O ^has_journal,extent
/dev/sdb1
FTP Server Destination Drive File Format
(Windows)
Sometimes it is observed that NTFS could be
the bottleneck in high-throughput situations. As
a an experiment, the destination file system
NETConnect ™ User’s Manual
43
ADMINISTRATIVE FUNCTIONS
could be switched from NTFS to FAT32 or the
newer exFAT.
Also, since we know that the NetConnect will
always upload files of significant size, larger
than default 'allocation size' can be set, since it
decreases overhead when dealing with large
files.
Compare the throughput numbers between
exFAT, FAT32 and NTFS and make a judicious
choice, which file system suits your needs the
best, as a standard optimization, NTFS with 64K
allocation size can be tested.
44
Logicube NETConnect™ User’s Manual
5. Live Acquisition
Overview
The Live Acquisition function allows you to capture
a snapshot of what is currently running in the
suspect PC’s memory at the time of acquisition.
Users can save the snapshot of the PC’s volatile
memory to both a flash drive and the Dossier Tray
or MPFS connected to a NETConnect.
Creating a Live Acquisition USB Flash Drive
To create a Live Acquisition USB Flash Drive users
must first download a free software and utilities
package called
moonsols_windows_memory_toolkit
community edition. The website URL to obtain
this software is listed below.
There are two types of Live Acquisition USB flash
drives that can be created. One that uses DD
Images and another that uses the E01 file format.
Note: If you wish to use the E01 file format for Live
Acquisition USB flash drives you must have
Guidance WinEN software. If you are unsure if you
have this software, please contact Guidance
Software for more information on how to obtain it.
Software and Hardware Requirements
The following are required to create the Live
Acquisition USB flash drive:
1. One USB flash drive. The recommended size is
8 GB or larger.
Note: The size of the USB flash drive must be
larger than the amount of RAM on the PC being
acquired. For example, if you are acquiring from a
45
NETConnect ™ User’s Manual
ADMINISTRATIVE FUNCTIONS
PC that has 8GB of RAM, you must use a USB
flash drive larger than 8GB.
2. Logicube’s USB utility – A file called
mem_capture.exe found on the DVD that
came with your NETConnect.
3. The file usbapp.conf which is also found on
the DVD that came with your NETConnect.
4. One of the following:
a. For DD Images moonsols_windows_memory_toolkit
_community_edition.zip. This
freeware software can be downloaded
from the following web site:
http://moonsols.com/component/jdownloads/view.d
ownload/3/2
b. WinEn from Guidance Software.
Step-By-Step Live Acquisition USB Creation
1. Format the USB flash drive using the NTFS file
system.
2. Copy the mem_capture.exe and usbapp.conf
files from the NETConnect DVD to the root of
the USB flash drive. The USB flash drive
should now contain the two files seen below.
3. For DD Images, follow step 3a. For E01 file
format, follow step 3b.
46
Logicube NETConnect™ User’s Manual
LIVE ACQUISITION
a. Unzip the contents of
moonsols_windows_memory_toolkit
_community_edition.zip to the root of
the USB flash drive.
Live Acquisition USB Flash Drive using DD Image
b. Copy the following files to the root of
the USB flash drive:
a. winen.exe
b. winen64.exe
Live Acquisition USB Flash Drive using WinEn (E01) from Encase
NETConnect ™ User’s Manual
47
ADMINISTRATIVE FUNCTIONS
Performing a Live Acquisition
To perform a Live Acquisition, follow these steps:
1. If you have not done so, create a Live
Acquisition USB flash drive by following
the steps in the previous section of this
chapter.
2. Attach a Dossier Tray or MPFS to the
NETConnect.
3. Attach the NETConnect to the same
network that the suspect’s PC is
connected to. If the suspect’s PC is not
connected to a network, you can attach
the NETConnect directly to the
suspect’s PC if it has a network card.
4. Turn the NETConnect on and wait for
the Ready LED to turn on.
5. With the suspect’s PC running, attach
the Live Acquisition USB flash drive to
the suspect’s PC.
6. Edit the file usbapp.conf through
Notepad and make changes to the
following values as needed:
WINDD:
Entering Yes will enable
the WinDD application if you created the
Live Acquisition USB flash drive with the
WinDD software. The value for this option
can only be Yes or No.
WINEN:
Entering Yes will enable
the WinEN application if you created the
Live Acquisition USB flash drive with the
WinEN software. The value for this option
can only be Yes or No.
FTP-HOST:
This should be the
NETConnect’s name (for example, NC000XXXXX) where XXXXX is the
NETConnect’s serial number.
FTP-USER:
It is recommended that
this value be left as the default it value.
48
Logicube NETConnect™ User’s Manual
LIVE ACQUISITION
FTP-PW:
It is recommended that
this value be left as the default value unless
the FTP-USER’s password was changed.
FTP-UPATH:
Enter one of the
following, depending on where you want to
save the data. Please make sure there is
space on the drive you want to use.
/media/D1_p1
Dossier Tray.
To save to D1 on the
/media/D1_p2
Dossier Tray.
To save to D2 on the
/media/JBOD_p2 To save to the first drive
on the MPFS.
/media/JBOD_p3 To save to the second
drive on the MPFS.
/media/JBOD_p4 To save to the third
drive on the MPFS.
/media/JBOD_p5 To save to the fourth
drive on the MPFS.
SPLIT-SIZE:
Do not change this
value. Depending on how much RAM the
computer that is being acquired has, the
output DD or E01 files may be split to
multiple files. The DD Image or E01 file will
be split on the attached Dossier Tray or
MPFS. The file on the Live Acquisition USB
flash drive will consist of only one DD or
E01 file.
7. Browse to the Live Acquisition USB
flash drive and run mem_capture.exe.
You may need to have Administrator
rights or the administrator password to
perform this step.
8. A prompt will appear saying “Please
enter Case name”. Type in a case
name and press Enter.
9. The Live Acquisition USB flash drive will
start capturing the information and save
it both on the USB flash drive and the
attached Dossier Tray or MPFS. The
information will be saved in a folder on
the USB flash drive and the attached
Dossier Tray or MPFS. The folder
name will be the same as the case
name enteredin step 8. This step may
take several minutes to complete.
NETConnect ™ User’s Manual
49
ADMINISTRATIVE FUNCTIONS
10. When the acquisition is complete, you
will notice that the light on your USB
flash drive stops blinking, you may now
disconnect the USB flash drive and the
NETConnect from the suspect PC.
At this point, you may connect the
NETConnect with the attached Dossier Tray
or MPFS to your own network. You can
either view the data directly or push/transfer
the data to your network as described in
Chapter 3. Connecting NETConnect to a
Network.
50
Logicube NETConnect™ User’s Manual
6. Software Updating Instructions
Logicube NETConnect Software Updating Procedures
New and improved software will appear from time to
time on our web site at www.logicube.com. It is
possible to update the software in the field by a
user.
The software, a file whose filename always starts
with local_ and has a .tar.xz file extension can be
downloaded from Logicube’s website. The software
update can then be placed on an FTP server or on
a Recovery USB flash drive. For more information
regarding the Recovery USB flash drive, see
Chapter 7. Creating a recovery USB flash drive.
Loading New Software through a Recovery USB flash drive
To update the software on the NETConnect using
this method, you will need to first create a Recovery
USB flash drive. For instructions on how to create
this, please refer to Chapter 7 Creating a Recovery
USB flash drive.
Once the Recovery USB flash drive has been
created, follow the steps below to load the new
software on the NETConnect:
1. Copy the software file (a file whose filename
always starts with local_ and has a .tar.xz file
extension) onto the nc folder of the Recovery
USB flash drive. Overwrite the existing file if
prompted.
2. Turn off the Logicube NETConnect and
disconnect the network cable from the back of
the unit.
51
NETConnect ™ User’s Manual
SOFTWARE UPDATING INSTRUCTIONS
3. Attach the Recovery USB flash drive to one of
the two USB ports in the back of the Logicube
NETConnect.
4. Turn the Logicube NETConnect on. The Power
LED should turn on solid green.
5. After about 60 seconds, the Ready LED will
start blinking (fast blinking LED).
6. About 4 minutes after turning the Logicube
NETConnect on, the Ready LED will blink
slowly.
7. About 5 minutes after turning the Logicube
NETConnect on, the Ready LED should turn
solid and stop blinking.
8. When the Ready LED and Power LED are
both on with solid LEDs (not blinking), turn the
Logicube NETConnect off and unlplug the
Recovery USB flash drive from the back of the
unit.
9. Re-attach the network cable to the back of the
Logicube NETConnect and turn the unit back
on. Wait for the Ready LED to turn on solid
green.
10. Once the Ready LED turns on as solid green,
turn the Logicube NETConnect back off then on
again (second reboot). Once the Ready LED
turns on solid green on the second reboot, you
can verify the software version by following the
steps in the section Verifying the Software.
Loading New Software through FTP
1. Using a Telnet program, login to the
NETConnect. Once connected to the
NETConnect, log in with the following
credentials (or log in with any username and
password belonging to the itgroup):
Username: it
Password: it
2. Type configure terminal and press Enter to go
to the configuration menu.
3. Type upgrade ftp and press Enter to go to the
upgrade ftp menu.
4. Type host ip/name and press Enter to set the
host FTP server where “ip/name” is the IP
address or host name of the FTP server.
52
Logicube NETConnect™ User’s Manual
SOFTWARE UPDATING INSTRUCTIONS
5. Type file filename and press Enter to set the
filename to download where “filename” is the
name of the file to download. The default is
nc/latest.tar.xz.
6. Type user username and press Enter where
“username” is the name the NETConnect will
use to log in to the FTP server.
7. Type password pass and press Enter where
“pass” is the password of the username set in
step 6.
8. Type exit and press Enter to go back to the
Configure Terminal menu.
9. Type config commit and press Enter to commit
the changes.
10. Type exit and press Enter to go back to the
root menu.
11. From the root menu, type upgrade ftp and
press Enter to begin the upgrade process. You
can check the status of the upgrade process by
typing status and pressing Enter in the root
menu.
12. Once the upgrade is complete, turn the
NETConnect off. Wait at least five seconds,
ten turn it back on. When the Ready LED turns
on as solid green, turn the Logicube
NETConnect back off then on again (second
reboot). Once the Ready LED turns on solid
green on the second reboot, you can verify the
software version by following the steps in the
section Verifying the Software.
Verifying the Software
1. Connect to the NETConnect via Telnet as
described elsewhere in this manual.
2. Login with at least an ITGroup level login (for
example, the IT username).
3. From the main menu, type version then press
Enter.
4. Type status and press Enter to see the version
information. The SVN Revision should match
the version on on the filename of the software
that was downloaded. The software version
can be seen after local_ (for example,
local_r932… …tar.xz).
NETConnect ™ User’s Manual
53
7. Creating a Recovery USB Flash Drive
Overview
This portion of the document will show you how to
create a Recovery USB flash drive using a
Windows® based PC. The Recovery USB flash
drive will re-install the Operating System of the
Logicube NETConnect and should only be used in
two scenarios:
1. To update the software on the NETConnect.
2. When instructed to do so by Logicube’s
Technical Support.
Since this will re-install the Operating System, it will
reset all settings back to the factory default settings.
Checklist
The following items are required to create a
Recovery USB flash drive:
1. A USB flash drive (minimum size of 2
GB).
2. An archiving utility that can
extract/decompress *.XZ files – We
recommend 7-Zip version 9.04 (beta
version) or higher which supports the
*.XZ files. 7-Zip is an open source
software. There are two versions
available for download; a 32-bit and a
64-bit (x64) version. 7-Zip’s homepage
can be found at http://www.7-zip.org/
3. Image Writer for Windows (Win32 Disk
Imager) – An open source software tool
54
NETConnect ™ User’s Manual
CREATING A RECOVERY USB FLASH DRIVE
for Windows used for writing images to
USB flash drives. There are two
versions available for download; The
win32 binaries and the source code
(source). Download the win32 binaries.
The homepage for Image Writer for
Windows can be found at
https://launchpad.net/win32-imagewriter.
4. The following images (files, found on the
included DVD):
i. DOM Image: dom.img.xz
ii. USB Image: recovery.img.xz
iii. NETConnect archive:
local_r905_09h37m22s_06-302010.tar.xz (or later)
Third Party Software Installation
Two types of software utilities are needed to create
the Recovery USB flash drive; an extraction or
decompression utility that supports *.XZ files and an
image writer that will write images onto USB flash
drives. Logicube recommends using 7-Zip and
Image Writer for Windows (Win32 Disk Imager).
Both of these are open source software.
7-Zip Installation
The following instructions are for 7-Zip. If you are
using other extraction/decompression utilities that
support *.XZ files, please refer to your software’s
manual or website for information on installation.
1. Download the 32-bit or 64-bit version of 7-Zip
from 7-Zip’s website at http://www.7-zip.org/ to
a folder of your choosing.
2. Locate and double-click the downloaded file to
start the Setup Wizard.
3. Follow the Setup Wizard to install the 7-Zip
software (we recommend the default settings).
4. When 7-Zip has been installed, click the Finish
button to close the wizard.
NETConnect ™ User’s Manual
55
CREATING A RECOVERY USB FLASH DRIVE
Image Writer for Windows (Win32 Disk Imager)
The following instructions are for Image Writer for
Windows. If you are using a different utility to write
images to a USB flash drive, please refer to your
software’s manual or website for more information.
1. Download the win32 binaries from Image Writer
for Window’s website at
https://launchpad.net/win32-image-writer.
2. Locate and double-click the downloaded file to
open the ZIP file.
3. Extract all the files to a folder of your choosing.
There is no setup wizard for this software.
Creating the USB Recovery flash drive
The following procedure outlines how to create the
USB Recovery flash drive. The procedure involves
three (3) sections:
Section I – Preparation
Section II – Extracting the recovery image
Section III – Writing the image to a USB flash drive
Section IV – Installing the DOM to the USB flash
drive.
Section I – Preparation
1. Ensure that you have a blank, formatted USB
flash drive available. The USB flash drive must
be at least 2 GB in size.
2. Insert the DVD that came with the Logicube
NETConnect to your PC’s optical drive.
3. Copy the following to your PC to a new folder of
your choosing (for example C:\NETConnect):
a. The file recovery.img.xz – located in
the root of the DVD.
b. The folder images – should have a file
called dom.img.xz. Once the folder is
copied, the file inside will get copied
too.
c.
56
The folder nc – should have a file with
a long name on it starting with “local_”.
Logicube NETConnect™ User’s Manual
CREATING A RECOVERY USB FLASH DRIVE
Again, once the folder is copied, the file
inside will get copied too.
Once the above have been copied, you should see
something similar to the image below on your PC:
Section II – Extracting the recovery image
The following instructions are for use with the 7-Zip
software. If you are using a different extraction
utility, please consult the user’s manual on how to
extract a *.XZ compressed file.
1. Browse to the folder you created in Section I.
2. Right-click on the recovery.img.xz file, then go
to 7-Zip, then click Extract Here.
3. A window will appear as the recovery image is
being extracted. This may take several minutes
depending on the speed of your PC.
4. When the extraction is complete, the window
will close automatically and you should see a
new file called recovery.img in the folder.
NETConnect ™ User’s Manual
57
CREATING A RECOVERY USB FLASH DRIVE
Section III – Writing the image to a USB flash
drive
The following instructions are for use with the
Image Writer for Windows (Win32 Disk Imager). If
you are using a different imaging utility, please
consult the user’s manual on how to write a *.IMG
file to a USB.
1. Attach a USB flash drive to your PC. The USB
flash drive must be 2 GB in size or larger.
Ensure that Windows assigns a drive letter to
the USB flash drive.
2. Browse to the folder where you extracted the
Image Writer for Windows (Win32 Disk Imager)
and double-click the Win32DiskImager.exe
file.
NOTE: If a “File Error” window appears after
double-clicking the Win32DiskImager.exe file, click
the OK button. This error usually appears if the PC
you are using has a floppy disk drive.
58
Logicube NETConnect™ User’s Manual
CREATING A RECOVERY USB FLASH DRIVE
3. In the Win32 Disk Imager window, click the
folder icon to select a disk image.
4. Browse to the folder you created in Section I
and select the recovery.img and click the Save
button.
5. Make sure that the Image File and Device are
correct. The Device should show the drive
letter of your USB flash drive. Click the Write
button to begin writing to the USB flash drive.
NETConnect ™ User’s Manual
59
CREATING A RECOVERY USB FLASH DRIVE
6. A confirmation screen will appear. Click the
Yes button to continue.
7. Win32 Disk Imager will start to write to the USB
flash drive.
8. When the process completes, no message will
be shown that it is complete. The progress
percentage will simply disappear and you will
see the screen below. Click the Exit button to
exit Win32 Disk Imager.
60
Logicube NETConnect™ User’s Manual
CREATING A RECOVERY USB FLASH DRIVE
Section IV – Installing the DOM to the USB flash
drive
The following instructions complete the recovery
USB flash drive.
1. Remove the USB flash drive from the PC.
2. After about 10-30 seconds, re-attach the USB
flash drive to the PC.
3. Browse the contents of the USB flash drive.
Two folders should be visible; images and nc.
4. Browse to the folder you created in Section I
and go into the images folder. Copy the
dom.img.xz file to the images folder of the
USB flash drive.
5. Browse to the folder you created in Section I
and go to the nc folder. Copy the local…tar.xz
(the file that begins with local_) to the nc folder
of the USB flash drive.
6. Once both files have been copied from steps 4
and 5, the Recovery USB flash drive is ready to
go.
Using the Recovery USB flash drive
The Recovery USB flash drive will re-install the
Operating System onto the Logicube NETConnect.
This will remove all the saved settings on the
Logicube NETConnect and should only be used in
the following scenarios:
•
When the Ready LED on the Logicube
NETConnect remains blinking (does not
turn into a steady LED) when the unit is
turned on.
•
When instructed by Logicube’s Technical
Support team.
To use the Recovery USB flash drive, perform the
following steps:
NETConnect ™ User’s Manual
61
CREATING A RECOVERY USB FLASH DRIVE
1. Turn off the Logicube NETConnect and detach
the network cable from the back of the unit.
2. Attach the Recovery USB flash drive to one of
the two USB ports in the back of the Logicube
NETConnect.
3. Turn the Logicube NETConnect on. The Power
LED should turn on solid green.
4. After about 60 seconds, the Ready LED will
start blinking (fast blinking LED).
5. About 4 minutes after turning the Logicube
NETConnect on, the Ready LED will blink
slowly.
6. About 5 minutes after turning the Logicube
NETConnect on, the Ready LED should turn
solid and stop blinking.
7. When the Ready LED and Power LED are
both on with solid LEDs (not blinking), turn the
Logicube NETConnect off and unlplug the
Recovery USB flash drive from the back of the
unit.
8. Re-attach the network cable to the back of the
Logicube NETConnect and turn the unit back
on. Wait for the Ready LED to turn on solid
green.
9. Once the Ready LED turns on as solid green,
turn the Logicube NETConnect back off then on
again (second reboot). Once the Ready LED
turns on solid green on the second reboot, an
administrator can set up the Logicube
NETConnect for use (users, FTP/CIFS path
and configuration, etc.)
62
Logicube NETConnect™ User’s Manual
8. Frequently Asked Questions
Q: Can I use the NETConnect with any other Logicube forensic duplicators?
A: At this time the NETConnect is designed to work exclusively with the Forensic Dossier Tray
and the MPFS only.
Q: What file access protocols does the NETConnect use?
A: CIFS, NFS, FTP, and iSCSI.
Q: Does NETConnect support TCP?
A: Yes, NETConnect supports the following network protocols; ARP, IP, UDP, TCP, HTTP,
ICMP, BOOTP/DHCP, DNS, MDNS and Telnet
63
NETConnect ™ User’s Manual
9. Index
Administrative functions, 2
Administrative Functions, 22
CIFS, 2, 5
Command Line Interface, 13, 14, 22, 33
credentials, 2, 13, 14, 15, 22, 24, 26, 29, 31, 32,
51
Disclaimer, Liability Limitation, II
Disk Management, 30, 32
DoD M-5220.22M, V, 30, 31, 32
Dossier® tray, 6, 7, 9
Drive, Destination, 30
erase, 22, 23, 31, 32, 33, 34, 37
EU, EUROPEAN UNION, III
file access protocols, 2, 5
Forensic Dossier, 1, 2, 6, 9
Forensic Dossier®, 1, 6, 9
format, 2, 16, 22, 23, 30, 31, 32, 37, 43, 45, 46
FTP, 13, 14, 26, 52
IP address, 12, 25
iSCSI, IV, 5, 16, 17, 20, 62
iSCSI Software Initiator, 16
LED, 5, 6, 10, 12, 13
Live Acquisition, V, 45, 46, 47, 48, 49
login ID, 13
macro, 14, 15, 16, 22, 23, 30, 31, 34, 35, 37
Macro, 2
MPFS, 1, 2, 6, 8, 9
MPFS™, 1, 6, 8, 9
NAS, 9
Network, 2, 5, 9, 11, 12
Network protocols, 2
Network Protocols, 5
NFS, 5
Partition, FAT32, 30, 32
push data, 12, 14, 15, 16, 24, 26
Recovery USB flash drive, V, 50, 51, 53, 54, 60,
61
RoHS Directive (2002/95/EC), III
Software, Loading, 51, 52
Technical Support, Logicube, 3, 63
Telnet, 2, 5, 12, 13
User interface (UI), 5
verify, II, 2, 22, 23, 31, 40, 41, 51, 52
Warranty, II
Warranty, Parts and Labor, II, III
Website, Logicube, 50
Windows 7, 12
Windows Vista, 12, 13
Windows XP, 12
For further assistance please contact Logicube Technical Support at: 818 700 8488 ext. 3, or by email to
[email protected]. Hours are 7:00am to 5:00pm PST M – F.
© 2010 Logicube Inc. All rights reserved. Logicube is a registered trademark of Logicube, Inc.
19755 Nordhoff Pl., Chatsworth, CA 91311, Tel: 818 700 8488, Fax: 818 700 8466, www.logicube.com
64
NETConnect ™ User’s Manual