1
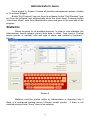
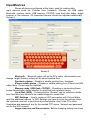
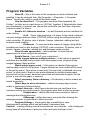
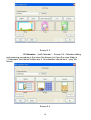
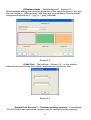
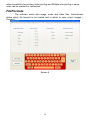
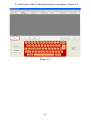
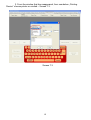
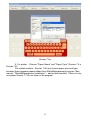
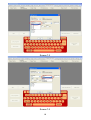
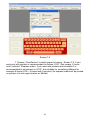
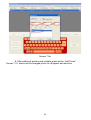
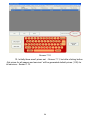
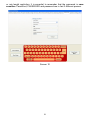
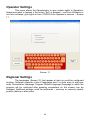
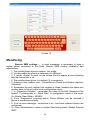
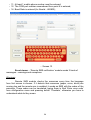
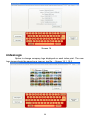
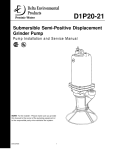
ODESSOS COLOUR LTD. PICTURE MAKER USER MANUAL FOR ADMINISTRATOR AND OPERATOR 1 Using the Operator’s and Administrator’s menu After pressing the upper left corner of the screen, a hidden menu pops up – Screen 1 Screen 1 A password is needed for logging in the relevant menu. Default passwords are: Operator – 111 and Administrator – 000 and may be always changed by the Administrator. 2 Administrator's menu Once logged in, Screen 2 shows all possible management options, divided in 15 sections (pages). Button “Exit Program” logs out from the software; button “Exit Windows” logs out from the software and automatically shuts the kiosk down. Pressing button “Goto Kiosk Mode” exits from Administrator menu and goes to the user part of the program. Statistics Shows counters for all available services. In order to view statistics, the Administrator should indicate: period (from date; to date), Time service, Printing device (printer or minilab), size and type of paper and method of payment Screen 2. Screen 2 Statistics could be printed (either by Administrator or Operator) only if there is a configured printing device (Choose receipt printer) , if there is not installed receipt printer „None“ have to be selected. 3 InputDevices Shows all devices configured at the kiosk, used for loading data. Input devices could be: Pictures from Facebook, iPhones via USB cable, Bluetooth, memory cards, USB memory, CD/DVD, local hard disc folder, image scanner or film scanner. All connected devices should be adjusted additionally Screen 3. Screen 3 Bluetooth – Bluetooth name will be the PCs name, Administrator can change target directory where will be saved sended files. Facebook photos – Disable or enable printing from facebook. iPhone mobile phone – Disable or enable printing from iPhone via USB cable. Note: iTunes must be installed. Memory cards, USB flash, CD/DVD – Checking or unchecking these boxes Adminsitrator define whether to read files from relevant device. Local Disk (HDD) – Pressing button „Browse“ can be selected a folder from hard disc from where to be readed images or media files. WiFi Settings – How to create an WiFi connection with Picture Maker read the additional manual. In WiFi Settings you have to enter the settings witch the custumer must set to send from his smart phone. Host is the PCs name, Username and password are for the created FTP server. Network and password are for the WiFi network. Image scanners and film scanners Before changing setting from kiosk 4 software device's drivers have be installed. Pressing button „SCAN“ will appear a scanning form for relevant scanner. # Тwain Scanner – image scanner From „Browse“ is selected the scanner application. Choose scanner from the form - Screen 3.1 and follow instractions. Screen 3.1 # Film Scanner (Pakon) – Screen 3.2. After opening the form default setting will appeared, they can be changed. From „Browse“ is selected folder where to save scanned images. Roll ID – name of the folder where will be saved images scanned from a film. It is advisable to be written the number which is on the film roll, so orders will be separated easier. Scan – After pressing button „Scan“ scanner's red light will begin to blink. When blinking stops scanner begin to give out a sound, that's the moment to put the film in scanner. When scanning finished pull out the film. Cancel – Cancel scanning process. Move Film – Moving film without scanning. In case film sticks or scanning process is terminated, using this button film can be removed from the scanner. Close Window – closing scanning form. 5 Screen 3.2 Program Variables Kiosk ID – this is the name of the computer on which software was installed. It can be changed from „My Computer -> Properties -> Computer Name“. Usually this name is used for Bluetooth name. How to show files? - The рrogram can show files separated „By Folders“, as they are on input device or „All Files“ together. If Administrator check two checkboxes, customers can choose the method to see their files, otherwise customer haven't a choice. Enable Jet / Advance services – Jet and Advance are two methods for order making. # Jet - Quick order preparing in 4 steps. In this mode customer can print images and burn discs (CD/DVD) without using the editing services for color correction, ID photos, sets of photos, frames, calendars, adding text and business cards creation. # Advance - To view and make copies of images using all the available services for disc burning (CD/DVD), color correction, ID photos, sets of photos, frames, calendars, adding text and business cards creation. Show license agreements – define whether to show licence agreements for kiosk using to the customer. Enable Sound – turn on/off voice instructions. Divide images between multiple printers – if this option is selected and there are installed many printers with same paper sizes, program divide images between these printers. Watch printer paper count – if this option is selected the program watchs paper counts for all printers. If paper finished no more orders will be send to the printer queue. This option is used only if to one kiosk is attached only one printer. In other case if there is one printer attached to multiple kiosks paper account will not be correct, because every kiosk will decrease its paper, but the printer is one and the paper is common. Select temporary Orders directory – the directory in which orders are stored temporarily. Select days to store old orders – define how many days to store orders in temporary Orders directory. Timeout intervals – after these intervals are over and there is no customer activity on monitor screen, the program goes back to start up screen. # Application – define after how many minutes to show a message that interval was over. # Message – define how many seconds after showing the message program to goes back to start up screen. Program Settings – the program has a possibility to save Administrator's settings which can be loaded if necessary later. Caution! : Loading settings should be performed very carefully - after loading an empty base all information of previous orders and price settings is lost! 6 Normal image quality interval – specify the image quality guide marks. Show customer info form – shows the customer info form on the end of the order. Hide language form – hiding the language(first) screen on the user interface. Show refresh button – refresh button on the image selecting screen. Always turn off Screen Saver – turn off the screen saver. User interface color – specify the color of the interface. Show PhotoBook form – inset the PhotoBook software on the Picture Maker select service form. Screen 4 Image Services Add or Remove image services that customers can use - Screen 5. Services are separated in three types : Base image services – main options (Rotation, Zoom, Fit, White border, Color Corrections, Red Eye Remove, Auto Correction, Color Restoration , Black and White, Sepia (retro photo)). # White border – in field can be entered border width, by default it is 4 mm. 7 Screen 5 # Color Corrections – pressing button „Change“ will appear a form and Color, Density, Contrast and Saturation steps can be changed – Screen 5.1 – The chosen value is greater, the changes on images are bigger. Screen 5.1 Advance image services – special options (ID Photos, Sets of photos, 8 Frames, Calendars, Businesscards and Add Text). Activation of advance image services happens with key. # ID Photos – „Add Size“ - most frequently used ID sizes are added, but Administrator can add additional sizes or remove already presented Screen – 5.2 Screen 5.2 # Frames - „Add Frame“ - Screen 5.3 – Frames are separated by folders.The path to the main directory where are folder is shown in „Target directory“, in case it is „.\Frames“ and is located in current directory. By default there are 3 folders but Administrator can make new or can rename folders from Windows. Using button „Add“ can be added, with „Remove“ can be removed frames. All frame files should be in “.png” file format. 9 Screen 5.3 # Calendars - „Add Calendar“ – Screen 5.4. Calendar adding and removing procedure is the same like frames, but here the main folder is „.\Calendars“ and default folders are 4. All calendars should be in “.png” file format. Screen 5.4 10 # Businesscards - „Add Background“ - Screen 5.5 Businesscards adding and removing procedure is the same like frames, but here the main folder is „.\Backgrounds“ and there are not subfolders. Businesscards backgrounds should be in “*.jpg” or „*.jpeg” fileformat. Screen 5.5 # Add Text – Text settings – Screen 5.6 – in this window Administrator can choose text rotation angle and text movement step. Screen 5.6 Enable Print Services? - Common printing services – if checkboxe „Photo Printing“ was unchecked, program can be used only for disc burning, 11 without possibility for printing. Index printing and Multiple size printing in same order can be checked or unchecked. FileFormats The software works with image, audio and video files. Administrator define which file formats to be loaded and in which to save output images – Screen 6. Screen 6 12 Printing Services The services for printing can be added on this screen – Screen 7.1 Steps for adding papers : 1. Choose tab „Printing Services“ - Screen 7.1 Screen 7.1 13 2. Press button „Add“ to add printing device and paper - Screen 7.2 Screen 7.2 14 3. From the window that has reappeared, from combobox „Prinitng Device“ choose printer or minilab – Screen 7.3. Screen 7.3 15 4. If printer is selected, the form of the selected printer will show up on the screen. If printer settings are made previously (for example paper size), press button „ОК“. In other case change the needed settings and press the button „ОК“ Screen 7.4. Screen 7.4 If minilab module is selected (for example None), the form of the selected minilab module will show up on the screen Screen 7.4a. 16 Screen 7.4a 5. For printer : Choose "Paper Name" and "Paper Type" (Screen 7.5 и Screen 7.6). For minilab module : (Screen 7.56) not choose paper size and type, because there appears papers added from MinilabManagement program (See manual "MinilabManagement installation" – add minilab module). If there is only one paper Screen 7.7 do not show in the program. 17 Screen 7.5 Screen 7.6 18 Screen 7.56 19 Screen 7.7 6. For printer : Enter the number of the images that can be printed to this printer - Screen 7.8. 20 Screen 7.8 7. Choose „TimeService“ to which paper to belong - Screen 7.9. If you work only with printers is recommended to choose „0%0“, that means „0 hours and 0 minutes“ (Express order). If you work with printers and minuilabs it is recommended to set printers to „0%0“, but minilabs for something different for example 6 hours (6%0 – 6 hours and 0 minutes). So express orders will be printed on printers, but not urgent orders on Minilab. 21 Screen 7.9 8. If you will add other printer (for example with paper 13х18 см ) or minilab press button „Add“ again and fill appropriate fields - Screen 7.9а 22 Screen 7.9а 9. After adding all printers and minilabs press button „Add Prices“ Screen 7.10, where can be changed prices for all papers and services. 23 Screen 7.10 10. Initially there aren't prices set - Screen 7.11, but after clicking button „Set prices for all papers and services“ will be generated default prices (1.00) for all services - Screen 7.12. 24 Screen 7.11 Screen 7.12 25 11. Administrator can change prices, choosing column with price and corrected it. To save changes have to click red button „Save changes“ - Screen 7.13. Screen 7.13 12. If in later phase the new printer or the paper is added on NECESSARILY have to be added price for that new paper choosing „Add Prices“ and pressing „Set prices for all papers and services“ - Screen 7.14. If not generated a price added paper will not be shown to the customer. 26 Screen 7.14 Burning The software offers a chance for CD and DVD burning - Screen 8. Administrator should determine the max size of information, that should be burned on a CD/DVD, enables or forbid burning, or determines whether to burn rewritable CDs. Caution! : Customers are able to burn EMPTY CD/DVD only!!! Pressing button „BURN / ERASE“ will appear a form, Administrator and Operator (if enabled by Administrator) are able to record files and folders on CDR, CD-RW, DVD-R, DVD-RW, DVD-RAM, DVD+R, DVD+RW и DVD+R DL, as well as to delete RW CD/DVD. It is very important to change burning devices settings correctly. If there is only one burning device, program will choose it by default. If there are many burning devices Administrator have to choose burner name from combox „Select burner for manual burning“ and to enter its number in field „Burner number“. If burning device is first it's marked like 0, if it's second like 1, if third - 2 and so on. Putting discs in burner can be made Manual or with Robot. The Robot is not included in standard configuration of the kiosk but can be added additionaly. If Robot presents it is necessary to be choosen Robot's burner device name, to enter burner number and the letter corresponding to the burner. By default „Reject bad discs in OutputBin“ is checked and haven't to be changed, because it 27 depends from the hardware characteristics of the kiosk. This option specify where to reject bad discs. On each Robot the certain number of the empty discs can be charged. After charging the Administrator have to enter this number in field „Set total disc numbers“ and press button „Set“. After each CD or DVD burning, the number in this field decrease and when it become 0, the program stops to burn dics from Robot. If Administrator adds new dics Robot burning will be enabled again. „Set min. disc warning“ - in this field is entered the minimum discs number after reaching which (if Administrator have choosen option „Monitoring“) can be sended warning SMS about decreasing discs count. Screen 8 Payment The kiosk has some payment options : Cach desk or with coin and bill acceptors – Screen 9. With coin and bill acceptors additionaly can be checked whether to use Hoppers (Devices for give change). 28 Screen 9 Money Controls Acceptors – pressing button „Settings“ will appears a form from Screen 9.1. First tab is ‘Acceptor Settings’. From combobox can be selected the acceptor which will be configured. The table below displays all accepted values. Right click on one of them will show properties which can be eddited. Tab ‘Dispensers Settings’ (Screen 9.2) is used for configuring the dispensers. From ‘Dispenser ID’ can be selected the dispenser which will be configured. If field “Inhibit Hopper” is not checked, have to be checked. If ‘Hopper Credit’ is ‘0’ - the hopper is empty so it cannot give change. In fileld ‘Set hopper credit’ is added credit after pressing button ‘Set Credit’. If ‘Append hopper credit’ is used the value of the field will be appended to the current hopper credit. ‘Minimal credit’ have to be less than ‘Hopper Credit’. The third tab “Statistics” displays the statistics for the MoneyControls equipment. 29 Screen 9.1 Screen 9.2 Password The password for both Administrator and Operator account could be changed - Screen 10. The new password should be confirmed twice. Password may be a random combination of letters, symbols and digits and there is no max 30 or min length restriction. It is essential to remember that the password is case sensitive. PassWord, PASSWORD and password are in fact 3 different passes. Screen 10 31 Operator Settings This menu allows the Administrator to give certain rights to Operators. determines what to happen if the button “Exit” is pressed – exit from Windows or exit from software; give rights to burn CD/DVD from Operator’s account – Screen 11. Screen 11 Regional Settings The languages (Screen 12) that appear at start up could be configured anytime. Software supports a lots of languages and it is quite easy to add new ones. Presentation Language, Program Default Language (Language in which the program will be continued after pressing somewhere on the screen) can be changed. Additional settings could be performed – currency or currency symbol position (before or after price). 32 Screen 12 Monitoring Remote SMS settings – to send messages is necessary to have a mobile phone connected to the kiosk. Remote SMS module installation and adjustments • 1. The mobile phone have to support text-mode; • 2. Via data cable the phone is connected to USB port; • 3. If model „Alcatel“ is used, on the screen have to appear an icon showing that the connection is ok; • 4. The mobile phone driver is installed if it is necessary; • 5. Adding a new modem from „ControlPanel->Phone and Modem Options>Modems“; • 6. Remember the port number that modem is linked, because the same port number have to be set to the kiosk configuration menu; • 7. In „Properties->Modem“ - remember the value of the field „Maximum Port Speed“. It corresponds to „Baud Rate“ in configuration menu of the kiosk. For Alcatel, Baud Rate = 460800; • 8. From „Diagnostics“ pressing button 'Query Modem' can be checked if phone is connected correctly; • 9. If not an error message - connection is ok. Just kiosk software have to be configured; • 10. From Administrator's menu in section Monitoring check „Enable Remote SMS“; 33 • • • 11. At least 1 mobile phone number must be entered; 12. The COM port number remembered form point 6 is entered; 14. Baud Rate is entered (for Alcatel - 460800); • Screen 13 Event viewer – ‘Remote SMS notification’ module sends 2 kinds of messages – warnings and exceptions. Warnings Remote SMS module checks the resources every time the language from first screen is chosen. If it detects that resources (paper, coins, discs) are running low and the remote sms is enabled, it sends an SMS with the codes of the warnings. These codes can be transtaled, typing them in filed ‘Enter error code’ from configuration menu and pressing button ‘Translate’, otherwise you have to understand what do they mean: 34 W01-Н01-29 Quantity of the resource ID of the printer or value of hopper Printer name, P (printer) or H (hopper) Code of the warning* Warning *The code of the warning could be one of the following: • W01 – Low paper quantity! • W02 – No paper! • W03 – Low coin quantity! • W04 – No coins! • W05 – Low Robor discs quantity! • W06 – No discs in Robot! Exceptions The exceptions could be thrown at any time. The come with a code and a short description. The rest of the message you can read from the OKKioskLog.log file, assuming the time of the exception. There are two types of exceptions: E01 – OKKiosk.exe software exception. This type of exception could be sent even if the problem is in hardware. E02 – Payment module is out of order. Check the payment hardware. Contacts Every kiosk owner can change contact details of his company written on the receipt – Screen 14. 35 Screen 14 IndexLogo Option to change company logo displayed on each index print. The new logo image should be saved as a .jpeg or .jpg file. – Screen 15.1, 15.2 36 Screen 15.1 Screen 15.2 37 About Information about the software, web site and e-mail address for contacts of Odessos Colour Ltd. – Screen 16. Screen 16 38 Operator’s menu Entering the Operator’s password leads to Operator Menu. Here any Operator can preview or print (if receipt printer was installed) Statistics, choosing Period, Time service, Printing device, Paper Size, Paper Type and Method of payment - Screen 17. So Operator can burn or erase CD/DVD, if Administrator gives him such rights - Screen 18. Depending on Administrator settings, pressing button “Exit” Operator may exit from Windows (kiosk shuts down), or from the software. Screen 17 39 Screen 18 40