1
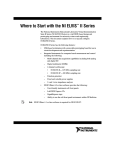
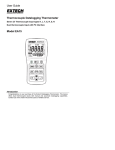
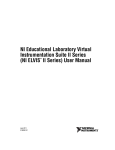
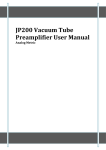
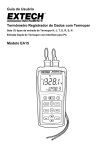
User's Guide Digital J/K Type Thermometer Model TM100 Introduction Congratulations on your purchase of the Extech TM100 Digital Thermometer with K/J single-type input. This meter is shipped fully tested and calibrated and, with proper use, will provide years of reliable service. Safety To prevent personal injury or meter damage, use the meter only as specified in this guide WARNING To avoid electrical shock or personal injury, do not apply more than 20Vrms between the thermocouple inputs or between the thermocouple and earth ground Meter Description Meter 1. 2. 3. 4. 5. Thermocouple input connector Function buttons (Power, Enter, C-F-K) Function buttons (Hold, MAX/MIN, Set) LCD display Battery compartment Display 1. 2. 3. 4. 5. 6. 7. Setup Offset option Hold mode Auto power off Upper display T1 reading Temperature units Lower display (max, min, avg, offset value of T1) 8. Max, Min and Average 9. Time display 10. K/J type thermocouple 11. Low Battery 2 TM100 V1.1 8/10 Operation Connecting thermocouples 1. This meter accepts any K/J-type thermocouple with spade lugs (sub-miniature type with one spade wider than the other). 2. Plug the thermocouple into the meter's thermocouple input jack. Measuring 1. Press the button to turn on the thermometer on. After 1 second the thermometer will display the first temperature reading (upper display). 2. Press the C-F-K button to select the desired temperature unit of measure. A display icon will reflect the selection. 3. Contact the object to be measured with the probe. Read the measured temperature in the display. Note: If the display indicates “OL” the temperature is outside the measurement range. The display shows "- - - -" when a thermocouple is not connected. MAX/MIN/AVG mode Press MAX/MIN to capture and step through the maximum (MAX), minimum (MIN) and average (AVG) temperature values. These values will be shown in the lower display with an elapsed time reference below (hrs:mins , mins:sec). 1. Press MAX/MIN to enter this mode. 2. Press MAX/MIN to step through maximum, minimum and average readings. 3. Press MAX/MIN for 3 seconds to return to normal mode. Data Hold Press the HOLD button to freeze the reading in the display. HOLD will appear at the top right of the display. Press the HOLD button again to return to normal operation mode. Backlight Press SETUP button to turn backlight off/on. 3 TM100 V1.1 8/10 Setup option The setup option is used to change the thermocouple type, to turn the sleep mode off/on and to adjust the thermocouple offset. Note: In the setup mode, the upper display shows menu items and lower display shows settings. 1. Press the SET button for 3 seconds to enter or exit setup. When the thermometer is in Setup mode, the display shows SETUP. Set Type J or K thermocouple 1. Press ▲ or ▼to scroll to the “TYPE” setting (shown bottom left). 2. Press ENTER to choose the option. 3. Press ▼ to toggle between J and K. 4. Press the SET button for 3 seconds to save the setting and return to normal mode. Set Sleep/Non-sleep mode The thermometer enters sleep mode by default. The meter will automatically shut off after 20 minutes if no button press occurs for 20 minutes. When the thermometer is in Setup mode, the display shows SETUP. 1. Press ▲ or ▼to scroll to the “SLP” setting. 2. Press ENTER to chose the option “On” or “OFF” will appear in the display. 3. Press ▼ to select on or off.. 4. Press ENTER to store the new setting in memory. 5. Press SET button for 3 seconds to return to normal mode. Set Offset Use the offset option in Setup (T1menu item) to adjust the thermometer’s readings to compensate for known temperature offset at a specific temperature. The allowable adjustment range is ± 5.0°C or ± 9.0 °F. 1. Plug the thermocouple into the input connector. 2. Place the thermocouple into the known, stable temperature environment (such as a ice bath or dry well calibrator). Allow the reading to stabilize. 3. Press ▲ or ▼to scroll to the “T1” option and press ENTER. 4. Change the offset temperature reading (upper display) by pressing ▼until it reaches the desired temperature. 5. Press SET button for 3 seconds to return to normal mode. Replacing the Batteries 1. Turn off the thermometer. 2. Loosen the screw and remove the battery door. 3. Replace the AAA batteries. 4. Replace the battery door and tighten the screw. 4 TM100 V1.1 8/10 Specifications Temperature Range: K type thermocouples -200°C to 1372°C (-328°F to 2501°F) J type thermocouples -210°C to 1100°C (-346°F to 2012°F) Temperature accuracy: T1 Above –100 0C (-148 0F) T1 Below –100 0C (-148 0F) ± [0.15%rgd+10C (1.8°F)] ± [0.5%rgd+20C (3.6°F)] Display Resolution: 0.1°C /°F /°K <1000, 1°C /°F /°K >1000 Battery: “AAA “1.5V×3 Operating Temperature: 0°C to +50°C (40°F to +122°F) Storage Temperature: −10°C to +50°C (14°F to +122°F) Dimensions: 8.7 x 2.5 x 1.1” (220 x 63 x 28mm) Weight: 7oz (200g) Warranty EXTECH INSTRUMENTS CORPORATION (A FLIR COMPANY) warrants this instrument to be free of defects in parts and workmanship for one year from date of shipment (a six month limited warranty applies to sensors and cables). If it should become necessary to return the instrument for service during or beyond the warranty period, contact the Customer Service Department at (781) 890-7440 ext. 210 for authorization or visit our website www.extech.com for contact information. A Return Authorization (RA) number must be issued before any product is returned to Extech. The sender is responsible for shipping charges, freight, insurance and proper packaging to prevent damage in transit. This warranty does not apply to defects resulting from action of the user such as misuse, improper wiring, operation outside of specification, improper maintenance or repair, or unauthorized modification. Extech specifically disclaims any implied warranties or merchantability or fitness for a specific purpose and will not be liable for any direct, indirect, incidental or consequential damages. Extech's total liability is limited to repair or replacement of the product. The warranty set forth above is inclusive and no other warranty, whether written or oral, is expressed or implied. Calibration and Repair Services Extech offers repair and calibration services for the products we sell. Extech also provides NIST certification for most products. Call the Customer Care Department for information on calibration services available for this product. Extech recommends that annual calibrations be performed to verify meter performance and accuracy. Support line (781) 890-7440 Technical Support: Extension 200; E-mail: [email protected] Repair & Returns: Extension 210; E-mail: [email protected] Product specifications subject to change without notice For the latest version of this User Guide, Software updates, and other up-to-the-minute product information, visit our website: www.extech.com Extech Instruments Corporation, 285 Bear Hill Road, Waltham, MA 02451 Copyright © 2009 Extech Instruments Corporation (a FLIR company) All rights reserved including the right of reproduction in whole or in part in any form. 5 TM100 V1.1 8/10