1
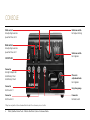
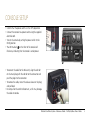
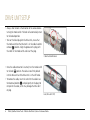
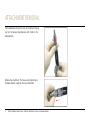
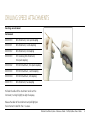
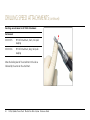
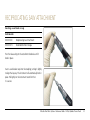
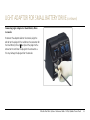
ElEctric
PEn driVE
sYstEm
Reference Guide
indications
The Electric Pen drive is indicated for screw insertion, pin and
wire placement, cutting of bone and metal, drilling, reaming,
decorticating, shaping, and smoothing of bones and teeth in
a wide variety of surgical procedures, including but not limited
to general orthopaedic trauma, foot, hand, maxillofacial,
neurosurgical, oral, otolaryngological, reconstructive, and
spine surgery.
Caution: Please review the Electric Pen Drive User’s
Manual prior to use for indications and other important
information.
Electric Pen Drive System Reference Guide DePuy Synthes Power Tools 1
Console
Slide control
For adjusting maximum
speed for Drive Unit 2
Slide control
For adjusting maximum
speed for Drive Unit 1
ON/OFF LED
Connector
For Light Adaptor for
Small Battery Drive/
Small Battery Drive II
Selection switch
For torque limiting
Selection switch
For irrigation
Flow rate
adjustment knob
For irrigation
Connector
For Drive Unit 1
Irrigation pump
Connector
For Drive Unit 2
Connector
For Foot Switch
*Wipe clean only with a cloth moistened with disinfectant. Do not immerse, rinse or sterilize.
2 DePuy Synthes Power Tools Electric Pen Drive System Reference Guide
consolE sEtUP
• confirm that the power switch is in the oFF (o) position.
• connect the console to a power outlet using the supplied
electrical cord.
• turn on the console by setting the power switch to the
on (I) position.
• the lEd marked ( ) on the front of the console will
illuminate, indicating that the console is under power.
• to connect the cable for the drive Unit, align the red dot
on the metal plug with the red dot on the connector and
push the plug into the connector.
• to remove the cable, retract the release sleeve on the plug
and pull back.
• do not pull on the cord to disconnect, as this may damage
the cable or console.
Electric Pen Drive System Reference Guide DePuy Synthes Power Tools
3
driVE Unit sEtUP
• always slide the lock in the direction of the arrows before
turning the mode switch. the lock will automatically return
to the locked position.
• to insert the black plug into the drive Unit, ensure that
the mode switch on the drive Unit is in the cable insertion/
removal ( ) position. align the groove on the plug with
the notch in the mode switch and insert the plug.
cable insertion/removal
• once the cable connector is inserted, turn the mode switch
to the lock ( ) position. the cable is now firmly locked
into the drive Unit and the drive Unit is in the off mode.
• to remove the cable, return the switch to the cable insertion/removal position ( ) and pull gently on the plug. do
not pull on the cable, as this may damage the drive Unit
or plug.
lock (drive Unit oFF)
4
DePuy Synthes Power Tools
Electric Pen Drive System Reference Guide
driVE Unit sEtUP (continued)
• to attach the hand switch to the drive Unit, align the
arrows on the sides of the hand switch with the
positioning arrows on the drive Unit. Press down on the
hand switch until it clicks into place on the drive Unit.
• the drive Unit can now be operated by using the hand
switch. the blue switch on the hand switch can also be
used to lock the drive Unit.
locking
switch
Electric Pen Drive System Reference Guide DePuy Synthes Power Tools
5
driVE Unit oPEration
the mode switch located on the base of the drive Unit is
used to lock or change rotational direction of the drive Unit.
the switch is also used during the insertion and removal of
the drive Unit cable. always slide the lock before turning the
mode switch.
For insertion or removal of the cable.
drive Unit will not function in this position.
locking mechanism for mode switch
locked position prevents accidental operation
of the drive Unit
clockwise rotation
cable insertion/removal
lock (drive Unit oFF)
counterclockwise rotation
Forward (clockwise)
6
DePuy Synthes Power Tools
Electric Pen Drive System Reference Guide
reverse (counterclockwise)
attachmEnt insErtion
Important: To prevent injuries, the mode switch on the
Drive Unit or the On/Lock switch on the Hand Switch
should be in the Lock position when inserting or
removing attachments or instruments.
• turn the release ring clockwise until it locks in the open
position. the release ring will protrude slightly from the
main body of the drive Unit.
• insert the attachment into the coupling, aligning the
position pins of the attachment with the grooves on
the release ring.
• Press the attachment lightly against the drive Unit.
the release ring will lock automatically.
• Pull lightly on the attachment to confirm that it is secure.
Electric Pen Drive System Reference Guide DePuy Synthes Power Tools
7
attachmEnt rEmoVal
While holding the drive Unit with the attachment facing
up, turn the release ring clockwise until it locks in the
open position.
remove the attachment. the release ring should stay in
the open position, ready for the next attachment.
8
DePuy Synthes Power Tools
Electric Pen Drive System Reference Guide
drilling sPEEd attachmEnts
Inserting an instrument
Instruments
05.001.030
drill attachment, mini quick coupling
05.001.031
drill attachment, J-latch coupling
05.001.032
drill attachment, ao coupling
05.001.033
45° oscillating drill attachment,
mini quick coupling
05.001.042
45° drill attachment, mini quick coupling
05.001.043
45° drill attachment, J-latch coupling
05.001.044
45° drill attachment, ao coupling
05.001.110
drill attachment, hex coupling
Pull back the collar of the attachment and insert the
instrument, turning it slightly to align the keyway.
release the collar of the attachment and pull lightly on
the instrument to confirm that it is secure.
Electric Pen Drive System Reference Guide DePuy Synthes Power Tools
9
drilling sPEEd attachmEnts (continued)
Inserting an instrument in 90° Drill Attachment
Instruments
05.001.035
90° drill attachment, short, mini quick
coupling
05.001.036
90° drill attachment, long, mini quick
coupling
move the locking lever of the attachment to the side as
indicated by the arrow on the attachment.
10
DePuy Synthes Power Tools
Electric Pen Drive System Reference Guide
drilling sPEEd attachmEnts (continued)
insert the instrument, turning it slightly to align the keyway.
lock the instrument in place by pushing the locking lever
back. Pull lightly on the instrument to confirm that it is
secure.
Electric Pen Drive System Reference Guide DePuy Synthes Power Tools
11
scrEW insErtion attachmEnts
Inserting an instrument
Instruments
05.001.028
screw attachment, ao coupling
05.001.029
screw attachment, hex coupling
05.001.034
screw attachment, mini quick coupling
Pull back the collar of the attachment and insert the
instrument, turning it slightly to align the keyway.
release the collar of the attachment and pull lightly on the
instrument to confirm that it is secure.
12
DePuy Synthes Power Tools
Electric Pen Drive System Reference Guide
K-WirE attachmEnt
Inserting a K-wire
Instrument
05.001.037
K-Wire attachment
Press the tensioning lever and insert a Kirschner wire into
the attachment. the tensioning lever can be rotated 300°
for surgeon preference.
release the tensioning lever to grip the wire. the wire
can now be inserted into the bone.
Repositioning or removing a K-wire
to reposition the wire in the attachment, press the tensioning
lever and pull back the unit along the Kirschner wire. release
the tensioning lever once the wire is repositioned.
Electric Pen Drive System Reference Guide DePuy Synthes Power Tools
13
sagittal saW attachmEnts
Inserting a saw blade in Sagittal Saw Attachment
Instruments
05.001.039
sagittal saw attachment
05.001.183
sagittal saw attachment, in-line
05.001.182
sagittal saw attachment, 90°
05.001.074
handhold for tool change
Press the clamping button on the attachment.
insert a sagittal saw blade into the saw blade coupling and
move it into the desired position (variable in 45° increments).
release the clamping button. Pull lightly on the saw blade
to confirm that it is secure.
14
DePuy Synthes Power Tools
Electric Pen Drive System Reference Guide
rEciProcating saW attachmEnt
Inserting a saw blade or rasp
Instruments
05.001.040
reciprocating saw attachment
05.001.074
handhold for tool change
turn the release ring on the attachment clockwise until it
locks in place.
insert a saw blade or rasp into the coupling, turning it slightly
to align the keyway. the instrument will automatically lock in
place. Pull lightly on the instrument to confirm that
it is secure.
Electric Pen Drive System Reference Guide DePuy Synthes Power Tools
15
oscillating saW attachmEnt
Instruments
05.001.038
oscillating saw attachment
05.001.074
handhold for tool change
Pull back the collar of the attachment.
insert a saw blade into the saw blade coupling and move
it into the desired position.
release the collar. Pull lightly on the saw blade to confirm
that it is secure.
16
DePuy Synthes Power Tools
Electric Pen Drive System Reference Guide
Burring Speed Attachments
DePuy Synthes Power Tools recommends using a new burr
for each surgery, as used burrs may increase the risk of necrosis
and increase the cutting time. All burrs are sold sterile.
Burrs should only be used with the attachment for which
they were intended, or with an attachment one size shorter
than the burr. For example, a medium burr should only be
used in a medium or a short attachment. Long burrs can be
used in the long and medium attachments as well as the XL
and XXL attachments. Use only DePuy Synthes Power Tools
burrs. The use of other cutting tools voids the device warranty.
Instruments
05.001.045
Burr Attachment, short
05.001.046
Burr Attachment, medium
05.001.047
Burr Attachment, long
05.001.048
Burr Attachment, short, angled
05.001.049
Burr Attachment, medium, angled
05.001.050
Burr Attachment, long, angled
05.001.055*
Burr Attachment, XXL, angled
05.001.063*
Burr Attachment, XL, angled
05.001.074Handhold for Tool Change
Electric Pen Drive System Reference Guide DePuy Synthes Power Tools 17
BUrring sPEEd attachmEnts (continued)
attach the burring attachment to the drive Unit or insert it
in the handhold for tool change.
turn the release ring of the burring attachment to the
UnlocK position.
18
DePuy Synthes Power Tools
Electric Pen Drive System Reference Guide
BUrring sPEEd attachmEnts (continued)
insert the burr as far as possible, turning it slightly to align
the keyway. the burr is fully inserted when the s, m, or l
mark on the burr shank is no longer visible.
turn the release ring of the attachment to the locK position
and pull lightly on the instrument to confirm that it is secure.
correct and incorrect insertion of the burr.
correct
incorrect
Electric Pen Drive System Reference Guide DePuy Synthes Power Tools
19
DRill Burr Attachment
Instrument
05.001.123Drill/Burr Attachment, for 2.35 mm shafts
This attachment is available for users who wish to use burrs
and drill bits with a 2.35 mm diameter round shaft.
To insert the cutting tool into the attachment, follow the
steps described for the burring attachments that use the
DePuy Synthes Power Tools Electric Pen Drive cutting tools.
To ensure proper fixation, the cutting tool must be inserted at
least 20 mm deep into the attachment and the attachment
locked in place.
20 DePuy Synthes Power Tools Electric Pen Drive System Reference Guide
small ElEctric driVE
Instruments
05.001.175
small Electric drive
05.001.186
Quick coupling for Kirschner Wires
Use of the small Electric drive with the Electric Pen drive
console adds the adaptability of a pistol, shaped handpiece.
to connect the adaptor cable to the console, align the red
dot on the plug with the red dot on the connector for the
small Electric drive and push the plug into the connector.
do not force the plug into the connector as this may damage
the plug and/or the console.
For complete instructions on the use of the small Electric
drive, see the User’s manual.
Electric Pen Drive System Reference Guide DePuy Synthes Power Tools
21
light adaPtor For small BattErY driVE
Instruments
05.001.108
light adaptor for small Battery drive
532.110*
small Battery drive ii
the light adaptor for small Battery drive allows the user to
power the small Battery drive ii handpiece with the Electric
Pen drive console.
insert the adaptor into the small Battery drive ii handpiece,
confirming the contacts on the adaptor align with the
contacts in the recess of the small Battery drive ii handpiece.
Press firmly to ensure the adaptor is engaged correctly,
and check by pulling handpiece lightly downward on the
adaptor. For safety, the adaptor can be inserted fully only
when in the correct orientation.
*can also be used with 532.010 – small Battery drive
22
DePuy Synthes Power Tools
Electric Pen Drive System Reference Guide
light adaPtor For small BattErY driVE (continued)
Connecting Light Adaptor for Small Battery Drive
to console
to connect the adaptor cable to the console, align the
red dot on the plug with the red dot on the connector for
the small Battery drive ( ) and push the plug into the
connector. do not force the plug into the connector as
this may damage the plug and/or the console.
Electric Pen Drive System Reference Guide DePuy Synthes Power Tools
23
Limited Warranty and Disclaimer: DePuy Synthes USA products are sold with a limited warranty to the original purchaser against defects in
workmanship and materials. Any other express or implied warranties, including warranties of merchantability or fitness, are hereby disclaimed.
WARNING: In the USA, this product has labeling limitations. See package insert for complete information.
CAUTION: USA Law restricts these devices to sale by or on the order of a physician.
To order in the US, call DePuy Synthes Power Tools Customer Service: (800) 327-6887.
Not all products are currently available in all markets.
Some devices listed in this Reference Guide may not have been licensed in accordance with Canadian law and may not be for sale in Canada. Please contact
your sales consultant for items approved for sale in Canada.
US Legal Manufacturer:
DePuy Synthes Products, LLC.
1302 Wrights Lane East
West Chester, PA 19380
USA
Tel: (610) 719-5000
To Order: (800) 327-6887
Fax: (800) 327-6661
Email: [email protected]
Canadian Legal Manufacturer:
Synthes Canada Ltd.
2566 Meadowpine Boulevard
Mississauga, Ontario L5N 6P9
Telephone: (905) 567-0440
To order: (800) 668-1119
Fax: (905) 567-3185
www.depuysynthes.com
© DePuy Synthes Power Tools, a division of DOI 2014. All rights reserved.
DSUS/PWT/0814/0057 9/14