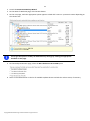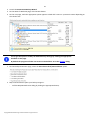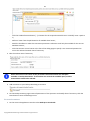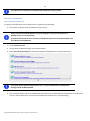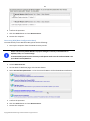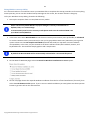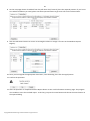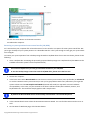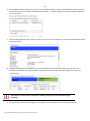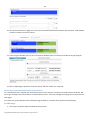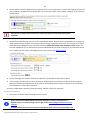
1
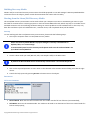
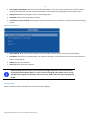
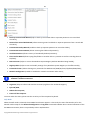
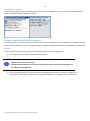
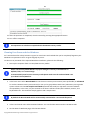
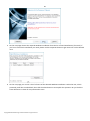
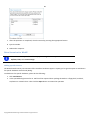
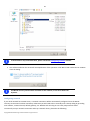
PARAGON Software GmbH Heinrich-von-Stephan-Str. 5c 79100 Freiburg, Germany Tel. +49 (0) 761 59018201 Fax +49 (0) 761 59018130 Internet www.paragon-software.com Email [email protected] Rescue Kit™ 14 Free User Manual Copyright© 1994-2014 Paragon Software GmbH. All rights reserved. 2 Contents Introduction .......................................................................................................................... 4 What’s New in Rescue Kit 14 ....................................................................................................................... 4 Product Components ............................................................................................................. 5 Features Overview................................................................................................................. 5 Features ..................................................................................................................................................... 5 Supported Technologies .............................................................................................................................. 6 Supported File Systems ............................................................................................................................... 6 Supported Media ........................................................................................................................................ 6 Supported virtual hard drive ....................................................................................................................... 7 Getting Started ...................................................................................................................... 7 System Requirements ................................................................................................................................. 7 Building Recovery Media............................................................................................................................. 8 Booting from the Linux/DOS Recovery Media .............................................................................................. 8 Startup .................................................................................................................................................................................... 8 Boot menu .............................................................................................................................................................................. 8 Booting from the WinPE Recovery Media ...................................................................................................11 Startup .................................................................................................................................................................................. 11 Typical Scenarios ................................................................................................................. 12 Backup Scenarios .......................................................................................................................................12 Backing up a hard disk or partition to external media (CD/DVD) ......................................................................................... 12 Backing up a hard disk or partition to a network drive ........................................................................................................ 14 Backing up a dual boot Mac to an external USB drive.......................................................................................................... 19 Recovery Scenarios ....................................................................................................................................21 Correcting EFI parameters .................................................................................................................................................... 21 Correcting BCD (Boot Configuration Data) ........................................................................................................................... 22 Fixing Windows startup ability ............................................................................................................................................. 23 Restoring a system partition from external media (CD/DVD) .............................................................................................. 26 Restoring a system partition from a network drive.............................................................................................................. 28 Restoring a dual boot Mac from an external USB drive ....................................................................................................... 35 Copying of data from the corrupted system disk to another hard disk ............................................................................... 37 Burning of data from the corrupted system disk to CD/DVD ............................................................................................... 39 Copying of data from a backup to the corrupted system partition ...................................................................................... 41 Cleaning User Passwords for Windows .......................................................................................................44 Copyright© 1994-2014 Paragon Software GmbH. All rights reserved. 3 Extra Scenarios for WinPE ..........................................................................................................................46 Adding specific drivers .......................................................................................................................................................... 46 Configuring network ............................................................................................................................................................. 47 Saving log files....................................................................................................................................................................... 50 Glossary............................................................................................................................... 51 Copyright© 1994-2014 Paragon Software GmbH. All rights reserved. 4 Introduction Paragon Rescue Kit™ 14 Free is an integrated set of powerful tools that is specially designed to tackle most of the problems you might face while using PC. Its primary objective is to provide all the necessary facilities to get the system back on track when it fails to boot or at least to retrieve valuable data from the failed hard disk. But that is not all the product can be used for. With Rescue Kit 14 you can easily recover an accidentally deleted partition, clean user passwords for Windows NT/2000/XP/Vista/2003/7/8/2008/2012, edit Windows registry, etc. In this manual you will find the answers to many of the technical questions, which might arise while using the program. Our company is constantly releasing new versions and updates to its software, that's why images shown in this manual may be different from what you see on your screen. What’s New in Rescue Kit 14 Enhanced backup format. Paragon introduces a pVHD (Paragon Virtual Hard Drive) format – a special VHD, optimized for storing backups of virtual and physical machines. It’s very efficient in handling incremental chains, data de-duplication and synchronization. pVHD allows obtaining backups that are up to four times smaller than original backup objects. What you get by using pVHD: - Incremental imaging works much faster and rock-stable in comparison with the old PBF; - Only pVHD images can be used to do immediate virtualization; - With the new backup technology, Paragon has also achieved easy support of any virtual containers (VMDK, VHD, VHDX). In the current version the pVHD support has a promotional goal. In future releases pVHD will gradually take the primary role. Uplifted Recovery Media Builder. Paragon’s Recovery Media Builder can help you prepare either Linux or WinPE-based bootable environment on a USB thumb drive or in an ISO file (previously only creation of WinPE images on USB was supported). Uplifted Linux Recovery Environment. Started from Rescue Kit 14 the Linux-based recovery environment is based on SuSe 12.3 (more hardware devices supported) and includes: - P2P Adjust OS Wizard to successfully migrate a Windows physical system to a different hardware platform (P2P); - uEFI fixup to clone, restore, migrate 64-bit Windows systems configured to the uEFI boot mode; Windows 8.1 support. Our product has been tested to work fine on Windows 8.1 RTM. New user-friendly interface: - Metro-style Express Launcher; - GUI of the Linux recovery environment has also been uplifted. Copyright© 1994-2014 Paragon Software GmbH. All rights reserved. 5 Product Components In order to cope with different tasks, the product contains several components: Linux/DOS based recovery environment is a multi-platform bootable media that enables to run utilities under Linux or PTS DOS, and that way to get access to your hard disk for maintenance or recovery purposes. Both platforms have their strong sides, for instance Linux can boast support of FireWire (i.e. IEEE1394) or USB devices. It enables to burn CD/DVD discs. However there can be some difficulties with detecting new hardware. DOS in its turn has no problems of that kind but is limited in features. The Linux/DOS recovery environment requires no installation and can be of great help when the system fails to boot. Besides it offers a Windows XP like environment. WinPE based recovery environment. Especially for keen followers of Windows, our product offers the option to prepare a WinPE based bootable media. Unlike the Linux/DOS recovery environment it can boast an excellent hardware support and the same interface as the Windows version can. However its system requirements are much tougher. Features Overview This chapter dwells upon key benefits and technical highlights of the product. Features Let us list some of the features: A handy Launcher to easily find and run the required tasks. Available location for backup images: - Backup to local mounted partitions. - Backup to local unmounted (without drive letter assigned) partitions. - Backup to an external mounted storage to provide for a higher level of data protection and system independence. - Backup to a special secured place on the hard disk called the Backup Capsule that has an independent system layout (e.g. a separate partition) and will stay operable should the active file system be damaged. To avoid an accidental removing or unauthorized access of the backup data, this partition is hidden and thus cannot be mounted in the operating system. - Backup to external media (CD/DVD) to guarantee a high level of data protection as long as the backup media is kept secure. - Backup to a network drive to stand a better chance of success in case of a hard disk failure. Sector backup to save not only all on-disk information but also the system service structures. It is ideal for making a backup image of an entire hard disk or system partitions to guarantee the operating system’s working capability. Restore an entire disk, separate partitions or only files you need from the previously created backup image. Undelete Partitions Wizard to recover an accidentally deleted partition. File Transfer Wizard to make such operations as transferring of files/directories or burning of them to CD/DVD as easy and convenient as possible. Providing access to Paragon backups as regular folders, it may also help to replace corrupted data from a previously created image in case of an operating system failure. Copyright© 1994-2014 Paragon Software GmbH. All rights reserved. 6 Network Configuration Wizard to establish a network connection on a bootable recovery media either to save a backup of a partition/hard disk or just several files on a network computer or retrieve a previously made backup from a network computer for recovery purposes. Boot Corrector to fix most of the system boot problems that can be a result of a human factor, program error or a boot virus activity. Registry Editor to view and modify settings of any Windows System Registry in the offline mode, i.e. when your operating system has not been started up. It is organized just the way Windows built-in editor is, so you can feel comfortable with it. Password Cleaner to clean user passwords for Windows NT/2000/XP/Vista/7/2003/2008. With its help you can easily change any user password, including Administrator's to a blank one, thus providing the possibility to freely log in to your operating system. Even if your password has been encrypted with the Syskey utility, you can still clean it up. Backup to Virtual Disk Wizard to back up entire hard disks or separate partitions to a virtual disk container. Registry Editor and Password Cleaner are only available for the Linux/DOS recovery environment. Supported Technologies Along with using innovative technologies from outside, Paragon has developed a number of its own original technologies that make its products unique and attractive for customers: Paragon UFSD™ technology to browse partitions of any file system including hidden and unmounted, modify and copy files and folders, etc. Microsoft Dynamic Disk (simple, spanned, striped, mirrored, RAID-5) to offer more management flexibility without the partition limitation of basic disks. Dynamic storage can be particularly beneficial for large-scale businesses when dealing with many physical hard disks involving complex setup. GUID Partition Table (GPT). It is the next generation of a hard disk partitioning scheme developed to lift restrictions of the old MBR. GPT disks are now supported by Windows Vista/7, Server 2008, Mac OS X and Linux. Supported File Systems Full read/write access to FAT16/FAT32 partitions. Full read/write access to NTFS (Basic Disks) under Windows, Linux and PTS DOS. Compressed NTFS files are also supported. Full read/write access to Ext2FS/Ext3FS/Ext4FS partitions. Limited read/write access to Apple HFS+ partitions. Unfortunately, support of non-Roman characters for the HFS+ file system is unavailable at the moment. The company is about to implement it in the nearest future. Supported Media Support of both MBR and GPT hard disks (2.2TB+ disks included) Copyright© 1994-2014 Paragon Software GmbH. All rights reserved. 7 IDE, SCSI and SATA hard disks SSD (Solid State Drive) AFD (Advanced Format Drive) Non-512B sector size drives CD-R, CD-RW, DVD-R, DVD+R, DVD-RW, DVD+RW, DVD-R, DVD+R double layer and also Blu-ray discs FireWire (i.e. IEEE1394), USB 1.0, USB 2.0, USB 3.0 hard disks PC card storage devices (MBR and GPT flash memory, etc.) Supported virtual hard drive VMware - Virtual Machine Disk Format (VMDK) Microsoft - Virtual Hard Disk (VHD, VHDX) Oracle - Virtual Desktop Image (VDI) Paragon’s backups (PBF/pVHD) Getting Started In this chapter you will find all the information necessary to get the product ready to use. System Requirements For the Linux bootable environment Intel Pentium CPU or its equivalent, with 300 MHz processor clock speed 256 MB of RAM SVGA video adapter and monitor Keyboard Mouse For the WinPE bootable environment Intel Pentium III CPU or its equivalent, with 1000 MHz processor clock speed At least 1 GB of RAM SVGA video adapter and monitor Keyboard Mouse Additional requirements Network card to send/retrieve data to/from a network computer Recordable CD/DVD drive to burn data to compact discs External USB hard drive to store data. Copyright© 1994-2014 Paragon Software GmbH. All rights reserved. 8 Building Recovery Media WinPE- and/or Linux-based recovery environments should be prepared on-site with Paragon’s Recovery Media Builder. To know more on the subject, please consult documentation that comes with this utility. Booting from the Linux/DOS Recovery Media The Linux/DOS recovery environment can be used to boot your computer into Linux or PTS DOS to get access to your hard disk for maintenance or recovery purposes. It also has the PTS DOS safe mode, which may help in a number of nonstandard situations such as interfering hardware settings or serious problems on the hardware level. In this case, only basic files and drivers (such as hard disk drivers, a monitor driver, and a keyboard driver) will be loaded. Startup To start working with the Linux/DOS recovery environment, please take the following steps: 1. Start up the computer from our Linux/DOS recovery media. Please use Recovery Media Builder to prepare Paragon's recovery environments on CD/DVD, flash, or in an ISO-image. To automatically boot from the recovery media please make sure the on-board BIOS is set up to boot from CD/USB first. 2. Launch a boot mode you need (Normal, Safe, Low-Graphics Safe) in the Boot menu. By default the Normal Mode will be automatically initiated after a 10 second idle period. 3. Click on the required operation to start. Hints on the selected at the moment item will help you make the right choice. 4. Consult the help system by pressing ALT+F1 to know more on the subject. Boot menu 32-bit environment Normal Mode. Boot into the Linux normal mode. This mode uses the full set of drivers (recommended); Safe Mode. Boot into the PTS DOS mode. This mode can be used as an alternative of the Linux normal mode if it fails to work properly; Copyright© 1994-2014 Paragon Software GmbH. All rights reserved. 9 Low-Graphics Safe Mode. Boot into the PTS DOS safe mode. In this case, only the minimal set of drivers will be included, like hard disk, monitor, and keyboard drivers. This mode has simple graphics and a simple menu; Floppy Disk. Reboot the computer from a system floppy disk; Hard Disk 0. Boot from the primary hard disk; Find OS(s) on your hard disks. The program will scan hard disks of your computer to find any bootable operating system. 64-bit environment Normal Mode. Boot into the Linux normal mode. This mode uses the full set of drivers (recommended); Safe Mode. Boot into the PTS DOS mode. This mode can be used as an alternative of the Linux normal mode if it fails to work properly; Reboot. Restart the computer. Power off. Shut down the computer. While working with the recovery environment you might experience some inconvenience caused by possible video artifacts. It is just a result of changing video modes and in no way will affect the program functionality. If this is the case, please wait a bit and everything will be OK. Normal Mode When the Normal mode is selected, the Linux launch menu appears: Copyright© 1994-2014 Paragon Software GmbH. All rights reserved. 10 Back up to Virtual Disk Wizard (helps to back up entire hard disks or separate partitions to a virtual disk container); Restore from Virtual Disk Wizard (allows restoring entire hard disks or separate partitions from a virtual disk container); Postmortem Backup Wizard (enables to back up separate partitions or entire hard disks); Postmortem Restore Wizard (allows restoring hard disks and partitions); Undelete Partition (allows recovery of accidentally deleted partitions); File Transfer Wizard (allows coping files/folders to another disk or a partition as well as recording them to CD/DVD); Boot Corrector (helps to correct the Windows System Registry without Windows being loaded); Registry Editor (helps to view and modify settings of any Windows System Registry in the offline mode); Password Cleaner (allows cleaning user passwords for Windows NT/2000/XP/Vista/7/8/2003/2008/2012); Network Configurator (enables to establish a network connection under Linux); If you are going to use network resources, first launch the Network Configuration Wizard to establish a network connection. Log Saver (helps to collect and send the necessary log files to the Technical Support); Eject CD/DVD; Reboot the computer; Power off the computer. To move within the menu, please use the arrow keys of the computer keyboard. Safe Mode When the Safe mode is selected, the PTS DOS launch menu appears. It has nearly the same functionality as for the Normal mode except for the Network Configurator and Log Saver commands. Besides due to certain limitations of the PTS DOS environment, there is no possibility to burn CD/DVD discs. Copyright© 1994-2014 Paragon Software GmbH. All rights reserved. 11 Low Graphics Safe Mode When the Low Graphics mode is selected, the PTS DOS launch menu appears. It has the same functionality and looks similar to the Safe mode but graphically simpler. Booting from the WinPE Recovery Media The WinPE recovery environment can be a real alternative to the Linux/DOS recovery environment. Providing nearly the same level of functionality it offers an excellent hardware support and the same interface as the Windows version does. Startup To start working with the WinPE recovery environment, please take the following steps: 1. Start up the computer from the WinPE recovery media. Please use Recovery Media Builder to prepare Paragon's recovery environments on CD/DVD, flash, or in an ISO-image. To automatically boot from the recovery media please make sure the on-board BIOS is set up to boot from CD/USB first. 2. Once it has been loaded, you will see the Universal Application Launcher. In general it enables to run components of the product, load drivers for undefined hardware or establish a network connection. Copyright© 1994-2014 Paragon Software GmbH. All rights reserved. 12 3. Click on the required operation to start. Hints on the selected at the moment item will help you make the right choice. 4. Consult the help system by pressing ALT+F1 to know more on the subject. The WinPE based recovery environment offers excellent hardware support. However in case it doesn’t have a driver for your disk controller, your hard disks will be unavailable. Please consult the Adding specific drivers scenario to know how to tackle this issue. Typical Scenarios This chapter lists a number of the most frequently used scenarios that may be accomplished with the program. You can find here useful recommendations and descriptions of operations. Backup Scenarios Backing up a hard disk or partition to external media (CD/DVD) To back up an entire hard disk or a separate partition and then burn the resulted image to CD/DVD, please do the following: 1. Start up the computer from our WinPE recovery media. Please use Recovery Media Builder to prepare Paragon's recovery environments on CD/DVD, flash, or in an ISO-image. To automatically boot from the recovery media please make sure the on-board BIOS is set up to boot from CD/USB first. Copyright© 1994-2014 Paragon Software GmbH. All rights reserved. 13 2. Launch the Postmortem Backup Wizard. 3. On the Wizard's Welcome page, click the Next button. 4. On the next page, mark the appropriate option opposite a hard disk’s name or a partition’s name depending on the chosen task. You’ve got the option to modify the default backup settings by marking the appropriate checkbox on this page. 5. On the Backup Destination page, select the Burn the data to CD or DVD option. 6. Select a recordable device on the list of available CD/DVD devices and edit the archive name, if necessary. Copyright© 1994-2014 Paragon Software GmbH. All rights reserved. 14 Please take into account the Estimated archive size value. It can give you a hint about the number of CD/DVD discs required for the operation. 7. Add comments to your backup describing its contents. 8. On the Backup Summary page review all parameters of the operation and modify them if necessary. Click the Next button to start the backup process. This operation can also be accomplished with the Linux/DOS recovery media. Backing up a hard disk or partition to a network drive To back up an entire hard disk or a separate partition and then place the resulted image to a network share, please do the following: For PBF images 1. Start up the computer from our WinPE recovery media. Please use Recovery Media Builder to prepare Paragon's recovery environments on CD/DVD, flash, or in an ISO-image. To automatically boot from the recovery media please make sure the on-board BIOS is set up to boot from CD/USB first. Copyright© 1994-2014 Paragon Software GmbH. All rights reserved. 15 2. Launch the Postmortem Backup Wizard. 3. On the Wizard's Welcome page, click the Next button. 4. On the next page, mark the appropriate option opposite a hard disk’s name or a partition’s name depending on the chosen task. You’ve got the option to modify the default backup settings by marking the appropriate checkbox on this page. By default the program will take into account exclude filters set in the Settings dialog. 1. On the Backup Destination page, select the Save data to local/network drives option. 2. Map a network disk to place your backup image to: - Call the Map Network Drive dialog by clicking the appropriate button; Copyright© 1994-2014 Paragon Software GmbH. All rights reserved. 16 - Click the standard browse button [...] to browse for the required network share or manually enter a path to it; - Define a letter from the pull-down list of available drive letters; - Mark the checkbox to make this connection permanent. Otherwise it will only be available for the current Windows session; - Click the Connect as user button at the foot of the dialog page to specify a user name and password to access the selected network share if necessary. 3. Edit the archive name if necessary. Please take into account values of the parameters Estimated archive size and Space available on backup destination - if the archive size exceeds the available space, another network drive needs to be selected. 4. Add comments to your backup describing its contents. 5. On the Backup Summary page review all parameters of the operation and modify them if necessary. Click the Next button to start the backup process. For virtual containers 1. On the Universal Application Launcher select Backup to Virtual Disk. Copyright© 1994-2014 Paragon Software GmbH. All rights reserved. 17 There are other ways to start up this function, please consult the Interface Overview chapter to know more on the subject. 2. On the Wizard's Welcome page, click the Next button. 3. Select partitions or entire hard disks you’d like to back up by using Shift or Ctrl to select several objects at once. Click Next to proceed. You’ve got the option to modify the default backup settings by marking the appropriate checkbox on this page. By default the program will take into account exclude filters set in the Settings dialog. 4. Specify location of the resulted image in the ‘Backup destination’ section. If you’d like to save it locally, either enter a full path to the target folder in the corresponding field or use the Browse button to find it. If you’re going to save the backup image on a network share, or a physical partition (a partition that doesn’t have a drive letter in the system), click on the Browse button. In the opened dialog you can see several options: Copyright© 1994-2014 Paragon Software GmbH. All rights reserved. 18 - Select Disk Drives to use a local disk as backup destination; - Select Partitions to use a physical partition as backup destination; - Click on the Map Network Drive icon to map a network share to use it as backup destination (our case). 5. To map a network share, please do the following: - Click the standard browse button [...] to browse for the required network share or manually enter a path to it; - Define a letter from the pull-down list of available drive letters; - Mark the checkbox to make this connection permanent. Otherwise it will only be available for the current Windows session; - Specify a user name and password to access the selected network share if necessary. Click OK when ready. Copyright© 1994-2014 Paragon Software GmbH. All rights reserved. 19 6. Edit the default archive name and description in the ‘Archive details’ section if necessary. Click Next to proceed. 7. Choose whether to execute the operation immediately after finishing the wizard and applying the pending changes (only if the virtual mode is enabled) or generate a script file to execute it later. 8. Click Finish to complete the wizard, and then apply the pending changes. Backing up a dual boot Mac to an external USB drive To back up a dual boot Mac (Mac OS X and Windows XP/Vista/7/8) and then place the resulted image to an external USB drive, please do the following: 1. Start up the computer from our Linux/DOS recovery media. Please use Recovery Media Builder to prepare Paragon's recovery environments on CD/DVD, flash, or in an ISO-image. To automatically boot from the recovery media please make sure the on-board BIOS is set up to boot from CD/USB first. 2. Connect an external USB drive to the computer. 3. Restart the computer. It will be automatically started up into the Linux recovery environment (Normal Mode), since it’s the only mode that provides support for Mac computers. 4. In the Linux launch menu select Postmortem Backup. You can find it in PTS DOS as well. 5. On the Wizard's Welcome page, click the Next button. 6. On the What to back up page, select your Mac hard disk. 7. On the Backup Destination page, select the Save data to any local drive or a network share option. Copyright© 1994-2014 Paragon Software GmbH. All rights reserved. 20 8. Select an external USB drive as a backup destination. 9. Edit the archive name if necessary. Please take into account values of the parameters Estimated archive size and Space available on backup destination - if the archive size exceeds the available space, another drive needs to be selected. 10. Add comments to your backup describing its contents. 11. On the Backup Summary page review all parameters of the operation and modify them if necessary. Click the Next button to start the backup process. Copyright© 1994-2014 Paragon Software GmbH. All rights reserved. 21 This operation can also be accomplished with the WinPE recovery media. Recovery Scenarios Correcting EFI parameters To specify a bootable device in the EFI boot entry, please do the following: 1. Start up the computer from the WinPE recovery media. Please use Recovery Media Builder to prepare Paragon's recovery environments on CD/DVD, flash, or in an ISO-image. To automatically boot from the recovery media please make sure the on-board BIOS is set up to boot from CD/USB first. 2. Launch Boot Corrector. 3. On the Wizard's Welcome page, click the Next button. 4. Select Correct EFI parameters to specify the required bootable device in the EFI boot entry. The option above will be available for the user, only if the operation is accomplished through the 64-bit WinPE media. 5. The wizard will detect and list all available GPT partitions that accommodate 64-bit Windows OS. Choose the one you need to boot from, to let the wizard modify the EFI boot entry correspondingly. Copyright© 1994-2014 Paragon Software GmbH. All rights reserved. 22 6. Confirm the operation. 7. Click the Finish button to close Boot Corrector. 8. Restart the computer. Correcting BCD (Boot Configuration Data) To automatically correct Windows BCD, please do the following: 1. Start up the computer from the WinPE recovery media. Please use Recovery Media Builder to prepare Paragon's recovery environments on CD/DVD, flash, or in an ISO-image. To automatically boot from the recovery media please make sure the on-board BIOS is set up to boot from CD/USB first. 2. Launch Boot Corrector. 3. On the Wizard's Welcome page, click the Next button. 4. Select Correct boot parameters… to let the wizard fix BCD in all found Windows installations. 5. Confirm the operation. 6. Click the Finish button to close Boot Corrector. 7. Restart the computer. Copyright© 1994-2014 Paragon Software GmbH. All rights reserved. 23 Fixing Windows startup ability Let’s assume that due to an unknown reason your Windows fails to complete the startup procedure. At first everything seems quite OK, you can see the standard startup messages on the screen, but at some moment it hangs up. To fix your Windows startup ability, please do the following: 1. Start up the computer from our Linux/DOS recovery media. Please use Recovery Media Builder to prepare Paragon's recovery environments on CD/DVD, flash, or in an ISO-image. To automatically boot from the recovery media please make sure the on-board BIOS is set up to boot from CD/USB first. 2. In the boot menu select Normal Mode to use the Linux recovery environment (more preferable) or Safe Mode to use the PTS DOS recovery environment (in case you’ve got problems with Linux). Moreover you’ve got the option to boot into the Low-Graphics Safe Mode (PTS DOS safe mode) to cope with a serious hardware incompatibility. In this case, only the minimal set of drivers will be included, like hard disk, monitor, and keyboard drivers. This mode has simple graphics and a simple menu. By default the Normal Mode will be automatically initiated after a 10 second idle period. 3. In the Linux launch menu select Boot Corrector. You can find it in PTS DOS as well. 4. On the Wizard's Welcome page, select the Search for Windows installations to correct option. 5. On the next page choose the required Windows installation from the list of found installations (if several), then select the Edit the Boot.ini file option. If you’re not sure which installation you need, please use the Properties button to get more info on the selected item. Copyright© 1994-2014 Paragon Software GmbH. All rights reserved. 24 6. Examine the file – maybe that’s where the problem is. If it contains a mistake, correct it by using the appropriate buttons. 7. If the Boot.ini file does not contain any mistake, please return to the Correct Windows Installations page to correct drive letters in the Windows System Registry. Copyright© 1994-2014 Paragon Software GmbH. All rights reserved. 25 8. On the next page choose a hard disk from the pull-down list (if several), then the required partition. If you’re not sure which installation you need, please use the Properties button to get more info on the selected item. 9. Click the Edit Letters button to correct an existing drive letter or assign a new one in the Windows System Registry. 10. Once you’ve assigned the appropriate drive letter, close the dialog, then click the Apply button. 11. Confirm the operation. 12. After the operation is completed click the Report button to see a well informative summary page. The program also enables to store the resulted report. To do that, just press the Save button and choose the exact location in the opened dialog. Copyright© 1994-2014 Paragon Software GmbH. All rights reserved. 26 13. Click the Finish button to close Boot Corrector. 14. Reboot the computer. Restoring a system partition from external media (CD/DVD) Let’s assume that your computer fails to boot because of a virus attack or corruption of some system critical files. But you’ve got a backup of your system partition on a bootable DVD disc. That’s just enough to easily get your system back on track again. To restore your system partition from a backup image located on CD/DVD when the current OS is down, please do the following: 1. Insert a CD/DVD disc containing the previously prepared backup image into a CD/DVD drive (the BIOS must be enabled to boot the system from the CD/DVD device). This scenario implies that you have got a bootable archive on your CD/DVD. In case the backup image is stored on several CD/DVD disks, please insert the first one. 2. Restart the computer. 3. In the boot menu select Normal Mode to use the Linux recovery environment (more preferable) or Safe Mode to use the PTS DOS recovery environment (in case you’ve got problems with Linux). Moreover you’ve got the option to boot into the Low-Graphics Safe Mode (PTS DOS safe mode) to cope with a serious hardware incompatibility. In this case, only the minimal set of drivers will be included, like hard disk, monitor, and keyboard drivers. This mode has simple graphics and a simple menu. By default the Normal Mode will be automatically initiated after a 10 second idle period. 4. In the PTS DOS launch menu select the Postmortem Restore Wizard. You can find the same wizard in Linux as well. 5. On the Wizard's Welcome page, click the Next button. Copyright© 1994-2014 Paragon Software GmbH. All rights reserved. 27 6. On the What to Restore page, you can see a list of available images (if several). Most likely the required archive will be there too. If not, click the standard browse button [...] to find it. When you find your image, double click on it to proceed. 7. On the Image Properties page, make sure that you select the correct image by viewing the provided information about the archive. 8. On the next page specify a hard disk, then one of its partitions to restore the image to (if several in your computer). By default, the program offers to restore the archive exactly where it belongs. That’s what we actually need. All contents on the partition selected for restoring purposes will be deleted during the operation. 9. On the Partition Start and Size page you can change size of the partition and its location if necessary. Copyright© 1994-2014 Paragon Software GmbH. All rights reserved. 28 10. On the Restore Summary page you can see your hard disk layout before and after the operation. Click the Next button to initiate the restore process. 11. In the Progress window you can see in real-time a detailed report on all actions carried out by the program. 12. After completing the operation close the wizard, and then reboot the computer. Restoring a system partition from a network drive Let’s assume that your computer fails to boot because of a virus attack or corruption of some system critical files. But you’ve got a backup of your hard disk on a remote backup server. That’s just enough to easily get your system back on track again. To restore your system partition from a backup image located on a network drive, please do the following: For PBF images 1. Start up the computer from the WinPE recovery media. Copyright© 1994-2014 Paragon Software GmbH. All rights reserved. 29 Please use Recovery Media Builder to prepare Paragon's recovery environments on CD/DVD, flash, or in an ISO-image. To automatically boot from the recovery media please make sure the on-board BIOS is set up to boot from CD/USB first. 2. Launch the Postmortem Restore Wizard. 3. On the Postmortem Restore Wizard's Welcome page, click the Next button. 4. On the Browse for Archive page you need to specify the required backup image. So you should take the following steps to do that: Select Network as a backup destination; Map a network disk where your archives are placed: - Call the Map Network Drive dialog by clicking the appropriate button; - Click the standard browse button [...] to browse for the required network share or manually enter a path to it; - Define a letter from the pull-down list of available drive letters; - Click the Connect as user button at the foot of the dialog page to specify a user name and password to access the selected network share if necessary. Copyright© 1994-2014 Paragon Software GmbH. All rights reserved. 30 You can also map a network disk with Network Configurator. Choose the required archive in the browser-like window. The Archive File Details section displays a short description of the selected image. 5. The What to Restore page displays detailed information about the contents of the archive. Select the required item to restore. In our case it is the first partition of the disk. Copyright© 1994-2014 Paragon Software GmbH. All rights reserved. 31 6. On the Where to Restore page specify a hard disk, then one of its partitions to restore the image to (if several in your computer). By default, the program offers to restore the archive exactly where it belongs. That’s what we actually need. All contents on the partition selected for restoring purposes will be deleted during the operation. 7. On the Restore Results page you can see the resulted disk layout. Besides there’s the possibility to change size of the partition and its location if necessary as well as assign a particular drive letter. If you’ve got to do with a 64-bit Windows configured to the uEFI boot mode, the Switch EFI to boot from destination drive option will become available for you to define what instance of Windows OS you’d like to boot from once the operation is over. Anyway you can specify a bootable device at any time through Boot Corrector. 8. On the next page of the wizard confirm the operation by selecting the appropriate option. 9. In the Progress window you can see in real-time a detailed report on all actions carried out by the program. Mark the checkbox at the bottom of the window to automatically switch off the computer on the successful accomplishment of the restore operation. 10. After completing the operation close the wizard, and then reboot the computer. For virtual containers 1. Start up the computer from the WinPE recovery media. Please use Recovery Media Builder to prepare Paragon's recovery environments on CD/DVD, flash, or in an ISO-image. You can get it here: www.paragon-software.com/myaccount/. To automatically boot from the recovery media please make sure the on-board BIOS is set Copyright© 1994-2014 Paragon Software GmbH. All rights reserved. 32 up to boot from CD/USB first. 2. On the Universal Application Launcher select the Restore from Virtual Disk Wizard. 3. On the Restore Wizard's Welcome page, click the Next button. 4. On the Browse for Archive page you need to specify the required backup image: Map a network disk where your archives are placed: - Call the Map Network Drive dialog by clicking the appropriate button; - Click the standard browse button [...] to browse for the required network share or manually enter a path to it; - Define a letter from the pull-down list of available drive letters; - Click the Connect as user button at the foot of the dialog page to specify a user name and password to access the selected network share if necessary. You can also map a network disk with Network Configurator. Choose the required archive in the browser-like window. The Archive File Details section displays a short description of the selected image. If you need more information on the selected backup object, please click the corresponding link at the bottom of the section. Click Next to proceed. Copyright© 1994-2014 Paragon Software GmbH. All rights reserved. 33 5. The What to Restore page displays detailed information about the contents of the archive. Select the required item to restore. If you need to restore several backup objects from a pVHD image in one operation, please use the Linux-based recovery media. 6. On the Where to Restore page specify a hard disk, then one of its partitions to restore the image to (if several in your computer). By default, the program offers to restore the archive exactly where it belongs. That’s what we actually need. Copyright© 1994-2014 Paragon Software GmbH. All rights reserved. 34 All contents on the partition selected for restoring purposes will be deleted during the operation. 7. On the Restore Results page you can see the resulted disk layout. Besides there’s the possibility to change size of the partition and its location if necessary as well as assign a particular drive letter. If you’ve got to do with a 64-bit Windows configured to the uEFI boot mode, the Switch EFI to boot from destination drive option will become available for you to define what instance of Windows OS you’d like to boot from once the operation is over. Anyway you can specify a bootable device at any time through Boot Corrector. 8. Choose whether to execute the operation immediately after finishing the wizard and applying the pending changes (only if the virtual mode is enabled) or generate a script file to execute it later. Copyright© 1994-2014 Paragon Software GmbH. All rights reserved. 35 9. Click Finish to complete the wizard, then apply the pending changes. 10. In the Progress window you can see in real-time a detailed report on all actions carried out by the program. Mark the checkbox at the bottom of the window to automatically switch off the computer on the successful accomplishment of the restore operation. 11. After completing the operation, please reboot the computer. To make Windows bootable on different hardware, please additionally complete the P2P Adjust OS Wizard. Restoring a dual boot Mac from an external USB drive Let’s assume that your Mac fails to boot because of a hard disk malfunction. But you’ve got a backup of your hard disk on an external USB drive. Just replace the failed disk with a new one and carry out a bare metal restore. To restore a dual boot Mac from a backup image located on an external USB drive, please do the following: 1. Start up the computer from our Linux/DOS recovery media. Please use Recovery Media Builder to prepare Paragon's recovery environments on CD/DVD, flash, or in an ISO-image. To automatically boot from the recovery media please make sure the on-board BIOS is set up to boot from CD/USB first. 2. Connect an external USB drive to the computer. 3. Restart the computer. 4. In the boot menu select Normal Mode to use the Linux recovery environment, since it’s the only mode that enables to work with USB devices. By default the Normal Mode will be automatically initiated after a 10 second idle period. 5. In the Linux launch menu select the Postmortem Restore Wizard. 6. On the Wizard's Welcome page, click the Next button. 7. On the What to Restore page, click the standard browse button [...] to find the required archive. When done, double click on it to select. Copyright© 1994-2014 Paragon Software GmbH. All rights reserved. 36 8. On the Image Properties page, make sure that you select the correct image by viewing the provided information about the archive. 9. On the next page specify a hard disk to restore the image to. All contents on disk selected for restoring purposes will be deleted during the operation. Copyright© 1994-2014 Paragon Software GmbH. All rights reserved. 37 10. On the Restore Summary page you can see your hard disk layout before and after the operation. Click the Next button to initiate the restore process. 11. In the Progress window you can see in real-time a detailed report on all actions carried out by the program. 12. After completing the operation close the wizard, and then reboot the computer. Copying of data from the corrupted system disk to another hard disk To retrieve valuable information from your hard disk and copy it to another hard disk when the system fails to boot, please do the following: 1. Connect the second hard disk to the computer. 2. Start up the computer from our Linux/DOS recovery media. Please use Recovery Media Builder to prepare Paragon's recovery environments on CD/DVD, flash, or in an ISO-image. To automatically boot from the recovery media please make sure the on-board BIOS is set up to boot from CD/USB first. 3. In the boot menu select Normal Mode to use the Linux recovery environment (more preferable) or Safe Mode to use the PTS DOS recovery environment (in case you’ve got problems with Linux). Moreover you’ve got the Copyright© 1994-2014 Paragon Software GmbH. All rights reserved. 38 option to boot into the Low-Graphics Safe Mode (PTS DOS safe mode) to cope with a serious hardware incompatibility. In this case, only the minimal set of drivers will be included, like hard disk, monitor, and keyboard drivers. This mode has simple graphics and a simple menu. By default the Normal Mode will be automatically initiated after a 10 second idle period. 4. In the Linux launch menu select the File Transfer Wizard. You can find the same wizard in PTS DOS as well. 5. On the Wizard's Welcome page, click the Next button. 6. Select a disk where the files you need are stored from the pull-down list in the right pane of the page. 7. Select files you want to copy and place them to Clipboard by pressing the left arrow-button. Click the Calc button to estimate the resulted data size. 8. On the Select Destination Type, choose the way the data will be stored. Select the Save data to any local drive or a network share item. Copyright© 1994-2014 Paragon Software GmbH. All rights reserved. 39 9. On the Select Destination Path page, select a hard disk to copy the data to by pressing the standard browse button [...]. 10. On the Transfer Summary page check all parameters of the operation. Click the Next button to accomplish the operation. 11. In the Progress window you can see in real-time a detailed report on all actions carried out by the program. 12. After the operation is completed, close the wizard by pressing the appropriate button. 13. Turn off the computer. This operation can also be accomplished with the WinPE recovery media. Burning of data from the corrupted system disk to CD/DVD To retrieve valuable information from your hard disk and burn it to CD/DVD when the system fails to boot, please do the following: 1. Start up the computer from our Linux/DOS recovery media. Copyright© 1994-2014 Paragon Software GmbH. All rights reserved. 40 Please use Recovery Media Builder to prepare Paragon's recovery environments on CD/DVD, flash, or in an ISO-image. To automatically boot from the recovery media please make sure the on-board BIOS is set up to boot from CD/USB first. 2. In the boot menu select Normal Mode to use the Linux recovery environment, since it’s the only mode that enables to burn CD/DVD discs. By default the Normal Mode will be automatically initiated after a 10 second idle period. 3. In the Linux launch menu select the File Transfer Wizard. You can find the same wizard in PTS DOS as well. 4. On the Wizard's Welcome page, click the Next button. 5. Select a disk where the files you need are stored from the pull-down list in the right pane of the page. 6. Select files you want to copy and place them to Clipboard by pressing the left arrow-button. Click the Calc button to estimate the resulted data size. 7. On the Select Destination Type, choose the way the data will be stored. Select the Burn data to CD/DVD item. Copyright© 1994-2014 Paragon Software GmbH. All rights reserved. 41 8. On the Choose a Recorder page, select a recorder from the list of available devices and then set a volume label by entering it in the appropriate field. 9. On the Transfer Summary page check all parameters of the operation. Click the Next button to accomplish the operation. 10. In the Progress window you can see in real-time a detailed report on all actions carried out by the program. 11. After the operation is completed, close the wizard by pressing the appropriate button. 12. Turn off the computer. This operation can also be accomplished with the WinPE recovery media. Copying of data from a backup to the corrupted system partition The system fails to boot since some files are damaged. If you have a backup of the system partition, you can recopy these files to make the system be operable again: Copyright© 1994-2014 Paragon Software GmbH. All rights reserved. 42 1. Start up the computer from our Linux/DOS recovery media. Please use Recovery Media Builder to prepare Paragon's recovery environments on CD/DVD, flash, or in an ISO-image. To automatically boot from the recovery media please make sure the on-board BIOS is set up to boot from CD/USB first. 2. In the boot menu select Normal Mode to use the Linux recovery environment (more preferable) or Safe Mode to use the PTS DOS recovery environment (in case you’ve got problems with Linux). Moreover you’ve got the option to boot into the Low-Graphics Safe Mode (PTS DOS safe mode) to cope with a serious hardware incompatibility. In this case, only the minimal set of drivers will be included, like hard disk, monitor, and keyboard drivers. This mode has simple graphics and a simple menu. By default the Normal Mode will be automatically initiated after a 10 second idle period. 3. In the Linux launch menu select the File Transfer Wizard. You can find the same wizard in PTS DOS as well. 4. On the Wizard's Welcome page, click the Next button. 5. Select a disk where the system backup is stored from the pull-down list in the right pane of the page. 6. Double click on the required backup to open. 7. Select files you want to copy and place them to Clipboard by pressing the left arrow-button. Copyright© 1994-2014 Paragon Software GmbH. All rights reserved. 43 Click the Calc button to estimate the resulted data size. 8. On the Select Destination Type, choose the way the data will be stored. Select the Save data to any local drive or a network share item. 9. On the Select Destination Path page, select your system disk to copy the data to by pressing the standard browse button [...]. 10. On the Transfer Summary page check all parameters of the operation. Click the Next button to accomplish the operation. 11. In the Progress window you can see in real-time a detailed report on all actions carried out by the program. Copyright© 1994-2014 Paragon Software GmbH. All rights reserved. 44 12. After the operation is completed, close the wizard by pressing the appropriate button. 13. Turn off the computer. This operation can also be accomplished with the WinPE recovery media. Cleaning User Passwords for Windows Let’s assume that after a busy business trip you’ve come home and realized that you’ve completely forgotten your Windows user password. That's no great tragedy any more. To clean a user password of the required Windows installation, please do the following: 1. Start up the computer from our Linux/DOS recovery media. Please use Recovery Media Builder to prepare Paragon's recovery environments on CD/DVD, flash, or in an ISO-image. To automatically boot from the recovery media please make sure the on-board BIOS is set up to boot from CD/USB first. 2. In the boot menu select Normal Mode to use the Linux recovery environment (more preferable) or Safe Mode to use the PTS DOS recovery environment (in case you’ve got problems with Linux). Moreover you’ve got the option to boot into the Low-Graphics Safe Mode (PTS DOS safe mode) to cope with a serious hardware incompatibility. In this case, only the minimal set of drivers will be included, like hard disk, monitor, and keyboard drivers. This mode has simple graphics and a simple menu. By default the Normal Mode will be automatically initiated after a 10 second idle period. 3. In the Linux launch menu select Password Cleaner. You can find the same wizard in PTS DOS as well. 4. On the Wizard's Welcome page, click the Next button. Copyright© 1994-2014 Paragon Software GmbH. All rights reserved. 45 5. On the next page choose the required Windows installation from the list of found installations (if several). If you’re not sure which installation you need, please use the Properties button to get more info on the selected item. 6. On the next page you can see a list of all users of the selected Windows installation. Select the user, which password you'd like to make blank, then click the Clean button to accomplish the operation. Or just click the Clean All button to clean all user passwords at once. Copyright© 1994-2014 Paragon Software GmbH. All rights reserved. 46 7. After the operation is completed, close the wizard by pressing the appropriate button. 8. Eject the media. 9. Reboot the computer. Extra Scenarios for WinPE Please use Recovery Media Builder to prepare Paragon's recovery environments on CD/DVD, flash, or in an ISO-image. Adding specific drivers The WinPE based recovery environment offers excellent hardware support. Anyway you’ve got the option to add drivers for specific hardware with a handy dialog. To add drivers for specific hardware, please do the following: 1. Click Load Drivers. 2. In the opened dialog browse for an .INF file of the required driver package located on a floppy disk, local disk, CD/DVD or a network share. Then click the Open button to initiate the operation Copyright© 1994-2014 Paragon Software GmbH. All rights reserved. 47 To know how to map a network share, please consult the Configuring network scenario. 3. You will be notified on the successful accomplishment of the operation. Click Yes to load another driver or No to close the dialog. The WinPE recovery environment can either be 32- or 64-bit, so are to be drivers for injection. Configuring network If your local network has a DHCP server, a network connection will be automatically configured once the WinPE recovery environment has been started up. Otherwise you will need to do it manually with a handy dialog by providing an IP address, a network mask, default gateway, etc. Besides with its help you can easily map network shares. To manually set up a network connection and map a network share, please do the following: Copyright© 1994-2014 Paragon Software GmbH. All rights reserved. 48 1. Click Configure Network. 2. In the opened dialog provide an IP address, a network mask, default gateway, etc. for your network device. 3. Click the Network drivers tab to map a network share. 4. Click Map Network Drive and provide all the necessary information to map a network share in the opened dialog: Click the standard browse button [...] to browse for the required network share or manually enter a path to it; Define a letter from the pull-down list of available drive letters; Click the Connect as user button at the foot of the dialog page to specify a user name and password to access the selected network share if necessary. Copyright© 1994-2014 Paragon Software GmbH. All rights reserved. 49 By clicking Disconnect Drive… you can delete an existing network share if necessary. 5. Click the Network identification tab to change a network name of your computer (generated automatically) and a workgroup name. 6. By default, the wizard saves all network settings in the netconf.ini file located on the WinPE RAM drive, thus it will only be available until you restart the computer. However, you can just once configure your network device and then save this file to some other destination, for instance a local drive, and this way avoid constant reconfiguration, just by providing a path to it. So Click Save to file to save the netconfig.ini file to the required destination. Network troubleshooter Network Configurator includes a traceroute/ping utility that enables to get detailed information on particular routes and measure transit delays of packets across an Internet Protocol (IP) network. So with its help you can easily track down problematic nodes. 1. If you need to ping some network host, please select Ping, then type in the required IP address or its name. Click Start when ready. Ping the specified host until stopped. Mark the option to ping the chosen host for indefinite time; Resolve addresses to hostnames. Mark the option to display hostnames instead of IP addresses. Number of echo requests to send. By default the utility sends 4 echo requests, which you can modify however. Copyright© 1994-2014 Paragon Software GmbH. All rights reserved. 50 2. If you need to trace a route to some network host, please select Trace route, then type in the required IP address or its name. Click Start when ready. Do not resolve addresses to hostnames. Mark the option to display IP addresses instead of hostnames. Maximum number of hops to search for target. By default the utility goes through maximum 30 hops when searching for the target host, which you can modify however. Wait timeout milliseconds for each reply. By default the utility waits 4 seconds for each echo reply message. If not received within the timeout, an asterisk (*) is displayed. Saving log files The program enables to simplify the procedure of sending support requests to the Paragon Support Team. In case of having difficulties with handling the program, you, with the help of this very function, can address the company support engineers and provide them with all the information they need such as the disk layout, performed operations, etc. in order to tackle the encountered problem. Information of that kind is stored in log files. To prepare a log files package, please do the following: 1. Click Log Saver. 2. Provide an e-mail address used for registering the product, then give a detailed description on the encountered problem in the corresponding text fields. Please don’t worry - we respect your privacy, so none of your confidential data will be exposed. This utility only collects the program’s operation logs to help our Support Team find and tackle your problem. Click Next to continue. Copyright© 1994-2014 Paragon Software GmbH. All rights reserved. 51 Log files do not contain any confidential information on the operating system settings or the user documents. 3. Browse for the required location of the log files package or manually provide a full path to it. Click Save to initiate the operation. Glossary Active Partition is a partition from which an x86-based computer starts up. The active partition must be a primary partition on a basic disk. If you use Windows exclusively, the active partition can be the same as the system volume. In the DOS partitioning scheme, only primary partitions can be active due to limitations of the standard bootstrap. The term backup originates from the time when the best way to protect valuable information was to store it in form of archives on external media. It’s become now a general notion to mean making duplications of data for protection purposes. Bootable Archive is created by adding a special bootable section when backing up the data to CD/DVDs. Thus you will be able to restore the data from these archives without having to run the program, but by simply booting from these CD/DVDs. Copyright© 1994-2014 Paragon Software GmbH. All rights reserved. 52 Cluster is the smallest amount of disk space that can be allocated to hold a file. All file systems used by Windows organize hard disks based on clusters, which consist of one or more contiguous sectors. The smaller the cluster size, the more efficiently a disk stores information. If no cluster size is specified during formatting, Windows picks defaults based on the size of the volume. These defaults are selected to reduce the amount of space that is lost and the amount of fragmentation on the volume. A cluster is also called an allocation unit. Extended Partition is a partition type you create only on a basic MBR (Master Boot Record) disk. Extended partition is used if you want to create more than four volumes on a disk, since it may contain multiple logical drives. File System Metadata. The servicing structures of a file system, which contain information about allocating files and directories, security information etc, are named the file system metadata. It is invisible for users and regular applications because its accidental modification usually makes a partition unusable. Hard Disk Geometry. Traditionally, the usable space of a hard disk is logically divided into cylinders, cylinders are divided into tracks (or heads), and tracks are divided into sectors. The triad of values {[Sectors-per-Track], [Tracks-per-Cylinder], [Amount-of-Cylinders]} is usually named the Hard Disk Geometry or C/H/S geometry. Tracks and cylinders are enumerated from "0", while sectors are enumerated from "1". These disk parameters play an essential role in the DOS Partitioning scheme. Modern hardware uses an advanced scheme for the linear addressing of sectors, which assumes that all on-disk sectors are continuously enumerated from “0”. To allow backward compatibility with older standards, modern hard disks can additionally emulate the C/H/S geometry. Hidden Partition. The concept of a "hidden" partition was introduced in the IBM OS/2 Boot Manager. By default, an operating system does not mount a hidden partition, thus preventing access to its contents. A method of hiding a partition consists in changing the partition ID value saved in the Partition Table. This is achieved by XOR-ing the partition ID with a 0x10 hexadecimal value. Master File Table (MFT) is a relational database that consists of rows of file records and columns of file attributes. It contains at least one entry for every file on an NTFS volume, including the MFT itself. MFT is similar to a FAT table in a FAT file system. MBR & 1st track of the hard disk is the 0th sector of the disk. MBR (Master Boot Record) contains important information about the disk layout: - The used partitioning scheme; - The starting records of the Partition Table; - The standard bootstrap code (or the initial code of boot managers, disk overlay software or boot viruses). Generally, the 0th sector is used for similar purposes in all existing partitioning schemes. The MBR capacity is not sufficient to contain sophisticated boot programs. That’s why the on-boot software is allowed to use the entire 0th track of the disk. For example, boot managing utilities such as LILO, GRUB and Paragon Boot Manager are located in the 0th track. Partition ID (or File system ID) is a file system identifier that is placed in the partition. It is used to quickly detect partitions of supported types. A number of operating systems completely rely on it to distinguish supported partitions. Partition ID is saved in appropriate entries of the Partition Table and takes only 1 byte of space. Partition Label (or Volume Label) is a small textual field (up to 11 characters) that is located in the partition's boot sector. This value is used for notification purposes only. It is detectable by any partitioning tool including the DOS FDISK utility. Copyright© 1994-2014 Paragon Software GmbH. All rights reserved. 53 Modern operating systems save it within a file system, e.g. as a special hidden file. Thus it is able to contain a relatively large amount of text in multiple languages. Partitioning Scheme is a set of rules, constraints and format of the on-disk structures to keep information on partitions located on a hard disk. There are known several partitioning schemes. The most popular of them is the so-called DOS partitioning scheme. It was introduced by IBM and Microsoft to use multiple partitions in the disk subsystems on IBM PC compatible computers. Another popular partitioning scheme is the so-called Logical Disks Model (LDM) that originates from the UNIX mainframe systems. Veritas Executive accommodates a simplified version of LDM to the Windows 2000 operating system. Windows 2000 and XP support two quite different partitioning schemes: the old DOS partitioning scheme and the new Dynamic Disk Management (DDM). The problem is that earlier versions of Windows do not support DDM. In addition, most hard disk utilities do not support it as well. Recovery Media is a CD/DVD disc, a USB flash card or even a floppy disk from which you can boot for maintenance or recovery purposes. Root Directory is the top-level directory of a formatted logical drive to include other files and directories. In modern file systems (Ext2/Ext3, NTFS and even FAT32) it does not differ from other directories. This is not the case for old FAT12 and FAT16 file systems. Serial Number. In the DOS partitioning scheme, every hard disk and every partition has a 32-bit serial number represented by an 8-figure hexadecimal value. It is stored in the MBR and its value is assigned when the MBR sector is initialized by Microsoft standard disk managing tools, such as Windows Disk Administrator and the FDISK utility. In fact, a hard disk's serial number is not important for most operating systems and software. It is known that Windows NT, 2000 and XP store its value in the database of assigned drive letters. A partition's serial number is stored in its boot sector (in FAT16, FAT32 and NFTS file systems). Its value is assigned when the partition is formatted. It does not play an important role for most operating systems and software as well. Copyright© 1994-2014 Paragon Software GmbH. All rights reserved.