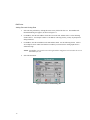
1
Device I/O Driver using
Extended Modbus Protocol (EMP)
for FIX DMACS and FIX MMI
2010S - EMP 16 Bit Driver (Version 5.3)
2011S - EMP 32 Bit Driver (Version 6.0)
User’s Guide
ABB Instrumentation
BS EN ISO 9001
St Neots - Certificate No. Q5907
Stonehouse - Certificate No. FM 21106
The Company
ABB Instrumentation is an established world force in
the design and manufacture of instrumentation for
industrial process control, flow measurement, gas and
liquid analysis and environmental applications.
We are committed to teamwork, high quality
manufacturing, advanced technology and unrivaled
service and support.
The quality, accuracy and performance of the
Company's products result from over 100 years
experience, combined with a continuous program of
innovative design and development to incorporate the
latest technology.
The NAMAS Calibration Laboratory No. 0255(B) is just
one of the ten flow calibration plants operated by the
Company, and is indicative of ABB Instrumentation's
dedication to quality and accuracy.
As a part of ABB, a world leader in process automation
technology, we offer customers application expertise,
service and support worldwide.
Health and Safety
To ensure that our products are safe and without risk to
health, the following points must be noted:
1. The relevant sections of these instructions must be
read carefully before proceeding.
2. Warning Labels on containers and packages must
be observed.
3. Installation, operation, maintenance and servicing
must only be carried out by suitably trained personnel
and in accordance with the information given or injury
or death could result.
4. Normal safety procedures must be taken to avoid
the possibility of an accident occurring when operating
in conditions of high pressure and/or temperature.
5. Chemicals must be stored away from heat,
protected from temperature extremes and powders
kept dry. Normal safe handling procedures must be
used.
6. When disposing of chemicals, ensure that no two
chemicals are mixed.
Safety advice concerning the use of the equipment
described in this manual may be obtained from the
Company address on the back cover, together with
servicing and spares information.
Stonehouse - Certificate No. 0255
Use of Instructions
∆
!
i
Warning. An instruction that draws attention to
the risk of injury or death.
Caution. An instruction that draws attention to
the risk of the product, process or surroundings.
Note. Clarification of an instruction or additional
information.
Information. Further reference for more detailed
information or technical details.
Although Warning hazards are related to personal
injury, and Caution hazards are associated with
equipment or property damage, it must be understood
that operation of damaged equipment could, under
certain operational conditions, result in degraded
process system performance leading to personal injury
or death. Therefore, comply fully with all Warning and
Caution notices.
Information in this manual is intended only to assist our
customers in the efficient operation of our equipment.
Use of this manual for any other purpose is specifically
prohibited and its contents are not to be reproduced in
full or part without prior approval of the Technical
Communications, ABB Instrumentation.
Licensing, Trademarks and Copyrights
MODCELL and MOD 30ML are trademarks of Asea
Brown Boveri, Inc.
Intellution® is a registered trademark, and THE FIX™
and FIX DMACS™ are trademarks of Intellution, Inc.
Company and product names mentioned in this manual
are trademarks or registered trademarks of their
respective companies.
ABB Instrumentation Inc
P.O. Box 20550
Rochester, NY 14602-0550
Ph: (716) 292-6050 Fax: (716) 273-6207
Printed in U.S.A.
© 1996, ABB Instrumentation Inc
EMP Driver
Contents
Contents
1 INTRODUCING THE EXTENDED MODBUS PROTOCOL (EMP) I/O DRIVER .......................... 1
1.1 SUPPORTED INTELLUTION SOFTWARE ........................................................................................................ 2
1.2 UPGRADING FROM 5.X TO 6.X SOFTWARE .................................................................................................. 2
2 SETTING UP THE HARDWARE ........................................................................................................... 3
2.1 SETTING UP THE COMPUTER....................................................................................................................... 3
2.2 CHECKING THE PORTS ON THE WINDOWS PLATFORM ................................................................................ 3
2.3 CHECKING THE PORTS ON THE WINDOWS NT PLATFORM .......................................................................... 4
2.4 CABLING .................................................................................................................................................... 4
3 SUPPORTED PROTOCOL COMMANDS............................................................................................. 5
3.1 SPECIFIC COMMANDS ................................................................................................................................. 5
3.2 ERROR CHECKING ...................................................................................................................................... 6
4 ADDING A POINT TO FIX DMACS AND VIEWING THE DATA.................................................... 7
4.1 ADDING A DATA LINK TO A PICTURE ......................................................................................................... 7
4.2 ADDING AN ANALOG INPUT BLOCK TO THE DATABASE ............................................................................. 8
4.3 DEFINING YOUR DRIVER CONFIGURATION ............................................................................................... 10
4.4 VIEWING THE RESULTS OF THIS EXERCISE ............................................................................................... 14
5 CONFIGURING THE I/O DRIVER...................................................................................................... 15
5.1 GUI I/O DRIVER CONFIGURATION BASICS .............................................................................................. 15
5.2 CHANNEL SETUP ...................................................................................................................................... 19
5.3 DEVICE DEFINITION FIELDS...................................................................................................................... 22
5.3.1 Moving Between Device Settings ..................................................................................................... 22
5.3.2 Device Definition Fields................................................................................................................... 22
5.4 MODCELL, MOD 30ML DETAILS ......................................................................................................... 23
5.4.1 Poll Record Definition Spreadsheet (Modcell, MOD 30ML)........................................................... 25
5.4.2 Field Descriptions (Modcell, MOD 30ML)...................................................................................... 25
5.5 MODBUS HARDWARE TYPE ..................................................................................................................... 27
5.5.1 Poll Record Definition Spreadsheet (Modbus)................................................................................. 28
5.5.2 Deleting Poll Records ...................................................................................................................... 28
5.5.3 Field Descriptions............................................................................................................................ 29
5.6 EXITING THE DID..................................................................................................................................... 34
6 CONNECTING THE DATABASE TO THE I/O CONFIGURATION .............................................. 35
6.1 DEVICE FIELD .......................................................................................................................................... 35
6.2 HARDWARE OPTIONS FIELD ..................................................................................................................... 35
6.3 I/O ADDRESS FIELD ................................................................................................................................. 36
6.3.1 Modcell and MOD 30ML I/O Address ............................................................................................. 36
6.3.2 Modbus I/O Address......................................................................................................................... 37
6.4 SIGNAL CONDITIONING FIELD................................................................................................................... 38
6.5 CONNECTING MODCELL AND MOD 30ML DATA .................................................................................... 40
6.5.1 Using Single I/O Points.................................................................................................................... 40
6.5.2 Using Multiple I/O Points ................................................................................................................ 41
i
EMP Driver
Contents
7 TROUBLESHOOTING ...........................................................................................................................43
7.1 TROUBLESHOOTING OVERVIEW................................................................................................................43
7.2 USING THE I/O DRIVER STATUS DISPLAY TROUBLESHOOTING PROGRAM ................................................44
7.3 USING THE DATASCOPE ............................................................................................................................50
7.4 OPTIMIZING THE POLLING PROCESS ..........................................................................................................51
7.4.1 Avoiding SAC Overruns....................................................................................................................51
7.4.2 Determine Your Message Rate .........................................................................................................51
7.4.3 Optimize Communications................................................................................................................52
7.4.4 Prioritize Your Poll Times ................................................................................................................53
7.5 PROBLEMS WITH FIX32 WHEN ANALOG OR DIGITAL REGISTERS ARE USED:....................53
Figures
FIGURE 4-1 DATA LINK DIALOG BOX ...............................................................................................................8
FIGURE 4-2 ANALOG INPUT BLOCK DIALOG BOX .............................................................................................9
FIGURE 4-3 CHANNEL COMMUNICATION SETTINGS DIALOG BOX ..................................................................10
FIGURE 4-4 DEVICE FIELDS ............................................................................................................................11
FIGURE 4-5 POLL RECORD EDIT DIALOG BOX ................................................................................................12
FIGURE 4-6 I/O CONFIGURATOR - EXIT OPTIONS ...........................................................................................13
FIGURE 4-7 PLACE ON SCAN PROMPT ............................................................................................................13
FIGURE 5-1 I/O DRIVER CONFIGURATION SCREEN .........................................................................................16
FIGURE 5-2 PORT SETTINGS DIALOG BOX .....................................................................................................19
FIGURE 5-3 DEVICE DEFINITION DIALOG BOX ................................................................................................22
FIGURE 5-4 MODCELL, MOD 30ML DETAILS DIALOG BOX ..........................................................................23
FIGURE 5-5 MODCELL, MOD 30ML POLL RECORD EDIT FIELDS ..................................................................25
FIGURE 5-6 MODBUS POLL RECORD EDIT FIELDS ..........................................................................................28
FIGURE 7-1 16 BIT I/O DRIVER STATUS DISPLAY DIALOG BOX .....................................................................45
FIGURE 7-2 32 BIT I/O DRIVER MISSION CONTROL DIALOG BOX ..................................................................45
FIGURE 7-3 I/O DRIVER DATASCOPE DIALOG BOX ........................................................................................50
Tables
TABLE 3-1 SUPPORTED COMMANDS................................................................................................................5
TABLE 5-1 I/O DRIVER CONFIGURATION SECTIONS .......................................................................................16
TABLE 5-2 VALID POLL BLOCK ENTRIES FOR MODBUS HARDWARE TYPE ..................................................29
TABLE 5-3 SUPPORTED DATATYPES ...............................................................................................................31
TABLE 5-4 EXCEPTION ENTRIES .....................................................................................................................32
TABLE 6-1 DATABASE BUILDER ADDRESS EXAMPLES FOR MODBUS .............................................................37
TABLE 6-2 SIGNAL CONDITIONING OPTIONS...................................................................................................38
TABLE 7-1 USING BUTTONS ON THE I/O DRIVER STATUS DISPLAY ................................................................46
TABLE 7-2 I/O DRIVER STATUS DISPLAY DIALOG BOX FIELDS ......................................................................46
TABLE 7-3 DRVST ERROR CODES ................................................................................................................47
TABLE 7-4 USING THE DATASCOPE ................................................................................................................50
ii
EMP Driver
Introducing the I/O Driver
1
INTRODUCING THE EXTENDED MODBUS PROTOCOL
(EMP) I/O DRIVER
The Extended Modbus Protocol (EMP) Device I/O Driver (DID) provides the software interface and
communications protocol between FIX DMACS™ and FIX MMI software and Modcell, MOD 30ML,
and other pure Modbus devices. Advanced I/O drivers, such as the EMP, take advantage of FIX
DMACS features and only work with FIX DMACS. This chapter lists the hardware and FIX DMACS
software that work with this driver.
This EMP driver is similar to the Modicon Modbus 1 (MB1) driver from Intellution in that it supports
the Modbus I protocol. Additionally, it supports Extended Modbus commands for the ABB MOD 30
ML Controller, Modcell Logic Controller Version 5.0, and Modcell Advanced Controller Version 2.0.
For earlier versions of Modcell instruments and other pure Modbus devices such as the 2050R Modcell
Controller or any other instrument that supports the Modbus I protocol, use the Modbus hardware type.
The System Configuration Manual contains information that is common to all FIX DMACS drivers.
Refer to the System Configuration Manual for the following information:
■
List of features available with advanced drivers.
■
Introduction to driver setup.
■
Introduction to driver operation.
■
Basic instructions on how to start the configuration program.
Use this driver reference manual to find support requirements, configuration values, and error code
descriptions that are specific to this driver. In addition, have your computer, instrument, and FIX
DMACS applications manuals nearby for reference.
This reference manual also provides an I/O driver tutorial that you might want to use when you set up
your I/O Driver. If you are familiar with Intellution I/O drivers and have some experience with FIX
DMACS, turn to Chapter 5 for more information. If you are not familiar with FIX DMACS, refer to
the System Configuration Manual first.
1
EMP Driver
Introducing the I/O Driver
1.1
Supported Intellution Software
The 2010S EMP 16 bit I/O driver, Version 5.3, can operate with the following Intellution® software:
■
FIX DMACS for Windows v5.0 or greater.
■
FIX MMI for Windows v5.0 or greater.
■
FIX DMACS for Windows NT v4.0 or greater.
The 2011S EMP 32 bit I/O driver, Version 6.0, can operate with the following Intellution® software:
1.2
■
FIX DMACS for Windows 95 and Windows NT v6.0 or greater.
■
FIX MMI for Windows 95 and Windows NT v6.0 or greater.
Upgrading From 5.x to 6.x Software
Port your Version 5.x, database file to Version 6.x, as described below. Note that the I/O driver
configuration file (*.EMP) can be used as is.
1.
Using the Windows operating system, start up FIX 5.x .
2.
Load, Reload your database using the Database Builder.
3.
EXPORT your database with the wildcard character * specified for Tag Name so all tags are
exported (filename.GDB is created).
4.
Exit out of FIX and Windows.
5.
Using the Windows 95 or NT operating system start up FIX32.
6.
Load the I/O driver Configuration file that matches your database.
7.
Load an empty database using the Database Builder.
8.
IMPORT your file (filename.GDB).
9.
Use SAVE AS to save your file as another file (filename.PDB).
10. Follow the procedures in the Upgrade Guide that comes with the 6.x FIX Software (except for the
Database Upgrade described above).
2
EMP Driver
Setting Up the Hardware
2
SETTING UP THE HARDWARE
This chapter discusses hardware configuration issues that affect the operation of the I/O driver
software. For complete information, check your hardware reference documents.
2.1
Setting up the Computer
The FIX DMACS Environment Setup Manual covers all the hardware and operating system setup
issues that must be addressed in order to use FIX DMACS and the I/O driver. Keep in mind that all
FIX DMACS SCADA nodes require at least a 486™ CPU when used with Windows.
2.2
Checking the Ports on the Windows Platform
Connect your cabling to either your PC’s COM1 or COM2 ports or the DigiBoard™ multi-port
interface board. You can combine these two types of ports to create up to eight channels. Use the
documentation provided with your DigiBoard to install it. When setting up COM ports, check that:
■
The DigiBoard can provide all eight channels, and be used as serial ports COM3
through COM9. After installation, bear in mind the following:
You can reassign the port numbers for each of the DigiBoard ports. Otherwise, the
software automatically numbers the ports starting where the resident ports left off. If
your computer only has one COM port, the DigiBoard will use COM2 - COM9; if your
computer has COM 1 and COM 2, the DigiBoard will use COM3 - COM9. Refer to
the DigiBoard configuration help option for more information on remapping the ports.
Most DigiBoard device drivers use interrupts. Refer to your DigiBoard documentation
to see if your specific DigiBoard driver requires interrupt settings on the hardware.
■
The DID program allows a total of 9 ports, each used only once as a channel’s primary
or backup port.
■
The PC’s COM port hardware must enable serial interrupts.
■
No expansion board in the PC can use the same interrupt levels as COM port 1 or port
2. In most PCs, COM Port 1 uses IRQ4 and COM Port 2 uses IRQ3. If a conflict
occurs, change the interrupt level of the conflicting expansion boards.
■
When using a Windows driver, your COM ports may need 16-byte first-in-first-out
(FIFO) support. Without FIFO support, you may experience communications failure.
3
EMP Driver
Setting Up the Hardware
2.3
Checking the Ports on the Windows NT Platform
Connect your cabling to either your PC’s COM1 or COM2 ports or the DigiBoard™ multi-port
interface board. You can combine these two types of ports to create up to eight channels. Use the
documentation provided with your DigiBoard to install it. When setting up COM ports, check the
following:
■
The DigiBoard can provide all eight channels, and be used as serial ports COM3
through COM10. After installation, bear in mind the following:
You can reassign the port numbers for each of the DigiBoard ports. Otherwise, the
software automatically numbers the ports starting where the resident ports left off. If
your computer only has one COM port, the DigiBoard will use COM2 - COM10; if
your computer has COM 1 and COM 2, the DigiBoard will use COM3 - COM10.
Refer to the DigiBoard configuration help option for more information on remapping
the ports.
Most DigiBoard device drivers do not use interrupts. Refer to your DigiBoard
documentation to see if your specific DigiBoard driver requires interrupt settings on the
hardware.
2.4
■
The DID program allows a total of 10 ports, each used only once as a channel’s
primary or backup port.
■
The PC’s COM port hardware must enable serial interrupts.
■
No expansion board in the PC can use the same interrupt levels as COM port 1 or port
2. In most PCs, COM Port 1 uses IRQ4 and COM Port 2 uses IRQ3. If a conflict
occurs, change the interrupt level of the conflicting expansion boards.
■
When using a Windows driver, your COM ports may need 16-byte first-in-first-out
(FIFO) support. Without FIFO support, you may experience communications failure.
Cabling
Consult the device user’s manual for information on the cabling needed to connect the computer to the
hardware.
4
EMP Driver
Protocol Commands
3
SUPPORTED PROTOCOL COMMANDS
This chapter describes the supported protocol commands for the Extended Modbus Protocol.
3.1
Specific Commands
The I/O driver supports those Modbus I and extended Modbus protocol commands necessary for full
analog and digital control.
Table 3-1 Supported Commands
Hardware
Commands Supported
Used for
All
1
Read Coil Value
All
2
Read Input Status
All
3
Read Holding Registers
All
4
Read Input Registers
All
15
Force Multiple Coils
All
16
Preset Multiple Registers
584L
20
Read General Reference.
584L
21
Write General Reference.
Modcell, MOD 30ML
65
Extended Modbus Commands
5
EMP Driver
Protocol Commands
3.2
Error Checking
The I/O driver uses Modicon Modbus I protocol for correct message detection. Please refer to the
Modicon Modbus I manual for details on the valid message formats. Some configurable error handling
is provided as listed below. A typical message cycle proceeds as follows:
Reply Timeout
The driver initiates a command message, and the port reply timer
starts. The timer stops when the driver receives the complete reply
message. If the timer expires before the complete reply is received,
the driver sends a retry message and the reply timer restarts. You
configure the Reply Timeout in the I/O driver configuration program.
Retry Message
Retry messages are sent the number of times you specified in the I/O
driver configuration program. Each time a retry is sent, the port
reply timer starts again. If all the retries have been unsuccessful,
then all poll records configured for the station that would not respond
are considered failed.
Delay Time
Failed records are placed off-line for the Delay time you specified in
the I/O driver configuration program. During the time a record is
off-line, no reads are issued for it.
Port Switching
After the Delay time expires, the driver switches to the backup port
(if one has been configured) and the communication cycle starts
again. If no backup port has been configured, the driver starts the
cycle again with the Primary port.
If the read is successful (including retries, if necessary), the poll
record is marked “OK” and polling resumes at the configured rate.
6
EMP Driver
Adding Point and Viewing Data
4
ADDING A POINT TO FIX DMACS AND VIEWING THE
DATA
To configure your I/O communication, there are several easy steps you need to follow. This section
provides an exercise that walks you through the setup of your driver, providing you with possible
entries you can make in your configuration, and demonstrates how to get real I/O displayed in a picture.
Keep in mind that you can repeat this exercise to help guide you through the configuration of your
driver, database blocks, and displays.
The focus of this exercise is to provide enough information so you can create:
Pictures to graphically display and control data in your hardware.
Blocks in the database that monitor locations in your hardware.
A driver configuration that receives data from your hardware.
The Tutorial that comes with your FIX software teaches you how to build database blocks, create
pictures, and use Dynamos. Unlike the Tutorial, which uses the simulation (SIM) driver, the exercise
that you’ll go through in this section not only has you add a link to a picture and add a database block,
but also steps you through the set up of a real I/O driver.
This exercise is designed to run on a SCADA node that has an I/O driver connected to it. If you have
not installed your I/O Driver, please do so now. This exercise also requires you to use the default
database and configuration files that were shipped with your FIX software. All steps for this exercise
were designed for the Windows platform.
4.1
Adding a Data Link to a Picture
This step in the exercise has you:
■
■
■
Start your FIX software.
Load the Draw application.
Add a Data Link to a picture.
, from the FIX DMACS
1.
Start the FIX software by double-clicking on the Startup icon,
group. This loads your FIX software.
2.
Double-click on the Draw Icon,
, to load the Draw program and open a new picture (this may
not be required if the Draw program is part of your startup.
7
EMP Driver
Adding Point and Viewing Data
3.
, from the toolbox (or select Link... from the tool menu then
Select the Data Link Button,
select the Data Link Button) and a stamper cursor appears on the screen. Position the stamper
cursor where you want the link to appear and click the left mouse button once. The Data Link
dialog box appears, as shown in Figure 4-1.
Figure 4-1 Data Link Dialog Box
Continue with the next step in this exercise to add the block that this link accesses for information.
4.2
Adding an Analog Input Block to the Database
This step in the exercise has you:
■
■
■
8
Identify the block that the Data Link will use to get data.
Add an Analog Input block to the database.
Configure the block’s driver fields.
1.
Enter AI1 in the Tagname field and select the OK button. Your FIX software then asks if you
want to add the block.
2.
Select the Add button. The Select a Type dialog box appears so you can select the type of
database block you want to add to the database.
3.
Select the Analog Input (AI) block, click on the OK button, and the Analog Input (AI) dialog box
appears, as shown in Figure 4-2.
EMP Driver
Adding Point and Viewing Data
EMP
NONE
SETPOINT-101
Figure 4-2 Analog Input Block Dialog Box
4.
Complete this dialog box by entering EMP (first driver is default) in the Device field and
D11:40001 in the I/O Address field (if you are using Modbus) otherwise enter D11:alias (if you
are using Modcell or MOD 30ML). The alias is created in the Application Builder Configured
List block. Select the OK button to save this configuration and exit this menu. Refer to Section
6.3 for more information on the I/O address field.
NOTE: If you are using Modbus, you may need to enter a different value for 40001 if your
instrument does not have this file area. Please see Table 5-2 for valid file areas in your
instrument if you have any questions.
5.
A dialog box with the I/O address should appear stating that the address is not in the configuration.
Click on the Yes button to add the address to the I/O Driver Configurator.
Continue with the next step in this exercise to define your I/O driver so the block can retrieve data
from your hardware.
9
EMP Driver
Adding Point and Viewing Data
4.3
Defining Your Driver Configuration
This step in the exercise has you:
■
■
■
■
■
■
1.
Define your driver’s channel communications.
Define your driver’s primary station number.
Define your driver’s hardware type.
Define your driver’s poll record.
Save and reload your driver configuration.
Place the AI1 block on scan.
With the I/O Driver Configurator dialog box on your screen, select the Setup button,
,
to display the Channel Communication Setting dialog box, as shown in
Figure 4-3. Enter the appropriate channel communication parameters for your hardware. Refer to
Section 5.2 for more information on using this dialog box.
NOTE: The parameters you enter into your Channel Communication Setting dialog box can
differ from what is presented in Figure 4-3.
When you have set all the appropriate parameters for your Channel Communication Setting dialog
box, click on the OK button, and you return to the I/O Driver Configurator dialog box.
Figure 4-3 Channel Communication Settings Dialog Box
10
EMP Driver
Adding Point and Viewing Data
2.
Enter the Primary Station number of the instrument that you want to communicate with in the
Primary Station field, as shown in Figure 4-4. Also, select the correct hardware type for the
instrument (MODBUS, MODCELL, or MOD 30ML).
Figure 4-4 Device Fields
Modbus Hardware Details:
For Modbus, enter the Addressing Type and bit base (defaults shown). Continue with Step 3.
Modcell, MOD 30ML Hardware Details:
The MIF (Modbus Interface File) file path is used to load or reload the MIF file associated with
this device (created using the Application Builder). The process of loading or reloading the MIF
file automatically builds the Foreground and Background poll type records. The System Event
poll type can be added or deleted with the Monitor System Events selection. Refer to Section 5.4
for details on loading a MIF file and a description of the poll records. Continue with Step 7.
11
EMP Driver
Adding Point and Viewing Data
3.
Select the first poll block by clicking the mouse in any field of the first row. The Modbus Poll
Record Edit dialog box appears, as shown in Figure 4-5.
4.
For Modbus, enter the start address for the file area in the start Address field. Use the following
format: address. An example is 40001. If an address is already present, you may be prompted to
change addresses.
5.
For Modbus, enter the end address in the End Address Field. Use the following format: address.
An example is 40010. Make sure that the I/O address you entered in the Analog Input block is
within this range.
NOTE: For Modbus, you can also enter the length and the configurator will calculate the correct
End Address for you.
6.
Select the OK button.
Figure 4-5 Poll Record Edit Dialog Box
12
EMP Driver
Adding Point and Viewing Data
7.
, from the top of the I/O Driver Configurator dialog box and the FIX
Select the Exit button,
software prompts you to select your exit options, as shown in Figure 4-6.
Figure 4-6 I/O Configurator - Exit Options
8.
Check the Save I/O Driver Configuration and Reload I/O Driver Configuration options and click
on the OK button.
The I/O Driver Reload dialog box appears asking if you want to continue. Select Yes, and the FIX
software reloads the driver configuration. The FIX software identifies that the reload is successful
by displaying the Reload Successful dialog box. When this appears, select the OK button to
continue.
9.
The Analog Input (AI) dialog box appears again. Select the OK button and the system displays the
prompt shown in Figure 4-7 asking if you want to place the block AI1 on scan. Select Yes to place
this block on scan.
Figure 4-7 Place On Scan Prompt
Continue with the next step to view the results of this exercise.
13
EMP Driver
Adding Point and Viewing Data
4.4
Viewing the Results of this Exercise
This step in the exercise has you:
■
Return to the Draw application to switch to the View application using the new QuickView
function.
■
View your Data Link updating with process data coming from your I/O driver.
1.
Your FIX software returns you to the Draw application. The Data Link appears as a series of
pound (#) symbols, such as ########. This represents the location of the link while in the
drawing mode.
Select the QuickView icon,
, to switch from Draw to the View application. Switching to
View allows you to see the link updating with real data coming from your instrument.
You should see your link updating with real-time data.
If you see question marks, such as ????????, this indicates that your driver is having problems
communicating to the hardware. Please refer to your troubleshooting guide in Chapter 7 of this
driver reference manual for instructions on how to troubleshoot this problem.
2.
14
To return to the Draw application, select QuickDraw from the View pull-down menu or type
<Ctrl><Q>.
EMP Driver
Configuring the I/O Driver
5
CONFIGURING THE I/O DRIVER
This chapter describes how to configure your I/O driver using a graphical user interface (GUI) program
called the I/O driver configurator. The I/O driver configuration consists of a map of channels, devices,
and poll records. It also contains several user-defined communication parameters.
See Chapter 6, Configuring I/O Drivers, in the System Configuration Manual for information about
the following:
■
Understanding I/O Driver Setup.
■
Starting the configuration program.
To learn about the configuration program’s conventions for entering and manipulating data, refer to the
Basics Manual.
The following subsections tell you what information you must enter into the I/O driver configurator
program’s fields to work with the EMP driver.
5.1
GUI I/O Driver Configuration Basics
After starting the I/O Driver Configuration program for an advanced GUI I/O driver, the initial screen,
shown in Figure 5-1, appears.
15
EMP Driver
Configuring the I/O Driver
Figure 5-1 I/O Driver Configuration Screen
Table 5-1 I/O Driver Configuration Sections
16
The...
Lets you...
Menu Bar
Access file management, display alarm option, custom
display, and on-line help commands.
Tool Bar
Access some of the menu commands with a single
mouse click. Commands include Open, Save, Reload,
Exit, and Help. Clicking these Tool Bar buttons
invokes the same dialog boxes as the menu
commands.
Channel Selection
Select a channel. Clicking the Setup button provides
the Port Settings dialog box, from which you can set
your channel’s communications parameters.
Device Settings
Set up individual devices.
EMP Driver
Configuring the I/O Driver
The...
Lets you...
Poll Record Spreadsheet
Display configured poll records. Click any record to
set the Modbus I/O address or view the Modcell, Mod
30ML address for specific poll records.
Status Bar
Display the status of the <Caps Lock>, <Num Lock>
and <Scroll Lock> keys as well as a description of the
selected menu command.
To enter data into the driver configuration worksheet, select commands from the menus on the menu
bar, as shown in Figure 5-1. Below is a summary of each available menu:
File menu — provides standard file commands, such as New, Open, Close, Save and Save As. The
Open, Save, and Save As commands allow you to select a File Type option. Use this option to select
either the extension for your driver configuration files or the .CSV extension for ASCII report files.
NOTE: At present, CSV files are not supported. If you save this configuration as a CSV file,
Modcell and MOD 30ML data will not be correct.
The Reload command updates the current configuration with the one in memory. This is necessary for
the rest of the system, such as Database Builder, to be able to see the new information. This will
temporarily stop SAC (Scan Alarm and Control) and the Driver, load the new driver configuration, and
restart SAC and the Driver.
NOTE: This feature is not supported on the Windows NT platform.
The File menu also lists the four most recent driver configuration files you have had open. Selecting
one of these files lets you open it without using the Open command.
The Exit command will allow you to close the I/O Driver configuration program.
View menu — provides toolbar and status bar display commands.
Options Menu — provides access to the Display Alarms command. This command allows you to
control the distribution of driver alarms to the alarm destinations enabled in the SCU, except the Alarm
Summary Display. By default, display of alarms is ENABLED. The Alarm Summary Display shows
communication errors as database block alarms, not driver alarms.
Help menu — provides access to Intellution’s on-line help system for the I/O Driver Configuration
program.
The I/O Driver Configuration program lets you open one driver configuration file at a time. Each
configuration file contains multiple poll records with limits based on available memory.
17
EMP Driver
Configuring the I/O Driver
The settings you make with the I/O Driver Configuration program must correspond to the settings in
the process control hardware so that FIX DMACS can communicate with your hardware.
After starting the I/O Driver Configuration program, you are ready to begin configuring your I/O
driver. You can configure your I/O driver by either entering text into the fields provided or by opening
an existing driver configuration and modifying its settings.
To create a new driver configuration, do the following:
[1] Start the I/O Driver Configuration program. See Section 6.2 of the System Configuration Manual
for instructions.
[2] Select New from the File menu.
[3] Enter your Channel, Device, and Poll Address settings into the fields provided. Refer to the
following sections of this manual for descriptions of these fields.
[4] Save your file. The default filename is NODENAME.EMP.
NOTE: You can save using any FILENAME.EMP, but the driver will only load the
NODENAME.EMP file.
18
EMP Driver
Configuring the I/O Driver
5.2
Channel Setup
A channel is a logical connection between an I/O driver and a field device or system. There are eight
channels available, as shown in Figure 5-1. Each channel’s Port Settings dialog box appears when you
click the channel number button, then click the Setup button. These dialog boxes allow you to assign
physical ports and communication parameters to each channel.
Click the Setup button for the Port Settings dialog box to appear, as shown in Figure 5-2.
Figure 5-2 Port Settings Dialog Box
Click the Advanced button and the Backup Port Settings dialog box appears. The Backup Port Settings
box contains the exact same fields as the Port Settings box, and allows you to define a port to use in
case the primary port fails. Values that are valid for primary ports are also valid for backup ports.
Enter all your channel settings in these dialog boxes and click OK. Primary and backup port settings
are described below.
Port — defines the physical COM port you want the channel to communicate through. Generally, use
COM1 and COM2 for PC ports. Choose any port number from COM3 to COM10 for the
DigiBoard™. A total of nine ports can be used in the Windows environment, a total of ten ports can be
used on Windows NT. If you do not want to use the primary port (or you want to temporarily disable
it), select None in the Port selection field. Note that the default is None; a port must be selected for the
driver to communicate.
19
EMP Driver
Configuring the I/O Driver
Baud Rate — identifies the speed at which the field device and software will communicate. This value
must match the value used by the field device that this channel is communicating with in order to
establish communication. The following baud rates are supported for this I/O driver:
300
600
1200
2400
4800
9600
19200
38400
Data Bits — specifies the number of data bits to use for communication. This value must match the
value used by the field device that this channel is communicating with in order to establish
communication. Legal entries are:
7
8
Stop Bits — specifies the number of stop bits to use for communication. This value must match the
value used by the field device that this channel is communicating with in order to establish
communication. Legal entries are:
1
2
Parity — specifies the parity to use for communication. This value must match the value used by the
field device that this channel is communicating with in order to establish communication. Legal entries
are:
None
Odd
Even
Flow Control — specifies the type of hardware handshaking allowed. Handshaking is only valid if
supported by the interface module. This value must match the value used by the field device that this
channel is communicating with in order to establish communication. Legal entries are:
None
RTS/CTS
DTR/DSR
RTS
Reply Timeout — specifies the number of seconds allowed for a field device to reply to a request to
read or write data. If the reply timeout expires, the driver sends a retry message. The default value is
calculated according to the baud rate. The reply timeout ranges from 0.1 to 1800.0 seconds. If the
response time from the instrument is slow due to processing overhead, you may need to increase the
timeout value.
20
EMP Driver
Configuring the I/O Driver
Retries — specifies the number of times that the driver resends a failed message before marking a poll
record as failed and initiating the Delay Time. The Retries range from 0 to 9. If you specify zero, the
driver sends no retries. Note that this parameter applies only to messages sent by the FIX DMACS I/O
driver.
Delay — indicates the amount of time, in seconds, to place a poll record off-line after a
communications failure. After the delay time expires, the driver attempts to switch to the backup port
or re-initiates the communication cycle (only the primary port is configured). The delay ranges from
0.0 to 3600.0 seconds.
PC Mode — Master for normal operation, Slave for Provox Applications
Valid Entries are:
Master
Slave
Protocol — RTU - Modicon RTU Protocol, ASCII - Modicon ASCII Protocol
Valid Entries are:
RTU (Modcell and MOD 30ML support this protocol only)
ASCII
NOTE: In ASCII mode, the message consists of printable characters and is easy to view when
troubleshooting. Since the ASCII mode uses twice as many characters as the RTU mode,
it is inherently slower. Consider this when assigning a Delay time in the configurator
21
EMP Driver
Configuring the I/O Driver
5.3
Device Definition Fields
A device is any field device or system that an I/O driver communicates with. The Device Definition
fields are shown in Figure 5-3.
Figure 5-3 Device Definition Dialog Box
5.3.1 Moving Between Device Settings
The driver can communicate with up to 255 different devices. From the Add Device box, use the
<Page Up>, <Page Down>, <Arrow> keys, or scroll bar to select and highlight the desired device.
That device’s settings appear in the appropriate fields.
5.3.2 Device Definition Fields
The device definition fields are described below:
Add — creates a device.
Delete — deletes the device that is currently selected. It will also remove all poll records defined for
this device.
Device Name — assigns a name to a device. This name is used by the driver to access I/O points on
the device and must be a unique name not used by any other device accessed by the driver on any
channel. You can enter up to five alphanumeric characters.
Description — assigns a description to a device. This parameter is optional. You can enter up to forty
characters
Primary Station — identifies the primary station number of the field device.
Valid primary station addresses are:
1 - 255 (Modbus)
1 - 247 (Modcell, MOD 30ML)
22
EMP Driver
Configuring the I/O Driver
Backup Station — indicates the station number of the field device that you have chosen to serve as a
backup to the primary station. This station number should be different from the primary station
number. Entry in this field is optional. Valid backup station addresses are:
1 - 255 (Modbus)
1 - 247 (Modcell, MOD 30ML)
Hardware — select correct hardware type for the instrument. Valid hardware types are:
MODBUS (2050R, Commander Series, PLC’s and earlier versions of Modcell)
MODCELL (Logic Controller version 5 and Advanced Controller version 2 or greater)
MOD 30ML (All MOD 30 ML Controllers)
5.4
MODCELL, MOD 30ML Details
Click the details button for the MIF (Modbus Interface File) details dialog box to appear, as shown in
Figure 5-4. Anytime a Modcell or MOD 30ML database is modified using the Application Builder, the
appropriate MIF file should be made during the compile process. When this database is downloaded to
the Modcell or MOD 30ML controller, the appropriate MIF file must be reloaded into the EMP driver.
Figure 5-4 Modcell, MOD 30ML Details Dialog Box
Path — Specify the directory path (location) of the MIF filename whose name is specified in
the File Name box. For example the file M30EMP.MIF created by the Application
Builder might be located in C:\APPBLD.
23
EMP Driver
Configuring the I/O Driver
File Name — Specify the name of the MIF file to be loaded or reloaded from the directory
path. For example the file M30EMP.MIF created by the Application Builder might be
located in C:\APPBLD so you would enter M30EMP here. Upon exiting this field for
the first time, the file will be automatically loaded and the MIF Time Stamp read. The
process of loading the MIF file automatically builds the Foreground and Background
poll type records.
Reload — Click on the MIF Reload button to reload the MIF file specified by the File Name
and Path fields. The process of reloading the MIF file automatically builds the
Foreground and Background poll type records.
File Timestamp — The MIF file time stamp is read from the header of the MIF file and
matches the instrument database time stamp.
System Events Monitor — The System Event poll type can be added (YES) or deleted (NO)
with the Monitor System Events selection. YES causes the driver to monitor the
System Event queue and adds the Sys Ev Poll Type Record to the list. NO disables
System Event monitoring and removes the poll record if it was previously on the list.
The System Event Queue can contain Informational Events, Diagnostic Events, Process
Alarm Events and Notification Message Events. Therefore, the user should configure
the appropriate filter parameters within the SYSTEM EVENT Block. The user may
also want to monitor the various diagnostic status attributes in the SYSTEM EVENT
Block. Diagnostics can be globally acknowledged by writing to the Diagnostic Ack
Command attribute in the SYSTEM EVENT Block.
Prior Events — Enter a number (0 to 24) that identifies how many prior system events are
read when going into runtime.
The EMP configurator will read up to 250 attributes from a MIF file. The MIF file contains the INSTR
ID and this is checked against the HARDWARE TYPE configured when the MIF file is loaded. If they
do not agree, an error message is displayed to the user. While the driver is communicating with an
instrument, the Foreground and Background signatures are monitored. If they differ from the
Foreground and Background signatures read from the MIF file, the associated poll records are placed
off line.
System Events can be monitored on-screen by enabling the ALARM HISTORY SERVICE in the FIX
DMACS Alarm Configuration dialog box, which is found in the SCU under Alarms. You may also
want to enable other Alarm Services such as the ALARM FILE SERVICE. When the driver initializes
up to 24 prior events can be read from the System Event Queue.
24
EMP Driver
Configuring the I/O Driver
5.4.1 Poll Record Definition Spreadsheet (Modcell, MOD 30ML)
A poll record is a set of I/O points that are read periodically as a group. I/O points are normally written
to individually upon request. The poll record spreadsheet, displayed at the bottom of the Device
Interface Driver (DID) screen, shows the poll records configured for the selected channel and device.
To scroll through the poll record spreadsheet and view different poll records, use the scroll bar or the
<Page Up> and <Page Down> keys. The number at the left side of the spreadsheet is the poll record
number for the current channel and device.
You input data into the poll record spreadsheet by clicking on any field within the spreadsheet. The
Poll Record Edit dialog box for the selected record appears. I/O attribute and Poll Type records are
automatically built from the MIF file and cannot be modified. Enter your Poll Time and Access Time
values in the Poll Record Edit dialog box and click OK. The Poll Record Edit dialog box is shown in
Figure 5-5.
Figure 5-5 Modcell, MOD 30ML Poll Record Edit Fields
5.4.2 Field Descriptions (Modcell, MOD 30ML)
Only the Poll Time and Access Time fields are configurable.
MIF Start Attribute — is read from the MIF file and identifies the first attribute in the MIF file for
this poll record message group.
MIF End Attribute — is read from the MIF file and identifies the last attribute in the MIF file for this
poll record message group.
MIF Number of Attributes — number of MIF file attributes read from the MIF file for this poll
record message group (background poll type message can have a maximum of 30 attributes).
Message groups are maximized according to Poll Type, Data Length, and Number of Attributes.
25
EMP Driver
Configuring the I/O Driver
Data Length — data length of the MIF file attributes read from the MIF file for this poll record
message group (the maximum data length per message is 246 bytes for foreground poll type or 251
bytes for background poll type).
Poll Type — The Poll type is identified as one of the following:
Sys Ev = System Event (Monitor System Events enabled)
Fg
= Foreground
Bg
= Background
Poll Time — specifies how frequently (in seconds) the polling task reads data for this poll record. The
poll time ranges from 0.0 to 86400.0 seconds (a maximum of 24 hours), or disabled.
An entry of 0 tells the driver to poll as fast as possible.
Do not confuse the poll time with the scan time you enter for individual database blocks. The poll
time defines how often the polling task refreshes the Driver Image Table from the hardware. Scan
time defines how often SAC retrieves data on a point-by-point basis from the driver image table.
For most applications, the blocks scan time should be less frequent than (greater time interval) or
equal to the poll time.
NOTE: To Disable the Poll Time, enter a dash (-) or D character in the poll time field. This
feature is useful for poll records that are used strictly for output.
Access Time — specifies how long the I/O driver continues to update poll records when there is no
read/write activity on those records. The access time ranges from 0.0 to 172800.0 seconds (a
maximum of 48 hours) or disabled.
NOTE: If the access time is set to disabled, the driver will continue to poll for information even if
there is no activity.
26
EMP Driver
Configuring the I/O Driver
5.5
Modbus Hardware Type
The Modbus hardware type for 2050R, Commander Series, PLC’s and earlier versions of Modcell,
requires each poll record to be built as described in this section. The device definition fields are:
Addressing Type — Number of digits in a Modbus address (see Table 5-2 address range column).
Valid Entries for Modbus hardware types are:
4-Digit
5-Digit
6-Digit
Bit Base — Base of bit numbers used in a Modbus address. Valid Entries are:
0-15
1-16
27
EMP Driver
Configuring the I/O Driver
5.5.1 Poll Record Definition Spreadsheet (Modbus)
A poll record is a set of I/O points that are read periodically as a group. I/O points are normally written
to individually upon request. The poll record spreadsheet, displayed at the bottom of the Device
Interface Driver (DID) screen, shows the poll records configured for the selected channel and device.
To scroll through the poll record spreadsheet and view different poll records, use the scroll bar or the
<Page Up> and <Page Down> keys. The number at the left side of the spreadsheet is the poll record
number for the current channel and device.
You input data into the poll record spreadsheet by clicking on any field within the spreadsheet. The
Poll Record Edit dialog box for the selected record appears. Enter all your poll record values in the
Poll Record Edit dialog box and click OK.
The Poll Record Edit dialog box is shown in Figure 5-6.
Figure 5-6 Modbus Poll Record Edit Fields
5.5.2 Deleting Poll Records
To delete a Modbus poll record, set its length to zero. The record does not appear in the spreadsheet
when you go back to the device and spreadsheet level.
28
EMP Driver
Configuring the I/O Driver
5.5.3 Field Descriptions
When available, click the down arrow to select values from the drop-down lists. Type in the desired
value for all other fields. The poll record definition fields are described below.
Start Address — specifies the location of the data where this poll record will begin. The address
format varies according to the PLC type you entered in the Device’s Addressing Type field.
End Address — specifies where this poll record will end. The End field is computed dynamically
using the values entered in the Start and Length fields.
Length — specifies the length of the data for this poll record. The Length field is computed
dynamically using the values entered in the Start and End fields. Please refer to Table 5-2 for
examples.
Table 5-2 Valid Poll Block Entries for MODBUS Hardware Type
Hardware
Micro 84
(u84)
Micro 84
(u84)
Micro 84
(u84)
Micro 84
(u84)
484
484
484
Memory
Type
0
Description
Maximum
Length
64
DID Example
Coil Status
Starting
Address Range
0001-0999
1
Input Status
1001-1999
64
1001
3
Input
Register
Holding
Register
Coil Status
Input Status
Input
Register
Holding
Register
Coil Status
Input Status
Input
Register
Holding
Register
Coil Status
Input Status
Input
Register
3001-3999
4
3001
4001-4999
32
4001
0001-0999
1001-1999
3001-3999
512
512
32
0001
1001
3001
4001-4999
254
4001
00001-09999
10001-19999
30001-39999
800
800
100
00001
10001
30001
40001-49999
100
40001
00001-09999
10001-19999
30001-39999
2000
2000
125
00001
10001
30001
4
0
1
3
484
4
184
184
184
0
1
3
184
4
584
584
584
0
1
3
0001
29
EMP Driver
Configuring the I/O Driver
Hardware
584
Memory
Type
4
584L
6
984
984
984
0
1
3
984
4
984
6
984-785
984-785
984-785
0
1
3
984-785
4
984-785
6
Description
Holding
Register
Extended
Registers
Coil Status
Input Status
Input
Register
Holding
Register
Extended
Register
Coil Status
Input Status
Input
Register
Holding
Register
Extended
Register
Starting
Address Range
40001-49999
Maximum
Length
125
DID Example
60000:[1-10]699999:[1-10]
00001-09999
10001-19999
30001-39999
124
60000:1
2000
2000
125
00001
10001
30001
40001-49999
125
40001
60000:[1-10]69999:[1-10]
000001-065530
100001-165530
300001-365530
124
60000:1
2000
2000
125
000001
100001
300001
400001-465530
125
400001
600000 665530:[1-10]
124
600000:1
40001
Poll Time — specifies how frequently (in seconds) the polling task reads data for this poll record. The
poll time ranges from 0.0 to 86400.0 seconds (a maximum of 24 hours), or disabled.
An entry of 0 tells the driver to poll as fast as possible.
Do not confuse the poll time with the scan time you enter for individual database blocks. The poll
time defines how often the polling task refreshes the Driver Image Table from the hardware. Scan
time defines how often SAC retrieves data on a point-by-point basis from the driver image table.
For most applications, the blocks scan time should be less frequent than (greater time interval) or
equal to the poll time.
NOTE: To Disable the Poll Time, enter a dash (-) or D character in the poll time field. This
feature is useful for poll records that are used strictly for output.
Access Time — specifies how long the I/O driver continues to update poll records when there is no
read/write activity on those records. The access time ranges from 0.0 to 172800.0 seconds (a
maximum of 48 hours) or disabled.
30
EMP Driver
Configuring the I/O Driver
NOTE: If exception-based processing is enabled, the access time is set to disabled. Also, If the
access time is set to disabled for poll blocks that are time-based, the driver will continue
to poll for information even if there is no activity.
Data Type — specifies the type of data collected by this poll record. See the list of legal entries below.
This field is automatically filled based on the memory type that the poll record is accessing. If you
modify this field, make sure the data type is correct for the information that you are requesting.
Table 5-3 Supported Datatypes
UNSIGNED - Unsigned 16-bit integer
SIGNED - Signed 16-bit integer
LONG - Unsigned 32-bit integer
ASCII - 8-bit character
FLOAT - 32-bit floating point (IEEE)
DIGITAL - unsigned bit
TFLOAT - 32-bit floating point (IEEE)
MFLOAT - 32-bit floating point (Modcell, MOD 30ML)
EVENTS - System Events (Modcell, MOD 30ML)
NOTE: You must first define an ASCII Data type in the DID in order to use Text blocks in the
Database Builder.
Exception Type — specifies whether you want to use exception-based or time-based processing.
Exception-based processing allows SAC to retrieve data from the driver image table only when
there is an exception: a significant I/O data change in the driver image table or an unsolicited
message from the process hardware. Time-based processing allows SAC to retrieve data at a set
time interval (defined by the block’s scan time). See the list of valid entries, as described in Table
5-4.
31
EMP Driver
Configuring the I/O Driver
Table 5-4 Exception Entries
Enter...
To...
DISABLED
(default)
Disable exception-based processing and use time-based processing.
ANALOG
Have SAC scan the DIT only when the I/O data changes beyond the
DEADBAND parameter.
DIGITAL
Have SAC scan the DIT when there is a change of state, such as from Open
to Close.
ASCII
Have SAC scan the DIT when there is any change in an ASCII string.
The following list describes each exception type in further detail.
■
If you enter ANALOG, DIGITAL, or ASCII in the Exception field for a poll record,
then you may also configure the corresponding block with an exception-based scan
time. You can only configure one database block with the same address as an
exception-based point.
The block’s scan time determines if exception-based processing takes place. If you set
the scan time to E, the block will use exception-based processing. If you set the scan to
a numerical value, the block will use time-based processing even if you enabled the
Exception field for the poll record in the I/O Driver Configurator.
The following table illustrates how an EXCEPTION entry in the Poll Record Edit box
can affect your configuration entries in blocks. Consult the Database Builder Manual
for more information on configuring database block scan times.
32
EMP Driver
Configuring the I/O Driver
Intellution recommends that you do not use exception type data blocks with Analog
Register and Digital Register blocks.
If your DID
selection is...
Then in the Database Builder you...
ANALOG
Must define all Digital points for the poll record with
time-based scan times.
May define all Analog points for the poll record
with exception-based scan times.
DIGITAL
Must define all Analog points for the poll record
with time-based scan times.
May define all Digital points for the poll record with
exception-based scan times.
Dead Band — specifies a value that represents an acceptable fluctuation in an ANALOG exceptionbased poll record. Enter any positive floating-point value up to 7 significant digits.
Entering a DEAD BAND parameter prevents SAC from scanning the Driver Information Table
when only minor fluctuations in data have occurred. For example, if you have a value of 50 in the
poll record and you set a DEAD BAND of 20, SAC will not update the record until incoming
values vary by 20. Therefore, only values less than or equal to 30 or greater than or equal to 70
will trigger an exception-based update.
Block Write — writes the entire poll record with the latest values written from the FIX. Block writes
only apply to analog data types (holding registers, input registers, extended registers). The
maximum length is 100.
33
EMP Driver
Configuring the I/O Driver
5.6
Exiting the DID
When you have completed your configuration of the driver, select the Save or Save As commands from
the File pull-down menu to save your changes. SAC can use all poll records as soon as you restart FIX
DMACS.
To Reload the new configuration without restarting FIX DMACS, click on the RELOAD icon, or select
the RELOAD command from the FILE pull-down menu. A dialog box will appear warning you that
SAC and the I/O Driver will be stopped for RELOAD. Continue YES or NO. If YES is selected, the
new I/O driver configuration will be loaded, and SAC and the I/O driver will be restarted. If no is
selected, the existing I/O driver configuration will continue to be loaded and used until the
configuration is reloaded or when FIX DMACS is restarted.
Select the Exit command from the File pull-down menu to exit the configuration program.
34
EMP Driver
Connecting Database to I/O Configuration
6
CONNECTING THE DATABASE TO THE I/O
CONFIGURATION
This chapter describes the I/O address fields found in primary blocks (such as the Analog Input Block);
that is, those blocks that communicate to field devices. This address must correspond to a single I/O
point that is part of one of your poll records. The Hardware Specifications fields are shown below and
are described in the sections that follow:
■
DEVICE field
■
HARDWARE OPTIONS field
■
I/O ADDRESS field
■
SIGNAL CONDITIONING field
In addition, this section describes how to connect specific Modcell and MOD 30ML data types to the
proper FIX blocks.
6.1
Device Field
The DEVICE field indicates which I/O driver is being used to access the I/O address used by the block.
The default entry is the 3 letter acronym for the driver listed as the first driver in the SCU SCADA Set
Up dialog box. The code for the Extended Modbus driver is EMP. Enter EMP in this field.
NOTE: The use of the name “device” here has nothing to do with the devices defined in the DID
program.
6.2
Hardware Options Field
The Extended Modbus I/O Driver hardware options can be set at NONE or LATCH.
•
Latch means that if there has been data read from a device and then there is a
communication problem, then the last good data will be presented to SAC (Scan Alarm
and Control).
•
None means data will only be presented to SAC if there were no errors. If there is an
error, SAC will display ??? marks.
35
EMP Driver
Connecting Database to I/O Configuration
6.3
I/O Address Field
The I/O ADDRESS field indicates where the data for the database block is stored. The formats used
for Modbus and Modcell, MOD 30ML are described below.
6.3.1 Modcell and MOD 30ML I/O Address
Device:Alias
The I/O Address field for Modcell and MOD 30ML accepts a maximum of 30 characters for the alias.
The parts of the format are discussed below:
Device — indicates the name you assigned in the DEVICE NAME field of the Device Definition
in the I/O driver configuration program. It is simply an alphanumeric tag that the Database
Builder uses to differentiate poll records collected from different field devices.
Alias — specifies the address of the I/O point and has the same name that you created in the
Application Builder as an alias in the Configured List block. You may find it
convenient to read the alias information from the MIF file by using your notepad
program and copying the third field (between second and third comma).
Example:
5, CONTROLL.PID_D_LP.CAS&DSP.AIN1.R, SETPOINT-101,
where SETPOINT-101 is the alias and the complete I/O address might be:
D11:SETPOINT-101
The Database Builder checks the I/O address you enter in the block with the I/O configuration loaded
in memory. If the I/O point does not correspond to a configured device and poll record, the Database
Builder prompts you to add the point to the I/O configuration. Refer to Section 6.5 for information on
connecting to a specific FIX block type.
36
EMP Driver
Connecting Database to I/O Configuration
6.3.2 Modbus I/O Address
Device:Address.[File Number].[bit]
For examples of valid I/O address please reference Table 6-1.
Block I/O Address fields accepts a maximum of 128 characters. The parts of the format are discussed
below:
Device — indicates the name you assigned in the DEVICE NAME field of the Device Definition
in the I/O driver configuration program. It is simply an alphanumeric tag that the Database
Builder uses to differentiate poll records collected from different field devices.
Address — specifies the address of the I/O point and has the same format that you used for
the Start Address and Length fields on the Poll Record Edit dialog box of the I/O driver
configuration program.
Bit — specifies a particular digital point in a data word. The bit entry is used for Digital blocks
and ranges from 0 - 15.
The Database Builder checks the I/O address you enter in the block with the I/O configuration loaded
in memory. If the I/O point does not correspond to a configured device and poll record, the Database
Builder prompts you to add the point to the I/O configuration.
CAUTION: Do not allow an Analog Register or Digital Register block access to the same memory
address location as a corresponding analog or digital exception-based primary block.
Since the Register blocks bypass SAC, you will not get an error message, but the
primary block address won’t be updated.
Table 6-1 Database Builder Address Examples for Modbus
Memory Type
Example DBB Address
Description
Coil Status
Dev1:00001
Digital Input Block
Input Status
Dev1:10001
Digital Input Block
Input Register
Dev1:30001
Analog Input Block
Holding Register
Dev1:40001
Analog Input or Output Block
Holding Register
Dev1:40001:15
Digital Input or Output Block
Extended Registers
Dev1:60003:1:14
Digital Block to read/write bit 14 in file 1 or
extended register 60003
37
EMP Driver
Connecting Database to I/O Configuration
6.4
Signal Conditioning Field
This field indicates the type of signal conditioning used on the raw data. Your entry will depend upon
the Data Type selected (Modbus only) in the Poll Record Definition dialog box. For MODCELL and
MOD 30ML Hardware types this field is not used (NONE).
If your Modbus Data Type is..
In the Signal Conditioning Field
enter...
UNSIGNED
Any option from Table 6-2
SIGNED
NONE or LIN
FLOAT, LONG, DIGITAL, TFLOAT, ASCII,
MFLOAT, or EVENTS
Nothing (any entry will be ignored).
NOTE: TFLOAT datatype is used in many third party controllers that support Modicon protocol.
TFLOAT, like FLOAT is also an IEEE value. All bytes are written out in order to one 32
bit register, as opposed to the regular FLOAT datatype which uses 2 consecutive 16 bit
registers. For true Modicon PLC’s use FLOAT datatype. MFLOAT datatype can be
used for Modcell and MOD 30ML controllers.
Valid options and the corresponding scaling for the EMP driver are shown in Table 6-2
Table 6-2 Signal Conditioning Options
38
Option
Scaling
Notes
12AL
0 - 4095
Scaled to EGU range in the block. Range checking Alarming.
Ignores the most significant 4 bits (nibble).
12BN
0 - 4095
Scaled to EGU range in the block. No Range checking Alarming.
Ignores the most significant 4 bits (nibble).
15AL
0 - 32767
Scaled to EGU range in the block. Range checking Alarming.
Ignores the most significant bit.
15BN
0 - 32767
Scaled to EGU range in the block. No Range checking Alarming.
Ignores the most significant bit.
3BCD
0 - 999
Scaled to EGU range in the block. Range checking Alarming.
4BCD
0 - 9999
Scaled to EGU range in the block. Range checking Alarming.
LIN (Unsigned) 0 - 65535
Scaled to EGU range in the block. No Range checking Alarming.
LIN (Signed)
-32768 +32767
Scaled to EGU range in the block. No Range checking Alarming.
None
No Scaling Ignores EGU range in the block. No Range checking Alarming.
EMP Driver
Connecting Database to I/O Configuration
Option
Scaling
Notes
LVZ
0 - 4000
Scaled to EGU range in the block. Range checking Alarming.
LZ12
0 - 4095
Scaled to EGU range in the block. Range checking Alarming.
LZ15
0 - 32767
Scaled to EGU range in the block. Range checking Alarming.
SQ12
0 - 4095
Scaled to EGU range in the block. Range checking Alarming.
SQ15
0 - 32767
Scaled to EGU range in the block. Range checking Alarming.
REG
0 - 9999
Scaled to EGU range in the block. Range checking Alarming.
SQR
0 - 4000
Scaled to EGU range in the block. Range checking Alarming.
39
EMP Driver
Connecting Database to I/O Configuration
6.5
Connecting Modcell and MOD 30ML Data
To connect Modcell and MOD 30 ML data to different FIX block types requires some special
considerations as described below.
6.5.1 Using Single I/O Points
Modcell and MOD 30 ML data can be used with the FIX block types as follows:
FIX Digital Type is used with Discrete data
FIX Analog Type is used with Short State, Long State, Count, and Floating Point data
FIX Text Block is used with Ascii and Hex Datatypes as follows:
The text block’s maximum length field and the data link character per line entry should
be set to the appropriate length depending on the ascii and hex configured size in the
instrument database.
FIX Text Block is used with Date Datatype as follows:
•
•
If the text block’s maximum length field is 8, the data will be displayed
as MM/DD/YY.
If the maximum length field length is 9, the data will be displayed as DDMM-YY
If the maximum length field length is not 8 or 9, XXXXXXX’s will be
displayed.
The data link character per line entry should be set to 8.
•
Date entry changes are accepted in either of the formats
•
•
FIX Text Block is used with Millisecond Time Datatype as follows:
•
•
•
40
If the text block’s maximum length field is 10-13, the SHORT format will
be displayed. (HHHH:MM:SS ie 1000:59:31)
If the maximum length field is 14 or longer, the LONG format will be
displayed. (HHHH:MM:SS.SSS ie 1000:59:31.579)
If the maximum length field is less than 10, XXXXX’s will be displayed.
•
The data link character per line entry should be set to 10 for the SHORT
format or 14 for the LONG format.
•
Time entries need only the minimum required data. For example, 1.9 is
1.9 seconds or 2:30 is 2 minutes and 30 seconds.
EMP Driver
Connecting Database to I/O Configuration
6.5.2 Using Multiple I/O Points
The FIX Analog Register block and Digital Register block can be used to access multiple analog and
digital I/O points within a poll record. These multiple points can be displayed using a Data Link (in
Ascii format, A_, or Floating Point, F_) in View and calculating the offset from the base attribute. The
offset is the number of attributes past the base attribute specified in the I/O address field.
For example, suppose the poll record has 60 attributes starting at attribute number 1. The data link
offset value is the attribute number minus the attribute number of the Data Link offset 0 (the first
analog or digital data link) which is specified in the I/O address field.
Note:
If attributes are inserted or deleted from the Configured List in the instrument, it will
require that you adjust the data link offsets.
MIF File Information
Line (Attr.) Num.
Data Type
1
Discrete
2
Discrete
3
Floating Point
4
Count
5
Ascii
6
Floating Point
7
Discrete
8
Millisecond Time
9
Long State
----51
Short State
52
Hex
53
Discrete
54
Floating Point
55
Floating Point
56
Floating Point
57
Count
58
Discrete
59
Discrete
60
Discrete
DATA LINK
Analog
Digital
A_0 or F_0
A_1 or F_1
A_0 or F_0
A_1 or F_1
A_3 or F_3
A_6 or F_6
A_6 or F_6
A_48 or F_48
A_52 or F_52
A_51 or F_51
A_52 or F_52
A_53 or F_53
A_54 or F_54
A_57 or F_57
A_58 or F_58
A_59 or F_59
41
EMP Driver
Connecting Database to I/O Configuration
42
EMP Driver
Troubleshooting
7
TROUBLESHOOTING
This chapter provides an overview of how to troubleshoot I/O driver problems. It also provides
information on how to troubleshoot your driver using the I/O Driver Status and Datascope programs.
7.1
Troubleshooting Overview
Some of the most common problems people encounter when setting up and using I/O drivers are caused
by one or more of the following:
■
Using incorrect or faulty cable connections. To verify your connections, refer to the
cable diagram in your hardware documentation.
■
Failing to match the communication parameters of the process hardware in the I/O
setup. Review your Channel configurations in the Port Settings dialog boxes. For
information about appropriate values for these fields, refer to Section 5-2 in this
manual.
■
Failing to correctly specify the correct station number of the process hardware in the
I/O setup. Review your driver configuration and your process hardware.
■
Failing to reload the new I/O driver configuration may result in the new information not
being loaded and the driver not communicating as expected. After changing your I/O
driver configuration, you must perform a reload before the new configuration will be
used.
■
Failing to specify a port # in the Channel configurations Port Settings dialog box. By
default, all ports are defined as NONE unless the user defines them.
■
Failing to link to any ON SCAN database blocks. You cannot access data from your
I/O driver in View until SAC is running and you have at least one primary database
block on scan and linked to the process data.
■
Leaving the controller in program mode instead of run mode.
■
If the I/O Driver will read values but will not write values, and if there is a write protect
switch on the hardware, make sure it is not set.
■
Attempting to communicate to areas of memory not defined in the controller.
■
Using the same interrupts for a computer expansion board and COM ports 1 and 2.
Most personal computers assign IRQ4 to COM port 1 and IRQ3 to COM port 2. If a
conflict occurs, change the interrupt of the conflicting expansion board. The most
common expansion conflict is the network adapter.
43
EMP Driver
Troubleshooting
If used, check the interrupts set on your DigiBoard. If your DigiBoard conflicts with
your network card, you may not be able to establish remote communications on login.
Also check the DigiBoard’s base memory and I/O base addresses for conflicts with
other cards.
■
Defining an Analog Register or Digital Register block that accesses the same address as
an exception-based block. This applies to I/O drivers v4.2 or greater. If an exceptionbased block is not updating correctly, do the following:
Examine your database to ensure that there are no Analog Register (AR) or Digital
Register (DR) blocks defined to the same address as the exception-based block.
Verify the AR and DR offsets in your pictures to make sure that they are not pointing to
the same address as the exception-based block.
7.2
■
Specifying an incorrect station number for your device. Check your hardware to make
sure they match. In some cases the station numbers may be set in octal or hexadecimal.
■
Having too small a buffer on the serial card. In this situation, you may need 16-byte
first-in-first-out (FIFO) support. Intellution provides a diagnostic program called
FIFO.COM that you can run from DOS to determine if you have FIFO support on your
COM ports. If the driver is experiencing communication failures and your COM port
does not support 16-byte FIFO, you can purchase an expansion serial board that
supports 16-byte FIFO.
Using the I/O Driver Status Display Troubleshooting
Program
Intellution provides a troubleshooting program called the I/O Driver Status Display (IOSTAT) that
displays communications statistics and errors. This display provides statistics such as the number of
new messages sent, the number of messages received, and the number of message retries. It also
indicates communication errors, such as parity errors, and errors detected by the hardware.
To start the I/O Driver Status Display, select IOSTAT from the Diagnostics menu on the I/O Driver
Control dialog box. The I/O Driver Status Display, shown in Figure 7-1 for the 16 bit driver and
Figure 7-2 for the 32 bit driver, appears. This dialog box shows I/O driver statistics for each channel,
one at a time. The Status field indicates whether the driver is currently STOPPED or ACTIVE.
44
EMP Driver
Troubleshooting
Figure 7-1 16 Bit I/O Driver Status Display Dialog Box
Figure 7-2 32 Bit I/O Driver Mission Control Dialog Box
To display statistics for other active drivers, follow these steps:
[1]
Access IOSTAT for the I/O driver for which you want to display statistics. The I/O
Driver Status Display window becomes active.
45
EMP Driver
Troubleshooting
[2]
Select the I/O Driver Control dialog box.
[3]
Use the accelerator key that is associated with your next driver (such as <Ctrl><2>) or
click on the driver’s name from the I/O Control dialog box. The I/O Driver Status
Display switches to your selected driver and its statistics.
Refer to Tables 7-1 and 7-2 for further instructions and explanations of the IOSTAT data.
Table 7-1 Using Buttons on the I/O Driver Status Display
To...
Select the...
Display statistics on other channels
Next Channel and Prev
Channel buttons.
Reset all fields to zero
Reset Statistics button.
Freeze the display
Pause/Update button.
Unfreeze the display
Pause/Update button.
Exit
Close button.
Table 7-2 I/O Driver Status Display Dialog Box Fields
Type
Field
Contains the…
Counters
Transmitted
Number of messages transmitted to the hardware.
Received
Number of responses received from the hardware.
Timed Out*
Number of timeouts that have occurred. A timeout occurs
when the software sends a message to the hardware but does
not receive a response in a predefined amount of time. The
Driver Image Definition program specifies this time.
Retried*
Number of retry messages that the driver has sent to the
hardware.
Protocol
Number of protocol errors that have occurred. Protocol
errors are messages that do not conform to the hardware’s
language; for example, the message has a bad Cyclic
Redundancy Check Character (CRC).
Break
Number of break errors. A break occurs when the data is
held for longer than one transmission time. An overloaded
computer can cause this error.
Serial I/O
Errors
46
EMP Driver
Troubleshooting
Type
Serial I/O
Errors
Status
Fields
Field
Contains the…
Frame
Number of framing errors. Framing errors occur when the
incoming message does not have the correct stop bit. The
Driver Image Definition program specifies the stop bit.
Parity
Number of parity errors. Parity errors occur when the parity
bit in the message does not match the hardware setup. The
Driver Image Definition program specifies the parity.
Overrun
Number of overrun errors. An overrun occurs when the
character in the receive buffer is overwritten by the next
character before it can be removed. An overloaded
computer can cause this error.
General
Number of general errors that do not fall into the previous
categories.
DRVSTA DRVSTH
Driver Specific error code fields. See Table 7-3 for a list of
valid codes.
*When the Timed Out and Retried fields have high counts and no other errors are indicated, you
probably have a faulty cable. Examine the pinouts.
Information listed in DRVSTA - DRVSTC list hardware-specific error codes (D-H not used for this
driver). These codes are part of the I/O drivers protocol. If numbers appear that are not listed in Table
7-3, please refer to your hardware manuals for a description of the problem. Codes are displayed in
hex format in DRVSTA and are displayed in decimal format within the ALARM HISTORY message
file (ie. EMP-Modbus Exception Response Code 108 Received: Channel 1
Device 1 Poll Record 2).
Table 7-3 DRVST Error Codes
DRVST A Error Codes
Error Code
Description
$01 (1)
Illegal Function. This is caused by an internal driver error.
$02 (2)
Illegal Data Address. This is generated when the address range specified in a poll
record is not available on the controller.
$03 (3)
Illegal Data value. Specified data are outside controller's range. Use the proper
signal conditioning type in DBB.
$04 (4)
Failure in associated device. Slave controller has failed to respond to a message or
an abortive error occurred. Controller may need to be restarted to Run Mode.
47
EMP Driver
Troubleshooting
Error Code
$06 (5)
Busy, rejected message. Consider increasing the reply timeout value in the
configurator.
$07 (7)
Negative acknowledgment. Check the controller for error.
$08 (8)
Memory parity error. This may occur on reads of extended memory locations. If
retries still fail then have system serviced.
$09 (9)
Invalid reply message length.
$0A (10)
Checksum error in reply.
$0B (11)
Internal error: receive buffer overflow.
$0C (12)
Slave mode error: Poll record not found.
$0D (13)
Slave mode error: Invalid poll record length.
$0E (14)
Slave mode error: Invalid Function Code requested.
$60 (96)
$61 (97)
$62 (98)
$63 (99)
NOT CONFIGURING SOURCE NAK for any of the configure write messages.
IN SERVICE MANUAL NAK due to instrument being in SERVICE MANUAL
MAIN DATABASE INVALID Action cannot be taken. Main database is invalid.
INVALID BLOCK Value of LSP.BLOCK is out of range; RSP (remote source
pointer) could not be calculated.
SOURCE NOT AUTHORIZED Write message not accepted; not in control of
LOOP.
PREVIOUS SHUTDOWN FAULT There was a previous shutdown fault. User
should investigate the cause, then write ACK SHUTDOWN INFO CMD (value 0) to
the interface block command attribute to clear the shutdown memory.
MODULE DATABASE INVALID Action cannot be taken because module
database is invalid.
MODULE WRITE PROTECTED Action cannot be taken because memory
module is write protected.
INVALID ATTRIBUTE Value of LSP.ATTRIBUTE is out of range; RSP (remote
source pointer) could not be calculated.
IN LOCKED STATE Write message not accepted; LOOP has been "locked".
MODULE NOT PRESENT Action cannot be taken because no memory module is
installed.
INVALID PARAMETER The data bytes in the request message was out of range
according to the data type of the attribute.
-ORThe data which was to be written was out of range of the attribute; either by data type
definition or user configuration.
ATTRIBUTE NOT WRITEABLE The attribute is never writable.
$64 (100)
$65 (101)
$66 (102)
$67 (103)
$68 (104)
$69 (105)
$6A (106)
$6B (107)
$6C (108)
48
Description
EMP Driver
Troubleshooting
Error Code
$6D (109)
$6E (110)
$6F (111)
$70 (112)
$71 (113)
$72 (114)
$73 (115)
$74 (116)
$77 (119)
$7C (124)
$7D (125)
$7E (126)
DRVSTB
DRVSTC
Description
MODULE SWITCH IN UPLOAD Write not accepted due to setting of the
memory module upload/download switch.
BLOCK NULL The LSP is not valid for the configuration; RSP could not be
calculated.
INVALID MODE Write not accepted due to setting of mode attribute.
INVALID WRITE BY CFG The attribute is not writable due to configuration.
Most likely reason: write to an INPUT attribute which is configured to be a source
pointer.
REDUNDANT SEQ NUMBER The sequence number has been used within the
last 4 sequence write messages.
SCAN MSG BUFFER FULL The scan message buffer is full. Try the message
again.
INSTRUMENT STATE IN TRANSITION An instrument state transition is in
process.
INVALID SETPT OR OUTPUT MODE Write not accepted due to setting of
SETPT MODE or OUTPUT MODE attribute.
INVALID MESSAGE Message type is not valid
IN HOLD STATE Write not accepted due to setting of INST STATE
TIME EXPIRED MSG DISCARDED An Extended Modbus write time-out NAK
code. This applies to the following messages. WRITE_ATTRIBUTE,
SEQ_WRITE_ATTRIBUTE, TAKE_CONTROL, RELEASE_CONTROL and
OVERRIDE CONTROL. These messages cannot be processed until the scan task
that they are directed to is idle. Therefore, if the write_message_timeout parameter in
the MSC block expires, the message will be discarded and this NAK code will be
returned.
TIME,EXPIRED MSG PROCESSED An Extended Modbus write time-out NAK
code. This applies to the following messages. WRITE_ATTRIBUTE,
SEQ_WRITE_ATTRIBUTE, TAKE CONTROL, RELEASE_CONTROL and
OVERRIDE CONTROL. These messages cannot be processed until the scan task
that they are directed to is idle. Therefore, if the write_message_timeout parameter in
the MSC block expires, this NAK code will be returned and the message will be
processed when it can but it may or may not be accepted.
Device number the error code in DRVSTA is associated with.
Poll record number the error code in DRVSTA is associated with.
49
EMP Driver
Troubleshooting
7.3
Using the Datascope
To start the Datascope, double-click the I/O Driver Control icon. When the I/O Driver Control dialog
box appears, select Datascope from the Diagnostics menu.
Note:
The Datascope requires fonts COMMFNT.FON and HEXFNT.FON to be loaded in the
Windows control panel. These fonts are included with the 16 bit EMP driver disk for
your convenience. The fonts are included with the Windows 95 and NT FIX software.
Figure 7-3 I/O Driver Datascope Dialog Box
The top area of the screen is reserved for the Datascope window. This window shows the incoming
messages. Table 7-4 explains how to use the Datascope.
Table 7-4 Using the Datascope
50
Select the…
To…
Next Chan and Prev Chan
buttons
Select the COM port or Digiboard port from which to
display messages.
Pause/Update button
Temporarily stop and restart the Datascope.
ASCII/Hex button
Toggle the message format between ASCII text and
hexadecimal.
Close button
Close the dialog box.
EMP Driver
Troubleshooting
7.4
Optimizing the Polling Process
After you have established communications and finished configuring your I/O driver and database, you
can improve performance and avoid overloading the polling process by following the steps described in
the following subsections.
7.4.1 Avoiding SAC Overruns
A SAC overrun occurs when SAC cannot successfully scan all of your database chains within the
configured scan time. To check your SAC overruns, do the following:
[1]
Create a System link to a display.
[2]
Select “Number of SAC overruns” field.
This displays the number of SAC overruns on the specified node since startup. To reduce SAC
overruns, do the following:
Increase the scan time for your chains or
Use phasing so that SAC does not try to execute all of your chains at the same time.
Refer to the Database Builder Manual for more information on phasing.
7.4.2 Determine Your Message Rate
The polling task continually polls your process hardware for data. There is a limit to the number of
messages and replies your node can handle in a given second. That limit is called the maximum
message rate (MMR).
The maximum message rate is affected by the various configuration choices; therefore, it differs for
each node. When you determine your node's maximum message rate, you can adjust your polling task
to within that limit.
If you are overloading the polling process, the resulting delays and communication backup results in a
slower update time than your system is capable of delivering.
To determine your message rate, follow the steps below while using a stopwatch:
[1]
Determine how many messages per second you should be sending based on your poll
records. For example, if you have 50 poll records configured for 1 second poll times,
you need to send 50 messages per second to satisfy the Driver Image Table.
51
EMP Driver
Troubleshooting
[2]
Run the I/O Driver Status Display program when your process is on-line.
[3]
Press the Reset button to restart the counters as you start the stopwatch.
[4]
Wait 60 seconds, then press the Pause button to freeze the counts on the screen.
[5]
Divide the number in the Transmitted field by 60 to get your maximum message rate
per second.
[6]
Divide the number in the Retried field by 60 to get your average number of retries per
second.
7.4.3 Optimize Communications
52
If your maximum message rate comes out lower than your Driver Image Table
demands, try the following to improve performance:
Reduce communication noise by using better shielded cables. Communication noise
can cause retries, forcing new messages to wait. Frequent retries lower the number of
new messages you can expect to send in a second.
Use the highest possible baud rate.
Reduce the number of poll records by combining poll records with adjacent addresses.
Locate all critical variables in one poll record for fast, continuous access. Set a shorter
poll time on this record.
Use the ACCESS TIME field of the Poll Record Definition dialog box to stop polling
on records that are used infrequently by FIX applications.
Use Analog Register and Digital Register blocks to access data that only needs to be
polled when an operator is viewing it.
Use a prioritization scheme, as described in subsection 7.4.4
EMP Driver
Troubleshooting
7.4.4 Prioritize Your Poll Times
To prioritize your poll times, slow down the poll times of the less critical poll records so that you can
poll the critical ones more frequently.
Assume you have a maximum message rate of 5 and you currently have 10 poll records, each set to
1-second poll times. Since your poll time setup exceeds your maximum message rate, you have
ensured that the blocks will actually have 2-second poll times (10 blocks at 5 per second equals 2
seconds). Also, assume that 1 of these poll records is critical and must be polled every second.
The solution is to assign a poll time of 1 second to the critical poll record and a poll time of 4 seconds
to the remaining poll records. This prioritization scheme allows the polling task plenty of time over a
4-second period to poll the critical poll record every second while polling the remaining records within
4 seconds.
In other words, since the polling task can handle 5 messages per second, and you use 1 message per
second to handle your critical poll records, that leaves the polling task 4 messages a second or 16
messages over a 4-second period to poll the remaining 9 poll records. Assuming that you had a low
retry count, you could poll the remaining 9 messages within a 3-second period.
7.5
1.
PROBLEMS WITH FIX32 WHEN ANALOG OR DIGITAL
REGISTERS ARE USED:
A SYSTEM ERROR (nio_pmap BAD BLOCK HANDLE) may occur when Analog or Digital
Register blocks are used and the I/O Driver Configuration file is modified by deleting a DEVICE
or a POLL RECORD from a DEVICE and then SAVING and RELOADING the I/O Driver
Configuration file. This SYSTEM ERROR will cause you to shutdown and restart FIX.
To avoid this problem do the following:
RELOAD an EMPTY DATABASE.
SAVE and RELOAD the I/0 Driver Configuration file.
RELOAD the appropriate DATABASE.
2.
When the FIX32 is started up or when theI/0 Driver Configuration file has been modified and it is
SAVED and RELOADED a DATA RETRIEVAL ERROR may occur for an Analog or Digital
Register block displayed on a VIEW screen. Simply select SKIP ONE or SKIP ALL and note that
the data is being retrieved ok.
53
EMP Driver
Troubleshooting
54
PRODUCTS AND SERVICING
A Comprehensive Instrumentation Range
Sensors, transmitters and related instruments for
flow, temperature, pressure, level and other process
variables
Flowmeters
electromagnetic, ultrasonic, turbine, differential pressure,
Wedge, rotary shunt, coriolis, vortex.
Differential Pressure transmitters
electronic and pneumatic.
Temperature
sensors and transmitters, fiber optic systems.
Pressure transmitters
Level
sensors and controllers.
Tank gauging systems
Cable-length measuring systems
Indicators, recorders, controllers and process
management systems
Recorders
circular and strip-chart types - single and multi-point - for
temperature, pressure, flow and many other process
measurements.
Controllers
digital display, electronic, pneumatic. Discrete single-loop
and multi-loop controllers which can be linked to a
common display station, process computer or personal
computer.
Pneumatic panel or rack-mounted display and
control instrumentation
Liquid and gas monitors and analyzers for on-line
and laboratory applications
Sensors
pH, redox, selective ion, conductivity and dissolved
oxygen.
Monitors and Analyzers
for water quality monitoring in environmental and power
generation and general industrial applications.
Packaged analytical instrumentation laboratories
Gas analyzers
Zirconia, paramagnetic, infrared, thermal conductivity.
Servicing
ABB Instrumentation provides a
comprehensive after sales service via a
Worldwide Service Organization. Contact one
of the following offices for details on your
nearest Service and Repair Center.
United Kingdom
London
ABB Kent-Taylor Limited
Tel: (1480) 470781
FAX: (1480) 470787
United States of America
Rochester, New York
ABB Instrumentation Inc.
Tel: (716) 292-6050
Fax: (716) 273-6207
Italy
Lenno (Como)
ABB Kent-Taylor SpA
Tel: (0344) 58111
Fax: (0344) 56278
The Company’s policy is one of continuous product
improvement and the right is reserved to modify
specifications contained herein without notice.
©1996 ABB Instrumentation
IB-23H153, Issue 2
ABB Kent-Taylor Ltd.
St. Neots Cambs.
England, PE19 3EU
Tel: (01480) 475321
Fax: (01480) 217948
ABB Instrumentation Inc.
P.O. Box 20550
Rochester, New York 14602-0550
Tel: (716) 292-6050
Fax: (716) 273-6207
ABB Kent-Taylor SpA
22016 Lenno
Como, Italy
Tel: (0344) 58111
Fax: (0344) 56278
9/96