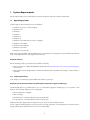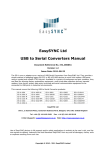
1
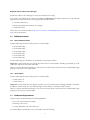
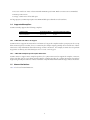
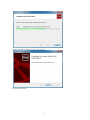
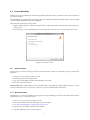
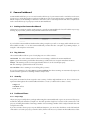
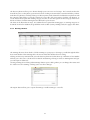
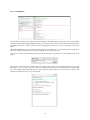
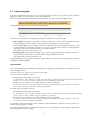
Goanna Studio
User Guide
Version 3.6.4
Visual Studio & Atmel Studio Edition
November 23, 2015
c 2008-2015, Red Lizard Software
c 2008-2015 Red Lizard Software
Copyright All rights reserved.
This document, as well as the software described in it, is provided under license and may only be used or copied in accordance with the terms of such license. The information
contained herein is the property of NICTA and is made available under license to Red Lizard Software. It is confidential
information as between the Recipient and Red Lizard Software and remains the exclusive property of NICTA. No part
of this documentation may be copied, translated, stored in a
retrieval system, or transmitted in any form or by any means,
electronic, mechanical, photocopying, recording or otherwise without the prior written permission of NICTA.
NICTA does not warrant that this document is error-free.
Red Lizard Software
Australian Technology Park
Level 5, 13 Garden Street
Eveleigh NSW 2015
Australia
Web: http://www.redlizards.com
Support: [email protected]
Contents
1 System Requirements
4
1.1 Operating Systems . . . . . . . . . . . . . . . . . . . . . . . . . . . . . . . . . . . . . . . . . . . .
1.1.1
4
Other Requirements . . . . . . . . . . . . . . . . . . . . . . . . . . . . . . . . . . . . . . .
4
1.2 IDE Requirements . . . . . . . . . . . . . . . . . . . . . . . . . . . . . . . . . . . . . . . . . . . . .
5
1.2.1
Microsoft Visual Studio . . . . . . . . . . . . . . . . . . . . . . . . . . . . . . . . . . . . .
5
1.2.2
Atmel Studio . . . . . . . . . . . . . . . . . . . . . . . . . . . . . . . . . . . . . . . . . . .
5
1.3 Hardware Requirements . . . . . . . . . . . . . . . . . . . . . . . . . . . . . . . . . . . . . . . . .
5
1.4 Supported Compilers . . . . . . . . . . . . . . . . . . . . . . . . . . . . . . . . . . . . . . . . . . .
6
1.4.1
A Word On C99 and C++11 Support . . . . . . . . . . . . . . . . . . . . . . . . . . . . . . .
6
1.4.2
A Word On Compiler-Specific Syntax Extensions . . . . . . . . . . . . . . . . . . . . . . . .
6
1.5 Known Limitations . . . . . . . . . . . . . . . . . . . . . . . . . . . . . . . . . . . . . . . . . . . .
6
2 Getting Started
7
2.1 License Agreement . . . . . . . . . . . . . . . . . . . . . . . . . . . . . . . . . . . . . . . . . . . .
7
2.2 Installation . . . . . . . . . . . . . . . . . . . . . . . . . . . . . . . . . . . . . . . . . . . . . . . .
7
2.3 License Activation . . . . . . . . . . . . . . . . . . . . . . . . . . . . . . . . . . . . . . . . . . . .
9
2.3.1
Online Activation . . . . . . . . . . . . . . . . . . . . . . . . . . . . . . . . . . . . . . . . .
9
2.3.2
Manual Activation . . . . . . . . . . . . . . . . . . . . . . . . . . . . . . . . . . . . . . . .
9
2.3.3
Activating Floating License . . . . . . . . . . . . . . . . . . . . . . . . . . . . . . . . . . .
10
3 Using Goanna Studio
11
3.1 Running Goanna Studio on a Project . . . . . . . . . . . . . . . . . . . . . . . . . . . . . . . . . .
11
3.1.1
Warning Messages . . . . . . . . . . . . . . . . . . . . . . . . . . . . . . . . . . . . . . . .
11
3.1.2
Parse Errors . . . . . . . . . . . . . . . . . . . . . . . . . . . . . . . . . . . . . . . . . . . .
12
3.1.3
Check Descriptions . . . . . . . . . . . . . . . . . . . . . . . . . . . . . . . . . . . . . . . .
12
3.1.4
Macro Visualisation . . . . . . . . . . . . . . . . . . . . . . . . . . . . . . . . . . . . . . .
12
3.1.5
Traces . . . . . . . . . . . . . . . . . . . . . . . . . . . . . . . . . . . . . . . . . . . . . . .
13
3.1.6
Stopping Goanna Analysis . . . . . . . . . . . . . . . . . . . . . . . . . . . . . . . . . . . .
13
3.2 Goanna Solution/Project Settings . . . . . . . . . . . . . . . . . . . . . . . . . . . . . . . . . . . .
13
3.2.1
Available Goanna Checks . . . . . . . . . . . . . . . . . . . . . . . . . . . . . . . . . . . . .
14
3.2.2
Files to Analyze . . . . . . . . . . . . . . . . . . . . . . . . . . . . . . . . . . . . . . . . . .
16
3.2.3
Options . . . . . . . . . . . . . . . . . . . . . . . . . . . . . . . . . . . . . . . . . . . . . .
17
3.3 HTML Report of Analysis Results (Advanced) . . . . . . . . . . . . . . . . . . . . . . . . . . . . . .
18
3.4 Analysis Results In XML File (Advanced) . . . . . . . . . . . . . . . . . . . . . . . . . . . . . . . .
18
3.5 Goanna Global Preferences . . . . . . . . . . . . . . . . . . . . . . . . . . . . . . . . . . . . . . . .
19
3.6 Checks Packages . . . . . . . . . . . . . . . . . . . . . . . . . . . . . . . . . . . . . . . . . . . . .
20
3.7 Sample Code . . . . . . . . . . . . . . . . . . . . . . . . . . . . . . . . . . . . . . . . . . . . . . .
21
4 Getting the Best Results from Goanna
22
4.1 Interprocedural Analysis . . . . . . . . . . . . . . . . . . . . . . . . . . . . . . . . . . . . . . . . .
22
4.2 A Word on False Positives . . . . . . . . . . . . . . . . . . . . . . . . . . . . . . . . . . . . . . . .
22
4.3 Using the _GOANNA Preprocessor Symbol . . . . . . . . . . . . . . . . . . . . . . . . . . . . . . .
23
4.4 Using the assert macro . . . . . . . . . . . . . . . . . . . . . . . . . . . . . . . . . . . . . . . .
23
2
5 Suppressing Warnings
24
5.1 Suppressing Warnings . . . . . . . . . . . . . . . . . . . . . . . . . . . . . . . . . . . . . . . . . .
24
5.2 Showing Suppressed Warnings . . . . . . . . . . . . . . . . . . . . . . . . . . . . . . . . . . . . .
24
5.3 Unsuppressing Warnings . . . . . . . . . . . . . . . . . . . . . . . . . . . . . . . . . . . . . . . . .
24
5.4 Goanna Suppression Manager . . . . . . . . . . . . . . . . . . . . . . . . . . . . . . . . . . . . . .
24
5.4.1
Toggling Suppression Status . . . . . . . . . . . . . . . . . . . . . . . . . . . . . . . . . . .
25
5.4.2
Searching and Sorting Warnings . . . . . . . . . . . . . . . . . . . . . . . . . . . . . . . .
25
5.4.3
Other Features . . . . . . . . . . . . . . . . . . . . . . . . . . . . . . . . . . . . . . . . . .
25
6 Goanna Dashboard
26
6.1 Getting to the Goanna Dashboard . . . . . . . . . . . . . . . . . . . . . . . . . . . . . . . . . . . .
26
6.2 Bug Statuses . . . . . . . . . . . . . . . . . . . . . . . . . . . . . . . . . . . . . . . . . . . . . . . .
26
6.3 Severity . . . . . . . . . . . . . . . . . . . . . . . . . . . . . . . . . . . . . . . . . . . . . . . . . .
26
6.4 Dashboard Views . . . . . . . . . . . . . . . . . . . . . . . . . . . . . . . . . . . . . . . . . . . . .
26
6.4.1
Project Page . . . . . . . . . . . . . . . . . . . . . . . . . . . . . . . . . . . . . . . . . . . .
26
6.4.2
Report Page . . . . . . . . . . . . . . . . . . . . . . . . . . . . . . . . . . . . . . . . . . . .
27
6.4.3
Directory Browser . . . . . . . . . . . . . . . . . . . . . . . . . . . . . . . . . . . . . . . .
28
6.4.4
Warnings Browser . . . . . . . . . . . . . . . . . . . . . . . . . . . . . . . . . . . . . . . .
29
6.4.5
Code Browser . . . . . . . . . . . . . . . . . . . . . . . . . . . . . . . . . . . . . . . . . . .
30
6.5 Database Upgrades . . . . . . . . . . . . . . . . . . . . . . . . . . . . . . . . . . . . . . . . . . . .
31
6.6 Project Settings (Advanced) . . . . . . . . . . . . . . . . . . . . . . . . . . . . . . . . . . . . . . .
32
6.6.1
Code Browser Character Encodings . . . . . . . . . . . . . . . . . . . . . . . . . . . . . . .
7 Command Line Options
7.1 Options . . . . . . . . . . . . . . . . . . . . . . . . . . . . . . . . . . . . . . . . . . . . . . . . . .
8 Troubleshooting
32
33
33
37
8.1 Known Issues For Visual Studio Users . . . . . . . . . . . . . . . . . . . . . . . . . . . . . . . . . .
37
8.2 Support . . . . . . . . . . . . . . . . . . . . . . . . . . . . . . . . . . . . . . . . . . . . . . . . . .
38
Index
39
1
System Requirements
Before using Goanna, please check that your system and project meets the system requirements.
1.1
Operating Systems
Goanna supports the following versions of Windows:
• Windows XP (Service Pack 2 or higher)
• Windows Vista
• Windows 7
• Windows 8
• Windows 8.1
• Windows 10
• Windows Server 2003 (Service Pack 1 or higher)
• Windows Server 2008
• Windows Server 2008 R2
• Windows Server 2012
• Windows Server 2012 R2
Both 32-bit (x86) and 64-bit (x86-64/AMD64) versions of Windows are supported (except Windows XP and Windows Server 2003, which we only support 32-bit version).
Required Software
Before installing Goanna, you will need to install the following:
• Microsoft Visual C++ 2008 Redistributable (Download from http://www.microsoft.com/en-us/download/details.
aspx?id=5582)
• .NET Framework 2.0 or higher (this is usually installed automatically when Visual Studio or Atmel Studio is
installed)
1.1.1
Other Requirements
Some features of Goanna may require additional software or packages.
Requirements for Goanna Dashboard, HTML Report and Goanna Suppression Manager
Goanna Dashboard (see 6), HTML Report (see 3.3) and Goanna Suppression Manager (see 5.4) requires a web
browser. The following web browsers are supported:
• Internet Explorer 9 or higher
• Microsoft Edge
• Mozilla Firefox - currently supported versions by Mozilla
• Google Chrome - currently supported versions by Google
While not officially supported, these features may also work on other modern browsers.
We also support Internet Explorer 7 and 8, however you may experience slow performance on these browsers;
using Goanna Central with these browsers is not recommended.
4
Requirements for LM-X License Manager
Goanna uses LM-X License Manager 4.4.2 from X-Formation for licensing.
If you wish to use web-based UI of the License Manager (Important: Red Lizard Software does not provide full
support for the web-based UI), the following software must be installed:
• A modern web browser
• Oracle Java Runtime Environment 1.6 or higher
• Adobe Flash Player
Please refer to X-Formation website (http://docs.x-formation.com/display/GEN/System+requirements+for+web-based+
UIs) for more information.
1.2
IDE Requirements
1.2.1
Microsoft Visual Studio
Goanna Studio supports the following versions of Visual Studio:
• Visual Studio 2005
• Visual Studio 2008
• Visual Studio 2010
• Visual Studio 2012
• Visual Studio 2013
• Visual Studio 2015
Goanna Studio supports all editions of Visual Studio, except Express edition.
Important: Goanna Studio does not support any other versions of Visual Studio, including Visual Studio 6, Visual
Studio .NET 2002 and Visual Studio .NET 2003.
There is a separate installation package for each version of Visual Studio. Please make sure to download the right
package for your version of Visual Studio.
1.2.2
Atmel Studio
Goanna Studio supports the following versions of Atmel Studio:
• Atmel Studio 6.0
• Atmel Studio 6.1
Important: Goanna Studio does not support any other versions of Atmel Studio, including AVR Studio 5 and older.
In addition, Goanna Studio does not currently support Atmel Studio 6.2 and Atmel Studio 7.0 Beta.
There is a separate installation package for each version of Atmel Studio. Please make sure to download the right
package for your version of Atmel Studio.
1.3
Hardware Requirements
Goanna requires, at the minimum, the following hardware:
• Processor: Intel Pentium 4 or higher
• Memory: 1 GB or more
• Storage: Minimum 1 GB of free disk space
For optimal analysis performance, we recommend at least the following:
5
• Processor: Intel Core 2 Duo or later CPU with minimum speed 2 GHz. Multi core CPUs are recommended.
• Memory: 4 GB or more
• Storage: 5 GB or more of free disk space
For large projects, Goanna may require more RAM and disk space than the ones shown here.
1.4
Supported Compilers
Goanna currently supports the following compilers:
Compiler Name
GNU (available on Atmel Studio only)
Microsoft Visual C++
1.4.1
Goanna Dialect Name
gnu
microsoft
Common Compiler Executables
gcc, g++, ld
cl, link
A Word On C99 and C++11 Support
Goanna strives to support most C99 and C++11 features as long as the compilers used in your projects also accept
them. However, please note that, for C++11 extensions, the analysis engine generally does not make use of these
extensions or any information derived from usage of these extensions. For example, Goanna does not perform
any pointer or memory use related analysis on C++11 std::shared_ptr.
1.4.2
A Word On Compiler-Specific Syntax Extensions
Goanna strives to support most compiler-specific C/C++ syntax extensions for supported compilers. However,
please note that even in cases where Goanna supports compiler-specific C/C++ syntax extensions, the analysis
engine will generally not make use of these extensions or any information derived from usage of these extensions.
1.5
Known Limitations
See 8.1 for a list of known limitations.
6
2
Getting Started
2.1
License Agreement
Before installing Goanna Studio, ensure you read the Goanna License Agreement, which can be found at
http://redlizards.com/license-term/evaluation-license-agreement/
if you are installing a trial version and
http://redlizards.com/license-term/
if you are installing a registered version of the tool. See Section 2.3 for how to purchase and install a license.
2.2
Installation
For the installation of Goanna Studio follow the next few steps:
1. Download the Goanna Studio distribution. The package is typically named GoannaVS-X.msi, where X is
the release number.
2. Double Click the downloaded .msi file, and read and confirm the license agreement.
3. Follow the installation wizard. Goanna Studio will invoke Visual Studio to complete the integration. This
may take several minutes.
7
4. At the end of the installation process click Finish.
5. Launch Visual Studio.
8
2.3
License Activation
Whether you are just evaluating Goanna or have purchased the full version, you must activate your license before
you can use Goanna.
You should have received an email containing your license information from Red Lizard Software. This email will
contain an Order Number that you will need below.
Then start the activation process by either:
• Simply opening any C/C++ solution in Visual Studio. At first run Goanna automatically shows you the activation screen.
• Alternatively, go to the Visual Studio Goanna menu and select Activate Goanna to open the activation screen.
Figure 1: Activation screen
2.3.1
Online Activation
At this point, you can now activate your license over the Internet connection. Follow these steps to complete the
activation:
1. Select Activate online at the activation screen.
2. Read and agree the license agreement.
3. Type your e-mail address and the order number you received.
4. Press Next to finish activation.
Atmel Studio users: Atmel Gallery version of Goanna Studio comes with free 30-day evaluation license. To activate the evaluation license, select Activate my FREE 30-day evaluation and follow the instructions.
2.3.2
Manual Activation
Alternatively, you can also manually activate your license by obtaining license file at the Red Lizard Software
website first. To do so, follow these steps:
1. Select I have a license file at the activation screen.
2. The screen will then show the challenge key of your machine.
3. Go to http://www.redlizards.com/purchase/activate-license/.
4. Type in your e-mail address and the order number.
5. Copy the challenge key into challenge text box.
9
Figure 2: Activation web page
6. Read and agree the license agreement, then press Activate.
7. Download your license file via the generated download link, and choose this file in the activation screen.
8. Press Next in the activation screen to finish activation.
2.3.3
Activating Floating License
If you have floating (network) license, follow these steps to borrow a seat from the license server:
1. Select I have a network license server at the activation screen.
2. Type the host name, and optionally port number, of your license server.
3. Enter the borrow duration.
4. Press Next to finish activation.
10
3
3.1
Using Goanna Studio
Running Goanna Studio on a Project
Quick Solution Select the files, project or solution you want analyzed in the Project Explorer and click the
Goanna icon in the toolbar. Goanna Studio will automatically display warnings, if there are any.
Figure 3: Analysis of an entire project.
Figure 4: Analysis of selected files.
Goanna Studio can be invoked on a project or a solution by selecting the appropriate entry from the Goanna menu,
where the Goanna icon appears (see Fig. 3). You can also select several files and right-click on these. The Goanna
option in the context menu allows you to run the tool over the selected files only (Fig. 4). Goanna can be called
in the same way from the context menu of a project or a solution in the Project Explorer.
3.1.1
Warning Messages
Any results from Goanna Studio will appear in the Error List window. The description of each warning takes the
following format:
Goanna[SPC-return] Missing return statement on some paths. CERT-MSC37-C
CWE-758 MISRAC2004-16.8 MISRAC++2008-8-4-3
The description consists of several parts:
11
• Goanna to distinguish Goanna warnings from other sources of markers in the Error List view.
• The check name (for example, [SPC-return]. This is the unique identifier of the Goanna check, used everywhere to identify the check, such as in the Reference Guide, the Describe Check help information, and in
the Checks tab of Goanna’s project/solution settings.
• The text of the warning message itself, for example, Missing return statement on some paths.
• A list of rule(s) from coding standards to which the warning applies, for example, CERT-MSC37-C CWE758 MISRAC2004-16.8 MISRAC++2008-8-4-3. This cross references Goanna warnings back to the
corresponding rule(s) in coding standards, whether or not you have enabled all the checks in those standards.
Each warning also identifies the file and line number, in much the same way as the compiler’s warning and error
messages. Double-clicking a message will place the cursor at the relevant part of the code.
3.1.2
Parse Errors
Goanna identifies syntactically erroneous code, ensuring that analysis only takes place on syntactically correct
code. If a file contains syntax errors Goanna will simply skip analysis of that file, and report the parse errors in
the error list.
3.1.3
Check Descriptions
The Goanna Checks tab allow you to view an online version of the check descriptions that appear in the companion
reference manual Goanna Reference Manual. Simply right-click a warning message and select Describe Check from the
context menu to view a detailed description of the check, including simplified code examples.
3.1.4
Macro Visualisation
Sometimes it is difficult to determine the reason for a particular warning, because the code invokes a C preprocessor (C++) macro. Visual Studio offers a tooltip window showing the macro definition, but that may not be enough
for effective debugging.
The Visual Studio edition of Goanna Studio can show the expansion of C++ macros. Right-click anywhere in a
Visual Studio code window to get a context menu, and choose Show macros. Each C++ macro in the source file will
be highlighted with a blue underline. Hover over the macro to show its expansion in a tooltip window.
While macros are being displayed, any purple underlines indicating Goanna warnings are hidden. From the same
context menu you used to show the macros, choose Clear macros to remove the blue macro underlines and restore
the purple warning underlines.
12
3.1.5
Traces
The Goanna trace window will allow you to trace through the path of execution leading to a warning message.
This may help with the debugging of larger functions. Simply right-click the warning message and select Show
trace from the context menu to view the Goanna Trace window.
Figure 5: Trace window
3.1.6
Stopping Goanna Analysis
To stop Goanna analysis that is currently running, open Goanna menu and click Cancel Goanna.
Note: This terminates all Goanna analysis that are currently running on your machine, not just the one that is
running within Visual Studio or Atmel Studio IDE.
3.2
Goanna Solution/Project Settings
Goanna provides various configuration options which apply to either whole solution, or a project. You can access
the settings window in two ways:
• Open Goanna menu and click either:
– Goanna Settings for solution <name of solution> or
– Goanna Settings for project <name of project>
or
• Right-click a solution or a project in the Solution Explorer, and click Goanna Solution Settings or Goanna Project
Settings.
Solution settings apply to all projects within that solution. If you wish to apply different settings to some projects,
in the Project Settings window uncheck Inherit settings from Solution.
Goanna settings for a project or solution are divided into a number of tabs: Checks, Files, and Options.
13
3.2.1
Available Goanna Checks
The Checks tab lets you enable and disable the checks that Goanna performs.
To configure and select the checks that Goanna Studio performs in each run, you can select one of three options:
• Default: This selects the Goanna Core set of checks, which produce the most accurate and complete diagnostics
for most projects. This option is recommended for most users.
• Coding Standards: This allows you, in addition to Goanna Core, to optionally include checks from a number of
industry coding standards. This option is useful for checking compliance of your code with these standards.
In addition to the default set of checks (Goanna Core), Goanna also supports the following standards:
Standard code
cert
cwe
misrac2004
misrac++2008
misrac2012
Standard name
Computer Emergency Response Team (CERT) C/C++ Coding Standard
Common Weakness Enumeration (CWE)
Motor Industry Software Reliability Association (MISRA) C:2004
Motor Industry Software Reliability Association (MISRA) C++:2008
Motor Industry Software Reliability Association (MISRA) C:2012
• Custom: This allows you enable or disable each check individually. Click on the checkboxes to toggle each
check or group of checks. You can also use the Select All and Select None buttons when the Custom option is
selected.
For a description of a specific check simply click on the check code and short description next to the checkbox.
Details and examples of the checks can be found in the companion reference manual Goanna Reference Manual.
Figure 6: Goanna Settings for Checks
Checks can be filtered by using the Filter option, simply type in what you would like to filter by and the checks will
be updated. Deleting any text in the Filter text box will display all the checks. Note that the Select All and Select None
buttons apply to the filtered checks, easily allowing you to add remove checks by filtering.
For example, in Custom mode you can easily enable all the Common Weakness Enumeration (CWE) checks by typing
cwe in the Filter box, and clicking Select All. Then clear the Filter box again to see the effect.
14
Exporting And Importing Check Selection
Goanna Studio also supports exporting and importing the check selection status so that you can easily configure
multiple machines to use the same set of checks.
To export checks selection to a file, click Export button and specify the location of the file to be saved. Once the
selection is exported to a file, you can then import this setting by clicking Import button.
Note that, the exported checks selection also contains information about what checks packages are enabled, to
ensure all necessary checks are available. This means that, for example, if you copy checks selection to a different
machine with different checks packages enabled, then this may result in enabling more checks than intended.
Goanna Studio will warn at import time in such cases.
15
3.2.2
Files to Analyze
The Files tab lets you quickly include and exclude the files that Goanna analyzes.
Figure 7: Files tab
• Paths to exclude from analysis: This is a list of files, paths and regular expressions that Goanna should not include
in analysis. The drop down menu to the right allows the addition of new files, paths, or regular expressions.
The Remove Selected button removes all selected items from the ignored paths list.
16
3.2.3
Options
The Options tab contains advanced options that control how Goanna analyzes your code.
Figure 8: Goanna Options
A description of these Goanna Studio options is as follows:
• Interprocedural analysis (default: yes): This enables interprocedural analysis. See section 4.1 later in this document for a detailed description of this feature.
• Eliminate false positives due to infeasible paths (default: yes): This enables false positive elimination based on a
Satisfiability Modulo Theories (SMT) solver algorithm. See section 4.2 later in this document for a detailed
description of this feature.
• Analyze global variables (default: yes): Instructs Goanna to include global variables in its analysis.
• Analyze user header files (default: no): Instructs Goanna to include user headers (generally, those included using
#include "..." syntax) into analysis.
• Extra arguments (default: none): This allows you to pass arguments to the Goanna executable. Most users will
not need to use this field, because Goanna Studio synthesizes the correct arguments from project files.
In some cases, though, a user may wish to pass arguments not found in a project file. When running Goanna,
you may want to search for include files in particular directories using the -I flag: -I C:\SomeIncludePath.
A list of the available arguments to the Goanna executable is detailed in section 7.1.
• Timeout (default: 240 seconds): This is the maximum number of seconds Goanna is allowed to spend in each
analysis phase within one source file.
Generally speaking, increasing timeout may result in more accurate results, but will take longer to complete
the analysis. Decreasing timeout will improve the running time, but may result in less accurate results. Due
to the underlying technology of the Goanna analysis engine, this timeout is essential.
Important: Setting this value to 0 (meaning infinite) is discouraged; this may cause Goanna to not terminate!
• Automatically add snapshot at each Goanna run (default: Always): By default Goanna automatically generates a new
snapshot for the Dashboard (see 6) after each analysis run. You can change this to Never to never generate a
snapshot automatically.
17
3.3
HTML Report of Analysis Results (Advanced)
Goanna can generate an HTML report of the analysis results. There are two types of HTML reports:
• Summary Report, which shows a summary of the analysis result, including:
–
–
–
–
Basic statistics, such as the number of files analyzed,
Per-category and per-severity warnings pie chart,
Bar charts of the top 10 warnings per check and top 10 files with warnings, and
List of warning numbers per check.
This report shows the high-level statistics of the analysis results in an easy-to-see format; and
• Warnings Report, which shows a table of all warnings found; this table is interactive and supports filtering.
Example of Summary Report
Example of Warnings Report
To generate HTML report files at the end of analysis, add --html-report option to Extra arguments field in the
This option accepts an optional argument to specify the type(s) of report
to be generated:
Options tab of the Goanna Settings dialog.
• --html-report=summary: Generates summary report file.
• --html-report=warnings: Generates warnings report file.
• --html-report=all or --html-report with no extra argument: Generates both summary and warnings report files.
• No --html-report option: HTML report files will not be generated.
Generated HTML report files will be saved to the directory where your project(s) are located. (Note: Not the
solution directory!)
3.4
Analysis Results In XML File (Advanced)
Goanna can optionally output the analysis result to a XML file. This is useful if you need Goanna to be used in
conjunction with some other platform or framework and need programmatic access to the analysis result.
To generate a XML output file at the end of analysis, add --output-xml=<xml-file-name> option to Extra
arguments field in the Options tab of the Goanna Settings dialog.
Generated XML output file will be saved to the specified file name in the directory where your project(s) are
located. (Note: Not the solution directory!)
Note: If the specified XML output file already exists, Goanna will overwrite the file at the end of next analysis.
18
3.5
Goanna Global Preferences
In addition to per-solution and per-project settings, Goanna also has some global settings options. To access these
options, click Goanna Preferences in Goanna menu.
Figure 10: Goanna Global Preferences Window
A description of these Goanna Studio options is as follows:
• Parallel Jobs: This option specifies how many (maximum) Goanna instances should run at one time (from 1
core up to 20 cores). By default this is set to the number of CPU cores available on the system.
• Verbose output: Enables verbose output mode, which causes Goanna to display command line arguments and
Goanna output from the console.
• Show full diagnostics output: Enables even more verbose output, which includes full Goanna debugging output.
Important: You should not enable this option unless you experience Goanna failures or crashes. Enabling
this option will also slow down analysis and produce a lot of output.
• Issue reports : Goanna can automatically generate issue reports when you experience Goanna failures or errors,
which can then be sent to Red Lizard Software to assist diagnosis. You can choose when to generate issue
reports from the following options:
– Never: Never generate issue reports.
– On failure (default for non-evaluation users): Generate issue reports when Goanna experiences fatal error.
– On error (default for evaluation users): Generate issue reports when Goanna experiences fatal error or
PARSE error.
– On timeout: Generate issue reports when Goanna experiences fatal error, PARSE error, or when analysis
times out.
– Always (Not Recommended): Always generate issue reports after every analysis, even if successful.
• Offer to send issue reports to Red Lizard Software: If this option is checked, then when Goanna generates issue reports
they will be displayed in a window which allows you to send the issue reports to Red Lizard Software for
diagnosis.
Important Note: Issue reports contain your name or e-mail address (extracted from license file), and additionally some information extracted from source files themselves. Please examine the content of the report
carefully before submitting them to Red Lizard Software.
19
3.6
Checks Packages
Goanna Studio comes with a default package of checks that you can choose to enable via the Checks tab as described in Section 3.2.1. It is also possible to install more checks, specifically for the purpose of providing extra
conformance checking for selected C/C++ standards.
Goanna ships with the following checks packages:
• stdchecks (enabled by default): "Goanna Core" checks. This checks package contains a set of checks for
common C/C++ issues.
• security: Checks that are targetting well known security vulnerabilities.
• misrac2004: Dedicated checks for MISRA-C:2004 coding standard.
• misrac++2008: Dedicated checks for MISRA C++:2008 coding standard.
• misrac2012: Dedicated checks for MISRA C:2012 coding standard.
It is also possible to add custom checks packages to the analysis results. Contact Red Lizard Software for more
information about custom checks packages.
To access these options, click Goanna Preferences in Goanna menu and select the Checks Packages tab.
Figure 11: Goanna Checks Package Preferences
To enable a checks package, click the checks package you wish to enable from Available Packages list, then click Install.
To disable a checks package, click the checks package you wish to disable from Installed Packages list, then click
Uninstall.
If you have a custom checks package, then you can add it by clicking Add Package.
Important Note
Checks package operations are global and may affect analysis on all existing and new projects. Additionally, enabling a checks package will also change the default set of checks to be enabled for all existing and new projects.
Installing or uninstalling checks packages, and adding custom checks packages may require User Account Control (UAC) approval on Windows Vista, Windows Server 2008 and later versions of Windows, as these operations
require write access to the installation directory of Goanna Studio.
20
3.7
Sample Code
Important: This sample code package can only be used with Visual Studio; it is not compatible with Atmel Studio.
A package containing a number of sample C/C++ files is available on our website. Go to http://www.redlizards.com/
resources/example-code/ and download the Visual Studio Sample Code package corresponding to your version of Visual Studio. The files in this package may be useful for practicing using Goanna Studio, or ensuring that
Goanna is working correctly.
A project file and solution file for Visual Studio are included in this directory. Open either of these files to open
the solution.
Once the project has loaded, you can try analyzing it with Goanna Studio.
21
4
4.1
Getting the Best Results from Goanna
Interprocedural Analysis
Goanna’s interprocedural analysis propagates information about function behaviour to other functions. This information includes parameter values, return values, and function effects that may impact other parts of the code.
This enables Goanna to detect things in your program such as freeing of memory through function calls, functions
that never return, and input values to some functions.
Interprocedural analysis is not limited to a specific set of checks, but rather enhances the precision of many checks.
An example of what interprocedural analysis can find can be seen in the sample of function myAlloc.
void ∗myAlloc(int param){
void ∗p = malloc(param);
if (p)
return p;
else
return NULL;
}
int main(int argc, char ∗∗ argv) {
int ∗ n;
n = (int∗)myAlloc(sizeof(int) ∗ 10);
n[0] = 5; // this may be a dereference of NULL
return ∗n;
}
Here, Goanna learns that myAlloc may return NULL. This means that when the return value of myAlloc is assigned
to n, Goanna knows this value may be NULL. Therefore, the expression n may be dereferencing a NULL pointer, and
Goanna will warn accordingly.
There is some additional computation overhead in running interprocedural analysis. If you need rapid results
without much depth, then turning off interprocedural analysis will provide faster results (at the cost of accuracy
in some checks). To turn off interprocedural analysis, use the --no-ipa option.
By default interprocedural analysis does two passes (in optimized order) over each file. This provides a good
approximation for function behaviours, but may miss some complex behaviours that require many passes to accurately detect. Additional precision can be gained by increasing the iteration limit (the maximum number of
passes Goanna will do). To change the interprocedural analysis iteration limit, use the --ipa-iterations option.
4.2
A Word on False Positives
Goanna considers all possible execution paths in your program, and will warn you if it finds potential defects (such
as use of an uninitialised variable) that occur only on particular execution paths and not others. But sometimes,
the execution path leading to a potential defect is actually not possible when the program is executed. If Goanna is
able to deduce this through static analysis, then it won’t warn you. But if it can’t, then you may receive a spurious
warning for a defect that isn’t really there. Such warnings are called false positives.
Some false positives occur because Goanna currently does not track dependencies between variables in loops. For
example, if you have a loop with two counters and only test one:
char buffer[11];
int i, count;
i = 0;
count = 10;
while (−−count >= 0) {
buffer[i++] = ’x’;
}
buffer[i] = ’\0’;
Goanna may issue a false positive warning because it doesn’t deduce that i
= 10 when the loop terminates.
Such false positives can often be suppressed with the assert macro (sec. 4.4). Otherwise you can suppress false
positives using the Goanna Dashboard (see 6.2).
22
4.3
Using the _GOANNA Preprocessor Symbol
Goanna has a built-in preprocessor definition, defined by the macro
#define _GOANNA 1
This allows code to be explicitly included in or excluded from analysis by Goanna. For example:
#ifdef _GOANNA
//Code only to be included while the program is being analysed
#endif
#ifndef _GOANNA
//Code not to be analyzed by Goanna
#endif
4.4
Using the assert macro
Goanna can sometimes use information provided by assert() to refine its analysis of numerical and pointer
values. It does this by using assert statements as assumptions for value ranges and pointer validity.
For example, in the code below:
void my_fun(void) {
int my_array[20];
int x = rand();
assert(x == 10);
f(my_array[x]);
}
the assert() means that the array reference must be in-bounds, even though the index variable x has a randomlyassigned value. Therefore, Goanna does not issue an out-of-bounds warning.
23
5
Suppressing Warnings
For a number of reasons, you may wish to ignore specific warning messages without modifying your check settings.
Goanna Studio allows you to easily hide and show warnings to help keep emphasis on the most critical bugs.
5.1
Suppressing Warnings
Quick Solution Right-click a warning and select Suppress Warning from the context menu. To view all suppressed
warnings, click the Show Suppressed Warnings button
the same way.
in the toolbar. From there, you can unsuppress warnings in
To hide a warning, right-click it in the Goanna Warnings list, and select Suppress Warning from the context menu.
Goanna takes special care to ensure that warning suppression never silently conceals actual regressions (bugs
that are fixed but inadvertently reintroduced) or unrelated bugs. If you suppress a warning, and later modify
the function or any other code having an effect on it, Goanna will notice that the code has been edited, and reissue the warning. Internally Goanna uses a hash of the actual syntax to determine if the code has changed, so
only significant changes will cause the warning to reappear, not just modifying the file or changing whitespace
or comments.
5.2
Showing Suppressed Warnings
When you ask Goanna Studio to ignore a warning, it will not be removed permanently from the database. The
list of Goanna warnings in the Goanna Warnings tab can be toggled, to show either the suppressed or unsuppressed
warnings. Click the Show Suppressed Warnings button on the right-hand side of the Goanna Warnings tab to toggle
which warnings are shown.
5.3
Unsuppressing Warnings
To unsuppress a warning, ensure you are showing suppressed warnings in the Warnings tab. Select the warning you
wish to unsuppress, right-click on it, and select Unsuppress Warning from the context menu.
You can unsuppress multiple warnings at once. To do this, select the warnings in the same way as you would to
suppress them, right-click on one of the selected warnings, and select Unsuppress Warnings from the context menu.
5.4
Goanna Suppression Manager
The Goanna Suppression Manager enables you to see the status of warnings and select which warnings to suppress or
unsuppress using a simple web-based interface.
It allows you to search and sort the list of warnings for a selected project, as well as suppress and unsuppress
warnings using the checkboxes on the right hand side of the screen.
24
5.4.1
Toggling Suppression Status
Under the Suppressed? column, you can check/uncheck the display status of a warning. Suppressed warnings will
not be displayed in the future Goanna analysis (see 5.1 for details).
5.4.2
Searching and Sorting Warnings
The Goanna Suppression Manager provides powerful searching and sorting capabilities for warnings.
Clicking the column headers sorts the results alternately in ascending or descending order.
Each column also has a search box that is specific to the column. Search boxes accept any plain text keyword; for
example, to search for all warnings from the check SPC-return, type SPC-return in the search box on the
Warning column.
Clicking a check name in the Warning column will display the detailed description of that check. Additionally, some
rules in the Rules column have links to the corresponding rule pages.
If you click file name or a line number, the corresponding file opens in the Visual Studio at that line.
5.4.3
Other Features
Warnings can be exported in CSV format via the Export button.
If you make changes to the source files and then run analysis, new warnings will not automatically appear in the
Gonanna Suppresion Manager. If this happens, click Refresh button to reload the warnings.
button will delete all suppression, warnings and analysis information for that project. Solution and project
options will remain.
Clear
25
6
Goanna Dashboard
Goanna Dashboard allows you to store and visualise the history of your Goanna results. It includes a web server,
goreporter, used to display these results in a web browser. Each of your analysis runs is captured in a snapshot,
which comprises of the warnings for that run as well as the source code analysed in the run. These snapshots are
used to track the history of your project in the Goanna Dashboard.
6.1
Getting to the Goanna Dashboard
Click Goanna Dashboard in the Goanna menu to open the Goanna Dashboard. This will load the Project Page
showing all projects that you have analysed with Goanna from Visual Studio.
If you load the Goanna Dashboard without first taking a snapshot you will see an empty table with the text “No
data available in table”. To use the Goanna Dashboard you must first take a snapshot. (by running analysis, or
using the “Take Snapshot” menu item)
6.2
Bug Statuses
The Goanna Dashboard allows you to classify bugs into one of five statuses:
Unclassified This is the default status for when a new warning is added to the Goanna Dashboard.
Ignore Ignore this warning; useful when the warning is valid, but does not require immediate attention.
Analyse This warning need to be investigated further before it can be classified properly.
Fix This warning is a problem that needs to be fixed.
Not a Problem This is warning is not a real bug (false positive).
If you select a warning to be either Ignore or Not a Problem, then these warnings are automatically suppressed;
Goanna will then ignore these warnings in future analysis runs.
6.3
Severity
Every check in Goanna has been assigned a static severity of either; High, Medium or Low. These severities are
represented throughout the Goanna Dashboard in three colours (or a blend of these three colours):
• High: Red
• Medium: Yellow
• Low: Green
6.4
Dashboard Views
6.4.1
Project Page
The project page is usually where you begin when using the Goanna Dashboard. It gives an overview of all projects
Goanna has analysed and taken a snapshot of. The table provides a high level overview of the current state of all
projects, including the number of warnings, number of new warnings, number of files analysed and the last time
a snapshot was taken.
If you do not want to have a project in your dashboard anymore, you can use the checkboxes on the left hand side
of the table to select the project(s) you wish to delete, then use the Delete Project button in the Dashboard’s toolbar.
26
6.4.2
Report Page
Once you select a project you are taken to the project’s report page. This page shows four graphs:
Snapshot History shows the overall progress of your project over time. Each point on the graph is one of your
previous snapshots, showing the total number of warnings by severity. Clicking on any point in the graph
will change the report page to show details about warnings in that snapshot. By default, the most recent
snapshot is selected.
Warnings By Category shows all warnings for your snapshot broken down into each warning type. Clicking on
a wedge will show the break down of warnings of that category. Clicking on a subsequent wedge will take
you to the warnings browser filtered for that particular warning type.
Top 10 Warnings shows the top ten warning types in this snapshot. Clicking on one of the bars in the chart will
take you to the warnings browser filtered by that warning type.
27
Warnings By Directory shows the concentration of warnings in your directory structure. A red node means
that there are more than 10 warnings per file (average) in the directory, a green one means there are zero
warnings per file (average). Clicking on a node will load the directory browser in that folder.
Global filters can be applied from the toolbar to filter by warning severity and/or bug status. These filters apply
to all charts.
6.4.3
Directory Browser
The directory browser is a way to browse through your project’s directory structure to see what files and folders
have what warnings. Total number of warnings per file or folder are broken down into warning categories and
displayed in a bar chart.
28
The directory browser allows you to browse through your source tree in a few ways. The location bar above the
chart allows you to see the path to your current location. Clicking on an item in the location bar will take you there
in the directory browser. Similarly, clicking on a directory name in the chart will reload the directory browser with
the contents of that folder. To view the contents of a source file, click on its name to load the code browser. To
see the details about a particular warning category for a file, click on the segment for that category in the bar of
the file or folder to load the warnings browser filtered for your selection.
The chart can be filtered in two ways. The sidebar allows for particular warning types, or warning categories to
be turned on and off. In addition, the global filters in the toolbar (severity and bug status) also apply to this chart.
6.4.4
Warnings Browser
The warnings browser shows details of all the warnings in your project. Filtering is possible through the filter
boxes in the header of the warnings table. The arrows in the table header allow for sorting.
Clicking on a directory name will take you to the directory browser for that directory. A file name or line number
will take you to the source code browser for that file and warning. Clicking on a Rule or Warning name will give
you a description of that rule.
Selecting warnings then clicking "Edit Warnings" button opens a dialog where you can change their status and
also add a note to the warnings. Clicking Update saves these changes.
The ‘Export’ button allows you to export all warnings or visible warnings to a CSV file.
29
6.4.5
Code Browser
The code browser displays a file and all its Goanna warnings. The right hand side shows the source code of the file
currently opened with warnings highlighted in three colours based on severity. The left hand side has the details
of warnings for this file. The box at the top of the left hand pane allows you to select a warning to see in more
detail.
Like in the warnings browser, you are able to change the status and add a note to each warning in the code browser.
This can be done by changing the status and/or adding a note and pressing Apply.
You can also click the warning header at the top of the left hand pane to jump to the corresponding line in Visual
Studio.
If there is trace information for a warning it will also appear in this pane. You can step through the trace just like
a debugger. To go to a step in the trace, click on it and the source code browser will jump to the corresponding
line. You can then navigate through the trace using either the up/down arrows on top of the trace dialog, or by
using the up/down arrow keys on your keyboard.
30
6.5
Database Upgrades
If you have upgraded from an older version of Goanna, Goanna may offer you to perform optional “database
upgrades“ to improve the performance of the Goanna Dashboard.
When you open Goanna Dashboard with the existing database, you may see the following notification:
Clicking the link will show a list of available optional upgrades:
In this version of Goanna, the following optional upgrades (called features) may be available:
• auto_vacuum: In Goanna 3.2.4 and before, deleting a snapshot or a project did not immediately delete
corresponding data from the database. This may result in the database size to never shrink.
Performing this upgrade causes Goanna to delete all residual data from removed snapshots and projects, and
set up the database so that when a snapshot or a project is removed, Goanna removes corresponding data
immediately. This ensures that the database size is always minimal.
This upgrade was introduced in Goanna 3.3.0.
• warning_index: Performing this upgrade causes Goanna to apply optimizations to database indexes, resulting in improved performance, especially when loading Warnings Browser view.
This upgrade was introduced in Goanna 3.3.0.
To apply an upgrade, click “Upgrade” button next to a desired feature. Alternatively, clicking “Upgrade All” button
will apply all available upgrades.
Important Notes
We recommend that you take a backup of the database before applying any of the upgrade. The database is located
in the following location:
<default-project-location>\summary.goannadb
For Visual Studio, the default location is:
• On Windows XP and Windows Server 2003:
C:\Documents and Settings\<name-of-user-who-installed-goanna>\My Documents\Visual
Studio <version-of-visual-studio>\Projects\summary.goannadb
• On Windows Vista, Windows Server 2008, and all later versions of Windows:
C:\Users\<name-of-user-who-installed-goanna>\Documents\Visual Studio <versionof-visual-studio>\Projects\summary.goannadb
For Atmel Studio, the default location is:
• On Windows XP and Windows Server 2003:
C:\Documents and Settings\<name-of-user-who-installed-goanna>\My Documents\Atmel
Studio\<version-of-atmel-studio>\summary.goannadb
• On Windows Vista, Windows Server 2008, and all later versions of Windows:
C:\Users\<name-of-user-who-installed-goanna>\Documents\Atmel Studio\<versionof-atmel-studio>\summary.goannadb
You should not run Goanna analysis, interact with the Goanna Dashboard, or otherwise run any Goanna commands, until the upgrade is complete.
Performing upgrade will take a long time depending on the size of the database. If your database is significantly
large, this may take hours to complete.
31
6.6
Project Settings (Advanced)
In general, the Goanna Dashboard should work for your project out of the box. However, there are a few advanced
settings available if you want to customise the behaviour.
Settings are applied on a per-project basis. To access your project’s settings click the gear menu in the top right
hand corner after loading your project (through the project page), and select Project Settings.
6.6.1
Code Browser Character Encodings
By default the Dashboard will recognize source files in ASCII and UTF-8 (and additionally on Windows, the default
character encoding used by your system). If your source files are not in any of these encodings, you will need to
specify the encoding here in order for it to display correctly in the source code browser. A link is available in the
Project Settings window listing all the encodings supported.
32
7
Command Line Options
This section is a detailed reference of the command line options that can be added to the Extra arguments field in
your Project or Solution Settings.
7.1
Options
Print absolute paths in warnings.
--absolute-path
--all-checks
--brief-trace
--c++
Run all available checks (overrides all other check related options).
Show immediately relevant decisions in trace output, not the majority of decisions.
Indicate that file(s) contain C++ code.
--check=<name>
Run a specific check (overrides any checks file).
Use the checks listed in <file> instead of the default checks in properties.init file.
--checks-file=<file>
Run all checks in the specified coding standard. For example, --checks=misrac2004 runs all
available checks in the MISRA C:2004 standard.
--checks=<standard>
Run the check(s) corresponding to one rule in the specified coding standard. For
example, --checks=misrac2004-12.8 runs the check(s) that implement MISRA C:2004 rule 12.8.
--checks=<standard>-<rule>
Only available on Linux. Output in color.
--color, --colour
--columns
--db=<file>
Print column positions in warnings.
Specify the database file to use for persistent information.
--directory=<dir>
Before doing anything, change to <dir>.
--force-analysis
Re-analyze files that have not changed since last run.
--help
Print help message for common options.
--ignore-errors
Ignore errors from the compiler.
--license-server=<server[:port]>
Attempt to contact a license server at address <server>. <Port> is optional (de-
faults to 6200).
--output-checks
Output the checks that are currently loaded.
Specify a warning format used by Goanna to output warnings. The following special
strings in <format> are expanded:
--output-format=<format>
%FILENAME% the filename
%RELFILE% the filepath and filename
%RELPATH% the filepath
%ABSFILE% the absolute filepath and filename
%ABSPATH% the absolute filepath
%DBRELFILE% the filepath relative to the database file and filename
%DBRELPATH% the filepath relative to the database file
%LINENO% the line number
%COLUMN% the column number
%CHECKNAME% the check identifier
%SEVERITY% the checks severity rating
%MESSAGE% the warning message
%RULES% corresponding rule(s) from coding standards, if any
%TRACE% counter example if any
%FUNCTION% the function name
%SUPPRESSED% a * if the warning is suppressed
%WARNINGID% the hash of this warning
%EOL% a line break
%% a literal %.
33
The default warning format is: “%RELFILE%:%LINENO%:
%SEVERITY%, %MESSAGE%. %RULES%%EOL%”.
warning:
Goanna[%CHECKNAME%] Severity-
Specify the location of the project root; default is ..
If the --project-dir option is given, then --goanna-dir is also required.
--project-dir=<path>
--quiet
Only display warnings and no other output.
--suppress=<warning
id> Suppress warning <warning id>.
--suppression-status
--system-headers
Output suppression status markers, without suppressing warnings.
Process system header files. Default: no.
Set a timeout (in seconds) for analysis of each source file. Default: 240.
Important: Setting this value to 0 (meaning infinite) is discouraged; this may cause Goanna to not terminate!
--timeout=<n>
Prints out a trace through the function that leads to the warning. This is helpful for understanding why
the warning occurs.
--trace
--trace-format=<format>
Specify the format to output traces. The following special strings are used in the trace
format:
%FILENAME% the filename
%RELFILE% the filepath and filename
%RELFILEX% the filepath and filename followed by “:”, or blank if in the current source file
%RELPATH% the filepath
%ABSFILE% the absolute filepath and filename
%ABSFILEX% the absolute filepath and filename followed by “:”, or blank if in the current source file
%ABSPATH% the absolute filepath
%DBRELFILE% the filepath relative to the database file and filename
%DBRELPATH% the filepath relative to the database file
%FUNCTION% the function name
%LINE% the line number
%TEXT% text describing the event on the trace
%TYPE% the type of the trace line
%EOL% a line break
%% a literal %.
The default trace format is: “%LINE%:
--unsuppress=<warning
%TYPE% - %TEXT%%EOL%”.
id> Unsuppress warning <warning id>.
Process user header files. Default: no.
--user-headers
--verbose
Display additional output information.
--version
Print version information.
--warning-ids
Output warning hashes.
Specify the C compiler executable to run (if
dialect when no --dialect is specified.
--with-cc=<compiler>
--nc is not specified).
Specify the C++ compiler executable to run (if
fault dialect when no --dialect is specified.
--with-cxx=<compiler>
--nc
Also affects the default
is not specified). Also affects the de-
Advanced Command Line Options
The following options are intended to be used only in cases where your environment requires them. In general,
you do not need to use these options.
--32
Analyze code for 32-bit targets (longs and pointers are 32 bits wide).
--64
Analyze code for 64-bit targets (longs and pointers are 64 bits wide).
--advanced-help
Print help message for advanced options.
--dialect=<file>
Specify the dialect of C/C++ compilers. Available dialects are:
34
• gnu (available on Atmel Studio only)
• microsoft
If you use this option, you should also specify --with-cc, --with-cxx and/or --with-ld to specify the
paths to the compiler(s) and linker. If these are not specified, then Goanna will assume the default name for
the specified dialect, which may not be what is available on your system.
If none of --dialect, --with-cc, --with-cxx or --with-ld are specified, then Goanna will assume
the default of gnu dialect with gcc C compiler, g++ C++ compiler and ld linker.
--error
Exit with error status code when warnings emitted.
--exclude=<file>
Exclude the specified <file> from analysis.
type> After analysis, also generate analysis report files in HTML format. You can optionally specify type of HTML reports to be generated (’summary’, ’warnings’ or ’all’). --html-report with
no type will generate all available reports.
--html-report=<output
--input-encoding=<type>
Specify the character encoding of the source file:
us-ascii ASCII (default)
utf-8 UTF-8
ansi (Available on Windows only) default character encoding of the system
Exit with <value> on internal error.
--internal-error=<value>
Specify the number of times interprocedural analysis iterates towards a fixed point.
The default is 2.
Important: Setting this value to 0 (meaning keep iterating until a fixed point is reached) is discouraged; this
may cause Goanna to not terminate!
--ipa-iterations=<value>
How many levels of inlining are performed for interprocedural traces. Default: 5.
Important: Setting this value to −1 (meaning infinite) is discouraged; this may cause Goanna to not terminate!
--ipa-trace-depth=<value>
--issue-report=<type>
Control generation of issue report files:
never Never
on-failure On failures only
on-error On failures and analysis errors
timeout On failures, errors, and timeouts
always Always (even if successful)
--license-borrow-hours=<number>
When contacting license server, borrow license for <number> of hours. De-
faults to 1, maximum of 24.
--license-dir=<directory>
--no-globals
--no-ipa
Set directory in which to look for a license file.
Do not analyze global integer variables.
Disable interprocedural analysis.
--output-file=<file>
--output-spec=<file>
--output-xml=<file>
Append warning messages to a specified file.
Use the contents of <file> as the output-format.
After analysis, also output warnings in XML format to <file>.
--parse-error-log=<file>
Log parse errors to the specified file instead of stderr.
--timeout-error=<value>
Exit with status code <value> when too many timeouts occur.
Maximum number of per-phase timeouts. Default: 3.
Important: Setting this value to 0 (meaning infinite) is discouraged; this may cause Goanna to not terminate!
--timeout-limit=<value>
Set a timeout (in seconds) for each phase of analysis. This is useful if you have a few
functions that take very long to analyze and you would like to limit the time spent on these, while still getting
as many results as possible on everything else. Default: 60.
Important: Setting this value to 0 (meaning infinite) is discouraged; this may cause Goanna to not terminate!
--timeout-per-phase=<n>
35
Diagnostics Command Line Options
The following options are provided for diagnostics purposes only. Do not use these options unless directed by
Red Lizard Software support team.
--alias
--configure=<dialect>
--dialect-mod=<dialect-mod>
--dataflow
--diagnostics-mode
--no-alias
--no-dataflow
--no-default-packages
--package=<package>
--package-dir=<directory>
--record
Any unrecognized options are treated as compiler arguments.
36
8
Troubleshooting
This section describes a number of known issues and solutions to them. Should you find more issues you think
we should know about, please contact us at mailto:[email protected].
8.1
Known Issues For Visual Studio Users
Note: The following issues do not apply for Atmel Studio users.
Managed Code
Managed C++, C++/CLI syntax extensions, and CLR (Common Language Runtime) related compiler options are not
supported.
Generated Files
Goanna Studio cannot distinguish between generated files and the hand-coded files that generate them, and will
issue warnings in the files in which they are found, in every instance they are found.
This means that large generated files may yield a large number of warnings stemming from a single bug in the
hand-coded file which generated it. This will cause a warning for every manifestation of this bug in the generated
code.
The #import Directive
When using the #import directive to import a dynamic library (.dll) or type library (.tlb), it is necessary to
compile the file containing the directive before it is analysed by Goanna Studio. Compilation generates a header
file with the extension .tlh.
Then in the source code where you perform your import, you can use the _GOANNA macro to conditionally include
the .tlh file. For example:
#ifdef _GOANNA
#include ".\Debug\msxml3.tlh"
#else
#import "msxml3.dll"
#endif
Precompiled Header Through Files
Goanna Studio does not currently handle ‘precompiled header through’ files, used with the MSVC option /Yu, if
the specified file does not exist. The third-party C/C++ parser we use does not handle precompiled header files in
the way given by the /Yu option.
Target Platforms (Visual Studio 2005 & 2008 only)
Only the following target platforms are supported: Win32, x86, x64, ia64, ARM, Pocket PC 2003 (ARMV4),
Smartphone 2003 (ARMV4), STANDARDSDK_500 (MIPSIV_FP), Windows Mobile 5.0 Pocket PC SDK
(ARMV4I) and Windows Mobile 5.0 Smartphone SDK (ARMV4I).
Important: The name of target platforms must match exactly as in the above list.
You may get a parse error if your project targets a platform not in this list.
37
Performance With Many Warnings
If you enable many checks, or use checks in misrac2004, misrac++2008 or misrac2012 checks packages,
then Goanna may display many warnings (1,000 or over) into Visual Studio or Atmel Studio’s “Error List” window.
If you select all types of errors (Errors, Warnings and Messages) to be displayed, this may slow down Goanna
analysis and degrade performance of the IDE substantially.
8.2
Support
Some unforeseen issues might occur while using Goanna Studio, depending on your particular compiler version,
include files, hardware, undocumented features in C/C++ or some combination of these. If you come across any
problems, please contact mailto:[email protected] or visit out support page at http://redlizards.com/resources/.
38
Index
_GOANNA preprocessor symbol, 23
assert macro, 23
Command Line Options
--32, 34
--64, 34
--absolute-path, 33
--advanced-help, 34
--alias, 36
--all-checks, 33
--brief-trace, 33
--c++, 33
--check, 33
--checks, 33
--checks-file, 33
--color, --colour, 33
--columns, 33
--configure, 36
--dataflow, 36
--db, 33
--diagnostics-mode, 36
--dialect, 34
--dialect-mod, 36
--directory, 33
--error, 35
--exclude, 35
--force-analysis, 33
--goanna-dir, 34
--help, 33
--html-report, 35
--ignore-errors, 33
--input-encoding, 35
--internal-error, 35
--ipa-iterations, 22, 35
--ipa-trace-depth, 35
--issue-report, 35
--license-borrow-hours, 35
--license-dir, 35
--license-server, 33
--nc, 34
--no-alias, 36
--no-dataflow, 36
--no-default-packages, 36
--no-globals, 35
--no-ipa, 22, 35
--output-checks, 33
--output-file, 35
--output-format, 33
--output-spec, 35
--output-xml, 35
--package, 36
--package-dir, 36
--parse-error-log, 35
--project-dir, 34
--quiet, 34
--record, 36
--suppress, 34
--suppression-status, 34
--system-headers, 34
--timeout, 34
--timeout-error, 35
--timeout-limit, 35
--timeout-per-phase, 35
--trace, 34
--trace-format, 34
--unsuppress, 34
--user-headers, 34
--verbose, 34
--version, 34
--warning-ids, 34
--with-cc, 34
--with-cxx, 34
Common Weakness Enumeration (CWE), 14
Computer Emergency Response Team (CERT) C/C++ Coding Standard, 14
False positives, 17, 22
Bug status, 26
Goanna Dashboard, 26
Bug status, 26
Views, 26
Interprocedural analysis, 22
Issue report, 19
License, 9
activation, 9
floating, 10
Motor Industry Software Reliability Association (MISRA) C++:2008, 14
Motor Industry Software Reliability Association (MISRA) C:2004, 14
Standards, 14
Traces, 13
Dashboard, 30
Warning
Suppression, 26, 29
39