1
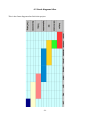
Android
Download and
Search Service
FINAL PROJECT
Autor: Carlos Martínez Pérez ( [email protected] )
Director: Tomáš Černý ( [email protected] )
CoDirector: Juan Carlos Ruiz ( [email protected] )
Titulación: Ingeniero Informático
11/07/2011
-1-
-2-
INDEX
1. Introduction
1.1 Introduction
1.2 Problem
1.3 Goals
2. Work Station
2.1 What is Android
2.2 Java
2.3 Eclipse
2.4 Plugin Android for Eclipse
2.5 Android Virtual Machine
2.6 Defining the Work Station
2.7 Why Android?
2.8 How Android Works
2.9 System Requirements
3. Technologies
3.1 SQLite
3.2 Android 2.2
-3-
3.3 Network
3.4 Rapidshare API
3.5 Filestube API
3.6 XML Parser
4. Defining the Project
4.1 Phases of the project
4.2 Gantt diagram Before
4.3 Gantt diagram After
4.4 Comparing Both diagrams
5. Components of the project
5.1 GUI
5.1.1 XML
5.1.2 All layouts
5.2 Activities
5.3 Services
5.4 Databases
5.5 Strings
5.6 Globals
5.7 Network
5.7.1 Http Connections
5.7.2 Rapidshare API
5.7.3 Filestube API
5.7.4 XML Parser
-4-
6. Testing
7. Problems/Solutions
8. Thinking in the future
9. Bibliography
-5-
1. INTRODUCTION
1.1 INTRODUCTION
Android, one of the Operating Systems for mobile devices/tables more used in the actuality,
offers a lot of applications to the mobile sector.
Due to the constant innovation in this sector, we think it is neccesary an application in this
Operating System that allows the user different options in the scope of the direct downloads.
In particular, we are are going to focus on one of the leading providers of direct downloads
available on the Internet: Rapidshare.
The need for this application comes from the small number of such software on Android, and
the increasing evolution of this Operating System encouraged to do it. Especially in the field of
search, because search engines currently available are through web pages, using the browser.
In addition to the above, Android Operating System was chosen for his use in many devices,
both tablets and mobile. And the lack of materials during the race to focus on this sector,
which is constantly growing.
1.2 PROBLEM
The problem that we thought to do the project AndDoSS is that currently there are not
enought software with this purpose on Android, and the increasing evolution of this operating
system encouraged it.
Also , the direct downloads are very useful in the current society, this is because people uses it
enought times. That's why we thought this application is interesting to develop.
-6-
The solution we propose to the lack of software is the creation of the application AndDoSS,
which we use http queries to search for files, and the api released by rapidshare to download
files from internet.
1.3 GOALS
The two main goals that we set at the creation of this project were:
1 - Create a file browser in Internet providers, intuitive and easy to use and which in turn is
powerful enough for use in the field of mobile devices.
2 - Attach to this search engine the ability to download files via RAPIDSHARE file provider on
the Internet.
To accomplish these objectives was necessary first part of finding information on the web,
which we have taken everything we have seen fit for the project.
The reason why the vendor selected to download files to the mobile device has been
RAPIDSHARE is because his API is the only one we found available, and you can select files
from your system to download the Android device using the application .
-7-
2. WORK STATION
The development of the application is going to be under Android Operating System which is
created by Google. At first im going to explain a little introduction about Android and after
that, i will explain about the different kinds of utilities and plugins i used to develop for this
Operating System.
2.1 WHAT IS ANDROID?
Android is an open-source software stack for mobile devices that includes an operating
system, middleware and key applications. Google Inc. purchased the initial developer of the
software, Android Inc., in 2005.Android's mobile operating system is based upon a modified
version of the Linux kernel. Google and other members of the Open Handset Alliance
collaborated on Android's development and release. The Android Open Source Project (AOSP)
is tasked with the maintenance and further development of Android.
Canalys reported that in Q4 2010 the Android operating system was the world's best-selling
smartphone platform, dethroning Nokia's Symbian from the 10-year top position.Jumping
from 23.5 percent, Android now represents 31.2 percent of the U.S smartphone
market.According to Gartner, Symbian is still slightly ahead on sales if some legacy non-Nokia
Symbian smartphones are included in the Q4 2010 figures.
Android has a large community of developers writing application programs ("apps") that
-8-
extend the functionality of the devices. There are currently over 150,000 apps available for
Android. Android Market is the online app store run by Google, though apps can also be
downloaded from third-party sites. Developers write primarily in the Java language,
controlling the device via Google-developed Java libraries.
The unveiling of the Android distribution on 5 November 2007 was announced with the
founding of the Open Handset Alliance, a consortium of 80 hardware, software, and telecom
companies devoted to advancing open standards for mobile devices.Google released most of
the Android code under the Apache License, a free software and open source license.
The Android open-source software stack consists of Java applications running on a Java-based,
object-oriented application framework on top of Java core libraries running on a Dalvik virtual
machine featuring JIT compilation. Libraries written in C include the surface manager,
OpenCore media framework, SQLite relational database management system, OpenGL ES 2.0
3D graphics API, WebKit layout engine, SGL graphics engine, SSL, and Bionic libc. The Android
operating system consists of 12 million lines of code including 3 million lines of XML, 2.8
million lines of C, 2.1 million lines of Java, and 1.75 million lines of C++.
The most recent released versions of Android are:
• 2.0/2.1 (Eclair), which revamped the user interface and introduced HTML5 and
Exchange ActiveSync 2.5 support
• 2.2 (Froyo), which introduced speed improvements with JIT optimization and the
Chrome V8 JavaScript engine, and added Wi-Fi hotspot tethering and Adobe Flash
support.
• 2.3 (Gingerbread), which refined the user interface, improved the soft keyboard and
copy/paste features, and added support for Near Field Communication
• 3.0 (Honeycomb), a tablet-oriented release which supports larger screen devices and
introduces many new user interface features, and supports multicore processors and
hardware acceleration for graphics.The Honeycomb SDK has been released and the
first device featuring this version, the Motorola Xoom tablet, went on sale in February
2011.
-9-
2.2 JAVA
Java is a programming language originally developed by James Gosling at Sun Microsystems
(which is now a subsidiary of Oracle Corporation) and released in 1995 as a core component
of Sun Microsystems' Java platform. The language derives much of its syntax from C and C++
but has a simpler object model and fewer low-level facilities. Java applications are typically
compiled to bytecode (class file) that can run on any Java Virtual Machine (JVM) regardless of
computer architecture. Java is a general-purpose, concurrent, class-based, object-oriented
language that is specifically designed to have as few implementation dependencies as
possible. It is intended to let application developers "write once, run anywhere". Java is
currently one of the most popular programming languages in use, and is widely used from
application software to web applications.
The original and reference implementation Java compilers, virtual machines, and class
libraries were developed by Sun from 1995. As of May 2007, in compliance with the
specifications of the Java Community Process, Sun relicensed most of its Java technologies
under the GNU General Public License. Others have also developed alternative
implementations of these Sun technologies, such as the GNU Compiler for Java, GNU Classpath,
and Dalvik.
-10-
2.3 ECLIPSE
Eclipse is a multi-language software development environment comprising an integrated
development environment (IDE) and an extensible plug-in system. It is written mostly in Java
and can be used to develop applications in Java and, by means of various plug-ins, other
programming languages including Ada, C, C++, COBOL, Perl, PHP, Python, Ruby (including
Ruby on Rails framework), Scala, Clojure, and Scheme. The IDE is often called Eclipse ADT for
Ada, Eclipse CDT for C/C++, Eclipse JDT for Java, and Eclipse PDT for PHP.
The initial codebase originated from VisualAge.In its default form it is meant for Java
developers, consisting of the Java Development Tools (JDT). Users can extend its abilities by
installing plug-ins written for the Eclipse software framework, such as development toolkits
for other programming languages, and can write and contribute their own plug-in modules.
Released under the terms of the Eclipse Public License, Eclipse is free and open source
software.
2.4 PLUGIN FOR ECLIPSE (Android SDK)
Android offers a custom plugin for the Eclipse IDE, called Android Development Tools (ADT),
that is designed to give you a powerful, integrated environment in which to build Android
-11-
applications. It extends the capabilites of Eclipse to let you quickly set up new Android
projects, create an application UI, debug your applications using the Android SDK tools, and
even export signed (or unsigned) APKs in order to distribute your application. In general,
developing in Eclipse with ADT is a highly recommended approach and is the fastest way to
get started with Android.
Once you have installed the ADT for Eclipse, you can start developing your Android
application.
2.5 ANDROID VIRTUAL MACHINE
An Android Virtual Device (AVD) is an emulator configuration that lets you model an actual
device by defining hardware and software options to be emulated by the Android Emulator.
-12-
The easiest way to create an AVD is to use the graphical AVD Manager, which you launch from
Eclipse by clicking Window > Android SDK and AVD Manager. You can also start the AVD
Manager from the command line by calling the android tool in the tools directory of the
Android SDK.
You can also create AVDs on the command line by passing the android tool options.
An AVD consists of:
• A hardware profile: Defines the hardware features of the virtual device. For example,
you can define whether the device has a camera, whether it uses a physical QWERTY
keyboard or a dialing pad, how much memory it has, and so on.
• A mapping to a system image: You can define what version of the Android platform will
run on the virtual device. You can choose a version of the standard Android platform or
the system image packaged with an SDK add-on.
• Other options: You can specify the emulator skin you want to use with the AVD, which
lets you control the screen dimensions, appearance, and so on. You can also specify the
emulated SD card to use with the AVD.
• A dedicated storage area on your development machine: the device's user data
(installed applications, settings, and so on) and emulated SD card are stored in this
area.
You can create as many AVDs as you need, based on the types of device you want to model. To
thoroughly test your application, you should create an AVD for each general device
configuration (for example, different screen sizes and platform versions) with which your
application is compatible and test your application on each one.
Keep these points in mind when you are selecting a system image target for your AVD:
• The API Level of the target is important, because your application will not be able to
run on a system image whose API Level is less than that required by your application,
as specified in the minSdkVersion attribute of the application's manifest file.
• You should create at least one AVD that uses a target whose API Level is greater than
that required by your application, because it allows you to test the forwardcompatibility of your application. Forward-compatibility testing ensures that, when
users who have downloaded your application receive a system update, your application
will continue to function normally.
-13-
• If your application declares a uses-library element in its manifest file, the application
can only run on a system image in which that external library is present. If you want to
run your application on an emulator, create an AVD that includes the required library.
Usually, you must create such an AVD using an Add-on component for the AVD's
platform (for example, the Google APIs Add-on contains the Google Maps library).
2.6 DEFINING THE WORK STATION
As we see in the introduction, we have to configure different kinds of utilities to develop an
Android application.
Then, to develop our application, i installed and configurated this different utilities:
– Eclipse 3.6.1 Helios
– Android Development Toolkit for 2.2 platform (Api level 8)
– Java 1.5 compiler
– Android Virtual Device (Platform 2.2, Api level 8, SD card 64Mb, Skin HVGA 320x480
2.7 WHY ANDROID
The Android version choosed for the application is the called "Froyo" (Android 2.2) because
was the last version of the Operating System at the moment of the project started his
development. So , it has to work in latest versions of Android without any problem.
Android has a Linux Kernel, security, memory management, proccess, events depends on it.
The kernel also works like an abstraction between the hardware and the rest of the software
stack.
-14-
2.8 HOW ANDROID WORKS
Android applications are written in the Java programming language. The Android SDK tools
compile the code—along with any data and resource files—into an Android package, an
archive file with an .apk suffix. All the code in a single .apk file is considered to be one
application and is the file that Android-powered devices use to install the application.
Once installed on a device, each Android application lives in its own security sandbox:
• The Android operating system is a multi-user Linux system in which each application is
a different user.
• By default, the system assigns each application a unique Linux user ID (the ID is used
only by the system and is unknown to the application). The system sets permissions for
all the files in an application so that only the user ID assigned to that application can
access them.
• Each process has its own virtual machine (VM), so an application's code runs in
isolation from other applications.
• By default, every application runs in its own Linux process. Android starts the process
when any of the application's components need to be executed, then shuts down the
process when it's no longer needed or when the system must recover memory for other
applications.
In this way, the Android system implements the principle of least privilege. That is, each
application, by default, has access only to the components that it requires to do its work and
no more. This creates a very secure environment in which an application cannot access parts
of the system for which it is not given permission.
However, there are ways for an application to share data with other applications and for an
application to access system services:
• It's possible to arrange for two applications to share the same Linux user ID, in which
case they are able to access each other's files. To conserve system resources,
applications with the same user ID can also arrange to run in the same Linux process
and share the same VM (the applications must also be signed with the same certificate).
• An application can request permission to access device data such as the user's contacts,
SMS messages, the mountable storage (SD card), camera, Bluetooth, and more. All
-15-
application permissions must be granted by the user at install time.
That covers the basics regarding how an Android application exists within the system. The
rest of this document introduces you to:
• The core framework components that define your application.
• The manifest file in which you declare components and required device features for
your application.
• Resources that are separate from the application code and allow your application to
gracefully optimize its behavior for a variety of device configurations.
The different components of an Android application are:
Activities
An activity represents a single screen with a user interface. For example, an email application
might have one activity that shows a list of new emails, another activity to compose an email,
and another activity for reading emails. Although the activities work together to form a
cohesive user experience in the email application, each one is independent of the others. As
such, a different application can start any one of these activities (if the email application
allows it). For example, a camera application can start the activity in the email application that
composes new mail, in order for the user to share a picture.
An activity is implemented as a subclass of Activity and you can learn more about it in the
Activities developer guide.
Services
A service is a component that runs in the background to perform long-running operations or
to perform work for remote processes. A service does not provide a user interface. For
example, a service might play music in the background while the user is in a different
application, or it might fetch data over the network without blocking user interaction with an
activity. Another component, such as an activity, can start the service and let it run or bind to it
in order to interact with it.
-16-
A service is implemented as a subclass of Service and you can learn more about it in the
Services developer guide.
Content providers
A content provider manages a shared set of application data. You can store the data in the file
system, an SQLite database, on the web, or any other persistent storage location your
application can access. Through the content provider, other applications can query or even
modify the data (if the content provider allows it). For example, the Android system provides a
content provider that manages the user's contact information. As such, any application with
the proper permissions can query part of the content provider (such as
ContactsContract.Data) to read and write information about a particular person.
Content providers are also useful for reading and writing data that is private to your
application and not shared. For example, the Note Pad sample application uses a content
provider to save notes.
A content provider is implemented as a subclass of ContentProvider and must implement a
standard set of APIs that enable other applications to perform transactions. For more
information, see the Content Providers developer guide.
Broadcast receivers
A broadcast receiver is a component that responds to system-wide broadcast announcements.
Many broadcasts originate from the system—for example, a broadcast announcing that the
screen has turned off, the battery is low, or a picture was captured. Applications can also
initiate broadcasts—for example, to let other applications know that some data has been
downloaded to the device and is available for them to use. Although broadcast receivers don't
display a user interface, they may create a status bar notification to alert the user when a
broadcast event occurs. More commonly, though, a broadcast receiver is just a "gateway" to
other components and is intended to do a very minimal amount of work. For instance, it might
initiate a service to perform some work based on the event.
A broadcast receiver is implemented as a subclass of BroadcastReceiver and each broadcast is
-17-
delivered as an Intent object. For more information, see the BroadcastReceiver class.
2.9 SYSTEM REQUIREMENTS
AndDoSS only needs three things to work like a full functional application:
1 - Internet connection (Wifi/3GP ...) . AndDoSS need the web to work, because it has to
connect to rapidshare to download/upload files, also the search needs to connect to another
webpages to do his funcionality, so every principal features of the application needs internet
connection.
2 – Device with Operating System Android 2.2 or higher. This only allows to install it on
modern devices (less than 2 years at the moment).
3 – The download/upload to Rapidshare provider it's only with a Rapidshare account right
now. Maybe in future funcionalities of the application we can add more flexibility in this step.
The searcher doesn't need the account.
-18-
3. TECHONOLOGIES
3.1 SQLite
SQLite is a software library that implements a self-contained, serverless, zero-configuration,
transactional SQL database engine. SQLite is the most widely deployed SQL database engine in
the world. The source code for SQLite is in the public domain.
Android contains the SQLite database management classes that an application would use to
manage its own private database. This class is on the package "android.database.sqlite".
Applications use these classes to manage private databases. If creating a content provider, you
will probably have to use these classes to create and manage your own database to store
content. See Content Providers to learn the conventions for implementing a content provider.
See the NotePadProvider class in the NotePad sample application in the SDK for an example of
a content provider. Android ships with SQLite version 3.4.0
Also , we can manage the database out of the application with the tools provided by the
Android SDK, this is the sqlite3 database tool in the tools/ folder. You can use this tool to
browse or run SQL commands on the device. Run by typing sqlite3 in a shell window.
-19-
3.2 ANDROID 2.2
Android 2.2 is a minor platform release including user features, developer features, API
changes, and bug fixes. The code name for this version is "Froyo", and it adds new features,
bug fixing and different updates.
The most important update is the new 2.6.32 kernel, and also , Android 2.2 accepts more than
256Mb of Ram memory.
3.3 NETWORK
AndDoSS uses a few tools to connecting to internet. The system allows to use the application
with 3GP connection and also with WIFI.
The technologie that we use to connect to the network is "org.apache.http":
-The core interfaces and classes of the HTTP components. These deal with the
fundamental things required for using the HTTP protocol, such as representing a message
including
it's headers and optional entity, and connections over which messages are sent.
order to prepare messages before sending or after receiving, there are interceptors for
-20-
In
requests and responses.
This is because this package is included in the SDK of Android, and is well integrated into it.
Easy way to do HTTP Request and every operations relationated with the network.
3.4 RAPIDSHARE API
Another of the techonologies we used to develop AndDoSS was the Rapidshare official API.
It allows to different operations in his system like download files, upload files, login with your
account, manage your folders inside rapidshare.
Rapidshare API was created because sometimes programming errors in popular tools might
cause an unwanted DDOS attack to the RapidShare servers. Thats why they develop this
official API.
The API works doing calls to:
-https://api.rapidshare.com/cgi-bin/rsapi.cgi?sub=subroutine (recommended)
-http://api.rapidshare.com/cgi-bin/rsapi.cgi?sub=subroutine (without SSL possible as well)
Where subroutine is one activity inside this parameters(we are not going to put all, because
they are explained in the official API document):
a) getaccountdetails: Returns key-pair values for the specific account.
b) setaccountdetails: Changes the settings of an account. Every parameter is optional. Not
transmitting a parameter name means not changing it.
c) download: Call this function to download a file from RapidShare.
And much more subroutines...
-21-
3.5 FILESTUBE API
The Filestube service was found in the first part of the project, it allows the application to
search Rapidshare files, but there are more providers in his search engine.
Before using the API you must get a unique key. This key it's provided when u are registered
on his service as a new user.
Here is an example that explain how the api works:
1.Request:
http://api.filestube.com/?key=2c17a6258659780e0bc6d2ca41ab731e&phrase=britney
2: Diferents kinds of Response from filestube in XML:
1. Successful response for the example request (above):
<answer>
<hasResults>1</hasResults>
<results>
<hitsTotal>603</hitsTotal>
<pageNumber>2</pageNumber>
<hitsForThisPage>10</hitsForThisPage>
<hits id="11">
<name>I_am_a_good_daughter_-_Britney.part1.rar</name>
<extension>rar</extension>
<size>98 MB</size>
<description>No description saved</description>
<address>
http://www.filestube.com/91539aa90c9c531d03e9/go.html
-22-
</address>
<details>
http://www.filestube.com/91539aa90c9c531d03e9/details.html
</details>
<tags>good|daughter|britney</tags>
<rate>0.00</rate>
<added>2007-09-17 00:44:16</added>
<related>14f84a6dab7f39c603e9</related>
<password/>
</hits>
<hits id="12">
...
</hits>
...
<hits id="20">
...
</hits>
</results>
</answer>
2. No results were found (or wrong 'phrase' given with a 'related' token):
<answer>
<hasResults>0</hasResults>
</answer>
3. Error response message (if something went wrong or invalid data were used):
<error>
<message>No phrase specified</message>
-23-
</error>
3.6 XML Parser
To parse the response of Filestube, we use SAX Parser.
SAX is the Simple API for XML, originally a Java-only API. SAX was the first widely adopted API
for XML in Java, and is a “de facto” standard. The current version is SAX 2.0.1, and there are
versions for several programming language environments other than Java.
SAX has recently switched over to the SourceForge project infrastructure. The intent is to
continue the open development and maintainence process for SAX (no NDAs required) while
making it easier to track open SAX issues outside of the high-volume xml-dev list.
SAX defines standard methods to query and set feature flags and property values in an
XMLReader. It is possible to change parser behaviors, such as requesting that an XML reader
to validate (or not validate) a document, and register new types of event handlers using the
getFeature, setFeature, getProperty, and setProperty methods.
The package that allow to use the saxparser is "org.xml.sax". This package provides the core
SAX APIs.
One we have the different files that SAX Parser process, we got different http links, and we
have to process it again to get the direct download links. The HTTP Request, returns us a
document like this(we supressed the biggest part of the Html because its too long):
<div style="float:right;padding-top:2px;"> </div> <pre id="copy_paste_links"
style="clear:both;padding: 6px; border: 1px inset #ccc; width: 590px;text-align:
left;background:#fff;overflow:auto;max-height:500px;
height:32px;">http://www.wupload.com/file/w867/12381812/Britney_Spears__Femme_Fatale.rar
</pre> </div><script type="text/javascript"
src="http://static.filestube.com/files//javascript/ZeroClipboard.js"></script><div
id="d_clip_container" style="position:relative"> <div id="d_clip_msg_copied">Copiado .</div>
<div id="d_clip_button">Copiar en el portapapeles</div> <a
-24-
href="http://www.filestube.com/dmca.html" id="d_abuse_button">Informar de un
abuso</a></div><br class="clear" /><script language="JavaScript">
initCopyToClipboard();</script> <script
src="http://cdn.gigya.com/wildfire/js/wfapiv2.js"></script>
Then , we examine the response from the server, and we extract the direct download link of
the file.
-25-
4. Defining the Project
4.1 Phases of the project
1) Analysis phase :
Getting as much information as possible on the Internet, books and other projects ...
At this stage the main goal was to see whether the project would be viable in the future, that
is, if would get our purpose in developing the application. Thanks to the searches we get a
successful project proposal and how to do it. Also needed a little learning to start developing
on Android, as it does not resemble any kind of development seen during the degreee (we
learned Java, but XML is also required for the interface and some concepts that need to be
clear about Android).
2) Implementation phase:
This phase is divided into two parts, the first is the realization of a user-friendly and simple
interface, without overloading the application. In the second part, developing the code necessary for
the proper functioning of the application, and finally integrate with the user interface.
3) Debugging phase:
Perform various tests on the application until do it stable and correct. Without getting errors and
controlling everything that derives from it, to avoid exceptions and others. Also test your
application on multiple mobile devices to ensure its operation in real hardware that runs Android
Operating System.
4) Documentation Phase:
Writing the project report, indicating all technical and logistical details required for the
-26-
project, as well as explaining the operation of the application with a user manual.
4.2 GANTT DIAGRAM BEFORE
This is the Gantt diagram before the project was started:
-27-
4.3 Gantt diagram After
This is the Gantt diagram after finish the project:
-28-
4.4 COMPARING BOTH DIAGRAMS
As we can see, there are important changes in the time about the different steps in the project
development.
First of all the analysis time wasn't enought to evaluate all the project, that was because a lot
of time we had problems finding ways to do searchs, finally we decided to do it with the
filestube API, but we evaluated another alternatives. Also we prepared the environment with
Eclipse, Android SDK, the plugin for Eclipse and also the emulator.
After that in the programming module, we spent about 1 month learning Android
programming, all the possibilities that Android allow us to do. Also the structures of Android
and how to do the project on eclipse.
Maybe the implementation was the module which didn't has changes after doing the project,
we thought to spent 3 months implementing , and we did a correct selection.
And later, the two last modules was completely wrong, that was because the documentation
period started at the same time of doing tests at the application. The application has got a lot
of bugs and some errors , and we spent more than 1 month to solve them. Other of the
troubles we had was that we hasn't got any Android terminal in our hands, so we found some
people who helped us to debug the application on real devices.
-29-
5. COMPONENTS OF THE PROJECT
5.1 Graphical User Interface
In computing a graphical user interface is a type of user interface that allows users to interact
with electronic devices with images rather than text commands. GUIs can be used in
computers, hand-held devices such as MP3 players, portable media players or gaming devices,
household appliances and office equipment . A GUI represents the information and actions
available to a user through graphical icons and visual indicators such as secondary notation,
as opposed to text-based interfaces, typed command labels or text navigation. The actions are
usually performed through direct manipulation of the graphical elements.
In an Android application, the user interface is built using View and ViewGroup objects. There
are many types of views and view groups, each of which is a descendant of the View class.
View objects are the basic units of user interface expression on the Android platform. The
View class serves as the base for subclasses called "widgets," which offer fully implemented UI
objects, like text fields and buttons. The ViewGroup class serves as the base for subclasses
called "layouts," which offer different kinds of layout architecture, like linear, tabular and
relative.
A View object is a data structure whose properties store the layout parameters and content for
a specific rectangular area of the screen. A View object handles its own measurement, layout,
drawing, focus change, scrolling, and key/gesture interactions for the rectangular area of the
screen in which it resides. As an object in the user interface, a View is also a point of
interaction for the user and the receiver of the interaction events.
In this part of the documentation we are going to explain all the details of the user interface in
AndDoSS application.This is the different components we use in our application:
-30-
a)Linear Layout:
LinearLayout aligns all children in a single direction — vertically or horizontally, depending on
how you define the orientation attribute. All children are stacked one after the other, so a
vertical list will only have one child per row, no matter how wide they are, and a horizontal list
will only be one row high (the height of the tallest child, plus padding). A LinearLayout
respects margins between children and the gravity (right, center, or left alignment) of each
child.
b)Scroll View:
Layout container for a view hierarchy that can be scrolled by the user, allowing it to be larger
than the physical display. A ScrollView is a FrameLayout, meaning you should place one child
in it containing the entire contents to scroll; this child may itself be a layout manager with a
complex hierarchy of objects. A child that is often used is a LinearLayout in a vertical
orientation, presenting a vertical array of top-level items that the user can scroll through.
c) TextView:
Displays text to the user and optionally allows them to edit it. A TextView is a complete text
editor, however the basic class is configured to not allow editing
d) EditText:
EditText is a thin veneer over TextView that configures itself to be editable.
e) Spinner:
A view that displays one child at a time and lets the user pick among them.
-31-
f) Checkbox:
A checkbox is a specific type of two-states button that can be either checked or unchecked.
5.1.1 XML
After explaining the most important components of an Android GUI, we are going to talk about
the XML.
Extensible Markup Language (XML) is a set of rules for encoding documents in machinereadable form. It is defined in the XML 1.0 Specification[4] produced by the W3C, and several
other related specifications, all gratis open standards.[5]
The design goals of XML emphasize simplicity, generality, and usability over the Internet.[6] It
is a textual data format with strong support via Unicode for the languages of the world.
Although the design of XML focuses on documents, it is widely used for the representation of
arbitrary data structures, for example in web services.
Many application programming interfaces (APIs) have been developed that software
developers use to process XML data, and several schema systems exist to aid in the definition
of XML-based languages.
All Android layouts are defined on XML language, this is an example of a simple layout:
<?xml version="1.0" encoding="utf-8"?>
<LinearLayout xmlns:android="http://schemas.android.com/apk/res/android"
android:layout_width="fill_parent"
android:layout_height="fill_parent"
android:orientation="vertical" >
<TextView android:id="@+id/text"
android:layout_width="wrap_content"
android:layout_height="wrap_content"
android:text="Hello, I am a TextView" />
-32-
<Button android:id="@+id/button"
android:layout_width="wrap_content"
android:layout_height="wrap_content"
android:text="Hello, I am a Button" />
</LinearLayout>
As we can see , the different components (TextViews, Buttons...) has different properties inside
his structure like the width, height, text inside etc.
5.1.2 Layouts
First of all we are going to present the interactivity of the different Screens in the application
and after that we are going to say how the different layouts are.
This is the diagram that talks about the interactivity between the different Screens.
After this, we are going to talk about all the layouts individualy, and explain how they work.
-33-
Main Screen:
As we can see, there are different components here. First of all there are an EditBox where the
url has to be written. And after this EditBox there are 2 buttons "Upload" and "Download".
Finally there are 3 bigger buttons than the 2 up of them, "Download List", "Upload List" and
"Account List".
This 5 buttons send you to another window, depending in which one you click.
-34-
Also if you click the "Menu" button, you get some options of the application:
We can see at the bottom three options "About", "Settings", and "Search". The "Search" send
you to the searcher that allows you to look for files in internet. Into "Settings" button you can
modify some parameters from the application.
-35-
Settings Screen:
In this screen , we can see a new component of the application, a "Spinner" that allows us to
change the download date of the application, also the default folder where we are going to
download files. If we click the button "Choose" the next layout is displayed:
About screen:
-36-
This is the version of the application , and some comments of it.
Search Screen:
The search screen is divided in 2 different parts:
a) Part of search with his EditText ,his button to activate the search and another button that
displays some parameters to change the search if you want.
b) Part of the list of files founded is displayed. This part is explained like a list of elements that
displays some info about the files founded.
-37-
Options Search Screen:
Here we have some differents elements displayed.
a)CheckBox: Used here to determinate which providers are used in the search.
b)Spinner: The functionality of the spinner is to select the extension of the file that we want to
search.
-38-
c)TextView: To write the number of searchs we want to do.
d)Button: To save the new options.
-39-
Historial Screen:
The Historial Screen is a Scroll View that show us the last searchs we did. That's displayed like
a list with different TextViews (as we can see at the photo). We can look at the options we had
when we did that search.
-40-
Account List:
If we are in the Main Screen and we click on Account List button, we can see the list of the
different accounts that we stored on the application.
This layout is very similar to the Historial Screen, but the information displayed is the name
and the provider used by the account. This is possible with the TextViews. If we click the
"Menu" of our Android device, we have the possibility to create a new Account in the next
layout "New Account Screen" . Also if we click in one of the accounts displayed, the layout
"Details Account" is displayed , we explain this layout later.
-41-
New Account Screen:
This is the layout to create new accounts in the application to download files or upload.
We have to select the Service (at this moment only Rapidshare.com) and after write in two
TextViews the username and the password of our account.
-42-
Account Detail Screen:
This Screen is used to display the different information that the application has about the
account selected. This is displayed in different TextViews, we cannot modify the account from
here. The information displayed is the Service, Username, Email, Rapidpro expire time and the
free space of the account.
-43-
Download List:
The download list is also a very similar layout of Account List, but the information displayed
this time is the state of the download, the name of the file and the name of the account that
started the download. Also with TextViews. If we want to start a new Download, we have to
click on the Menu button of our device, and select the option "New Download" and the next
layout is displayed. Besides, if we click one of the downloads of the List, we get the "Download
Detail" layout to the top of the application.
-44-
New Download Screen:
The New Download screen uses all the important components of the Android layouts. An
EditText to display the URL to download, a Spinner to select the Account (also we have the
possibilitie from here to create a new account), and the starting time of the download, or
select with a CheckBox download right at the moment.
The other layout we talked before from the Download List Screen is the Download Detail
Screen, the one we are going to explain now.
-45-
Download Detail Screen:
This layout represent all the information about the download selected. The name of the file
(with his url), the account which activate the download, status... etc. All this information is
displayed with TextViews. Besides we can start or stop the download from here, and set his
priority thanks to a Spinner.
-46-
Upload List Screen:
The Upload List Screen Represents the same as the Download List but with the elements we
want to upload to the Rapidshare Server (to our account). If we click on one of the uploads, the
detail about that upload is displayed.But also, we can start a new upload from here. We do that
clicking the Menu button from our Android device and after that select the option New
Upload.
-47-
Upload Detail Screen:
All the information about the upload is displayed here (its like the Download detail screen,
very similar).
New Upload Screen:
-48-
In this layout, we have an EditText with the rute to the file we want to upload, and we have a
Spinner to select the account that we want to manage the upload. Also, we can create a new
account from here, the same as the new download layout allows.
5.2 ACTIVITIES
An activity is a single, focused thing that the user can do. Almost all activities interact with the
user, so the Activity class takes care of creating a window for you in which you can place your
UI with setContentView(View). While activities are often presented to the user as full-screen
windows, they can also be used in other ways: as floating windows (via a theme with
windowIsFloating set) or embedded inside of another activity (using ActivityGroup). There
are two methods almost all subclasses of Activity will implement:
• onCreate(Bundle) is where you initialize your activity. Most importantly, here you will
usually call setContentView(int) with a layout resource defining your UI, and using
findViewById(int) to retrieve the widgets in that UI that you need to interact with
programmatically.
• onPause() is where you deal with the user leaving your activity. Most importantly, any
changes made by the user should at this point be committed (usually to the
ContentProvider holding the data).
To be of use with Context.startActivity(), all activity classes must have a corresponding
<activity> declaration in their package's AndroidManifest.xml.
The Activity class is an important part of an application's overall lifecycle, and the way
activities are launched and put together is a fundamental part of the platform's application
model.
After explaining what is an Activity on Android, we are going to explain the most important
Activities from the project, and his development:
-49-
1) MainActivity:
As his name indicate, this is the principal activity of the application. The one which controls
the navigation of the different Screens. In his method OnCreate, called when the Activity starts
his execution, we associate the buttons to local variables of the class, that allows us to manage
the navigation between the layouts.
buttonDownloadList = (Button) findViewById(R.id.buttonDownloadList);
buttonDownloadList.setOnClickListener(new View.OnClickListener() {
public void onClick(View v) {
startDownloadList();
}
});
buttonUploadList = (Button) findViewById(R.id.buttonUploadList);
buttonUploadList.setOnClickListener(new View.OnClickListener() {
public void onClick(View v) {
startUploadList();
}
});
// button to new download click listener
buttonDownload = (Button) findViewById(R.id.buttonDownload);
buttonDownload.setOnClickListener(new View.OnClickListener() {
public void onClick(View view) {
startNewDownload();
}
});
// button to new upload click listener
buttonUpload = (Button) findViewById(R.id.buttonUpload);
buttonUpload.setOnClickListener(new View.OnClickListener() {
public void onClick(View view) {
startNewUpload();
}
});
// button to account list click listener
buttonAccountList = (Button) findViewById(R.id.buttonAccountList);
buttonAccountList.setOnClickListener(new View.OnClickListener() {
public void onClick(View view) {
startAccountList();
}
});
Also , we modify the default Menu of Android applications and we add the new item "Search"
that one, sends us to the Search Screen.
-50-
@Override
public boolean onCreateOptionsMenu(Menu menu) {
super.onCreateOptionsMenu(menu);
// add new menu item to Options menu - other items are defined in
// OptionsMenuActivity
menu.add(0, Globals.SEARCH_ID, 0,
R.string.menuSearch).setIcon(android.R.drawable.ic_menu_search);
return true;
}
@Override
public boolean onMenuItemSelected(int featureId, MenuItem item) {
//handling menu items click
switch(item.getItemId()) {
case Globals.SEARCH_ID:
// start search activity
Intent searchActivity = new Intent(this,
SearchActivity.class);
startActivity(searchActivity);
return true;
}
return super.onMenuItemSelected(featureId, item);
}
The "onMenuItemSelected" method is called when one of the items of the menu is clicked. If
that element is the Search, we call the Search Activity.
Is the same for all the buttons in the Activity, we did the connection between buttons and
layouts starting each activity when his button is clicked.
2)AccountList Activity:
This Acitivity works the same way as the DownloadList Activity and UploadList Activity.
First, in the "onCreate" method, we call the Databases to fill the information about all the
accounts.
This is possible thanks to the "android.database.Cursor" library.
private void fillData() {
// Get all of the rows from the database and create the item list
mDbHelper.open();
Cursor accountsCursor = mDbHelper.getAllAccounts();
startManagingCursor(accountsCursor);
-51-
// Create an array to specify the fields we want to display in the list
(only TITLE)
String[] from = new String[]{AnddosDbAdapter.colAccountUsername,
AnddosDbAdapter.colAccountService};
// and an array of the fields we want to bind those fields to
int[] to = new int[]{R.id.textAccountRow, R.id.textAccountRowService};
// Now create a simple cursor adapter and set it to display
SimpleCursorAdapter accounts =
new SimpleCursorAdapter(this, R.layout.account_list_row,
accountsCursor, from, to);
// make message to user if no accounts is in database
if(accounts.getCount()==0)
Toast.makeText(this, R.string.textNoAccounts,
Toast.LENGTH_SHORT).show();
listAccounts.setAdapter(accounts);
mDbHelper.close();
}
We have different mehods in our Database Class to get the information we want in each layout
of the application. For example, here we get all the accounts, and we associate it to the layout
to be displayed on the screen.
Also we added the possibilitie to delete an account, with a long-click on an account, the
"Context Menu" is displayed, and we added that option.
@Override
public void onCreateContextMenu(ContextMenu menu, View v,
ContextMenuInfo menuInfo) {
super.onCreateContextMenu(menu, v, menuInfo);
// create context menu for delete account
menu.add(0, Globals.DELETEACCOUNT_ID, 0, R.string.menuDeleteAccount);
}
@Override
public boolean onContextItemSelected(MenuItem item) {
//handling click to delete account
switch(item.getItemId()) {
case Globals.DELETEACCOUNT_ID:
AdapterContextMenuInfo info = (AdapterContextMenuInfo)
item.getMenuInfo();
accountId = info.id;
createAlertDeleteAccount();
return true;
}
return super.onContextItemSelected(item);
}
This method calls the private method "createAlertDeleteAccount" which functionality is going
-52-
to the database and delete the selected account.
private void createAlertDeleteAccount()
{
// create alert dialog to prevent the deletion of downloads that are
linked to this account
AlertDialog.Builder builder = new AlertDialog.Builder(this);
builder.setTitle(R.string.alertDeleteAccountTitle)
.setMessage(R.string.alertDeleteAccountMessage)
.setCancelable(false)
.setPositiveButton(R.string.alertDeletePosButton, new
DialogInterface.OnClickListener() {
public void onClick(DialogInterface dialog, int id) {
// delete account in database and refill data from
database
mDbHelper.open();
mDbHelper.deleteAccount(accountId);
mDbHelper.close();
fillData();
}
})
.setNegativeButton(R.string.alertDeleteNegButton, new
DialogInterface.OnClickListener() {
public void onClick(DialogInterface dialog, int id) {
dialog.cancel();
}
});
AlertDialog alert = builder.create();
alert.show();
}
Also the information on the screen is updated again, calling the "fillData" method.
3)AccountNew Activity:
This class has the aim to create a new account with the layout "Account New", getting the info
in that layout and store it on the Database.
Here the method onCreate only associate the Buttons, EditTexts and all the components inside
the layout. And after clicking the save button we store it.
// save button click listener
saveButton.setOnClickListener(new View.OnClickListener() {
public void onClick(View view) {
// check for empty fields
if(TextUtils.isEmpty(mUsernameText.getText()) ||
TextUtils.isEmpty(mPasswordText.getText()))
{
createAlertEmptyUserOrPass();
}
else
-53-
{
}
saveAccount();
setResult(RESULT_OK);
finish();
}
});
private void saveAccount() {
String service = mServiceSpinner.getSelectedItem().toString();
String username = mUsernameText.getText().toString();
String password = mPasswordText.getText().toString();
mDbHelper.open();
// save account to database
long id = mDbHelper.createAccount(service, username, password);
if (id > 0) {
// add fail to store into database
}
mDbHelper.close();
}
As we can see, we have a method named "createAccount" which stores the information about
the account writed on the layout.
HistorialList,DownloadList,DownloadDetails,DownloadNew, UploadList,UploadDetails and
UploadNew Activities works in the same way as the Account Activities do.
4)Search Activity:
The Search Activity is the class responsible for doing the searches and completing the search
history for each search performed. The searchs are implemented with Asynchronous tasks, because
then they are independent of the GUI, so the searchs cannont block the GUI.
private void performSearch() {
String phrase = editTextSearch.getText().toString();
{
}
else
{
if(TextUtils.isEmpty(phrase))
createAlertNoPhrase();
-54-
UpdateDbVar();
progressDialog = ProgressDialog.show(SearchActivity.this,
"Please wait...", "Retrieving data...", true, true);
PerformSearchTask task = new PerformSearchTask();
task.execute(phrase);
progressDialog
.setOnCancelListener(new
CancelTaskOnCancelListener(task));
}
}
This is the definition of the PerformSearchTask,inside the Activity.
private class PerformSearchTask extends
AsyncTask<String, Void, ArrayList<SearchResult>> {
@Override
protected ArrayList<SearchResult> doInBackground(String... params) {
String phrase = params[0];
return searchMaker.makeSearch(phrase);
}
@Override
protected void onPostExecute(final ArrayList<SearchResult> result) {
runOnUiThread(new Runnable() {
public void run() {
Nresult=Integer.toString(result.size());
if(result.isEmpty())
Toast.makeText(SearchActivity.this,
R.string.textSearchNoResults, Toast.LENGTH_SHORT).show();
searchAdapter = new
SearchResultAdapter(SearchActivity.this, R.layout.search_row, result);
listSearchResults.setAdapter(searchAdapter);
saveHistorial();
//listSearchResults.setBackgroundColor(Color.BLUE)
;
if (progressDialog != null) {
progressDialog.dismiss();
progressDialog = null;
}
});
}
}
}
-55-
Every time we do a search, we store it on the database of the Historial.
The Historial allows only to store the last 20 searchs, so we need to count the number of searchs
stored, and also get the older search inside the database, because maybe is going to be replaced.
public void UpdateDbVar(){
//Update values of id and number of elements of the historial
mDbHelper.open();
Globals.numberHistorialElements=mDbHelper.getNumberHistorialElements();
Globals.HistorialIdMin=mDbHelper.getOlderHistorialElement();
Globals.HistorialIdMax=mDbHelper.getNewerHistorialElement();
mDbHelper.close();
}
private void saveHistorial(){
/*CODE HERE*/
mDbHelper.open();
// save account to database
// add check if acounts info exists on rapidshare!!
if(Globals.numberHistorialElements==20){
ok=mDbHelper.updateHistorialElement(Globals.HistorialIdMin,
name,
Globals.HistorialIdMax+1,extension,Integer.toString(Globals.MAX_SEARCHS)
,Nresult,rapidshare,megaupload,filesonic,fileserve
,megashares,hotfile);
if(ok==false)
Log.v("Historial Table Update", "Error updating the
table");
else{
Globals.HistorialIdMax++;
}
}
else if(Globals.numberHistorialElements<20){
id =
mDbHelper.createHistorialElement(Globals.HistorialIdMax+1, name,extension,
Integer.toString(Globals.MAX_SEARCHS),Nresult,rapidshare
,megaupload,filesonic,fileserve,megashares,hotfile
);
if (id < 0) {
// add fail to store into database
}
else{
Globals.HistorialIdMax++;
Globals.numberHistorialElements++;
}
}
mDbHelper.close();
}
-56-
This method ( SaveHistorial ) check if the database of the searchs is full (20 elements), if is
not, it store the search. But if it's full, it delete the older element and put the new one in his
place.
5)ShowOptions Activity:
This activity is associated with the layout Options Search. His functionality is to save the new
parameters that we want to use in our searchs. But also, there are a few security checks to
allow a correct functionality from the layour.
For example, one of the Providers (Checkbox) has to be checked.
if(!checkboxRapidshare.isChecked() && !checkboxMegaupload.isChecked() &&
!checkboxMegashares.isChecked() && !
checkboxFileserve.isChecked() &&
!checkboxFilesonic.isChecked() && !
checkboxHotfile.isChecked())
flag=2;
Besides, the number of the EditText should be between 1 and 15.
If this conditions are satisfied, the new parameters are saved for the searchs, and if not, a
message is displayed on the screen.
//Error in number
if(flag==1){
Toast.makeText(this, "Number between 1-15",
Toast.LENGTH_SHORT).show();
}
//Error in providers
else if(flag==2){
Toast.makeText(this, "Almost 1 provider to search",
Toast.LENGTH_SHORT).show();
}
This are the most importante Activities of the application, next we are going to explain the
services.
-57-
5.3 SERVICES
A Service is an application component representing either an application's desire to perform a
longer-running operation while not interacting with the user or to supply functionality for
other applications to use. Each service class must have a corresponding <service> declaration
in its package's AndroidManifest.xml. Services can be started with Context.startService() and
Context.bindService().
Note that services, like other application objects, run in the main thread of their hosting
process. This means that, if your service is going to do any CPU intensive (such as MP3
playback) or blocking (such as networking) operations, it should spawn its own thread in
which to do that work. More information on this can be found in Processes and Threads. The
IntentService class is available as a standard implementation of Service that has its own
thread where it schedules its work to be done.
After this explanation about the services, we are going to talk about the two main Services in
the application:
1)DownloadProvider Service:
The DownloadProvider Service has the aim to execute the different downloads that we start
on the DownloadNew Activity, and manage them. Also the downloads works like threads,
because this class extends "Thread" class.
This provider uses the class "RapidshareDownloadProvider" to interconnect the application
with the Rapidshare API.
@Override
public void onCreate() {
super.onCreate();
this.nm = (NotificationManager)
getSystemService(NOTIFICATION_SERVICE);
this.pt = new DownloadProviderThread(this);
this.pt.start();
DownloadProviderService.running = true;
this.displayInformation(getText(R.string.downloadServiceStarted)
-58-
.toString());
}
WifiManager wm = (WifiManager)getSystemService(WIFI_SERVICE);
this.wifiLock = wm.createWifiLock("DownloadWifiLock");
this.wifiLock.acquire();
2)UploadProvider Service:
The UploadProvider Service has the aim to execute the different uploads that we start on the
UploadNew Activity, and manage them. Also the uploads works like threads, because this class
extends "Thread" class.
This provider uses the class "RapidshareUploadProvider" to interconnect the application
with the Rapidshare API.
@Override
public void onCreate() {
super.onCreate();
this.dbProvider = new
DatabaseProvider(this.getApplicationContext());
this.upload = new UploadProviderThread(this.dbProvider, this);
this.upload.start();
UploadProviderService.running = true;
this.displayInformation(this.getText(R.string.uploadServiceStarted).toString());
WifiManager wm = (WifiManager)getSystemService(WIFI_SERVICE);
this.lock = wm.createWifiLock("UploadWifiLock");
this.lock.acquire();
}
public void displayInformation(String text) {
Toast.makeText(this.getApplicationContext(), text,
Toast.LENGTH_SHORT)
.show();
}
-59-
5.4 DATABASES
The database are very important in the application, this is due to we have to store information
between executions of it.
The information we want to store is involved with Accounts, Downloads, Searchs, Uploads...
most part of the application needs it.
This are the different tables of our database:
a) Historial Table: This table is used to store the different searchs we did , and also the
parameters used for that searchs. It is a little table because we only allow 20 elements.
try{db.execSQL("CREATE TABLE IF NOT EXISTS " + HistorialTable + " ("
+
+
+
+
+
+
+
+
+
+
+
colHistorialID + " INTEGER PRIMARY KEY, "
colHistorialName + " TEXT NOT NULL , "
colHistorialExtension + " TEXT NOT NULL , "
colHistorialNumberResults + " TEXT NOT NULL , "
colHistorialNumberSearchs + " TEXT NOT NULL , "
colHistorialProviderRapidshare + " TEXT NOT NULL, "
colHistorialProviderMegaupload + " TEXT NOT NULL , "
colHistorialProviderFileserve + " TEXT NOT NULL , "
colHistorialProviderFilesonic + " TEXT NOT NULL , "
colHistorialProviderMegashares + " TEXT NOT NULL , "
colHistorialProviderHotfile + " TEXT NOT NULL)" );
b) Accounts Table: This table is used to store all the information about one account.
db.execSQL("CREATE TABLE IF NOT EXISTS " + accountsTable + " ("
+ colAccountID + " INTEGER PRIMARY KEY AUTOINCREMENT , "
+ colAccountService + " TEXT NOT NULL , "
+ colAccountUsername + " TEXT NOT NULL , "
+ colAccountPassword + " TEXT NOT NULL )");
c) Downloads Table: This table is used to store the downloads, all his parameters, and also is
relationated with the Accounts Table with a Foreign Key.
db.execSQL("CREATE TABLE IF NOT EXISTS " + downloadsTable + " ("
+ colDownloadID + " INTEGER PRIMARY KEY AUTOINCREMENT, "
+ colDownloadDateTime + " TEXT NOT NULL, " + colDownloadUrl
+ " TEXT NOT NULL, " + colDownloadFilename
+ " TEXT NOT NULL, " + colDownloadStatus
+ " INTEGER NOT NULL, " + colDownloadPriority
+ " INTEGER NOT NULL, " + colDownloadAccount
+ " INTEGER NOT NULL, FOREIGN KEY (" + colDownloadAccount
+ ") REFERENCES " + accountsTable + " (" + colAccountID
+ "));");
-60-
d) Uploads Table: The same than the Downloads Table. But for uploads.
db.execSQL("CREATE TABLE IF NOT EXISTS " + uploadsTable + " ("
+ colUploadID + " INTEGER PRIMARY KEY AUTOINCREMENT, "
+ colUploadFilepath + " TEXT NOT NULL, "
+ colUploadFilename + " TEXT NOT NULL, " + colUploadStatus
+ " INTEGER NOT NULL, " + colUploadAccount
+ " INTEGER NOT NULL, FOREIGN KEY (" + colUploadAccount
+ ") REFERENCES " + accountsTable + " (" + colAccountID
+ "));");
All this tables are managed with an Adapter that allows us to work with them easily. The
Adapter is defined AnddosDbAdapter. Inside them we have the definition of the tables, and
also a lot of methods to work with them. Create, Delete and Update elements, get information...
5.5 STRINGS
The application has a Strings.xml file due to don't repeat the same strings again and again. Its
located on the file res/values/strings.xml. And inside are almost the most quantity of the
strings we used on the application.
This is a part of that file:
<string
<string
<string
<string
<string
<string
<string
name="titleHistorialList">AndDos - Historial List</string>
name="textNoHistorialElements">No elements in the Historial</string>
name="TextResultsHistorialRowWrited">Number Results:</string>
name="TextExtensionHistorialRowWrited">Extension:</string>
name="TextSearchsHistorialRowWrited">Number Searchs:</string>
name="TextNameHistorialRowWrited">Search:</string>
name="TextProvidersHistorialRowWrited">Providers:</string>
5.6 GLOBALS
There are also another file with different variables, this variables are used to positionate the
menus, besides there are another functionality to them. One variable is used to control the
Historial Table of the database, and some other functionalities like the parameters of the
searchs (Options of the Search). This is used to check if some options are active or inactive,
and how many providers are selected...
-61-
public final class Globals {
//Options menu globals
public static final int
public static final int
public static final int
public static final int
public static final int
public static final int
ABOUT_ID = Menu.FIRST;
SEARCH_ID = Menu.FIRST + 1;
SETTINGS_ID = Menu.FIRST + 2;
NEWACCOUNT_ID = Menu.FIRST + 3;
NEWDOWNLOAD_ID = Menu.FIRST + 4;
NEWUPLOAD_ID = Menu.FIRST + 5;
//Context menu globals
public static final int DELETEACCOUNT_ID = Menu.FIRST + 10;
public static final int DELETEDOWNLOAD_ID = Menu.FIRST + 11;
public static final int DELETEUPLOAD_ID = Menu.FIRST + 12;
//Settings keys
public static final String PREFS_NAME = "AnddosSettings";
public static final String DATA_FOLDER = "dataFolder";
//Search Globals
public static int MAX_SEARCHS = 10;
public static boolean rapidshare = true;
public static boolean megaupload = false;
public static boolean fileserve = false;
public static boolean megashares = false;
public static boolean filesonic = false;
public static boolean hotfile = false;
public static String extension="";
public static int POS_EXTENSION=0;
public static String AllExtensions="All extensions";
//Historial globals
public static long HistorialIdMin=1;
public static long HistorialIdMax=1;
public static long numberHistorialElements=-1;
}
5.7 NETWORK
The network on our application is only used when we do a search or we are
downloading/uploading any file. It's managed by the libraries of Android and other libraries
that we found on Internet.
-62-
5.7.1 HTTP CONNECTIONS
For the HTTP Connections we used the org.apache.http librarie.
The core interfaces and classes of the HTTP components. These deal with the fundamental
things required for using the HTTP protocol, such as representing a message including it's
headers and optional entity, and connections over which messages are sent. In order to
prepare messages before sending or after receiving, there are interceptors for requests and
responses.
For use that library we implemented the class HttpRetriever.
public class HttpRetriever {
private DefaultHttpClient client = new DefaultHttpClient();
public String retrieve(String uri) {
HttpGet getRequest = new HttpGet(uri);
try {
HttpResponse getResponse = client.execute(getRequest);
final int statusCode =
getResponse.getStatusLine().getStatusCode();
if (statusCode != HttpStatus.SC_OK) {
Log.w(getClass().getSimpleName(), "Error " + statusCode + "
for URL " + uri.toString());
return null;
}
HttpEntity getResponseEntity = getResponse.getEntity();
if (getResponseEntity != null) {
return EntityUtils.toString(getResponseEntity);
}
}
catch (IOException e) {
getRequest.abort();
Log.w(getClass().getSimpleName(), "Error for URL " +
uri.toString(), e);
}
return null;
}
public InputStream retrieveStream(String url) {
-63-
HttpGet getRequest = new HttpGet(url);
try {
HttpResponse getResponse = client.execute(getRequest);
final int statusCode =
getResponse.getStatusLine().getStatusCode();
if (statusCode != HttpStatus.SC_OK) {
Log.w(getClass().getSimpleName(), "Error " + statusCode + "
for URL " + url);
return null;
}
HttpEntity getResponseEntity = getResponse.getEntity();
return getResponseEntity.getContent();
}
catch (IOException e) {
getRequest.abort();
Log.w(getClass().getSimpleName(), "Error for URL " + url, e);
}
return null;
}
}
This class is used to do all the gets on HTTP protocol ,connecting to the Filestube API.
5.7.2 RAPIDSHARE API
As we explain before , we have services to connect to the Rapidshare API, but the classes that
allows us to connect inside the implementation are the RapidshareDownloadProvider class.
public class RapidshareDownloadProvider implements ServiceProvider {
private
private
private
private
private
ServiceProviderListener listener;
URL url;
FileSaver fileSaver;
final String DEFAULT_API_HOSTNAME = "api.rapidshare.com";
boolean downloadIsRunning = false;
.....
}
URL downloadUrl = createApiDownloadUrl(
-64-
matcher.group("hostname"), fileInfo.getId(),
fileInfo.getName(), account,
matcher.group("dlauth"), position);
System.out.println(downloadUrl);
connection = downloadUrl.openConnection();
InputStream downloadStream = c
onnection.getInputStream();
byte[] buffer = new byte[4 * 1024];
// Loop can be stopped by calling stopDownload() method
which set downloadIsRunning.
for (int bytes = 0; (bytes =
downloadStream.read(buffer)) > 0 && downloadIsRunning;) {
fileSaver.write(buffer, bytes);
fileInfo.getSize(),
if (listener != null) {
listener.downloadProgress(this,
fileSaver.getPosition());
}
}
if (listener != null) {
if (downloadIsRunning) {
listener.downloadFinish(this);
}
else {
listener.downloadStop(this);
}
}
downloadIsRunning = false;
This is the code that allows the application to connect the Rapidshare api, we did a buffer that
reads the answer, and the fileSaver, writes the file on the buffer.
Once the file is downloaded , it ends.
5.7.3 FILESTUBE API
The application contacts the Filestube API using the SearchMaker class.
This class connects the API using again the HttpRetriever explained before, and it evaluates
the answer using the parsers. This is because the API returns a XML text in his answer.
-65-
public ArrayList<SearchResult> makeSearch(String phrase){
String url = constructSearchUrl(phrase);
String response=null;
ArrayList<SearchResult> result = new ArrayList<SearchResult>();
//Log.d(getClass().getSimpleName(), response);
for(int i=1;i<=Globals.MAX_SEARCHS;i++){
response =
httpRetriever.retrieve(url+"&page="+Integer.toString(i)
+"&extension="+Globals.extension);
if(response == null){
response = "";
}
else{
result.addAll(xmlParser.parseSearchResultResponse(response));
response.trim();
}
}
This code do searchs until we get the number indicated in the parameter "MAX_SEARCHS"
defined in the options of the search. And it adds to the array of answers the response of the
XML Parser, so adds the links to the result.
After we had all the links answered by the api, we select the only ones that we want. This is
because we cannot select the providers of the answer, so we have to filter it.
if(isToDelete(itemResponse))
toDelete.add(i);
else{
if(Globals.megaupload &&
itemResponse.contains("megaupload.com"))
item.setAddress(itemResponse);
if(Globals.rapidshare &&
itemResponse.contains("rapidshare.com"))
item.setAddress(itemResponse);
if(Globals.fileserve &&
itemResponse.contains("fileserve.com"))
item.setAddress(itemResponse);
if(Globals.megashares &&
itemResponse.contains("megashares.com"))
item.setAddress(itemResponse);
if(Globals.filesonic &&
itemResponse.contains("filesonic.com"))
item.setAddress(itemResponse);
if(Globals.hotfile && itemResponse.contains("hotfile.com"))
item.setAddress(itemResponse);
}
-66-
Finally we return the value of result to the layout and it displays all the links and his
information (size, extension...).
5.7.4 XML PARSER
After the Filestube API returns us the XML file with all the files to download, we have to
process that XML file to extract the information that we want from it.
The SaxParser allows us to do that, so we can evaluate the xml using the method
parseSearchResultResponse at the SearchMaker class.
public ArrayList<SearchResult> parseSearchResultResponse(String xml) {
try {
XMLReader xmlreader = initializeReader();
SearchResultHandler personHandler = new SearchResultHandler();
// assign our handler
xmlreader.setContentHandler(personHandler);
// perform the synchronous parse
xmlreader.parse(new InputSource(new StringReader(xml)));
return personHandler.retrieveSearchResultList();
}
catch (Exception e) {
e.printStackTrace();
return null;
}
}
After this, we have the links of the files we want to analize.
-67-
6. TESTING
After lot of debug, we think the application is enought stable. We tested it in different ways,
first of all we tested it on the Android Virtual Machine. This was very useful to correct a few
bugs, and exceptions that we are going to explain later.
Also we tested the application in real devices for 2 weeks. Concretely we used this 2
devices,both of them with Android 2.2:
– Samgung Galaxy S:
Network
HSUPA 900/1900/2100
EDGE/GPRS 850/ 900/1800/1900
Dimension
64.2 X 122.4 X 9.9 mm (119g)
Display
4.0” WVGA(480x800) 16M SUPER AMOLED
mDNIe(Mobile Digital Natural Image engine)
Processor
1GHz CPU Speed
– HTC Desire:
Display
Type: Touch-sensitive screen with pinch-to-zoom capability
Size: 3.7 inches
Resolution: 480 X 800 WVGA
CPU Processing Speed
1 GHz
-68-
Storage
ROM: 512 MB
RAM: 576 MB
Internet
3G:
Up to 7.2 Mbps download speed
Up to 2 Mbps upload speed
GPRS:
Up to 114 kbps downloading
EDGE:
Up to 560 kbps downloading
Wi-Fi™:
IEEE 802.11 b/g
After this 2 weeks testing the application on real devices, the experience was so good, we solve
all the bugs we get and also we experimented great feeling about the application. It works fast,
unless you do a lot of searchs, but it depends on the Internet connection.
In conclusion the application is working correctly, and usually in fast times.
-69-
7.PROBLEMS/SOLUTIONS
We found different problems developing the application , due to different reasons:
a) First of all, we had great difficulty adapting parsers http requests made in the search files.
This was because to get the xml pages, the size of one's exceeded the limit of buffers in
memory which are stored, having to adapt the design using a buffer to concatenate the
characters every 2048 bytes.
b) In addition, the search was a big challenge at first, as the requests that were made were
enough to websites (with the consequent delay, which was sometimes too long). In a first
version of the searches took about twice what it takes now. This is because the use was made
of the class AsyncTask, enables AsyncTask proper and easy use of the UI thread. This class
allows to perform background operations and publish results on the UI thread without having
to manipulate threads and/or handlers.
An asynchronous task is defined by a computation that runs on a background thread and
whose result is published on the UI thread. An asynchronous task is defined by 3 generic
types, called Params, Progress and Result, and 4 steps, called onPreExecute, doInBackground,
onProgressUpdate and onPostExecute.
Still, sometimes due to bad internet connection, searches can take a while.
c)Another problem encountered during development, was able to store in the device some of
the data that the application needs to have full functionality, after closing the application and
reopen it.
This was solved using the database explained before, in which tables we store all the
information necessary for the proper functioning of the application after each of his
executions.
d)And finally we had a problem of matching each new version of the api that Rapidshare
updates to fit in our application.
-70-
8. THINKING IN THE FUTURE
Since AndDoSS is an application developed for Android, the intention is to further develop
once delivered as final project, and maybe someday be able to upload to AndroidMarket users
can enjoy it. So have raised several ideas to improve implementation in half term, which aim to
bring out new features and enhancements adding to the application.
Approaches that have been designed to improve the application were as follows:
-Adapt AndDoSS version to older versions of the OS. This idea arises in order to make a
version that can work in more Android devices. Initially sets the objective to lower the
requirements to the 2.0 version of Android, this is because most of Android devices already
have a version greater than or equal to 2.0. Later perhaps apply enhancements that make it
compatible with even older versions.
-Add support for new providers to download files / search in a more efficient way.
This is one of the major improvements we wish to make. As a good download manager, we
want to add new suppliers to download / upload files to the Internet. Also wish to contact
directly with suppliers to carry out the searches were not made through third party services
available on the Internet, but through their own databases / systems using the providers, this
would eliminate much of the computing necessary for the carrying out of searches with a
improvement in time.
Initially, contact with Rapidshare to search your file system should be a priority because it is
the only supplier currently available for download in AndDoSS.
Then add support for it and other providers (Megaupload, Fileserver, Filesonic etc)
-Improve the application to make it faster (searchs). As mentioned in the previous section,
contact the search providers and they provide us some improvement in the searchs, it would
be very important. But we also must continue to explore other fields such as threads (threads)
or a previously saved search in history not to have to make it again. From there you can follow
several routes that could provide a substantial improvement in the application.
-71-
9. BIBLIOGRAPHY
1) http://en.wikipedia.org/
2) http://www.eclipse.org/
3) http://www.android.com/
4) http://developer.android.com/index.html
5) http://developer.android.com/guide/index.html
6) http://www.g-loaded.eu/2010/10/04/rsapiget-download-rapidshare-api/
7) http://images.rapidshare.com/apidoc.txt
8) http://www.android-spa.com/
9) http://www.youtube.com/
10)http://www.droiddraw.org/
11)http://www.filestube.com/api.html
12)http://www.filestube.com/apidoc.html
13)http://rapid-search-engine.com/
14)http://www.rapidse.net/
15)http://webtoolsandtips.com/resources/how-to-search-rapidshare-files-for-download/
16)http://rapidoogle.com/
17)http://getandroidstuff.com/
18)http://www.slideshare.net/sullis/connecting-to-web-services-on-android
19)http://www.androidpeople.com/android-xml-parsing-tutorial-using-saxparser
20)http://www.anddev.org/using_xmlresourceparser_to_parse_custom_compiled_xmlt9313.html
21)http://www.anddev.org/parsing_xml_from_the_net_-_using_the_saxparser-t353.html
22)http://www.rapidravage.com/
23)http://users.dsic.upv.es/~fjabad/pfc/estructura.pdf
24)http://www.xtensivearts.com/2009/07/03/episode-1-getting-started/
25)http://www.xatakandroid.com/tutoriales/primeros-pasos-con-android-instalar-ydesinstalar-aplicaciones-sin-el-android-market
26)http://www.genbetadev.com/
27)http://hubpages.com/hub/Tips-to-solve-the-UnknownHostException-on-Android
-72-
28)https://edux.feld.cvut.cz/courses/Y36SI3/
29)www.google.com
30) www.htc.com
31)www.samsung.com
-73-