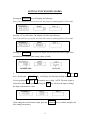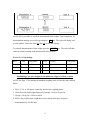
1
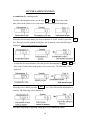
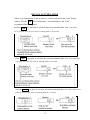
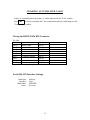
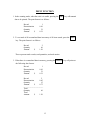
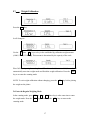
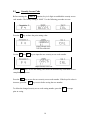
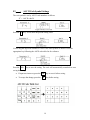
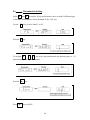
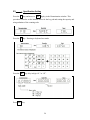
"KCS SERIES"
COIN COUNTING SCALES
215 Vollmer Avenue
P.O. Box 985
Oldsmar, FL 34677-0985
Tel: 813/855-6789
Fax: 813/854-3069
[email protected]
"KCS SERIES" - COIN COUNTING SCALE
USER MANUAL
CONTENTS:
Page
Features, Specifications . . . . . . . . . . . . . . . . . . . . . . . .
1
Warranty, FCC Rules
. . . . . . . . . . . . . . . . . . . . . . . .
2
Scale Unpacking Instructions . . . . . . . . . . . . . . . . . . . . .
3
Best conditions for Weighing . . . . . . . . . . . . . . . . . . . .
4
Calibration, How the Scale Counts . . . . . . . . . . . . . . . . . .
4
Keypad Functions . . . . . . . . . . . . . . . . . . . . . . . . . .
5
Setting Token Unit Weight Mode . . . . . . . . . . . . . . . . . . .
6-7
Setting Denomination Unit Weight Modes. . . . . . . . . . . . . .
8-9
Preset U.S. Coin Settings . . . . . . . . . . . . . . . . . . . . . . .
9
Establishing a Piece Weight . . . . . . . . . . . . . . . . . . . . . .
9
Accumulation Function . . . . . . . . . . . . . . . . . . . . . . . .
10
Recall Accumulation . . . . . . . . . . . . . . . . . . . . . . . . .
11
Clearing Accumulated Value . . . . . . . . . . . . . . . . . . . . .
12
RS232 Pin Connector Wiring . . . . . . . . . . . . . . . . . . . . .
12
Print Function
. . . . . . . . . . . . . . . . . . . . . . . . . .
13
“F” Key Function Description . . . . . . . . . . . . . . . . . . . . .
14
Error Messages . . . . . . . . . . . . . . . . . . . . . . . . . . . . .
15
Security Jumper . . . . . . . . . . . . . . . . . . . . . . . . . . . .
15
F2 Baud Rate Setting
. . . . . . . . . . . . . . . . . . . . . . . .
16
F3 Weight Calibration . . . . . . . . . . . . . . . . . . . . . . . . .
17
F4 Security Access Code . . . . . . . . . . . . . . . . . . . . . . .
18
F5 ASC II Code Symbol Settings . . . . . . . . . . . . . . . . . . .
19
F6 Denomination Setting . . . . . . . . . . . . . . . . . . . . . . .
20 – 21
F7 Linearity Calibration . . . . . . . . . . . . . . . . . . . . . . . .
22 – 23
F8 Specification Setting . . . . . . . . . . . . . . . . . . . . . . . .
24 – 25
F9 Weight Calibration . . . . . . . . . . . . . . . . . . . . . . . . .
26
ii
"KCS SERIES" – COIN COUNTING SCALE
Features
•
•
•
•
•
•
•
•
•
•
•
•
•
•
•
Auto calibration
Programmable Unit Weight and Denomination
10 preset keys for coins, tickets or tokens denomination
3 bright displays for Quantity / Denomination / Total Value
Total value calculation
Up to 25 accumulations
Tare function (100% Tare)
Settable ASC II Code symbol
Currency value setting range 0.01 to approximately 999
Security password
Overload protection
LED backlight included
RS-232 interface included
Baud Rate Selection: 300/600/1200/2400/4800/9600
Low battery and charging status indication
MODELS
KCS-12
KCS-30
KCS-60
Capacity
6 kg/12 lb
15 kg/30 lb
30 kg/60 lb
Division
1 gram/0.002
2 grams/0.004
5 grams/0.01
Operating Temperature : 32° F. – 104° F.
Power Source: AC 110V 50/60 Hz
(DC 6V 4.5AH Rechargeable Battery)
Platter Size : 11.0” x 9.0” (280 mm x 230 mm)
Overall size : 11.0” W x 11-1/4” D x 4-3/4” H
1
Ship Weight : 11 lbs
Limited Warranty: 12 months
WARRANTY
KLOPP International Inc. offers customers a one-year warranty on this product from the
day it is purchased.
In the U.S.A., the product (if defective) should be returned, freight prepaid by the
customer, to KLOPP International Inc. in Florida. In any event, please contact the
KLOPP International Inc. office before shipping to confirm that the product is covered by
this warranty.
This warranty only applies to product failures due to defective materials and/or
workmanship. This warranty will be rendered invalid if, upon inspection, it is found that
the product was: abused; used for a purpose for which it was not designed; mishandled;
placed in a hostile environment; repaired by unauthorized personnel; improperly installed
or not adjusted in accordance with instructions given in this manual.
If repair under warranty is confirmed by KLOPP International Inc., then the product will
be repaired (or replaced at the discretion of KLOPP International Inc.) and returned to the
customer at no extra cost.
COMPLIANCE WITH FCC RULES
Please note that this equipment generates, uses, and can radiate radio frequency energy.
This equipment has been tested and has been found to comply with the limits of a Class
A computing device pursuant to Subpart J of Part 15 of FCC rules & These rules are
designed to provide reasonable protection against interference when equipment is
operated in a commercial environment. If this unit is operated in a residential area, it
might cause some interference and under these circumstances the user would be required
to take, at his own expense, whatever measures are necessary to eliminate the
interference.
(FCC = Federal Communications Commission in the U.S.A.)
2
SCALE UNPACKING INSTRUCTIONS
Unpack the scale carefully and keep the packing material if you are likely to transport the
scale again in the future.
In the carton you should find this manual plus:
• The Counting Scale and Platter
• An AC/DC adapter (check that the AC input rating is correct)
• Plastic Plug Insert
1.
Remove the protective packing materials from around the scale. Then remove the
shipping overload stop (6 kg and 15kg scales only) on the bottom of the scale and
place in shipping container for future use.
2.
Place counting scale pan onto scale base being careful to line up pan pins with
receptive holes. Push down carefully to secure pan.
3.
Place the scale on a suitable weighing surface (see BEST CONDITIONS FOR
WEIGHING, next page) and turn the adjustable feet until the spirit level shows that
the scale is level.
4.
Plug in the AC/DC adaptor. The AC input requirements could be 100, 120 Volts
(50/60Hz) depending on the area in the world so please check that the adaptor is
correct. The adaptor’s DC output should be about 6 Volts (please note that an
alternative 6V DC power supply might not be stable for this scale). Ground the
chassis to an earth ground if you think static electricity may be a problem.
5.
Locate the on/off switch on the left under side of the scale and turn switch to “on”.
Please Note: Your scale is battery operated. However, it is advisable to use the AC
adapter when possible assuring you that your coin counting scale battery is fully
charged at all times.
6.
Note: The backlighting on the three LCD displays will shut down within 5 seconds
after startup conserving battery life. Applying weight to the platter or use of
function keys will instantly turn backlighting on.
7.
See Page 9 for pre-set U.S. Coin settings.
AC Adapter Power Supply: AC 110V 50/60 Hz (DC 6V 4.5AH Rechargeable Battery) is
found on the left hand side next to the on/off switch.
RS232 communications port is to be used for connecting to a printer or computer for coin
or token data accumulation downloading. This port is located on the right hand underside
of the scale. A standard 25-pin DIN connector male type is used to connect to the scale.
For wiring of the RS232 25-pin DIN connector, see page 12
3
BEST CONDITIONS FOR WEIGHING
•
•
•
•
•
•
•
•
•
•
•
The Scale must be level (check the spirit level on the Scale).
Best temperature is about 20°C/68°F at about 50% Relative Humidity.
The weighing room should be kept clean and dry.
The weighing table must be of a solid construction.
Corners of rooms are best as they are less prone to vibrations.
Don’t install the scale near heaters or air conditioners.
Don’t install the scale in direct sunshine.
Try to ensure a stable AC power supply when using an adaptor.
Keep equipment-containing magnets away from the scale.
Warm-up the scale before use or leave it on standby overnight.
Earth ground the scale chassis for electrostatic discharge if the weighing conditions
warrant.
CALIBRATION
KLOPP International Inc. has already done the calibration setup for your KCS Scale.
Please see Page 17 for calibration information.
HOW THE SCALE COUNTS
The KCS Scale counts by knowing the weight of one piece, called the unit weight, then
applying it to the total weight of what you are trying to count. For example, if you are
weighing nickels that have a unit weight of 4.987 and the batch weighs 498.7, the scale
will tell you that you have 100 pieces. Sounds simple, but things rarely weigh exactly 1g
and piece variations can add errors – plus you often have containers to hold the pieces
and that weight must be discarded. The KCS Scale takes all the trouble out of counting
and has many features that will make repeated counting easy and precise.
The two main methods to enter a unit weight and start counting:
(See the table on Pages 6 thru 9.)
1.
Unit Weight by the Keyboard
2.
Unit Weight by an ID Number
4
KEYPAD FUNCTIONS
0
≈
9
Keys used for entering unit weights of coins and tokens in “Coin Cal”
mode.
1
≈
9
Selects pre-programmed “denomination to be counted” keys.
Token
CE
Z
Select token counting mode key. Note: The total accumulation window does
not function in this mode. Also, use this key to enable/disable display
screen backlight by holding it down until the scale beeps.
Clear entry key.
Zero key. The zero range is full scale capacity +/-2%.
Key used to TARE out coin counting scoop. The TARE annunciator will be lit
T
in the
in the “Denomination” display window indicating that a TARE weight has
been adddbeen added.
1. If the container is removed from the scale, the display will show “-------“ in the
“Quantity” and “Total” display windows. Pressing “T” again will clear the
TARE function mode and the annunciator “4” symbol will disappear.
M+
Accumulation key and print data.
MR
Recall accumulation key.
MC
Clear accumulated value key.
Total
Print key and print out accumulated data key.
PRINT
Print key and print out all accumulated data in memory key.
Coin Cal
Setting mode key to set denomination and token unit weights. Access
setting mode for changing or adding unit weights of coins or tokens.
5
.
SETTING INDIVIDUAL UNIT WEIGHTS FOR NUMERIC KEYS
TOKEN UNIT WEIGHT MODES
Pressing the
Coin Cal
key will display the following:
Note: If no other key is pressed, the scale will return to counting mode in 10 seconds.
Press the “0” key four times. The display will show the following:
Note: If no other key is pressed, the scale will return to counting mode in 10 seconds.
Pressing the Coin Cal key again will display the last token unit value weight or the
denomination of unit weight (last setting value).
Then press the Token key. Pressing the Coin Cal
denomination. Use digits
key will display the flashing
0 thru 9 to input the new weight. NOTE: The unit
weight is restricted to three decimal places. Pressing the CE
key will clear the input
or change the input of the numeric values.
Upon setting the corrected unit weight, press the Coin Cal
new setting into memory.
6
key to confirm and place the
Use the above procedure to set all the denomination and token unit weights. Upon
completion, all denominations settings are saved by pressing the
T
key. The scale will
display zero in each window. Power the scale off, then on, to save settings.
To print all denominations of unit weight, press the
PRINT
return to normal counting mode automatically after printing.
7
key. The scale will then
SETTING UNIT WEIGHTS MODES
Pressing the Coin Cal key will display the following:
Note: If no other key is pressed, the scale will return to counting mode in 10 seconds.
Press the “0” key four times. The display will show the following:
Note: If no other key is pressed, the scale will return to counting mode in 10 seconds.
Pressing the Coin Cal key again will display the last token unit value weight or the
denomination of window (last setting value) (or 000).
To select the denomination value of unit weight, select and press one of the
keys. Pressing the
Use key pad digits 0
Coin Cal
thru
1
thru 9
key will display the following flashing denomination.
9 to input the new weight. NOTE: The unit weight is
restricted to three decimal places. Pressing the CE key will clear the input or change
the input of the numeric values.
Upon setting the corrected unit weight, press the Coin Cal key to confirm and place the
new setting into memory.
8
Use the above procedure to set all the denomination unit weights. Upon completion, all
denominations settings are saved by pressing the
T
key. The scale will display zero
in each window. Power the scale off, then on, to save the settings.
To print all denominations of unit weight, press the PRINT key. The scale will then
return to normal counting mode automatically after printing.
Pre-set U.S. Coin Settings :
Key 1
$ 1.00
8.000 grams
Key 4
10 cents
2.268 grams
Key 2
50 cents
11.260 grams
Key 5
5 cents
4.987 grams
Key 3
25 cents
5.652 grams
Key 6
1 cent
2.656 grams
US Paper Currency
0.992 grams
Establishing a per piece weight for the unknown weight of a token or ticket
NOTE: See Page 17 for entering the standard weighing mode. Follow the steps outlined
below:
1. Place 25, 50, or 100 pieces counted by hand on the weighing platter.
2. Write down the total weight displayed. (Example: 1.244 for 50 pieces)
3. Divide 1.244 by 50 = 0.0249 or 0.024
4. 0.024 is the per piece unit weight that can be entered in the piece weight or
dedenomination key for this item.
9
ACCUMULATION FUNCTION
Accumulation (In counting mode)
To select a denomination value, use the keys 1
thru 9 . Place coins of the
same value on the platter or in a coin scoop. The following will be displayed:
When the scale becomes stable (see arrow at bottom of “Total” window), press the
M+
key. This will store the quantity and dollar value in memory. Once the following is
displayed , remove coins from pan or coin scoop.
To input the next accumulation, select the specific denomination key 1 thru 6 (etc).
Place coins of same value on the platter or in a coin scoop. The following will be
displayed:
When the scale is stable, press the
M+
key. This will store the information in
memory. The following will be displayed:
The above steps may be repeated, saving up to 25 accumulation counts.
10
RECALL ACCUMULATION
If there is an accumulation of data in memory, it will be indicated in the “Total” display
window. Press the MR
key. It will display “Accumulated data” and “Total
Accumulated Data” in sequence.
Press the MR
key one time. It will show the first accumulated data. Note: If no other
key is pressed, the scale will return to counting mode in 10 seconds
Press
MR
key again. It will show the second accumulated data. Note: If no other key
is pressed, the scale will return to counting mode in 10 seconds
Press the MR
key again. It will show the total accumulated data. Note: If no other key is
pressed, the scale will return to counting mode in 10 seconds
11
CLEARING ACCUMULATED VALUE
If there is accumulation data in memory, it will be indicated in the “Total” window.
Press MC
to clear accumulated data. The accumulation indicator will disappear at the
“Total” display window.
Wiring the RS232 25-Pin DIN Connector
Pin Outs
Pin 1
Pin 11
Pin 2*
Retrieve data
Pin 12
Pin 3*
Transmit data
Pin 13
Pin 4
Request to send
Pin 14
Pin 5
Clear to send
Pin 15
Pin 6
Data set ready
Pin 16
Pin 7*
Common (ground)
Pin 17
Pin 8
Pin 18
Pin 9
Pin 19
Pin 10
Pin 20
• Indicates required pin connections
Serial (RS-232) Interface Settings:
Baud Rate:
Data Bits:
Hand Shake:
Parity:
9600 bps
8 bits
DTR/DSR
No Parity
12
PRINT FUNCTION
1. In the counting mode, when the scale is in stable, pressing the
M+ key will transmit
dadata to be printed. The print format is as follows:
Record
Denomination
Quantity
Amount
$
1
0.01
51
0.51
2. To see totals of all accumulated data in memory of all items stored, press the Total
ke key. The print format is as follows:
Record
Quantity
Amount
$
2
66
1.26
These represent total records, total quantities, and total monies.
3. When there is accumulated data in memory, pressing the PRINT
the the following data format:
Record
Denomination
Quantity
Amount
$
1
0.01
51
0.51
Record
2
Denomination
0.05
Quantity
15
Amount
$
0.75
______________________
Total
Quantity
66
Total
Amount
$
1.26
13
key will print out
“F” KEY FUNCTION DESCRIPTION
Press the M+
key and hold. Until F1 is displayed in the Denominations window Power
the counting scale on. The scale will count back to zero and enter “Function Setting
Mode”.
Press the T
key in sequence. The Denomination display will show F1 thru F9 in a
display window.
NOTE: F1 thru F4 are free setting in the window without putting the security jumper to
“ADJUST” position. You will find the security jumper located on back of display panel
14
inside the scale. To locate, remove the four case screws found on the bottom cover of the
scale. Separate the bottom case from the top case. The display board will be exposed.
Error Message Chart:
A to D Value 0
240000
E7
320000
power on zero
(Normal)
524287
E6
Before adjusting linearity and completing weight calibration, the internal value counts
should be within 240,000~320,000. Otherwise, please adjust resistor R1/R2 or change
our the load cell.
E 1 => Over power on ZERO + 10% total SPAN value.
E 2 => Under power on ZERO – 10% total SPAN value.
E 6 => The internal value is over 320.000.
E 7 => The internal value is under 240.000
-O L - => The max. capacity is over full capacity + 91 divisions.
NOTE: Before entering the function key settings, please locate the SWA1 mini-jumper
located on the top side of the main board, left of the aluminum RS232 shield. Be careful
when separating the top and bottom covers as to not damage or loosen the ribbon cable
from the key pad to the main board.
Move the jumper from Lock Position to the Adjust Position.
Normal Lock Position
Function Key Adjust Position
Upon completion of all function key settings, relocate the jumper to the normal lock
position.
15
F2
Baud Rate Setting
Press the 0
key to display the prior setting value.
Press the T key to select the required baud rate of 300, 600, 1200, 2400, 4800, or 9600
in the circle.
Press the M+
key to save and store the selected baud rate. The scale will
automatically count back to zero, finishing the baud rate setting.
NOTE: To change, press the
F
key to escape before storing the indicated rate.
16
F3
Weight Calibration
Press the 0
key.
It will change to
Use the
0
thru
9
keys to key in the established kg calibration weight amount
(6.000, 12.000, 15.000 kg). This amount is determined by the capacity of the scale.
Place full capacity weights on the platter. When the scale indicates “stable”, the scale will
automatically enter into weight mode and finish the weight calibration. Press the
CE
key to re-enter the counting mode.
NOTE: To exit weight calibration without changing, press the
CE key before placing
the weight on the platter.
To Enter the Regular Weighing Mode
In the counting mode, press MC +
4
+
9
(three keys) at the same time to enter
the weight mode. Press the MC key, followed by the CE
counting mode.
17
key to return to the
F4
Security Access Code
Before entering the Coin Cal function, key in 4 digits to establish the security access
code number. The factory setting is “0000”. Use the following procedure to reset.
Press the 0 key to show the prior setting value.
Use the 1
thru 9
Press the M+
keys to input the new security access code number.
key to save the setting. The scale will automatically count back to zero
completing the process.
Press the M+ key to save the new security access code number. If the keyed-in value is
incorrect, press the
CE key to reset before saving the new number.
To delete the changed security access code setting number, press the
prior to saving.
18
F
to escape
F5
ASC II Code Symbol Settings
The coin symbol is set by ASC II code numbers as follows.
“$” = ASC II code 24
Press the 0
key. It will show the present setting value.
Use the keypad digit code numbers to ASCII code chart symbol as desired. Press the
appropriate key following the ASCII code table list for reference.
Press the M+
key to save the setting. The scale will automatically count back to zero
saving the setting.
•
If input was incorrect, press the CE key to reset it before saving.
•
To escape the change, press the
F
key before saving.
19
F6
Denomination Setting
Digits 0
thru
9 or total for 10 key pad locations can be set with 10 different types
or amounts, denomination, values (Example 0.50¢, 1.00, etc).
Use the
T
key to move from F1 to F6.
Press the 0 key.
To use digit
0 ,
1 , 2
key to key in decimal point 0 (no decimal point), or 1 (1
place decimal), or 2 (2 place decimal).
Press the M+ key.
Press M+
key to SAVE.
20
Press M+ to save.
After completing the setting, press the
F key and the scale will count back to zero,
saving the setting.
Examples:
Denomination 0 => If there is no decimal points used, the value will key in as (200.)
Denomination 1 => If there is 1 decimal point used, the value will key in as (20.0)
Denomination 2 => If there are 2 decimal points used, the value will key in as (2.00)
21
F7
Linearity Calibration
The linearity setting is selected by using four points along a weighing sequence.
Press the T key and move to F7
Display in the denomination window.
Remove the platter from the scale and set aside. Press the 0 key.
Replace the platter on the scale.
Press the F
key to record the first value. When the scale is stable (Denomination
display shows I L.), place the first weight 10kg on the pan.
Press the F key to record the first linearity value. When the scale is stable,
(Denomination display shows 2 L.), place the second weight 10kg on the pan.
22
Press the F
key to record the second linearity point. When the scale is stable,
(Denomination display 3 L.), place the third weight 10kg on the pan.
Press the F key to record the third linearity point. When the scale is stable, take off the
weight on the pan before the scale counts back to zero. The linearity calibration is now
complete.
Use the
9
key to escape linearity calibration and return to the counting mode.
NOTE: The above procedure is for the 30kg scale base. For a 15kg scale, use 3 pieces of
5kg weights, following the same sequence. For a 30kg scale, use 3 pieces of 20kg
weights or a combination of 5kg and 10kg weights totaling 20kgs, following the same
sequence.
23
F8
Specification Setting
Press the T key and move to
F8
display in the Denomination window. This
procedure is used to set the internal values for the key pad and setting the capacity and
min graduation of the counting scale.
Press the 0 key. Entering to keyboard test mode.
Press the M+ key. Key in digit “01” or “02”.
Press M+ key.
24
Press the M+
key and the scale will count back to zero. The scale specification
setting is completed.
25
F9
Weight Calibration (Set at Factory)
Press the T key to move to the
F9 display in the Denomination window.
Press the 0 key.
NOTE: Make sure there is no weight on the platter.
Press the M+ key when the scale is in stable. The weight display will show full
capacity value.
Place a weight (6kg, 15kg or 30kg) (full capacity) on the weight platter. Press the M+
key. When the scale is in stable, take the weight off the platter before the scale counts
back to zero. The weight calibration is now complete.
NOTE: Use a 6kg weight for calibration of a 6kg Coin Scale. Use a 15kg weight for
calibration of a 15kg Scale, and a 30kg weight for a 30kg Scale.
26