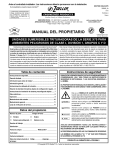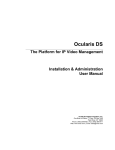
1
Using the FLIR PTZ-35x140 with NetDVMS On-Net Surveillance Systems, Inc. th One Blue Hill Plaza, 7 Floor, PO Box 1555 Pearl River, NY 10965 Phone: (845) 732-7900 | Fax: (845) 732-7999 Web: www.onssi.com 0009101001236-SP4.24019 Legal Notice This product manual is intended for general information purposes only, and due care has been taken in its preparation. Any risk arising from the use of this information rests with the recipient, and nothing herein should be construed as constituting any kind of warranty. © 2002-2010 On-Net Surveillance Systems, Inc. All rights reserved. OnSSI and the ‘Eye’ logo are registered trademarks of On-Net Surveillance Systems, Inc. Ocularis, Ocularis Client, Ocularis Client Lite, Ocularis Video Synopsis, NetEVS, NetDVMS, NetDVR, ProSight, NetGuard, NetGuard-EVS, NetSwitcher, NetMatrix, NetCentral, NetTransact, NetPDA and NetCell are trademarks of On-Net Surveillance Systems, Inc. All other trademarks are property of their respective owners. On-Net Surveillance Systems, Inc. reserves the right to change product specifications without prior notice. Contents FLIR User Manual Table of Contents INTRODUCTION........................................................................................................................................... 2 NETDVMS CONFIGURATION ..................................................................................................................... 3 ADD A CAMERA TO NETDVMS...................................................................................................................... 3 CONFIGURE THE CAMERA DRIVER ................................................................................................................. 5 ADJUST FLIR MODE SETTINGS ..................................................................................................................... 7 ASSIGN DEVICE PRIVILEGES ....................................................................................................................... 10 ADD THE FLIR TO A VIEW ........................................................................................................................... 10 USING THE FLIR........................................................................................................................................ 11 PELCO D AUX COMMAND REFERENCE ................................................................................................ 13 CONTACT INFORMATION ........................................................................................................................ 14 On-Net Surveillance Systems, Inc. i Introduction FLIR User Manual Introduction The FLIR PTZ-35x140MS is a high-resolution multi-sensor camera system designed specifically for the security market for medium to long range security applications. It includes a sophisticated thermal imaging system that provides excellent night visibility and situational awareness. This model also contains a dual field-of-view thermal imaging system called Foveus, patented by FLIR, which provides a high resolution thermal image with a 5° view nested inside a wider 20° view. In addition to this thermal imaging system, is a high resolution daylight camera which provides optimal surveillance regardless of the time of day or lighting conditions. Ocularis, when used with the NetDVMS network video recorder, allows you to switch modes of this sophisticated camera on the fly from within the Ocularis Client using the “Pelco D” protocol. This document discusses the software configuration and use for the FLIR PTZ 35x140MS camera with NetDMVS and Ocularis. It assumes that all hardware is already configured (see the documentation included with the FLIR camera or www.flir.com) and the use of an Optelecom V30E analog encoder. 2 On-Net Surveillance Systems, Inc. NetDVMS Configuration FLIR User Manual NetDVMS Configuration Use the following procedures to configure the FLIR PTZ-35x140MS camera in NetDVMS. Add the Camera to NetDVMS Configure the Camera Driver Adjust FLIR Mode Settings Add a Camera to NetDVMS Add the FLIR camera to NetDVMS as you would any other camera. 1. Open the NetDVMS Administrator application. 2. Click Add Device. Figure 1 Adding a Device from NetDVMS Administrator 3. Enter the IP address for the camera. Click Next. Figure 2 Add an IP Address for the Device On-Net Surveillance Systems, Inc. 3 Configure the Camera Divers 4. FLIR User Manual Enter the password for administrative access to the camera as well as the driver for the corresponding encoder used. Click Next. Figure 3 Enter password and select driver 5. When the camera is found, click Next on the following screen: Figure 4 Device Found 6. Enter a display name for the camera. Figure 5 Assign a name to the device This is the label that will appear to the user. 7. Click Finish. Further configuration is required for this camera. 4 On-Net Surveillance Systems, Inc. Configure the Camera Driver FLIR User Manual Configure the Camera Driver 1. The camera now appears in the NetDVMS Device Manager. Expand and select the device and click Edit Device. Figure 6 Configure Driver Settings 2. From the Edit device settings screen, click Camera Settings. Figure 7 Modify Driver Settings 3. Check the Some of the connected cameras are Pan/Till/Zoom cameras checkbox. 4. In the PTZ type controlled through COM1 drop-down, select Pelco-D. 5. Click the row that says “Camera 1” to enable entry in the fields at the bottom of the pop-up. On-Net Surveillance Systems, Inc. 5 Configure the Camera Divers 6. 7. FLIR User Manual fill out the fields according to the following: Field Name Description Name This is the camera label that will be displayed. You may change the name here. Number This is a number assigned as a shortcut to the camera. It is not currently used but a number must be entered. Type Select Moveable from the drop-down menu. Device Port Select COM1 Port Addr Default is ‘1’ and this is the recommended setting. Click Apply. Figure 8 Modify Driver Settings 8. Click OK to close this pop-up. 9. Click OK to close the Edit Device pop-up. 10. To be sure that all changes are saved, click the Exit button to avoid possible data loss. The next step is to configure the various FLIR modes. 6 On-Net Surveillance Systems, Inc. Adjust FLIR Mode Settings FLIR User Manual Adjust FLIR Mode Settings Operators using Ocularis Client/Client Lite may change the modes of the FLIR camera on the fly while viewing camera video. Follow these steps to configure FLIR presets to be able to allow these functions. 1. Reopen the NetDVMS Administrator. 2. The PTZ settings need to be accessed, so pause the Recording Server by clicking the Service Manager button and clicking Pause. 3. Once the recording server is paused, select the FLIR camera and click the Setting button. Figure 9 Modify Camera Settings 4. The Camera Settings for FLIR PTZ-35x140MS screen appears. Click the PTZ Preset Positions button in the lower right corner. 5. The PTZ Preset Positions pop up appears. The Preset Positions list is prepopulated with the presets as defined by the manufacturer. On-Net Surveillance Systems, Inc. 7 Adjust FLIR Mode Settings FLIR User Manual Figure 10 PTZ Preset Position Settings In order for operators to control the various modes of this camera, presets must be configured using specific names. 6. Identify 8 presets to define. It can be any eight and for ease of configuration, we suggest using 8 contiguous presets. FLIR_ACTIVE_DLTV FLIR_DLTV_AUTOFOCUS FLIR_ACTIVE_IR FLIR_BLACK_HOT FLIR_WHITE_HOT FLIR_PLATEAU_VALUES FLIR_AGC_TYPE FLIR_IR_FFC Table 1 FLIR Preset Names 8 7. Select the first preset to be configured, and click the Edit Name button. 8. In the Preset Position pop-up, enter a preset name from the list in Table 1. On-Net Surveillance Systems, Inc. Adjust FLIR Mode Settings FLIR User Manual Figure 11 Preset Position Name 9. Click OK. 10. Repeat this process for each of the modes listed in Table 1. Figure 12 Preset Position Settings 11. When done, click OK to save and close the PTZ Preset Positions pop up. 12. Click OK to close the Camera Settings pop up. 13. Click Exit to save changes, restart the Recording Server and close the NetDVMS Administrator. The FLIR camera has now been configured in NetDVMS. On-Net Surveillance Systems, Inc. 9 Adjust FLIR Mode Settings FLIR User Manual Assign Device Privileges The next step is to assign rights for this camera to each user. If using Ocularis, this is done via the Ocularis Administrator application. Refer to the Ocularis Administrator User Manual for further instructions. If using NetDVMS directly with Ocularis Client Lite, this is done in the NetDVMS Image Server Administrator. Refer to the NetDVMS User Manual for further instructions. In either case, be sure that the user has privileges to control the presets for this camera. Add the FLIR to a View While not required, you likely want to include the newly added FLIR to one of the views available to the operator(s). If using Ocularis, views are created in the Ocularis Administrator application. Refer to the Ocularis Administrator User Manual for further instructions. If using NetDVMS directly with Ocularis Client Lite, views are created in the Ocularis Client Lite setup mode. Refer to the Ocularis Client/Client Lite User Manual for further instructions. 10 On-Net Surveillance Systems, Inc. Using the FLIR Camera FLIR User Manual Using the FLIR Once the FLIR has been added and configured in NetDVMS and appropriate privileges have been assigned and views created, the operator may now change the mode of the FLIR while viewing its video. 1. Log in to Ocularis Client/Client Lite. 2. Open a view that contains the FLIR camera. Or right-click to display the Circular Control Menu and select the FLIR from the Select Camera quadrant. 3. Position the mouse over the FLIR pane to display the Interactive Overlay Controls. Click ‘presets’ Figure 13 Interactive Overlay Controls 4. Click the presets control to display configured presets for this camera. Figure 14 Select Mode from Preconfigured Presets On-Net Surveillance Systems, Inc. 11 Using the FLIR Camera 5. Select from the preconfigured presets to change the mode of the FLIR camera. Note: 12 FLIR User Manual The mode of the FLIR is set at the camera. Therefore, if one user changes the mode, it will be changed for all users. Also, the mode that is displayed, is the mode that the video is streamed and, therefore, the mode that the video will be recorded. On-Net Surveillance Systems, Inc. Using the FLIR Camera FLIR User Manual Pelco D Aux Command Reference For more information, see the FLIR (www.flir.com) and Pelco (www.pelco.com) websites. Pelco Aux Command Aux 1 on Aux 1 off Aux 2 on Aux 2 off Aux 3 on Aux 3 off Aux 4 on Aux 4 off Command FF 01 00 09 00 01 0B FF 01 00 0B 00 01 0D FF 01 00 09 00 02 0C FF 01 00 0B 00 02 0E FF 01 00 09 00 03 0D FF 01 00 0B 00 03 0F FF 01 00 09 00 04 0E FF 01 00 0B 00 04 10 On-Net Surveillance Systems, Inc. TVIS7 or SR100 Black Hot White Hot Active = DLTV Active = IR Toggle Plateau Values Toggle AGC Type DLTV Autofocus (toggle) IR FFC NetDVMS Preset Names FLIR_BLACK_HOT FLIR_WHITE_HOT FLIR_ACTIVE_DLTV FLIR_ACTIVE_IR FLIR_PLATEAU_VALUES FLIR_AGC_TYPE FLIR_DLTV_AUTOFOCUS FLIR_IR_FFC 13 Pelco D Aux Command Reference FLIR User Manual Contact Information On-Net Surveillance Systems (OnSSI) One Blue Plaza 7th Floor P.O. Box 1555 Pearl River, NY 10965 Website: www.onssi.com General: [email protected] Fax: 845.732.7900 845.732.7999 Sales Support: [email protected] 845.732.7900 x7011 Technical Support: [email protected] 845.732.8900 x7012 Training: [email protected] 845.732.7900 x7050 14 On-Net Surveillance Systems, Inc.