1
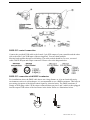
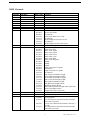
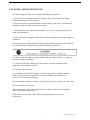
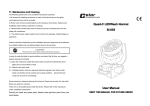
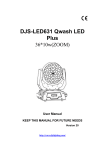
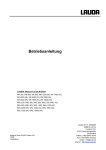
Thank you for your patronage. We are confident that our excellent products and service can satisfy you. For your own safety, please read this user manual carefully before installing the device. In order to install , operate, and maintain the lighting safety and correctly. We suggest that the installation and operation should be done by the verified technician and follow the instruction strictly. Every person involved with the installation, operation and maintenance of this device has to: -be qualified -follow carefully the instructions of this manual SAFETY INSTRUCTIONS Important safety warns: This device has left the factory in perfect condition. In order to maintain this condition and to ensure a safe operation, it is absolutely necessary for the user to follow the safety instructions and warning notes written in this user manual. Important: Damages caused by the disregard of this user manual are not subject to warranty. The dealer will not accept liability for any resulting defects or problems. If the device has been exposed to temperature changes due to environmental changes, do not switch it on immediately. The arising condensation could damage the device. Leave the device switched off until it has reached room temperature. This device falls under protection-class I. Therefore it is essential that the device be earthed. The electric connection must carry out by qualified person. Make sure that the available voltage is not higher than stated at the end of this manual. Make sure the power cord is never crimped or damaged by sharp edges. If this would be the case, replacement of the cable must be done by an authorized dealer. Always disconnect from the mains, when the device is not in use or before cleaning it. Only handle the power cord by the plug. Never pull out the plug by tugging the power cord. 1 Classe LWZ 60 v1.0 During initial start-up some smoke or smell may arise. This is a normal process and does not necessarily mean that the device is defective, it should decrease gradually. Please don't project the beam onto combustible substances. If the external flexible cable or cord of this luminaire is damaged, it shall be exclusively replaced by the manufacturer or his service agent or a similar qualified person in order to avoid a hazard. Please be aware that damages caused by manual modifications to the device are not subject to warranty. Keep away from children and non-professionals. GENERAL GUIDELINES This device is a LED lighting effect for professional use on stages, in discotheques, theatres, etc., the device was designed for indoor use only. This fixture is only allowed to be operated with the max alternating current which stated in the technical specifications in the last page of this manual. Lighting effects are not designed for permanent operation. Consistent operation breaks may ensure that the device will serve you for a long time without defects. Do not shake the device.avoid brute force when installing or operating the device. While choosing the installation-spot, please make sure that the device is not exposed to extreme heat, moisture or dust. Please don't project the beam onto combustible substances.The minimum distance between light-output from the projector and the illuminated surface must be more than 1 meter. If you use the quick lock cam in hanging up the fixture, please make sure the quick lock fasteners turned in the quick lock holes correctly. Operate the device only after having familiarized with its functions. Do not permit operation by persons not qualified for operating the device. Most damages are the result of unprofessional operation. Please use the original packaging if the device is to be transported. For safety reasons, please be aware that all modifications on the device are forbidden. If this device will be operated in any way different to the one described in this manual, the product may suffer damages and the guarantee becomes void. Furthermore, any other operation may lead to short-circuit, burns, electric shock, lamp explosion, crash, etc. 2 Classe LWZ 60 v1.0 INSTALLATION INSTRUCTIONS Mounting the device The applicable temperature for the lighting is between -10°C to 45°C. Do not use the lighting under or above the temperature. The installation of the effect has to be built and constructed in a way that it can hold 10 times the weight for 1 hour without any harming deformation. The installation must always be secured with a secondary safety attachment, e.g. an appropriate safety rope. Never stand directly below the device when mounting, removing or servicing the fixture. The operator has to make sure the safety relating and machine technical installations are approved by an expert before taking the device into operation for the first time. These installations have to be approved by a skilled person once a year. Overhead mounting requires extensive experience, including amongst others calculating working load limits, installation material being used, and periodic safety inspection of all installation material and the device. If you lack these qualifications, do not attempt the installation yourself. Improper installation can result in bodily injury. The electric connection must only be carried out by a qualified electrician. Before mounting make sure that the installation area can hold a minimum point load of 10 times the device’s weight. Connect the fixture to the mains with the power plug. Installation via the Omega holders a) Fixed the clamp on the bracket by tighten up the M12 screw on the bracket to the Ф13 hole in the middle of the bracket. b) Insert the quick-lock fasteners of the first Omega holder into the respective holes on the bottom of the device. Tighten the quick-lock fasteners fully clockwise. c) Install the second Omega holder. Pull the safety-rope through the holes on the bottom of the base and over the trussing system or a safe fixation spot. Insert the end in the carabine and tighten the safety screw. Please refer to the picture below: 3 Classe LWZ 60 v1.0 DMX-512 control connection Connect the provided XLR cable to the female 3-pin XLR output of your controller and the other side to the male 3-pin XLR input of the moving head. You can chain multiple Moving head together through serial linking. The cable needed should be two core, screened cable with XLR input and output connectors. Please refer to the diagram below. DMX-512 connection with DMX terminator For installations where the DMX cable has to run a long distance or is in an electrically noisy environment, such as in a discotheque, it is recommended to use a DMX terminator. This helps in preventing corruption of the digital control signal by electrical noise. The DMX terminator is simply an XLR plug with a 120 Ω resistor connected between pins 2 and 3,which is then plugged into the output XLR socket of the last fixture in the chain. Please see illustrations below. 4 Classe LWZ 60 v1.0 DMX LED INDICATOR Solid red: No dmx Fast flashing red: Dmx signal receiving LCD Display Operations Attention: When you are in Wireless/Reset function menu, to Cancel the Wireless memory, you need to push the Enter button for 5 seconds. 5 Classe LWZ 60 v1.0 DMX Channels Channel 1 2 3 4 5 6 7 8 9 Attribute PAN PAN 16Bit TILT TILT 16Bit RED GREEN BLUE WHITE SHUTTER 10 11 DIMMER COLOR MACRO 12 13 14 ZOOM P/T SPEED CONTROL Dmx Value 000-255 000-255 000-255 000-255 000-255 000-255 000-255 000-255 000-006 007-065 066-069 070-128 129-132 133-191 192-195 196-255 000-255 000-004 005-008 009-012 013-016 017-020 021-024 025-028 029-033 033-036 037-040 041-044 045-049 050-094 095-099 100-149 150-154 155-166 167-178 179-190 191-202 203-214 215-226 227-238 239-250 251-255 000-255 000-255 000-127 128-240 241-245 246-250 251-255 Function Pan movement from 0 to full Pan Fine pan movement from 0 to full step Tilt movement from 0 to full tilt Fine tilt movement from 0 to full step Red dimmer from off to full Green dimmer from off to full Blue dimmer off to full White dimmer off to full No function Slow to fast strobe No function Pulse strobe from slow to fast No function Strobe fading in from slow to fast No function Strobe fading out from slow to fast Master dimming from Off to Full on No function Static Color Red Static color Amber Static color yellow Static Color Green Static Color Cyan Static Color Blue Static Color Magenta 7200K 3200K 5600K Eight color step at 9 speeds No function Eight color fade at 5 speeds No function Red+Green from dark to bright Green+Red from bright to dark Green+Blue from dark to bright Blue+Green from bright to dark Blue+Red from dark to bright Red+Blue from bright to dark RGB from dark to bright Blue+Red from dark to bright at the same time green from bright to dark Output 100% at the same time to be from narrow beam to wide beam Pan/Tilt Motor Speed from fastest to slowest No function Auto programs put a no function value between the front and end of the reset value to reset once channel is held at this value for 3 seconds put a no function value between the front and end of the reset value 6 Classe LWZ 60 v1.0 CLEANING AND MAINTENANCE The following points have to be considered during the inspection: 1) All screws for installing the devices or parts of the device have to be tightly connected and must not be corroded. 2) There must not be any deformations on the housing, color lenses, fixations and installation spots (ceiling, suspension, trussing). 3)Mechanically moved parts must not show any traces of wearing and must not rotate with unbalances. 4)The electric power supply cables must not show any damage, material fatigue or sediments. Further instructions depending on the installation spot and usage have to be adhered by a skilled installer and any safety problems have to be removed. In order to make the lights in good condition and extend the life time, we suggest a regular cleaning to the lights. 1) Clean the inside and outside lens each week to avoid the weakness of the lights due to accumulation of dust. 2) Clean the fan each week. 3) A detailed electric check by approved electrical engineer each three month, make sure that the circuit contacts are in good condition, prevent the poor contact of circuit from overheating. We recommend a frequent cleaning of the device. Please use a moist, lint- free cloth. Never use alcohol or solvents. There are no serviceable parts inside the device. Please refer to the instructions under “Installation instructions”. Should you need any spare parts, please order genuine parts from your local dealer. 7 Classe LWZ 60 v1.0 TECHNICAL SPECIFICATIONS 36PCS 10W RGBW high power LEDs 50,000 hours lifespan and low power consumption 8 bit smooth and 16 Bit precise resolution for PAN/TILT movement 540°/630° pan and 265° tilt movement 10 degrees to 60 degrees zoom Scan position memory, auto reposition after unexpected movement RGBW color mixing system LED shutter LED dimming LED rainbow effect Macros effect Strobe effect with 18 flashes per second and pulse effect General dimming and blackout for all four colors 14 DMX channels DIM4 technology( 4096 step linearity dimmer) DMX512, master-slave and sound activated controllable or auto operation Cable DMX and Wireless DMX control Blue background LCD display Input Voltage: AC110-240V 50-60Hz LED Quantities: 36pcs 10W 4-in-1 RGBW LEDs Control Signal: DMX512, master-slave and sound activated or auto operation Control Channel: 14 DMX Channels Power Consumption: 360W/ 380W(max) Dimensions: 350x260x350mm Packing Dimensions: 425x295x400mm Net Weight: 9kgs Gross Weight: 11kgs Remark: errors and omissions for every information given in this manual excepted. All information is subject to change without prior notice. 8 Classe LWZ 60 v1.0