1
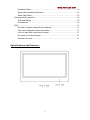
www.zerouav.com Ver 2.2 Sharp Vision FPV Ground Station (7-inch high bright LED monitor with built-in 5.8G dual receiver and DVR) 1 www.zerouav.com User Manual Specifications and Features: ................................................................................3 Features: ..............................................................................................................6 Button Functions: .................................................................................................6 DVR Control Buttons: ....................................................................................6 Display Control Buttons: ................................................................................6 FPV Interface Descriptions ...................................................................................7 DVR Interface : .....................................................................................................7 External video input Interface : .............................................................................8 Display Interface Setting:......................................................................................8 Frequency Group Selection: ..........................................................................8 System: .........................................................................................................9 Volume: .........................................................................................................9 Latitude: ........................................................................................................9 Brightness: ....................................................................................................9 Contrast: ........................................................................................................9 Saturation: .....................................................................................................9 Burst: .............................................................................................................9 Language ......................................................................................................9 DVR Interface Descriptions: .................................................................................9 Video Playback............................................................................................ 10 Recording Settings: ..................................................................................... 10 Resolution: .................................................................................................. 10 Cycle Recording: ......................................................................................... 11 Motion Detection: ........................................................................................ 11 Motion Detection Sensitivity: ....................................................................... 11 Date Stamp: ................................................................................................ 12 Audio Acquisition: ........................................................................................ 12 Image Quality: ............................................................................................. 12 Advanced Settings: ............................................................................................ 13 Format: ........................................................................................................ 13 Date/Time: ................................................................................................... 13 Language: ................................................................................................... 14 TV Mode: ..................................................................................................... 14 Default Settings: .......................................................................................... 14 Quick Access Descriptions: ................................................................................ 15 Timer Stop/Start: .......................................................................................... 15 Reset Timer: ................................................................................................ 15 2 www.zerouav.com Interface Switch: .......................................................................................... 15 Show/Hide Indication Windows: .................................................................. 15 Show Help Menu: ........................................................................................ 15 Packing and Accessories:................................................................................... 16 Size and Weight: ......................................................................................... 16 Accessories: ................................................................................................ 16 FAQ: ................................................................................................................... 17 Not able to search channels automatically: ................................................. 17 The video displayed is black-and-white: ...................................................... 17 Can not start after connected to power: ...................................................... 17 No channel can be received: ....................................................................... 17 Volume is too low: ....................................................................................... 17 Specifications and Features: 3 www.zerouav.com 4 www.zerouav.com LED Screen Power Supply Input Output DVR Specification Matching antenna interface Display resolution Backlight Brightness Aspect ratio Response time Color system Working voltage Current Signal 800×480 LED 700 Lux 16:9 10ms PAL/NTSC DC:2S-4S battery 850MA @ 12V Video(PAL/NTSC),Audio Signal 12V(input power >12v) Resolution TF card supported Packing size Monitor size Gross weight Video,Audio 100mA D1/VGA/QVGA Max 32G 205mm×130mm×106mm 183mm×121mm×31mm 0.66kg Interface RP-SMA 5 www.zerouav.com Features: Specially designed for aerial photography system, Sharp Vision all-in-one monitor has the following features: High brightness: up to 700 Lux. Dual receiver: built-in dual receivers. DVR black box background system: integrated DVR black box can run in the background for recording. No delay/anti blue screen/anti black screen: the built-in DVR system won’t cause any delay in receiving signal; blue screen or black screen will definitely not occur. Auto/manual channel scan: no need for DIP switch. Button Functions: At the back of the monitor, there are 2 groups of buttons, one for DVR control and the other for display control. DVR Control Buttons: UP DOWN MENU (left button) MODE (right button) OK Functions Move cursor up Move cursor down Po pup/exit menu/sub menu Enter/exit video playback mode Confirm selection /play/stop Display Control Buttons: Functions UP Move cursor up DOWN Move cursor down LEFT/ - Adjustment key(-) Right/+ Adjustment key(+) Popup menu/confirm selections OK Quick Access to Hiding indication windows Popping up HELP menu Popping up former interface/ pausing time/resetting time if long press Popping up next interface - 6 www.zerouav.com Note: Three display resource types of this monitor are: FPV interface, DVR interface and External video input interface. Use LETF key to switch the interface. FPV Interface Descriptions FPV interface is the default boot interface. Voltage indicator: input voltage value is displayed; Display from 6.5V to 26.5V. Recording indicator: a red “R” flashes when DVR is working in the background. Time indicator: monitor running time is displayed. Signal strength indicator: the strength of both the signals received by ANT1 and ANT2 is displayed. DVR Interface : 7 www.zerouav.com External video input Interface : Display Interface Setting: Press OK button to po pup menu setting: Frequency Group Selection: You can manually select the desired frequency from 4 groups: A, B, C and D, or select SCAN option to start auto search. Press LEFT, RIGHT or OK button to stop searching. 8 www.zerouav.com Dual 5.8G receivers cover 31 channels: System: Press LEFT or RIGHT button to enter system setting, 3 options are provided: AUTO/ PAL/NTSC. If AUTO selected, the input video system will be automatically identified. System setting will cause display failure. Volume: Control buttons: LEFT (-), RIGHT (+).Range: 1 to 40. Latitude: Control buttons: LEFT (-), RIGHT (+).Range: C1-C3. Brightness: Control buttons: LEFT (-), RIGHT (+).Range: 1-40. Contrast: Control buttons: LEFT (-), RIGHT (+).Range: 1-40. Saturation: Control buttons: LEFT (-), RIGHT (+).Range: 1-40. Burst: Adjust Color Burst to get colorful image. Control buttons: LEFT (-), RIGHT (+).Range: P0-P7. Language: Control buttons: LEFT (-), RIGHT (+).Options: Chinese/English. DVR Interface Descriptions: Note:Please back up your data in TF card; when the TF card is used for the first time, it will be auto formated . 9 www.zerouav.com Pressing RIGHT button can switch FPV interface to DVR interface and pressing LEFT button can switch back to FPV interface. Video Playback First,switch to the DVR interface, pressing MODE (RIGHT) button can start video playback. Press UP or DOWN button to select a desired file, then press OK button to start playing it. UP DOWN MENU (LEFT) MODE (RIGHT) OK Functions Move cursor up Move cursor down Po pup/exit menu/sub menu Enter/exit video playback mode Confirm selection /play/stop DVR can run front-end or back-end. In any interface except DVR setting and video playback mode, pressing OK button (middle one of DVR control group) can start recording in the background, without affecting FPV use. Recording Settings: Press MENU button to select sub menu: Resolution: D1(720×576(PAL)),720×480(NTSC)),VGA(640×480) QVGA(320×240), higher resolution results in clearer video images and larger video file. 10 www.zerouav.com Cycle Recording: If Cycle Recording is selected, the latest videos recorded will cover the earliest ones when the TF card is full. “OFF”: if Cycle Recording function is closed, video files will not be cut into small segments; If you select 3 min to 10 min, Cycle Recording function is open then; the length of each video segment is corresponding to the selected value. Motion Detection: If Motion Detection is selected, the DVR will automatically start recording according to its internal algorithm when any motion is detected. Motion Detection Sensitivity: Motion Detection Sensitivity can be adjusted by 3 levels: High/Medium/Low; the higher level is selected, the more easily the DVR is triggered to record. 11 www.zerouav.com Date Stamp: Select ON/OFF to decide whether date and time will be showed at the bottom of the video images. Audio Acquisition: Select ON/Off to decide whether sounds can be recorded real-time into video files. Image Quality: Image definition and video file size can be adjusted by 3 levels. Higher image quality results in higher image definition and larger video file; When resolution D1(720×576(PAL)) is selected, the file sizes of videos recorded at different Image Quality options are as follows: Best: 1.7G/h Good: 1.2G/h Standard: 800M/h 12 www.zerouav.com Auto power up recording: Select YES/ON to decide whether videos need to be auto recorded when power up. Advanced Settings: Press the MENU button twice will pop up the Advanced Setting options including Format, Date/Time and Language. Format: Enter Advanced Settings, and select Format option to format the TF card. In order to optimize the file system ,DVR will format the TF card, if it’s used for the first time; Please back up your data in TF Card. Note: all files stored in the TF card will be deleted after the card is formatted. Date/Time: Enter Advanced Settings → select Date/Time option → press UP/DOWN button to select a desired date/time → press MENU button to exit. 13 www.zerouav.com Language: Enter Advanced Settings → select Language option → press UP/DOWN button to select a desired language from 8 languages provided → press MENU button to exit. TV Mode: Video output system can be selected and video input system will be automatically identified. Select the system according to which country you are in. Default Settings: This option leads back to factory default settings. 14 www.zerouav.com Quick Access Descriptions: Timer Stop/Start: In the FPV or external video interface, pressing LEFT button (of the display control group) once can stop the timer, and pressing LEFT again can restart it. Reset Timer: In the FPV or external video interface, long pressing LEFT button (of the display control group) can reset the timer. The time displayed will restart from zero. Interface Switch: Pressing RIGHT button can switch between FPV, DVR and external video interfaces. Show/Hide Indication Windows: In any interface, pressing UP button (of the display control group) once can hide the indication windows, and pressing UP again can show them again. Show Help Menu: In any interface, pressing DOWN button (of the display control group) can show Help menu, pressing DOWN again can make it disappear. 15 www.zerouav.com Packing and Accessories: Size and Weight: Specification Packing size 205mm×130mm×106mm Gross weight(dual receiver + DVR) 0.66kg Light blocking drape 1 Velcro cable tie Female T-plug to male XT60 plug connector cable Female T-plug to male XT90 plug connector cable Female to female T-plug connector extension cable AV input/output cable Power supply output cable 1 Yellow Video input Red Black White Audio input Video output Audio output Accessories: Accessories Interface descriptions 16 1 1 1 1 1 www.zerouav.com FAQ: Not able to search channels automatically: Auto channel scan only functions in the FPV interface. In the DVR interface, users should search channels manually. The video displayed is black-and-white: Check whether the camera output is black-and-white (some cameras might automatically shift to black-and-white in low-light conditions) If it normally displays in full color in the DVR interface, users can adjust the “BURST”in menu from P0 to P7. Can not start after connected to power: First fully charge the battery, and make sure its discharge current at least reaches 1.4A. Check whether the battery power is enough. If a 2S battery is being used, try a 3S battery for testing. Check whether it is caused by poor contact of the T-plug and battery cable. Check whether the power source is correctly connected to positive and negative poles. No channel can be received: Install antennas, and move the monitor close to the 5.8 GHz transmitter. Connect video signal to the transmitter. Check whether the channel provided by the transmitter is one of those listed in the channels-able-to-be-received-table; check with other channels. Volume is too low: Turn it to full volume. Check whether the microphone of the transmitter works well. 17