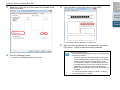
1
P2WW-2410-04ENZ0
TOP
Contents
Index
Introduction
How to Use ScandAll PRO
Explains about "ScandAll PRO".
Overview of
ScandAll PRO
Explains how to scan documents using
the scanning application "ScandAll PRO".
How to Use
ScandAll PRO
How to Use This Manual
TOP
Contents
Index
How to Use This Manual
How to Use This Manual
Introduction
This section shows how to use this manual.
Cover page
Overview of
ScandAll PRO
Index page
How to Use
ScandAll PRO
Jumps to the
top page of
each chapter.
Jumps to the page of the index that is clicked.
TOP: Jumps to the cover page.
Contents: Jumps to the contents page.
Index: Jumps to the index page.
Contents page
Jumps to this
page.
Common Note:
z To display or print this manual, either Adobe® Acrobat® (7.0 or later)
or Adobe® Reader® (7.0 or later) is required.
z Clicking a blue character string (where the mouse pointer changes
into a link-selecting icon such as
reference.
while pointing) moves to the
z In this manual, you can use the Search tool of Adobe® Acrobat® or
Adobe® Reader®.
For details, refer to Adobe® Acrobat® or Adobe® Reader® Help.
z On the keyboard, press the [PageUp] key to move to the previous
page, and the [PageDown] key to the next page.
Jumps to the page of the title that is clicked.
2
TOP
Contents
Index
Introduction
Introduction
Introduction
Thank you for using ScandAll PRO.
Manufacturer
Overview of ScandAll PRO
PFU LIMITED
International Sales Dept., Imaging Business Division,
Products Group
Solid Square East Tower, 580 Horikawa-cho, Saiwai-ku,
Kawasaki-shi Kanagawa 212-8563, Japan
Phone: (81-44) 540-4538
All Rights Reserved, Copyright © PFU LIMITED 2007 - 2010
ScandAll PRO is an application that enables you to display
and edit images scanned with a fi-series Image Scanner.
This manual describes how to use ScandAll PRO for scanning
with a fi-series Image Scanner.
For details about the functions of ScandAll PRO, refer to the
"ScandAll PRO Help".
Trademarks
Microsoft, Windows, Windows Server, Windows Vista, and
SharePoint are either registered trademarks or trademarks of
Microsoft Corporation in the United States and/or other
countries.
ISIS is a registered trademark of EMC Corporation in the
United States.
Adobe, the Adobe logo, Acrobat, and Adobe Reader are either
registered trademarks or trade names of Adobe Systems
Incorporated in the United States and/or other countries.
Kofax and VRS are trademarks or registered trademarks of
Kofax, Inc.
Other company names and product names are the registered
trademarks or trademarks of the respective companies.
Overview of
ScandAll PRO
How to Use
ScandAll PRO
Use in High-Safety Applications
This product has been designed and manufactured on the
assumption that it will be used in office, personal, domestic,
regular industrial, and general purpose applications.
It has not been designed and manufactured for use in
applications (simply called "high-safety applications" from
here on) that directly involve danger to life and health when a
high degree of safety is required, for example, in the control of
nuclear reactions at nuclear power facilities, automatic flight
control of aircraft, air traffic control, operation control in masstransport systems, medical equipment for sustaining life, and
missile firing control in weapons systems, and when
provisionally the safety in question is not ensured.
The user should use this product with adopting measures for
ensuring safety in such high-safety applications. PFU
LIMITED assumes no liability whatsoever for damages arising
from use of this product by the user in high-safety
applications, and for any claims or compensation for damages
by the user or a third party.
3
TOP
Contents
Index
Conventions
Conventions
Introduction
Symbols Used in This Manual
Product
In this manual, the following symbols are used to describe
operations as well as indicate warnings.
!
This symbol alerts operators to particularly important
information. Be sure to read this information.
This symbol alerts operators to helpful advice regarding
operation.
Abbreviations Used in This Manual
The following abbreviated terms used in this manual are
described.
Product
Indication
Windows® XP Home Edition
(Service Pack 2 or later)
Windows® XP Professional
(Service Pack 2 or later)
Windows® XP Professional x64 Edition
Windows
XP
Windows Server® 2003 R2, Standard
Edition
Windows Server® 2003 R2, Standard x64
Edition
Windows
Server 2003
Windows
(*1)
Indication
Windows Vista® Home Basic (32/64-bit)
Windows Vista® Home Premium (32/64-bit)
Windows Vista® Business (32/64-bit)
Windows Vista® Enterprise (32/64-bit)
Windows Vista® Ultimate (32/64-bit)
Windows
Vista
Windows
(*1)
Windows Server® 2008 Standard (32/64-bit)
Windows Server® 2008 R2 Standard
(64-bit)
Windows
Server 2008
Windows® 7 Home Premium (32/64-bit)
Windows® 7 Professional (32/64-bit)
Windows® 7 Enterprise (32/64-bit)
Windows® 7 Ultimate (32/64-bit)
Windows 7
Microsoft® Office SharePoint® Portal Server
2003
Microsoft
SharePoint Server
Overview of
ScandAll PRO
How to Use
ScandAll PRO
Microsoft® Office SharePoint® Server 2007
Adobe® Acrobat®
Adobe Acrobat
*1 : Where there is no distinction between the different versions of the
above operating system, the general term "Windows" is used.
4
Conventions
Description of Successive Operations
In the procedures described in this manual, successive
operations are connected with J in between.
Example: Click the [Scan] menu J [Scan Settings].
Screen Examples in This Manual
The screen examples in this manual are subject to change
without notice in the interest of product improvement.
If the actual displayed screen differs from the screen
examples in this manual, operate by following the actual
displayed screen while referring to the user's manual of the
scanner application you are using.
The screen examples used in this manual are of TWAIN
driver, ISIS driver, ScandAll PRO (which is an image capturing
application), and Adobe Acrobat.
The screen examples used in this manual are of Windows
Vista. Depending on the operating systems you are using, the
screen examples and operations may differ from the actual
ones. Also note that, depending on the scanner model,
screens and operations stated in this manual may differ when
you update TWAIN driver/ISIS driver. In this case, refer to the
manual provided upon updating the driver(s).
TOP
Contents
Index
Introduction
Overview of
ScandAll PRO
How to Use
ScandAll PRO
Scanner Component Names in This Manual
The button names on the scanner and the name of the display
area of the operator panel described in this manual may differ
depending on the scanner you are using.
In this case, refer to the Operator’s Guide for your scanner.
5
Contents
Contents
TOP
Contents
Index
Introduction
How to Use This Manual ................................................................................................................................... 2
Introduction ........................................................................................................................................................ 3
Conventions ....................................................................................................................................................... 4
Chapter 1 Overview of ScandAll PRO .......................................................................................................... 8
1.1
1.2
Overview of
ScandAll PRO
How to Use
ScandAll PRO
What is ScandAll PRO? ................................................................................................................................................ 9
ScandAll PRO .................................................................................................................................................................. 9
Features ....................................................................................................................................................................... 10
Feature of ScandAll PRO ............................................................................................................................................... 10
Chapter 2 How to Use ScandAll PRO ......................................................................................................... 11
2.1
2.2
2.3
2.4
2.5
2.6
2.7
2.8
Launching ScandAll PRO ........................................................................................................................................... 12
Selecting a Scanner Driver ......................................................................................................................................... 13
Selecting a Scanner Model ......................................................................................................................................... 14
Scan Parameters ......................................................................................................................................................... 15
Scanning Methods ...................................................................................................................................................... 16
Scanning with [Scan]...................................................................................................................................................... 16
Scanning with [Batch Scan]............................................................................................................................................ 16
Scanning with [Scan] .................................................................................................................................................. 17
Scanning with [Batch Scan] ....................................................................................................................................... 20
Creating and Editing Profiles.......................................................................................................................................... 20
Scanning Documents ..................................................................................................................................................... 22
Advanced Scanning .................................................................................................................................................... 23
Scanning Methods List ................................................................................................................................................... 23
Duplex Scanning Using the ADF Virtual Duplex Option (fi-6750S) ................................................................................ 24
Saving Scanned Images in PDF File Format ................................................................................................................. 26
6
Contents
2.9
Dividing a Multipage Document Using Patch Codes ...................................................................................................... 28
Dividing a Multipage Document Using Barcodes ........................................................................................................... 30
Using the Scanner Buttons to Start a Scan Quickly ....................................................................................................... 34
Specifying the Result of Zone OCR as a File Name ...................................................................................................... 37
Specifying the Result of Barcode Recognition as a File Name ...................................................................................... 41
Creating Saving Folders for Each Batch Scan ............................................................................................................... 44
Saving Scanned Images from a Batch Scan to a Microsoft SharePoint Server ............................................................. 46
Restarting a Suspended Batch Scan ............................................................................................................................. 48
Outputting Indexing Information File and Linking with an Application ............................................................................ 49
Detecting Errors in the Scanned Document (fi-6800)..................................................................................................... 51
Useful Post-Scan Functions ....................................................................................................................................... 53
Marking Thumbnails ....................................................................................................................................................... 53
Saving Scanned Images to a Microsoft SharePoint Server ........................................................................................... 54
TOP
Contents
Index
Introduction
Overview of
ScandAll PRO
How to Use
ScandAll PRO
Index ................................................................................................................................................................ 55
7
Chapter 1
Overview of ScandAll PRO
This chapter describes the overview and features of ScandAll PRO.
1.1 What is ScandAll PRO?................................................................................................................................9
1.2 Features .....................................................................................................................................................10
TOP
Contents
Index
Introduction
Overview of
ScandAll PRO
How to Use
ScandAll PRO
Chapter 1 Overview of ScandAll PRO
1.1 What is ScandAll PRO?
ScandAll PRO
ScandAll PRO is an application for scanning images, which
conforms with both the TWAIN and ISIS standards.
Used with a TWAIN or ISIS driver, ScandAll PRO allows you
to scan a document to convert it into image data. You can also
scan a document with a VRS (*1) ISIS interface.
ScandAll PRO is suitable for routine task input, such as
computerizing business or application forms.
TOP
Contents
Index
Introduction
Overview of
ScandAll PRO
How to Use
ScandAll PRO
*1: An application that can easily create high-quality images. VRS can also
detect and automatically correct errors that may occur while scanning.
For a example, scanning documents containing skewed or smudged
characters due to the colored or shaded effects.
z For details about the functions of ScandAll PRO, refer to the
ScandAll PRO Help.
z If your scanner does not support VRS, you cannot use VRS.
9
TOP
Contents
Index
Chapter 1 Overview of ScandAll PRO
1.2 Features
Feature of ScandAll PRO
ScandAll PRO has the following features:
■ Various Scan Settings
z Conforms with both TWAIN/ISIS standards.
z Allows batch processing (batch scan), enabling scan operations with
scan conditions, file format, and file save destination specified. You
can also save the specified scan settings as a profile.
z Has hot key controls, enabling batch scan operations with a single
touch on a keyboard.
z Allows events to be set, enabling batch scan operations with a single
press of the [Scan] or [Send to] button.
Introduction
z Text-recognizes scanned barcode data or a part of the image with
Zone OCR, and outputs the data to the indexing information file.
z Launches the specified application while using the output image file
or indexing information file as a parameter.
z Checks for errors in the scanned images, and if any exist, changes
the background color of the target thumbnail. (fi-6800 only)
z Marks thumbnails of the scanned images by changing the
background color so that they can be easily sorted.
Overview of
ScandAll PRO
How to Use
ScandAll PRO
■ Display/Edit/Save Functions to Meet Your Needs
z Shows multiple files side-by-side for comparison.
z Allows you to edit the scanned images in various ways such as
rotating, reverting, deskewing, sorting, and page-insertion and
deletion. You can save the edited data as a new file, or resave it with
the profile settings used for the scan.
z Outputs both color and monochrome images simultaneously with a
single scan. (When using a scanner that supports the multi-image
output function.)
z Inputs/outputs Bitmap, JPEG and TIFF files.
z Outputs the scanned images in PDF or PDF/A file format. You can
also create searchable PDF files and high-compression PDF files.
■ Other Useful Functions
z Automatically saves the scanned images in the specified server by
linking with FTP server or Microsoft SharePoint Server.
z Sends the scanned images as an attached file by linking with an
e-mail program.
z Classifies pages of a document in a specified unit and saves them in
separate files by using patch codes or barcodes.
10
Chapter 2
How to Use ScandAll PRO
This chapter describes how to scan documents with the scanner using ScandAll PRO.
2.1 Launching ScandAll PRO ...........................................................................................................................12
2.2 Selecting a Scanner Driver.........................................................................................................................13
2.3 Selecting a Scanner Model.........................................................................................................................14
2.4 Scan Parameters........................................................................................................................................15
2.5 Scanning Methods......................................................................................................................................16
2.6 Scanning with [Scan] ..................................................................................................................................17
2.7 Scanning with [Batch Scan]........................................................................................................................20
2.8 Advanced Scanning....................................................................................................................................23
2.9 Useful Post-Scan Functions .......................................................................................................................53
TOP
Contents
Index
Introduction
Overview of
ScandAll PRO
How to Use
ScandAll PRO
Chapter 2 How to Use ScandAll PRO
2.1 Launching ScandAll PRO
TOP
Contents
Index
Introduction
1
Select the [Start] menu J [All Programs] J [Fujitsu
ScandAll PRO] J [ScandAll PRO].
D ScandAll PRO starts up.
Overview of
ScandAll PRO
How to Use
ScandAll PRO
12
TOP
Contents
Index
Chapter 2 How to Use ScandAll PRO
2.2 Selecting a Scanner Driver
A fi-series Image Scanner comes with two scanner drivers; a
TWAIN driver that conforms with the TWAIN standard, and an
ISIS driver that conforms with the ISIS standard.
ScandAll PRO supports both drivers, and there is no
significant difference between them. Choose one to suit your
requirements.
The following explains how to select the scanner driver (switch
between TWAIN and ISIS) to use with ScandAll PRO.
1
Select the [Tool] menu J [Preferences].
2
On the [Scan] tab, select either of the drivers under
[Device Driver].
D The [Setup] dialog box appears.
Introduction
Overview of
ScandAll PRO
How to Use
ScandAll PRO
z In ScandAll PRO, [TWAIN] is selected by default.
z For functional details of the TWAIN driver, refer to the
TWAIN Driver Help.
z For functional details of the ISIS driver, refer to the ISIS
Driver Help.
3
Click the [OK] button to save the settings.
13
TOP
Contents
Index
Chapter 2 How to Use ScandAll PRO
2.3 Selecting a Scanner Model
You need to select a scanner to use before you scan a
document.
The following explains how to select the scanner.
1
Select the [Scan] menu J [Select Scanner].
2
Select a scanner you want to use, and click the [Select]
button.
D The [Select Scanner] dialog box appears.
Introduction
ISIS driver:
Overview of
ScandAll PRO
How to Use
ScandAll PRO
Select the scanner model that you connected to your computer. Note
that the indication of the scanner model name depends on the
selected scanner driver.
TWAIN driver:
14
TOP
Contents
Index
Chapter 2 How to Use ScandAll PRO
2.4 Scan Parameters
Introduction
The scan parameters are configured in the scanner driver’s
setup dialog box.
ISIS driver:
The scanner driver’s setup dialog box specifications differ
depending on the scanner.
For details, refer to the Operator’s Guide for the scanner you
are using.
1
Overview of
ScandAll PRO
How to Use
ScandAll PRO
Select the [Scan] menu J [Scanner Setting].
D The scanner driver's setup dialog box appears.
TWAIN driver:
For the configurable parameters in the respective drivers, refer to the
Operator’s Guide for the scanner you are using.
2
When you have completed the settings, click the [OK]
button.
D The scan parameters are configured.
15
Chapter 2 How to Use ScandAll PRO
2.5 Scanning Methods
There are two ways to scan documents by using ScandAll
PRO.
Scanning with [Scan]
Use this option when scanning a small number of pages.
Each time you scan documents, you may need to configure
new settings as necessary, such as the file format, saving
destination, and scan parameters.
For details, refer to "2.6 Scanning with [Scan]" (page 17).
TOP
Contents
Index
Introduction
Overview of
ScandAll PRO
How to Use
ScandAll PRO
Scanning with [Batch Scan]
Use this option when scanning a large number of pages.
You can save scan settings as a "profile" in advance, and scan
documents according to the profile.
Profiles are configured for scan settings such as the file
format, saving destination, scan parameters, image
processing properties, and application with which to interact.
You can create more than one profile beforehand, so you do
not have to configure new settings every time you scan
documents. You only need to switch between profiles.
For details, refer to "2.7 Scanning with [Batch Scan]" (page
20).
16
TOP
Contents
Index
Chapter 2 How to Use ScandAll PRO
2.6 Scanning with [Scan]
Each time you scan documents, you may need to configure
new settings as necessary, such as scan and saving
parameters.
1
Load a document on the scanner.
2
Select the [Scan] menu J [Scan Settings].
3
In the [Scan Settings] dialog box, configure various
settings such as for saving the scanned images.
Introduction
Overview of
ScandAll PRO
How to Use
ScandAll PRO
For how to load a document on the scanner, refer to the Operator’s
Guide for the scanner you are using.
D The [Scan Settings] dialog box appears.
For information about the setting items you can configure,
refer to the ScandAll PRO Help.
17
Chapter 2 How to Use ScandAll PRO
4
Click the [Scanner Setting] button.
5
6
D The scanner driver's setup dialog box appears.
TWAIN driver:
T.B.D
Configure the scan parameters.
For the configurable parameters in the respective drivers, refer to the
Operator’s Guide for the scanner you are using.
When you have completed the settings, click the [OK]
button.
D You are returned to the [Scan Settings] dialog box.
7
Click the [Scan] button.
TOP
Contents
Index
Introduction
Overview of
ScandAll PRO
How to Use
ScandAll PRO
When using the TWAIN driver, clicking the [Scan] button
may display the scanner driver's setup dialog box. If so,
you can also change the settings in the dialog box
displayed.
Click the [Scan] button to scan the document.
Click the [Close] button when you finish scanning.
ISIS driver:
If you do not want to display the scanner driver's setup
dialog box, clear the [Show TWAIN dialog before each
batch scan process] check box in the [Scan Settings]
dialog box.
18
Chapter 2 How to Use ScandAll PRO
D After the document is scanned, the scanned image(s) are
displayed on the ScandAll PRO window, and then saved to a file.
TOP
Contents
Index
Introduction
Overview of
ScandAll PRO
How to Use
ScandAll PRO
z If you clear the [Save to file] check box in the [Scan
Settings] dialog box, the scanned image(s) will no
longer be saved to a file. To save the image(s) to a file,
select the [File] menu J [Save As].
z To scan documents with the same settings afterwards,
select the [Scan] menu J [Scan].
z For more details about the functions and operations of
ScandAll PRO, refer to the ScandAll PRO Help.
For information about scanning methods other than scanning with
[Scan], refer to "2.8 Advanced Scanning" (page 23).
19
TOP
Contents
Index
Chapter 2 How to Use ScandAll PRO
2.7 Scanning with [Batch Scan]
With Batch Scan, you can save various settings as profiles
beforehand and then scan documents by using such profiles.
Creating and Editing Profiles
1
Select the [Scan] menu J [Batch Scan Settings].
D The [Batch Scan Settings] dialog box appears.
Profile List
2
Do the following as necessary:
z To create a new profile:
Click the [Add] button.
D A new profile appears in the [Profile Editor] dialog box.
z To create a new profile based on an existing profile:
Select a profile you want to change the settings for, and click the
[Copy] button.
D The profile you selected from the profile list is displayed as a
new profile in the [Profile Editor] dialog box.
Introduction
Overview of
ScandAll PRO
How to Use
ScandAll PRO
z To change the settings of an existing profile:
Select a profile you want to change the settings for, and click the
[Edit] button.
D The selected profile appears in the [Profile Editor] dialog box.
z To delete an existing profile from the profile list:
Select a profile you want to delete, and then click the [Delete]
button.
D The selected profile is deleted.
When you create a profile, the profile is added in the profile list.
20
Chapter 2 How to Use ScandAll PRO
3
In the [Profile Editor] dialog box, configure settings for
scanning and saving the scanned images.
TOP
Contents
Index
Introduction
Overview of
ScandAll PRO
How to Use
ScandAll PRO
z The profile showing [Template] at [Type] in the dialog
box is a default sample profile. It cannot be used for
actual scanning. Use this profile as the base of new
profiles.
z When the title line of each parameter in the profile list is
clicked, profiles other than [Template] are sorted.
z You can specify the initial setting values beforehand.
1 Select the [Tool] menu J [Preferences] and specify
a profile name for [Initial setting for profile] on the
[Scan] tab.
!
For information about the setting items you can configure,
refer to the ScandAll PRO Help.
2 For [Batch Scan Setting], create a profile with the
same name as the one you specified.
3 An asterisk (*) is displayed to the right of the profile
type, to indicate that default values are used for the
profile settings. When you create a new profile with
the [Add] button, the profile is created with the
default settings values.
When you use TWAIN driver, only [00: Current Setting] is
available for [Setting File] in [Scanner Settings].
4
Click the [OK] button.
D You are returned to the [Batch Scan Settings] dialog box.
Added or copied profiles by using the [Add] or [Copy] button are
added to the profile list.
21
Chapter 2 How to Use ScandAll PRO
Scanning Documents
1
Load a document on the scanner.
2
Select a profile from the [Select the Batch Profile] dropdown list on the toolbar.
D After the document is scanned, the scanned image(s) are
displayed on the ScandAll PRO window, and then saved to a file.
TOP
Contents
Index
Introduction
Overview of
ScandAll PRO
How to Use
ScandAll PRO
3
Click the [Start Batch Scan] button.
z You can perform a scan by using the [Scan] menu or by
configuring settings in the [Batch Scan Settings] dialog
box as well. For more information, refer to the ScandAll
PRO Help.
z When a batch scan is performed, the batch scan
working state is temporarily saved automatically.
Because only one working state is temporarily saved
for each scanning profile at a time, the saved state is
always overwritten with the one last used. The
temporarily saved batch scan working state can be
restored from the [Scan] menu J [Restore Batch
Scan]. For details on how to restore a batch scan, refer
to "Restarting a Suspended Batch Scan" (page 48).
z If another scan is appended, inserted, replaced, or
added to the document batch, or scanned images are
edited after performing a batch scan, you can save the
changed contents from the [File] menu J [Save].
22
Chapter 2 How to Use ScandAll PRO
2.8 Advanced Scanning
Launching the TWAIN driver from ScandAll PRO allows you to
scan documents by various methods.
The following shows the scanning methods list.
Scanning Methods List
TOP
Contents
Index
Introduction
Overview of
ScandAll PRO
How to Use
ScandAll PRO
Changing the scanning method
z "Duplex Scanning Using the ADF Virtual Duplex Option (fi-6750S)"
(page 24)
Setting post-scan operations and processes
z
z
z
z
z
z
z
z
z
z
"Saving Scanned Images in PDF File Format" (page 26)
"Dividing a Multipage Document Using Patch Codes" (page 28)
"Dividing a Multipage Document Using Barcodes" (page 30)
"Specifying the Result of Zone OCR as a File Name" (page 37)
"Specifying the Result of Barcode Recognition as a File Name" (page
41)
"Creating Saving Folders for Each Batch Scan" (page 44)
"Saving Scanned Images from a Batch Scan to a Microsoft
SharePoint Server" (page 46)
"Restarting a Suspended Batch Scan" (page 48)
"Outputting Indexing Information File and Linking with an Application"
(page 49)
"Detecting Errors in the Scanned Document (fi-6800)" (page 51)
Changing the scanner’s scan responses
z "Using the Scanner Buttons to Start a Scan Quickly" (page 34)
23
Chapter 2 How to Use ScandAll PRO
Duplex Scanning Using the ADF Virtual Duplex
Option (fi-6750S)
When selecting the Batch Scan option
The ADF Virtual Duplex option allows you to scan the front of
the pages of a document first, and then scan the reverse sides
in succession. It then automatically sorts these scanned
pages in the correct order.
6
4
3
Front Side
How to Use
ScandAll PRO
JKL
5
1
Introduction
Overview of
ScandAll PRO
JKL
JKL
JKL
DEF
ABC
Display the profile to be used for scanning in the [Profile Editor] dialog
box. On the [Scan] tab, select [ADF (Virtual Duplex)] from [Scan
Type].
TOP
Contents
Index
Sort
(Auto)
DEF
6
ABC
5
4
2
Back Side
3
2
1
1
Load a document face down on the ADF paper chute.
2
In ScandAll PRO, specify Duplex Scan mode.
When selecting the Scan option
When using a scanner driver
In the [TWAIN Driver (32)] dialog box, select [ADF (Virtual Duplex)]
from [Scan Type].
For how to load a document on ADF paper chute, refer to the
Operator’s Guide for the scanner you are using.
Select the [Perform ADF virtual duplex scanning] check box in the
[Scan Settings] dialog box.
In the ISIS driver dialog box, you cannot configure
settings for ADF virtual duplex scanning. When using this
driver, go to the [Scan Settings] dialog box or use the
Batch Scan option.
24
Chapter 2 How to Use ScandAll PRO
3
4
Perform a scan with ScandAll PRO.
D When the scanning is complete, a message appears to prompt
you to reload the document face up.
Load the document face up on the ADF paper chute.
For how to load a document on ADF paper chute, refer to the
Operator’s Guide for the scanner you are using.
!
5
When scanning the reverse sides of the pages of a
document, carefully load the document so that:
z The document is scanned from the last page.
z The pages are not upside down.
Click the [Yes] button.
D The reverse sides of the pages are scanned.
When the scanning is complete, the pages of the scanned
document are sorted automatically.
!
z The ADF Virtual Duplex option is not available once
you have selected any of the following. To use the
option, change the settings in ScandAll PRO or in the
scanner driver.
- The [Output color and monochrome simultaneously]
and [Sort color and monochrome automatically]
check boxes on the [File format and Name scheme]
tab in the [Profile Editor] dialog box.
- Any of the [Number of Pages per Separator], [Use
Patchcode-Based Job Separation Sheet], [Use
Barcode-Based Job Separation Sheet], and [Use
Hardware-Based Job Separation Sheet] check
boxes on the [Document separator] tab in the
[Profile Editor] dialog box.
- The [Multi Image Output] check box in the [Multi
Image] dialog box, which is opened by clicking the
[Enable Multi Image] check box in the [TWAIN Driver
(32)] dialog box of the TWAIN driver.
- The [Split Image] and [Blank Page Skip] check
boxes in the [Option] dialog box, which is opened by
clicking the [Option] button in the [TWAIN Driver
(32)] dialog box of the TWAIN driver.
- The [On] check box under [Blank Page Deletion] on
the [Blank Page Deletion] tab of the ISIS driver.
- The [Front Image #1] and [Front Image #2] check
boxes for [Camera] under [Image Mode] on the
[Image Processing] tab of the ISIS driver.
z The scanned images are not sorted if the page count
on the front pages differs from that on the back side.
TOP
Contents
Index
Introduction
Overview of
ScandAll PRO
How to Use
ScandAll PRO
25
Chapter 2 How to Use ScandAll PRO
Saving Scanned Images in PDF File Format
ScandAll PRO allows you to create PDF data easily without
any special steps. By changing the compression rate, you can
reduce the size of PDF data.
ScandAll PRO is recommended for scanning in color or
grayscale mode.
When scanning with the Scan option
Select a file format from [File Format] in the [Scan Settings] dialog
box.
Load a document on the scanner.
2
In ScandAll PRO, select the file format to save the
scanned images from the following:
Introduction
Overview of
ScandAll PRO
How to Use
ScandAll PRO
The procedure is as follows:
1
TOP
Contents
Index
For how to load document on the scanner, refer to the Operator’s
Guide for the scanner you are using.
z
z
z
z
PDF File
SinglePage PDF File
PDF/A File
SinglePage PDF/A File
When selecting the Batch Scan option
Display a profile name you want to use for scanning your file in the
[Profile Editor] dialog box. Select the [File format and Name scheme]
tab, and then select a file format from [File Format].
A [PDF File] or [SinglePage PDF File] is saved in a format
compatible with Adobe Acrobat 4.0 (PDF 1.3), while a
[PDF/A File] or [SinglePage PDF/A File] saved in a PDF/
A-lb format (format for an archive of digital documents
based on PDF 1.4).
Selecting [SinglePage PDF File] or [SinglePage PDF/A
File] creates one file per scanned image, and selecting
[PDF File] or [PDF/A File] creates one file containing
multiple scanned images.
26
Chapter 2 How to Use ScandAll PRO
3
To configure PDF-related optional settings, click the [PDF
Option] button.
D The [Output PDF File] dialog box appears.
TOP
Contents
Index
Introduction
Overview of
ScandAll PRO
How to Use
ScandAll PRO
In this dialog box, you can change the compression rate for creating a
file, make searchable PDF files, and set a password to open a PDF
file.
For details about the [Output PDF File] dialog box, refer to
the ScandAll PRO Help.
4
Perform a scan with ScandAll PRO.
!
ScandAll PRO features the outputting of scanned images
as PDF file(s), but does not officially support the function
to open PDF files. You can forcibly open files, but they
may not be displayed correctly, and operation may be
unstable.
To view PDF files, it is recommended to use an
application that can open PDF files, such as Adobe
Acrobat.
27
Chapter 2 How to Use ScandAll PRO
Dividing a Multipage Document Using Patch
Codes
ScandAll PRO supports the Job Separation function using
patch code sheets. This function allows you to divide scanned
images of a multipage document by a specified unit without
interrupting the ongoing scan, and save them respectively in
separate folders. When the output file format is set to
multipage PDF or TIFF, and multipage document is scanned,
the pages can be divided by the specified unit and saved as
separate files.
2
Create a new batch profile in ScandAll PRO, and then
open the [Profile Editor] dialog box.
For how to create profiles, refer to "2.7 Scanning with [Batch Scan]"
(page 20).
3
Select the [Document separator] tab, and then select the
[Use Patchcode-Based Job Separation Sheet] check box.
TOP
Contents
Index
Introduction
Overview of
ScandAll PRO
How to Use
ScandAll PRO
The procedure is as follows:
1
Prepare patch code sheets.
The PDF file for use as a patch code sheet comes with two size types
(A4 and Letter). Before using the patchcode-based Job Separation
function, you need to select the [Start] menu J [All Programs] J
[Fujitsu ScandAll PRO] J [Patch Code] J [Job Separation (A4)] or
[Job Separation (Letter)], and then print the PDF file of either "Job
Separation (A4)" or "Job Separation (Letter)" as many as you need.
!
z Take note of the following when you print out a patch
code sheet:
- Use blank white paper.
- Set the scaling to 100%.
The sheet is not recognized correctly when printed
in a size smaller than the original.
- Do not save toners.
The sheet is not recognized correctly if the print is
too light.
- Do not use thin paper in order to avoid bleedthrough.
z Using the same patch code sheets repeatedly may
decrease the recognition accuracy due to accumulated
dirt on the sheets. If the patch code sheets are not
recognized correctly or get smudged, print new patch
code sheets.
z To suppress the scanning of patch code sheet images,
select the [Remove separation sheet] check box.
z In Duplex Scan mode, you can disable the scanning of
the back side of patch code sheet by selecting the
[Remove the next page of a separation sheet] check
box.
28
Chapter 2 How to Use ScandAll PRO
4
Insert the patch code sheets wherever you want the file/
folder to separate.
Load the document with the patchcode-printed sheets face down on
the ADF paper chute.
2 Set [Document Counter], [Folder delimiters],
[Character string 1], and [Page Counter] in [Settings
applied].
TOP
Contents
Index
Introduction
Overview of
ScandAll PRO
How to Use
ScandAll PRO
Patchcode-printed Sheets
5
Using the batch profile you created above, perform a
batch scan.
For how to perform a batch scan, refer to "2.7 Scanning with [Batch
Scan]" (page 20).
Follow the procedure below to save images of a scanned
document that are separated by patch code sheets, in
separate folders.
1 Select the [Use the Name Rule] check box on the
[File format and Name scheme] tab in the [Profile
Editor] dialog box, and click the [Name Rule] button.
D [Document Counter] situated above [Folder
delimiters] is the folder name, and the scanned
images are saved in this folder.
If [Folder delimiters] is not set, no folders are
created, and [Document Counter], [Character string
1], and [Page Counter] will be the file name.
Example of saving files in folders:
When specifying
[Document Counter] as
folder names
Saving folders
0001
image0001.jpg
image0002.jpg
..
.
0002
image0001.jpg
image0002.jpg
.
..
D The [Name Rule] dialog box appears.
0003
image0001.jpg
image0002.jpg
When not specifying
[Document Counter] as
folder names
..
.
Saving folders
0001image0001.jpg
0001image0002.jpg
..
.
0002image0001.jpg
0002image0002.jpg
..
.
0003image0001.jpg
0003image0002.jpg
..
.
29
Chapter 2 How to Use ScandAll PRO
Dividing a Multipage Document Using Barcodes
ScandAll PRO supports the Job Separation function using
barcode-printed sheets. This function allows you to divide
scanned images of a multipage document by a specified unit
without interrupting the ongoing scan, and save them
respectively in separate folders. When the output file format is
set to multipage PDF or TIFF, and multipage document is
scanned, the pages can be divided by the specified unit and
saved as separate files. You can create files and folders with a
name that includes the document counter or the text
recognized from barcode.
ScandAll PRO can detect the following types of barcodes:
Code
Character set
The following lists the barcode detection parameters:
Item
Barcode height
10 to 30 mm / 0.39 to 1.18 inches
Barcode length
300 mm / 11.81 inches or less
Barcode margin
5 mm / 0.20 inches or more on each side of
barcode
Barcode base color
White (This may not be recognized correctly
depending on the document.)
Barcode color
Black
Resolution
200 to 600 dpi
Barcode angle
Horizontal and vertical
Field width
UPC/EAN/
JAN
Numbers
UPC:12 (UPC-A only; includes
check digits)
EAN, JAN: 8 or 13 (includes
check digits)
CODE39
Numbers, alphabets,
7 symbols
1 to 32
(excludes start/stop codes)
CODE128
Full ASCII codes
1 to 32
(excludes check characters)
Codabar
4 start/stop
characters, numbers,
10 alphabets and
symbols
1 to 32
(excludes start/stop codes)
Parameter
!
TOP
Contents
Index
Introduction
Overview of
ScandAll PRO
How to Use
ScandAll PRO
z If you scan a document with an undefined barcode type for
this function, the document may be separated wrongly, and
the scanned images may also be deleted depending on the
scan settings. To prevent this, check the document carefully
in advance to see if it has undefined barcodes. It is
recommended that you limit the barcode types to be
detected, and define the area to detect barcodes.
z Using the same barcode sheets repeatedly may decrease
the recognition accuracy due to accumulated dirt on the
sheets. If the barcode sheets are not recognized correctly or
get smudged, print new barcode sheets.
z If the text recognized from the barcode includes any control
characters and/or characters unavailable for a file or folder
name, such as \, /, ,, :, *, ?, ", <, >, |, those are replaced with
"_" (underscore) in the created folder or file name.
z The barcode may not be recognized correctly depending on
the document (if skewed), the scanner driver settings and/or
the print status of barcodes. Operate after ensuring that the
barcode is correctly recognized.
30
Chapter 2 How to Use ScandAll PRO
3
The procedure is as follows:
1
Select the [Document separator] tab, and then select the
[Use Barcode-Based Job Separation Sheet] check box.
Scan a sample image for barcode recognition.
Introduction
For how to perform a scan, refer to "2.6 Scanning with [Scan]" (page
17) or "2.7 Scanning with [Batch Scan]" (page 20).
Overview of
ScandAll PRO
The image created with ScandAll PRO can be used for
samples.
Details of the conditions are as follows:
Resolution
200 dpi or
higher
2
Color format
Paper size
Monochrome/
8-bit Gray/
24-bit Color
Height and width:
50 to 453 mm
TOP
Contents
Index
How to Use
ScandAll PRO
Create a new batch profile in ScandAll PRO, and then
open the [Profile Editor] dialog box.
For how to create profiles, refer to "2.7 Scanning with [Batch Scan]"
(page 20).
z To suppress the scanning of the image of barcodeprinted sheet, select the [Remove separation sheet]
check box.
z In Duplex Scan mode, you can disable the scanning of
the back side of barcode-printed sheets by selecting
the [Remove the next page of a separation sheet]
check box.
31
Chapter 2 How to Use ScandAll PRO
4
Click the [Setup] button.
5
Click and drag to select the area to detect the barcode.
D The [Barcode Setting] dialog box appears.
D The selected area is displayed in shaded red.
!
To change the sample image to be shown, replace it
from the [File] menu J [Open].
z Barcode type
You can specify the barcode type to be searched for
from the [Barcode] menu J [Advanced].
TOP
Contents
Index
Introduction
Overview of
ScandAll PRO
How to Use
ScandAll PRO
6
After you have completed the area selection, select the
[File] menu J [Exit] to save the setting contents.
!
z Sample image display
The sample image displayed on the barcode setting
window is as follows.
If barcode scanning performance deteriorates, limit the
barcode types to be detected or narrow the barcode
area to improve the scanning performance.
If there are multiple barcodes in the barcode detecting
area, the one recognized first will be enabled.
z Barcode recognition results
You can check the barcode recognition result of the
sample image from the [Barcode] menu J [Recognize
Barcode].
- An image which has been displayed once and then
saved is displayed as a sample image. If no relevant
image is saved, the last image displayed on the
main window is used as a sample image. If there is
no image displayed on the main window, select the
[File] menu J [Open] to select a sample image.
- Bitmap or JPEG (except Progressive JPEG) files are
available.
32
TOP
Contents
Index
Chapter 2 How to Use ScandAll PRO
7
Insert the barcode-printed sheets wherever you want the
file/folder to separate.
Load the document with the barcode-printed sheets face down on the
ADF paper chute.
Introduction
Overview of
ScandAll PRO
D [Job separation sheet] situated above [Folder
delimiters] is the folder name, and the scanned
images are saved in this folder.
Barcode-printed
Sheets
8
Using the batch profile you created above, perform a
batch scan.
For how to perform a batch scan, refer to "2.7 Scanning with [Batch
Scan]" (page 20).
Follow the procedure below to save images of a scanned
document that are separated by barcode-printed sheets,
in separate folders, and name each folder with a
character string recognized from the relevant barcode:
1 Select the [Use the Name Rule] check box on the
[File format and Name scheme] tab in the [Profile
Editor] dialog box, and click the [Name Rule] button.
D The [Name Rule] dialog box appears.
2 Set [Job separation sheet], [Folder delimiters],
[Character string 1], and [Page Counter] in [Settings
applied].
How to Use
ScandAll PRO
If [Folder delimiters] is not set, no folders are
created, and [Document Counter], [Character string
1], and [Page Counter] will be the file name.
Example of saving files in folders:
When specifying [Job
separation sheet] as
folder names
Saving folders
January
image0001.jpg
image0002.jpg
.
..
February
image0001.jpg
image0002.jpg
.
.
.
March
image0001.jpg
image0002.jpg
.
..
When not specifying
[Job separation sheet]
as folder names
Saving folders
Januaryimage0001.jpg
Januaryimage0002.jpg
..
.
Februaryimage0001.jpg
Februaryimage0002.jpg
..
.
Marchimage0001.jpg
Marchimage0002.jpg
..
.
33
Chapter 2 How to Use ScandAll PRO
Using the Scanner Buttons to Start a Scan
Quickly
6
Select the [Events] tab, and then select the event.
From the [Select an event] menu, select the event that you want to
launch an application for.
You can perform a scan simply by pressing the [Scan] or
[Send to] button on the scanner. To do this, you first need to
assign your desired scanning applications to these buttons.
Introduction
Overview of
ScandAll PRO
Computer Settings
1
TOP
Contents
Index
How to Use
ScandAll PRO
Confirm that the scanner is connected properly to your
computer, then power on the scanner.
For how to connect the scanner to your computer, refer to the
Operator’s Guide for the scanner you are using.
2
Select the [Start] menu J [Control Panel].
3
Select the [Hardware and Sound] icon.
4
Select the [Scanners and Cameras] icon.
5
D The [Control Panel] window appears.
D The [Hardware and Sound] window appears.
The following events can be selected:
D The [Scanners and Cameras] window appears.
z Scan Button (when the [Scan] button is pressed)
Display the properties of the scanner.
z Send to 1 to n (when the [Send to] button is pressed while a
number (from 1 to n) is displayed on the operator panel)
Double-click the scanner icon.
!
Numbers displayed on the operator panel depend on the
selected scanner.
Example: Send to 1 - 9
34
Chapter 2 How to Use ScandAll PRO
7
Select the application to be launched when an event
occurs.
Select the [Start this program] option button under [Actions], and then
select the application you want to use.
9
Start up ScandAll PRO.
10 Select the [Tool] menu J [Preferences].
Introduction
11 Select the [Event] tab.
Overview of
ScandAll PRO
D The [Setup] dialog box appears.
12 Select the action for the event you selected in Step 6, and
then select a profile from the list you want to use for
scanning.
8
TOP
Contents
Index
How to Use
ScandAll PRO
Click the [OK] button.
This completes the computer settings for an application other than
ScandAll PRO. Then, configure settings for your scanner according to
"Scanner Settings" (page 36).
z The screens and operations may differ slightly if the
operating system that you are using is other than
Windows Vista.
z If you want to link with other buttons here, repeat Steps
6 to 7, and finally perform Step 8.
You need to create the required profile beforehand.
For how to create profiles, refer to "2.7 Scanning with
[Batch Scan]" (page 20).
13 Click the [OK] button.
14 Exit ScandAll PRO.
35
Chapter 2 How to Use ScandAll PRO
When you press the linked button, ScandAll PRO starts up,
and a batch scan is executed according to the selected
profile's settings.
Scanner Settings
ADF Type
Flatbed Type
Function
Function
Send to
Scan
Power
Hopper Height
!
Depending on the scanner you are using, the profile name
specified as [Send to 1 to n] in Step 12 is displayed on the
operator panel. However, the profile name is not displayed
correctly if...
z the name is set in a language that the scanner does not
support (Unsupported languages are displayed with ■)
z the name does not fit into the display range (16 characters ×
3 rows)
TOP
Contents
Index
Introduction
Overview of
ScandAll PRO
How to Use
ScandAll PRO
Paper Thickness
Thin
Thick
Send to
Scan
[Scan] Button
[Send to] Button
[Scan] Button
[Send to] Button
z When using the [Scan] button
No setting changes are needed.
D Pressing the [Scan] button starts up the application you selected.
z When using the [Send to] button
Press the [Function] button to change the number displayed on the
operator panel.
Match the event set at the computer (Send to 1 to n) and the number.
To perform the event configured with [Send to 2], for example, display
[2] on the operator panel.
D Pressing the [Send to] button starts up the application you
selected.
Operator panel specifications differ depending on the scanner.
For details, refer to the Operator’s Guide for the scanner you
are using.
36
TOP
Contents
Index
Chapter 2 How to Use ScandAll PRO
Specifying the Result of Zone OCR as a File
Name
The procedure is as follows:
1
ScandAll PRO supports the Zone OCR function. With this
function, you can perform Zone OCR on a specified area of a
scanned document and output the recognition result to a file.
You can also use character strings recognized by the Zone
OCR as a file name or folder name.
This section explains how to set the character strings
recognized by Zone OCR as a file name.
z The following resolutions are recommended for images.
Resolution higher than 600 dpi cannot be recognized for
Color/Gray.
- Monochrome: 400/600 dpi
- Color/Gray: 200/300 dpi
z The deskew function of the driver and the orientation
correction filter may improve the recognition rate.
Scan a sample image for Zone OCR.
For how to perform a scan, refer to "2.6 Scanning with [Scan]" (page
17) or "2.7 Scanning with [Batch Scan]" (page 20).
The image created with ScandAll PRO can be used for
samples.
Details of the conditions are as follows:
Resolution
200 dpi or
higher
2
Color format
Monochrome/
8-bit Gray/
24-bit Color
Paper size
Introduction
Overview of
ScandAll PRO
How to Use
ScandAll PRO
Height and width:
50 to 453 mm
Create a new batch profile in ScandAll PRO, and then
open the [Profile Editor] dialog box.
For how to create profiles, refer to "2.7 Scanning with [Batch Scan]"
(page 20).
37
Chapter 2 How to Use ScandAll PRO
3
Select the [Filter] tab, and then select the [Enable Zone
OCR] check box.
5
Click and drag to select an area for Zone OCR.
TOP
Contents
Index
Introduction
Overview of
ScandAll PRO
How to Use
ScandAll PRO
D The selected area is displayed in shaded red.
6
4
Click the [Settings] button.
D The [Zone OCR Settings] dialog box appears.
After you have completed the area selection, select the
[File] menu J [Exit] to save the setting contents.
z Sample image display
The sample image displayed on the Zone OCR setting
window is as follows.
- An image which has been displayed once and then
saved is displayed as a sample image. If no relevant
image is saved, the last image displayed on the
main window is used as a sample image. If there is
no image displayed on the main window, select the
[File] menu J [Open] to select a sample image.
- Bitmap or JPEG (except Progressive JPEG) files are
available.
To change the sample image to be shown, replace it
from the [File] menu J [Open].
38
Chapter 2 How to Use ScandAll PRO
z Zone OCR advanced settings
You can specify advanced settings for Zone OCR from
the [Zone OCR] menu J [Advanced]. For information
about the setting items you can configure, refer to the
ScandAll PRO Help.
8
Set [Character string 1], [Page Counter], and [Zone OCR]
in [Settings applied].
TOP
Contents
Index
Introduction
Overview of
ScandAll PRO
How to Use
ScandAll PRO
D [Character string 1], [Page Counter], and [Zone OCR] are used for
the file name.
z Zone OCR results
You can check the sample image Zone OCR result
from the [Zone OCR] menu J [Zone OCR].
7
Click the [Name Rule] button on the [File format and
Name scheme] tab in the [Profile Editor] dialog box.
D The [Name Rule] dialog box appears.
Note the following when using the character strings
recognized by Zone OCR as a file name.
z Up to 32 characters can be recognized.
z Illegal characters (\ / : ? * " < > | , ) are replaced with "_"
(underscore).
z Line feed characters are deleted.
z If outputting the single page type file, include [Page
Counter] to the file name. If the page counter is not
included, the file name may be duplicated.
z When multipage type files are created, the character
string recognized at the Zone OCR on the top page will
be used for the file name.
9
Load a document on the scanner.
10 Using the batch profile you created above, perform a
batch scan.
For how to perform a batch scan, refer to "2.7 Scanning with [Batch
Scan]" (page 20).
39
Chapter 2 How to Use ScandAll PRO
Confirm and correct zone OCR results.
When the [Confirm and correct zone OCRed text]
check box is selected for [Zone OCR Advanced
Settings], the [Zone OCRed Text Confirmation and
Correction] dialog box is displayed when a batch scan
is performed. You can confirm and correct zone OCR
results in this dialog box.
TOP
Contents
Index
Introduction
Overview of
ScandAll PRO
How to Use
ScandAll PRO
40
Chapter 2 How to Use ScandAll PRO
Specifying the Result of Barcode Recognition as
a File Name
3
Select the [Filter] tab, and then select the [Perform
barcode recognition] check box.
TOP
Contents
Index
Introduction
ScandAll PRO supports the barcode recognition function. With
this function, you can perform barcode recognition on a
specified area of a scanned document and output the
recognition result to a file. You can also use character strings
recognized with barcode recognition as a file name or folder
name.
This section explains how to set a character string recognized
with barcode as a file name.
Overview of
ScandAll PRO
How to Use
ScandAll PRO
The recommended resolution for an image to be used for
barcode recognition is 200 to 600 dpi.
The procedure is as follows:
1
Scan a sample image for barcode recognition.
For how to perform a scan, refer to "2.6 Scanning with [Scan]" (page
17) or "2.7 Scanning with [Batch Scan]" (page 20).
The image created with ScandAll PRO can be used for
samples.
Details of the conditions are as follows:
Resolution
200 dpi or
higher
2
Color format
Monochrome/
8-bit Gray/
24-bit Color
Paper size
4
Click the [Settings] button.
D The [Barcode Setting] dialog box appears.
Height and width:
50 to 453 mm
Create a new batch profile in ScandAll PRO, and then
open the [Profile Editor] dialog box.
For how to create profiles, refer to "2.7 Scanning with [Batch Scan]"
(page 20).
41
Chapter 2 How to Use ScandAll PRO
5
Click and drag to select an area for barcode recognition.
z Barcode properties
You can specify advanced settings for barcode
recognition from the [Barcode] menu J [Advanced].
For information about the setting items you can
configure, refer to the ScandAll PRO Help.
TOP
Contents
Index
Introduction
Overview of
ScandAll PRO
How to Use
ScandAll PRO
D The selected area is displayed in shaded red.
6
z Barcode recognition results
You can check the sample image barcode recognition
result from the [Barcode] menu J [Recognize
Barcode].
After you have completed the area selection, select the
[File] menu J [Exit] to save the setting contents.
z Sample image display
The sample image displayed on the barcode setting
window is as follows.
- An image which has been displayed once and then
saved is displayed as a sample image. If no relevant
image is saved, the last image displayed on the
main window is used as a sample image. If there is
no image displayed on the main window, select the
[File] menu J [Open] to select a sample image.
- Bitmap or JPEG (except Progressive JPEG) files are
available.
To change the sample image to be shown, replace it
from the [File] menu J [Open].
7
Click the [Name Rule] button on the [File format and
Name scheme] tab in the [Profile Editor] dialog box.
D The [Name Rule] dialog box appears.
42
Chapter 2 How to Use ScandAll PRO
8
Set [Character string 1], [Page Counter], and [Barcode] in
[Settings applied].
TOP
Contents
Index
Introduction
Overview of
ScandAll PRO
How to Use
ScandAll PRO
D [Character string 1], [Page Counter], and [Barcode] are used for
the file name.
Note the following when using the character strings
recognized with barcode recognition as a file name.
z Up to 32 characters can be recognized.
z Illegal characters (\ / : ? * " < > | , ) and spaces for the
top or end are replaced with "_" (underscore).
z Line feed characters are deleted.
z If outputting the single page type file, include [Page
Counter] to the file name. If the page counter is not
included, the file name may be duplicated.
z When multipage type files are created, the character
string recognized with the barcode recognition on the
top page will be used for the file name.
9
Load a document on the scanner.
10 Using the batch profile you created above, perform a
batch scan.
For how to perform a batch scan, refer to "2.7 Scanning with [Batch
Scan]" (page 20).
43
TOP
Contents
Index
Chapter 2 How to Use ScandAll PRO
Creating Saving Folders for Each Batch Scan
If the same batch profiles are used consecutively, multiple files
with same file name are created and may overwrite the
previous batch scan output file.
With ScandAll PRO, in order not to overwrite the file, you can
make a setting to create folders for saving image files each
time a batch scan is executed.
The procedure is as follows:
1
3
Load a document on the scanner.
4
Using the batch profile you created above, perform a
batch scan.
D When the batch scan is executed, the [Batch Folder Name] dialog
box appears.
For how to perform a batch scan, refer to "2.7 Scanning with [Batch
Scan]" (page 20).
5
Enter a batch folder name, and click the [OK] button.
Introduction
Overview of
ScandAll PRO
How to Use
ScandAll PRO
Create a new batch profile in ScandAll PRO, and then
open the [Profile Editor] dialog box.
For how to create profiles, refer to "2.7 Scanning with [Batch Scan]"
(page 20).
2
Select the [File format and Name scheme] tab, and then
select the [Use a batch folder] check box.
D The batch scan starts and the scanned image file is saved in the
created folder with the specified name.
If the names of the batch folders include a number of 8 or
less digits at the end, names are created by adding "1" to
the previously specified number. In the case where
adding "1" would increase the number of digits, the
number returns to "1" instead.
If folder names include a number of more than 8 digits at
the end, the number does not vary.
Example:
Specified batch folder
name
Next batch folder name
Batch_0009
Batch_0010
Batch_9999
Batch_0001
Batch_000000001
Batch_000000001
44
Chapter 2 How to Use ScandAll PRO
Example of saving files in folders:
When using folders created for
each batch scan
Saving folders
Batch_0001
image0001.jpg
image0002.jpg
.
..
Batch_0002
image0001.jpg
image0002.jpg
.
..
Batch_0003
image0001.jpg
image0002.jpg
.
..
TOP
Contents
Index
Introduction
Overview of
ScandAll PRO
How to Use
ScandAll PRO
45
Chapter 2 How to Use ScandAll PRO
Saving Scanned Images from a Batch Scan to a
Microsoft SharePoint Server
2
Click the [Linking] tab, and select the [Link up with the
following process] check box.
TOP
Contents
Index
Introduction
With ScandAll PRO, you can perform a batch scan and save
the scanned image file to a Microsoft SharePoint server.
!
Overview of
ScandAll PRO
The server on which Microsoft SharePoint Server is run
requires some ScandAll PRO modules to be installed. In order
to install the modules in a server, obtain
"ScandAllPROSrv.exe" from the [ScandAll] folder in the Setup
DVD-ROM, and execute it on the server.
How to Use
ScandAll PRO
The procedure is as follows:
1
Create a new batch profile in ScandAll PRO, and then
open the [Profile Editor] dialog box.
For how to create profiles, refer to "2.7 Scanning with [Batch Scan]"
(page 20).
3
Select [Upload to Microsoft SharePoint Server] and click
the [Setup] button.
D The [Information to transfer to the SharePoint Server] dialog box
appears.
4
Specify the settings for saving the scanned images to the
Microsoft SharePoint server.
5
Click the [OK] button.
D This returns to the [Profile Editor] dialog box.
46
Chapter 2 How to Use ScandAll PRO
TOP
Contents
Index
6
Load a document on the scanner.
7
Using the batch profile you created above, perform a
batch scan.
Introduction
D When the batch scan is executed, the image file is saved in the
Microsoft SharePoint server.
Overview of
ScandAll PRO
For more information, refer to the ScandAll PRO Help.
How to Use
ScandAll PRO
47
Chapter 2 How to Use ScandAll PRO
Restarting a Suspended Batch Scan
With ScandAll PRO, when a "batch scan" is performed, the
batch scan working state is temporarily saved automatically
If you want to restart the batch scan, select the [Scan] menu J
[Restore Batch Scan] for the saved batch scan working state.
After restoration, you can restart the scanning.
For example, you can continue the interrupted batch scan the
next day. Similarly, if another more urgent scan needs to be
performed while a batch scan is running, its working state can
be saved, allowing it to be restarted at a later time.
Perform a batch scan
(Automatically saved)
Restore the saved working
state and restart the batch
scan
TOP
Contents
Index
Introduction
Overview of
ScandAll PRO
The procedure to restore the saved batch scan working state
is as follows:
1
Select the [Scan] menu J [Restore Batch Scan].
2
Select a batch scan you want to restore, and click the
[Restore] button.
How to Use
ScandAll PRO
D The [Saved batch scan data list] dialog box appears.
Perform a different scan
D The working status of the selected batch scan is restored on the
main window. You can perform additional operations for the batch
scan, such as additional scanning or image editing.
For more information, refer to the ScandAll PRO Help.
48
Chapter 2 How to Use ScandAll PRO
Outputting Indexing Information File and Linking
with an Application
With ScandAll PRO, you can output the result of Zone OCR
and the barcode recognition result to the indexing information
file. You can specify an application to be launched and a
parameter to pass the name of the indexing information file to
the application.
This function allows you to create a batch profile, such as for
saving image data with indexing information in the server.
3
In the [Profile Editor] dialog box, select the [Linking] tab,
and then select the [Output indexing information] check
box. To set the file name and file type to be output, click
the [Set Indexing Info] button, and set in the [Set Indexing
Info] dialog box.
TOP
Contents
Index
Introduction
Overview of
ScandAll PRO
How to Use
ScandAll PRO
The procedure is as follows:
1
Create a new batch profile in ScandAll PRO, and then
open the [Profile Editor] dialog box.
For how to create profiles, refer to "2.7 Scanning with [Batch Scan]"
(page 20).
2
Set the barcode or Zone OCR in the [Profile Editor] dialog
box.
For details on how to set a barcode, refer to "Dividing a Multipage
Document Using Barcodes" (page 30). For details on how to set Zone
OCR, refer to "Specifying the Result of Zone OCR as a File Name"
(page 37).
z Indexing information files are saved in the folder
specified with [Folder Name] in the [File format and
Name scheme] tab, in the [Profile Editor] dialog box.
When the [Use a batch folder] check box is selected,
indexing information files are output to the batch folder.
z Indexing information files are of the following types.
For information about the details of file types, refer to
the ScandAll PRO Help.
- Unicode Text format
YYYY/MM/DD hh:mm:ss [TAB] file name [TAB]
page number [TAB] "Zone OCR recognition
result" [TAB] "barcode recognition result"
- CSV format
"YYYY/MM/DD hh:mm:ss", "file name", "page
number", "Zone OCR recognition result",
"barcode recognition result"
49
Chapter 2 How to Use ScandAll PRO
- XML format
<?xml version = "1.0" encoding = "utf-8"?>
<root>
<page>
<item name = "Date&time" value = "date and
time" />
<item name = "Full Path" value = "file name (full
path)" />
<item name = "Page Number in Document" value
= "page number in document" />
<item name = "Zone OCR" value = "zone OCR
result" />
<item name = "Barcode" value = "barcode
recognition result" />
</page>
.
.
</root>
4
In the [Profile Editor] dialog box, select the [Link up with
the following process] check box on the [Linking] tab, and
then select the [Launch another application] option button.
Click the [Setup] button, and specify the application to be
launched for [Application Program] and %i for [ArgumentParameter] in the [Option] dialog box.
TOP
Contents
Index
Introduction
Overview of
ScandAll PRO
How to Use
ScandAll PRO
5
Load a document on the scanner.
6
Using the batch profile you created above, perform a
batch scan.
D After the document is scanned, ScandAll PRO launches the
application and passes the indexing information file name to the
application as a parameter.
For how to perform a batch scan, refer to "2.7 Scanning with [Batch
Scan]" (page 20).
50
Chapter 2 How to Use ScandAll PRO
Detecting Errors in the Scanned Document
(fi-6800)
z When selecting the [Mark pages when error is detected by
Automatic Image Quality Checker] check box
The scanned document is checked for any folds or tears.
If an error is detected, it is indicated by changing the background
of the thumbnail for the page containing the error to yellow.
If an error is detected in the scanned document, the
background color of the thumbnail changes automatically so
that the user can recognize the target image easily.
z When selecting the [Mark pages when multifeed is detected] check
box
The scanned document is checked for any errors where multiple
pages are fed at a time or where sheets of different lengths are
fed.
If a multifeed error is detected while scanning, the scan is
continued without stopping. After all scans are completed, the
multifeed error is indicated by changing the background of the
thumbnail for the page containing the error to red.
The procedure to set the automatic error detection and
notification is as follows:
1
Create a new batch profile in ScandAll PRO, and then
open the [Profile Editor] dialog box.
For how to create profiles, refer to "2.7 Scanning with [Batch Scan]"
(page 20).
2
On the [Scan] tab, select the [Mark pages when error is
detected by Automatic Image Quality Checker] and [Mark
pages when multifeed is detected] check boxes, and click
the [OK] button.
3
TOP
Contents
Index
Introduction
Overview of
ScandAll PRO
How to Use
ScandAll PRO
Click the [Detail Scanner Settings] button on the [Scan]
tab to configure the scan parameters.
z When selecting the [Mark pages when error is detected by
Automatic Image Quality Checker] check box
Scanner driver
Settings
TWAIN driver
On the [Rotation] tab in the [Option]
dialog box displayed by clicking the
[Option] button, select [Automatic Page
Size Detection] or [Black Background]
for [Automatic Size and Skew detection].
ISIS driver
Configure the parameter as either of the
following:
z Select [Automatic], [Deskew], or
[Long Page] for [Cropping] on the
[Main] tab.
z Select [Black] for [Backing] on the
[Paper Handling] tab.
51
Chapter 2 How to Use ScandAll PRO
z When selecting the [Mark pages when multifeed is detected] check
box
Scanner driver
TWAIN driver
ISIS driver
4
Settings
7
Using the batch profile you created above, perform a
batch scan.
D If there is an error in the scanned document, the target thumbnail
is displayed with background of a different color.
TOP
Contents
Index
Introduction
Overview of
ScandAll PRO
On the [Job/Cache] tab in the [Option]
dialog box displayed by clicking the
[Option] button, select [Check
Overlapping (Ultrasonic)], [Check
Length], or [Check Overlapping and
Length] for [Multifeed Detection].
Detected
Fold
On the [Multifeed Detection] tab, select
[Paper Overlap] or [Paper Length] for
[Multifeed Detection].
How to Use
ScandAll PRO
When you have completed the settings, click the [OK]
button.
D This returns to the [Profile Editor] dialog box.
5
6
Click the [OK] button in the [Profile Editor] dialog box to
add the profile.
You can replace a scanned image with an error by
selecting the [Page] menu J [Replace] J [Scan].
Load a document on the scanner.
!
Depending on the color or shape of the document, errors
may be detected by mistake or fail to be recognized, since
they are detected only in the corners of the scanned
image.
Make sure to check the scanned image yourself even
when you use this detection function.
52
TOP
Contents
Index
Chapter 2 How to Use ScandAll PRO
2.9 Useful Post-Scan Functions
Marking Thumbnails
This function is useful to distinguish a certain desired image
from others.
The procedure is as follows:
3
After marking the desired image, select an option from the
following:
Menu option
Overview of
ScandAll PRO
Used to...
Previous Marked Page
Display the previous marked page.
Next Marked Page
Display the next marked page.
1
Load a document on the scanner and perform a scan.
First Marked Page
Display the first marked page.
2
Select the thumbnail of the desired image, and then select
the [Mark] menu J [Mark].
Last Marked Page
Display the last marked page.
Unmark
Unmark the selected thumbnail.
Unmark All
Unmark all thumbnails.
D The background of the selected thumbnail turns to
orange.
Introduction
How to Use
ScandAll PRO
You can also unmark a thumbnail by right-clicking and
selecting [Unmark Selected Pages] while the thumbnail is
selected.
You can also mark a thumbnail with orange background
by right-clicking and selecting [Mark Selected Pages]
while the thumbnail is selected.
53
Chapter 2 How to Use ScandAll PRO
Saving Scanned Images to a Microsoft
SharePoint Server
You can save scanned images to a Microsoft SharePoint
server.
!
Scan to Microsoft SharePoint needs to be installed.
If not, install it referring to [Readme] from the [Start] menu J
[All Programs] J [Fujitsu ScandAll PRO].
TOP
Contents
Index
Introduction
Overview of
ScandAll PRO
How to Use
ScandAll PRO
The procedure is as follows:
1
Load a document on the scanner and perform a scan.
2
Select the [File] menu J [Send] J [Microsoft SharePoint].
3
Save the scanned images to the Microsoft SharePoint
server.
D The [Scan to Microsoft SharePoint] dialog box appears.
For more information, refer to Scan to Microsoft SharePoint User
Guide.
You can view Scan to Microsoft SharePoint User Guide by selecting
the [Start] menu J [KnowledgeLake] J [Scan to Microsoft SharePoint
User Guide].
54
TOP
Contents
Index
Index
Index
Introduction
A
L
advanced scanning......................................................... 23
B
launching ScandAll PRO ................................................ 12
M
batch scan ...................................................................... 44
C
Microsoft SharePoint server ..................................... 46, 54
Overview of
ScandAll PRO
How to Use
ScandAll PRO
P
conventions ...................................................................... 4
creating and editing profiles............................................ 20
D
PDF ................................................................................ 26
post-scan functions ........................................................ 53
R
dividing multipage document
barcode ....................................................................
patch code................................................................
driver
ISIS ..........................................................................
TWAIN......................................................................
restarting batch scan ...................................................... 46
restoring batch scan ....................................................... 48
30
28
13
13
F
features........................................................................... 10
H
how to use
ScandAll PRO .......................................................... 11
this manual................................................................. 2
I
indexing information file.................................................. 49
introduction ....................................................................... 3
S
saving folders ................................................................. 44
scan.......................................................................... 16, 17
Scan button .................................................................... 34
scan parameters............................................................. 15
scanning methods .......................................................... 16
scanning methods list..................................................... 23
scanning with
[Batch Scan]....................................................... 16, 20
[Scan] ................................................................. 16, 17
selecting
scanner driver .......................................................... 13
scanner model ......................................................... 14
Send to button ................................................................ 34
55
Index
specifying file name
barcode .................................................................... 41
Zone OCR ................................................................ 37
V
TOP
Contents
Index
Introduction
VRS .................................................................................. 9
Overview of
ScandAll PRO
What is ScandAll PRO?.................................................... 9
How to Use
ScandAll PRO
W
56
TOP
Contents
Index
Introduction
Overview of
ScandAll PRO
How to Use
ScandAll PRO
How to Use ScandAll PRO
P2WW-2410-04ENZ0
Issue date: July 2010
Issued by: PFU LIMITED
z The contents of this manual are subject to change without notice.
z PFU LIMITED assumes no liability for incidental or consequential damages arising from the use of this Product, and any
claims by a third party.
z Copying of the contents of this manual, in whole or in part, as well as the scanner applications is prohibited under the
copyright law.


![[Scan] button on the ScanSnap.](http://vs1.manualzilla.com/store/data/005658366_1-513fc66afaf683e0c3b25d8948918383-150x150.png)