1
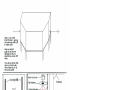
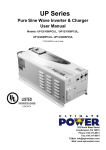
BioWave Hydro DI-9200 User Manual Assembling Hydro DI – 9200: Assembling your BioWave Hydro DI – 9200, is a very short and simple process. All you have to do is take the Hydro DI – 9200 out of the box, make sure its standing on a flat level surface, vertically on its bottom end. There are 2 ways to recognize which side is the bottom of the Hydro DI9200: - The top end has an easily noticeable red warning sticker (read the sticker carefully before using the Hydro DI – 9200). - The power cord always comes out of the bottom cover. Installing and Running Hydro DI – 9200: For optimal results, and to keep your Hydro DI – 9200 under warranty, we advise you to use the Hydro DI - 9200 in the following way: - Start by making sure the Hydro DI – 9200 is placed vertically on its bottom end, secured, leveled, and stable. - The base of the rotating cages should be aligned with the top of the plants, to achieve this it is recommended to get the adjustable ceiling bracket from BioWave Industries Inc. designed especially for the Hydro DI – 9200(ask your retailer how you can get one). As your plants grow bigger, using the 1 adjustable ceiling bracket will help to keep the base of the rotating cages aligned with the top of the plants. - If you are putting the Hydro DI – 9200 on the floor, a table, or a shelf, and not using the adjustable ceiling bracket make sure that the Hydro DI – 9200 is secured, leveled, and stable( you can use a piece of cloth or carpet as an insulator under the Hydro DI - 9200). - It’s optimal to have the Hydro DI – 9200 as close as possible to the center of the growing area. - Run the Hydro DI – 9200 (for 15 minutes on, 45 minutes off, every hour during the light cycle). You can use a multi program timer for this purpose. - Keep the Hydro DI – 9200 turned OFF during the dark cycle. - Make sure that the adjustable ceiling bracket is attached to the growing room or greenhouse ceiling, in a level and stable way, and that the screws that join the Hydro DI – 9200 to the ceiling bracket are tight. After mounting plug the Hydro DI – 9200 to the timer, plug the timer to a working wall outlet, and you are done. NOTE: The Hydro DI – 9200 must be used throughout the whole life cycle of the plant. Maintaining Hydro DI – 9200: Although your BioWave machine is very easy to use, any machine with moving components requires periodic maintenance to ensure longevity and optimal performance. At least every five months you need to service your machine, using the following procedure. 2 1) Disconnect the machine from the power source/ timer before performing maintenance. 2) It is recommended but not necessary to dismount the Hydro DI – 9200 from any brackets, and place the machine horizontally on a table. 3) Remove both end covers using a 3/16” Allen wrench. 4) Locate all four bearings, use a cotton swab or rag to remove any excess grease from the bearings. 5) Using a grease gun, locate the brass grease nipple on the side of each bearing. Using multi-purpose lithium grease (off-white in color) attach the grease gun to the grease nipple, and begin greasing. Apply grease, until grease begins to overflow out of the top of the bearing. Do not add grease past this point, over-greasing can be a catalyst for bearing failure. 6) If the grease just flows out around the nipple it means that the nipple is clogged. Get a wrench or socket take the nipple off and take a paperclip or other wire and clean out the nipple. Blow through it to make sure it is no longer clogged and replace on the bearing. 7) Carefully put the covers back on to the machine, make sure the cover with the red warning sticker is the top cover. Be careful of electronics while putting covers back on. NOTE: It is imperative to service your machine. Failure to do so will void your warranty. If you need any help email [email protected] or call :( 626) 330 -1923 3 BIOWAVE HYDRO D9200 Biowave Product Knowledge SLS part # 725900 The Biowave unit is designed to send out harmonic subsonic frequency levels to the plants, to help the plant breathe better, keeps pests away (hasn’t been proven yet), increases CO2 intake, produces essential oils,and 20% more yield. The Biowave is preset on a rotation design to produce these frequency levels. Testing at Ohio State for about 12 to 14 months to prove that this unit keeps pests away. o CASING: Stainless Steel o PACKAGING: Unit comes in a white display box. The box is inside another box with 1” foam between the two boxes. Unit will include instructions, contact, tech, and troubleshooting info. o HEIGHT: 3’ x 1’ x 1’ o WEIGHT: 49lbs o VOLTS: 120V o WATTS: 60 watts o UNIT COVERS: 1.5 Acres o UPS GROUND: Yes o MOUNTING: Mount from the ceiling in the center of the room with an adjustable bracket. The unit must be stable. Top of Biowave unit should be flush with the canopy. Mount vertically. The power cord comes out of the bottom of the unit. Wall mounts coming soon. o CYCLE: 15 minutes on 45 minutes off. Apollo 6 (734100) Timer is needed. Run the Biowave during light cycle only. DO NOT RUN WHEN LIGHTS ARE OFF. The BioWave machine is a technology that boosts the photosynthesis in plants, it helps the plants to breathe better during the night there is no photosynthesis, and there is no need to use the BioWave. And as most experts shared with us, the plants need to rest during the night, and assimilate the chlorophyll created during the light cycle, and we don’t want to disturb their balance by turning the BioWave machine on. o o o o o WARRANTY: 3 year warranty; Excludes customer misuse of product. TECH CALLS: Biowave Industries will take tech calls. Please contact George or Will @ 626330-1923 or email @ [email protected]. REPAIR: Customer can repair the unit themselves. It is extremely simple. This will not void the warranty. RMA Techs at Sunlight Supply will learn how to repair this unit. Repair consists of motor, pulley, belt, and cage. If RMA tech at SLS CANNOT repair, Biowave can repair or replace the unit. REPLACEMENT PARTS: Replacement parts will be provided in the future by SLS. MAINTENANCE: Grease every three to four months. There are nipples on the unit that you would put the grease in. Any grease would work; to the cheapest grease or the most expensive grease. Hydro DI – 9200 Troubleshooting Starting BioWave: • Occasionally one or both rotors on the BioWave Machine won’t start. Try the following: Plug the machine on and wait for 20 seconds o Many BioWave machines start in a sequence, with one of the rotors starting between 515 seconds after the first one, if your BioWave Machine does this; it is no cause for alarm, just something to be aware of before troubleshooting in the future. Basic Troubleshooting: • Is the machine plugged into a working outlet/timer? o If you are using a timer try plugging directly into a wall/power strip • Is the machine mounted correctly? o BioWave must be mounted vertically with the bottom cover pointed to the floor, and the top cover pointed towards the ceiling o The BioWave Machine has a top and bottom, there are a couple of ways to check if it is mounted correctly: The top is labeled on the front with a red sticker The wall chord always comes out of the bottom cover o Make sure your BioWave Machine is level Advanced Troubleshooting: • Power the machine on o If the interior (smaller) rotor will not spin, the issue is under the bottom cover o If the exterior (bigger) rotor will not spin, the issue is under the top cover o Power the machine off, based on which rotor it is your focus should go to the corresponding cover for the rest of your troubleshooting • Focus on the green light in the power supply (located under the top cover), power the machine on o If the light does not turn whatsoever the issue is electrical, if the light turn on the issue is mechanical, if the light only turns a little bit without staying on, the issue may be either electrical or mechanical. o Power the machine off, unplug the machine, carefully, lay the machine down on a flat surface, the wide side down. o Use a 3/16” Allen wrench to remove the cover of the affected side, this is done by removing the two screws located on each side of the cover • If the light did not turn on ( did not turn at all) in the preceding test ,check the following: o With the cover now off, are there any loose/bare (unconnected) wires? o Check the plug that connects into the power supply, unplug the wire, and plug-it back in, make sure that it is all the way plugged in. o You can test if this is the solution with the cover off and the machine lying down. If the light still will not turn at all it is likely that the power supply is defective, or the power cable has been damaged. If this is the case, contact BioWave. • If the light is turning but the rotor is not turning OR the light turns a little bit but does not continue to rotate check the following: o The problem is most likely an issue with the tension of the timing belt, before proceeding MAKE SURE the BioWave Machine is unplugged. The timing belt can be too tight or too loose, both can cause the rotor to not spin. Here is how you tell: • Pinch the belt with your thumb and forefinger the belt should have tension without any pressure from pinching. You should be able to pinch (with relative ease), constricting the belt just inside the diameter of either pulley (it should not pinch further than 2/3’s of the diameter of the pulley). If you can’t pinch it to this point (or it is difficult to pinch) the belt is too tight, if you can pinch it past 2/3’s diameter (especially if it is very easy) the belt is too loose. If the belt tension is perfect and still not working, contact BioWave. If the belt needs to be adjusted continue following the directions • o Look at the belt, if any part of it is frayed or has holes, then the belt is damaged and needs to be replaced, If you need another belt or are changing the belt, contact BioWave we will help you find what caused the damage to the belt and/or provide you with a new one. To change the tension on the belt, take the following steps: Loosen the bolts that connect the motor mounts to the endplate (these bolts are on the rotor side of the endplate, are visible with the cover on, and pass through the tensioning slots on the endplate). Loosen all three bolts. They don’t need to be unscrewed all the way, an 1/8th of an inch is plenty, and will make reassembly much easier. • OPTIONAL: while you have these bolts loose, it will give you a chance to check the integrity of the pulley on the motor (this could be the cause of your problem) If you want to check this read the next set of bullet points otherwise skip ahead o Slide the motor along the tensioning slots all the way forward (towards the front of the machine) the belt should fall off or become very loose o Pull the belt off o Push the bottom of the pulley with your index finger with LIGHT pressure if the pulley moves easily, it is either damaged, or defective, contact BioWave immediately if this is the case If the belt is too loose slide the motor towards the back of the machine, if it is too tight than slide the motor towards the front of the machine. You won’t need to slide it too far in either direction, a little bit goes a long way. When you believe you’ve reached the right level of tension, tighten the 3 bolts that you loosened, as you tighten the bolts check the tension on the belt because it WILL change, so adjust accordingly. Before putting the cover back on make sure all bolts are tight. While putting the cover back on, make sure all of the wires are under the cover, and not close to any moving parts of the machine, slide the cover over the tabs, insert screws, tighten, and put your BioWave back to work. You may want to contact BioWave to set up a service call. You may also choose to proceed on your own, please be aware if you choose to proceed on your own; you do so at your own caution. If you do not follow the directions carefully you could cause irreparable damage to the BioWave Machine rendering any warranties void. For all service inquiries contact BioWave Industries Inc. or your BioWave retailer: Please have the name and model of your Machine ready. [email protected] Or call 626-330-1923