1
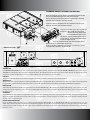
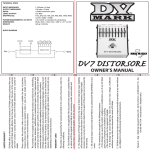
MOMARK
AMP FRAME 250 / AMP FRAME 500 / AMP FRAME 600 / AMP FRAME 800
OWNER’S MANUAL
www.momark.it
www.markbass.it
1. IMPORTANT SAFETY INSTRUCTIONS
1) Read these instructions;
2) Keep these instructions;
3) Heed all warnings;
4) Follow all instructions;
5) Do not use this apparatus near water;
6) Clean only with dry cloth;
7) Do not block any ventilation openings. Install in accordance with the manufacturer’s instructions;
8) Do not install near any heat sources such as radiators, heat registers, stoves, or other apparatuses (including amplifiers) that produce heat;
9) Do not defeat the safety purpose of the polarized or ground-type plug. A polarized plug has two blades with one wider than the other. A grounding type plug has two blades and a third grounding prong. The wide blade or the third prong are provided for your safety. If the provided plug
does not fit into your outlet, consult an electrician for replacement of the obsolete outlet;
10) Protect the power cord from being walked on or pinched, particularly at plugs, convenience receptacles, and the point where they exit from
the apparatus;
11) Only use attachments/accessories specified by the manufacturer;
12) Unplug this apparatus during lightning storms or when unused for long periods of time;
13) Refer all servicing to qualified service personnel. Servicing is required when the apparatus has been damaged in any way, such as when the
power supply cord or plug is damaged, liquid has been spilled or objects have fallen into the apparatus, or when the apparatus has been exposed
to rain or moisture, does not operate normally, or has been dropped;
14) “Warning: to reduce the risk of fire or electric shock, do not expose this apparatus to rain or moisture; and objects filled with liquids, such as
vases, should not be placed on this apparatus”;
15) The socket outlet shall be installed near the equipment and shall be easily accessible;
16) The power cord must be unplugged prior to servicing.
1. PRÉCAUTIONS D’EMPLOI
1) Lire ces instructions;
2) Conserver ces instructions;
3) Suivre tous les conseils d’utilisations;
4) Suivre toutes les instructions;
5) Ne pas utiliser cet appareil au bord de l’eau;
6) Nettoyer uniquement avec un chiffon humide;
7) Ne pas bloquer le système de ventilation. Installer conformément aux instructions du fabricant;
8) Ne pas installer l’appareil près d’une source de chaleur tel qu’un radiateur, un fourneau, ou bien un autre appareil qui produit de la chaleur;
9) Ne pas modifier le système de sécurité de la fiche polarisée ou de de la fiche pour les prises de terre. Une fiche polarisée a deux broches, l’une
étant plus distante de l’autre. Une fiche pour prise de terre a deux broches et une pointe pour la masse. La broche plus distante et la pointe pour la
masse ont été installées pour votre sécurité. Si la fiche fournie de rentre pas dans votre prise de courant consulter un électricien pour la substitution;
10) Protéger le cordon d’alimentation afin qu’il ne soit pas piétiné ou écrasé tout particulièrement au niveau des fiches, des prises de courant
femelles, et des parties qui sortent de l’appareil;
11) Utiliser uniquement les accessoires recommendés par le fabricant;
12) Ne pas branché l’appareil en cas d’orage accompagné d’éclairs. Le débrancher en cas de non utilisation prolongée;
13) S’adresser à un service assistance agréé si l’appareil a subi des dommages, si le cordon d’alimentation ou la fiche a été endommagé, si un liquide a été renversé sur l’appareil ou bien si un object est tombé dans l’appareil, si ce dernier a été exposé à la pluie ou à l’humidité, s’il ne fonctionne
pas correctement ou s’il est tombé;
14) “Avertissant: pour réduire le risque du feu ou de décharge électrique, n’exposez pas cet appareil à la pluie ou l’humidité et les objets remplis de
liquides; tels que des vases, ne devraient pas être placés sur cet appareil”;
15) La prise de courant doit être installée près de l’appareil et doit être facilement accessible;
16) La fiche principale doit être débranchée avant toute opération d’entretien.
MORE INFORMATION
For warranty and service information, please contact your local Markbass distributor (contact information available at www.markbass.it). For more
technical information, please visit us at www.markbass.it and fill out the form on the Contact Us page.
We hope you enjoy your amp and use it to make great music!
“The Lightning Flash with arrowhead symbol within an equilateral triangle,
is intended to alert the user to the presence of uninsulated “dangerous
voltage” within the product enclosure that may be of sufficient magnitude to
constitute a risk of shock to persons.”
“The exclamation point within an equilateral triangle is intended to alert the
user to the presence of important operating and maintenance (servicing)
instructions in the literature accompanying the product.”
2.MOMARK MODULES ASSEMBLY INSTRUCTION
5
4
3
Prior to installing and/or removing modules, be sure to turn
the unit off AND unplug it from the power source.
Do not connect the unit to a power source unless all three
modules are installed in the amp frame.
Insert the tool (1) supplied with the modules into the two
holes on the front panel of the module.
2
1
3. MOMARK REAR PANEL
5
2
Slide each module right-side-up into the amp frame. Be careful to insert each module into the proper slot! The PRE module goes in the left slot (2); the EQ module goes in the 1
center slot (3); and the MASTER module in the the right slot (4).
1
For each module fasten the two corresponding
upper screws and two lower screws (5).
To disassemble a MoMark and remove the modules, repeat the operations above in inverse order.
2
1
3
4
5
6
7
8
SPEAKER OUT
The MOMARK AMP FRAME can be connected to one or two speaker cabinets. The high-quality Neutrik SPEAKON COMBO jacks (2) accepts either a
SPEAKON or a 1⁄4” speaker cable. Do not use instrument cables. The minimum load is 4 ohms. If you connect two cabinets, the impedance of each
cab must be 8 ohms or higher. If you connect a 4 ohm cabinet, you cannot connect a second cabinet.
LINE OUT
This balanced XLR (8) output sends a balanced signal to the mixing console or snake in live and studio situations.
GROUND LIFT
Occasionally when you’re playing live and using the LINE OUT (8), the soundman will detect a hum from your amp’s signal. This is almost always due
to a grounding problem related to your power source; you will likely eliminate this hum simply by pressing the GROUND LIFT (7) button.
PRE/POST EQ
This button (6) determines whether the signal that leaves the XLR LINE OUT (8) is affected by your amplifier’s EQ settings or not. In most cases, you
will find that sound engineers prefer to receive a pre-EQ signal. Note that the line out signal includes whatever effects you’ve connected through
the effects loop.
TUNER OUT
The TUNER OUT (3) is an unbalanced signal that can be sent to a tuner, allowing you to tune as you play without passing your signal through pedals,
which can degrade the quality of your signal. You can also use this output to send your signal on to another amp, or any kind of recording unit that
doesn’t require a balanced signal.
EFFECT SEND AND RETURN
If you use effect pedals or rack gear, you can route them through the SEND EFFECT (5) and RETURN EFFECT (4) on the rear panel of the amp. The
effects loop is wired in parallel—this means that if something happens to your effects chain (a battery dies or a cable gives out, for example) while
you’re playing, you will not lose your main signal. If desired, however, the effects loop can be easily modified by authorized service personnel to
operate in series.
Product specifications are subject to change without notice.
v 5.jun.2009
4.MOMARK Amplifier SECTIONS Technical Details
250 WATT
500 WATT
600 WATT
800 WATT
INPUT
RETURN EFFECT
unbalanced; impedance range 22-100 Kohm (depends on the module’s input); max voltage 20 Vpp (depends on the module’s input)
OUTPUT
SEND EFFECT
unbalanced; impedance 1 Kohm; max. voltage 12 Vpp (depends on module’s input); max DC value 50 V
TUNER OUT
LINE OUT
unbalanced; impedance 3.9 Kohm; max. voltage 2 Vpp
unbalanced; impedance 1 Kohm; max. voltage 20 Vpp (depends on module’s input), max DC value 60 V
SPEAKER OUT
1/4” / speakon combo x2
OTHER
HEIGHT
2 rack units (2.95 in./7.5 cm)
WIDTH
12.87 in. / 32.7 cm (19.01 in. / 48.3 cm with rack ears)
DEPTH
WEIGHT
OUTPUT POWER
10.43 in. / 26.5 cm
7.7 lbs / 3.5 kg
7.7 lbs / 3.5 kg
7.7 lbs / 3.5 kg
7.7 lbs / 3.5 kg
150 W RMS @ 8 ohm, 250 W @ 4 ohm
300 W RMS @ 8 ohm, 500 W @ 4 ohm
370 W RMS @ 8 ohm, 600 W @ 4 ohm
450 W RMS @ 8 ohm, 800 W @ 4 ohm
MINIMUM LOAD
POWER REQUIREMENT
POWER CONSUMPTION
4 ohm
100 V; 120 V; 230 V; 240 V (voltage is factory preset according to region of sale)
Markbass amps/combos was manufactured to be sold and used in the country of purchase, and is factory preset to that country’s voltage.
Due to homologation issues, the voltage may not be changed.
350 W
POWER SUPPLY
POWER AMP
600 W
600 W
800 W
Digital Class D
Digital Class D
Switching Mode Digital
Analog Class A/B
Analog Class A/B
FUSE
EUROPE
3.15 A 250V T 5x20
4 A 250V T 5x20
4 A 250V T 5x20
6.3 A 250V T 5x20
AUSTRALIA/UK
3.15 A 250V T 5x20
4 A 250V T 5x20
4 A 250V T 5x20
6.3 A 250V T 5x20
USA/CANADA
6.3 A 250V T 5x20
8 A 250V T 5x20
8 A 250V T 5x20
8 A 250V T 5x20
JAPAN
6.3 A 250V T 5x20
10 A 250V T 5x20
10 A 250V T 5x20
10 A 250V T 5x20
Italy - 66020 San Giovanni Teatino (Ch) - Via Po, 52/A
Tel. +39 085 446 37 55 - Fax +39 085 440 77 64
www.momark.it
www.markbass.it - [email protected]