1
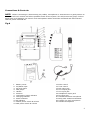
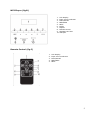
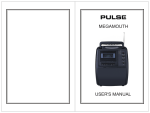
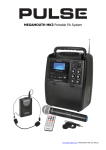
30W Wireless Portable PA System
with MP3 Player
Model: MEGAMOUTH MP3 MKII
www.pulse-audio.co.uk
1
Safety Information
The lightning bolt
within a triangle is
intended to alert the
user to the presence
of a dangerous
voltage levels within
the product’s
enclosure.
To reduce the risk of electric
shock, do not remove cover
of this device. There are no
user serviceable parts
inside. Refer servicing only
to qualified service
personnel.
The exclamation point within a triangle is
intended to alert the user to important
operating and maintenance (servicing)
instructions in the literature accompanying
the appliance.
This voltage may be of
sufficient magnitude
to constitute an
electric shock risk.
Safety Precautions
• Read and retain these instructions
• Follow all instructions and heed warnings
• Do not use this device near water
• If the surface becomes dirty, clean only with dry cloth, do not use solvents or thinners
• Do not block ventilation openings
• Do not install near heat sources such as radiators, heat registers, stoves, or other devices that
produce heat
• Do not defeat the safety purpose of the grounded plug. The BS1363A 13A mains plug has two
blades and a third ground prong. The wide blade or third prong is provided for your safety. If the
provided plug does not fit into your outlet, consult an electrician for replacement of the obsolete
outlet
• Protect the power cord from being stressed at the plugs, main socket outlet, and where they exit
the amplifier
• Only use accessories specified by the manufacturer
• Unplug the device during lightning storms or when unused for an extended time
• Refer all servicing to qualified personnel
• This device must not be exposed to water in any way. No object filled with liquids should be
placed on apparatus
2
Pulse 30W Wireless Portable PA System with MP3 Player
A wireless portable digital PA system that has a built-in MP3 player for digital music playback from SD/MMC card or USB
flashdrive. Ideal for mobile use in schools, lectures, theaters and conferences. It has an internal rechargeable battery & VHF
wireless receiver.
This unit includes a host of features, along with an impressive list of specifications, which are detailed over the next pages.
Please take the time to read this document completely prior to installation of this product. Should you have questions
regarding installation or operation of this unit, please contact your Pulse Retailer or Pulse Technical Support.
Features
•
•
•
•
•
•
•
•
•
•
•
•
•
•
•
•
•
•
30Wmax Power output
50m Effective range (open field)
Internal MP3 player:
o Play MP3 and WMA files via internal memory, SD/MMC cards or USB flash drives
o Supports 3 folder levels
o Remote control
o 11 EQ modes and 3 repeat modes
Power ON/Off/Volume, MP3, Echo & Tone controls
Low power, Charging, Power & Wireless receiver LED indicators
Signal level indicator LED array
Retractable antenna
Integrated folding handle
Handheld VHF wireless microphone
VHF Wireless belt pack transmitter with tie clip & headset microphones
6.35mm (1/4") Jack socket microphone input
6.35mm (1/4") Line out
2x Phono line input - suitable for laptop or MP3
3.5mm Jack socket headphone out & Aux in
12V DC Power socket
Dimensions (WxHxD): 264x335x145mm
Weight: 6kg
Supplied with PA system, Handheld wireless mic, Headset mic, Lavalier mic, Beltpack transmitter,
2x 9V batteries, mains lead & user manual.
Specification:
3
Connections & Controls:
NOTE: Before connecting or disconnecting any cables, microphones or instruments it is good practice to
turn down all level controls and where possible switch off the system. This will prevent any pops, clicks or
bangs that could damage unit. Main’s cords and speaker cables should be connected and disconnected
with the power switched off.
Fig.A
1. Battery Cover
2. AC/Mains input
3. AF level meter
4. MP3 player
5. Handle
6. Antenna
7. Low battery power indicator
8. Charging indicator
9. Power indicator
10. RF indicator
11. Master power switch & volume
12. MP3 power switch & volume
13. Echo control
14. Tone control
15. MIC input jack
16. Line output jack
17. Line input jack
18. Headphone output jack
19. DC input jack
20. Handheld wireless microphone
21. Body pack wireless transmitter
22. Lavalier (tie clip) microphone
23. Headset microphone
4
MP3 Player (fig.B)
1. LCD Display
2. Input source selection
3. PLAY/PAUSE
4. PREVIOUS
5. NEXT
6. Folder
7. Repeat
8. Remote Sensor
9. SD/MMC card slot
10. USB port
Remote Control (fig.C)
1.
2.
3.
4.
5.
LCD Display
Input source selection
PLAY/PAUSE
PREVIOUS
NEXT
5
Operation
1) POWER
a) AC / Mains Power:
i) This unit is designed for operation on 230Vac~50Hz only – care should be taken before
connecting to any mains voltage supply to ensure the outlet conforms with this specification.
ii) Connect the unit to the local mains voltage supply, turn the master volume control (11 – fig.A)
clockwise past the click point and the main unit will power up. The power indicator (9 – fig.A)
will illuminate to indicate normal operation.
b) Built-in Rechargeable 12V battery:
i) Open the battery compartment and connect the battery terminals, take great care to ensure
the leads are connected with the correct polarity (Red = Positive +ve, Black = Negative –ve).
ii) Turn the master volume control (11 – fig.A) clockwise past the click point and the main unit will
power up. The power indicator (9 – fig.A) will illuminate to indicate normal operation. If the low
power indicator (7 – fig.A) the unit requires connection to AC Mains Power to recharge the
battery.
c) Connection to DC Power:
i) The MEGAMOUTH can be charged and operated from an external 12V DC power source when
connected to the DC IN jack (19 – fig.A)
ii) The DC power supply must be 12-15V DC and of the correct polarity. The DC IN jack requires a
“centre positive” connection.
2) CHARGING THE BATTERY
a) Plug the mains power cable into the AC power jack, the charging indicator (8 – fig.A) will illuminate
red. Charging the unit takes on average 10 hours. The battery will charge with the power switch in
either the off or the on position.
b) When the charge indicator (8 – fig.A) turns green this indicates the unit is charged and ready for
use.
c) The battery should be discharged and recharged every two months to avoid damage to the battery.
3) MP3 PLAYER
a) Turn the master power volume (11 – fig.A) clockwise past the click point, the power indicator will
illuminate.
b) Turn the MP3 power switch and volume clockwise past the click point, the LCD Display will
illuminate and display “SEARCHING”. If no flash drive or SD card is inserted the display will show
“NO DEVICE”.
c) Insert a flash drive into the USB port (10 – fig.B) or an SD/MMC card info the SD/MMC card slots
(9 – fig.B) and the unit will begin playback automatically. If both USB and SD/MMC cards are
inserted the player will prioritise the USB flash drive. To change source from the USB flash drive to
the SD/MMC card press the INPUT button (2 – fig.B).
d) The MP3 player has 11 EQ modes: Normal, Rock, Pop, Classic, Jazz, Blues, Hall, Bass, Soft,
Country and Opera. To select any of the modes press the EQ button (6 – fig.C) on the remote
control. This function is only available via the remote control and cannot be accessed from the
main control panel (fig.B)
e) The MP3 player has three repeat modes: Repeat Track, Repeat Folder and Repeat All. To access the
repeat functions press the REPEAT button (7 – fig.B or 10 – fig.B).
f) The MP3 player can support up to levels of folders within the USB flash drive or SD/MMC card.
i) Press the folder button (6 – fig.B). The first level folders will display on the screen. (the LCD
screen can display up to four folders at once. If there are more than 4 folders, press VOLbutton to go to the next page of folders. Press VOL+ button to return to the last page)
ii) Press
or
buttons to choose the song and press
to play the track.
4) WIRELESS MICROPHONES
a) Insert a 9V PP3 battery into the transmitter. The battery compartment for the handheld
microphone is accessed by unscrewing the cap at the base of the unit (20 – fig.A) while the batter
6
compartment in the beltpack transmitter is accessed by sliding the front portion downwards away
from the switches (21 – fig.A). Switch on the transmitter via the power switch, the battery light on
either of the transmitters will flash and then remain off. NOTE: When the power indicator LED
illuminates the battery power is low – replace the battery with a new one taking care to dispose of
the old battery via an appropriate recycling scheme.
b) Extend the aerial on top of the main unit (6 – fig.A).
c) To confirm the selected wireless transmitter is working correctly the RF indicator (10 – fig.A) will
illuminate. NOTE: Only one wireless transmitter can be switched on and operated at a
time – switching two transmitters on at the same time will lead to the RF signal dropping
out causing an unreliable audio signal.
d) Adjust the amplifier main volume, tone, echo controls to suit. Take great care to avoid feedback
when adjusting controls and levels. Should the transmitter become too close to the amplifier
feedback can easily occur, this is a result of the microphone picking up the sound from the main
speaker and the system amplifying the sound numerous times resulting in a dangerous high pitch
noise. Feedback can damage audio systems and also present a danger to human hearing.
5) WIRED MICROPHONES
An additional wired microphone can be used with the MEGAMOUTH systems. The system accepts
most dynamic handheld microphones. Plug the MIC into the 6.35mm (¼”) mono jack socket (15 –
fig.A) on the side of the main unit.
6) EXTERNAL AUDIO SOURCES
The MEGAMOUTH will accept a standard line level input (17 – fig.A). Typical devices that can be
used with the LINE IN are MP3 players, laptops and CD players.
7) AUDIO (LINE) OUTPUT
The MEGAMOUTH has a standard Line Level output for connection to a second MEGAMOUTH unit –
this will allow coverage of larger venue’s. The cable required to link from unit to unit is a “Mono
6.35mm (1/4”) Jack to 2x Phono Plugs” your local PULSE dealer will stock these.
8) PHONE OUT
The MEGAMOUTH provides a headphone output for use with standard headphones or earphones.
The jack socket (18 – fig.A) will accept most 3.5mm (1/8”) stereo headphone plugs.
7
Compliance
When this product reaches the end of its life, do not dispose with household waste. See www.recyclemore.co.uk for details of how to dispose of PULSE products in an environmentally sound fashion, or
contact PULSE directly via www.pulse-audio.co.uk
Warranty
Pulse products are warranted, by Pulse, against manufacturer defects for a period of one year from the
original date of purchase. This warranty is limited to manufacturer defects, in either materials or
workmanship. Consumable items such as batteries and lamps are covered for a period of 90 days from
date of original purchase. PULSE, or any other worldwide divisions of Premier Farnell PLC, is not
responsible for any consequential or inconsequential damage to any other component, structure or the
cost of installation or removal of said items. Defective items should be returned to the retailer from whom
they were originally purchased.
This warranty will not cover damage due to improper use such as (and not limited to) damaged cones,
mounting frames, voice coils or items damaged by weather damaged items. Batteries are covered by a 90
day warranty from date of purchase.
For questions or specific information regarding warranty replacement or repair, contact:
PULSE
www.pulse-audio.co.uk
8