1
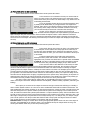
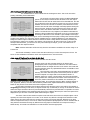
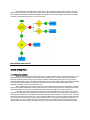
Nikon D7000
Autofocus System
Explained
Introduction
As photographers, the importance of getting fast and accurate focus is obvious. A lack of understanding the
autofocus system, its options, or the ability to control the system is going to result in missed shots and will make
capturing quality images much more challenging. With the D7000 being the “new kid on the block”, as well as its
new Multi-CAM 4800DX autofocus system, many new owners are struggling to get the comprehensive understanding
required to successfully use the camera in a broad range of situations.
The cameras User’s Manual contains most of the information needed to understand the system, but leaves a lot to be
desired in the way the material is presented. The information is scattered across several pages and the descriptions
are very brief. Bouncing from page to page leaves the reader a bit confused and makes it more difficult to distinguish
differences in what’s being presented. One of the biggest problems is the naming conventions used in the User’s
Manual. They are too similar and everything is called a “mode”. This document will attempt to clear up some of the
confusion by adding a better flow to the presentation, provide more detailed explanations, and simply call the
“modes” by what they are displayed as in the viewfinder. I hope that this document brings you up to speed quickly
and makes your experience with the D7000 more enjoyable.
Before Getting Started
Before getting started, some expectations need to be set on what topics will be explained and which ones
won’t. Because this document is specifically about the autofocus system, I won’t be discussing manual focus. Manual
Focus is a necessary feature for modern DSLR’s and is still preferred for several situations and types of photography.
But in this day and age, its use constitutes a very small percentage compared to the use of autofocus. In addition,
manual focus specifics could depend on the lens in use. Please refer to the owner’s manual for any manual focus
information.
Another feature that won’t be discussed is Live View. Live View allows the photographer to use the LCD
monitor on the back of the camera in place of using the viewfinder. You’re probably familiar with this type of
functionality if you’ve ever used a modern point-and-shoot camera. Live View is also required when shooting video.
The reason that Live View won’t be discussed is that it uses completely different terminology than what’s used for the
Viewfinder. I believe that including it in this document would only cause confusion. Since my goal is to eliminate
confusion, I decided not to cover it. There are some similarities between Live View and the Viewfinder, but Live View
would probably be better served in its own document.
What will be covered is a fairly elaborate explanation of the autofocus system in the D7000. To be more
specific, I’ll be covering the new Multi-CAM 4800DX system that is used by the D7000. This new system has a total of
thirty-nine sensors available. Nine of the sensors are cross type sensors and are positioned in the center of the
frame. A cross type sensor is able to detect contrast in two directions. The rest of the sensors are line type sensors
that detect contrast in a single direction. The Multi-CAM 4800DX is proving itself to be very robust and extremely
efficient.
I have divided the content of this document into three different topics. They are the “Autofocus M ode” ,
the “AF-Area M ode” , and the “M enu Options and Controls” . These topics have a fairly high level of complexity,
especially when you consider the interaction between them. We’re going to look into each topic individually. The goal
is to obtain a solid level of understanding for each section before moving on to the next. Then combine the
information just learned with the new topic. Hopefully, the end result will be a level of knowledge that will allow you
to make sound decisions on which autofocus selections and configurations to use and to make these decisions
instantly.
Note: It is recommended to have your camera in hand while reading the document to verify what is being presented
and to reinforce the concepts.
Autofocus Mode
The D7000 “Autofocus Mode” has three selections available that pertain to autofocus and control the
autofocus behavior of the system. They are Single Servo M ode (AFS), Continuous Servo M ode (AFC), and
Auto Servo M ode (AFA) . The key word here is Servo . The servo system controls the behavior of the motors used
for focusing. In an inadvertent way, these modes also control the readiness of the shutter to fire and capture an
image.
Any one of the three modes can be selected by pressing and holding the AF Mode Button and rotating the
Main Command Dial in either direction. The AF Mode Button is the button integrated into the Focus Mode Selector.
This is located on the front of the D7000 at the lower left of the lens (with the camera held at the photographer’s eye
level position). The Main Command Dial is on the back of the camera at the right thumb position.
AF-S (referred to as AFS in this doc)
The AFS abbreviation is used in the viewfinder to indicate that Single Servo Mode is active. The abbreviation
can be seen in the viewfinder by pressing and holding the AF Mode Button (illustrated below). It is always displayed
in the control panel on the top of the camera, or on the LCD panel if you press the Info Button. The Info Button is
located on the back of the camera at the bottom right corner.
In AFS, when the autofocus system is activated with a half press
of the Shutter Release Button, will adjust focus until it can achieve a lock
on the active focus sensor. Once the subject is in focus and the focus locks,
the autofocus motor will be deactivated. No further focusing will be
attempted. Focus will remain locked as long as the Shutter Release Button
is held half way down. With the default settings, if focus lock is achieved,
continuing with a full press of the Shutter Release Button will fire the
shutter and capture the image. The default behavior of the shutter in this
mode is that the shutter will remain disabled until the subject is locked in
focus. Later in the Menu Options section, I will explain how the default
behavior can be changed.
The choice of AFS is ideal for stationary subjects such as buildings and other inanimate objects. It’s also
ideal when you want to focus on the subject and recompose before shooting. You should be aware though of
subjects that are perceived to be stationary but really aren’t. This can happen with subjects such as people and
animals where very minor movement can occur after the focus has locked. These minor movements could cause the
subject to be out of focus in the captured image. It’s also possible that your own movement could be the culprit and
not the fault of subject movement. These “perceived as stationary” subjects can be shot using AFS, but you should
rely on your awareness of this issue and your own technique to avoid the potential problem.
AF-C (referred to as AFC in this doc)
The AFC abbreviation is used in the viewfinder to indicate that Continuous Servo Mode is active. The
indication can be seen in the same places as previously described (viewfinder, control panel, and LCD).
In AFC, the autofocus system will continually adjust focus on the
active focus sensor. The continuous adjustment of focus will occur as
long as the Shutter Release Button is held in the half press position. In this
mode, the default shutter behavior is that the shutter is always enabled. At
any time, a full press of the Shutter Release Button will fire the shutter and
capture the image. This is regardless of whether the subject is in focus or
not. In AFC, a focus lock doesn’t occur. The motor stays active and is ready
to continue adjusting focus if the subject moves. The default can be
changed for this mode as well and will be described in the Menu Options
section.
The choice of AFC is ideal for subjects that have motion. Its use is
in conjunction with the Predictive Focus Tracking feature. This feature tracks the movement of your subject as the
subject moves towards or away from the camera. The Predictive Focus Tracking will consider the speed of the
subject motion and include the time lag of the shutter. When the shutter button is pressed, it will then adjust the
focus to where it predicts your subject will be when the shutter opens.
AF-A (referred to as AFA in this doc)
The AFA abbreviation is used in the viewfinder to indicate that Auto Servo Mode is active.
This mode lets the camera choose whether AFS or AFC should be
used and will automatically switch to one or the other for you. The servo
mode chosen by AFA will be based on two factors. The first factor is the
AF-Area Mode that has been selected and the second factor is whether
subject motion is detected. AF-Area Mode is the next topic so explaining
this in detail is a little premature. For now, all you need to know is that
only two AF-Area Modes are available in AFS and all modes are available in
AFC. This means that there are two modes available in both AFS and AFC.
If the decision can be based on where the mode is available, then it’s an
easy decision. However, if the AF-Area Mode is available in both modes,
then AFA needs to check for subject motion before it can decide which
mode to choose. The behavior of the mode chosen (AFS or AFC) will be consistent with how that particular mode has
been configured in the menu options. I will come back to this after the AF-Area modes are discussed.
I n-Sum m ary:
There are really only two ways that the servo motor behaves for autofocus and they are controlled by Single
Servo Mode (AFS) and Continuous Servo Mode (AFC). The third mode is Auto Servo Mode (AFA) and it automatically
selects one of the two behaviors based on what is detected. Both of the servo modes are configurable in the menu
options. The servo modes affect the servo motor behavior and the activation/deactivation of the shutter release.
To simplify and to eliminate confusion, I will be referring to Single Servo Mode, Continuous Servo Mode, and
Auto Servo Mode as AFS, AFC, and AFA from here on out.
AF-Area Mode
The AF-Area Mode can be thought of as complementing the servo modes to enhance the level of flexibility
and control that the camera provides. The concepts of AF-Area are completely different from the servo modes in the
previous topic. Even though they are completely different, they do interact with one another. The interaction
depends on the AF-Area Mode and servo mode combination that is chosen. You will learn in the following sections
that not all AF-Area modes are available in both AFS and AFC. The range of choices available in AF-Area Mode can be
separated into four different categories providing slightly different features and behaviors. The categories are
Single Point-AF, Dynam ic Area-AF , 3D-Tracking , and Auto-Area AF .
Note: AF-Area Mode and Auto Area-AF are terms that can easily be confused. AF-Area Mode is a collection
of autofocus settings. Auto-Area AF is one of the settings available. To eliminate some of the confusion I will refer to
Auto Area-AF as Auto. Auto won’t be discussed until later.
Before we get into the specifics of each category, it is necessary to talk about some of the general features
of the Multi-CAM 4800DX system and the AF-Area Mode categories.
The Multi-CAM 4800DX has a total of thirty-nine sensors that are used as focus points in the AF-Area Mode.
The AF-Area Mode is how the user can configure the focus points for a specific situation. Functionality exists to select
a wide range of configurations including the selection of a single sensor, groups of sensors in various sizes, or allows
you to tell the camera to automatically make the selection for you.
When you look into the viewfinder, you will see a set of brackets.
All thirty-nine of the sensors are contained within the bracket outline.
In all AF-Area Modes except Auto, the sensor used as the initial
point of focus can be selected manually. The easiest method to select a
specific point is to activate the meter with a half press of the Shutter
Release Button and then use the directional arrows on the Multi Selector
control. The Multi Selector is located on the back just to the right of the
LCD screen. This method however will only display the center point of an
array. For educational purposes, I suggest that you activate metering by
pressing the AF Mode Button. This method will allow you to see the active
sensor(s), the Autofocus Mode, and the AF-Area Mode in the viewfinder. If
you move the focus point away from the center of the frame, you can quickly return it to the middle of the frame by
pressing the OK Button. The OK Button is located in the center of the Multi Selector control. Pressing OK however,
will change the viewfinder display back to the default display. Pressing the AF Mode Button at anytime will get you
back to the autofocus display. Next we will take a look at the different categories in the AF-Area Mode.
Single P oint-AF (referred to as Single P oint in this doc)
The S abbreviation is used in the viewfinder to indicate that Single Point-AF is active as seen in the lower
right corner of the illustration. This can be seen when pressing and holding the AF Mode Button.
In Single Point there is only one sensor that is active. Any one of
the 39 sensors can be selected manually as the initial point of focus. The
manual describes Single Point in it’s own category and suggests that it be
used for stationary subjects. If you are shooting a stationary subject then
it’s implied to use Single Point with AFS. However, Single Point is available
in both AFS and in AFC. In some ways Single Point is a little unique as will
be explained later.
Note: Single Point is also available in AFA because as we’ve learned, AFA is
just selecting one of the two servo modes for you. Because Single Point is
available in both AFS and AFC, the decision on which mode AFA selects will
have to be based on whether subject motion is detected.
A very common use of Single Point is when it’s used in conjunction with AFS to take advantage of the focus
locking feature. It makes focusing on the subject and then recomposing a very simple and quick task. For AFC,
examples of using Single Point are track and field, motor sports, and birds at rest. I use birds at rest because a bird
at rest is likely to have some motion. Remember the “perceived as stationary” warning from earlier. The others are
because they are easy to track.
Dynam ic Area-AF
The Dynamic Area Modes are available for use only in conjunction with AFC. The choices available create a
very powerful set of options that can assist photographers in capturing subjects in motion. The options available
cover a wide variety of different types of motion from steady and predictable to completely erratic. For all Dynamic
Area Modes, the photographer can select the initial point of focus manually.
9 Point (referred to as d9 in this doc)
The d9 abbreviation is used to indicate that 9 Point Dynamic AF is active. This can be seen when pressing
and holding the AF Mode Button.
In this mode there are a maximum of nine sensors that are active.
This forms a small array of sensors that the system will be analyzing. The
center sensor in the array is used as the initial point of focus. The other
eight sensors surrounding it are for assist. First you will focus on the
subject with the center point of the array and continue holding the Shutter
Release Button in the half press position. While holding, any movement of
the subject within the array is tracked dynamically, allowing any point
within the array to take over as the primary point of focus. As you follow
the subject and attempt to keep the array on top of it, the array is acting
as a buffer to compensate for any lead or lag that you may have in
tracking. This is a key concept in how the dynamic modes work.
Any one of the thirty-nine sensors may be selected manually as the initial point of focus. Selecting off center focus
points are mainly used for more pleasing composition. In the process of selecting the point of focus and using the AF
Mode Button, you will notice that the array moves as a single group. The group will function in the same way as if it
were centered. You should notice however, that when you approach the outer edges of the brackets, the number of
sensors in the array will be reduced to less than 9 points.
The choice of d9 is best suited for subjects in motion that have slightly irregular movement but are fairly
easy to follow. Examples would include soccer players and skiers. Another consideration of choosing d9 will be the
size of the subject within the frame. It’s often desirable to match the size of the array with the subject size. The main
goal is to keep the array over the subject while following and tracking it. If the subject gets outside of the array, then
focus will have to be re-initiated. If following the subject is more difficult than anticipated, you might want to try the
next larger size array. In this case, the next size would be d21.
Note: Before moving on to the d21 mode, I want to back up for a minute. Now that you understand a little
more about dynamic modes, I want to explain why I said that Single Point was a little unique. Even though Single
Point is available in AFC, single point can’t technically be considered as a dynamic mode because there aren’t any
assist points associated with it. It can be used though in AFC in the same maner as a dynamic mode.
21 Point (referred to as d21 in this doc)
The d21 abbreviation is used to indicate that 21 Point Dynamic AF is active.
In this mode there are a maximum of twenty-one sensors that are
active. The center sensor is the selected sensor for the initial point of focus
and the other twenty are for assist. The functionality is very similar to the d9
functionality just discussed.
If you are manually choosing the focus point and viewing the array
by holding the AF Mode Button, as you approach the outer edges of the
brackets, there will be a more drastic reduction of assist points than seen in
d9. One thing worth noting is that with horizontal movement of the array,
you’ll see that virtually the entire half of the frame has assist points.
The d21 array is obviously a much larger array than the d9
array. It’s better suited for subjects such as pets while they play and birds in
flight. The larger array size of d21 tends to work well when the subject is faster or more difficult to track than a
subject where d9 is appropriate. The goal in choosing the appropriate dynamic mode is choosing an array that has
the correct size for the subject and choosing one that allows you to track the subject while keeping the subject within
the array.
39 Point (referred to as d39 in this doc)
The d39 abbreviation is used to indicate that 39 Point Dynamic AF is active.
In this mode, all thirty-nine sensors are active. The selected sensor
is the initial point of focus and the other thirty-eight are for assist. Any of
the thirty-nine points available can be selected as the initial point of focus,
but since all sensors are active, you won’t see the movement of the array as
in d9 and d21.
A common mistake that is often made when selecting d39 is
thinking that more points must be better. The d39 mode does have its
appropriate uses, but those uses should be for a specific reason and not as
a catch all. You have to remember that this mode is intended for subjects
with motion and is using a dynamically changing array to detect motion.
I know I haven’t made a clear distinction on this earlier, but there
are two basic techniques that can be used when photographing subjects with motion. One technique is where the
camera is held still and the subject moves around within the frame. The other technique is following the subject
(panning) where the subject remains in relatively the same location in the frame. The examples given for d9 and d21
are best suited for the panning technique. The d39 mode is better suited for using the “still” technique. But this is
just a guideline. The reason that d39 is better suited for the still technique is that if your subject isn’t filling much of
the frame then the background is occupying a significant part of the dynamic array. When panning, all 39 points are
detecting motion while trying to track the movement of the subject. In this situation, the system could possibly get
confused and incorrectly consider a background point as where the new focus point should be.
The choice of d39 is best suited for subjects that are unpredictable and require a larger area to cover the
nature of the subject’s movement. Examples would be Hummingbirds, a Gazelle avoiding a predator, and UFO’s (just
kidding).
At this point you are aware of the subject size issue and the type of motion that will help you in making a
choice of which dynamic mode to use. There is one more consideration that should be included in the decision. The
final consideration that I believe will allow you to make the best decision is a matter of speed. It should be clear that
with each setting there are a specific number of points that the system will be analyzing. From a technical point of
view, the autofocus method used is passive phase detection. In a phase detection system, defocus calculations must
be made to control the focus motors and provide information to the Predictive Focus Tracking. Because of this, it will
take longer to analyze thirty-nine points than it will to analyze twenty-one, or to analyze nine, or to analyze a single
point. The AF system is more likely to make faster decisions and to keep up with the subject’s motion if a smaller
array is used. But there’s an obvious balance in the decision that must be applied.
Remember this: The things to consider when choosing the appropriate dynamic mode is the size of the subject in
the frame, the predictability of the subject’s motion, your own abilities to keep the subject within the array, and
choosing the smallest usable array for the best processing speed.
3D-Tracking (referred to as 3d in this doc)
The 3d abbreviation is used to indicate that 3D-Tracking AF is active. This can be seen when
pressing and holding the AF Mode Button.
The 3d mode is the most unique mode in the Multi-CAM 4800DX
system. In some ways it behaves like the d39 mode but in other ways it
behaves like the Auto-area AF mode which will be described later. Like d39
you are allowed to select the initial focus point from any of the 39 sensors
available. Once the servo motors are activated, it then behaves more like
the Auto-area AF mode where the display continually updates showing the
active focus point. However the main reason that this mode is the most
unique is that it uses different information for autofocus than the other
modes. The 3d mode uses color, brightness, and distance information for
autofocus. When considering the appropriate use for 3d you should mainly
be looking for differences in color contrast. A good example of this might
be tennis. In tennis you typically have a green court as the background and a player wearing white. Another example
would be a dog playing on a green lawn. In these examples there is a significant difference in color between the
background and the subject. Another difference is that the 3d mode is using distance information provided by the
lens allowing the subject to be tracked in any direction. This is where the 3d name comes from. If using the still
technique described earlier, you don’t have to worry about following the subject, you can concentrate more on
composition and other important factors.
Note: Distance information will be used only when the information is available such as when using a D or
G series lens.
The 3d mode is basically a version of Auto-area AF but allows you to select the initial point of focus. The
source of color and distance information used in 3d is explained more in the next section.
Auto-area AF (referred to as Auto in this doc)
The Auto abbreviation is used to indicate that Auto-area AF is active.
The Auto mode is the fully automatic mode for the D7000. Many
photographers prefer to keep autofocus under their own control and are
somewhat reluctant to delegate all control to the camera. This mode does
however implement some very sophisticated features not available in most
modes other than 3d.
The D7000 has a new built-in 2016-pixel RGB sensor for exposure
metering. The meter reads the exposure from various parts of the frame
and then compares it to subject and scene information stored in a
database, looking for a match. The information from the 2016-pixel RGB
sensor provides color and brightness information. When used with a D or G
series lens, distance information is also available. The mechanism just
described is known as the Scene Recognition System (SRS). It’s a technology unique to Nikon. Tracking subjects by
color, brightness, distance, and other SRS information provides better subject identification for tracking. Another
benefit of using D and G series lenses is that face recognition is possible.
In Auto mode, information from the SRS is passed to the autofocus system. Auto mode is then capable of
recognizing and tracking a wide variety of subjects whether they are stationary or moving. In this mode the camera
detects the subject and selects the focus point automatically. Manual focus point selection is not possible. The active
focus points will be flashed in the viewfinder briefly when focus is obtained. After that, the active focus point will be
displayed and you will notice a continual update while tracking the subject.
The choice of Auto is best suited for complex scenes and scenes where there are multiple subjects. This is
especially true when these subjects are in motion. It can become very difficult to manage these situations in other
modes. Auto is also useful when there isn’t enough time to select a focus point manually. Although it is an ideal
mode for inexperienced users, it has a use for amature and professional photographers as well.You shouldn’t think of
using autofocus automation as being any different than using exposure automation such as Aperture Priority or
Shutter Priority. It’s another tool available for use and should be used when appropriate.
As promised back in the description of AFA, I said I would come back and describe the detail of how AFA
makes decisions on which servo mode to select. Now that the AF-Area Mode descriptions are complete, you should
have a better understanding of what AF-Area Modes are available in the two servo modes. The best way to explain
the detail of the AFA decision process is to use a flow chart.
Menu Options and Controls
Custom Setting M enu
a1 AF-C priority selection
The AF-C priority selection menu allows the user to configure the AFC mode to use Release priority or Focus
priority. Release priority is the default. When configured for Release priority, the shutter will always be enabled.
When the autofocus system is turned on by pressing the Shutter Release Button half way down, the system will
continually adjust focus as long as the Shutter Release Button is held in that position. Because the shutter is enabled,
when the Shutter Release Button is fully pressed, the shutter will fire and the image will be captured. This is
regardless of whether focus has been achieved or not.
When configured for Focus priority, the shutter is only enabled when focus has been achieved on the active
sensor. If the Shutter Release Button is fully pressed and focus has been achieved, then the shutter will fire and the
image will be captured. If focus has not been achieved, then nothing will happen. The shutter will not fire.
It should be noted that just because Focus priority has been selected for AFC doesn’t make it the same as
using AFS. The difference is that in Single Servo Mode when focus is achieved on the active sensor, the focus locks
and the motor is deactivated. In Continuous Servo Mode with Focus priority selected, focus does not lock. The motor
stays active and continues to adjust focus. This is an important distinction. If the subject has motion and requires the
use of Continuous Servo Mode, you should consider whether an out of focus image is acceptable or whether an out
of focus image is of no use. Using Focus priority in AFC does have some negative aspects. Because focus must be
achieved before the shutter will fire, shooting in bursts (Cl or Ch) may become more erratic and experience delays.
a2 AF-S priority selection
The AF-S priority selection menu allows the user to configure the AFS mode to use Release priority or Focus
priority. Focus priority is the default. When configured for Focus priority, the shutter is only enabled when focus has
been achieved on the active sensor. If the Shutter Release Button is fully pressed and focus has been achieved, then
the shutter will fire and the image will be captured. If focus has not been achieved, then nothing will happen. The
shutter will not fire.
When configured for Release priority, the shutter will always be enabled. When the autofocus system is
turned on by pressing the Shutter Release Button half way down, the system will attempt to obtain focus on the
active sensor. If focus is obtained, then the focus will lock and the autofocus motor will be deactivated.
At first I was tempted not to even mention this feature. The only benefit I see is that it allows you to
capture out of focus images. But after further consideration, I decided that one person might not perceive all of the
possible situations that others might encounter. I would just recommend leaving this setting on Focus priority unless
you have a specific reason to change it.
a3 Focus tracking w ith lock-on
When using AFC with an AF-Area Mode selected and tracking a subject such as a bird in flight, a race car on
a track, or a player on a field, the camera is using predictive focus tracking to keep the subject in focus. It’s not uncommon for some object such as a tree, a pole, or a person to pass between the camera and the subject. Allowing
the camera to switch focus from the real subject to the obstruction is not desirable. The Focus tracking with lock-on
option can introduce a delay that will prevent the switch from occurring. Focus tracking with lock-on has selectable
settings from 5 thru 1 and off.
5 (Long)
The Long delay appears to be approximately 3 seconds.
4
3 (Normal)
The default setting of Normal delay appears to be approximately 2 seconds.
2
1 (Short)
The Short delay appears to be approximately 1 second.
Off (No Delay)
Setting the selection to Off removes any delay and will refocus immediately.
Note: The delay is an approximation due to the difficulty in testing the option.
a4 AF point illum ination
This setting controls highlighting of the focus point in the viewfinder while focus is occurring. When focus
has been achieved the focus point will be black. For most situations I recommend leaving this set to the default of
Auto. There are 3 settings available.
Auto
The default setting of Auto will highlight the focus point in red if the background is dark.
The focus point will not be highlighted if the background is light.
On
Setting to On will highlight the focus point in red regardless of the background color.
Off
Setting to Off will not highlight the focus point.
a5 Focus point w rap-around
When manually selecting a focus point using the Multi Selector, the Focus point wrap-around selection will
control whether the focus point wraps around one edge to the other. Wrapping can occur from top to bottom,
bottom to top, left to right, or right to left. I recommend changing this setting from the default to allow wrapping
because it might be faster to get the focus point to the other side of the frame. There are two settings available.
Wrap
Setting to Wrap will cause the focus point to wrap around to the opposite side.
No wrap Setting to No Wrap will disable wrapping. If the focus point is at an edge, pressing the
arrow key in the same direction will have no effect.
a6 N um ber of focus points
The Number of focus points menu is an important menu for configuring the autofocus system for speed or
accuracy. This is a field relevant setting. The choices are for 39 points or 11 points. The 39 points selection is the
default. When the 39 points option is selected, each press of the Multi Selector arrows will advance by one sensor
when manually selecting your initial focus point. To move from extreme left to extreme right of the frame requires 10
key presses. To move from extreme top to extreme bottom requires 5 key presses. I consider this to be the best
setting when initial focus point accuracy is your main concern.
When the 11 points option is selected, moving from extreme left to extreme right of the frame requires 5
key presses. To move from extreme top to extreme bottom requires 3 key presses. I consider this to be the best
setting when the speed of selecting the initial focus point is your main concern.
a7 Built-in AF-assist illum inator
The settings available for the Built-in AF-assist illuminator are On or Off. When On is selected, the
Illuminator will light up to assist the AF system in low light conditions. The light will only illuminate if specific
conditions are met. The conditions are that AFS must be selected manually or by the AFA mode and the active sensor
must be the center sensor. The range of the Illuminator is approximately 10ft/3m. It is suggested to leave the menu
setting to On unless the light might be inappropriate for the shooting environment. Also be aware that some lenses
and some lens hood configurations can obstruct the light from performing its purpose.
f5 Assign AE-L/ AF-L button
The Assign AE-L/AF-L button menu allows the user to assign different behaviors to the AE-L/AF-L button
located on the back of the camera to the right of the viewfinder. Not all assignment options pertain to autofocus.
Options denoted with an * are associated with autofocus.
AE/AF lock* - Exposure and focus will lock while the button is pressed. This is the default.
AE lock only – Exposure will lock while the button is pressed.
AF lock only* - Focus will lock while the button is pressed.
AE lock (Hold) – Exposure will lock when the button is pressed the first time. It will remain locked
until the button is pressed a second time or until the exposure meters turn off.
AF-ON* - This option is popular with many photographers. It moves turning on autofocus from the
half press functionality of the Shutter Release button to the AE-L/AF-L button. The Shutter Release
button can’t be used to initiate autofocus if this option has been selected.
FV lock – Flash value will lock when the button is pressed. A second press will cancel the lock.
Controls
Focus M ode Selector
The Focus Mode Selector is a two position switch located on the front of the D7000 at the lower left of the
lens (with the camera held at the photographer’s eye level position). The two positions are AF(autofocus enabled)
and M(manual focus enabled).
AF M ode Button
The AF Mode Button is used to select the AF Mode and the AF-Area Mode. Press and hold the button while
making the selection. It is also used while making the initial focus point selection. The AF Mode Button is integrated
into the Focus Mode Selector.
M ulti selector
The Multi Selector is an eight direction switch. It’s located to the left of the LCD screen. The Multi Selector is
used for performing many tasks on the D7000. When used in conjunction with the AF Mode Button it’s used to move
the initial focus point selection in either a vertical, horizontal, or diagonal direction.
OK button
The OK button is located in the center of the Multi Selector. It’s used for performing many tasks on the
D7000.When used in conjunction with the AF Mode Button, it will return the focus point selection to the center of the
frame. The OK button is also used to confirm the choice of menu selections.
Focus selector lock
The Focus Selector Lock is used as a protection to enable/disable the Multi Selector. It is a two position
switch located just below the Multi Selector on the back of the camera. The two positions are L (Multi Selector
disabled) and a White Dot (Multi Selector enabled). This is used to prevent an inadvertent press of the Multi Selector
that would change the sensor selected as the point of focus.
info button
The Info Button is used to display information in the LCD. It’s located on the back of the camera at the
bottom right corner. The information displayed in the LCD is very informative. I consider it to be a great learning aid
for subjects such as autofocus. I strongly suggest you use it while trying to understand the material being presented
in this document.
Conclusion
With all that has been explained, I think that you would agree that the D7000 and the Multi-CAM 4800DX
provides a robust number of features and choices. The modes available cover just about any situation that you’re
likely to come across and they all work very well for their intended purpose.
Most photographers tend to gravitate towards just two or three of the modes. They become very familiar
with them and use them almost exclusively. In general, this is fine as long as they are successful. It’s probably
unlikely that very many D7000 owners will be using all of the modes on a routine basis. In many cases, more than
one mode will work for a specific subject. With a good understanding of the modes, you should be able to figure out
why other modes are likely to be successful or why they might not work for a situation. It’s important to obtain this
level of understanding. One of the greatest aspects of photography and what makes photography interesting as well
as challenging is artistic impression. Because of artistic impression, recommended settings and suggested use of
certain modes is really not that useful. The way I shoot a subject might be completely different than the way you
shoot it. Also there are an infinite variety of conditions and situations that might exist that would change the best
mode to use. For these reasons, a high level of understanding is what is required to be successful. Trying to use
“canned settings” will stifle your progress.
Now that you have the academic knowledge of how the system works and know the features, functions,
and modes available, it is time to put all of this into practice. And by practice I mean practice switching between the
different modes and combinations. Only with practice will you obtain the skills required to get those shots before the
moment is gone. The knowledge alone isn’t enough.
I hope that this document will accomplish its goal and that you’ll be using the D7000 at its potential soon. I
know that gathering and compiling the information has been a tremendous help for my knowledge and skill. Thank
you for your time.
-W ant to play a gam e?When I first started with my D7000, I actually created a game for myself to play that would force
me to practice and learn the skills necessary to use the autofocus system in the real world. As goofy as this game
may sound, I can proudly say that now I can switch to specific configurations with very little thought and in the
matter of a second. It has taught me good hand position for the D7000 where my left thumb now rests naturally
near the AF Mode Button. There aren’t any strict rules to the game, but here’s how I played in general.
Face N orth – pick a small object that is smaller in the frame than the d9 array. You will shoot this object
using AFS single point.
Face East – Pick an object that has color contrast. You will shoot this object using AFA 3d.
Face South – Pick an object that is about the size of the d9 array. Shoot this using AFC d9.
Face W est – Pick an object that is about the size of the d9 array. Shoot this using AFC d21 but you will
place the object in the left side of the frame and move your selected focus point to the object.
Now play the game. Rotate clockwise and go to the specific setting for that direction as quick as
you can. Take your shot. Now rotate to the next direction and get your next shot at the new settings for that
direction. Continue this through several rotations.
In the next round try turning counter-clockwise. As you become comfortable, try changing objects and
settings making it more difficult and introducing new tasks such as changing the number of focus points (a6). You’ll
be surprised at how much speed you gain over time.
When ready, go shoot in the real world and have some fun. You might find that you’re now able to
spend more time paying attention to composition, and other important factors than fumbling with autofocus. I wish
you the best of luck and hope you enjoy the D7000!