1
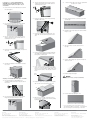
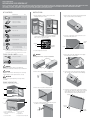
INSTALLATION MANUAL
REFRIGERATOR DOOR REVERSAL KIT
Models: ETB2102PE, ETB2302PE, ETB2602PE, ETB3202PE, ETB3502PE, EBB2602PA, EBB3202PA, EBB3502PA, WBB3400PA, WBB3400WA, WBB3700PA, WBB3700WA, HTB2300PC,
HTB3200PC, HTB3500PC, WTB2300WC, WTB2300PC, WTB2500WC, WTB2500PC, WTB2800WC, WTB2800PC, WTB3400WC, WTB3400PC, WTB3700WC, WTB3700PC.
This installation manual is applicable to both top freezer (top mount) and bottom freezer (bottom mount).
Kit contentS
INSTRUCTIONS
DESCRIPTION
QTY
Cover top cabinet wh gr
Cover top cabinet wh wht
1
1
Hinge top cover left gr
Hinge top cover left wht
1
1
Hinge top left
1
Hinge centre left
1
Hinge bottom base left
1
Door auto closer LH
2
Screw centre hinge
2
Cover screw mullion WH GR
Cover screw mullion WH WHT
2
2
1. E
nsure refrigerator is empty of all loose items and
unplugged from power source.
Top freezer
7. R
emove top door by opening 45º and gently slide off
hinge. Set door aside to prevent damage.
Bottom freezer
2. S
tore power cord next to motor to prevent damage.
Check for water in drain pan and remove any water
with a cloth or sponge if necessary.
8. Unscrew
2 centre hinge screws. Remove the cover
hole mullion with plastic lever.
cover hole
mullion
drain pan
rear view of
refrigerator
motor
NOTE: K eep kit parts separate from other parts as you
disassemble them to avoid mix-ups.This installation manual
is applicable to both top freezer and bottom freezer models.
screws
3. L
ay the refrigerator on its back.
TOOLS YOU WILL NEED (not supplied)
WARNING
Your refrigerator is heavy – you may need assistance.
Phillips head screwdriver
9. R
emove RH centre hinge by lifting the door slightly
and sliding hinge out of the door.
1
bottom door
8mm (5/16") hex head socket
2
WARNING
Electrolux/Westinghouse takes no responsibility for
incorrectly assembled doors leading to injury or malfunction
CAUTION
top door
Top freezer
Bottom freezer
4. Remove the hinge cover with a soft plastic lever.
Refrigerator must stand for 30 minutes prior to connecting
to power supply to ensure system functions correctly.
10. R
emove bottom door by opening 45º and gently
slide off hinge. Set door aside to prevent damage.
IMPORTANT
45º
All hinge screws require tightening to a torque setting
of 5-10Nm.
fridge description
Top view of right hand hinge cabinet
2
5. Remove the LH cap with a soft plastic lever.
1
11. Remove
the cover door from top door and assemble it
on the other side. Remove the RH door auto closer and
replace with LH door auto closer (kit content) on the
other side. Repeat the same step with bottom door.
4
3
cover door
Bottom view of right hand hinge cabinet
6
6. U
nscrew 3 x 8mm top hinge screws and remove RH
top hinge. Do not discard screws.
5
door auto
closer LH
door auto
closer RH
1 Cover top cabinet WH
2 Hinge top right and hinge top
cover right
3 Cover hole mullion
4 Hinge centre right
and screws
5Adjustable foot
6 Hinge bottom assembly right
19. Place the bottom hinge LH (kit content) onto the
cabinet, placing it down then towards cabinet to
install. Replace the screw.
Follow Step 12 – 16 for model WTB2300 and
WTB2500 where fitted with kick plate. For other
models without kick plate please skip to Step 17
and onwards.
26. Ensure that the edges of the doors are parallel with
the sides of the cabinet.
1
12. Unscrew the four screws indicated below to remove
the side kickplates.
2
20. Replace
the hinge foot onto the LH bottom hinge
and tighten with screw.
27. E
nsure that the bottom door and the top door have
a parallel gap.
13. U
nscrew the bottom hinge screw shown, pull the
hinge away from cabinet then up to remove.
1
2
28. F
ully tighten the LH top hinge to the cabinet until the
hinge is secure.
21. R
eplace the bottom door by holding at 45º and
gently slide onto the bottom hinge and close the
door.
14. P
lace the bottom hinge LH (kit content) onto the
cabinet, placing it down then towards cabinet to
install. Replace the screw.
45º
1
2
29. C
lip the LH hinge cover (kit content) over LH
top hinge.
15. R
emove the spacer from the kickplate and clip to the
other side.
22. R
eplace LH centre hinge (kit content) by lifting the
door slightly and sliding hinge into the door and
placing the door down again.
1
30. Insert the RH top hinge hole cap (Kit content) in the
cabinet as shown.
16. A
ssemble the kickplate to the refrigerator using the
four screws.
2
23. Insert 2 x 8 mm screws from existing centre hinge
into the LH centre hinge, tighten the screw until the
bracket is secured. Assemble 2 phillips head screws
and covers (kit content) on the other side as shown
below.
screws
& covers
31. Stand the refrigerator upright.
screws
17. U
nscrew the hinge foot using phillips head
screwdriver and unscrew foot on opposite side. Do
not discard.
WARNING
Your refrigerator is heavy – you may need assistance.
Skip Steps 17 to 20 and follow from Step 21 & onwards.
24. R
eplace the top door by holding at 45º and gently
slide onto the centre hinge and close the door.
45º
33. Level the cabinet by adjusting the foot.
18. U
nscrew the bottom hinge screw shown, pull the
hinge away from cabinet then up to remove.
2
25. S
lide the LH top hinge (kit content) into the door,
loosely screw the 3 x 8mm screws from the existing
top hinge in the cabinet.
1
** It is recommended to apply a small amount of silicone
grease (Molykote EM-50L or equivalent – not provided with
kit) on all pivoting pin of left hand hinges for lubrication.
For further information on these appliances, or to obtain detailed dimension and installation information, call into your Retailer, phone or email our Customer Care team or visit our website:
AUSTRALIA
phone: 1300 363 640
fax: 1800 350 067
email: [email protected]
web: www.westinghouse.com.au
NEW ZEALAND
phone: 0800 436 245
fax: 0800 225 088
email: [email protected]
web: www.westinghouse.co.nz
© 2014 Electrolux Home Products Pty Ltd ABN 51 004 762 341
Malaysia
domestic toll free: 1300 881 122
fax: +60 37955 5511
email: [email protected]
GMAN_DOORREV_May14 Part number: 807557701
VIETNAM
domestic toll free: 1800 58 88 99
phone: +848 3910 5465
fax: 848 3910 5470
email: [email protected]
SINGAPORE
customer care hotline: +65 65078699
HONG KONG
phone: +852 8203 0298
email: [email protected]
web: www.electrolux.com.hk