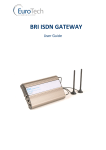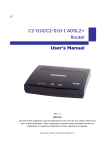
1
VoIP2ALL Gateway 4 Channels Version 2.1 User Manual Connecting VoIP Directly to Cell Phones TM Dear Customer, We thank you for purchasing our VoIP2ALL Gateway. The information in this manual does not constitute a warranty of performance, although the information has been compil ed and checked for accuracy by Eurotech Communication Ltd. All our products are developed and produced by experienced engineers, who aspire to achieve customer satisfaction, utility value and reliability of products. Warranty Policy The product you have purchased is under warranty of 12 months from the date of purchase, by the original purchaser. In case of defects of materials or workmanship, Eurotech Communication will replace it free of charge. This warranty applies to hardware/software but does not include SIM Cards. This warranty will not be honored if the device has been mishandled in any way. We hope you enjoy our product and we will be happy to receive any comments you may have. This will enable us t o improve our products and the technical support that we give to every customer. 3 Table of Contents User Manual ................................ ................................ ................................ ............ 1 Getting Started ................................ ................................ ..... .שגיאה! הסימניה אינה מוגדרת Check Your Package Items ................................ ................................ ........................ 7 The 4 Channel VoIP2ALL Gateway Solution Overview ................................ ................. 8 Chapter 1: Installing SIM Cards and Connecting the Cables ................................ ......... 9 Chapter 1.1: Installing the SIM Cards ................................ ................................ ..... 9 Chapter 1.2: Connecting the Cables ................................ ................................ ......10 Chapter 2: Installing the Manager Application ................................ ......................... 11 Chapter 2.1: Install the VoIP2ALL Management Application into an MS Windows PC ................................ ................................ ................................ 11 Chapter 3: Configurations with the VoIP2ALL Management Application .................... 12 Chapter 4: Ports Settings ................................ ................................ ........................ 14 Chapter 4.1:General Settings ................................ ................................ ...............14 Chapter 4.2: Time Table ................................ ................................ ....................... 15 Chapter 4.3: Prefixes ................................ ................................ ................................ ....... 16 Chapter 4.3: Local SIM ................................ ................................ ................................ .... 18 Chapter 5: VoIP Settings ................................ ................................ ......................... 19 Chapter 5.1:General Settings ................................ ................................ ...............19 Chapter 5.2: Tones Settings ................................ ................................ ............................. 21 Chapter 5.3: SIP Server Settings ................................ ................................ ............22 Chapter 5.4: FXO Settings ................................ ................................ ................................ 24 Chapter 5.5: Calls Repot Records Settings ................................ ................................ ..... 25 Chapter 5.6: SIP Status ................................ ................................ ......................... 26 Chapter 6: SIM Server ................................ ................................ ............................ 28 Chapter 6.1:Adding SIM Server ................................ ................................ ............28 Chapter 6.2: The SIM Server Settings ................................ ................................ ............. 28 Chapter 7: Users ................................ ................................ ................................ .... 30 Chapter 7.1: Uses Capabiliteis ................................ ................................ ........................ 31 Chapter 8: Monitoring Calls ................................ ................................ .................... 32 Chapter 8.1: The Port Control Window ................................ ................................ .......... 32 4 Getting Started Eurotech Communication team is glad you have chosen to use the Eurotech’s VoIP2ALL Gateway for your needs. We will do our best, to make your installation efforts as well as day-to-day configuration and monitoring tasks , to be as pleasant as possible. We wish you a smooth operation , while greatly saving on your office mobile phone calls. This chapter is your “Map for installation, configuration and monitoring tasks” and includes a short explanation on each stage , as well as references for more elaborated explanations, drawings and examples in following chapters. The fo llowing is a list of tasks which are recom mended to go through. It includes mandatory tasks as well as optional tasks that are not required for your current needs. It is advised , that you will use the following menu as your check-up To-Do-List. We advise you, to print this chapter and mark each stage when completed (e.g. V mark when done). Mandatory - Check package items delivered in your package Refer to the “Check your Package Items” chapter in order to see if all items, which should be in your package, are delivered . Mandatory – SIM cards installation and connections o Install SIM Cards o Install Antennas o Install LAN cable Refer to “Chapter 1: SIM Cards Installation and Cables Connecting” for specific and detailed guidelines. 5 Mandatory – Install the management application Install the MS-Windows Management Application on the PC/Laptop allocated for the system management. Use the provided CD. Refer to “Chapter 2: Installing the Manager Application ” for further information. Mandatory – General configurations In order to operate the system, mandatory basic setup steps should be performed by using the LAN. Mandatory - System configuration Use the LAN connection and VoIP2ALL Management MS-Windows application. You can use this method for later day -to-day management for monitoring and reports of the VoIP2ALL activity. The gateway system via IP is highly recommended as you can have the management done remotely from the system via internet connection. 6 Check Your Package Items Please verify that your package contains the following components (some were ordered specifically) before installation: Main Hardware Device - The 4 Channel VoIP2ALL Gateway 110/220V 50-60Hz Electric Power Converter to 12V with cables supplied GSM Antenna – To be installed to the VoIP2ALL. LAN connection cable - for VoIP2ALL connection to the internet. TCP/IP Cross Cable (Red Cable) – for connecting the gateway directly to the PC Network Interface Card. RS-232 Serial PC Comport connection cable (RJ -45 to RS-232 COM) – for debugging and direct access to the config uration files. Will be referred as Com cable in this manual . Software Installation CD - Installation kit of the gateway Manager CD for MS-Windows Management Application, including the User Manual file and additional auxiliary utilities. 7 The 4 Channel VoIP2ALL Gateway Solution Overview The 4 Channel VoIP2ALL Gateway, which will be referred as the VoIP2ALL in short, is a gateway that can connect VoIP calls to the GSM Network. The VoIP2ALL has a built in SIP Server that can register up to 32 VoIP clients. The Gateway can connect each of his VoIP clients to the GSM network directly completely bypasses the local landline telephone company . The VoIP2ALL has 4 GSM ports and a VoIP SIP Server. You can program how to connect the ports. VoIP2ALL can connect VoIP Client to another VoIP Client. You can even call from one of the GSM ports and go out on another GSM port. Each GSM port has one SIM. In addition the gateway has the option of a built in SIM Server of two cards of 32 SIM each. The gateway also has the ability to connect external SIM Servers. Each GSM port can be programmed to work with any of the SIMs in the SIM Servers at any given time. The Gateway can be configured to direct the calls through the most economical SIM. 8 Chapter 1: Installing SIM Cards and Connecting the Cables Each port has one local SIM. The SIMs is inserted under the antenna connector. Chapter 1.1: Installing the SIM Cards Insert the SIM cards into the Gateway as follows: On the front of the Gateway, You will see 4 slots for the SIMs marked SIM – Port1 to 4. Position the SIM in front of one of the slots. The SIM metal contacts should be facing upward and the snubbed triangle should be facing inwards. Push the SIM until the SIM will lock and you hear a click. The SIM is now in place. Note: To extract the SIM you need to push the SIM inward and release the SIM, the SIM will be free from is lock, only then you can pull it out. Chapter 1.3: Connecting the Cables LAN cable - The LAN cable is used to connect the system to the internet network, connect the LAN line to the RJ-45 marked LAN. Com Cable – Connect the Com Cable from the PC RS -232 com port to the RJ45 marked COM (Not necessary for daily use ). Antenna– Connect the GSM antenna. Position the antennas at least 20 centimeters apart and more then 1.5 meters from the gateway. Power cable - Connect the power supply from your 110-240V 50-60Hz power outlet to the VoIP2ALL Gateway power connector. 9 Chapter 2: Installing the M anager Application Before operation, configuration settings must be made in the VoIP2ALL. Configuration is done on an auxiliary computer by using the VoIP2ALL Management MS-Windows Application provided for MS -Windows operating system. Chapter 2.1: Install the VoIP2ALL Management Application into an MS-Windows PC 1. Insert the VoIP2ALL Management installation CD into the CD drive of the PC. 2. In Windows Explorer, navigate to the installation CD drive. 3. Double click 4. Click Next. 5. The Setup Type window will open. 6. Select Complete and click next. 7. Click Install. The VoIP2ALL Management application installs itself. Wait until a completion message will appear. to install the Management Appli cation. 10 Chapter 3: Configurations with the VoIP2ALL Management Application After installing the Management applic ation, launch it and define the Connection between the PC and the VoIP2ALL as described below. Launch the VoIP2ALL Management by pressing or by pressing: on your PC desktop, Start > Programs > Eurotech -Communication > VoIP2ALL Management. The VoIP2ALL Management application window will open. 11 Connecting to the Gateway 1. Press in the toolbar. The Selected Connection window will open. 2. Enter in the Host Address the IP Address of the Gateway (The default IP Address of the gateway is 10.16.2.245). 3. Enter in the Port Number the port of the gateway (The default port is 2007) . Note: You must wait 30 seconds after connecting the power to the gateway for the initialization process to end before connecting with the PC Management. Note: If you can't remember the IP Address see Appendix A: Com Port. Setting the Clock 1. 2. 3. 4. Press in the toolbar. Select in the Date box the date of the gateway. Enter in the Time box the time of the gateway. Select in the Date Format how to display the date, (Day:Month:Year) or (Year:Month:Day). 5. Press Save to change the time and date. Restarting the Gateway To reset the gateway, press the Restart System button. (This will not reset the GSM ports). 12 Chapter 4: Ports Settings In this window we define the settings for each port. We can define when each port will work and with which SIM he will register in the GSM network . Note: All features regarding the SIM Server will be available in future ve rsions. Open the Ports window. 4.1 General Settings Select "General" from the ports list on the left. 1. If "Default Sim" is enabled : the gateway will use the SIMs in the SLAVE cards as default if no other SIM is assign to the port at that time. If disabled the gateway will load only the sim that assign in the Time Table. 2. "Internal Srv" , "Clock IP" and "Clock Port" - not is use currently. 13 Chapter 4.2 Time Table Open the Time Table tab to assign the SIMs to a time. Assigning a SIM to work in a Port at a specific Time 1. 2. 3. 4. Select a port from the list of the ports in the left. Select in the "Type" the form of the Time Table, Monthly or Weekly. Select in the "Swapping Type" to work by Time table. Select a SIM from the list of available SIMs at the top. The list is organized by the SIM Servers. L1 at the top of the list is the SIM on board the SLAVE card. 5. At the top of the Time table is the dates and on the left is the hours. 6. Each time slot is for an hour. 7. Left click will select the SIM for this time slot a nd mark it with is number. 8. To unselect a time slot simply click on it again. 9. You can't choose a SIM that is already in use at that time in the gateway. 10. After setting all the needed SIMs press "Save". Assigning the SIMs to work for duration of time 1. 2. 3. 4. Select a port from the list of the ports in the left. Select in the "Type" the form of the Time Table, "Monthly" or "Weekly". Select in the "Swapping Type" to work by "Call Duration". Select a SIM from the list of available SIMs at the top. The list is organi zed by the SIM Servers. L1 at the top of the list is the SIM on board the SLAVE card. 5. At the top of the Time table is the dates and on the left is the place on the list. 6. Left click will select the SIM for this time slot and mark it with is number. A dialo g box will open. Enter the units for this SIM. 7. The current count of the units of the SIM will appear in the brackets. 8. To unselect a time slot simply click on it again. 9. You can't choose a SIM that is already in use at that time in the gateway. 10. After setting all the needed SIMs press "Save". 11. The calculation of the units each call took is: Number of unit = (time of the call/ Bill Interval) * Units per Interval. 12. At the end of each call the count of the units with be updated. 13. When the count will reach zero the port will register the next SIM on the list. 14 Chapter 4.3 Prefixes In the basic setting, a call that’s comes in from one of the ports will receive a dial tone. The gateway will route the call according to the prefix of the dialed number. In this window we list all the ports in the gateway and their prefixes. Press the Prefixes tab to see: 1. Enter the Prefixes for this port. When a dialed number start with this prefix the call will route to this port. If the prefix of a port is *, then all the calls that didn't fit the other ports prefixes will go through this port. If two or more ports have the same prefix then the gateway will rotate the calls between the ports. 2. Select in the Remove Prefix box how many digits to remove from the beginning of the dialed number. 3. Enter in the Add Prefix box the digits to be added at the end of the number. 4. Select in the Incoming Calls Handle the operation mode for each port: Dial Tone – All calls that come from this port will receive a dial tone to call any other port. Blocked - All calls that come from this port will be blocked. The caller will hear a busy tone. Destination Number - All calls that come from this port will Route automatically to a number according to the Incoming Calls Destination mode. 15 5. Select in the Incoming Calls Destination how to choose the destination number: Fixed – All calls that come from a port in a Destination Number mode will route to one fixed number according with their place in the table. GSM1 calls will route to Num1, GSM2 will route t o Num2 and so on. Priority – All calls that come from a port in a Destination Number mode will route to Num1, if the number is busy, not answering (for the No Replay Timeout) or doesn't exist, the call will route to the next number on the list until there is a answer. Cyclic – The same as in Priority, Except that each call will begin in the next number on the list. 6. Press Save to activate all the changes. Note: After you finished dialing press # to dial the number as it is without waiting the Last Digit Timeout. Examples: Dialing from the GSM to a VoIP extension To call a VoIP extension from a GSM mobile phone through the GSM port 1 with the default settings: 1. Dial the number of the SIM card in port 1. 2. Hear a dial tone. 3. Dial 9 and the VoIP extension n umber (9 is the prefix for VoIP in the default setting). 4. Dial # to send the number. Dialing from a VoIP extension to a GSM mobile phone To call from a VoIP extension to GSM mobile phone with the default settings: 1. Pick up the VoIP extension and hear a dia l tone. 2. Dial the GSM mobile number. 3. Dial # to send the number. 4. The call will route through one of the GSM ports. 16 Chapter 4.4 Local SIM The local SIM is the SIM on board the slave. The setting will take effect when the local SIM will register on the GSM Network. PIN Code – The PIN Code for the SIM when the SIM is PIN Code protected. CLIR – Show or Hide the number of the SIM. Net ID – Locking the SIM on a specific network. BCCH – Locking the SIM on a specific BCCH. When empty he will lock on the best reception BCCH. BCCH Timer – Rotating the BCCH. To rotation will be every BCCH Timer in seconds between all the BCCH that have a reception better then the BCCH rssi. BCCH rssi – The minimum reception for rotation. Bill Interval – The interval for each unit (see Call Duration). Units per Interval – The units for each interval (see Call Duration). Recharge Value, Current Balance – Currently not in use. 17 Chapter 5: VoIP Settings In this window we define the VoIP Settings. Press to open the VoIP setup window. Chapter 5.1: General Settings Press the General tab to see: IP Settings In the IP Settings you can define the IP Address, port, Subnet Mask and the gateway Address of the VoIP2ALL gateway. 18 Changing the IP Address of the Gat eway 1. 2. 3. 4. 5. 6. Open the General tab in the VoIP window. Connect to the gateway with the old IP address in port 2007. Enter in the IP Address box the new IP address for the gateway . Press Save. Disconnect from the gateway. Restart the gateway, wait 30 seconds for initialization and connect with the new address. Dialing Settings 1. Enter in the Wait for Dialing the time in seconds the gateway will wait for the first digit to be dialed. 2. Enter in the Last Digit Timeout the time in seconds to wait between the last digit dialed and the calling of that number. 3. Enter in the No Replay Timeout the number of seconds with no answer the gateway will wait before calling the next number (In Priority or Cyclic mode). 4. Enter in the DELA (seconds) the number of seconds each DELA number will stay in memory. 5. Change in the Debug Level the amount of detail to be shown on the Debug Screen (if necessary). 6. Press Save to activate all the changes. 19 Chapter 5.2: Tones Settings In this window we can set the tone for each port. Where Rx is the to ne of the speaker and Tx is the tone of the microphone. Press the Tone tab to see: Adjusting the Tones 1. Press on the right side of the tone bar, a slider will appear. Slide the slider or change the level number in the middle to the desired level (From -30dbm to +30dbm). 2. Repeat this action for all the tones you need to adjust. 3. Press Save to activate the changes. 20 Chapter 5.3: SIP Server Settings In this window we control the setting of the SIP Server. Press the Sip tab to see: 1. Press Refresh. 2. Select in Codec 1 to Codec 8 the priority of the Codecs. The SIP Server will try to connect the VoIP calls using the first Codec if it isn’t possible it will try the next. 3. Check the Authentication checkbox when you want that the Users will need a password to register in the gateway SIP Server. 4. The SIP Port, RTP Start Port, RFC2833 Payload Type indicates the current settings of the SIP Server. 21 Connecting the gateway SIP Server to external SIP Server You can connect the SIP Server of the gateway t o external SIP Server by adding a host in the Hosts table. When the SIP Servers are connected you will be able to make calls from one SIP Sever to another. Adding a Host to the Hosts Table 1. Enter the Name you selected for the Host. 2. Enter the IP Address of the SIP Server you want to register in . 3. Enter the Port number of the SIP Server (the Default is 5060) . 4. Enter the User number (the number to call the Gateway in the external SIP Server). 5. Enter in the Secret box the authentication number when needed. 6. Press Enter. 7. Press Save to update the new Hosts. 8. Press the Restart Gateway button in the System Window to restart the gateway. While restarting the gateway will register in the external SIP Server. 9. Connect again to the gateway. 10. If the registration succeeded the Status will change to Reg. 11. Go to the Ports window and define a prefix for this Host. Calling to External SIP Server VoIP Client To call a VoIP Client in the external SIP you need to dial the prefix of the Host and the number of the VoIP client. Calling from the External SIP Server To call the gateway from the Host you need to dial the User name, you will get a dial tone then you dial the desired number, like any other call in the gateway it will go according to the prefix of the number. 22 Chapter 5.4: FXO Settings In this window we control the setting of the FXO port. Note: This window relevant only in gateways with FXO ports. Press the FXO tab to see: Adding a New Country to the List 1. Enter in the Country Name the name of the country you want t o add and press Add. 2. The new country will appear on the list. 3. Press on the + sign near the Dial Tone to open the Dial Tone settings of the country. Enter for each parameter the setting of the PSTN in that country. 4. Do the same for the Disconnect Tone and the Ringing Tone. 5. Press SAVE. Changing the Current Country 1. Select the list the Current Country for the FXO settings. 2. Press SAVE. Note: You must restart the gateway to activate the settings. Removing a Country from the List 1. Press the Remove button of the country you want to delete from the list . 2. Press SAVE. 23 Chapter 5.5: Calls Report Records Settings Press the CDR tab to open the window that’s control the setting of the Calls Reports. The records of the calls are saved in files inside the gateway. 1. Check the Active check box to activate the Calls Reports Records. 2. Check the VoIP Filter if you don’t want to record the VoIP calls. 3. Enter in the File Size box the maximum size that each CDR file could be. 4. Enter in the File Amount box the maximum CDR files that wou ld be saved in the memory. 5. To see the CDR files enter in the web browser the address of the gateway, the default is: ftp://10.16.2.245/ you will see the files of the gateway, Enter the conf directory, the CDR files are in the CDR directory. Select the latest file and open it. The CDR format is: Calling Number. Called Number. Origin Channel (Port number, where 33 is internal VoIP). Destination Channel. Start Time. Connect Time. End Time. Release Cause. Note: All the times is in the format [Day, Month, Year, Hour, Minute, Seconds] 24 Chapter 5.6: SIP Status This window lists all the SIP Accounts that are registered in the SIP Server. Press the Sip Status tab to see: 1. 2. 3. 4. Press Refresh to monitor the SIP accounts that registered in the gateway. The User ID is an identification number in the Sip Server for this account. The User Name is the sip account number. The User IP is the IP Address of this sip account. 25 Adding a New SIP account 1. 2. 3. 4. Open the configuration page of your SIP phone. Enter in the "SIP Server" parameter the IP address of the gateway. Enter in the "SIP User ID" parameter the number you chosen for this extension. If the Authentication option at the SIP tab is enabled then e nter in the "Authenticate Password" the password for this client. 5. Save the settings and restart. 6. Press Refresh to see the SIP account in the list. Note: For each VoIP account there mu st be a User in the User List. T hat User must have the same VoIP number as the VoIP account and the secret to match the authentication password. 26 Chapter 6: SIM Server Note: the connection of the 4CH to SIM Servers will be available in future versions. The gateway can connect to SIMs in internal and external SIM Server. In this window we define to what SIM Server the gateway will connec t and what will be the settings for each SIM in this SIM Servers. Open the Virtual SIM window: 6.1 Adding a SIM Server to the SIM Servers List 2. 3. 4. 5. Enter the IP address and the port of the SIM Server you want to connect to. The default pot for a VoIP2ALL S IM Server is 2009. You can connect to up to 20 SIM Servers. Press the Save List button. 27 6.2 The SIM Server settings 1. Press the Synchronization button. The getaway read the SIMs list from each SIM Server that he is connected to. 2. All the SIMs that in the SIM Servers will appear at the list. 3. The list is arranged by the SIM servers. Each SIM Server has cards called ports (starting from port0). Each card has the SIMs from 0 to 32 according to their location on the card. 4. For each SIM you can setup the setting in witch the SIM will work with. PIN Code – The PIN Code for the SIM when the SIM is PIN Code protected. CLIR – Show or Hide the number of the SIM. Net ID – Locking the SIM on a specific network. BCCH – Locking the SIM on a specific BCCH. When empty he w ill lock on the best reception BCCH. BCCH Timer – Rotating the BCCH. To rotation will be every BCCH Timer in seconds between all the BCCH that have a reception better then the BCCH rssi. BCCH rssi – The minimum reception for rotation. Bill Interval – The interval for each unit (see Call Duration). Units per Interval – The units for each interval (see Call Duration). Recharge Value, Current Balance – Currently not in use. 5. This setting will take effect when the SIM will register in the GSM network. 28 Chapter 7: Users The identification and authorization for each action in the gateway is done by defining users. You can define up to 500 users. For each user you can define the numbers he uses and a different action for his calls. Press to open the Users window. Adding a User To add a new user to the list, E nter this values and press the Insert button: ID – The User number in the list. First Name Last Name VoIP Number GSM Number PSTN Number Capabilities – What this user can do. Active Features – Not active in this version. Secret – The SIP authentication password. 29 Updating a Number in the List To update a user: 1. Locate the user on the list. 2. Change in that line the values of the user. 3. Press the Update button of the user. 4. Press OK to confirm update. Deleting a User from the List To delete a user: 1. Press the Delete button of the user (located at the end of the user line in the list). 2. Press OK to confirm the delete. Searching for a User To find a user in the list: 1. Select in the Search Field box by which field to search. 2. Enter the Value to search. 3. Press the Search button. 4. The list will show all the users that come up on the search. 5. To return to the complete list press the All Users button. 7.1 The User Capabilities DELA The DELA is a way for a GSM mobile phone to get back to the VoIP extension that called him. 1. Change the Capabilities value to 1 to enable the DELA for the user. 2. When a call from the VoIP to the GSM number of the user is made, the gateway will save the number of th e extension that called. 3. Enter in the DELA box (in the Prefixes tab that at the VoIP window), the number of seconds the gateway will remember the extension number. 4. If in that time the user will call the gateway from the GSM number, the gateway will give him a dial tone to call. He could dial any number or press * to return to the extension that called him. 5. If a few extensions called the user, Pressing * will go to the first extension that called, at the next GSM call, Dialing * will go to the next extension that called. 6. Each extension number will be called once. 30 Callback The Callback is a way for the User to make the gateway call him and make the call on the expense of the SIM. 1. Change the Capabilities value to 8 to enable the Callback for the user. 2. When a call comes from the GSM number of the user, the gateway will disconnect the call and call him back. 3. The user will get a dial tone to make a call. Note: The gateway will make a callback to the user GSM number. Verify that the prefix of this number is on the prefixes ta ble and the Remove Prefix box beside it isn’t checked. 31 Chapter 8: Monitoring Calls To monitor calls press: The monitor screen opens. 1. The Sim indicator shows the status of the SIM (see below). 2. The Net indicator shows the status of the SIM registration in the GSM network (see below). 3. The SIM# indicates the number of the active SIM (1 is local SIM and 2 is SIM Server SIM). 4. The number at the top left indicates the GSM reception level. 5. The Net ID indicates the ID number of the GSM network. 6. The BCCH indicates the number of the Broadcast Ch annel. The Net and Sim indicator's States: A red indicator indicates there is no connection. A yellow indicator indicates there is a connection, but no data transfer. A green indicator indicates transfer of data. 7. Point the mouse on the blue triangle at the bottom right and click the right button. A menu will appear: Refresh port – Get fresh data from the ports. Reset Port - Reset the ports, the ports reset in couples. Port Control – Open the Port Control window. 32 The Port Control window This window controls the GSM port settings. 1. Select the SIM Number for this setting. 2. Enter in the PIN Code box the PIN code of the SIM when needed. 3. Select a Caller identification option in the Caller ID list: To enable the GSM network to set caller ID standards, select Network. To disable identification of the SIM, select CLIR Suppression. To enable identification of the SIM, select CLIR Invocation. 4. To assign the SIM to work with a specific GSM ne twork, in the Operator ID, enter the GSM network operator ID, from 1–999999. Enter 0 to work with the SIM operator. 5. There are three methods of selecting the BCCH: Auto BCCH Lock - The SIM will register with the BCCH with the highest RSSI. BCCH Lock – Lock the SIM to register at the defined BCCH . Enter in the box the BCCH number. BCCH Random – The BCCH will rotate every specified time. Select in the RSSI the BCCH minimum level of reception to register. Enter in the Timer, the time for each rotation. 33 6. Press the BCCH Control button to monitor the BCCH cells . 1. The middle cell is the cell that the SIM is connected to. 2. Around it are all the surrounding BCCH cells the gateway is detecting. 3. For each cell there is the following information: LAC - Location Area Code. CI - Cell ID MCC - Mobile Country Code BSIC - Basic Station Identity Code BCCH - Broadcast Control Channel RSSI- Receiver Signal Strength. 4. You can choose a BCCH channel by clicking on the cell. The module will automatically register in the new BC CH. 5. You can close the BCCH Control window by clicking on the X button in the middle of the window. 34 Sending SMS To send SMS press the Send SMS tab: 1. 2. 3. 4. 5. 6. 7. 8. Select in the Format box the format of the SMS. Check the Right to Left box when writing in a language from right to left. Enter the SMS message in the Message box. Press the Font button to select a different font. Press the Save button to save the SMS. Enter in the Phone Number box the GSM number to send the SMS to. In the SMSC Number you see the number of the SMS server. Enter in the Bulk Numbers the list of GSM numbers, w hen needed to send to the SMS to many numbers. 9. Press the Send button to send the SMS. To Send SMS: Write the SMS message in the Message box. Enter the number to send the SMS in the Phone Number. Press the Send button. 35 Receiving SMS 1. When SMS will arrive from the GSM network an icon envelope will appear in the monitor. 2. To see the messages open the SMS Inbox tab in the Port Control window. 3. Press Delete to deletes the massages. 4. Press the Font button to select a different font. 5. Press the Save button to save the messages. 36 Appendix A: Com Port The Com Port connection, give you direct access to the Linux based operating system files of the DSP. 1. Connect the Com Cable from the gateway to the PC RS232 Com Port. 2. Connect the Hyper Terminal press "Disconnect" than "Properties". 3. In the "Connect To" tab press "Configure", The "Port Setting" should be: 4. Press "OK" and move to the Settings tab. 5. Press ASCII Setup: 6. Sett this settings and press OK. 7. Press "Connect" in the Hyper Terminal. 8. When restarting the gateway you will see the initialization process. Wait until it finished. 9. Press the Enter button. On screen you will see #. 10. To see the IP settings write the command ifconfig and press Enter. 37 11. On screen you will: 12. The IP Address of the gateway is marked in a red circle. 38 Appendix B: Direct Access to the ftp Files This access to the ftp files is for copying and deleting the calls report files and for upgrading the firmware. Warning: Any change in the ftp files may result with the gateway not working properly. 1. Open My Computer on the desktop. 2. In the Address bar enter ftp://10.16.2.245/ (When 10.16.2.245 is the IP address of the gateway). 3. Press Enter 4. You will see this window: 5. 6. 7. 8. Enter "root" in the User Name box. The Password box should stay empty Press Log On and the Ftp files window will be open. You can copy or delete the calls reports files in the cdr folder. 39