1
JiffyDOS User’s Manual
Version 6.01
1
Contents
Introduction
Getting Started . . . . . . .
Getting Help . . . . . . . .
Installation Service . . . .
What this Manual Includes
.
.
.
.
4
4
4
4
5
What is JiffyDOS?
Features . . . . . . . . . . . . . . . . . . . . . . . . . . . . . . . . . . . . . . . . .
Performance . . . . . . . . . . . . . . . . . . . . . . . . . . . . . . . . . . . . . . .
Compatibility . . . . . . . . . . . . . . . . . . . . . . . . . . . . . . . . . . . . . .
6
6
7
8
.
.
.
.
.
.
.
.
.
.
.
.
.
.
.
.
.
.
.
.
.
.
.
.
.
.
.
.
.
.
.
.
.
.
.
.
.
.
.
.
.
.
.
.
.
.
.
.
.
.
.
.
.
.
.
.
.
.
.
.
.
.
.
.
.
.
.
.
.
.
.
.
.
.
.
.
.
.
.
.
.
.
.
.
.
.
.
.
.
.
.
.
.
.
.
.
.
.
.
.
.
.
.
.
.
.
.
.
.
.
.
.
.
.
.
.
Using JiffyDOS
ROM Switching . . . . . . . . . . . . . .
Using a Tape Drive with JiffyDOS . . .
Function Key Definitions . . . . . . . .
Listing Freeze . . . . . . . . . . . . . . .
Getting Maximum Performance . . . . .
The JiffyDOS File Copier . . . . . . . .
Setting the Sector Interleave . . . . . . .
If you’re not getting top Performance .
If a Program won’t Load or Operate . .
What to do if a program won’t load . .
Using JiffyDOS with RAM Units . . . .
Using JiffyDOS Commands with BASIC
.
.
.
.
.
.
.
.
.
.
.
.
.
.
.
.
.
.
.
.
.
.
.
.
.
.
.
.
.
.
.
.
.
.
.
.
.
.
.
.
.
.
.
.
.
.
.
.
.
.
.
.
.
.
.
.
.
.
.
.
.
.
.
.
.
.
.
.
.
.
.
.
.
.
.
.
.
.
.
.
.
.
.
.
.
.
.
.
.
.
.
.
.
.
.
.
.
.
.
.
.
.
.
.
.
.
.
.
.
.
.
.
.
.
.
.
.
.
.
.
.
.
.
.
.
.
.
.
.
.
.
.
.
.
.
.
.
.
.
.
.
.
.
.
.
.
.
.
.
.
.
.
.
.
.
.
.
.
.
.
.
.
.
.
.
.
.
.
.
.
.
.
.
.
.
.
.
.
.
.
.
.
.
.
.
.
.
.
.
.
.
.
.
.
.
.
.
.
.
.
.
.
.
.
.
.
.
.
.
.
.
.
.
.
.
.
.
.
.
.
.
.
.
.
.
.
.
.
.
.
.
.
.
.
.
.
.
.
.
.
12
12
13
13
15
16
17
21
26
28
28
29
30
The JiffyDOS Commands
Command Descriptions . . . . . . . . .
Setting the Default Device . . . . . . . .
Displaying the Directory . . . . . . . . .
Reading the Disk Drive Error Channel .
Loading BASIC Programs . . . . . . . .
Saving BASIC Programs . . . . . . . . .
Loading Machine-Language Programs .
Loading and Running the First Program
Verifying Programs . . . . . . . . . . . .
Listing BASIC Programs from Disk . .
Listing ASCII Files from Disk . . . . . .
“Un-NEWing” a BASIC Program . . . .
Initializing the Disk Drive . . . . . . . .
Resetting the Disk Drive . . . . . . . . .
. . . . .
. . . . .
. . . . .
. . . . .
. . . . .
. . . . .
. . . . .
on Disk
. . . . .
. . . . .
. . . . .
. . . . .
. . . . .
. . . . .
.
.
.
.
.
.
.
.
.
.
.
.
.
.
.
.
.
.
.
.
.
.
.
.
.
.
.
.
.
.
.
.
.
.
.
.
.
.
.
.
.
.
.
.
.
.
.
.
.
.
.
.
.
.
.
.
.
.
.
.
.
.
.
.
.
.
.
.
.
.
.
.
.
.
.
.
.
.
.
.
.
.
.
.
.
.
.
.
.
.
.
.
.
.
.
.
.
.
.
.
.
.
.
.
.
.
.
.
.
.
.
.
.
.
.
.
.
.
.
.
.
.
.
.
.
.
.
.
.
.
.
.
.
.
.
.
.
.
.
.
.
.
.
.
.
.
.
.
.
.
.
.
.
.
.
.
.
.
.
.
.
.
.
.
.
.
.
.
.
.
.
.
.
.
.
.
.
.
.
.
.
.
.
.
.
.
.
.
.
.
.
.
.
.
.
.
.
.
.
.
.
.
.
.
.
.
.
.
.
.
.
.
.
.
.
.
.
.
.
.
.
.
.
.
.
.
.
.
.
.
.
.
.
.
.
.
.
.
.
.
.
.
.
.
.
31
31
32
32
33
33
34
34
35
35
35
36
36
36
37
2
.
.
.
.
.
.
.
.
.
.
.
.
.
.
.
.
.
.
.
.
.
.
.
.
.
.
.
.
.
.
.
.
.
.
.
.
.
.
.
.
.
.
Validating Disks . . . . . . . . . . . . . .
Formatting Disks . . . . . . . . . . . . . .
Disabling the 1541 “Head Rattle” . . . . .
Copying files . . . . . . . . . . . . . . . .
Changing the Sector Interleave . . . . . .
Combining Files and Creating Backups .
Renaming Files . . . . . . . . . . . . . . .
Scratching (Deleting) Files . . . . . . . .
Locking and Unlocking Files . . . . . . . .
Directing Output to a Printer . . . . . . .
Printing the Screen . . . . . . . . . . . . .
Disabling the JiffyDOS Function Keys . .
Re-Enabling the JiffyDOS Function Keys
Disabling the JiffyDOS Commands . . . .
Re-Enabling the JiffyDOS Commands . .
Special Command Features . . . . . . . .
.
.
.
.
.
.
.
.
.
.
.
.
.
.
.
.
37
37
39
39
40
41
41
41
42
43
43
43
44
44
44
45
Wedge
. . . . . . . . . . . . . . . . . . . . . . . . . . . . . . . .
. . . . . . . . . . . . . . . . . . . . . . . . . . . . . . . .
. . . . . . . . . . . . . . . . . . . . . . . . . . . . . . . .
46
46
46
46
Addendum
The Super Graphics Gold Printer Interface . . . . . . . . . . . . . . . . . . . . .
Using 1581 Partitions (subdirectories) . . . . . . . . . . . . . . . . . . . . . . . .
Command Summary . . . . . . . . . . . . . . . . . . . . . . . . . . . . . . . . . .
48
48
48
48
Compatibility Guarantee
Warranty . . . . . . . . . . . . . . . . . . . . . . . . . . . . . . . . . . . . . . . .
51
51
Enhancements to the DOS
Command Chaining . .
String Variables . . . .
Default Device Override
3
.
.
.
.
.
.
.
.
.
.
.
.
.
.
.
.
.
.
.
.
.
.
.
.
.
.
.
.
.
.
.
.
.
.
.
.
.
.
.
.
.
.
.
.
.
.
.
.
.
.
.
.
.
.
.
.
.
.
.
.
.
.
.
.
.
.
.
.
.
.
.
.
.
.
.
.
.
.
.
.
.
.
.
.
.
.
.
.
.
.
.
.
.
.
.
.
.
.
.
.
.
.
.
.
.
.
.
.
.
.
.
.
.
.
.
.
.
.
.
.
.
.
.
.
.
.
.
.
.
.
.
.
.
.
.
.
.
.
.
.
.
.
.
.
.
.
.
.
.
.
.
.
.
.
.
.
.
.
.
.
.
.
.
.
.
.
.
.
.
.
.
.
.
.
.
.
.
.
.
.
.
.
.
.
.
.
.
.
.
.
.
.
.
.
.
.
.
.
.
.
.
.
.
.
.
.
.
.
.
.
.
.
.
.
.
.
.
.
.
.
.
.
.
.
.
.
.
.
.
.
.
.
.
.
.
.
.
.
.
.
.
.
.
.
.
.
.
.
.
.
.
.
.
.
.
.
.
.
.
.
.
.
.
.
.
.
.
.
.
.
.
.
.
.
.
.
.
.
.
.
.
.
.
.
.
.
.
.
.
.
.
.
.
.
.
.
.
.
.
.
.
.
.
.
.
.
.
.
.
.
.
.
.
.
.
.
.
.
.
.
.
.
.
.
.
.
.
.
.
.
.
.
.
.
.
.
Introduction
Getting Started
When you first receive your JiffyDOS system, you will probably be anxious to install
it and to start taking advantage of the speed increases that JiffyDOS provides. Before
beginning, however, please note that installing JiffyDOS requires the partial disassembly of
your computer and disk drive(s). While this does not require a knowledge of electronics, it
does require some manual dexterity to perform. Read through the installation instructioons
carefully before starting. If you do not feel confident about installing JiffyDOS yourself,
refer installation to a qualified technician, or take advantage of Creative Micro Design’s
installation service.
Also, please be aware that installing JiffyDOS will void any factory warrenty applicable
to your computer or disk drive. If you are concerned about voiding your warrenty, you
may want to delay installing JiffyDOS until your warrenty period has expired (Commodore
normally warrents their equipment for a period of 90 days).
After you have installed JiffyDOS
After you have installed JiffyDOS, please take the time to become familiar with this manual.
It describes the many commands and features of your JiffyDOS system, and gives you
instructions on how to use them. You will also find information that will help you get the
most performance out of JiffyDOS. If you experience any problems when using JiffyDOS,
please check the manual - it may provide you with the information that you need to solve
the problem.
Getting Help
If you run into any problems or have any questions about the installation or operation of
JiffyDOS, please feel free to contact Creative Micro Designs. We will be glad to assist in
any way we can. Our address and phone number are listed below:
Creative Micro Designs, Inc.
P. O. Box 789
Wilbraham, MA 01095
(413) 525-0023
Installation Service
Creative Micro Designs offers a JiffyDOS installation service. If you would like us to install
JiffyDOS in your computer and/or disk drive, please contact us for information and prices.
4
What this Manual Includes
This manual gives you complete instructions on how to use your JiffyDOS system.
Section 2, “What is JiffyDOS?”, describes the performance and other features of
JiffyDOS.
Section 3, “Using JiffyDOS”, gives you instructions on how to enable and disable
JiffyDOS, how to use the JiffyDOS function keys, how to control listings and how to
get the most performance out of your system.
Section 4, “The JiffyDOS Commands”, provides a description of each JiffyDOS command.
The JiffyDOS guarantee and Warranty are included at the back of this manual.
5
What is JiffyDOS?
JiffyDOS is an enhanced Disk Operating System (DOS) for Commodore C-64, SX-64,
and C-128 computers. Programmed onto ROMs that replace the Kernal ROM(s) in your
computer and the DOS ROM in your disk drive, JiffyDOS provides the speed, commands
and convenience missing on stock systems. Because it is ROM-based, JiffyDOS becomes an
integral part of your system, and is able to provide performance without the compatibility
problems of Cartridges and other speed-enhancement systems.
Features
Uses no ports or cabling
JiffyDOS installs without any extra cabling between your computer and disk drive(s), and
does not tie up the Cartridge, User or Cassette ports. This enables compatibility with
all hardware devices (such as modems, memory expansions, etc.), and gives JiffyDOS an
advantage over cartridge speedups and other hardware upgrades (RapiDOS, 1541 Flash!,
DigiDOS, Dolphin DOS) which require extra cabling that plugs into one of the ports on
your computer.
Built-In DOS Wedge Commands
JiffyDOS includes a complete, built-in implementation of the Commodore DOS 5.1 Wedge
command set. The DOS Wedge provides simple, easy-to-learn commands that eliminate the
need to type complicated instructions when you need to perform common disk operations
such as scratching files and formatting disks. The JiffyDOS version of the Wedge also
includes a series of enhancements that make it easier to use the commands within BASIC
programs.
Additional JiffyDOS Commands
In addition to the standard DOS Wedge, JifyDOS includes a number of special commands
that make using your computer even easier. The JifyDOS commands all use the familiar
DOS Wedge syntax, and enable you to perform functions such as disabling the head rattle
(bump) on 1541’s locking and unlocking files, listing files directly from disk, “un-NEWing”
BASIC programs and dumping the screen to a printer.
Convenience features
JiffyDOS provides a full compliment of convenience features that enable you to list the
directory without disturbing memory; to load and run the first program on disk; and to
pause, inspect and restart BASIC of JiffyDOS listings. In addition, JiffyDOS includes a
full set of function key definitions that work along with the directory listing to eliminate
the need to type lengthy filenames when loading, saving, or scratching files.
6
Does not bypass error checking
All JiffyDOS operations retain the built-in DOS error checking and correction routines
that are a necessary part of any reliable data storage system. While other speedup systems
and utilities (i.e. the ones boasting 10-second formats) bypass these routines, JiffyDOS
provides speed without jeopardizing the integrity of your data.
Incorporates the latest Commodore upgrades
When you purchase JiffyDOS, the ROMs you receive have been programmed to include the
latest Commodore upgrades. The JiffyDOS ROM for the 1571 eliminates bugs affecting
Relative files, drive initialization, etc. and has also been modified to solve the problems
with disk backup utilities (Fast Hack-Em, Copy II-64/128, etc.) caused by the Commodore
upgrade. The JiffyDOS Kernal ROM for the C-64 is based on the latest version, as are the
64- and 128-mode Kernal ROMs for the C-128.
Performance
Speeds up all disk operations
JiffyDOS has been designed to speed up all operations on 1541, 1541 compatible, 1571 and
1581 disk drives. This includes the initial loading of all types of programs (including copyprotected software), saving, reading and writing files from within programs, autobooting
(C-128 in 128 mode), scratching, validating, and formatting (1541 drives). JiffyDOS/128
speeds up disk operations in both 64 and 128 modes and is able to speed up the alreadyquick 128-mode operation of 1571 and 1581 drives.
Works within all types of software
Because of its ROM-based design, JiffyDOS is able to work from within all types of software
to increase disk-access speed when you need it the most. Wordprocessors, databases,
spreadsheets, programming languages, MIDI software and games all benefit from the builtin speed provided by JiffyDOS. Since JiffyDOS requires no extra RAM in your computer
or disk drive and does not alter vectors, it can speed up the operation of all software that
relies on the disk-access routines built into the Kernal ROM.
Speeds up access of SEQ, REL, & USR files
Another important feature of JiffyDOS is its ability to speed up the access of all types
of files. Program (PRG), Sequential (SEQ), Relative (REL) and User (USR) files can all
be accessed faster on JiffyDOS systems. This makes JiffyDOS effective with software that
uses these file types, and provides an advantage over cartridge speedup products which
improve performance only with PRG files.
7
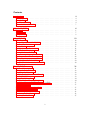
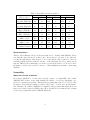
Table 1: C-64, SX-64, C-128 in 64 Mode
1541
1571
1581
Disk Operation
Stock JiffyDOS Stock JiffyDOS Stock JiffyDOS
Load 202-block
program (PRG file)
124
12
124
9
102
8
Save 100-block
program (PRG file)
75
24
75
20
40
15
Read 125-block
SEQ or USR file
84
15
84
13
63
9
Write 100-block
SEQ or USR file
81
27
81
24
44
17
Read 64 154-byte
REL records
40
14
40
14
37
10
Write one 154-byte
REL records
.350
.125
.350
.120
.325
.110
Read/Write 16K on
command channel
47
9
47
9
47
9
Speed comparisons
Tables 1 and 2 illustrate the speed increases that can be obtained with JiffyDOS. Please
note that the times shown are rounded off to the nearest second, and do not take into
account the disk spin-up delay (approx. 1/2 second) and the time required for directory
searching (which varies in relation to the size of the particular directory). Other factors
may also influence the results that you obtain on your system. Refer to Section 3 for more
information on these factors and for ways to obtain maximum performance when using
JifyDOS.
Compatibility
Works with virtually all software
We designed JiffyDOS to be fast.-.but not at the expense of compatibility. As a result,
JiffyDOS will load and operate with virtually all software of every type (including copyprotected commercial programs). This includes programs that cannot be loaded by other
speedup products such as cartridges, software-based “turbo” loaders, and other hardwarebased systems. In addition, JiffyDOS is compatible with programs that utilize their own
fast-access routines (such as GEOS) and will work with the non-standard file formats
created by programs such as the VORPAL utility kit.
8
Disk Operation
Load 202-block
program (PRG file)
Save 100-block
program (PRG file)
Read 125-block
SEQ or USR file
Write 100-block
SEQ or USR file
Read 64 154-byte
REL records
Autoboot 202-block
program
Read/Write 16K on
command channel
Table 2: C-128 in 128 Mode
1541
1571
Stock JiffyDOS Stock JiffyDOS
1581
Stock JiffyDOS
124
12
14
9
12
8
75
24
48
25
26
14
84
15
31
12
20
10
81
27
48
33
20
11
40
14
21
14
17
10
125
13
54
10
13
9
47
10
10
6
10
6
RAMDOS compatibility
JiffyDOS commands are compatible with Commodore’s RAMDOS for the 1700, 1750, and
1764 RAM expansion units (REU’s), as well as being compatible with the RAM operating
system used by CMD in the RAMLink RAM expansion interface.
Compatible with all hardware
Because it does not use any ports, JiffyDOS can work in conjunction with all hardware
devices available for C-64’s and C-128’s, including modems, RAM expansions, MIDI interfaces, hard disk drives, etc. JiffyDOS systems are also compatible with all serial bus devices
(non-JiffyDOS disk drives, printers, printer interfaces, etc.). JiffyDOS can be installed on
disk drives regardless of device number, and devices numbers can be changed on JiffyDOS
drives via software or hardware with no problems. In addition, JiffyDOS-equipped disk
drives can be used with stock C-64 and C-128 computers, if necessary.
Uses stock disk and file formats
All files written under JiffyDOS are identical to standard Commodore files. Disks formatted
on JiffyDOS systems are identical to those formatted on stock systems. This means that
you will have no problems using the disks, programs and files you create with JiffyDOS on
stock systems (and vice-versa).
9
Can be completely switched out
In the event that a program will not load or operate properly with JiffyDOS (this should
be a rare occurance - we know of only a few heavily copy-protected games that will not
load), you can switch your system back to a completely stock version with the flip of a
switch. As an added advantage, you can use the switching system to switch JiffyDOS in
or out with power on.
Available for all 64’s, 128’s and virtually all drives
JiffyDOS systems are available for the following computers and disk drives:
C-64
64C
SX-64
C-128
C-128D
1541
1541C
1541-II
1571
1581
FSD-1
FSD-2
Excelerator+
Excel 2001
OC-118
MSD-1
MSD-2
Enhancer 2000
BCD/5.25
10
BCD/128
RF501C
RF512C
FD-168
SW71
Indus GT
CSD-1
JiffyDOS can be ordered for any combination of the above computers and disk drives.
Additional drive ROMs can be ordered if you wish to speed up second, third or fourth
drives. JiffyDOS allows the use of multiple dissimilar drives (i.e. 1541, 1571, 1581) whether
or not they are equipped with JiffyDOS ROMs. JiffyDOS-equipped disk drives can be
used interchangeably on different JiffyDOS-equipped computers (for example, a C-64 and
C-128), or with stock computers. Contact Creative Micro Designs if you are interested in
expanding your JiffyDOS system.
Compatibility Guarantee
Because of our confidence in the compatibility of JiffyDOS, we back our product with a
30-day, Money-Back Compatability Guarantee. The JiffyDOS guarantee is simple: If you
are dissatisfied because JiffyDOS is not compatible with any of the hardware or software
that you own, simply return the unit unmodified and in good condition within 30 days of
purchase for a complete refund. This offer is only valid with units purchased directly from
CMD. See the back of this manual for a complete description of the JiffyDOS Guarantee.
11
Using JiffyDOS
ROM Switching
JiffyDOS enables your computer and disk drive(s) to be switched back to stock mode, if
necessary. You will probably be able to have JiffyDOS selected all of the time. However,
in rare cases, your system may have to be switched back to stock mode to allow a program
to load or operate properly.
C-64, SX-64, and C-128
The normal procedure for switching Kernal selections on the C-64, SX-64, and C-128 is
to first turn your computer OFF, flip the selector switch to the desired position and then
power the computer back ON. After your computer is powered back on, the sign-on screen
will indicate which Kernal has been selected. If the JiffyDOS Kernal is selected, the sign-on
screen will read:
JiffyDOS V6.01 (C) 1989 CMD
This may differ slightly if your version of JiffyDOS is not version 6.01. If the stock
Kernal routines have been selected, the normal BASIC sign-on screen will be displayed.
1541 and compatibles
The normal procedure for switching JiffyDOS in or out on 1541 and compatible drives is
to power the drive off, set the selector switch to the desired position and then power the
drive back ON. (Note: The SX-64 does not have a seperate drive selector switch.) Reading
the disk drive error channel immediately after power-up will indicate which ROM selection
has been made. If JiffyDOS has been selected, the message is:
73, JiffyDOS 5.0 1541, 00, 00
(Note: The JiffyDOS version 6 drive ROMs have not been changed since version 5,
therefore the actual version number displayed by the drive ROM is version 5). If the stock
ROM routines have been selected, the message is:
73, CBM DOS V2.6 1541, 00, 00
1571 and 1581
On 1571 and 1581 drives equipped with JiffyDOS, a software switching scheme is used
to select between JiffyDOS and the stock DOS. With JiffyDOS installed, the drives sense
whether the computer they are connected to is in stock or JiffyDOS mode and subsequently
select the corresponding DOS routines automatically. No manual switching is required.
Switching ROMs with power on
JiffyDOS has been designed to allow ROM switching while your system is powered on.
This is especially useful in cases where a heavily copy-protected program will not load
12
with JiffyDOS selected, but will perform high-speed drive accesses properly if JiffyDOS is
switched in once the program is up and running.
Precautions The only precaution necessary for switching ROM selections on your computer or disk drive with power on is to be sure that no disk accesses are taking place at
the time (switching while a disk drive is being accessed will cause the system to hang up).
Take note, however, that switching Kernal ROM selections on your computer while running a program may not be 100% reliable - that is, the program running at the time may
crash when the switch is toggled or may hang up when a device access is attempted (some
programs will respond better than others).
Switching to the Stock Kernal while in BASIC To switch from the JiffyDOS Kernal to
the stock Kernal while your computer is in BASIC direct mode, first disable the JiffyDOS
commands by using the @Q command and then flip the Kernal Selector Switch to the stock
position.
Switching to the JiffyDOS Kernal while in BASIC To switch from the stock Kernal to
the JiffyDOS Kernal while your computer is in BASIC direct mode, first flip the Kernal
Selector Switch to the JifyDOS position and then type in one of the following commands:
SYS 58551 (64 mode)
SYS 65137 (128 mode)
Using a Tape Drive with JiffyDOS
It is not possible to use a tape drive (Commodore DATASETTE, etc) while the JiffyDOS
Kernal is selected. If tape access is attempted, an ILLEGAL DEVICE NUMBER ERROR
will occur.
To use a tape drive with JiffyDOS, select the stock Commodore Kernal ROM routines
first by using the Kernal Selector Switch. See “ROM Switching” earlier in this section for
instructions.
Function Key Definitions
JiffyDOS offers the convenience of function keys defined with JiffyDOS Wedge commands
and BASIC keywords. The function key definitions are active only in BASIC direct mode
and are automatically disabled when a BASIC or ML program is run, in order to avoid
conflict with any program-defined function key assignments. The JiffyDOS function key
definitions are:
f1
Display the directory
f3
Load a BASIC program
13
f5
Load and run a BASIC program
f7
Load an ML program
f2
List a BASIC program from disk
f4
List an ASCII (text) file from disk
f6
Save a BASIC program
f8
Scratch a file
Using the function keys with the directory listing
The JiffyDOS function key definitions have been designed to work along with the filenames
in the directory listing. Once the directory has been listed, the cursor can be moved to
the line of the desired filename, the appropriate function key can be pressed, and then
RETURN can be pressed when it is OK to proceed with the command.
Using the JiffyDOS function keys with the directory listing eliminates the possibility of
filename misspellings. And, there is no need to enter a colon (:) after the filename or erase
the filetype characters manually in order to avoid a syntax error. After the function key
has been pressed, the filename can be altered if desired.
Disabling the function keys
The JiffyDOS @F command may be used to disable the function key definitions in 64 mode.
In 128 mode this command will switch the function keys from the JiffyDOS definitions to
the standard 128 definitions. Refer to Section 4, “The JiffyDOS Commands”, for a complete
description of the @F command.
Re-enabling the JiffyDOS function keys
The following commands are used to re-enable the standard JiffyDOS function key definitions. For more information see Section 4 of this manual.
SYS 58551 (64 mode)
SYS 65137 (128 mode)
Reprogrammable function keys (64 mode)
The function keys (C-64 or C-128 in 64 mode) can be redefined by using a BASIC program.
The following program redefines the keys with the strings assigned to variables F1$ through
F8$ (change these strings to the new definitions you want to assign). Please note that the
keys must be assigned in the order shown in line 55 (f1, f3, f5, f7, f2, f4, f6, f8) and each
definition must end with a CHR$(0).
15 F1$=”@$:*”+CHR$(13)+CHR$(0)
14
20 F2$=”@D”+CHR$(0)
25 F3$=”/”+CHR$(0)
30 F4$=”@T”+CHR$(0)
35 F5$=”~”+CHR$(0)
40 F6$=”<-”+CHR$(0)
45 F7$=”%”+CHR$(0)
50 F8$=”@”+CHR$(34)+”S:”+CHR$(0)
55 F$=F1$+F3$+F5$+F7$+F2$+F4$+F6$+F8$
60 BUF=820
65 FOR I=1 TO LEN(F$)
70 POKE(BUF+I-1),ASC(MID$(F$,I,1)):NEXT I
75 POKE 176,BUF-(256*(INT(BUF/256)))
80 POKE 177,INT(BUF/256):POKE 155,0
The variable “BUF” points to the RAM area where the new definitions will be stored
(Address 820 is the Tape Buffer). This can be changed to point to any safe RAM area
except for the areas under the BASIC and Kernal ROMs.
Listing Freeze
JiffyDOS features an enhanced listing freeze method that differs from V5.0. The listing
freeze is especially helpful when you are scanning a long BASIC program or a listing produced by the @$ (directory), @D (list BASIC program), or @T (list ASCII file) commands.
In addition, the listing freeze will work from within many commercial programs.
Scanning a listing
You can easily scan a listing by using the CTRL key. Holding down CTRL will stop the
listing from scrolling off the screen. When you want the listing to start scrolling again,
release the CTRL key. While you are holding down the CTRL key, you can also freeze or
single-step the listing (see below).
Freezing a listing
To freeze a listing, press CTRL+S (Press S while holding down the CTRL key). This will
stop the listing from scrolling and allow you to take your hands off the keyboard. To restart
the listing, press any key except CTRL, RUN/STOP, SHIFT, or the
key.
Single-stepping a listing
With JiffyDOS you can “single-step” a listing. Single-stepping enables you to scroll through
a listing one line at a time. To single-step, first stop the listing by holding down <CONTROL>. Then, while continually holding down the CTRL key, alternately press the S and
15
W keys. Each time you press W a new line will appear on the screen. You can restart the
scrolling by releasing the CTRL key after you have pressed W.
Ending a listing
JiffyDOS enables you to end (break off) any JiffyDOS or BASIC listing by pressing and
holding RUN/STOP. You can press RUN/STOP while a listing is scrolling, or while it is
frozen after CTRL+S has been pressed. Note: Pressing RUN/STOP will work well with
BASIC and JiffyDOS listings, but will not necessarily break off the listings that occur
within commercial programs.
Getting Maximum Performance
As a general rule (with 1541, 1571, and compatible drives only), programs and files saved
with JiffyDOS will load faster than programs and files saved on stock systems (or with
JiffyDOS switched out). In some cases, re-saved files can be loaded up to 3 times faster.
With programs (or files) that already load quickly with the 1571 in 128 mode, re-saving
files may be the only way to obtain a discernable speed increase.
Re-saving files under JiffyDOS does not alter the file’s format or contents in any way
— it merely rearranges the data more efficiently on disk, which allows JiffyDOS to find
each block (sector) more quickly. Re-saved files remain compatible with stock Commodore
systems.
Re-writing files
To get the maximum possible speed increase when loading files from within other programs
(i.e., wordprocessors, MIDI sequencers, etc.), start up the program, load in the desired file,
and then re-save it. For example, to increase the load speed of a MIDI sequencer file, load
your MIDI sequencing program with JiffyDOS enabled and then load the file you want to
speed up into the sequencer. After the file has been loaded, simply save it back to disk.
In many cases, this procedure can double the speed at which files can be loaded. Another
method is to use the JiffyDOS file copier to re-write files. See the section titled “The
JiffyDOS File Copier” for more information.
Changing the Sector Interleave
JiffyDOS also enables you to easily change the sector interleave on 1541 and 1571 drives.
This feature makes it possible to increase the disk-access speed of particular programs that
JiffyDOS seems to have little effect on. In some cases, changing the sector interleave may
be the only way to increase disk-access performance - especially when a 1571 drive is used
with a C-128 in 128 mode. For example, when a standard interleave is used, JiffyDOS
does little to speed up Paperclip III (1571 in 128 mode). However, if the sector interleave
16
is changed to a value of 7, file-access speed is doubled. See the section titled “Setting the
Sector Interleave” for more information.
The JiffyDOS File Copier
JiffyDOS includes a built-in two-drive file copier that makes it easy to backup valuable
data files, to copy files between 1541, 1571 and 1581 drives, and to copy files to and from
RAM expansion units running under Commodore’s RAMDOS. Although the file copier
built into JiffyDOS is not the fastest one in existence, it has the following advantages over
stand-alone copy utilities:
The JiffyDOS file copier is built-in, which enables you to copy files without the hassle
of loading a stand-alone utility.
Copies PRG, SEQ, REL and most USR files.
Saves time and trouble by automatically replacing existing files of the same name on
the destination disk. (The file is first scratched, then written. Save-with-Replace is
not used).
Unlike most utilities, the JiffyDOS file copier uses the standard JiffyDOS interleave
(or the interleave specified by the @G command), which enables you to maximize the
performance of the files that you copy.
Because the JiffyDOS copier does not rely on drive-specific routines, it can also be
used to transfer non-copy-protected programs or files between any two Commodore
or Commodore-compatible disk drives, including those that are not equipped with
JiffyDOS. This makes it easy to move files between 1541, 1571, 1581 and compatible
drives.
The JiffyDOS file copier is compatible with Commodore’s RAMDOS, which makes
it ideal for transferring files to and from RAM Expansion Units.
Files can be copied with JiffyDOS without disturbing programs currently in memory.
The file copier commands can be used within BASIC programs, enabling you to write
your own custom copy routines.
The file copier can be used to change the file type of PRG, SEQ, and USR files.
Re-Saving files
As described in the User’s Manual, using a file copy utility (such as the JiffyDOS file copier)
to re-save files created by the stock DOS is one of the best ways to increase performance
when using 1541 and 1571 disk drives. In fact, with programs or files that already load
17
quickly on a 1571 in 128 mode, re-saving may be the only way to obtain a discernable
speed increase. The following types of files can benefit from being re-saved (copied) using
the JiffyDOS file copier:
Any file written under the stock Commodore DOS.
Any file originally written on a 1541 drive now used on a 1571 drive.
Any file originally written on a 1571 drive now used on a 1541 drive.
File copier commands
The following JiffyDOS commands provide you with the ability to copy files. Although only
four commands are involved, they must be used properly in order to produce the desired
results. Before copying any files, you should understand the function and application of
each command. (For detailed information on each individual command, see the section
covering JiffyDOS commands).
@Xdev# Sets the destination drive for copying.
*”filename” type Copies filename to the destination drive.
CTRL+A Toggles the copy flag on/off for all files in the directory listing.
CTRL+W Toggles the copy flag on/off for a single file in the directory listing.
How to copy files with JiffyDOS
The following procedures describe the steps you will need to follow when copying files
with JiffyDOS. Before using the JiffyDOS file copier for the first time, read through the
procedure carefully. It is also a good idea to experiment with non-valuable disks until you
are sure you can make successful copies.
Copying a single file
If you need to copy one or two files, or you do not want to disturb a BASIC program
currently in memory, use the following procedure:
1. Place the source disk in the drive that you want to copy from. Place the destination
disk in the drive that you want to copy to. Note: No action is necessary at this point
for a source or destination that is an REU.
2. Use the @X command to tell JiffyDOS which drive is the destination drive. For
example, enter @X9 if the destination drive is to be device 9.
18
3. Use the @# or CTRL+D commands to set the default device to the source drive. For
example, enter @#8 if the source drive is to be device 8.
4. List the directory from the source drive. You can enter @$ or press f1. Stop the
listing (press RUN/STOP) when you see the file(s) that you want to copy appear on
the screen.
5. Cursor up to the file that you want to copy. Keep the cursor on the left side of the
screen. Press the asterisk (*) key (the asterisk should appear in the leftmost column
on the same line as the file you want to copy).
6. Press RETURN. The file will be copied from the source drive to the destination drive.
7. Repeat Steps 4-6 for any additional files that you want to copy.
Copying multiple files
If you need to copy more than a few files, use the following procedure:
1. Follow Steps 1-3 above under “Copying a single file”.
2. Load the directory from the source drive by entering /$. Note: This will overwrite
any BASIC program currently in memory. Make sure you load the directory with
the /$ command. Do not use the @$ command.
3. List the directory (type LIST). If the directory listing is longer than one screen, you
can use the JiffyDOS “Listing Freeze” feature to easily locate the desired file(s). Next,
use the CTRL+A and/or CTRL+W commands to select the files that you want to copy
(see below). The asterisk (*) indicates that the file will be copied.
a) Pressing CTRL+A will togle the copy flag on/off for all files in the listing, and
then re-display the entire list.
b) Pressing CRTL+W will toggle the copy flag on/off for a single file. The cursor
must be on the same line as the file that you wish to toggle, and must be to the
far left of the screen. Do not press RETURN when the cursor is on the same line
as one of the filenames. This will result in a corrupted file list, and will require
that you reload the directory from disk.
4. Enter RUN. The file copier will start working. When all files have been copied, the
cursor will return to the screen.
19
Using the file copier commands in BASIC programs
The following two examples illustrate how to use the file copier commands within a BASIC
program.
Example 1:
100 @#8 : REM Set the source drive to device 8
110 @X10 : REM Set the destination to device 10
120 *”JIFFYMON”PRG : REM Copy PRG file "JIFFYMON"
130 *”TAX DATA”SEQ : REM and SEQ file "TAX DATA"
140 END from drive 8 : REM to drive 10
Example 2:
100 INPUT”SOURCE DRIVE”;S Input the source drive
110 INPUT”DESTINATION”;D Input the destination drive
120 @#S : @XD Set the source and destination
140 INPUT”FILENAME”;F$ Input the filename
150 INPUT”TYPE (P/S/R/U)”;T$ Input the filetype
160 IF T$=”P” THEN *F$ PRG If file is PRG, copy it as such
170 IF T$=”S” THEN *F$ SEQ If file is SEQ, copy it as such
180 IF T$=”R” THEN *F$ REL If file is REL, copy it as such
190 IF T$=”U” THEN *F$ USR If file is USR, copy it as such
Changing the filetype of PRG, SEQ and USR files
The JiffyDOS file copier also enables you to change the filetype of PRG, SEQ and USR
files. (Note: You cannot change a PRG, SEQ or USR file into a REL file, and you cannot
change a REL file into any other type of file.) Use the following procedure to change the
filetype of a PRG, SEQ or USR file:
1. Follow Steps 1-4 under “Copying a single file”.
2. Cursor up to the file that you wish to change. Make sure the cursor is on the left-hand
edge of the screen. Press the asterisk (*) key. Do not press RETURN yet.
3. Stay on the same line and cursor over to the filetype (PRG, SEQ, USR). Type the
new filetype that you want over the one displayed on the screen, and press RETURN.
The file will be copied to the destination drive and will be assigned the new filetype.
Changing the filetype can also be done by using the JiffyDOS commands within a BASIC
program. See below:
100 INPUT”SOURCE DRIVE”;S Input the source drive
110 INPUT”DESTINATION”;D Input the destination drive
120 @#S : @XD Set the source and destination
140 INPUT”FILE TO CHANGE”;F$ Input the filename
150 INPUT”NEW TYPE (P/S/U)”;T$ Input the new filetype
20
160 IF T$=”P” THEN *F$ PRG Make it a PRG file
170 IF T$=”S” THEN *F$ SEQ Make it a SEQ file
180 IF T$=”U” THEN *F$ USR Make it a USR file
Additional notes about the JiffyDOS file copier
Whenever you copy files using the method shown above under “Copying multiple
files” make sure that you load the directory by using the /$ command. DO NOT use
the @$ command. The CTRL+A and CTRL+W commands will not work properly if
the directory has been loaded using @$.
JiffyDOS cannot copy non-standard files such as 1581 “CBM” partition files and the
special USR files created by GEOS.
Changing a PRG file to a SEQ or USR file will not remove the first two bytes in the
file (the load address). Likewise, changing a SEQ or USR file to a PRG file will not
add two load address bytes to the beginning of the file.
When JiffyDOS starts to copy a REL file, there may be a significant delay (up
to about 40 sec.) while JifyDOS interrogates the source drive to determine the
record size of the particular REL file. While this operation is being carried out, the
destination drive will sit inactive. Do not assume that this period of inactivity means
the system has “hung up”.
After a REL file is copied, the error light will always be flashing on the source drive.
This does not indicate that an error has occurred during copying.
Setting the Sector Interleave
As mentioned earlier, JiffyDOS enables you to optimize performance with some software
through changing the sector interleave. The @G command is used to ease selection of the
required interleave. For specific information on the @G command, see the section covering
JifyDOS commands.
Understanding sector interleave
Each time the DOS writes a file to disk, it uses a sector interleave value to lay out the
physical distance (number of sectors skipped) between consecutive sectors (blocks) of a file.
After a file is written, its interleave can greatly affect the speed at which the file can be
read. If the space between consecutive sectors (the interleave) is too small, the DOS cannot
read the next block in the file without having to wait for the disk to spin one additional
revolution (one disk revolution takes 0.2 seconds). If the interleave is larger that it has
to be, the DOS also spends unnecessary idle time waiting for the next sector to reach the
read/write head.
21
Drive
1541
1571
Table 3: JiffyDOS and Stock interleave values
JiffyDOS Interleave
Stock Interleave
PRG SEQ, REL, & USR PRG, SEQ, REL, & USR
6
10-12*
10
4
8-10*
6
* Depends upon track zone
Because JiffyDOS can access and transfer data faster than the stock DOS, it uses special
interleave values designed to reduce access delays to a minimum. For PRG files, JiffyDOS
uses an interleave that provides the fastest possible access when the Kernal Load routine is
used. For SEQ, REL and USR files, JiffyDOS uses a compromise interleave value designed
to perform well in most cases. On the other hand, the stock Commodore DOS uses the
same interleave value for all file types. Both JiffyDOS and stock interleave values for 1541
and 1571 drives are listed in table 3.
The standard JiffyDOS interleave values work well in most cases. However, because of
the many different ways that programs load and access data, there are times when using a
different interleave value is the only way to provide maximum performance.
When to adjust the interleave
In general, if your JiffyDOS system is already performing close to its maximum capability
(within a few seconds of the times shown in the performance charts in Section 2), then
changing the interleave will do little to improve performance. However, if you notice that a
particular program seems to load or access data two to three times slower than is possible
with JiffyDOS, then changing the interleave and resaving the program and/or data files
could provide the speed you are looking for.
Files that can benefit from a new interleave
1. Any program (PRG-type) that is not loaded by the Kernal Load routine. Instead of
using the Kernal Load routine, many commercial programs incorporate a loader that
reads in sections of the program byte-by-byte.
2. Any PRG data file not accessed by the Kernal Load routine. Note: most programs
that use PRG data files do not use the Kernal Load routine to access the data in the
PRG file.
3. Any SEQ, REL, or USR file that is read by a slower-than-normal access routine. Unfortunately, many programmers do not take the time to optimize their file-access code
(maybe because the stock Commodore DOS is so slow), or use a compiled language
that is inefficient to begin with (like compiled BASIC). As a result, some commercial programs suffer from lackluster file-access performance, even after JiffyDOS is
installed.
22
Determining the optimum interleave
To determine the optimum interleave for a particular program or data file, follow the
procedure outlined below:
1. First, be sure that you have read the information above so that you understand which
programs and files can benefit from an altered interleave.
2. You will need two disk drives so that the necessary files can be copied from the
original disk to the new disk. The drive you will copy from is the source drive, the
drive you will copy to is the destination drive.
3. Determine a starting interleave value. On 1541 drives, use 6. On 1571 drives, use 4.
4. Make a copy of the original disk. If it is a program disk, the copy should be a nibble
backup, fast copy or parameter copy that is an exact duplicate of the original with
the same sector interleave. If it is a data disk, it should contain the necessary system
files, print drivers, etc. (if any), but no actual data files.
5. Insert the copy of the original disk into the destination drive.
6. Insert the original disk into the source drive.
7. Set the default to the destination drive. Use the @# or CTRL+D commands. For
example, enter @#9 if the destination drive is device #9.
8. Enter the desired interleave value by using the @G command. For example, enter @G5
to set the interleave to 5.
9. Set the default to the source drive. Use the @# or CTRL+D commands. For example,
enter @#8 if the source drive is device #8.
10. Load the directory from the source drive by entering /$. List the directory and then
use the CTRL+A and/or CTRL+W commands to select the program(s) or data file(s)
that will be getting the new interleave (see the section covering the JiffyDOS file
copier for more information on the CTRL+A and CTRL+W commands).
a) IMPORTANT: Make sure you load the directory with the /$ command. Do not
use the @$ command.
11. Tell JiffyDOS which drive is the destination drive by using the @X command. For
example, enter @X9 if the destination drive is device #9.
12. Copy the files from the source drive to the destination drive by entering RUN.
23
13. Test the destination disk to see if the new interleave has helped performance. If
the disk is a program disk, load the program. If it is a data disk, load and run the
program that will access the data, and then load the data file(s). Time the disk
accesses and see if the new interleave has helped. Keep a record of the results.
14. Return to step 5 and increase the interleave value by one. Continue this procedure
until you have tried all interleave values up to and including 16.
15. Compare the timing results you recorded in step 13 to determine the interleave value
that provides the best performance.
16. Re-Copy the program(s) or data file(s) using the optimum interleave value. Follow
Steps 5 through 12.
17. Before continuing, make sure the standard interleave is reinstated on all drives. The
safest way to do this is to completely reset your system (C64 users should power
down, then up; C-128 users can press the reset button).
18. Carefully read the following procedure concerning data files that require an altered
interleave.
Data files which require an altered interleave
Each time you are planning to work with data files that require an altered interleave, follow
the prcedure below:
1. Before loading and running the program that will access or create the data file(s),
set the default to the drive that will contain the data disk. Use the @# or CTRL+D
commands. For example, enter @#9 if the data drive is device #9.
2. Set the interleave to the optimum value for the particular program. For example,
enter @G9 if the optimum value is 9. Remember, do this for 1541 and 1571 drives
only - altering the interleave on 1581 drives will have no effect on performance.
3. If more than one drive will be accessing the data, Repeat Steps 1 and 2 for each of
the additional data drives.
4. Reset the default to the drive that the program will load from. For example, enter
@#8 if the program will be loaded from device #8.
5. Load and run the program that will access the data.
6. Read, write and create data files in the normal fashion from within the program.
7. After you have finished working with the program, make sure that the standard
interleave is reinstated on all drives (refer to Step 17 in the previous procedure).
24
Important points to remember about the interleave
Adjusting the interleave is only effective on 1541 and 1571 drives - it will not increase
performance on the 1581. Adjusting the interleave will also be effective on drives that
are closely compatible with the 1541 and 1571 (for example FSD, Bluechip, Amtech,
Swan, Excel, Enhancer and Cardco drives). Adjusting the interleave with drives that
are not as closely compatible (such as MSD and Indus drives), should be approached
with caution and may in fact disturb the DOS in these drives to the point where
disks and data could be corrupted.
Files that already perform up to the maximum speed provided by JiffyDOS will not
benefit from being re-written using a new interleave value. In fact, performance with
these files will most likely suffer if a different interleave value is used. However, if a
particular program loads or accesses data two to three times slower than is possible
with JiffyDOS (refer to the times shown on pages 5 and 6 of the User’s Manual),
then changing the interleave could provide the increased speed you are looking for.
. The correct interleave for a particular program or file depends upon numerous
factors and must be chosen carefully. In most cases, a trial-and-error approach must
be employed to find the optimum value.
. Adjusting the interleave for a particular program or file cannot make up for grossly
inefficient programming practices. In other words, if the software you are using is
just plain slow, there just isn’t much that can be done to speed up disk access. Even
machine language programs can be written poorly enough to fall into this category.
. Adjusting the interleave may not do much for slow-running languages like BASIC.
A good example is a loop that reads a file one byte at a time using the GET#
statement. Because the BASIC interpreter takes so long to execute each instruction,
far too much time passes between the actual reading of each byte. Compiled BASIC
is better, but not as much as you would expect. While adjusting the interleave may
help speed up file access from within BASIC, it will most likely not provide the
maximum speed that JiffyDOS is capable of.
Some programs utilize custom file access routines that completely bypass the Kernal
ROM. GEOS and Flight Simulator II are two examples. Neither JiffyDOS nor an
altered interleave can help the performance of such programs.
Files saved under JiffyDOS using a standard or altered interleave will most likely
load slower on stock systems.
Be careful if you have both 1541 and 1571 drives. The optimum interleave for a 1571
drive may cause severely decreased performance on a 1541 drive (1571’s can read
data much faster than 1541’s). If you have disks that will be used on both 1541 and
1571 drives, then use the optimum interleave for the slower 1541 drive.
25
If you’re not getting top Performance
When using certain programs, you may feel that JiffyDOS is not increasing performance
as much as it should be. In these cases, the problem is most likely related to the particular
software in use. There are also some considerations to note when using the 1571 drives.
Programs with built-in fast loaders
Some programs utilize their own built-in fast loaders. Some examples are GEOS, the
Mastertracks MIDI sequencer, Fast Hack’Em, and disks created by certain types of “freezer”
cartridges. These programs contain their own DOS which bypasses the disk-access routines
in the Kernal and DOS ROMs. Since JiffyDOS resides in these ROMs, any program which
bypasses the disk-access routines renders JiffyDOS ineffective. As a result, JiffyDOS can
provide little, if any, performance gains with such programs.
In these cases, better performance may be achieved only by altering the software so that
it uses the disk-access routines provided in the Kernal ROM, or to alter the interleave as
outlined previously. Altering the software itself can be a difficult job, even if you have the
programming know-how. Another option is to contact the software manufacturer to see if
any versions of the program exist that do not incorporate the built-in fastloader, or if there
is an easy way to disable it. If you own the Mastertracks MIDI sequencer, contact Creative
Micro Designs to obtain a free conversion utility which disables the built-in fastloader and
enables JiffyDOS to take charge of disk accesses.
BASIC programs
Programs written in BASIC will produce mixed results with JiffyDOS because of the
slowness of the BASIC interpreter. The interpreter spends most of its time figuring out
what each instruction is and what it should do with it - making disk access time insignificant
when compared to this software overhead. As a result, the speed increases you notice when
using JiffyDOS will vary according to the way the BASIC program was written.
JiffyDOS performs best when loading another program from within BASIC (i.e. LOAD”TEST.ML”,8,1).
Because the entire file is accessed by a single instruction (the LOAD command), JiffyDOS
can perform at 100% efficiency. On the other hand, reading a file byte-by-byte by means of
the GET# instruction is the least efficient method of accessing a file. Because of the amount
of software overhead involved in interpreting the GET# instruction and the other instructions in a typical GET loop (and because of the disk-access characteristics of GET#), you
will probably notice no better than a 2Ö speed increase with JiffyDOS. Whenever possible,
use the INPUT# instruction to read files. Input # will perform much better than GET#
- especially if you read in a long string each time INPUT# is executed (the longer the
string, the better the performance).
Compiled BASIC (i.e. programs compiled using Basic-64 or Blitz!) will perform better
with JiffyDOS than uncompiled BASIC (the elimonatoon of interpreter overhead is the
main reason). However, the degree of speed increase will still depend upon how the original
26
program was written. See the above paragraph for a discussion of the GET# and INPUT#
instructions.
Machine-language programs
JiffyDOS performs best when disk accesses are handled by efficient, well-written machinelanguage routines (JiffyDOS performance specifications are based on results obtained using ML routines). However, not all machine-language routines are efficiently written which means that the speed increases you experience using JiffyDOS can vary greatly from
program-to-program.
Fragmented files
“Fragmented” files have their data scattered across a disk in a non-orderly fashion. This
usually occurs on disks that have had a number of files “scratched”, or erased. When a file
is saved to such a disk, the DOS first fills up the empty areas left by the scratched files.
If the file being saved is long, it may be written to many of these randomly-located areas.
When it comes time to read the file, the DOS is forced to search across a wide area of the
disk in order to retrieve all the data, which can add significantly to the amount of time it
takes to read the file.
To eliminate file fragmentation, copy the files from the fragmented disk to an empty
disk. You can transfer the files using the JiffyDOS file copier or a file-copy program. See
“Getting Maximum Performance” earlier in this section for more information.
Sprites
“Sprites” are graphic display items that can be moved around quickly and easily on the
screen. Although sprites are used primarily in games (Pac-Man is a sprite), they are also
found in other types of programs (the GEOS pointer is also a sprite). While it seems
unlikely that a screen graphic could affect disk-access performance, sprites present a real
problem for serial-bus communications routines. Sprites are hardware-generated by the
VIC-II chip, and displaying them requires the VIC-II to “steal” cycles from the 6510/8510
microprocessor. Cycle stealing makes it impossible to use high-speed software timing loops
to transfer data over the serial bus (JiffyDOS uses timing loops). Even the stock Commodore C-64 is prone to hang up when sprites are displayed during serial I/O.
The solution to the problem is to disable sprites (shut them off) whenever serial bus
communications are taking place. This is the approach used by GEOS (you’ll notice the
pointer disappear during disk accesses). Unfortunately, few programs imitate GEOS in
this regard. Because of such programs, JiffyDOS is forced to disable sprites on its own
(Commodore also does this in their 128-mode DOS). When JiffyDOS has to disable sprites
for each byte read or written over the serial bus, data transfer slows down to the turtlelike speed of stock systems (this slowdown also occurs, by the way, with Commodore’s
128-mode DOS).
27
Unfortunately, there is not much you can do if sprites are causing JiffyDOS to slow down
(unless, of course, you have written the offending program yourself and can change it).
1571 drives
If you are using a JiffyDOS-equipped 1571 drive with a C-64, SX-64, or a C-128 in 64 mode,
you will obtain maximum performance only if the 1571 is in 1541 mode. With JiffyDos
installed, your 1571 can access (and format) both sides of a disk in 1541 mode - making it
unnecessary to switch to 1571 mode to benefit from the increased dual-side storage. This
means:
1. You should not use the U0>M1 command to switch into 1571 mode when using a C64, SX-64 or C-128 in 64 mode (this will reduce performance). C-64/SX-64 owners:
Note that the 1571 is automatically in 1541 mode upon power-up.
2. When switching from 128 mode to 64 mode on a C-128, use the reset switch and hold
down the key. Do not use the GO64 command. Using GO64 will leave the 1571 in
1571 mode, resulting in reduced performance in 64 mode.
Note: If you must use the GO64 command, sending the U0>M0 command to the 1571 disk
drive will place it in 1541 mode, ensuring best performance.
If a Program won’t Load or Operate
Although we have made every effort to ensure compatibility with as much software as
possible, you may occasionally run across a program that will not load or operate properly
with JiffyDOS. Loading problems are almost always caused by extravagant copy-protection
schemes that rely on stock head step rates, serial bus timing, and particular ROM versions
(these copy protection schemes are the same ones that cause loading problems on 1571 and
1541C drives). Unfortunately, it would be necessary to reduce the performance of JiffyDOS
in order to provide compatibility with these programs.
Another very rare type of program will load OK under JiffyDOS but will not operate
properly once loaded. This type of problem is caused almost exclusively by bad programming practices (i. e. the indiscriminate use of ROM routines without regard to normal
entry points, jump tables, etc.). This misuse of ROM routines has become so widespread
that Commodore is now very reluctant to change (even fix or improve) their own ROMs for
fear of introducing compatibility problems. Since JiffyDOS relies on carefully selected ROM
changes to enhance performance, undoing any of these alterations to provide compatibility
with just one program would unfortunately reduce performance, features, or both.
What to do if a program won’t load
JiffyDos includes a switch which will return your system to a 100% stock configuration
to ensure compatibility with the few programs that do present problems. Refer to “ROM
28
Switching” earlier in this section for information on how to switch JiffyDOS out in order
to provide compatibility with problem programs.
Using JiffyDOS with RAM Units
The JiffyDOS commands support Commodore’s RAMDOS for the 1700, 1750 and 1764
RAM Expansion Units in both 64 and 128 modes. Please read the following information
carefully before using an REU with JiffyDOS.
Recommended RAMDOS Versions
The following versions of Commodore’s RAMDOS are required for proper operation with
JiffyDOS:
1. 64 mode: RAMDOS V4.2 (or higher)
2. 128 mode: RAMDOS V4.3 (or higher)
Using earlier RAMDOS versions will subject you to the bugs that they contain and to
incompatibilities with certain JiffyDOS commands. If you do not have the correct version
of RAMDOS, it can be obtained from Q-Link, a User’s Group, bulletin board or friend.
Note: All versions of Commodore’s RAMDOS are in the public domain.
JiffyDOS commands that conflict with RAMDOS
The following JiffyDOS commands are incompatible with Commodore’s RAMDOS and
should not be used:
1. @L:filename (Lock a file)
2. |filename (load and run a machine-language program)
Starting up RAMDOS on your JiffyDOS system
To use RAMDOS along with JiffyDOS, do the following:
1. Power up or reset your system with JiffyDOS active (the power-on screen message
will indicate if JiffyDOS is switched in).
2. Start up RAMDOS as you would normally. DO NOT load the DOS Wedge supplied
on your RAMDOS diskette - it will disable the JiffyDOS commands.
3. Use the JiffyDOS commands as you would normally to access the REU. Remember to
avoid the JiffyDOS commands that are not compatible with RAMDOS (see above).
29
The limitations of RAMDOS
Commodore’s RAMDOS relies on software vectors to operate. Since many commercial
programs reset these vectors, they effectively disable RAMDOS and render the REU useless.
Because of the design of RAMDOS and the REU, JiffyDOS cannot overcome this limitation
and provide increased commercial compatibility with RAMDOS. So, although JiffyDOS
will make using your REU easier, it cannot by itself extend the usefulness with commercial
software. Future CMD products are planned which will overcome these problems and make
your REU useable with nearly all software.
Using JiffyDOS Commands with BASIC
Whenever JiffyDOS executes a command, it opens up a 255-byte buffer at the top of
BASIC. If you have a BASIC program in memory that takes up all (or almost all) of
the available BASIC memory, an OUT OF MEMORY error may occur when the buffer is
opened. If this problem occurs with a particular program you are working on or using, you
can do two things to overcome the memory shortage:
1. If you are in direct mode, enter CLR. In most cases, this will free up enough memory
for the buffer.
2. Shorten the offending program, or cut down on its use of arrays and variables.
30
The JiffyDOS Commands
JiffyDos offers the convenience of a complete, built-in implementation of the Commodore
DOS 5.1 Wedge command set. Also included are a set of additional commands that provide
functions that are not accessible on stock systems or through the standard DOS Wedge.
All JiffyDOS commands can be entered in BASIC direct mode and/or used from within
BASIC programs.
Command Descriptions
This section gives a complete description of each JiffyDOS command. The commands are
listed by their function, along with the syntax of each form of the command. Examples
are provided after the command descriptions to illustrate the use of each command in its
basic and optional forms. If no example is given, the only form of the command is as listed
in the syntax line. Here is a brief description:
. . . Indicates a command in which the last parameter given may be repeated. NOTE: The
maximum length of a command string is 41 characters.
{ } Used to enclose information which is optional to the command syntax. The brackets
themselves are not part of the command.
filename Indicates where a filename should be placed in a command. Other names are
used to indicate filenames as well such as oldfile, file1, and backup.
dev# Used to indicate where a device number should be placed in a command. Legal
device numbers are usually 4 or 5 for printers, and 8 through 11 for disk drives.
Direct: Shows the syntax of the command when used in direct mode.
Program: Shows the syntax of the command when used in a program. This syntax may
usually be used in direct mode as well, and in many cases, must be used in order to
take advantage of the default device override feature.
Parameters printed in italics are not literal and should be replaced with the proper information when using the command.
Parameters printed in plain text are literal and must be included in the command.
A drive number may optionally be used with most drive commands. This is useful when
using dual drives such as the MSD-2 or Commodore 4040. To indicate a drive number (0
or 1), place the drive number just prior to the colon (:) in the command string. If using a
command with quotes, place the device number and colon within the quotes.
31
Setting the Default Device
Two commands are available for switching the JiffyDOS default device on multiple-drive
systems: The standard DOS Wedge command :#, and the convenient JiffyDOS CTRL+D
device toggle.
@#
Direct: @#dev#
Program: same
The @# command is used in multiple-drive systems to specify the default disk drive device
number for all JiffyDOS commands. When this command is entered, an attempt is made
to access the drive with the device number specified within the command. If the access
succeeds, the specified drive becomes the new default drive. If the access fails, a DEVICE
NOT PRESENT error will be displayed, and the default device will remain unchanged.
@#9 Sets the default drive device number to 9 (if device 9 is present).
CTRL+D
The CTRL+D command is used on multiple-drive systems to switch the default disk drive
device number for all JiffyDOS commands. Pressing CTRL+D (holding down the CTRL key
and pressing D at the same time) will switch the default device assignment and display the
new device number on the screen. For example, if device 8 is the current default, CTRL+D
will make device 9 (if present) the default, and display a “9” on the screen. If device 9 is
the current default, pressing CTRL+D will make device 8 the default, and display an “8”on
the screen. CTRL+D offers a much more convenient means of changing default devices than
the :# command. The CTRL+D command is only available in direct mode.
Displaying the Directory
Direct: @${:filename}
Program: :”${:filename}”{,dev#}
JiffyDOS provides a quick, convenient way to display disk directories without overwriting
programs stored in your computer’s BASIC memory. JiffyDOS directories can be easily
printed, suspended or ended at any time.
The @$ command displays the disk directory. Typing @$ with no filename displays
the entire directory. @$ followed by a colon and a filename will display the specified file
in the directory listing (if it exists). A selective listing can be displayed by using pattern
matching or wild cards as part of the filename. The directory can be printed by entering the
32
@P command prior to issuing the @$ command, and after the listing has been completed,
output can be restored to the screen by issuing another @P command.
Note: A directory listing produced by the @$ command can be paused or suspended at
any time by using the commands described in the section titled “Listing Freeze”.
@$ Displays the entire directory.
@$:TEST The directory listing will display the file TEST if it exists on disk.
@$:T* All files having a “T” as the first letter in their filename will be displayed in the
directory listing.
@P Lists the directory to a printer.
@$ Output is then restored to the @P screen.
Reading the Disk Drive Error Channel
Direct: @{””,dev#}
Program: same
JiffyDOS makes it easy to find out what has happened when the error light on your disk
drive starts flashing. Instead of having to type in a program (as you must on stock systems),
you can enter a single character to display the error messages output by your disk drive.
The @ command is used to read and display the disk drive error channel. This is useful
in determining what type of error has occurred when the red error light on the disk drive
is flashing (you will also be pleased to find that issuing the @ command will also shut off
the distracting flash of the error light). If @ is typed when the error light is not flashing,
the drive “OK” message will be displayed (00, OK,00,00).
If the @ command is entered when the system (or your disk drive) has just been powered
up or reset, the disk drive’s DOS type and version number will be displayed.
Loading BASIC Programs
JiffyDOS provides two commands for loading BASIC programs.
Load a BASIC program
Direct: /filename
Program: /”filename”{,dev#}
The / command provides a shorthand method of loading a BASIC program. Typing
/filename is identical to entering the BASIC command LOAD”filename”,n (where n
is the default drive device number).
33
Load and RUN a BASIC program
Direct: ↑filename
Program: ↑”filename”{,dev#}
The ↑ command loads and runs a BASIC program. Typing ↑filename is the same as entering
the BASIC commands LOAD”filename”,n (where n is the default drive device number)
and RUN.
Saving BASIC Programs
Direct: ←filename
Program: ←”filename”{,dev#}
The JiffyDOS ← command saves a BASIC program. Typing ←filename is equivalent to
entering the BASIC command SAVE”filename”,n (where n is the default drive device
number).
Loading Machine-Language Programs
JiffyDOS provides two powerful commands for loading machine-language programs.
Load a machine language program
Direct: %filename
Program: %”filename”{,dev#}
The % command loads a machine language file without resetting any BASIC pointers.
Typing %filename is the equivalent of entering the command LOAD”filename”,n,1
(where n is the default drive device number), except that the BASIC program pointers are
not reset as a result of the load. This avoids OUT OF MEMORY errors, and also means
that the BASIC program pointer is not reset to the beginning of the current program. Thus,
this command provides a way to load ML programs from within a BASIC program without
resorting to the usual contortions. For example, use a routine similar to the following to
load a number of machine language modules:
10 %”ML1”:%”ML2”:%”ML3”
Load and execute machine language program
Direct: £filename
Program: £”filename”{,dev#}
34
The £ command loads and then runs a machine-language program. Typing £filename is
a much more convenient alternative to entering LOAD”filename”,n,1 and then doing
a SYS to start the program. At the beginning of a load, the £ command finds the starting
address of the ML file and then begins execution at that addredss when the program
has finished loading. Note: While this command will work properly with most machine
language programs, it will not work with programs that have entry points that differ from
their load addresses.
Loading and Running the First Program on Disk
SHIFT+RUN/STOP
The SHIFT+RUN/STOP key combination can be used to load and run the first program
on disk. Using this command is identical to entering the BASIC commands LOAD”:*”,8,1
and RUN. This provides a quick, convenient way of starting up most commercial software
programs. In 64 mode the
key may be used instead of SHIFT .
Verifying Programs
Direct: ’filename
Program: ’ “filename”{,dev#}
The ’ (apostrophe) command verifies a file in memory against a file on disk. Using this command provides a shorthand method of entering the BASIC command VERIFY”filename”,n,1
(where n is the default drive device number). This command will work with all machine
language files and with all BASIC programs that have been saved under the current BASIC
environment (i. e. a BASIC program saved on the C-64 will verify properly on a C-64 but
not on a C-128 in 128 mode).
Listing BASIC Programs from Disk
Direct: @D:filename
Program: @D”filename”{,dev#}
The @D (DLIST) command enables a BASIC program to be listed to the screen or to a
printer directly from the disk without loading it into memory first. The file listing can
be directed to a printer by issuing the @P command prior to using this command. After
the listing has been completed, output can be restored to the screen by entering the @P
command once again. For legible results, take care to use @D to list only BASIC programs.
Note: A listing produced by the @D command can be paused or suspended at any time
by using the commands described in the section titled “Listing Freeze”.
@D:GAME A listing of the program GAME will be sent from disk to the screen.
35
@P A listing of the program LOTTERY will be @D:LOTTERY output from disk to a printer
(device #4). @P Output is then restored to the screen.
Listing ASCII Files from Disk
Direct: @T:filename
Program: @T”filename”{,dev#}
The most common use of the @T (TYPE) command is to list an ASCII text file (such
as a wordprocessor file) to the screen or to a printer. When using @T, care should be
taken to list ASCII files only - otherwise, the results may be unpredictable (for example,
a BASIC program will display garbage if listed to the screen or to a printer via @T). The
default output device for the @T command is the screen. To list a file to the screen, enter
@T:filename. To print a listing, issue the @P command prior to using the @T command.
When the printout is complete, you can restore output to the screen by entering @P once
more.
Note: A listing produced by the @T command can be paused or suspended at any time
by using the commands described in the section titled “Listing Freeze”.
@T:LETTER Lists the file LETTER to the screen.
@P Lists the file APPOINTMENTS to a printer. @T:APPOINTMENTS Output is restored
to the screen at the @P completion of the command.
“Un-NEWing” a BASIC Program
Direct: @O
The JiffyDOS @O (Old) command can be used to recover a BASIC program that has
been accidently “NEWed”. Entering @O will also recover a BASIC program lost when the
computer is reset. Note that the Un-NEW command is only effective if no new BASIC
lines have been entered since the original program was lost.
Initializing the Disk Drive
Direct: @I
Program: @”I”{,dev#}
The @I (INITIALIZE) command initializes the disk drive. Initialization causes the drive to
read the BAM (block availability map) and ID from a diskette and store this information
in its internal memory. Initialization also clears the error channel and turns off the error
LED on the drive (if it is flashing). At times (i. e. after a DRIVE NOT READY error), it
36
will be necessary to initialize the disk drive before it can be used to perform any further
operations. Remember that the @I command clears the error status of the drive, so if you
wish to read the drive error channel after an error has occurred (see the @ command), do
so before using this command. Note that it is a good idea to initialize the disk drive every
time you insert a diskette into the drive.
Resetting the Disk Drive
Direct: @UJ
Program: @”UJ”{,dev#}
The @UJ command is used to reset the disk drive. Note that @UJ may not work properly
with older 1541 drives. For this command to work with older 1541’s, the alternate syntax
@U: may be required.
Validating Disks
Direct: @V
Program: @”V”{,dev#}
The @V (VALIDATE) command is used to free unused blocks on a diskette. After a diskette
has been in use for a while, more blocks may be free than the BAM and directory indicate.
Primarily, this happens when unclosed files have been scratched. Using the @V command
will free space on a diskette available for use. Note that this command may take some
time to complete, depending on the amount and size of the files located on the particular
diskette.
Formatting Disks
The @N (NEW) command is used to format a diskette. There are three versions of this
command to cover long, short, and extended formatting of the diskette.
Note: Using inferior media can cause errors during formatting. JiffyDOS is less forgiving
in this respect than the stock DOS, but when a formatting error occurs it should indicate
to you that the media may not be reliable.
“Long” NEW
Direct: @N:diskname,ID
Program: @”N:diskname,ID”{,dev#}
37
This version of the @N command is necessary when formatting a diskette for the very first
time. Diskname is any name you wish to assign to the disk and can be up to 16 characters
long (the diskette name appears at the top of directory listings). The ID can be any 2
characters and is written to the directory along with the diskname and also to all header
blocks on the diskette. Remember to include the comma between diskname and ID when
using this form of the command.
“Short” NEW
Direct: @N:diskname
Program: @”N:diskname”{,dev#}
This version of the @N command performs a “short” NEW on a diskette that has already
been formatted. A short NEW clears the directory and BAM of an already-formatted
diskette and is much quicker than completely reformatting.
“Extended” NEW for 1571 from 64 mode
(JiffyDOS-equipped 1571 drives only)
Direct: @N2:diskname,ID
Program: @”N2:diskname,ID”{,dev#}
This version of the @N command is used exclusively to format both sides of 1571 disks when
the 1571 is in 1541 mode (the stock Commodore DOS allows only one side of a diskette
to be formatted in 1541 mode). This command helps take advantage of the double-side
1541-mode operation provided by JiffyDOS. Note that the 1571 is in 1541 mode upon
power-up, and will only switch to 1571 mode if used with a C-128 in 128 mode, or if the
U0>M1 command is issued. The @N2 command is effective only on 1571’s equipped with
JiffyDOS - using this command on other drives will result in a syntax error (no formatting
will take place).
Examples:
@N:NEWDISK,00 Completely formats (NEWs) a diskette and assigns the name“NEWDISK”
and the ID code “00” to the diskette.
@N:BACKUP Performs a short NEW (clears the directory and BAM) and assigns the name
“BACKUP” to the diskette.
@N2:TWOSIDE,01 Formats both sides of a 1571 disk when the 1571 is in 1541 mode.
Assigns the name “TWOSIDE” and the ID code “01” to the diskette.
@”N:NEWDISK,00”,9 Completely formats a diskette in the drive assigned as device number 9 with the name “NEWDISK” and the ID code “00”.
38
Disabling the 1541 “Head Rattle”
Direct: @B (JiffyDOS/64 only)
Program: same (JiffyDOS/64 only)
The @B (BUMP) command can be used to disable the 1541 head rattle (bump) routine
which occurs when certain disk errors are encountered. Entering @B will disable the head
rattle. If you wish to re-enable the head rattle, you may do so by issuing the @UJ command.
This command does not support the default device override function.
Note: To ensure accurate formatting, @B will not disable the head bump at the start of
a disk NEW (format).
Copying files
The JiffyDOS file copier consists of four specialized commands that enable you to make
quick, convenient copies of non-copy-protected programs or data files. See the section on
using the JiffyDOS file copier for step-by-step procedures on how to apply these commands.
Set Destination Device
Direct: @Xdev#
Program: same
The @X command sets the destination drive for copying files. The device number specified
in the command can be that of any disk drive on the serial bus, or the device number of a
RAM expansion unit.
@X10 Set the destination drive to device 10.
Copy file from source to destination
Direct: *”filename”filetype
Program: same
The * (asterisk) command copies a file to the destination drive specified in the @X commands (see above). The filetype specified by this command can be PRG, SEQ, REL, or
USR.
*”TEST”PRG Copies the PRG file “TEST” to the destination drive specified in the last
@X command that was issued.
39
CTRL+A
The CTRL+A command toggles the copy flag for all files in the directory listing. For this
command to work properly, the directory must first be loaded into memory using the /$
command. When you press CTRL+A, the copy flag for each file in the directory will be
toggled, and then the directory will be re-listed to the screen with the new copy status for
each file displayed. A file marked for copying will have an asterisk (*) next to it in the
directory listing. After you have marked the files that you want to copy, the actual process
of copying the files is started by entering the BASIC RUN command.
CTRL+W
The CTRL+W command toggles the copy flag of a single file in the directory listing. For
this command to work properly, the directory must first be loaded into memory using the
/$ command. To select the file that you wish to toggle, move the cursor to that file in
the directory listing and press CTRL+W. The cursor must be kept to the leftmost edge of
the screen. A file marked for copying will have an asterisk (*) next to it in the directory
listing. If the directory listing is longer than one screen, you can use the JiffyDOS “Listing
Freeze” feature to easily locate the desired file(s). You can redisplay the entire directory
listing at any time by entering the BASIC LIST command. After you have marked the
files that you want to copy, the actual process of copying the files is started by entering
the BASIC RUN command.
Changing the Sector Interleave
JiffyDOS provides a means for adjusting the interleave (intersector gap) for files it writes.
Adjusting the sector interleave can provide faster program loading and file-access performance in instances where the standard JiffyDOS interleave values are not appropriate.
Adjusting the interleave can be one of the best ways to improve performance when a 1571
disk drive is used on a C-128 in 128 mode. See the section on adjusting the sector interleave
under “Getting Maximum Performance” for step-by-step procedures on how to apply this
command.
Gapsize
Direct: @Ggapsize
Program: same
The @G command changes the sector interleave (intersector gap) of the current JiffyDOS
default disk drive to the value specified by gapsize. Valid gapsize values range from 0 to
16. Since no range checking is done by this command, be sure that you do not exceed the
above limits (0-16), or else unpredictable drive operation may result during writes to disk.
If you find that you have entered an illegal value, simply re-enter the command with the
40
correct value. To reinstate the default JiffyDOS interleave, enter a gapsize of 0. Remember,
changing the sector interleave is only effective on 1541, 1571 and compatible drives - do
not try to change the interleave of 1581 or MSD drives. Also, please note that the default
device override feature cannot be used with this command.
@G8 Set the sector interleave of the default device to 8.
@G0 Re-establish the standard JiffyDOS interleave.
Combining Files and Creating Backups
Direct: @C:newfile=oldfile{,file2}...
Program: @”C:newfile=oldfile{,file2}...”{,dev#}
The @C (COPY) command enables you to duplicate a file. @C can also be used to combine
two or more text or data files into a single file. Programs may not be combined in this
manner. Note that @C will duplicate a file under a different name on the same diskette, but
will not copy or combine files from one diskette to another, or from one drive to another.
@C:BACKUP=ORIGINAL Creates a new file named BACKUP which is an exact duplicate
of the file named ORIGINAL.
@C:DATA=BITS,BYTES Creates a file named DATA which is the combination of the files
BITS and BYTES.
Renaming Files
Direct: @R:newname=oldname
Program: @”R:newname=oldname”{,dev#}
The @R (RENAME) command can be used to rename a file on disk. When using the @R
command, remember that the new name for the file is entered first (to the left of the =
sign) and that the existing name of the file is entered second (to the right of the = sign).
@R:REPORT=NOTES Renames the file NOTES as REPORT.
Scratching (Deleting) Files
Direct: @S:file1{,file2}...
Program: @”S:file1{,file2}...”{,dev#}
41
The @S (SCRATCH) command can be used to delete (scratch) a file or a number of files
from a disk. Files can be scratched one at a time (by entering the exact filename) or in
groups, by specifying filenames explicitly or by using pattern matching and/or wild cards.
The error channel may be read at the completion of the @S command by issuing the @
command, but will not otherwise be displayed. If used after scratching, the number of files
scratched will be displayed. For example, the following message indicates that two files
have been scratched:
01, FILES SCRATCHED,02,00
This message indicates that no files have been scratched:
01, FILES SCRATCHED,00,00
Examples of using the @S command:
@S:TEST Scratches the file named TEST
@S:* Scratches all files from a disk.
@S:T* Scratches all files that begin with the letter T.
@S:?T Scratches all files with names two characters long that have a “T” as the second
character.
@S:BITS,BYTES,WORDS Scratches the files BITS, BYTES and WORDS
Locking and Unlocking Files
Direct: @L:filename
Program: @”L:filename”{,dev#}
The @L (LOCK) command locks and unlocks files. Once a file has been locked, it cannot
be accidently scratched and is marked with a “<” at the end of its directory entry (i. e. 32
“TESTFILE” PRG<). The @L command works as a toggle - that is, if @L is used on an
unlocked file, the file will be locked. If @L is used on an already locked file, the file will be
unlocked.
Note: The LOCK command (@L) will not work with 1581 or MSD disk drives which are
not equipped with JiffyDOS.
@L:TESTPROGRAM Locks the file TESTPROGRAM (if TESTPROGRAM is not currently
locked).
@L:TESTPROGRAM Unlocks the file TESTPROGRAM (if TESTPROGRAM is currently
locked).
42
Directing Output to a Printer
Direct: @P{,dev#}{,secondary address}
Program: same
The @P (Printer output toggle) command makes it easy to send BASIC program listings,
directory listings, or output from the JiffyDOS @D and @T commands to a printer. Entering
@P before issuing a command that normally produces a listing to the screen will result in
the screen output being redirected to your printer (the default is device #4, secondary
address=0). If you wish to specify a different printer device number and/or secondary
address, include the device number and secondary address in the @P command as shown
in the examples below. To restore output to the screen after using the @P command,
simply enter @P again. Normally, the secondary address of 0 is used for uppercase/graphics
printing, and a secondary address of 7 is used for uppercase/lowercase printing.
@P Send screen output to printer (device #4, secondary address 0)
@P,5 Send screen output to printer (device #5, secondary address 0)
@P,5,7 Send screen output to printer (device #5, secondary address 7)
@P Restore output to screen (assuming @P has already been used to redirect screen output
to a printer).
Printing the Screen
CTRL+P
The CTRL+P (PRINT SCREEN) command outputs the current text screen to a printer.
Pressing CTRL+P (holding down the CTRL key and then pressing “P”) will cause the text
displayed on the screen to be sent to a printer. This function automatically detects the
current screen mode in order to print from the proper character set. The printer must be
configured as device 4.
Disabling the JiffyDOS Function Keys
Direct: @F
Program: same
The @F (FUNCTION KEY) command is used to disable the JiffyDOS function key definitions. Typing @F with the function keys enabled (as they are upon power-up) will disable
them. In 128 mode this will cause the standard 128 function key definition to be activated.
The JiffyDOS function key definitions are active only in BASIC direct mode and are disabled when programs are run in order to avoid conflict with any program-defined function
key assignments.
43
Re-Enabling the JiffyDOS Function Keys
SYS 58551 (JiffyDOS/64)
SYS 65137 (JiffyDOS/128)
The SYS commands are used to re-enable the JiffyDOS function key assignments. This
can be necessary if the commands have been previously disabled via the @F command, or
after a program has been run.
SYS 58551 Will restore the JiffyDOS/64 function keys and commands on a C-64, SX-64
or C-128 in 64 mode.
SYS 65137 Will restore the JiffyDOS/128 function keys on a C-128 in 128 mode.
Disabling the JiffyDOS Commands
Direct: @Q
Program: same
The @Q (QUIT) command disables all JiffyDOS commands and function key definitions
and reinstates all stock BASIC vectors. The disk drive fast-access routines are not disabled,
however, and will continue to operate at full speed.
Re-Enabling the JiffyDOS Commands
SYS 58451 (JiffyDOS/64)
SYS 65137 (JiffyDOS/128)
These SYS commands are used to re-enable the JiffyDOS commands. This can be necessary
if the commands have been previously disabled via the @Q command, if the JiffyDOS Kernal
has been switched in while the computer power is ON, or if an applications program has
altered the BASIC tokenization or execution vectors. In any of these cases, the JiffyDOS
commands will not be available.
SYS 58451 Restores the use of all JiffyDOS/64 commands on a C-64, SX-64, or C-128 in
64 mode. This will not restore the JiffyDOS function key definitions.
SYS 65137 Restores the use of all JiffyDOS/128 commands on a C-128 in 128 mode.
44
Special Command Features
Using the Commands in Direct and Program Modes
All JiffyDOS commands may be used in BASIC direct mode and/or from within BASIC
programs. When using the commands within programs, many of the command/filename
strings must be enclosed in quotes. For example, @S:FILENAME is acceptible in direct
mode only, while @”S:FILENAME” is the required form for program mode. The following
are examples of using commands in program mode. Be sure to check the command syntax
given in the previous reference section if you are uncertain how to use a command in
program mode.
Examples of program-mode command syntax:
10 @”$:*” Display the directory
20 @”S0:filename” Scratch a file
30 @#9 Set the default device to 9
40 @”D:filename” List a BASIC program from disk
50 @”I:” Initialize the default drive
Drive Specification
All commands which perform a disk operation may specify a drive number (0 or 1) within
the syntax of the command. This is useful if a dual-drive unit (i. e. MSD-2 or Commodore
4040) is sharing the serial bus with a JiffyDOS system. To specify the drive number, insert
the 0 or 1 in front of the colon in each command.
Examples:
@$1:* List the directory from drive 1
@S0:filename Scratch a file from drive 0
When addressing 1541 and compatible drives, the 0 or 1 is not required, but a 0 may be
used if desired.
45
Enhancements to the DOS Wedge
JiffyDOS offers these three major enhancements to the standard DOS Wedge command
format.
Command Chaining
In program mode, the JiffyDOS commands may be chained with BASIC commands or
other JiffyDOS commands within the same program line.
Examples:
10 @#9:@”S:TEST”:@#8 Switch default to device 9, scratch a file, and then switch
the default back to device 8.
20 @”$:*”
:PRINT:@ Display the directory, print a blank line, and display the error channel.
Note: Chaining is also possible to some degree in direct mode, as long as programmode syntax is used, and no standard BASIC commands are intermixed with JiffyDOS
commands.
String Variables
With JiffyDOS, string variables may be used as part of the standard DOS Wedge and JiffyDOS commands. This makes it possible to input disk command strings from the keyboard
into a string variable, and then use that variable within a command sent to the disk drive.
This makes it easy to design short, memory-efficient, interactive disk “housekeeping” programs with JiffyDOS - something which is not possible with the Commodore DOS Wedge,
which forces filenames to be hard-coded into your program.
Example program using string variables:
10 REM SCRATCH A FILE
20 @”$” Display the directory
30 INPUT”FILENAME”;N$ Get filename
40 @”I:” Initialize the disk drive
50 @”S:”+N$ Scratch the file
60 END
Default Device Override
In JiffyDOS, the current default device may be overridden by specifying a device number at the end of each command. There are two requirements for doing this: First, the
command/filename string must be in quotes (as in program mode); and second, the device number must be preceded by a comma. Using the default override is convenient in
multiple-drive systems where it eliminates the bother of having to switch the default device
assignment back and forth (using the @# or CTRL+D commands) each time a command
46
is sent to the secondary drive. The default drive override can be used in both direct and
program modes.
Examples:
@”S0:filename”,9 Scratch a file on device 9
@”$:*”,9 Display directory of device 9
@””,10 Display device 10 error channel
The device number may also be assigned to a variable as in:
10 A=9 A=device number
20 @”$” A Directory of device 9
47
Addendum
The Super Graphics Gold Printer Interface
The Xetec Super Graphics Gold (SGG) printer interface introduces a few quirks into the
system when using certain hardware and software. For instance, when using the JiffyDOS
device toggle (CTRL+D) with an SGG interface attached, you will see device number 14
show up. This is because the SGG responds to that device number for burst commands.
Do not attempt to send JiffyDOS commands to the SGG via device number 14 or a serial
bus lockup will occur. This interface can also cause serial communication problems when
using a 1571 equipped with JiffyDOS, and serial bus lockups seem to occur much more
frequently. We recommend sending the following commands immediately after turning on
your equipment when using the SGG interface on a JiffyDOS and 1571 equipped system:
OPEN 15,4,15:PRINT#1,”SL”:CLOSE15
These commands should also be sent after pressing the RESET and CLEAR buttons on
the SGG at the same time.
Using 1581 Partitions (subdirectories)
You may use the JiffyDOS wedge to move between partitions (often called subdirectories)
on the 1581 disk drive. The partition you wish to move to must be visible in the current
directory on your 1581, or else you will have to move back to the root directory. Here is
the JiffyDOS syntax for moving to a 1581 partition:
Direct: @/0:name
Program: @”/0:name”{,dev#}
In order to move back to the root directory use the same command without a drive number
and name:
Direct: @/
Program: @”/”{,dev#}
Also note that if you wish to use the JiffyDOS file copier to copy files to or from a 1581
partition, you must use the above commands to change to the proper partition first. For
more information on how to create and use 1581 partitions, see chapter 6 of the Commodore
1581 Users Guide.
Command Summary
Standard DOS 5.1 Wedge Commands
@ Read the disk drive error channel
48
@C:newfile=file Copy a file on the same diskette
@I Initialize the disk drive
@N:diskname,ID Format (NEW) a diskette
@N:diskname Short NEW
@Q Disable the JiffyDOS commands
@R:newname=oldname Rename a file
@S:file1{,file2}... Scratch a file (or files)
@UJ Reset the disk drive
@V Validate a disk
@$ Display the disk directory
@#device Set the default device number
/filename Load a BASIC program
~filename Load and run a BASIC program
%filename Load an ML program
←filename Save a BASIC program
Additional JiffyDOS Commands
@B Disable the 1541 head rattle
@D:filename List a BASIC program from disk
@F Disable the function keys
@G Set interleave gapsize
@L:filename Lock/Unlock a file
@O Un-NEW a BASIC program
@P Toggle printer output
@T:filename List an ASCII file from disk
@X Set Destination device number
49
*”filename”type Copy a file
|filename Load and run an ML file
’filename Verify a file
CTRL+A Toggle all files for copy
CTRL+D Default drive toggle
CTRL+P Screen dump
CTRL+W Toggle single file for copy
SHIFT+RUN/STOP Load & run first program on disk
SYS 58451 Re-enable the JiffyDOS commands (64 mode)
SYS 58551 Re-enable the JiffyDOS function keys and commands (64 mode)
SYS 65137 Re-enable the JiffyDOS commands (128 mode)
50
Compatibility Guarantee
JiffyDOS is guaranteed by Creative Micro Designs, Inc. to be compatible with all commercial hardware and software designed for use with Commodore C-64 and C-128 computers.
This guarantee applies for a period of 30 days from the date of purchase. If, during the
term of this guarantee, the Buyer determines that a compatibility problem exists, a full
refund will be issued, providing that the Buyer:
1. Purchased the unit directly from Creative Micro Designs, Inc.
2. Returns the unit postage pre-paid, undamaged, with all manuals and any other materials included, to Creative Micro Designs, Inc.
3. Submits a written letter of explanation advising the nature of the compatibility problem(s), how they were encountered, the name of the incompatible hardware/software,
the manufacturers name and the version number, if any.
Creative Micro Designs, Inc. shall not be responsible for any incidental or consequential
damages of any kind or nature whatsoever, including lost economic opportunity or the loss
of any data or information which may have resulted from the installation or use of the
JiffyDOS system.
Warranty
Creative Micro Designs, Inc. warrents the JiffyDOS system against manufacturing defects
for a period of 90 days from the date of purchase. During this period, the Buyer may return,
postage prepaid, the JiffyDOS system to Creative Micro Designs, Inc. for replacement or
repair.
Creative Micro Designs, Inc., reserves the right to deny replacement or repair of any
JiffyDOS system which has been damaged due to abuse or improper installation.
Creative Micro Designs, Inc. shall not be responsible for any incidental or consequential
damages of any kind or nature whatsoever, including lost economic opportunity or the loss
of any data or information which may have resulted from the installation or use of the
JiffyDOS system.
Creative Micro Designs, Inc. shall supply the JiffyDOS system configured to the latest
manufacturing version available at the time of order and shall have no obligation to enhance,
revise or update previously sold systems in the event that improved or revised versions are
offered for sale at some future date.
51