1
Steel Fury: Kharkov 1942
User's manual
2
CONTENT
LIST OF USED REDUCTIONS…………………
..................3
1 SYSTEM REQUIREMENTS…………………………………… ................4
2 GAME INSTALLATION, START AND UNINSTALL...................................5
3 MAIN MENU ………………………………………………....
................6
3.1 Player selection........................................................................................7
3.2 Company........................................................................ ........................8
3.3 Options........................................................................... ....................9
4 CONTROLS………………………………………………………... .........11
4.1 Switching between stations in the tank...............
.............11
4.2 Switching between views in the tank............................................... 11
5 SHORT HISTORY OF EVENTS …………………………………......
......18
6 INGAME REALISM ……………………………………...
......................20
7 INTERFACE………………………………………………………… ..........21
7.1 Mechanic-driver station...............................................
....................21
7.2 Gunner-gunlayer station........................................ ............................23
7.3 Commander station......................................................
.................25
7.4 Targeting mode..............................................................
..............28
8 MAP…………………………………………………………… .................30
8.1 Distance meter and visibility check...............................
32
8.2 Movement on a route....................................................................
...35
8.3 Orders to division..........................................................
..........37
8.4 Tactical signs on a map..................................................
..39
9 SIGHTS USAGE.....
...............41
9.1 Т-34 mod. 1941 sight......................
.41
9.2 MkII «Matilda» III sight..............
..45
9.3 Pz-IV ausf. F2 sight......................................................... ......................46
10 SHELLS USAGE...........................................................
...........48
10.1 Signs of defeat of the armour targets...............................
...50
10.2 Symbols of damages in the statistic.......................
.50
11 INSTRUCTION TO THE TANKMAN!........................................................51
12 FAQ.................................................
........53
13 UNCERTAINTIES IN GAME.............................................................. .........54
3
LIST OF USED REDUCTIONS
A
- army (38А - 38-th army)
AK - army corps
венг. - Hungarian
г.
- city / year
гв. - Guards (RKKA)
гпд - mountain rifle infantry division (Wehrmacht)
ит. - Italian
кк - cavalry corps (RKKA)
кд - cavalry division (RKKA)
лпд - light infantry division (Wehrmacht)
мд - motorized division
мсбр - motorized infantry brigade
отбн - detached tank battalion
п.
- settlement
пд - infantry division (Wehrmacht)
пп - infantry regiment (Wehrmacht)
ПТ - anti-tank
ПТР - anti-tank rifle
ПТО - anti-tank gun
р.
- river
рум. - Romanian
с.
- village
свх. - sovkhoz
сд - rifle division (RKKA)
сп - rifle regiment (RKKA)
тбн - tank battalion
тбр - tank brigade
тд - tank division
тк - tank corps
4
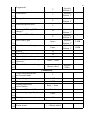
1 SYSTEM REQUIREMENTS
Minimum
AMD Athlon 2500+
Intel Pentium IV 2GHz
Processor
512 Mb
RAM
Video card
ATI Radeon 9500 128 Mb
nVidia GeForce 6600 128 Mb
Sound card
DirectX 8 compatible
Operating system
Windows XP SP2
Recommended
Processor
RAM
AMD Athlon 64 X2 4200+
Intel Pentium D 3GHz
1,5 Gb
Video card
ATI Radeon X1600 256 Mb
nVidia GeForce 7600 256 Mb
Sound card
DirectX 8 compatible
Operating system
Windows XP SP2
ATTENTION!
- Game is not started on video cards series nVidia GeForce FX..
- Game installation works only if the user has rights of the administrator.
- Mission editor and tools works only if the user has rights of the administrator.
- Game demands support of instructions SSE by the processor.
-Game can incorrectly work, if the processor or a video card are "overclocked".
5
2 GAME INSTALLATION, START AND UNINSTALL
For game installation insert a disk “Steel Fury: Kharkov 1942” in your CD/DVD
drive. The setup programm will appear automatically if it has not occurred, start the
program setup.exe in the root of CD/DVD. The setup will offer you all necessary
operations on installation. Follow the instructions of installation appearing on the
screen.
ATTENTION! Installation process can occupy several minutes. It is not
recommended to carry out any other actions on the computer during installation.
For game start click on icon: «Steel Fury Kharkov 1942» on a desktop, or
Start>Programs> «Graviteam»> «STEEL FURY Kharkov 1942»> «STEEL FURY
Kharkov 1942».
For game uninstall click on icon: Start>Programs>«Graviteam»>«STEEL
FURY Kharkov 1942»>Uninstall.
6
3 MAIN MENU
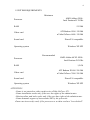
After game start before you there will be a screen of the main menu. In the
right part of the screen a number of buttons is located.
ATTENTION! At prompting of the cursor of the mouse on the button or menu point,
in the bottom part of the screen the description or helps on the allocated element of
the menu is displayed.
Picture 3.1 – Main menu.
user
- Active user.
CONTINUE
- continue earlier started game.
CHANGE PROFILE
- allows to create the new player or to load earlier
created profile of the player.
CAMPAIGNS - allows to begin new game - one of the campaigns, training
or single mission.
OPTIONS
- give access to various game options. For more
information look paragraph "Options" below.
CREDITS - list of authors of game.
EXIT - exit to Windows.
7
3.1 Change profile
For creation of a new profile press button "CREATE", enter the name of a new
profile and press button "ACCEPT".
For use of an existing profile choose available profile in the field "SELECT
PLAYER" with ypu mouse (2) and press button "ACCEPT".
Picture 3.2 – Change profile.
1) Statistics of the chosen player.
2) Field of selecting of the player.
3) Control buttons of section "Change profile".
4) Place for typing the name of a new profile of the player.
8
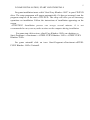
3.2 Campaigns
To start campaign or single mission it is necessary:
- Pass to a bookmark "CAMPAIGN";
- Choose interesting campaign and mission;
- Start mission pressing button "START".
Picture 3.3 – Mission and campaign choice.
1) Field with the list of the accessible campaigns, training missions or battles.
2) Field with the list of accessible battles.
3) In this field the historical inquiry at date of battle is displayed.
4) Control buttons of "Campaign" section:
"START" - allows to begin the chosen battle.
"MAP" - displays a map of operations on the chosen battle.
"BACK" - return to "Main menu".
5) Tank Image on which the player will be at war.
9
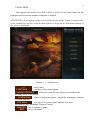
3.3 Options
Options panel allows to choose difficulty level of game, detail and realism level.
Also you can adjust controls and joystick.
Picture 3.4 – Video settings.
1) Control buttons of section "Options".
"DEFAULT" - return game options by default.
"APPLY" - apply the made changes.
"AUTODETECT"- allow game to define automatically options of quality
for the computer of the player.
"BACK" - return to the main menu.
2) Buttons of a choice of sections of game settings.
- Main settings
- Video settings
- Sound and music settings
10
- Difficulty settings
- Realism settings
- Controls settings
- Game settings
11
4 CONTROLS
4.1 Switching between stations in the tank
1) In case to quickly "switch" to the chosen stations keys F1 ... F5 are used. For
fast "switching" the corresponding point of the menu «REALISM SETTINGS»>"Resettlement" should be resolved. Switching from station to station occurs
instantly and probably while the member of crew to which place you wish to be
switched is alive.
Following stations are accessible to resettlement:
- Mechanic-driver [F1];
- Gunner-gunlayer* [F2];
- Commander* [F3];
- Loader [F4];
- Radio operator-machine gunner [F5].
2) In case to physically "change" on other station combinations of keys CTRL+F1 ...
CTRL+F5 are used. Thus "replacing" occupies some time. For example, in case of
death of the mechanic-driver it is possible to "change" on its station and continue
tank movement, or in case loader's death it is necessary to change to its station, for
loading shells to main gun and coupled machine gun.
Following stations are accessible for replacing:
- Mechanic-driver [CTRL+F1];
- Gunner-gunlayer* [CTRL+F2];
- Commander* [CTRL+F3];
- Loader [CTRL+F4];
- Radio operator-machine gunner [CTRL+F5].
* ATTENTION! In tank T-34 the commander of the tank operates as «tank
commander» and "gunner-gunlayer".
4.2 Switching between views in the tank
1) Cockpit and sights.
For switching between views «from a cabin» and «sights» keys [INSERT] or
[DELETE] are used .
In cockpit:
- The review in cockpit is made by the mouse;
- For switching between instrument panels keys [PageUp] and [PageDown] are used;
12
Work with sights:
For switching between sights keys [PageUp] and [PageDown] are used.
Depending on sight type probably:
- Opening armored caps of sights [G] **;
- Control only from the keyboard (survey panoramas) [T/Y];
- Joint use of the keyboard and mice (sights) for gun's targeting and turret turn.
ATTENTION! Some sights are rigidly fixed and manipulations with them are not
provided.
** ATTENTION! Some sights are closed with armored caps and for their using it is
necessary to open caps with key [G]. If cap is closed, the red indicator blinks at the
top of the screen.
2) Tank hatch view.
In game the view from the tank hatch is provided.
To look from the hatch key [P] is used. The Operations procedure:
Open the hatch [H/J];
Look from the hatch [P] if the hatch is closed, it will open automatically by pressing
[P], but after returning to fighting branch of the tank, the hatch is not closed;
The view to be made by the mouse:
- on an axis X for the horizontal review (to the left/to the right)
- on axis Y to look out of the hatch or to hide for the hatch (forward/back).
During the view from the hatch, on commander station probably use of the fieldglass [B].
3) External camera.
For switching view to the external camera key [F9] is used. (The External camera
should be resolved in options menu). Control of the external camera is made with
«Numeric Keyboard» (NUMPAD) Num1... Num9.
Controls options by default are in table 4.1.
13
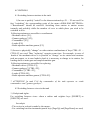
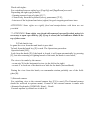
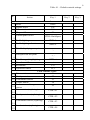
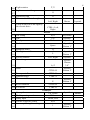
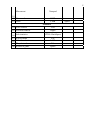
Table 4.1 – Default controls settings.
№
Action
1
2
3
4
Pause
Ingame menu
Time acceleration
Map on/off
Control panel on/off
5
6 Enable lighting
Enable lighting of station
7
Disable displaying nav points
8
Next/previous nav point
9
10 Disable target's highlighting
11 Console on/off
12 Screenshot
13 Open/close hatch
14
15
16
17
18
19
General
Pause
Esc
F11
F8
CTRL+BackSpace
CTRL+L
Shift+L
\
=, -
CTRL+ \
/
F12
H, J
Crew stations /Views
Driver station
F1
Gunlayer station
F2
Commander station
F3
Loader station
F4
Radioman-machine gunner
F5
station
Driver station (replacing)
CTRL+F1
Gunlayer station (replacing)
20
Commander station (replacing)
21
Loader station (replacing)
22
Key 1
CTRL+F2
CTRL+F3
CTRL+F4
Key 2
Key 3
14
Radioman-machine gunner
23 station (replacing)
24 Sight/cabin
25 View from hatch
26 View hatch/cabin
CTRL+F5
Insert
P
Mouse
External camera
F9
27 External camera on/off
External camera zoom in/out
Num7, Num9
28
External camera left/right
Num4, Num6
29
External camera higher/lower
Num8, Num2
30
External camera reset to default
Num5
31
Crew AI controls
Q
32 Driver "Stop!"
Firing mode for AI gunlayer
33
34 Gun to the tank heading
35 Driver "Forward!" (Faster)
36
37
38
0
~
W
Driver "Backward!" (Slowly)
S
Driver "To the left!"
A
Driver "To the right!"
D
Open/close all hatches in tank
Delete
6
39
7
40 Get cover
Move to an active nav point
8
41
9
42 Move along the road
Sights/observation devices/turrets
C
43 Lightning of a sight scale
Switching of sights
PgUp, PgDown
44 forward/back
BackSpace
45 Zoom in field of view
Joy Cap 0
Joy Cap
180
Joy Cap
270
Joy Cap
90
15
46 Sight rotation
Sight connect with a gun
47
48 Open/close cap
Turret to the left-to the right
49
Turret to the left-to the right by
the electric drive
50
51 Gas clamp
52 Gas
53 Slowly
Brake
54
55 Mountain brake
Headlights on/off
56
57 Levers controls
Gear change
58
T, Y
O
G
Left, Right
CTRL+ Left,
Right
Driver
B, N
Up
Down
Space
L
Left, Right
Horn
65
66
67
68
69
Gun up/down
Shell operating mode
Delay input
Choice of type of a shell
Armour-piercing/discarding
Joystick
Joy Slider
Joystick
Joystick
Joystick
‘Button 1"
Q
A, Z
59
60 Battery on/off
61 Ignition on/off
Starter on/off
62
63 Reset odometer
64 AT on/off
Mouse
CTRL+H
CTRL+U
CTRL+I
E
CTRL+K
CTRL+S
Gunlayer
Up, Down
Tab
Home, End
B, N
1
Joystick
‘Button 5"
Joystick
Joystick
‘Button
3/4"
Joystick
‘Button 2"
Joystick
‘Button 6"
Joystick
Joystick
‘Button 5"
Mouse
16
Fragmental
2
70
Cumulative
3
71
Shrapnel
4
72
Practical/special shell
5
73
Command "Charge!"/"Do not
74 charge!"
Command "Short!"
75
Shot from a gun
76
Shot from a machine gun
77
78 Left SC
79 Right SC
80 Input of the lateral amendment
Manual adjustment of range
81 (discrete)
Manual adjustment of range
82
R
E
Space
Enter
Num +, NumMouse wheel
F
LMB
RMB
Num +, Num Num 0
Enter
B
Map
90
Zoom in/out
Joystick
‘Button 3"
Joystick
‘Button 4"
Joystick
‘Button 2"
Joystick
‘Button 1"
Q
W
{, }
Commander
Target designation and
83 movements mode
84 Target designation
85 Movement
Aiming correction
86 closer/further
87 Command "Direct hit!"
Active weapon (gunlayer)
88
89 Field-glass (in a hatch view)
Joystick
‘Button 6"
Joystick
‘Button 7"
Joystick
‘Button 8"
+, -, Mouse wheel
Joystick
Slider
LMB
RMB
17
Movement
91
92 Commands
93 Drift
94 Next vehicle
95 Previous vehicle
96
97
98
99
100
Info/statistics
Exit to menu
Vehicle selection
Player’s tank
Return to game
Numpad
RMB
LMB
Statistics
Left
Right
CTRL+BackSpace
Esc
LMB
Tab
Space
Space
18
5 SHORT HISTORY OF EVENTS
During the offensive operation lead by January, 1942 near Izym, Barvenkovo,
Lozova the Soviet armies seized a salient with depth about 90 km and width 100 km,
which was named - Barvenkovsky or Izymsky "salient". Presence of this salient bore
direct threat to rears and flank of German armies.
By spring 1942 the attention of both combatants was focused on huge
Barvenkovsky salient on which fatal battles for both parties were to take place. There
was only one question - who will strike the first. German offensive (under the name
«Friderikus I») was planned for May, 18th, 1942. Major tasks of this operation were
to cut off Barvenkovsky salient and occupy bridgehead on east bank of the river
Severski Donets, for the subsequent attack to Caucasus and Volga....
But Red Army forces have struck for some days earlier.
Picture 5.1 – Campaign plan.
19
According to the plan (picture 5.1) the main attack from south to Kharkov was
made by 6-th army of general A.M. Gorodnjanskogo from Barvenkosky salient and
from southwest to Krasnograd - the army group of the general L.V. Babkina.
Formation of 28-th army and part of armies of nearest 21-st and 38-th armies attacked
from the north and northwest towards to 6-th army from area of Saltowa to Kharkov.
In 7.30 mornings on May, 12th after hour artillery preparation forces of Red
Army have gone over to the offensive. During from May, 12 till May, 16th, 1942
troops of Red Army could break through German defense on all depth. Depth of
breakthrough reached 65 km. By May, 17th Krasnograd was partly surrounded and
the Soviet armies reached outskirts of Kharkov.
Counterattack of German armies has begun on May, 17th, 1942 from southern
front of Barvenkovsky salient. Thus, the operation "Friderikus I"planned on May,
18th, 1942 has begun per day earlier. Attack was made by troops of a striking force
under command of the general fon Kleist and it has appeared unexpected for Soviet
9-th army. For one day on May, 17th, 1942 breakthrough of German armies has
reached 25 km.
On May, 21st, 1942 begun an attack of 6-th German army under command of
the general fon Paulus from northern front of Barvenkovsky salient. Later, this army,
become well known owing to fights under Stalingrad where it has been completely
surrounded and destroyed.
By May, 22nd, 1942 surrounding of the Soviet armies on Barvenkovsky salient
has been completed. Attempt to deblock the surrounded armies from the outside by
forces of 38-th army defeated. The Soviet formations fighted in encirclement till
May, 29th.
Separate small groups managed to escape to the east coast of Severski Donets only about 35 thousand person from 250 thousand surrounded could fight from
"pocket".
20
6 INGAME REALISM
Game polygons are made on the basis of a real landscape and were
reconstructed according to archival and photographs documentary, and also
photography and video filming of the area.
Great open spaces which have been not limited by impassable mountains,
woods or other barrier are accessible to action to the player. It allows the player to
choose his own ways of movement and battle tactics.
The battles presented by game are based on events of May 1942г., restored on
archival materials, and also memoirs of veterans who took part in those battles.
At calculation of damages in the game the arrangement of the basic units of
techniques being under control of the player or AI is considered. Deducing out of
operation these units can lead to various effects which model features of damage of
this unit, for example: stop of vehicle, jamming of a tower, loosing of tracks of the
tank and others. At the certain degree of damages of vehicles the crew can leave it.
All tanks and the majority kinds of vehicles have the armouring that is means,
that armour has different thickness in different projections of vehicles and it is
necessary for player to consider it during fight.
21
7 INTERFACE
7.1 Mechanic-driver station
Picture 7.1 – Mechanic-driver interface.
1) Indication panel of the player place:
- player place – mechanic-driver [F1]
- view from the hatch [P]
- binocular (on/off) [B]
- protective armored cap (open/close) [G]
2) Indication panel of working modes of AI:
indication of a command of tank’s movement [WASDQ]
- move to shelter [7]
- hatches position (open/close) [6]
- movement on road [9]
22
3) Indication panel: gas [B/N], gear [A/Z], forward/backward, tank’s units
condition.
4) Course indicator.
5) Indication panel of battle arrangements (see. 7.3 Tank commander site).
6) Indicator of target’s highlighting (on/off) [CTRL+| ].
7) Indicator of NAV’s highlighting [ | ].
8) Information console [?].
9) Control point of mission’s objective.
23
7.2 Gunner-gunlayer station
Picture 7.2 – Gunner-gunlayer interface.
1) Indication panel of the player place.
2) Indication panel of working modes of AI.
3) Indication panel of the ginner-gunlayer [F2]
1. shell working mode [TAB]:
- impact
- with delay
and grapeshot
2. specified delay (range in tens meters) [Home/End]
3. shell’s type [B/N]
4. available number of shells of the chosen type
5. total ammo for machine gun (drums/bullets in drum)
24
4) Course indicator.
5) Indication panel: status of shell loading [R].
6) Indication panel of battle arrangements (see 7.3 Tank commander site).
7) Indication panel of targets and highlight of control points (on/off) [CTRL + |,
| ].
25
7.3 Tank commander station
Picture 7.3 – Tank commander interface.
1) Indication panel of the player place – tank commander [F3].
2) Indication panel of working modes of AI.
3) Course indicator.
4) Information console.
5) Indicator of fire mode (gun, machine gun, compound) [Num Enter].
6) Correction of fire (closer/farther/hit).
[Num+, Num-, Num 0]
7) Indication of firing mode at movement of the tank [0]:
green – marching fire
orange –firing from short stop
red – firing from the ground
grey – firing only at targets, specified by the player.
By default there is a "green" mode - shooting in movement, in this case AI
of a gunner-gunlayer and a radio operator-machine gunner prefers to fire
26
basically from the automatic weapon or from small distances, that not always
reasonable. AI is automatically switched to this mode, if command to movement
[W] during a stop for shooting in "red" and "orange" modes is given.
"Orange" mode - firing from short stops, before a shot AI пшму a
command to the driver «Short!». Tank stops, makes a shot, continues movement.
"Red" mode - firing from the ground, AI fires, and stop moving, if sees
(can fire) even at one target.
"Grey" mode - firing only on targets specified by the player, the behaviour
of AI at presence of targets equivalent to a "red" mode. It is possible to specify
targets for firing in a targeting mode [F], marked them with the frame, pressing
the left mouse button.
8) Indicator of target’s highlighting (on/off) [CTRL + | ].
9) Indicator of NAV’s highlighting (on/off) [ | ].
At firing targets chosen by the commander of the tank (see paragraph 7.4) are
priority.
The Commander has an opportunity to correct shooting of gunner-gunlayer,
informing results of a shot from the main gun (button Num + and Num-) - closer or
farther, and also can "fix" direct hit by a command «Hit!» (button Num 0).
The Commander of the tank is the chief of tank's crew and is responsible for the
tank, its arms and crew in every respect.
7.3.1 Tank commander duties
Tank commander in battle is obliged:
а) keep his station in operational readiness, control movement of the tank and
carry out assigned task;
б) continuously recon a battlefield, find targets, recieve reports from crew, in
movement to be applied to area, using shelters to firing and maneuver; at detection of
almost impassable sites of area and mine fields - bypass them;
в) look after the tank of the commander of a platoon, its signals and signs, help
nearest tanks with fire at direct threat from enemies;
г) leave fight only by an order of the senior chief; try to falling back with tank's
reverse movement to the nearest shelter while under enemy fire;
27
7.3.2 Tank driving
Tank's commander can control movement of the tank, giving orders to the
mechanic-driver. For this purpose control keys are used:
[W] - "Forward", "Faster " ("Stop");
[S] - "Slowly", "Backward" ("Stop");
[A] - "Left-hand ", "Left";
[D] - "Right-hand", "Right";
[Q] - "Stop";
[E] - "Short!" (stop) - mechanic-driver will make a short stop and will continue
movement independently right after a shot from the gun or in 8 seconds;
In "hatch view" tank commander can use binocular (button [B]).
Control of movement of divisions is carried out through the control panel in
map mode [F8] (for details see paragraph 8.2 "Movement on a route") or in
«Targeting mode» [F] (for details see paragraph 7.4 "Targeting mode").
28
7.4 Targeting mode
For enable/disable targeting mode use button [F].
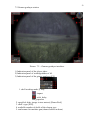
Picture 7.4 – Targeting mode
1) Targeting cursor.
2) Selection zone.
3) Marked target (LMB).
4) Target found out by crew of the tank.
5) Point of tank’s route marks with flag (RMB).
6) Approximate distance from the tank of the player up to a point on area (in
meters).
7) Chance of detection of the target at targeting.
In targeting mode (button [F]) "Left mouse button " (LBM) is used for marking
single and multiply targets; "Right mouse button" (RMB) is used for giving order to
move to marked point in area.
29
For targeting it is necessary to mark out one or several targets, pressing and
holding LMB. During marking in the right and below the cursor the estimated
probability of successful localization of the target on range of 1 km is shown. The
probability of detection of the target decreases with the increasing of distance. In case
of successful targeting, the target or several targets will be highlighted by red dots.
The most important target is allocated with a white rhombus. Next targeting reset all
previous targets.
To give order to move to a point on area in targeting mode - place the cursor of
the mouse at a necessary point on area and press the right mouse button.
30
8 MAP
observe mission’s progress and give orders to subordinates
.
By means of a map, player can examine area on which mission is occurred,
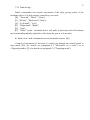
Picture 8.1 – Map.
1) Map's control panel.
2) Orders to division.
3) Compass on/off.
4) Mission objectives show/hide.
5) Attach map to the tank of the player.
6) Distance meter and checking lines of sight.
7) Airstrike indicator.
8) Shelling indicator.
9) Buttons of returning to mission or exiting to main menu.
10) List of mission’s objectives. Sign [>] means that mission in progress, sign [] – mission failed, [+] – mission complete.
11) Panel of map’s position control.
31
12) Mission’s text.
13) Panel of division’s orders.
14) Panel of division’s formations.
15) Panel of transmitting orders method.
Scale of a map 1 : 25 000 (in 1 centimeter - 250 meters). Side of a grid’s cell 250 meters.
32
8.1 Distance meter and visibility check
For measuring of distances on a map the measuring ruler is used.
Picture 8.2 – Distance meter and visibility check.
1) Start button of measurer.
2) Measured distance in meters.
3) Line of measuring.
4) Finishing point.
5) Starting point.
For the beginning of measurements it is necessary to choose a ruler (1), choose
a point on a map concerning which measurement [LMB] will be done, choose a point
of the termination of measurement with the cursor of the mouse.
On the screen there will be a dark blue point - the beginning of measurement, a
line, and number - a distance in meters between the beginning of measurement and a
current cursor position of the mouse. The distance is measured in meters.
33
To fix measurements it is necessary to press left mouse button [LMB] again,
there will be the red point showing the end of the measured piece. To repeat
measurement it is necessary to press once again [LMB].
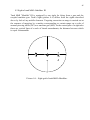
For visibility checking of point B from point A, it is necessary to establish the
beginning of a piece in point A, the end in point B. If the line is painted completely in
light green color - the review from point A to the point B is opened completely. If the
part of a line is painted in red color, it means a site from a place of changing of
colors, up to point B is not looked through from height of human growth (1,7 m).
If the part of a line is painted in dark green color in point B from point A it is
visible objects in height over 0,5 meters. For example: it is visible a tower and the top
part of the tank, but lying soldier or heavy machine gun is not so visible.
If the part of a line is painted in dark blue color in point B from point A it is
visible objects in height over 1,2 meters. For example: it is visible the top part of a
tower of the tank and commander turret, but sitting soldier or AT gun is not so visible
to a down.
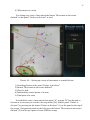
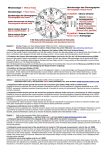
Gagging of visibility are made from height of 1,7 m according to figure 8.3.
A
а)
B
A
б)
B
A
в)
B
A
г)
B
34
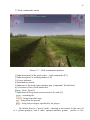
Picture 8.3 – Different types of visibility.
а) Objects are fully visible.
б) Objects with height more than 0,5 m are visible.
в) Objects with height more than 1 m are visible.
г) Objects with height less than 1,7 m. are not visible.
35
8.2 Movement on a route
For setting up a route of movement the button "Movement to the sector
defined" on the panel "Orders to division" is used.
Picture 8.4 – Setting up a route of movement to a tank/division.
1) Switching button of the panel "Orders to division".
2) Button "Movement to the sector defined".
3) Player’s tank.
4) Intermediate control points of a route.
5) Final point of a route.
To establish a route of movement from point "A" to point "B" for the tank or
division it is necessary to switch to the map mode [F8]. Enable panel "Orders to
division" by pressing on the button "Orders to division" (1) on the panel at the top of
the screen. On appeared panel (at the left) press the button "Movement to the sector
defined" (2) and set up a point of route LMB on a map.
36
If it is necessary to set up the route of movement consisting of several points,
(for example the route from point "A" to point "D" through points "B" and "C") is
necessary to press and hold key CTRL on the keyboard then press the button
"Movement to the sector defined" (2) on the panel "Orders to division" and
consistently set up points ("B", "C" and "D") on a map by the left mouse button
(LMB)
37
8.3 Orders to division
Following orders to the division are accessible to the player:
1) «Do like me!»
2) Move to the sector defined
3) Move to shelter
4) Stop
5) Turn in the specified direction
6) Mount up
7) Disembark
Order «Do like me!» cancel the previous order on movement. All the
subordinated units try to execute maneuver and take their position in current
formation. In the further the subordinated unit will try to keep formation concerning
the tank of the player, thus the player can operate the tank independently or by means
of commands of management of movement.
Order «Move to the sector defined» sets up a route of movement to the subordinated
division irrespective of independently of the player.
Movement to shelter is possible at presence of corresponding type of shelter in
nearest area.
To turn in the necessary direction it is necessary for player to specify a point
concerning the tank. All the subordinated units will execute a turn in the same
direction.
If player has transport vehicles in his division it is accessible to manage infantry's
position - outside or inside vehicles. Remember, that infantry divisions carry out
landing from vehicles in case of danger independently.
Player can sets up different types of formation to his division:
1) No formation
2) Form a line
3) Form the column
4) Increase the distance
38
5) Decrease the distance
ATTENTION! Change of formation occurs only for further orders of movement.
There are several ways to pass the word to the subordinated units (you must
disable setting «Always carry out orders »).
1) By radio
2) By flags
3) By flares
4) By voice
5) By flashlight
The most effective is the way of transmitting of orders by radio. However radio
station can be broken, and then the player should choose an alternative method.
Transmitting orders by flags is used in the daytime and allows to control the
subordinates who are in a zone of direct visibility.
Transmitting orders by flashlight is accessible only during dark time of day and
also demands direct visibility of the subordinate.
Voice transmitting of orders allow to control units which are in immediate
proximity from the tank of the player. Flares have property to come to an end.
39
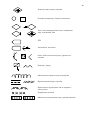
8.4 Tactical signs on a map
Ручной пулемет (ДП, MG-34)
Станковый пулемет (Maxim)
Ручной противотанковый гранатамоет (GzB 39)
Зенитная пулеметная установка
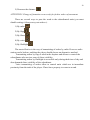
Легкий огнемет (FmW-41)
Противотанковая пушка (общее обозначение),
до 85 мм, до 100 мм
Пушка (общее обозначение), до 100 мм, до 152
мм
Гаубица (общее обозначение), до 122 мм,
до 155 мм
Самоходная гаубица, до 122 мм
Зенитная пушка (общее обозначение), малого
калибра, среднего калибра
РСЗО (общее обозначение), среднего калибра
Миномет (общее обозначение), малого
калибра, среднего калибра, крупного калибра
40
Зенитная самоходная установка
Огневая позиция арт. батареи, минометов
Танк, танк командира батальона, плавающий
танк, огнеметный танк
БТР
Автомобиль, мотоцикл
Окоп, наблюдательный пункт, укрытие для
техники
Блиндаж, эскарп
Малозаметное проволочное заграждение
Противотанковый ров, надолбы
Проволочное заграждение (число штрихов –
число рядов)
Заграждение из ежей
Минное поле противопехотное, противотанковое
41
9 SIGHTS USAGE
9.1 Sights of tank Т-34 mod. 1941.
Tank T-34 mod 1941 is equipped by two sights intended for shooting from a gun and
a machine gun coupled to it. It is telescopic sight TMFD and periscopic sight PT4-7.
Also the tank is equipped by a sight for shooting from a course machine gun.
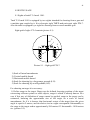
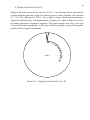
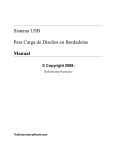
Sight grid of sight PT-4 contain (picture 9.1):
2
1
3
5
4
Picture 9.1 – Sight grid PT4-7.
1) Scale of lateral amendments
2) Vertical mobile thread
3) Horizontal mobile thread
4) Scale for shooting by a long-range grenade (LG).
5) Scale for shooting by an old grenade (OG).
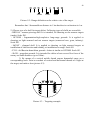
For shooting on target it is necessary:
1) Define range to the target. Range can be defined, knowing position of the target
concerning reference points or other objects, range to which is already known. In a
case if this way of definition of range cannot be applied, range to the target can be
estimated, knowing the approximate size of the target on a scale of lateral
amendments. So if it is known, that horizontal extent of the target from the given
angle is equal to 2 meters, and its relative size in a sight corresponds 4 thousandth, so
the range to the target makes approximately 500 meters if 2 thousandth - 1000 meters
etc. (picture 9.2).
42
1000м
500м
250м
Picture 9.2 - Range definition on the relative size of the target.
Remember that 1 thousandth on distance in 1 km has the size on horizon in 1 m.
2) Choose type of a shell for target defeat. Following types of shells are accessible:
- BR350A - armour-piercing shell. It is intended, for shooting on the armour targets
(tanks). Scale DG.
- OF350M - fragmentation-high-explosive long-range grenade. It is applied to
shooting on light armored and not armour targets (armoured cars, guns, infantry).
Scale DG.
- Sh354Т - shrapnel shell. It is applied to shooting on light armored targets at
installation of shock action and infantry, at installation on range. Scale SG.
- F350 - old Russian demolition grenade. Action is similar to OF350M. Scale SG.
- Sh350 - grapeshot grenade. It is intended for defeat of not covered live force of the
enemy on small distances (up to 200m).
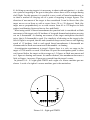
3) By means of a vertical mobile thread expose demanded range on a
corresponding scale. Point a crosshair of vertical and horizontal threads of a sight at
the target, and make a shot (picture 9.3).
Picture 9.3 – Targeting example.
43
4) At firing on moving targets it is necessary to shoot with anticipation, i.e. to take
out a point of targeting of the gun in that place where there will be a target during
shell flight. For this purpose it is possible to use a scale of lateral amendments or
to shoot a method of carrying out of a point of targeting in target figures. The
direction of movement of the target is thus considered. It can be face-to-face (the
target moves on us/from us with a course from -30 to +30 degrees), flank (the
target moves perpendicularly to us with courses from 60 to 120 degrees in both
parties) and slanting (between face-to-face and flank).
When using scales of lateral amendments the practical rule is considered: at flank
movement of the target each 10 km/hour of its speed demand anticipation carrying
out on 4 thousandth. At slanting movement of the target anticipation decreases
twice, that is 2 thousandth is equal. For simplicity of shooting on the target in the
field of fight is accepted, that the tank (armored troop-carrier) moves with fighting
speed of 15 km/hour. And to such speed lateral amendments 6 thousandth are
recommended at flank movement and 4 thousandth - at slanting.
At anticipation appointment in target's figures there is a rule: on range to the
target of 1200 meters on each 10 km/hour of speed the anticipation point is taken
out forward before the target on the average on 1,5 figures at flank movement and
on 1 figure at slanting movement. At smaller distance, the amendment decreases a
little, at bigger - increases. Figures are counted from the target's centre.
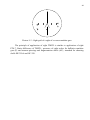
In pictures 9.4 - 9.5 sight grids TMFD and a sight of a course machine gun are
shown. A scale of a sight of a course machine gun is the motionless.
Picture 9.4 – Sight grid TMFD.
44
Picture 9.5 - Sight grid of a sight of a course machine gun.
The principle of application of sight TMFD is similar to application of sight
PT4-7. Basic difference of TMFD - presence of sight scales for ballistics machine
gun (P) and armour-piercing and fragmentation shells (AF), intended for shooting
shells BP-350A and OF-350.
45
9.2 Sight of tank MkII «Matilda» III
Tank MkII "Matilda" III is equipped by one sight for firing from a gun and the
coupled machine gun. Tank's sight (picture 9.6) differs from the sights described
above by lack of any mobile elements. Targeting correction on range is carried out at
the expense of targeting by a marker corresponding to certain range on a scale of
armour-piercing shells (AP) or a machine gun (MG). In the central part of a sight also
there are vertical lines of a scale of lateral amendments, the distance between which
is equal 4 thousandth.
Picture 9.6 – Sight grid of tank MkII «Matilda».
46
9.3 Sights of tank Pz-IV ausf. F2
Sights of the tank consist of two devices, T.Z.F 5 - for shooting from a gun both the
coupled machine gun and a sight for shooting from a course machine gun (pictures
9.7 - 9.8). The sight grid of T.Z.F 5 has a scale of range which turns concerning a
sight axis simultaneously with displacement of squares of a sight. It allows to receive
the better permission on range at targeting. The central squares also carry out a role
of a scale of lateral amendments. So the size of the big triangle is equal 4 thousandth,
and the small, is equal 2 thousandth.
Picture 9.7 - Sight grid of tank Pz-IV ausf. F2.
47
Picture 9.8 - Sight grid of a course machine gun of tank Pz-IV ausf. F2.
48
10 SHELLS USAGE
In fighting following types of shells are accessible to the player: armor-piercing
continuous, armor-piercing discarding, armor-piercing chamber, cumulative (armor
burning), demolition, fragmentation-high-explosive, grapeshot, shrapnel. In training
missions the practical shell also is used.
Tank Т-34 mod. 1941. Following shells can be in ammunition of the tank:
1) BR-350А - armor-piercing chamber shell, contains the small amount of
explosive, at punching of armor blows up inside target, putting additional damages.
May split at punching of armor with thickness more than 70 mm. It is assign for
defeat well armored vehicles, tanks, SPAM. Contains tracer which gives a flame of
green color.
2) OF-350 - fragmentation-high-explosive shell, contains explosive. Can "work"
in two modes - fragmental and explosive. In a mode of explosive action it is possible
to set up delay mechanism. It is assign for defeat of infantry, guns, destruction of
field fortifications and barriers. It can be used against light armored vehicles (an
armored troop-carrier, armored cars).
3) F-350 - old Russian demolition grenade. It is assign for defeat of infantry,
guns, destruction of field fortifications and barriers. Possesses "bad" ballistics in
comparison with OF-350, it is used at lack of shells of other types. For firing this type
of shell use a scale «SG».
4) Sh-354T - shrapnel shell. Contains small dislodging charge and ready hitting
elements. It is assign for defeat of not covered infantry, possesses large damage
effect. It can be used in three modes: shrapnel (remote delay mechanism),
"grapeshot", hitting action. In a mode of hitting action it can be used on armored
vehicles (punches the armor about 40 mm). In "grapeshot" mode - it is used in close
combat against infantry, blasting of dislodging charge and outlet of hitting elements
is carried out right after an outlet from a gun tube.
5) Sh-350 - grapeshot shell. It is assign of defeat of not covered infantry in close
combat, scattering of a sheaf of hitting elements is carried out directly after an outlet
from a gun tube.
Tank Mk II «Matilda» III. Following shells can be in ammunition of the tank:
1) Mk-I - an armor-piercing continuous shell without tracer. The basic type of
ammunition. It is assign for defeat armor vehicles, does not contain explosive. It is
inefficient against light armored vehicles, frequently punches through it, not putting
damages. Because of small caliber (42 mm) does not possess sufficient underarmor
action.
2) Mk-II - an armor-piercing continuous shell with tracer. Additional type of
ammunition. It is assign for defeat armor vehicles, does not contain explosive. It is
49
inefficient against light armored vehicles, frequently punches through it, not putting
damages. Because of small caliber (42 mm) does not possess sufficient underarmor
action..
3) P.F.H. Mk-IT – practical shell, with tracer. Additional type of ammunition. It
is assign for training, puts insignificant damages for vehicles. Possesses ballistics
similar to shell Mk-I.
Tank Pz-IV ausf. F2. Following shells can be in ammunition of the tank:
1) PzGr-39 – pointed armor-piercing chamber shell, contains a small amount of
explosive, at punching of armor blows up inside target, putting additional damages. It
is assign for defeat well armored vehicles, tanks, SPAM. Contains tracer which gives a
flame of red color. The basic type of an armor-piercing shell.
2) PzGr-40 – armor-piercing discarding shell, does not contain some explosive.
Punches the armor due to kinetic energy, has high initial speed. It is used against
heavy tanks on distances up to 500 meters. On distances more than 500 meters speed
of this shell quickly falls, that leads to significant decrease in armor-piercing action.
3) Gr. 38 HL/B – cumulative shell. For punching the armor uses the directed
explosion. Contains explosive. The size of punching armor strongly depends on a
corner between a normal to a surface of the armor in a punching point and a direction
of trajectory of a shell. It is used against various armor vehicles. Punching ability of
that shell remains practically constant on all extent of a trajectory of flight.
4) SprGr-34 – fragmentation-high-explosive shell, contains explosive. Can
"work" in two modes - fragmental and explosive. In a mode of explosive action it is
possible to set up delay mechanism. It is assign for defeat of infantry, guns,
destruction of field fortifications and barriers. It can be used against light armored
vehicles (an armored troop-carrier, armored cars).
50
10.1 Signs of defeat of the armour targets
At direct hit of a shell to the vehicle there can be typical signst indicating of its
damage, or inactivation.
1) visible damages of the target after hit (holes, breaches);
2) loss of a track;
3) a long stop of a moved vehicles;
4) ceasing fire from the main and additional armaments;
5) inflammation of the target (fire, smoke);
6) leaving vehicle crew.
10.2 Symbols of damages in the statistic
In statistics mode near a hit's vector of a shell the code of damages received by
vehicles from a corresponding shell is shown after finishing of the battle. List of
codes and their interpretation give in table 10.1.
Table 10.1 – Codes of damage and their interpretation.
code
Ф
П
вд
ст
км
зр
пл
Г
Д
Б
К
Р
Т
МП
МБ
О
АК
interpretation
Lights (projectors, headlights, dimensions)
Sights, periscopes
Driver is incapacitated (contused, badly wounded or killed)
Gunlayer is incapacitated (contused, badly wounded or killed)
Commander is incapacitated (contused, badly wounded or killed)
Loader is incapacitated (contused, badly wounded or killed)
Machine gunner is incapacitated (contused, badly wounded or killed)
Track damaged
Engine broken or damaged
Ammunition damaged
Transmission damaged
Radio damaged
Fuel tank is punched
Gun malfunction
Turret turning mechanism damaged or jammed
Armament damaged
Accumulator damaged
51
11 INSTRUCTION TO THE TANKMAN!
1) During fight try to orientate the tank against to the enemy with its strongest part - a
front part of the tank.
2) When approaching to the target try to use folds of the ground, shelter and a
mask (a fine bush, etc.). Aspire to borrow the most favorable position against enemy.
In offensive try to outflank the enemy.
3) At carrying out orders put to division watch over battlefield, find targets and
destroy them. Open fire on enemy's tanks independently, try to dispose your tank in
such way, that you can fire to the most weak spots. Most weak spots of tanks are:
weapon, onboard and fodder armor, sighting-slit, openings for sights and chassis.
4) When you detect tanks of the enemy - fire on the nearest tank with armorpiercing shells and if they are not present, fragmental, established on explosive
action; simultaneously specify the target to other tanks.
5) On distances to target over 600 m fire from the ground. On plane surface
under enemy fire shoot from a gun only from "Short" stop and from machine guns in
movement.
6) At distances up to 400 m aim on the most visible vertical surface of the tank.
At distances over 400 m aim in the middle of a frontal or fodder part of the tank. The
distance of the most valid fire on tanks - 600-800 m and closer.
7) Make aim fire on the nearest tank with the maximal rate of fire. Transfer fire
on other targets only after destroying the first target. Watch over results of fire and
correct fire carrying out of a point of an aiming..
8) Being in defense - choose a gun position with good circular bombardment
that ahead, on a distance 400 m there are less, there were no not raked spaces.
Carefully watch over a battlefield. Remember! - the crew of the tank which earlier
has found out the enemy, has advantages in its destruction.
9) At attack of a first line of the enemy defence open fire with fragmentation
shells, and also from machine guns on found AT guns. Thus you forced to drop flat
guncrew and temporarily stop fire (fire on suppression).
10) During attack keep up radio contact with the infantry, do not give the enemy
cut off infantry from the tank. Do not admit enemies infantry close to the tank as thay
52
can use anti-tank granates and other weapons against the tank. Remember - your
infantry will protect you from a direct attack of grenade launcher on your tank, fires
on guncrew of AT guns, and also will specify with tracer bullets the most dangerous
targets and will help to destroy them.
The tankman! Bring down furious gun and machine-gun fire upon enemy. Wipe off
with fire, kill with tracks alive force and techniques of the enemy!
53
12 FAQ
Q: Why the screen is all black?
A: In some tanks sights are closed with armored caps. Open cap using button G.
Q: Why a machine gun and a gun shoot "aside"?
A: Some sights allow carrying out the circular review [T/Y], i.e. rotating in a
horizontal plane irrespective of a gun. Set up a sight in position with button O by
default.
Q: Why in training mission №2 (shooting training), I cannot put out of action the
German tank?
A: In training mission you use a practical shell which is intended basically for
"indication" of a trajectory and a point of hit. It can’t inflict serious damages. For
completion of mission it is enough to hit each target 1 time.
Q: In missions on tank MkII "Matilda" III, it is very difficult to destroy German
armored troop-carriers. May be their armoring is strongly overestimated?!?
A: It's all right with armor :). In tank's MkII ammunition load was only one type of
shell - continuous armor-piercing of two mods. - with tracer and without it. Such
shell has no explosive charge, and frequently punches light armored targets through,
or according to small caliber do not give sufficient quantities of secondary splinters
when punching out armor thinner than 30 mm, for crippling. For crippling an
armored troop-carrier shoot at engine section (a forward part an armored troopcarrier) or at chassis.
54
13 UNCERTAINTIES IN GAME
1) Machine gun in T-34 represents machine gun DTM, and sight scale at the radio
operator-machine gunner station corresponds to machine gun DTM. Actually, here
there should be machine gun DT with no sight scale.
2) Some missions take place on «not original» polygons, i.e. area is not absolutely
precisely reproduced used the most similar range from another mission.
3) In game, procedure of starting engine is simulated for the carburetor engine, since
tank T-34 has the diesel engine, this procedure is not correct.
4) Mortars in game have no correct minimum range of firing.