1
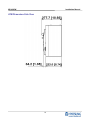
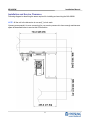
MX-4000W
Installation Manual
Copyrightⓒ 2011 Nautilus Hyosung Inc. All right reserved
MX-4000W
Installation Manual
Revision Record
DATE
PAGE
VERSION
December, 2011
All
1.0
DESCRIPTION OF CHANGE
New Publication
2
MX-4000W
Installation Manual
Table of Contents
Introduction
························································································································ 4
Warning Signs························································································································· 5
Common Precautions for Safety
······································································································ 5
Description of Precaution Symbols ····································································································· 6
Installation Information ·········································································································· 8
Installation Condition and Space
······································································································ 8
Environmental Specification (Temperature & Humidity) ······································································ 8
Power Requirements
······················································································································· 8
ATM Dimension - Front View
··········································································································· 9
ATM Dimension - Plan View
············································································································ 9
ATM Dimension - Side View
·········································································································· 10
Installation and Service Clearance
Packing Dimensions
·································································································11
······················································································································ 12
System Installation ··············································································································· 13
Unpacking ········································································································································· 13
Physical Installation – Wall Mounting ······························································································ 14
3
MX-4000W
Installation Manual
Introduction
The MX-4000W is a wall-mounted ATM and designed to meet the everyday demands of immediate
cash needs for individuals with a compact size to fit in virtually any place. This Automated Teller
Machine (ATM) is connected to a network processor to verify accounts and any other inquires
through the insertion of a customer’s card. The MX-4000W is easy to use, easy to service and is
able to support customer’s needs.
This manual is designed to provide installation guide for the MX-4000W ATM and provide detailed
description of the following:
● Information for installation
● Environmental Specification
● Power Specification
All information described in this manual is a licensed product of Nautilus Hyosung Corporation.
It is the policy of Nautilus Hyosung Corporation to improve products as new technology, components,
software, and firmware become available. Therefore Nautilus Hyosung reserves the right to change
specifications without notice.
4
MX-4000W
Installation Manual
Warning Signs
Common Precaution for Safety
Precautions outlined this manual provide information on safe and
proper handling of the product. Non-compliance of the precautions
may result in injury or damage to the product.
This precaution symbol with sample term tells you safety warnings
during equipment handlings.
Please read the following instructions before operating equipment.
1. Operate equipment in the order outlined in this manual.
2. Follow precautions indicated in this manual, as well as the equipment itself.
Failure to properly address these precautions may lead to injury or damage to the product.
3. Avoid operations not addressed in this manual.
4. If you cannot remedy system problems using the methods outlined in this manual,
please refer to contact information listed in the manual.
5. Any change or modifications in construction of this device which are not expressly approved
by the party responsible for compliance could void the user’s authority to operate the equipment.
NOTE:
This equipment has been tested and found to comply with the limits for a Class A digital device,
pursuant to part 15 of the FCC Rules. These limits are designed to provide reasonable
protection
against harmful interference when the equipment is operated in a commercial environment. This
equipment generates, uses, and can radiate radio frequency energy and, if not installed and used in
accordance with the instruction manual, may cause harmful interference to radio communications.
Operation of this equipment in a residential area is likely to cause harmful interference in which case
the user will be required to correct the interference at his own expense.
5
MX-4000W
Installation Manual
Description of Precaution Symbols
Sign
Description
Risk Of Electric Shock
• Do not remove cover. Only a maintenance engineer should open the cover.
• To avoid risk of electric shock, do not touch.
• Make sure to turn off the power before servicing the equipment.
Hot Surface
• Do not touch the equipment when it is on.
• The equipment can get extremely hot and may cause a burn.
• Make sure to close the cover before running the equipment.
Moving
• The equipment is heavy. Make sure at least 2 people lift or move the equipment
• Do not attempt to move the equipment alone. You may be injured from
dropping the heavy equipment
Risk of Injury
• Always lock Push-Plate before adding cash to cassette.
• Refer to user manual for details.
Risk of Injury
• Turn off the machine before performing any service work.
• Use caution to avoid injury
Handling Heavy Equipment
• You may be injured if machine is dropped or mishandled.
• Use caution when moving the machine to avoid injury
Risk of Injury
• Use caution when operating the push-plate to avoid injury.
• The covers should be locked to avoid injury.
• Refer to operating manual before installing the cassette.
6
MX-4000W
Installation Manual
Sign
Description
Fire Hazard
• Place the equipment in an area away from any combustible materials.
• The equipment may catch on fire from overheating or short circuit of the power
supply unit.
Disassembly
• Do not disassemble or modify the equipment unless you are a certified engineer.
• Contact the service center for maintenance, adjustments and repairs.
• Improper disassembly may cause fire or electrical shock.
Fall down
• Do not place the equipment where the floor cannot sustain the weight of the
equipment, or on slanted or unstable surface.
• Equipment may fall down and cause injury or damage.
Unplug the Equipment
• Stop using the equipment immediately if it smokes, emits an unusual smell, makes
abnormal sounds, or if liquids or other foreign materials enter the equipment.
• If the above-mentioned abnormalities occur, immediately turn off the power,
unplug the equipment and contact the service center.
• If you ignore these symptoms, the equipment may catch on fire or cause electric
shock.
CAUTION:
1. TO REDUCE THE RISK OF FIRE, USE ONLY No. 26 AWG OR LARGER
TELECOMMUNICATION LINE CORD
2. RISK OF EXPLOSION IF BATTERY IS REPLACED BY AN INCORRECT TYPE.
DISPOSE USED BATTERIES ACCORDING TO THE INSTRUCTIONS
3. FOR PLUGGABLE EQUIPMENT, THE SOCKET-OUTLET SHALL BE INSTALLED NEAR THE
EQUIPMENT AND SHALL BE EASILY ACCESSIBLE.
4. THE EQUIPMENT IS TO BE SECURED TO THE BUILDING STRUCTURE BEFORE
OPERATION
5. A SECURITY CONTAINER SHALL BE PERMITTED TO OPTIONALLY BE PROVIDED WITH A
SECONDARY LOCK, BUT IMPROPER USE OF THE SECONDARY LOCK FEATURE WILL
REDUCE THE SECURITY LEVEL OF THE ATM.
7
MX-4000W
Installation Manual
Installation Information
Installation condition and space
Following conditions should be met before installing equipment.
1. Temperature while operating should be between 41°F - 95°F.
2. Relative humidity while operating should be between 25% < RH < 85%, Non-Condensed.
3. Avoid locations where intense direct light is reflected off the LCD screen.
4. Avoid locations where strong static electricity can occur.
5. Avoid placing the product next to equipment that produces electromagnetic waves. It could
interfere with data transfer.
6. The floor must allow easy wheelchair access from the front or the side.
7. Space required for servicing the machine should be considered before installation.
Environmental Specification (temperature & humidity)
Temperature
Humidity
Operating
5°C ~ 35°C / 41℉ ~ 95℉
In Storage
0°C ~ 40°C / 32℉ ~ 104℉
Operating
25% ~ 85%
In Storage
10% ~ 90%
Power Requirements
Main Power Supply
100W Free Voltage
(90~264VAC)
8
MX-4000W
Installation Manual
ATM Dimension-Front View
ATM Dimension-Plan View
9
MX-4000W
Installation Manual
ATM Dimension-Side View
10
MX-4000W
Installation Manual
Installation and Service Clearance
Following diagram is describing the areas required for installing and servicing the MX-4000W.
NOTE: All the unit in the dimension is mm and [ ] is inch scale.
Hyousng recommends it is more convenient for your service personnel to have enough maintenance
space as described below to service this ATM machine
11
MX-4000W
Installation Manual
Packing Dimensions
In some cases it may be necessary to store the ATM (in its box) before it is installed. See figure
below for information on the dimensions of out box including two MX-4000W ATMs.
1
760mm [29.92]
2
920mm [36.22]
3
840mm [33.07]
NOTE:
1. The dimensions of a boxed MX-4000W ATM are 620x770x425mm (24.41x30.31x16.73inch,
HXWXD).
2. Approximate weight of each MX-4000W ATM is 99.21~110.23lb (45~50 Kg). Actual weight will
vary depending on ATM component configuration.
12
MX-4000W
Installation Manual
System Installation
Unpacking
1. Cut the straps that are fastened around the box with a knife. (See Fig.1 below) Be careful when
cutting the straps.
2. Use an appropriate tool to remove the nails from the palette. (See Fig.2 below)
3. Remove the lid, then box from the top. Do not discard the packaging materials until you have
verified any shipping damage claim. Contact your distributor immediately if you see any shipping
damage. Store the box in a safe place to re-use or discard of appropriately.
4. Verify the contents carefully with the packing list to be sure all items listed are included. Notify
your distributor of any shortages.
Fig.1
Fig.2
CAUTION: In order to move the machine and place it in a proper location, you should
seek the help of professionals trained in moving heavy equipment.
13
MX-4000W
Installation Manual
Physical Installation-Wall Mounting
To install MX-4000W ATM, perform the following steps (referring to the picture in the following
pages),
NOTE:
● Prior to the installation, you will need to prepare the hardware (e.g. shank) to mount the
mounting frame bracket. Due to the variety of walls and their composition, Nautilus Hyosung
can not supply the hardware you may require. The maximum shank diameter of the mounting
hardware is 1/5 inch.
● It is the owner’s responsibility to ensure that the machine is anchored securely. Personal
injury and equipment damage can occur if the machine is not properly secured.
1. Unlock the key lock and press the Push_End button to open the front door.
2. Take out the cash dispenser unit by pulling it out and separate the mounting frame bracket.
(Unfasten the screws, 6ea)
3. Attach the mounting frame bracket separated in the previous step on the wall using the hardware
prepared in advance. It is recommended that the bottom of the mounting frame bracket is 1m
(39.37inch) off the floor to help meet ADA guidelines.
4. Hang the ATM on the mounting frame bracket and fasten the screws (6ea) unfastened in the step
of 2.
5. To take the power cable and LAN cable out of the ATM, separate the bracket on the bottom inside
the ATM. After taking them out, place the bracket on its original position.
14
MX-4000W
Installation Manual
Fig.3 Attaching the mounting frame bracket separated from the ATM
15
MX-4000W
Installation Manual
Fig.4 Attaching the mounting frame bracket using the hardware (e.g.
shank, studs, and so on)
16
MX-4000W
Installation Manual
Fig.5 To help meet ADA guidelines,
it is recommended that the bottom of the mounting frame bracket is 1m
(39.37inch) off the floor.
17
MX-4000W
Installation Manual
Fig.6 Hanging the ATM on the mounting frame bracket
18
MX-4000W
Installation Manual
Fig.7 Hanging the ATM on the mounting frame bracket and fastening the
screws (6ea).
19
MX-4000W
Installation Manual
Fig.8 Taking out the power & LAN cable from the ATM
To take the power cable and LAN cable out of the ATM, separate the bracket on the bottom inside
the ATM. After taking them out, place the bracket on its original position.
Power & LAN Cable Hole when installing
MX-4000W on the wall
20
MX-4000W
Installation Manual
Fig.9 The external appearance after the completion of installation
21