1
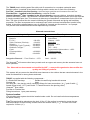
The HEALTHY HOUSE Ltd
The Old Co-Op, Lower St, Ruscombe, Stroud, Glos, GL6 6BU
Tel: 0845 450 5950, Fax: 01453 753533,
[email protected] www.healthy-house.co.uk
DOUBLE PLASTIC
UNDERSINK DRINKING WATER SYSTEM
THH2P
INSTALLATION INSTRUCTIONS
*IMPORTANT*
We suggest getting quotes from 3 different plumbers and showing them
the fitting instructions. Water filters must be fitted according to the
manufacturer's instructions. Damage caused by plumbers inexperienced
in fitting water filters cannot be covered by our guarantee. If the unit has
to be returned to our supplier and damage has been caused a charge
will be applied. All components are checked before dispatch. Please
check them carefully when they arrive. If any components have been
damaged in transit we must be notified immediately.
1
The THH2P plastic drinking water filter with push fit connections is a complete undersink water
filtration system. It consists of two plastic housings which contain one of each of the following:Pre Filter - installed in the first housing - removes larger particles and increases flow rate or a
Fluoride Filter – installed in the first housing – reduces fluoride
Imperial UltracarbTM filter - installed in the second housing, removes chlorine, chemicals, bacteria,
particles and heavy metals. The UltracarbTM candle uses a silver impregnated ceramic micro filter that has
a closely controlled pore size. This removes a wide range of waterborne contaminates for the life of the
filter. The silver is locked into the ceramic inhibiting the growth of bacteria and giving self-sterilising
properties. The filter incorporates an ion exchange resin, which reduces lead and other harmful heavy
metals. It should be replaced approx every 6 months for 4 people and 9 months for 1 to 2 people.
The pre-filter and fluoride filters should be replaced every 6 months.
Ultracarb removal chart
Pathogenic Organisms
Bacteria
E. Coli Vibrio Cholerae (Cholera) Shigella Salmonella Typhi (Typhoid) Klebsiells Terrigen Cysts
Cryptosporidium Giardia -
>99.99%
>99.99%
>99.999%
>99.999%
>99.999%
>99.999%
>99.999%
Inorganics Removal - Free Chlorine - >97%
Trace Organics
Oestrogen and synthetic oestrogen
Insecticides
Lindane - >85%
Herbicides
Atrazine - >85%
Phenols
TCP - >50%
Polyaromatic Hydrocarbons - >95%
Trihalomethanes
Chloroform - >50%
Lead - >98.3%
The UltracarbTM will remove other heavy metals such as copper and mercury but the amounts have not
been quantified.
The Ultracarb has been tested and certified by NSF - a non-profit organisation that certifies the
quality and safety of products.
This system will not remove the beneficial trace elements or the calcium that are natural elements in the
water and beneficial for strong bones and teeth.
THH2P is supplied with the following components:2 x Plastic filter housings
Double size wall fixing bracket with screws
Chrome tap
Hose
DIY fitting kit:- line piercing valve, necessary fittings for hose connections (1x 3/8" push fit with 7/16"
female thread to tap, 1x3/8" push fit with 1/2" female thread to line piercing valve)
UltracarbTM filter candle
Pre-filter or Fluoride filter
Fitting instructions. 1 year parts warranty
System location:
Your drinking water system should be installed under a sink. Do not install unit where temperatures
fall below freezing.
Tap:The tap should be placed near the sink. A 5cm (2”) flat surface is required to mount the tap,
and the thickness of the mounting surface should not exceed 32mm (11/4”). The size of the hole
required is 12.5mm (1/2").
2
Water feed connection:
The line piercing valve is a simple way of diverting your cold water supply. Locate this assembly as
close to the system as possible. Connect to the cold water supply line only.
Principal components:
The first component in the
system is the line-piercing
valve (1), which is easily
connected to the cold water
supply line. (This is usually
the supply leading to the cold
water tap in the kitchen.) The
line-piercing valve is
connected by flexi pipe (food
grade). (2) to the inlet of the
filter housing(s) with
individual bracket (3), which
contains the candle(s)
(4).The flexi pipe (6) is
connected from the outlet of
the filter housing(s) to the
chrome tap (7).
Tap installation:
Select the desired tap position on a flat part of the draining
board. To allow the tap to pour into the sink, it should be
located no more than 100mm (4”) from the corner of the sink
bowl. Examine the underside of the sink at that point to
ensure that you can get to it in order to connect the tubing to
the underside of the tap assembly.
Drill a 12.5mm (½") hole either using a carpenter’s drill or a
high speed bit.
Place the threaded portion of the tap stem through the drilled
hole so that the lever is in a convenient position for easy
access when you want to turn the tap on. Secure in place with
the flat washer, star washer and hex nut provided. You may
wish to use a spanner on the flats of the tap to hold it in the
desired position. If this is the case, be sure to place a piece of
cardboard between the tap and the jaws of the spanner to
avoid marking the polished finish. The tap assembly includes
a white adaptor with push fit connection which screws directly
onto the thread of the tap stem make sure you screw this on
tightly to prevent any leaks. The water outlet spout should
swivel freely to any required position.
3
Line piercing valve and tubing installation:
The self-tapping line piercing valve is designed for use with
15mm (9/16") OD soft copper supply tubing (plain or chromed)
and rigid metal pipe.
Do not use with flexible ribbed supply tubing, which is too thin
and requires special hardware.
Turn off cold water valve from under sink or main water line
valve for whole house.
Before installing line piercing valve, make sure piercing lance
does not protrude beyond the rubber gasket.
Assemble line piercing valve on cold water supply.
Do not fit to hot water line
The back plate must be firmly fixed to the wall in order to
avoid distortion of the copper pipe and possible leakage
when screwing valve into saddle. Turn handle clockwise to
pierce soft copper tube until valve is firmly seated. (Valve is
closed in this position). Turn on water supply to pressurize
the cold water line. Connect grey adaptor with push fit
connector to valve outlet on the line piercing valve.
.
Initial tubing connections:
For convenience, it may be
advisable to complete under
counter hose connections at this time.
Unit installation:
To mount the drinking water unit, elevate it at least 5cm (2") off the floor and
mark the location of mounting holes needed. Drill holes for mounting screws
and install screws, allowing the mounting bracket slots to slip over them.
Final tubing connections:
Connect the flexi pipe tubing to the INLET side of the filter housing head and
into the push fit connector on the line-piercing valve. Push the tubing well
into the push fit connector. When it is fully in place it will not leak and can
only be released by pressing in the collar at the same time as withdrawing
the tubing. Next push the flexi pipe into the OUTLET side of the filter housing
head. Caution: The wrong direction of water flow will damage the
candle.
Tubing should follow contour of the cabinets
Cut tubing to desired length using square cuts.
Do not make sharp bends.
Keep tubing from the unit to the tap as short as practical for good flow.
4
Testing for leaks:
Make sure that all the push fit joints are securely positioned by pushing the flexi pipe firmly. Ensure that
the candle housing is screwed tightly onto the head. Ensure that the whole system is connected correctly
and all joints are tight and firmly attached.
With the line piercing valve still in the closed (clockwise) position, turn on the mains water supply and
check that the line piercing valve is tightly connected and not leaking. Now slowly open the line piercing
valve tap and check the entire installation for leaks. Check very carefully.
Once you are happy that there are no leaks, WITH NO CANDLES INSTALLED set the chrome tap to
continuous flow mode and flush out the line for a few minutes. Again, check for leaks whilst the water is
on continuous flow.
Conditioning the filter cartridge:
In order to remove any loose particles resulting from the manufacture of the candle, allow the new
filters to stand in water overnight and then once the filters are inserted in the unit run the first 3 litres
of water to waste.
Installation/Replacement of filter cartridge:
With the water supply off, vent any pressure by opening the tap. Unscrew the filter housing.
Care should be taken as it will be full of water. Install/Replace the cartridge(s), ensure they are
positioned correctly and seals are made. To seal the candles into the head, the upper
spigot/thread of the candle threads into the head using the candle-sealing washer. THIS SEAL IS
ESSENTIAL TO THE CORRECT WORKING OF THE FILTER. Develop the habit of checking
that it is in place before you screw on the candle when cleaning or replacing. The body can now
be screwed into the head. DO NOT OVER TIGHTEN.
The water first passes through the Pre-filter, which removes larger particles and increases flow
rate, or through the fluoride reducer and then the UltracarbTM which is a multi-stage water treatment
unit. The water enters the housing and percolates from the outside into the candle through the
porous ceramic. The first stage of treatment of the UltracarbTM is micro filtration through the
ceramic membrane. This cleanses the water of suspended particles. Because of its superfine
filtration characteristics - the porous ceramic is too small for bacteria to penetrate - it also performs
a further essential function. It actually disinfects the water by filtering out at least 99.99% of any
bacteria that might have entered the water supply from the mains. The water then passes through
a number of special water treatment media, which serve to improve the taste and act against a
whole range of chemical contaminants.
Cleaning the filter:
Due to filtration of particulate contaminants from the water during use, the flow of water from the
UltracarbTM candle may reduce over a period of time. To return the water flow to its normal level,
simply remove the candle, taking care not to contaminate the inside of the filter housing with
unfiltered water or dirty hands. Take the candle to the sink and hold under running water, scrub
gently with a stiff kitchen/nail brush. The UltracarbTM is ceramic so try not to rub too hard as it
could break. The candle is now ready to replace in the filter housing and screw clockwise to seal. It
is always advised to use a little vaseline around the rubber washer to ensure ease in removing
housing next time. Hand tighten only
Limited warranty:
Drinking water units are warranted for materials and workmanship for one year.
Reminder Service:
The Healthy House will send a cartridge replacement reminder and will continue to remind unless
advised otherwise.
5
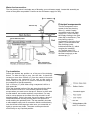


![Progesterone Receptor (PR) [16]](http://vs1.manualzilla.com/store/data/005703733_1-5d4a6a4c070c4aacc906912b3410a27a-150x150.png)