1
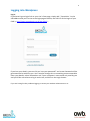
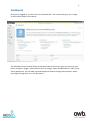
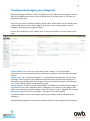
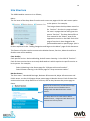
1
UKDN Waterflow
Content Management System
User Manual
2012
2
Contents
3. Introduction to UKDN CMS.
4. Logging in to UKDN CMS.
5. The Dashboard, Home Screen.
6. Adding and Editing Content.
7. Creating posts and pages.
8. Formatting text using the rich editor.
9. Adding a link to your posts.
10. Adding images, media and documents to your posts and pages.
13. Uploading and editing files in the Media Library.
14. Editing Files.
15. Creating and managing your categories.
16. Categorising posts/blog entrees.
Categorizing/Parenting Static Pages.
17. Formatting your blog posts.
Viewing your posts/pages through content development.
Saving & publishing your post or page.
18. Adding Categories and Pages to the Menu.
19. Site Structure.
20. Conclusion and contact information.
3
Introduction to Wordpress
Wordpress is an open source Content Management System (CMS). It is the behind the
scenes mechanism that easily allows you to edit, control and create the content on your
website.
This established platform has been modified by our team of developers to allow you to edit
your website content and make instant text and image changes.
4
Logging into Wordpress
Log In
If you haven’t got a login link on your site’s front page, simply add “ /wp-admin “ to the
URL address and you’ll arrive at the login page as below; the URL link to the login of your
CMS is; http://www.yourdomain.co.uk/wp-admin. ;
If you lose your details, you can click on ‘Lost your password?’ and a new Password will be
generated and e-mailed to you. You’ll need to change this to something more memorable.
Enter your details; select ‘Remember me’ if your computer is secure and only used by you
and you’d like not to have to log in each time, and click on the Login button.
If you are having further problems logging in contact your website administrator or IT.
5
Dashboard
Once you’re logged in, you will arrive at the Dashboard – the screen that gives you a range
of information about your website.
The dashboard menu located down the left hand side of the screen gives you access to your
posts, categories, pages, media content (such as images, videos and documents – PDF’s) and
menu appearance. You can add, edit and categorise content through these options, which
we will go through later on in this document.
6
Adding and Editing Content
What’s the difference between pages and posts?
Pages are usually those which have a static purpose in life, for example an about page. They
do not usually contain information about news items, or content which is added to the site
on a regular basis.
Pages are generally defined so that they are always accessible from the front page and menu.
Some people build entire sites with just Pages – this is especially the case for sites with little
need for dynamic content and is very popular with small businesses who simply want an online
brochure.
Posts usually contain chronographically arranged information – for example, news, events,
case studies and blog entries. The semantic structure is defined by categories and tags, and
whilst making it easy for people to navigate your site will also help search engines to
understand the content of your site and so improve the relevance of search results
Underneath sub heading’s ‘Pages’ and ‘Posts’ your are brought to a page that lists all the
pages of content within your website (posts and pages bring you to pages that have the
same functionality and presentation-like the one below);
7
Creating Posts and Pages
Click Posts and Add New in the left hand toolbar (if you’re writing a static Page, you go to
Pages and Add New instead)
From here you can click through to the post/page you wish to edit/create which will bring
you through to this page;
Title- The top box in the centre of the page is where you can add/edit the page/post title.
Permalinks- This is positioned immediately under the title box, and is used to name the
page URL. For example; the Permalink for ‘contact us’ would be www.ukdn.co.uk/contact-us
or /contact-ukdnwaterflow or whatever you wished to call it. We recommend titling your
posts and pages to be search engine friendly and rich with keywords surrounding your
services.
Excerpt- This enables you to give an overall summary to the post/page, a lot like the blurb of
a book, to entice people to read the content and benefits the weight of your website.
8
Formatting text using the rich editor
You can easily format text using the rich editor if you're familiar with any Microsoft Word
packages.
Un-ordered List
(Bullet points)
Insert/embed
media
Link/Unlink
Ordered List
Strike-out
Block Quote
Italic
More Breakteaser text option.
Text
Alignment
Bold
Spell-Check
Full screen
editing.
Show advanced options(as shown here).
Text
Style
Undo/Redo
Underline
Text colour
Align text
Custom
Characters
Paste Text
Paste
from word
Help.
Contains lots
of useful
information.
Indent
Left/Right
Remove
Formatting
.
As you can see from the buttons, it’s possible to format text in a number of ways using the
buttons and they’ll be familiar to any user of word processor software. You can also extend
the size of the box by dragging on the bottom right of it.
By default you’ll only see one line of buttons, not the two below – that’s because you need
to press the Advanced Options button on the far right to see them.
If you get stuck, hovering over the buttons will describe what they do, and the short cut to
use them from the keyboard.
Essentially, what you’re working with should be familiar to you – it’s rather like using
WordPad or some other similar low-end word processor.
9
Adding a link to your content
One of the most important things you can do on your website is to link out to other sites
and create inbound links to service spec pages. Those other sites will appreciate the links,
but it also shows where you get your information from. This is useful to the reader and also
a sign of an experienced and skilful blogger who cites his references. There’s also absolutely
nothing wrong with linking within your own site. Of course, it takes a little extra time, but
it’s worth it for the extra engagement.
To create a link in text, highlight the text you wish to link and then click on the link icon;
Once you have clicked the Link icon, this light box will appear over the content box;
You then fill the URL box with the
required link and click “add link”. You
have now added a link into your
content.
You then fill the URL box with the
required link and click “add link”. You
have now added a link into your
content.
10
Adding Images, Media and Documents to your posts and pages
Above the content box in the top left hand corner there are four icons beside
“Upload/Insert”.
Add
Image
Add Video
Add Audio
Add Media
(Documents)
Once you have clicked on the icon-the type of content you are adding to your content, this
light box will appear;
To upload the file required from your computer, click “Select File” or drag the file from its
folder location into the “drop files here” box. The page will open your documents folder on
your computer, allowing you to search through your document folders to upload the file in
question.
11
Once the file has been downloaded the following box will appear;
Title – this is the title of the image.
Alternative Text- a brief description
of the image.
Caption–the caption text for the image
Size – you’ll want to choose how big
the image is. If it’s not too big, you can
use the Full Size image –
Just make sure it fits into the space
available. Otherwise, a Thumbnail, by
default is a 150x150px square, and
Medium is cropped to fit in a
300x300px space.
Link URL – this is the address of the
original image you’ve uploaded, by
default, but it also allows you to
create a link to another website
here – quickly and effectively. You
can also press the three buttons –
None, meaning the image has no
link, File URL, the default, and Post
URL which will show your image
within the design of the site rather
than as an image on its own.
Alignment – This allows you
to set how the image is
aligned. The small icons
show the effect on the text
wrapping.
All files added in the content boxes will automatically be saved into your ‘Media Gallery’
meaning that all the documents used in your website are documented within the CMS
system if needed at a later date in other posts/pages, or just as a back up in editing
emergencies.
From Computer- Upload
files into CMS from
computer.
From URL- Add an image
from an online source.
Gallery- list of images
associated with specific
post.
Media Library- A list of
files uploaded
throughout the website.
Once you’ve selected your options, you press the Insert into Post button to add the image to
where your cursor was when you chose to Add Images.
12
When you have added the file to your content, it should look like this;
To add a “banner” image to the
specific post (the banner is the
main image on the UKDN website
which stretches the length of all
pages beneath the main menu),
please click “Add Image” in the
“Banner Image” box situated
beneath the main content editing
box.
You can move the image to be where you wish it to be by
clicking and dragging the file in your content if required or
you can click on the image, click on the picture icon and
edit it within the light box on screen.
If you do not want the file to be a link, click “none”
underneath the “Link URL” box and then insert the file into
the post.
You can also set a featured image for the post/page in this
section by clicking “Use as featured image” instead of “Insert into Post” which will give the
page/post a header image.
This will then use the image in a predesigned layout in your page template instead of
putting it inside your content.
For example it may be used as a teaser thumbnail on a list page.
Once you have completed adding the content to your page/post, you must save or publish
the content to avoid losing your work.
13
Uploading and editing files in the Media Library.
If you have many files to upload, either onto one page or throughout the website, using the
“Media Library” allows you to manage your site media.
The “Media Library” is a page featured in the right hand side of your
dashboard and CMS system
Media
Library
Once you have clicked this you are brought to a page that lists all the media
on your site a lot like the posts and pages page.
From here you can add, delete and edit media files.
To re-size, crop or rotate an image, describe, link and caption your file, in
your CMS, find and click the file in question, and then click “edit” underneath
the image. The following page will appear;
14
Editing Files
Rotate
Clockwise
Flip
Vertically
Rotate counter
clockwise
Flip
Horizontally
Undo / Redo
Crop
You must use your curser to select the section of the
image that you wish to crop if you need to, but if the
image needs resizing you can manually add the
image size by clicking “Scale Image” or change the
size of the image when adding the image through
the “media icon” within content ‘page’ and ‘blog’
CMS pages.
Ensure you save any changes made to image files by clicking ‘Save’ before you leave the
page.
15
Creating and managing your Categories
Organising categories makes it easy to navigate your site. Adding a new category is always
easy and straightforward and can even be done while you create a post, if you have the
appropriate user level.
As you can see, there’s already a category called ‘News’ which allows you to arrange news
articles (blog posts) into the ‘News’ page on the front screen. You can add a series of
categories to arrange your blog posts like so;
Click on the ‘Categories’ option under ‘Posts’ in the left hand menu. You will come to this
page;
Category Name- This is the nice, short name of the category. Try to avoid length
descriptions. One or two words are best, and easiest to read on most websites and search
engines.
Category Slug- This is an advanced option – it’s automatically populated if you don’t put
anything in. Until you get to more advanced techniques you can leave this field alone. It
describes the permalink path to the category when the permalinks option in WordPress is
set. It’s the website address to that particular page.
Category Parent- If you’re creating a subcategory, this allows you to define which category
is a parent. You can place categories within a category. For instance if your category was
‘News’ you could have another category in there for ‘Sports’ and/or ‘Regional’-for example.
Description- Optional, but can be helpful – especially if you have multiple
contributors/editors to your site. Explain concisely but clearly what the purpose of the
category is.
Click Add New Category and you have successfully created a new category for the website.
16
Categorizing posts
Blog entrees will generally need to be categorised so as not to get lost within the site map.
You can do this through the ‘post’ page of the CMS platform like so, through the ‘Categories’
box on the right hand side of the screen when creating or editing a blog post;
Category- Here you will see a list of categories
within your website. Here you can just click the
category the post is required to be added to.
Add New Category- Here you can create and add a
new category instead of going through to the actual
categories page and creating one there.
Categorizing/Parenting static pages
Sometimes you need to categorize pages and create drop downs in the menu, and create
pages underneath pages-creating an information hierarchy. You can do this through the
options given to you down the right hand side of the page under ‘Page Attributes like so;
Parent- Click the arrow to view all pages within the
site map of the CMS. Then click the page you wish to
act as parent to the page your editing in question.
Template- Select which template you would like your
content to take shape in with this option. The theme
will allow you to format your pages with a couple of
design options to give your content a specified feeling.
These templates are usually designed by the website
developer.
Order- If you have more than 1 page under another
page you may wish for them to be ordered in a certain
way. This option allows you to name which page goes
first, second or third by simply numbering that here.
17
Formatting your blog posts
Here you can format the design of your blog posts in a very similar way to how you can
format your pages through static page ‘Template’ option mentioned on the previous page.
You can do this through the ‘Format’ option down the right hand side of the post CMS page;
Just click the on the formatting options to edit
the layout of your content in the front end.
Viewing your Posts/Pages throughout content development
In the publish box (as featured below) you can click ‘Preview’ to view how your post/page
looks in the front end. OR, once you have saved the content as a ‘Draft’ (strongly
recommended so as not to lose any work throughout your content development stages) you
can click the ‘Preview Post’ option situated under the ‘Edit Post’ / ‘Edit Page’ title in your
CMS page.
Saving and publishing your posts and pages
You can specify what current status your content is in, whether it is a draft, pending review
or ready to be published my clicking the options in your ‘Publish’ box situated in the top
right hand corner of your editing page;
Save page/post as a draft
for later review.
Status of post/page
Control visibility setting
here.
Manage the date your post will be published.
(You can pre-write pages and content, and then
schedule it to be published live on site at a later
date or state an earlier date for your post if you
wish to bulk content and online presence).
Delete post / page.
.
Preview
post/page
here.
Publish to make
post / page live on
main site.
18
Adding Categories and Pages to the Menu
When you create a new page or category, it will not appear on site until you place it into the
menu. To do this you must complete the following;
Firstly, click on Appearance in the right hand menu of the Dashboard. In the drop down that
appears, click on Menus. You will be brought to the following page;
UKDN has a choice of 2 menus, coded when the site was developed for the Professional area
and the Parent area. To choose what menu you would like to add your page/category too,
just click the relevant tab located above the Menu content box.
Here is the list of pages/categories that
make up the menu in question.
When you add the page/category you
can click to drag and drop your new
page/category into the position you
wish it to take within the menu.
Organising your site appropriately will
help visitors navigate through your site
and appeal to search engines.
Tick the pages/category
you wish to add to the
menu here. If you cannot
see the relevant
page/category, click View
All to see a list of all
Conclusion
pages/ categories.
Click Add to
Completed!
Menu beneath
your options.
Once you have added your page/category to the menu, click Save
Menu to ensure it is saved at the right time in the right place.
19
Site Structure
The UKDN website structure is as follows;
Menu
The list items of the drop down from the main menu are pages with the main menu option
as the parent. For example;
This image shows the drop down menu list
for “services”. Services is a page and each
list item is a page that has been given the
parent “Services”. The drop down effect is
then created in the “Menu“ area of the
appearance section in the CMS. Each child
page of services is then dragged to be
positioned beneath its parent page- (this is
further explained in the “Adding Categories and Pages to the Menu” page of this document.
This feature is further used to structure the Market Sectors, Services, About Us and Case
Studies areas of the website;
Case Studies;
Each specific service –drain unblocking, drain & sewer cleaning– is the child of “Services”.
Each of these services has a case study dedicated to it which requires its specific service to
be its parent. For example;
Drain Unblocking is the Parent page for “100 year old council market”.
Drain & Sewer cleaning is the Parent page for “busy commuter station”
Market Sectors;
The four areas – Household Drainage, Business & Commercial, Major Infrastructure and
Public sector- are the child pages whose parent page is Market Sectors. Each of these four
sections also have a drop down list of services, and so they become the parent page to
those.
Business & Commercial, Household Drainage,
Major Infrastructure and Public Sector;
Categorised with Market Sectors as their
Parent.
The drop down list to each section within
Market Sectors; categorised with Business &
Commercial as their parent.
20
Conclusion
Completed!
You’ve successfully finished updating your website! This document can be used
as a referral throughout your updating requirements.
If there is anything you are uncertain of, or if you require further assistance,
please contact OWB at;
OWB
The Bond,
180-182 Fazeley Street,
Birmingham,
West Midlands,
B5 5SE
Tel: 0121 773 0277
Email: [email protected]
Web: http://www.owb.uk.com