1
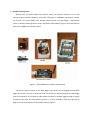
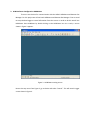
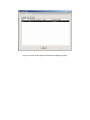
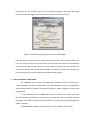
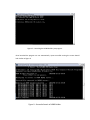
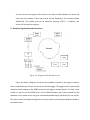
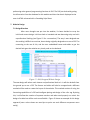
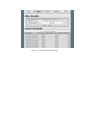
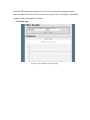
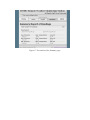
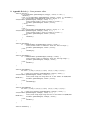
User Manual for HOBO Project Nicholas Lavanda Senior Software Project CEN 4935 Instructor: Dr. J. Zalewski April 15, 2010 1. Hardware Configuration Working with the Onset HOBO micro weather station, this project’s objective is to use the sensors to detect weather conditions, record this information in a database, and make it available via the web . The Onset HOBO micro weather station consists of a data logger, a temperature sensor, a relative humidity/pressure sensor, and two RF radio modules. Figure 1 shows the different pieces of the HOBO micro weather station. Figure 1 – Onset HOBO micro weather station devices The sensors connect directly to the data logger. Four sensors can be plugged into the data logger at one time. They use a connection much like an Ethernet plug and plug into the data logger next to the batteries. The remote RF radio module connects to the data logger through a custom connection. The other RF radio module connects to a server through a serial port (RS 232). A diagram of how these pieces are connected is shown in Figure 2. Figure 2 – Diagram of how Onset HOBO micro station devices connects to each other 2. HOBO Software Installation In order to talk to the weather station one has to use Onset’s proprietary software. First install the Onset Remote Site Manager. To install this program insert the installation CD and run the setup.exe program, if it does not auto run. There is no advanced configuration needed for this program, so just remember where you install it to so you can run the program later. The next program that needs to be installed is Onset’s HOBOware software. To install this software insert the HOBOware CD and run the setup.exe program, if it does not auto run. HOBOware has no advanced configuration needed; just remember where it is installed to so it can be run at a later time. 3. HOBO Software Configuration: HOBOWare There are two choices for communication with the HOBO: HOBOware and Remote Site Manager. For this project we will use both HOBOware and Remote Site Manager. First we need to setup the data logger to record information from the sensors. In order to do this we will use HOBOware. Start HOBOware by double clicking on the HOBOware icon. As a result, a screen shown in Figure 3 appears. Figure 3 – HOBOware starting screen Now at the top menu from Figure 3, go to device and select “Launch”. This will Launch Logger screen shown in Figure 4. Figure 4 – Launch Logger screen from HOBOware On this screen under “Channels to Log” make sure all of the desired sensors that you want to log are checked. It is recommended to select all of the sensors. Now select how often you would like the data logger to log sensor information by changing the “Logging Interval”. For this project we select 30 seconds. Once the Logging interval is selected we need to decide on a Launch option. Select the radial next to “Now” to start logging information immediately. Once you have done this, click on the “Launch” button at the bottom of the screen. Now the program will take some time to configure the data logger. Once the data logger is launched, which is indicated by the appearance of a status bar, you may close HOBOware, by selecting Exit menu choice from the screen as shown in Figure 3. 4. HOBO Software Configuration: Onset Remote Site Manager Now start up the Onset Remote Site Manager, by double clicking on the Remote Site Manager icon. As a result a screen shown in Figure 5 should appear. Figure 5 – Onset Remote Site Manager Start‐up screen Once the Remote Site Manager is running we need to create a remote site. In order to do this click on the “Set up remote site profiles” button and a screen will appear, as shown in Figure 6. Figure 6 – Remote Profile page from Remote Site Manager program From the Remote Profile Screen, as shown in Figure 6, select the “Add Site” tab. A screen like Figure 7 will appear. Figure 7 – Remote Site Manager software Add Site page At this screen, as shown in Figure 7, you will need to give the site a name where it says “* Name”. Then from the choices for “Connection Route” select “Local Port”. Now where it says “* COM Port” select “COM 1” or which serial port that you have connected the radio module to. The Auto‐Readout Schedule will need to be setup in order for the program to auto readout. To setup the auto readout select the checkbox next to “Utilize Schedule”. Next change the “Read out new data every” and select “CUSTOM”. This will allow you to select how often you would like it to sample in the column “DDD:HH:MM”. Change this value to 3 minutes. Now where it says “* Datafile path” select where you would like to save the files containing the sensor data that this software is generating. Once you have these parameters filled out click “OK” button. From this screen click “Connect” and a screen like Figure 8 will appear. This page is attempting to connect to the data logger and it should connect if the parameters are correct. Figure 8 – Remote Connection page from Remote Site Manager If the parameters are not correct the software will tell you that it is not connected. If this is the case, edit your parameters to the correct ones. Once you have the remote site connected to, close the screen. Now you will be back at a screen shown in Figure 6. Here you should see the site you just created in the “Auto‐Readout Schedule”. Click on the “activate” box and select the correct remote site to activate to begin the automatic readout process. 5. Java‐Based Updater: HOBO Builder The HOBOware has no means of populating the database used for this project so a custom application was made. Programmed in Java, HOBO Builder will connect to the database and automatically keep it updated. The program flowchart is shown in Appendix A and its code in Appendix B. It is recommended that the HOBOBuilder.java file is stored in the location you choose the Onset Remote Site Manager to save the sensor readout files. After the program has been compiled it is launched from the command line console. The proper syntax being (an example is shown in Figure 8): java HOBOBuilder <update interval (seconds)> <sensor readout .txt file’s path> Figure 8 – Launching the HOBO Builder java program. Once launched the program can run automatically. Upon successful running the screen should look similar to Figure 9. Figure 9 – Successful launch of HOBO Builder. As one can see the program will connect to the hobo mySQL database on satnet and enter the new readings. These new entries will be displayed in the console window additionally. The update cycle can be halted by pressing “CTRL‐C”. In addition, this action will also quit the program. 6. Database Organization and Connections Figure 10- Diagram of the Hardware used.
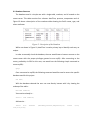
Figure 10 shows a diagram of how all the hardware involved in the project connects. Data is collected by the sensors and stored on the data logger. The logger will then periodically send the stored readings to the HOBO service via the logger’s wireless system. The data is then stored in a text file on the HOBO Server via the HOBO software, and is then entered into the database on the satnet server using the Java‐Based updated design specifically for the project. The data can then be viewed through the internet by clients by accessing the website located on the satnet server. 6.1 Database Structure The database used is a simple one with a single table, readouts, and is located on the satnet server. This table contains four columns: dateTime, pressure, temperature and rh. Figure 10 shows a description of the readouts table showing the field’s name, type, and other attributes. Figure 11- Description of the Database
While not shown in Figure 11; dateTime is used a primary key to identify each entry as unique. In order to manually check the database, the user would have to have an account on the satnet server with the proper privileges granted to use mySQL. After connecting to the server, preferably via SSH for this case, one would use the following simple command to access mySQL: mysql
Once connected to mySQL the following command would be used to access the specific database used for this project use hobo;
With the database selected the user can now directly interact with it by viewing the makeup of the table… Describe readouts;
View entries already in… Select * from readouts;
Add entries … Insert
into
val2,val3,val4);
readouts
(dateTime,pressure,temperature,rh)
values
(val1,
Remove entries… DELETE FROM readouts WHERE dateTime = dateToBeDeleted;
Update entries… Update readouts SET columnName=someValue WHERE someColumn=somevalue;
There are more SQL commands to interact with the database but these provide the gist of the desired function. 6.2 Database Connectivity The database is connected to from two points: HoboBuilder (the Java program that updates the database which is located on the server hosting the HOBO software and hardware) and the website. In order to connect to a database in Java a driver specific to the implantation of the database must be loaded in the program. In this case the Connector/J MySQL JDBC driver is used. In order to use this driver one must download and install the jar file from www.MySQL.com. Once installed the driver is loaded in the program with the following code (see Appendix C for more detailed code of the Java‐based updater): Class.forName("com.mysql.jdbc.Driver").newInstance();
Once loaded a connection can be established by adding the following line of code: Connection con = DriverManager.getConnection("jdbc:mysql://hostname/DB
name", "user", "password");
In order for these two lines of code to work the java.sql package must be imported. To connect to the database via the website functions within PHP are used. The two following lines of PHP code are used to connect to a mySQL database (see appendix E for more detailed code of the website): $conn = mySQL_connect($host, $dbuser, $dbpass) or die (‘Error’);
MySQL_select_db($dbname);
Both the mySQL_connect() and mySQL_select_db() functions are built into PHP provided mySQL is enabled in the php.ini. The values proceeded by a $ are variables in PHP that the coder would have set up. Once the connections are setup SQL statements are passed to them to query the database. This passing is done with PHP’s mysql_query() function, for example: $query = "SELECT * FROM readouts ORDER BY dateTime DESC";
$result = mysql_query($query);
In this case, the SQL statement was saved to a local variable first before passing, due to the author’s preference. The function will return a return a ResultSet that contains the rows in the database that satisfied the query; for this example that would be all entries and sorting them by dateTime in descending order. Another example would be: $query = "SELECT * FROM readouts WHERE $filter BETWEEN $low AND $high
ORDER BY dateTime DESC";
$result = mysql_query($query);
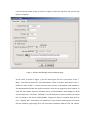
This time the results returned would be more specific. $filter would have retrieved from a list box containing which column the user wants to filter the results by. $low and $high would also be retrieved from a user inputted value and be used to select entries which fall between these two values. 6.3 Data Retrieval and Presentation While the entry into the database is done with the Java‐based updater something else must be done in order to actually view this data in a meaningful manner. This is where the website comes into play. The website is coded in mix of HTML and PHP, as html doesn’t have the means to interact with the database on its own. PHP is scripting language used quite often to interact with databases as it does it well and is open‐source. Using various commands (not going into specific as some examples are provided in the previous sections and more can be found in Appendixes C‐G) one is able to query the database and performing other general programming functions in PHP. The PHP just deals with getting the information from the database for this website and then the data is displayed to the user via HTML enhanced with a Cascading Style Sheet. 7. Website Design 7.1 Design Direction After more thought was put into the website, it’s been decided to scrap the initial and current design. It did not look as intended and was becoming tacky and a bit unprofessional looking (see Figure 12 for a screenshot). The way it was designed was also making it difficult to continue, due to being originally designed not to use a CSS. The converting to the use of this, and the over embedded frames and tables to get the desired look gave the website very clunky code on the backend. Figure 12 - Old (Scrapped) Website Design.
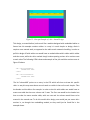
The new design will take a much cleaner and professional look to it. It will also be built from the ground up to use a CSS. The frames and tables will also be scrapped and a different method will be used to create the layout of the website. This method consists of using the formatting capabilities of a CSS and intelligent placing and design of the <div> tag. By doing this, it will allow the creation of separate sections and when used properly can mimic the design of a table but will be much more flexible. Figure 13 shows an example of this design approach (note: colors chosen are used just to point out each different component more easily). Figure 13- Concept Example of <div>-based Design
This design, as stated before, looks much like a website designed with embedded tables or frames but this example contains neither. In a way it is much simpler to design, albeit it requires more manual work, as opposed to the table much automatic handling. In order to pull this design off with tables one would have to embed tables within tables within tables and then some; while the <div> method simply involves putting various <div> sections next to each other The following HTML shows and example of the pick and blue sections seen in Figure 13 above: <div id="column400">
COLUMN 400 TEST
</div>
<div id="column200">
COLUMN 200 TEST
</div>
The id=”column400” points to an entry in the CSS which tells how to draw this specific <div>. In way this may seem about as much work as a table in the end is much simpler. Take the Header and the Menu for example. In order to do this with tables one would have to create one table that has one column and 2 rows. The first row would be the header but then to make the menu another table, with one row and six columns would have to be created in the second row. To do this would <div> design, one would just put seven <div> sections in, no thought into embedding needed, as they could just be listed like in the example above. 7.2 Design Specifics The design of the website will be simple and everything will go in a single main column. Colors will be soft and clean and the overall design lean more towards a minimalistic approach. Any page on the site will be accessible from any other page via a “menu” bar. 7.2.1 Home Page Figure 14 - Index Page of Website
Figure 14 shows a screenshot of the home page, index.php. At the top you can see the header which displays the name of the site. Below it is the menu. Both of these items will on every page of the site. When the mouse hovers over a button on the menu, that buttons background color will darken. As one can see in Figure 14, the button of the current page is further darkened and disabled from being clicked on. The following code shows how the menu is created: <div id="menu">
<div id="mDBtn">
<div id="menuTxt"> <u> Home </u> </div>
</div>
<div id="menuSub">
<div id="menuSens"> Sensor Readouts </div>
<br />
<div id="mSBtn" onclick="window.location.href='tables.php?page=1'">
<div id="menuTxtE"> <a href="tables.php?page=1"> Tables </a> </div>
</div>
<div id="mSBtn" onclick="window.location.href='graphs.php'">
<div id="menuTxtE"> <a href="graphs.php"> Graphs </a> </div>
</div>
<div id="mSBtn" onclick="window.location.href='summary.php'">
<div id="menuTxtE"> <a href="summary.php"> Summary </a> </div>
</div>
</div>
<div id="mSBtn2" onclick="window.location.href='about.html'">
<div id="menuTxt"> <a href="about.html"> About </a> </div>
</div>
</div>
Below the menu, the most recent entry will be displayed. The following code shows how: <?php
$dbhost = 'satnet.fgcu.edu';
$dbuser = 'nmlv2';
$dbpass = '';
$conn = mysql_connect($dbhost, $dbuser, $dbpass) or die ('Error
connecting to mysql');
$dbname = 'hobo';
mysql_select_db($dbname);
$query = "SELECT * FROM readouts ORDER BY dateTime DESC LIMIT 1";
$result = mysql_query($query);
$num=mysql_numrows($result);
$dateTime = "";
if($result) {
while($row = mysql_fetch_assoc($result)) {
$dateTime=$row["dateTime"];
$pressure=$row["pressure"];
$temperature=$row["temperature"];
$rh=$row["rh"];
}
}
echo "<div id=\"dbHeader\">";
echo " <div id=\"dbTimeCol\"> Time Stamp </div>";
echo " <div id=\"dbPresCol\"> Pressure </div>";
echo "
<div id=\"dbTempCol\"> Temperature (°
C)
</div>";
echo " <div id=\"dbRHCol\"> Relative Humidity </div>";
echo "</div>";
if($dateTime!="") {
echo "<div id=\"dbRow0\">";
echo " <div id=\"dbTimeCol\"> $dateTime </div>";
echo " <div id=\"dbPresCol\"> $pressure </div>";
echo " <div id=\"dbTempCol\"> $temperature </div>";
echo " <div id=\"dbRHCol\"> $rh </div>";
echo "</div>";
} else {
echo "<div id=\"dbRow0\">";
echo "Database empty.";
echo "</div>";
}
?>
Following that will just be headers and paragraphs of general information about the site. 7.2.2 Tables Page Figure 15- Screenshot of Tables Page.
Figure 15 is a screenshot of the tables page. Under the menu a form is placed to allow the filtering of the results. The following code shows how: <form id="reg" action="tables.php" method="get"> <div id="frmText">
The readouts listed can be filtered via the following form:
</div>
<input type="hidden" name="page" value="1" />
<br />
<div id="frmFields">
Filter by:
<select class="field" name="selType" id="selType"
onchange="Javascript:CheckDisplay()">
<option value="All">All</option>
<option value="dateTime">Time Stamp</option>
<option value="pressure">Pressure</option>
<option value="temperature">Temperature</option>
<option value="rh">Relative Humidity</option>
</select>
</div>
<br />
<div id="dbHidden" style="display:none">
In the range of
<input type="text" id="txtLow" name="txtLow" size="19"
maxlength="19" />
to
<input type="text" id="txtHigh" name="txtHigh" size="19"
maxlength="19" />
</div>
<br />
<div id="frmBtns">
<input type="button" id="btnFilter" value="Filter"
onmousedown="Javascript:Filter()" />
<input type="reset" id="btnReset" value="Reset" />
</div>
</form>
The hidden type of name page is there to allow the form to work with the pagination code as the code requires that a page value be passed with the form. The div, dbHidden, is only shown if the filter type is not set to all. Below the form the actual data collected from the HOBO unit is displayed. Due to the amount of possible entries the results are broken up by pagination. This makes it so that no more than 300 entries are shown at once. The user can simply click the page numbers above the table to see the rest of the entries. The code for this is too long for a meaningful snippet, so refer to Appendix E for details. 7.2.3 Graph Page Figure 16- Screenshot of Graph Page.
Figure 16 shows a screenshot of the graphing page. This page also contains a form to filter the results shown but this one only accepts dates and times to limit. Under the form is a button to refresh the graph below. The button will only refresh the one graph and not affect the others or reload the page. The code to handle this is too long for a meaningful snippet, so refer to Appendix D for more details. Under the refresh button is the graph itself. There are three graphs (only one is shown in the screenshot), one for each of the sensor types currently attached to the HOBO, and each has its own refresh button. The graph is created by the PHPGraphLib package. This is done by passing a array of data to the library which will return a PNG image file. The following code snippet shows an example; $sql="SELECT dateTime, pressure FROM readouts WHERE dateTime BETWEEN
'$low' AND '$high'";
$result = mysql_query($sql);
if($result) {
while($row = mysql_fetch_assoc($result)) {
$dateTime=$row["dateTime"];
$pressure=$row["pressure"];
//ADD TO ARRAY
$dataArray[$dateTime]=$pressure;
}
}
$graph->addData($dataArray);
$graph->setTitle("Barametric Pressure Over Time");
$graph->setRange(1200,800);
$graph->setBars(false);
$graph->setLine(true);
$graph->createGraph();
7.2.4 Summary Page Figure 17- Screenshot of the Summary page.
Figure 17 shows a screenshot of the summary report page. Below the menu the report is made. The data is collected by one large SQL statement. $query = "SELECT COUNT(*) AS numRead, AVG(pressure) AS avgPres,
AVG(temperature) AS avgTemp, AVG(rh) AS avgRH, MAX(pressure) AS maxPres,
MAX(temperature) AS maxTemp, MAX(rh) AS maxRH, MIN(pressure) AS minPres,
MIN(temperature) AS minTemp, MIN(rh) AS minRH, MIN(dateTime) AS minTS,
MAX(dateTime) AS maxTS FROM readouts";
$result = mysql_query($query);
if($result) {
while($row = mysql_fetch_assoc($result)) {
$numRe=$row["numRead"];
$avgPr=$row["avgPres"];
$avgTe=$row["avgTemp"];
$avgRh=$row["avgRH"];
$maxPr=$row["maxPres"];
$maxTe=$row["maxTemp"];
$maxRh=$row["maxRH"];
$minPr=$row["minPres"];
$minTe=$row["minTemp"];
$minRh=$row["minRH"];
$minTS=$row["minTS"];
$maxTS=$row["maxTS"];
}
}
Then the results are simply displayed using headers and paragraphs. Also at the bottom the page on can see a footer. This footer is also on every page. 7.2.5 About Page Figure 18- Screenshot of the about page.
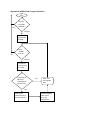
Figure 18 shows a screenshot of the About page. This page just displays some information about the site, project, equipment used, and author. This is done just using simple headers and paragraphs. Appendix A: Troubleshooting A1. HOBO Configuration Problem: Hobo Hardware is not being recognized by HOBOware. Solution: Sometimes, usually after extended non‐use, the software may have difficulty detecting the hardware. This can generally be fixed with a combination of unplugging/plugging connections and removing and reinserting batteries or other power sources, much like a resetting a home router. If the hardware still fails to be recognized then the problem likely lies with a dead power source or faulty hardware. Problem: Hobo Hardware is not being recognized by Onset Remote Manager. Solution: If the “OK” light on the data logger is flashing and everything is connected properly and the hardware is still not being detected by Onset Remote Manager then the problem is likely with the settings placed on the screen shown back in Figure 7. The “Connection Route” setting can have problems sometimes. If “Local Port” does work then select the “Remote Modem” option. Simply put, usually only one of this will work, so it may be necessary to try the other if one does not work. A2. HOBO Builder – Java based Updater Problem: Console displays: “NULL POINTER: Could not find a entry in the database that matched an entry in the <filename>. This likely means the file passed does not match the original file used to create the database. This program is not designed to handle this case" Solution: The HOBO Builder software assumes that the readouts will always be saved to the same file. If a file other than the one originally used to create the database is used then the software will fail to update the database as it will find no entries in the new readouts file which already exists in the database. The prevents the program from finding a reference point on where to start the update. Appendix B: HOBO Builder Program Flowchart Start
Connect to mySQL Database Fail Success Grab most recent entry from DB. Fail Open readout text file Success Grab most recent entry from file. Timestamp of DB entry < Timestamp of text file entry. No
Wait until next update time
Yes Enter most recent entries in text file into DB. Update database most recent entry for comparison.
Appendix C: HoboBuilder.java /**
* @(#)HoboBuilder.java
*
*
* @author Nicholas Lavanda
* @version 1.00 2009/10/7
*
*
Reads the text file generated by the HOBOware software. The text file contains
*
a log of the various sensor readings. This version can handle a HOBO unit that
*
has Barometic Pressure, Temperature, and Relative humidity sensors and the unit
*
must have all three, no less, no more. This data is then entered into a
*
database, no duplicate entries.
*
*
The user must determine the time inbetween the reads and enters via a command
*
line parameter.
*
*
NOTE: This program does handle the cases where the database is modifed by
*
another source while running, specifically deletion of records in the database.
*
If records are deleted or the entire database is empty during runtime the
*
program will not catch and continue as if the database was in the same state
*
as the last update.
*/
import java.sql.*;
import java.io.*;
import java.util.*;
import java.text.SimpleDateFormat;
import java.text.DateFormat;
public class HoboBuilder {
private static boolean active;
public HoboBuilder() {}
public static void main(String [] args) throws SQLException {
String input = null;
String fileName = "";
SimpleDateFormat gFormat = new SimpleDateFormat("yyyy/MM/dd HH:mm:ss");
java.sql.Timestamp recentEntry = null;
java.sql.Timestamp dateTime = null;
Double pressure;
Double temperature;
Double rh;
long sleepTime = 0;
int entryCount = 0;
Connection con = null;
Statement stmt = null;
boolean emptyDB = false;
// Check to see if the sleep time was provided. Exit if not.
if (args.length!=2) {
System.out.println("Usage: HoboBuilder <sleep time between updates
in seconds> <hobo file>");
System.exit(1);
} else {
fileName = args[1];
sleepTime = Long.parseLong(args[0]);
// Check to see if a long enough time has been given.
// While the HOBO software can be set to readout every second the
amount of time
// it actually takes to complete the readout will around 30 secs or
more.
if (sleepTime<30) {
System.out.println("\nUpdate Cycle must be greater than 30s
as that is the shortest time between readings on HOBO unit itself.");
System.exit(1);
}
// User input in seconds, convert to milliseconds.
sleepTime *= 1000;
// Notify that the HOBO Builder process has begun by outputting to
console.
System.out.println("\nHOBO Builder Activated at \t\t" + timeStamp()
+ "\n\t Press CTRL-C to end process.\n");
active=true;
}
/**************************************************************************/
//connect to database
try {
System.out.println("Attempting to connect to HOBO MySQL
server...\n");
Class.forName("com.mysql.jdbc.Driver").newInstance();
con = DriverManager.getConnection("jdbc:mysql://satnet.fgcu.edu/hobo",
"nmlv2", "");
if(!con.isClosed())
System.out.println("Successfully connected to MySQL server...\n");
stmt = con.createStatement();
} catch(Exception e) {
System.err.println("Exception: " + e.getMessage() + "\n");
System.out.println("Connection to MySQL server failed. Exiting program.");
System.exit(1);
}
/**************************************************************************/
// get the total amount of entries currently in the db
ResultSet rsCount = stmt.executeQuery("SELECT COUNT(*) as count FROM
readouts");
rsCount.next();
entryCount = rsCount.getInt("count");
//grab most recent entry
ResultSet rs = stmt.executeQuery("SELECT dateTime FROM readouts ORDER BY
dateTime");
rs.next();
/*to prevent a possible overload on the satnet servers the ammount of
entries in the
* database is limited to 2880 entries or 24 hours worth of data at a 30
sec sensor
* reading interval
*/
if (entryCount>2880) {
// grab the first entry
java.sql.Timestamp initial = rs.getTimestamp("dateTime");
// skip ahead the (total numberof entry - 2880)th entry in the db
int toDelete = entryCount - 2880;
for (int i = toDelete; i>0; i--)
rs.next();
// grab the (total numberof entry - 2880)th entry
recentEntry = rs.getTimestamp("dateTime");
//delete the entries from the inital date to the (total numberof
entry - 2880)th date
// to reduce the number of entries to 2880
stmt.executeUpdate("DELETE FROM readouts WHERE dateTime BETWEEN \""
+ initial + "\" AND \"" + recentEntry + "\"");
entryCount = 2880;
}
rs = stmt.executeQuery("SELECT dateTime FROM readouts ORDER BY dateTime
DESC LIMIT 1");
if (rs.next())
recentEntry = rs.getTimestamp("dateTime"); // the most recent entry
do {
//Notify that reading has begun by outputting to console.
System.out.println("Updating of HOBO database Started: \t" +
timeStamp());
try {
// Open the text file containing the HOBO read out
(hobo.txt).
BufferedReader in = new BufferedReader (new
FileReader(fileName));
// Scroll past the information not needed in hobo.txt
for (int i=0;i<5;i++)
input = in.readLine();
// Scroll past the the entries already in database
try {
do {
input = in.readLine();
//Parse the date and time from the string
StringTokenizer st = new
StringTokenizer(input, "\t");
String dateStr = st.nextToken();
String dateStrF = gFormat.format(new
java.util.Date(dateStr));
dateTime = new
java.sql.Timestamp((gFormat.parse(dateStrF)).getTime());
// If no entries in database then use first
in hobo.txt.
if (recentEntry==null) {
recentEntry = dateTime;
emptyDB = true;
break;
}
} while(recentEntry.after(dateTime));
} catch (NullPointerException e) {
System.out.println("\nNULL POINTER: Could not find a
entry in the database that " +
"matched an entry in the \"" + fileName +
"\". This likely means the file passed " +
"does not match the orginal file used
to create the database. This program " +
"is not designed to handle
this case");
System.exit(1);
}
// if at end of file, data base is up to date
//
close
// else, new entries to be input
//
parse and place into databse
if (!in.ready()) {
System.out.println("Database is already up to
date.");
in.close();
/****************************************************************/
// Close Connection to database
try {
if(con != null)
con.close();
} catch(SQLException e) {}
} else {
/***************************************************************/
// Check to see if database is open
if(con.isClosed())
try {
System.out.println("Attempting to
connect to HOBO MySQL server...\n");
Class.forName("com.mysql.jdbc.Driver").newInstance();
con =
DriverManager.getConnection("jdbc:mysql://satnet.fgcu.edu/hobo", "nmlv2", "");
if(!con.isClosed())
System.out.println("Successfully
connected to MySQL server...\n");
stmt = con.createStatement();
} catch(Exception e) {
System.err.println("Exception: " +
e.getMessage() + "\n");
System.out.println("Connection to MySQL
server failed. Exiting program.");
System.exit(1);
}
while(in.ready()) {
// If the database is empty dont refresh
input, use current.
if (!emptyDB) {
input = in.readLine();
}
System.out.println("
" + input);
//Parse the date and time from the string
StringTokenizer st = new
StringTokenizer(input, "\t");
String dateStr = st.nextToken();
String dateStrF = gFormat.format(new
java.util.Date(dateStr));
dateTime = new
java.sql.Timestamp((gFormat.parse(dateStrF)).getTime());
//Parse the pressure from the string
pressure=Double.parseDouble(st.nextToken());
//Parse the temperature from the string
temperature=Double.parseDouble(st.nextToken());
//Parse the relative humidity from the
string
rh=Double.parseDouble(st.nextToken());
/***************************************************************
* Delete old entries to make room for new
ones
*/
if (entryCount>2879) {
//get the oldest entry
ResultSet rs2 =
stmt.executeQuery("SELECT dateTime FROM readouts ORDER BY dateTime LIMIT 1");
// date of the oldest entry
rs2.next();
java.sql.Timestamp victim =
rs2.getTimestamp("dateTime");
//remove the oldest entry
stmt.executeUpdate("DELETE FROM
readouts WHERE dateTime = \"" + victim + "\"");
entryCount--;
}
/****************************************************************/
// Enter Parses into database
stmt.executeUpdate("INSERT INTO readouts (
dateTime, pressure, temperature, rh ) VALUES ( \""+ dateTime + "\", "+ pressure+ ",
"+temperature+", "+rh+" )");
entryCount++;
emptyDB=false;
}
//Update the time of the most recent entry.
recentEntry = dateTime;
// Close hobo.txt
in.close();
//Notify that reading has ended by outputting to
console.
System.out.println("Update complete: \t\t\t" +
timeStamp());
/****************************************************************/
// Close Connection to database
try {
if(con != null)
con.close();
} catch(SQLException e) {}
}
} catch (Exception e) {
System.out.println(e);
}
// Wait until next check.
try {
Thread.sleep(sleepTime);
} catch(Exception e) {
System.out.println(e);
}
}while(active);
}
//Returns the current time and date
//
public static String timeStamp() {
java.util.Date readStamp = new java.util.Date();
SimpleDateFormat formatter = new SimpleDateFormat("yyyy/MM/dd HH:mm:ss");
return formatter.format(readStamp);
}
}
8. Appendix D: hobo.js – Form parameter editor
function Filter() {
if (trim(document.getElementById('selType').value) == "All") {
SendPost();
} else if (trim(document.getElementById('selType').value) == "dateTime") {
if (trim(document.getElementById('txtLow').value) == "" &&
trim(document.getElementById('txtHigh').value) == "") {
alert("Please enter a range of values to filter.");
document.getElementById('txtLow').focus();
} else {
CheckTSLow();
}
} else {
if (trim(document.getElementById('txtLow').value) == "" &&
trim(document.getElementById('txtHigh').value) == "") {
alert("Please enter a range of values to filter.");
document.getElementById('txtLow').focus();
} else {
CheckLow();
}
}
}
function CheckLow() {
if
(isNaN(document.getElementById('txtLow').value)) {
alert("Please insert a numerical value for the low range.");
document.getElementById('txtLow').focus();
} else {
CheckHigh();
}
}
function CheckHigh() {
if
(isNaN(document.getElementById('txtHigh').value)) {
alert("Please insert a numerical value for the high range.");
document.getElementById('txtHigh').focus();
} else {
SendPost();
}
}
function CheckTSLow() {
var reTS = /(\d{2})\/(\d{2})\/(\d{4}) (\d{2}):(\d{2}):(\d{2})/;
if
(!reTS.test((document.getElementById('txtLow').value)) ||
trim(document.getElementById('txtLow').value) == "") {
alert("Time stamp low range must be in the format of DD/MM/YYYY
HH:MM:SS");
document.getElementById('txtLow').focus();
} else {
CheckTSHigh();
}
}
function CheckTSHigh() {
var reTS = /(\d{2})\/(\d{2})\/(\d{4}) (\d{2}):(\d{2}):(\d{2})/;
if
(!reTS.test((document.getElementById('txtHigh').value)) ||
trim(document.getElementById('txtHigh').value) == "") {
alert("Time stamp high range must be in the format of DD/MM/YYYY
HH:MM:SS");
document.getElementById('txtHigh').focus();
} else {
SendPost();
}
}
function SendPost() {
document.getElementById('reg').submit();
}
//-------------------------------------------------------------------------------------------------------------------------function FilterGraph() {
var count = 0;
if (trim(document.getElementById('txtLow').value) != "") {
count += CheckTSLowG();
}
if (trim(document.getElementById('txtHigh').value) != "") {
count += CheckTSHighG();
}
if (count==0) {
SendPost();
}
}
function CheckTSLowG() {
var reTS = /(\d{2})\/(\d{2})\/(\d{4}) (\d{2}):(\d{2}):(\d{2})/;
if
(!reTS.test((document.getElementById('txtLow').value))) {
alert("Time stamp low range must be in the format of DD/MM/YYYY
HH:MM:SS");
document.getElementById('txtLow').focus();
return 1;
} else {
return 0;
}
}
function CheckTSHighG() {
var reTS = /(\d{2})\/(\d{2})\/(\d{4}) (\d{2}):(\d{2}):(\d{2})/;
if
(!reTS.test((document.getElementById('txtHigh').value))) {
alert("Time stamp high range must be in the format of DD/MM/YYYY
HH:MM:SS");
document.getElementById('txtHigh').focus();
return 1;
} else {
return 0;
}
}
//-------------------------------------------------------------------------------------------------------------------------function CheckDisplay() {
if (document.getElementById('selType').value == "All") {
document.getElementById('divID').style.display="none";
} else {
document.getElementById('divID').style.display="";
}
}
//-------------------------------------------------------------------------------------------------------------------------function trim(str) {
return str.replace(/^\s\s*/, '').replace(/\s\s*$/, '');
}
9. Appendix E – view.php – Displays results in text form.
<html>
<head>
<title> HOBO Weather Montitoring Station - Florida Gulf Coast Univerity </title>
<script type="text/javascript" src="hobo.js"></script>
</head>
<body>
<form id="reg" action="view.php" method="get">
<div class="left">
The readouts listed can be filtered via the following form: <br />
Filter by:
<select class="field" name="selType" id="selType" onchange="Javascript:CheckDisplay()">
<option value="All">All</option>
<option value="dateTime">Time Stamp</option>
<option value="pressure">Pressure</option>
<option value="temperature">Temperature</option>
<option value="rh">Relative Humidity</option>
</select> <br />
<div id="divID" style="display:none">
In the range of
<input type="text" id="txtLow" name="txtLow" size="19" maxlength="19" />
to
<input type="text" id="txtHigh" name="txtHigh" size="19" maxlength="19" />
<br />
</div>
<input type="button" id="btnFilter" value="Filter"
/>
<input type="reset" id="btnReset" value="Reset" />
</form>
onmousedown="Javascript:Filter()"
<?php
$dbhost = 'localhost';
$dbuser = 'root';
$dbpass = '';
$conn
mysql');
=
mysql_connect($dbhost,
$dbuser,
$dbpass)
or
die
('Error
connecting
to
$dbname = 'hobo';
mysql_select_db($dbname);
?>
<?php
$filter="";
if (isset($_GET['selType']))
$filter = $_GET["selType"];
if (isset($_GET['txtLow']))
$low = $_GET["txtLow"];
if (isset($_GET['txtHigh']))
$high = $_GET["txtHigh"];
if ($filter=="All" || $filter=="") {
$query = "SELECT * FROM readouts ORDER BY dateTime DESC";
} else if ($filter=="dateTime") {
$query = "SELECT * FROM readouts WHERE $filter BETWEEN '$low' AND '$high' ORDER BY
dateTime DESC";
} else {
$query = "SELECT * FROM readouts WHERE $filter BETWEEN $low AND $high ORDER BY
dateTime DESC";
}
$result = mysql_query($query);
$num=mysql_numrows($result);
$i=0;
echo "<h3> Current Weather Station Sensor Readings</h3>";
echo "<table>";
echo
"<tr><td
width=20%><b>
Time
Stamp
</b></td><td
width=20%><b>
</b></td><td width=20%><b> Temperature (° C)</b></td><td width=20%><b>
Humidity </b></td> </tr>";
while ($i < $num) {
$dateTime=mysql_result($result,$i,"dateTime");
$pressure=mysql_result($result,$i,"pressure");
$temperature=mysql_result($result,$i,"temperature");
$rh=mysql_result($result,$i,"rh");
echo
"<tr
align=\"right\">
<td>
$temperature </td><td> $rh </td> </tr>";;
$i++;
}
echo "</table>"
?>
</body>
</html>
$dateTime
</td><td>
$pressure
Pressure
Relative
</td><td>
10. Appendix F – graph.php – Displays results in graph form.
<html>
<head>
<title> HOBO Weather Montitoring Station - Florida Gulf Coast Univerity </title>
<script type="text/javascript" src="hobo.js"></script>
</head>
<body>
<form id="reg" action="graph.php" method="get">
<div class="left">
Select date range of readouts shown: <br />
Between
<input type="text" id="txtLow" name="txtLow" size="19" maxlength="19" />
and
<input type="text" id="txtHigh" name="txtHigh" size="19" maxlength="19" />
<br />
<input type="button" id="btnShow" value="Show" onmousedown="Javascript:FilterGraph()"
/>
<input type="reset" id="btnClear" value="Clear" />
</form>
<?php
$low = "";
$high = "";
if (isset($_GET['txtLow']))
$low = $_GET["txtLow"];
if (isset($_GET['txtHigh']))
$high = $_GET["txtHigh"];
echo "<div><img src=\"pgraph.php?txtLow=$low&txtHigh=$high\" /></div>";
echo "<div><img src=\"tgraph.php?txtLow=$low&txtHigh=$high\" /></div>";
echo "<div><img src=\"hgraph.php?txtLow=$low&txtHigh=$high\" /></div>";
echo "<div align=\"right\"><a href=\"http://www.ebrueggeman.com/phpgraphlib\"> Graphs
generated by PHPGraphLib. </a></div>";
?>
11. Appendix G – summary.php – Displays summary report.
<html>
<head>
<title> HOBO Weather Montitoring Station - Florida Gulf Coast Univerity </title>
</head>
<body>
<?php
$dbhost = 'localhost';
$dbuser = 'root';
$dbpass = '';
$conn
mysql');
=
mysql_connect($dbhost,
$dbuser,
$dbpass)
or
die
('Error
connecting
to
$dbname = 'hobo';
mysql_select_db($dbname);
?>
<?php
$query = "SELECT COUNT(*) AS numRead, AVG(pressure) AS avgPres, AVG(temperature) AS
avgTemp, AVG(rh) AS avgRH, MAX(pressure) AS maxPres, MAX(temperature) AS maxTemp, MAX(rh)
AS maxRH, MIN(pressure) AS minPres, MIN(temperature) AS minTemp, MIN(rh) AS minRH,
MIN(dateTime) AS minTS, MAX(dateTime) AS maxTS FROM readouts";
$result = mysql_query($query);
if($result) {
while($row = mysql_fetch_assoc($result)) {
$numRe=$row["numRead"];
$avgPr=$row["avgPres"];
$avgTe=$row["avgTemp"];
$avgRh=$row["avgRH"];
$maxPr=$row["maxPres"];
$maxTe=$row["maxTemp"];
$maxRh=$row["maxRH"];
$minPr=$row["minPres"];
$minTe=$row["minTemp"];
$minRh=$row["minRH"];
$minTS=$row["minTS"];
$maxTS=$row["maxTS"];
}
}
echo "<h3> Summary Report of Readings</h3>";
echo "<table>";
echo
"<tr><td
width=20%><b>
Total
Number
of
Readings:
</b></td><td>
$numRe
</td></tr>";
echo "<tr><td width=20%><b> Time Period: </b></td><td colspan=2> $minTS -- $maxTS
</td></tr>";
echo "<tr><td> </td></tr>";
echo "<tr><td width=20%><b> Avg. Pressure </b></td><td width=20%><b> Avg. Temperature
</b></td><td width=20%><b> Avg. RH </b></td></tr>";
echo "<tr><td width=20%> " . sprintf ("%5.2f", $avgPr) . "</td><td width=20%> " .
sprintf ("%5.2f", $avgTe) . " </td><td width=20%>" . sprintf ("%5.2f", $avgRh) . "
</td></tr>";
echo "<tr><td width=20%><b> Max. Pressure </b></td><td width=20%><b> Max. Temperature
</b></td><td width=20%><b> Max. RH </b></td></tr>";
echo "<tr><td width=20%> " . sprintf ("%5.2f", $maxPr) . "</td><td width=20%> " .
sprintf ("%5.2f", $maxTe) . " </td><td width=20%>" . sprintf ("%5.2f", $maxRh) . "
</td></tr>";
echo "<tr><td width=20%><b> Min. Pressure </b></td><td width=20%><b> Min. Temperature
</b></td><td width=20%><b> Min. RH </b></td></tr>";
echo "<tr><td width=20%> " . sprintf ("%5.2f", $minPr) . "</td><td width=20%> " .
sprintf ("%5.2f", $minTe) . " </td><td width=20%>" . sprintf ("%5.2f", $minRh) . "
</td></tr>";
echo "</table>";
?>
</body>
</html>