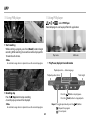
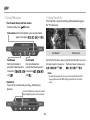
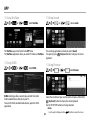
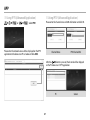
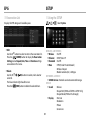
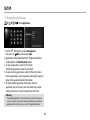
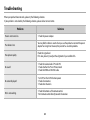
1
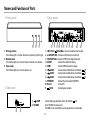
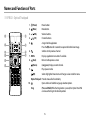
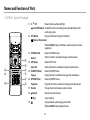
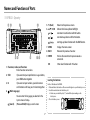
Please read this installation manual carefully before use. Safety Precautions Be sure to observe these precautions so as to use the product correctly and prevent injuries or damage to property. Warning Do not connect multiple power plugs to one outlet. It may result in a fire. Do not place this product under direct sunlight, near heaters or in places where there is heat. It may result in a fire. Do not use or keep the product and accessories for a long time at 0°C or lower or at 40°C or higher. It may cause fire, heat, or other dangers. Do not pull the power cord to disconnect it. If the power cord is damaged, it may cause a fire or an electric shock. Do not bend the power cord too much and do not place heavy objects on the power adapter as it may become damaged. Do not connect or disconnect the power adapter with wet hands. It may cause an electric shock. Never disassemble, repair, or modify the product, accessories, or power adapter. This presents the danger of fire and electric shock. Do not let foreign substances, moisture, or water get into the product and accessaries. It may cause malfunctions or fire. Disconnect the the power adapter during thunder and lightning to avoid damage and fire. When there is heat or smoke from the product, immediately remove the power adapter. It may cause a fire or an electric shock. Do not let children or pets suck on or bite the product and accessories. It may result in a fire or other dangers. Do not bend the HDMI cable or damage the power adaptor by pressing on it with a heavy object. There may be a risk of fire or electric shock. Do not drop or hit your remote control. This may cause a malfunction or injury. Do not clean the product with chemicals such as benzene or thinner. It may cause deformation and discolouration. Avoid placing the product and accessories in places where there is high temperature or moisture. The product may malfunction or cause electric shock. Always use certified parts. If you do not use certified parts, the product may work abnormally and cause overheating, fire, explosion, electric shock, and/or injuries. Do not plug or unplug the power adaptor and HDMI cable with wet hands. Doing so may pose a hazard. Keep the power adaptor and HDMI cable from heating devices. It may cause explosion or electric shock. Caution - Batteries Do not use damaged batteries for your remote control. If you replace the battery with the wrong type of battery, you can cause an explosion. Replace only with the same battery or an equivalent type. Do not dispose of batteries in a fire as it may explode. Caution - Data Protection Do not interrupt the power while in the process of upgrading the system software or an application. Do not interrupt the power during file uploading/downloading. 2 Table of Contents Safety Precautions........................................................................................................2 Table of Contents...........................................................................................................3 Names and Functions of Parts...................................................................................4 Front Panel..............................................................................................................................4 Side Panel................................................................................................................................4 Rear Panel................................................................................................................................4 RF RCU - Optical Trackpad...............................................................................................5 RF RCU - QWERTY................................................................................................................7 Connections....................................................................................................................8 Connecting HDMI & AV cable........................................................................................8 Connecting ETHERNET cable.........................................................................................8 Connecting S/PDIF..............................................................................................................8 Connecting satellite antenna cable.............................................................................8 Connecting external storages........................................................................................9 Connecting USB storages................................................................................................9 Connecting power adaptor............................................................................................9 Connecting peripherals....................................................................................................9 Getting Started........................................................................................................... 10 Turning the unit on.......................................................................................................... 10 Turning the unit off.......................................................................................................... 10 RF RCU pairing................................................................................................................... 10 First-time installation....................................................................................................... 10 Basic Settings...................................................................................................................... 12 Satellite setting - Antenna type.................................................................................. 12 Satellite setting - Scan..................................................................................................... 12 Satellite setting - edit...................................................................................................... 13 TP setting - scan................................................................................................................. 14 TP setting - edit.................................................................................................................. 14 Deleting a channel........................................................................................................... 14 Configuring the Home Screen.................................................................................... 14 Viewing program information.................................................................................... 15 Using the status information menu......................................................................... 15 Using multi mode............................................................................................................. 15 Configuring the Main Menu........................................................................................ 16 3 CHANNEL...................................................................................................................... 17 CHANNEL configuration................................................................................................ 17 Using the sort menu........................................................................................................ 17 Advanced Channel List configuration..................................................................... 18 Using the channel sort menu...................................................................................... 18 Channel editor.................................................................................................................... 19 Favorite group.................................................................................................................... 20 APP................................................................................................................................. 21 APP menu............................................................................................................................. 21 Using screen capture....................................................................................................... 22 Using iMedia player......................................................................................................... 22 Using PVR player............................................................................................................... 24 Using TimeShift.................................................................................................................. 25 Using YouTube................................................................................................................... 26 Using DLNA......................................................................................................................... 26 Using Search....................................................................................................................... 26 Using Browser..................................................................................................................... 26 Using IPTV (Advanced Application)......................................................................... 27 Using xbmc (Advanced Application)....................................................................... 28 Using APK Installer (Advanced Application)........................................................ 28 FAVORITE...................................................................................................................... 29 Remove from Favorites.................................................................................................. 29 INTERNET...................................................................................................................... 29 Add to Favorites................................................................................................................. 29 EPG................................................................................................................................. 29 Configuring the EPG........................................................................................................ 29 Viewing program information.................................................................................... 30 Using the sort menu........................................................................................................ 30 Add Reservation Recording......................................................................................... 30 Reservation List.................................................................................................................. 31 SETUP............................................................................................................................ 31 Using the SETUP................................................................................................................ 31 Managing applications.................................................................................................. 33 Troubleshooting......................................................................................................... 34 Specifications.............................................................................................................. 35 Names and Functions of Parts Front panel Rear panel 1 2 3 1. RCU signal status The indicator light is on when the device is recieving an RCU signal. 2. Network status The indicator light turns on when the unit connects to a network. 3. Power status The indicator light turns on when power is on. Side panel 1 2 1. USB 2. SD/MMC 1 2 3 4 5 6 7 8 9 10 11 1. LNB 13/18V 400mA Max. Connect a satellite antenna cable. 2. e-SATA(OPTION) Connect e-SATA device to e-SATA slot. 3. S/PDIF(OPTICAL) Connect S/PDIF to the digital audio unit. 4. AV OUT Connect AV cable to the display. 5. HDMI Connect HDMI cable to the display. 6. USB Connect external USB devices to USB slot. ( 5V) 7. USB Connect external USB devices to USB slot. ( 5V) 8. USB Connect external USB devices to USB slot. ( 5V) 9. ETHERNET Connect the LAN cable to ETHERNET. 10. RS-232 Connect PC. 11. 12V 2A Connect power adaptor. Connect USB type peripheral devices to USB slot. ( 5V) Insert SD/MMC to memory slot. If SD/MMC is not mounted, the camera application is not available. 4 Names and Functions of Parts RF RCU - Optical Trackpad 1 2 3 4 5 7 6 8 1. (Power) Power button. 2. (Mute) Mute button. 3. / (VOL) Volume buttons. 4. / (CH) Channel buttons. 5. Assigns hotlink application. Press the button for 3 seconds to capture the hotlink icon image. 6. Switches to the previous channel. 7.MENUDisplays application menu items if available. 9 8. (Back) Returns to the previous screen. 10 (Home)(Long press) Displays current channel. 9. Plays/pauses media. (OK) Selects highlighted menu item and changes values inside the menu. Optical Trackpad Provides mouse-like functionality. 10. Opens Audio and Subtitle Language selection options. Drag (Press and Hold) While the Drag button is pressed, the Optical Track Pad can be used to drag to the desired position. 5 Names and Functions of Parts RF RCU - Optical Trackpad 11. /// Moves the focus up/down/left/right. - TimeShift (Option) TimeShift function is activated by pressing the left button while watching program. 12. EPG (White) Displays the Electronic Program Guide (EPG). (Status Information) 11 12 13 16 14 15 17 18 19 (Press and Hold) Displays notifications, weather reports and recent applications. 13. CHANNEL (Red) Moves to CHANNEL menu. Zoom In 14. APP (Green) Zoom in function is available on images and web browsers. Zoom Out 15. FAVORITE (Yellow) Page up 16. INTERNET (Blue) Zoom out function is available on images and web browsers. Moves to APP menu. Moves to FAVORITE menu. Page up function is available on text pages and web browsers. Moves to INTERNET menu. Page down function is available on text pages and web browsers. Page down 17. NumberChanges the channel number or enters numbers. 18. (Record) Records the current channel. (Stop) Stops recording. 19. Displays teletext, audio language, and subtitle. (Press and Hold) Displays keyboard screen. 6 Names and Functions of Parts RF RCU - Qwerty 3 2 1 5. (Back) Returns to the previous screen. 9 6.▲/▼/◄/► / / / 4 5 6 7 Use Page up/down function with the Shift button. 7.MENU Displays the menu screen. 8.BACK Removes the previous character. OK 2.ShiftIf you want to input capital letters or upper letters, press Shift button together. 3.FnIf you wan to input numbers, special characters and functions with blue, press Fn button together. Use Volume up/down with the Fn button. 9.ENTERFinishes the current text input or executes a command. 8 1. Character, number, and functions Enter characters or numbers. 4. Moves the focus up/down/left/right. Use Zoom in/out function with Fn button. (Multi Language) You can enter the language you selected in the System menu of Setup. (Search)(Press and Hold) Displays search screen. 7 OK or select function with Fn button. Inserting the batteries Use the 2 AA batteries for RF RCU. 1.Push and slide in the direction of the arrow in the figure to open the battery cover. 2. Insert the new batteries into the battery slot. yy Make sure you match the plus (“+”) ends with the plus markings on the battery case. 3. Close the battery covers. Connections Connecting HDMI & AV cables Connecting S/PDIF HDMI cable Digital audio cable(Optical) AV cable (stereo type) Connecting Ethernet cable Connecting a satellite antenna cable Satellite antenna cable 8 Connections Connecting external storage devices Connecting the power adaptor e-SATA cable Power adaptor Connecting USB storage devices USB Storage Device Connecting peripherals Wireless keyboard and mouse. USB Storage Device SD/MMC Wireless dongle 9 Getting Started Turning the unit on First-time installation Turning the unit off Before you can watch television or listen to the radio, you must first perform the installation procedures. The First time installation gives you the convenience of selecting various languages, displays setting, network setting, weather setting, channel location setting and channel search. Press the Power button on the RCU to turn the device on and off. Please refer to Connections before initial use. You can press the Power button to select Sleep, Shutdown or Reboot. To Sleep, Shutdown, press button to select off timer. 1. Using the // (OK) buttons, select Country and Language settings. You can skip by pressing the (BLUE) button. RF RCU pairing 2. Press the (OK) button to select Display Settings. 3. Press (OK) button to changes icon for move. 4. Use the /// buttons to change the display size. 5.Press the (Back) button to save. During the initial booting, a pairing screen will be displayed. 1. Press the and buttons at the same time for 2 seconds. 2. An “OK” message will be displayed after pairing is complete. 10 Getting Started 6. Press the (OK) button to select Network Settings. 7. Select Ethernet DHCP, Ethernet Manual or Wireless. Ethernet DHCP : Automatic setting. Ethernet Manual : Manual setting. (IP address, Sub-Netmask, Default gateway, DNS address) Wi-Fi DHCP : Displays the Wi-Fi list. Wi-Fi Manual : Manual setting. 9. Press the (OK) button to select Channel Location Settings. 10. Using the // (OK) butons, select the channel search location. 11. Select ALL, FTA or Scramble and then press the to display the Channel Search screen. 12. Press the (OK) button to save and then press button. (OK) button 13.Select ALL, FTA or Scramble and then press the button. (OK) (Back) 8.Press the (OK) button to select Weather Settings. Use the // (OK) buttons to select the city name. 11 Getting Started Basic Settings 3.Use the // (OK) buttons to select the DiSEqc 1.0, DiSEqc 1.1, Motor or USALS options. The Channel Search screen will be shown. . Select the System menu (the default PIN code is 0000). You can change the language, locale, font size, resolution, PIN code, sound and picture options and screen size from this menu screen. Note If you want to change the Antenna type, press the (YELLOW) button. Satellite setting - Scan Satellite setting - Antenna type . 1. Select the System menu (the default PIN code is 0000). 2. Select the Channel Search menu item to display the “Antenna type” popup menu. 1. Use the // (OK) buttons to select the satellite for multi search. The blue indicator light should turn on. Note Motor or USALS does not support multiple selection. 2. Press the (RED) button to scan for satellites. 3.Select the ALL, FTA or Scramble menu items to display the Channel Search screen. 4. Press the (OK) button to save. 12 Getting Started Satellite setting - edit Satellite setting - edit 1. Use the // (OK) buttons to select a satellite to search for. The blue indicator light should turn on. 2.Press the (GREEN) button to display the Satellite Edit popup menu. Satellite Press the (OK) button to display a popup menu. To edit sort, use the / buttons to select the Satellite name or Longitude. Next, use the // (OK) buttons to select the satellite. DiSEqC 1.0 or 1.1 Motor or USALS setting LNB Frequency Press the (OK) button to display popup menu. Use the // (OK) buttons to select an option. Note You can select the LNB frequency using the / buttons. LNB Power Use the / buttons to select ON or OFF. LNB 22KHz Use the / buttons to select AUTO, ON or OFF. DiSEqC Version Use the / buttons to select DiSEqC version. DiSEqC Port Use the / buttons to select DiSEqC port. The Motor and USALS settings do not support DiSeqC 1.0 or 1.1. Note You can select a satellite using the / buttons. Edit Name You can change the satellite name. To save the name, press the (OK) button. 13 Getting Started TP setting - scan Configuring the Home Screen To display Home Screen, press and hold 1. Use the // (OK) buttons to select a satellite for TP search. The blue indicator light should turn on. 2. Press the (RED) button to display the Channel Search screen. 3.Set up the menu. Current Time (Home) button. Current Channel Information Note NIT search is only supporteed in TP search mode. TP setting - edit 1. Use the // (OK) buttons to select a satellite for TP edit. The blue indicator light should turn on. 2. Press the (GREEN) button to display the Transponder Edit popup menu. 4.Set up the menu. Deleting a channel Channel name Channel Information icon High Definition Radio Scramble Lock Favorite 1. Use the // (OK) buttons to select a satellite or transponder list. The blue indicator light should turn on. 2. To delete a channel, press the (BLUE) button. 3.Press the (Back) button to return to the previous screen. Program name & time Program progress bar Dolby T Teletext S Multi Audio 2 Subtitle Network Quality (blue) Signal (red) 14 Getting Started Viewing program information Using multi mode 1.While watching a program, press the program information. 1.Press the button while watching a program to select Teletext, Audio and Subtitle Language, and Audio Mode. button to display the 2.While the program information is displayed, press the to display detailed program information button 2.Press the Note Program information will disappear after five seconds of inactivity. Using the status information menu To display Status information, press and hold the Current area Date & time button 4-Day Weather Forecast Recent applications 15 (Back) button to return to the previous screen. Getting Started Configuring the Main Menu To display the Main Menu, press the Use the // (OK) buttons to make a selection. (MENU) button. Main menu Hot button Description Red button. Displays the Channel list. Green button. Displays the Application list. Yellow button. Displays the CHANNEL, APP or INTERNET favorites. Current date & time Blue button. Displays the bookmarks list. White button. Displays the 7-day Electronic Programme Guide (EPG). None 16 Selects on main menu. Displays the settings list’s main menu. CHANNEL Using the sort menu CHANNEL configuration To display the CHANNEL menu, press (RED) button. 2.The Options screen will be displayed. TV, Radio or TV+Radio sort Use the / buttons to select TV, Radio or TV+Radio. The channel list will change to the selected option. Satellite name sort Use the / buttons to select the satellite name. Group sort Use the / buttons to select the group. Possible options are Default, A-Z, Z-A, HD, SD, Scrambled or FTA. Find sort To Find channels, enter the first letters of the channel name. Channel list You can select the Channel Editor, Options menu or Advanced Channel List. Displays the channel information. (Satellite name, Frequency, Polarity and Symbol rate) Note To Find sort, select the Default of Group sort. Sorted channels on Find sort will not be saved. If you cannot find any channels using Find sort, there are no saved channels beginning with the specified letters. Using the sort menu 1.Press the or . Select CHANNEL menu. (MENU) button to display the Options screen. Favorite group sort Use the / buttons to select the favorite group name. Note 17 The Favorite group can be set in the Channel editor. CHANNEL Advanced Channel List configuration Using the channel sort menu To display the Advanced Channel List menu, press buttons. The preview screen will be displayed. The colour buttons can be used to sort channels. or . Displays selected program information. 1.You can sort channels by using colour buttons. Sorting by Satellite Press the (RED) button to sort channels by Satellite. Sorting by Favorite group Press the (GREEN) button to sort channels by Favorite Group. To select F1 ~ F12, press (OK) button. Sorting by Channel name Press the (YELLOW) button to sort channels by channel names. (A~Z or Z~A) Display all channel Press the (BLUE) button to display all channels. 2.Press the (Teletext) button to go to the Channel List menu. 3. Press the button to go to the Channel Editor menu. Channel list You can select the Channel List or Channel Editor. You can select sort menu. 18 CHANNEL Channel editor or Channel editor Channel edit . Select the Channel Editor menu. Selection commands Sort (Red button) Edit - Lock (Green button) Edit - Rename (Green button) Edit - Add/Remove favorite (Green button) Edit commands Displays sorted satellite. Displays selected program information. 1.Press the (OK) button to enter multi edit mode. The blue indicator light should turn on. Note Refer to help menu for select/deselect. Press the (GREEN) button to edit channels. Select (lock), (unlock), (delete), (rename), or Add/Remove favorite . Press the (OK) button to select. Finally, press the (Back) button to save changes. Channel sort Press the (RED) button to sort channels. Select satellite TV or Radio Default, A-Z, Z-A, CAS, FTA, HD-SD. Next, press the (OK) button to save changes. 19 CHANNEL Channel editor Favorite group or . Select Favorite group menu. Multi select for move Move focus (Blue button) Channel move Press the (BLUE) button to move channels. Use the // (OK) buttons to make a selection. Note To switch channel, select the ALL satellite of Sort (RED) button). ( Add/remove commands Displays the channel lists of sorted satellite. 1.Press the 2.Press the group. A 20 Help menu for edit. Displays selected favorite group. (YELLOW) button to select the favorite group. (OK) button to add the channel to the favorite will be displayed next to the channel. CHANNEL APP Favorite group APP menu or . Select APP menu. 1.Use the /// buttons to select an application. 2.Press the (MENU) button to display the Options menu. 3.Use the (OK) buttons to select either Add to Favorite, Assign Hotlink or Hide App commands. Channel sort (Red button) Move focus (Blue button) Channel sort Press the (RED) button to sort channels. Select satellite TV or Radio Default, A-Z, Z-A, CAS, FTA, HD-SD. Next, press the (OK) button to save changes. Rename group Press the (GREEN) button to rename the group. Press the (OK) button to display the keyboard screen. Select group Press the (YELLOW) button to select the favorite group. To select F1 ~ F12, press the (OK) button. Move Press the (BLUE) button to move channels. Use the // (OK) buttons to make a selection. 3.Press the (Back) button to return to the Channel Editor menu. APP Menu Add to Favorite Adds the app to the Assign Hotlink (FAVORITE) list. Assign Hotlink Assigns the selected application to Hotlink. Press the (Assign) button to run the assigned application. Note Only applications can be assigned to Hotlink. 21 APP APP menu Using iMedia player or . Select iMedia player. Connect a USB device to use iMedia player. iMedia player allows you to watch videos, listen to music and view pictures. Hide App Hidden App List Hide App Adds the selected application to the (Hidden App List) menu. To display the Hidden App List, press the button. Video Recovery App Press the (MENU) button to show the application in the Hidden App List. Selecting the Recovery menu displays the (App List). Press the button to display the App List. Use the / buttons to move the current media playback position on the seek bar. Playback position. Total length. Using screen capture 1.Press and hold the button for three seconds to perform a screen capture. 2. The captured image will be automatically set as the icon image. 3. The captured image will be saved on an external storage device. Note Connect an external storage device to save captured images. This only applies to downloaded apps. Play previous video. Play next video. Press the (OK) button to play/pause. Press the (Stop) button to stop playback and return to the previous screen. 22 Note Unicode subtitle is supported. Screen capture function is supported. APP Using iMedia player Using iMedia player Music Select the music file. Picture Select the photo file. Press the (OK) button to play/pause. Use the / buttons to move the current media playback position on the seek bar. Previous file Rotate - right Next file. Rotate - left Music settings Play the next file. Displays the play list settings (Add / Delete / Select All). Press the (OK) button to play/pause. Play the previous file. Display the play list. Plays the previous / next file. To toggle repeat mode, press the :Repeats the current song. :Repeats all songs. :Do not repeat. Slide settings (OK) button. Displays music settings. 23 To toggle repeat mode, press the (OK) button. APP Using PVR player Using PVR player . Select PVR Player. Recorded programs can be played from this application. Start recording While watching a program, press the (Record) button to begin recording. While recording, the record icon will be displayed for 10 seconds each minute. Play mode Note An external storage device is required to save the recorded program. Edit mode Play/Pause, Replay & time information Playback position. Audio Language. Playback position (time). Recording stop Press the (Stop) button to stop recording. A save file pop-up menu will be displayed. Total length. Press the Press the Note An external storage device is required to save the recorded program. 24 (OK) button to play/pause. (Back) button to stop playback. Repeat To toggle repeat mode, press the :Repeats the program. :Do not repeat. (OK) button. APP Using PVR player Using TimeShift If the Time Shift is set while watching satellite broadcasting, press the ““ button once. Fast-forward, Rewind and Slow-motion To change mode, press (OK) button. Slow-motion Each time the button is pressed, slow motion speed is changed to , , and Fast-Rewind Fast-Rewind Each time the button is pressed, the rewind speed is increased as , , and . Fast-Forward Each time the button is pressed, the forward speed is increased as , , and . Fast-Forward Each time the button is pressed, Each time the button is pressed, the rewind speed is increased as the forward speed is increased as , , and , , and . . Note An external storage device to save to can be specified in the USB storage sub-menu in the PVR Settings menu found in the Setup menu. Seek Mode If you want to use seek mode, press the button during playback. Use the / buttons to move the current media playback position on the seek bar. 25 APP Using YouTube or Using Search . Select YouTube. Using DLNA or or . Select search. For searching application and website, select Search. To input text, press (Keyboard) button to display the virtual keyboard. The YouTube app can be found in the APP menu. The YouTube application allows you watch HD videos on YouTube. Using Browser . Select DLNA. DLNA technology allows you to display content from other DLNA-enabled devices directly on your TV. To search for DLNA-enabled media devices, open the DLNA application. or . Select Browser. Select the search box if you want to search and press and hold the (Keyboard) button to display the virtual keyboard. Use the /// buttons to change selection. 26 Note Use the optical trackpad on the (OK) button to move the cursor. APP Using IPTV (Advanced Application) or Using IPTV (Advanced Application) Please enter the channel name and URL information and click OK. . Select IPTV. Please enter the network access address displayed on the IPTV application to the browser on PC as below and click ADD. Channel Name IPTV channel URL After the (OK) button is pressed, the channel will be displayed on the PC browser and IPTV application. PC 27 Screen APP Using xbmc (Advanced Application) or Using APK Installer (Advanced Application) . Select xbmc. Disclaimer XBMC software is provided for advanced users for experimental purposes. The software is offered without any warranties or right of claim for any damage caused to the product or any source or body external. The product manufacturer or its distributors will not be liable for any damages caused by the use of this software. Please refer to the official XBMC website for full instructions and support for the software. or . Select APK Installer. You can installation to select APK installer file. Note APK files need to be saved on an external USB storage device. You can use various services like Video, Pictures, Weather and etc. through xbmc. If you download Skins from System menu, you can change the xbmc skins. 28 FAVORITE EPG Remove from Favorites Configuring the EPG . Select Favorite menu. or INTERNET Reservation Add Reservation List Options menu for sort. Add to Favorites 1.Press the 2.Press the . Select EPG menu. (MENU) button to display the Options menu. (OK) button to select Remove from Favorite. 1.Press the 2.Press the or or . Select INTERNET menu. Channel list 1.Use the / buttons to select a channel. 2.Press the button to move to the program list. 3.Use the / buttons to specify a date. (MENU) button to displays the Options menu. (OK) button to select Add to Favorite. 29 Program List EPG Viewing program information Using the sort menu Press the Find sort To Find channels, enter the first letters of the channel name. (OK) button to display program information. Note To Find sort, select the Default of Group sort. Sorted channels on Find sort will not be saved. If you cannot find any channels using Find sort, there are no saved channels beginning with the specified letters.. Using the sort menu Favorite group sort Use the / buttons to select the favorite group name. Note 1.To sort channels, press the (MENU) button. 2.Displays Options screen. TV, Radio, or TV+Radio sort Use the / buttons to select TV, Radio or TV+Radio channel lists. Satellite name sort Use the / buttons to select a satellite name. Group sort Use the / buttons to select a group. Possible options are Default, A-Z, Z-A, HD, SD, Scrambled or FTA. The Favorite group can be set in the Channel editor. Add Reservation Recording 1.Use the /// buttons to select a program. 2.Press the button to display the Reservation Setting menu. Repeat, Date, Time and Duration settings are available in this menu. The icon will be displayed. 30 EPG SETUP Reservation List Using the SETUP Displays the PVR storage and available space. Edit Use the/ buttons to select an item in the reservation list. Press the (GREEN) button to display the Reservation Settings menu. Repeat, Date, Time and Duration settings are available in this menu. . Select System. WIRELESS & NETWORKS Wireless : On/Off. Ethernet : DHCP/Static IP. Bluetooth : On/Off. More : VPN (Virtual Private Network) : Wireless hotspot : Mobile networks(3G) - USB type NETWORKS & SERVICE SAMBA Service : Network service to connected storage. DEVICE Sound: Volume : Output Port (HDMI and SPDIF or SPDIF Only) : Output Mode (LPCM or Passthrough) Display: Font size : Resolution : Picture : Screen size Delete Use the // / (OK) buttons to select, multi-select or select all. The blue indicator light should turn on. Press the (RED) button to delete the selected item. 31 SETUP Using the SETUP Using the SETUP MANAGEMENT Apps : Application management. Storage : Storage information. PERSONAL Accounts & sync Location services SYSTEM Language & input: Language. : Keyboard & input methods. : Mouse/Track pad - Pointer speed. Date & time : Select time zone. : Use 24-hour format. : Select date format. Weather: Show weather forecast on Status information menu. : Location. : Temperature unit (Celsius or Fahrenheit). Parental : Lock settings. Lock : Lock channel editor. : Lock channel. : Hide locked channel. : Change PIN code. You can change PIN code (Default PIN code is 0000). If you lost your PIN code you are not able to access to any functions with PIN Code. (DO NOT FORGET IT!) Note : Master PIN code : 7962 PVR: Storage path. : Time-shift. Channel Location : Select location for channel. More : Pairing for RF remote controller. : Factory reset. This procedure will erase all of your personal data including information about your Google Account, any other accounts, your system and application settings, and any downloaded applications. This data cannot be recovered. INFORMATION User manual System upgrade - Firmware upgrade : Firmware upgrade from network. : Firmware upgrade from USB. : Notify when new firmware is available. System upgrade - Channel upgrade : Upgrade channel data from network. : Upgrade channel data from USB. : Extract channel data. Warning : Do not turn off the device during software update. System information 32 SETUP Managing applications . Select Application. 1.Use the /// buttons to select Management. Next, press the (OK) button to select Apps. 2.Applications downloaded from the TV Application Market are displayed in the ‘Downloaded’ section. 3 To view all applications, select the “All” section. The default applications cannot be uninstalled. 4.To view all running applications, select the “Running” section. Running applications can be stopped by selecting the respective option in the application detailed information. 5.To display detailed application information, select the application. You can force quit, uninstall, delete data, remove settings and clear the cache of the application from here. Warning Downloaded Applications from the web may come from unknown sources. To protect your device and personal data please download applications from trusted source, such as TV Application Market. 33 Troubleshooting When your product does not work, please try the following solutions. If your problem is not solved by the following solutions, please call our Service Centre. Problems Solutions Power is not turned on. Check the power adaptor. The device is hot. You may feel the device is warm when you use the product or connect the power adapter for a long time. However, the product has no other problems. Poor picture quality Check the signal level. If it is low, please try to adjust the alignment of your satellite dish. No sound Check the volume level of TV and STB. Check whether the TV or STB are muted. Check the HDMI and AV OUT cable. No screen displayed Turn OFF and turn ON the main power. Check all connectors. Check other channels. RCU is not working. Check the batteries of the remote control. Point remote control directly towards the receiver. 34 Specifications Tuner Input Connector Input Frequency Input Impedance Signal Level LNB Power LNB Control LNB Tone Switch Demodulation Input Symbol Rate A/V Decoder Transport Stream Aspect Ratio Audio Decoding Audio Mode Sampling Video Resolution Input / Output Video/Audio (Stereo) HDMI RS-232 USB e-SATA S/PDIF (OPTICAL) SD/MMC Ethernet Wireless Hardware Main Chipset RAM Flash Memory Software Operating System Internet Browser Media Player Protocols Graphics Upgrade Media Support Container Video Codec Audio Codec F-type, IEC-169-24, Female 950MHz to 2150MHz 75Ω -25 to -65 dBm 13V/18V (Max 400mA with short circuit protection) DiSEqC 1.0 , 1.1 & 1.2, USALS 22KHz (600mV) QPSK, 8PSK DVB-S : 2-45 Ms/s DVB-S2 : 10-30 Ms/s (QPSK), 10-31 Ms/s (8PSK) MPEG-2 ISO/IEC 13818 MPEG2 MP@ML MPEG2 MP@HL MPEG-4 HP@L 4.1 16:9 MPEG Layer I & II & III Single channel/Dual channel/Joint Stereo/Stereo 32, 44.1 and 48kHz PAL/NTSC up to 1080P Composite Video and Audio L/R (option) Fully compliant with HDMI 1.3a D SUB (9Pin) 4 x USB 2.0 Up to 3 Gbps Digital Audio output 1 x SD memory card slot 10/100BASE-T : RJ-45 Ethernet 802.11 b/g/n (2.4Ghz) Power Supply Input Voltage Adaptor Type Power Consumption ARM Cortex-A9 1GHz (2500 DMIPS) 1GB (DDR3) NAND 4GB, SPI 8MB Android 4.0 ICS WebKit-based Android browser Photo, Music, Video Static, DHCP, HTTP(VOD), HLS(Live, VOD) 2D/3D graphics with hardware acceleration or alpha blending Firmware upgrade by network and USB MP4, AVI, MKV, 3GP, MPEG TS , MOV, MP3, OGG H.264(MPEG4-AVC, VC-1), MPEG2, DivX3/4/5 MP3, AAC, MPEG Audio 12V DC, 2A Wall mount Type (100 ~ 240Vac, 50/60Hz) 19 W Physical Specification Size (W) 200 mm x (D) 130 mm x (H) 40 mm Weight458g Operating Temperature 0°C to + 45°C 35 C350-0003