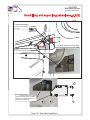
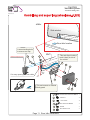
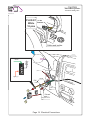
1
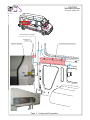
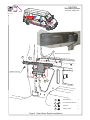
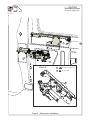
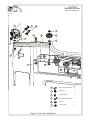
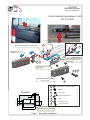
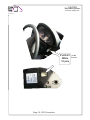
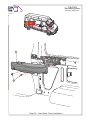
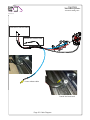
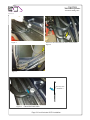
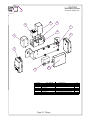
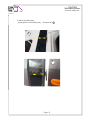
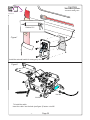
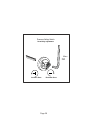
ai
M
E-
l:
@
fo
in
a
il
o.
.l c
oo
oc
t
u
8
7
PowerDoorAndStep.com
27
49
L
888.928.8000
AE
ox
.B
O
P.
09
46
ch
ta
e
P
a
ikv
-T
Mercedes Sprinter
VW CRAFTER
R
IS
ASD
Automatic Sliding Door
PN: 015-0003-DL Kombi standard (wheelbase-3.665)
Kombi long and super long (wheelbase-4.325)
Original Door latch mechanism
& operation with handles
Recommendation
Please print this instruction manual in color
01.04.15
CRAFTER
Mercedes Sprinter
Automatic Sliding Door
PowerDoorAndStep.com
888.928.8000
Gear-motor ASSY
Signal Light
Pneumatic Safety Strip
Operating Switch
VSS
Plug K1
White
18 pins
VSS Detector
Buzzer
Control Unit
Remote Control Receiver
Pneumatic Safety Switch
Door Limit Switch
Wiring Harness
Main Fuse
Lock Actuator ASSY
Page 1. ASD System - Overview
CRAFTER
Mercedes Sprinter
Automatic Sliding Door
PowerDoorAndStep.com
888.928.8000
Cut according to Template
Drill 7 (x2)
Cut according to dimensions
Supplied Template
55
70
20
Page 2. Cutting and Preparation
CRAFTER
Mercedes Sprinter
Automatic Sliding Door
PowerDoorAndStep.com
888.928.8000
Drill 4.5 according to detail (25)
A-A
90
3
A
4.5mm
A
2
1
Original bolt
2
Socket flat head screw M4X20 - 1
3
Lock nut M4
Page 3. Chain Slide Strip Installation
-1
CRAFTER
Mercedes Sprinter
Automatic Sliding Door
PowerDoorAndStep.com
888.928.8000
5
Thick washer 6 (H=3mm)
4
Original nuts (x3)
8
6
7
5
Thick Washer 6
6
Hex head screw M6X16 - 1
- 3
7
Washer 6
- 1
8
Flange nut M6
- 1
Page 4. Gear-Motor Bracket Installation
CRAFTER
Mercedes Sprinter
Automatic Sliding Door
PowerDoorAndStep.com
888.928.8000
A
6
9
8
View-A
6
Hex head screw M6X16 - 6
8
Flange nut M6
6
Page 5. Gear-motor Installation
-6
CRAFTER
Mercedes Sprinter
Automatic Sliding Door
PowerDoorAndStep.com
888.928.8000
10
7
6
15
6
13
11
5
14
8
15
15
12
QTY
6
Hex head screw M6X16 - 3
5
Washer 6
8
Flange nut M6
- 2
-2
12
Hex head screw M6X30 - 1
14
Nut M6
-1
15
Lock nut M6
-3
Page 6. Front Idler Installation
CRAFTER
Mercedes Sprinter
Automatic Sliding Door
PowerDoorAndStep.com
888.928.8000
Kombi standard (wheelbase-3.665)
PN: 015-0003
Drill 7mm
15
Cut away opening for rear idler
16
Discard original cover
FRONT
16
12
This end slips in behind
track & body in side of
the vehicle
7
This end mounts on outside
of body panel
7
Rear idler cover Combi standard
PN:151-15-803
17
8.5
Socket button head screw M6X16 - 1
15
Washer 6
- 2
Lock nut M6
-2
Hex head screw M6X30
- 1
14
Nut M6
-1
26
Nut’s Plastic Cover
-1
21
FRONT
18
12
11 10
26
24
7
Template
14
51
70
24
These notches line up
with the end of the track
Page 7. Rear Idler Installation.
Philips screw 5/8"
-1
CRAFTER
Mercedes Sprinter
Automatic Sliding Door
PowerDoorAndStep.com
888.928.8000
Kombi standard (wheelbase-3.665)
PN: 015-0003
Drill 5 according to Template
OPTION 2
21
Note
Number of chain links is 196
( for vehicles: Kombi standard wheelbase
and Delivery van)
19
20
22
18
Chain holder
PN:128-15-030
21
22
Page 8. Roller Chain Installation
Socket button head screw M5X16 - 1
Lock nut M5
-1
CRAFTER
Mercedes Sprinter
Automatic Sliding Door
PowerDoorAndStep.com
888.928.8000
Kombi long and super long (wheelbase-4.325)
STEP 1
Drill 7mm
Discard original cover
m
15m
These notches line up
with the end of the track
Cut away opening for rear idler
15
Template
21
11 10
18
FRONT
8.5
51
70
STEP 2
65
Cut away opening for rear idler installation
70
125
Page 9. Rear Idler Installation.
CRAFTER
Mercedes Sprinter
Automatic Sliding Door
PowerDoorAndStep.com
888.928.8000
Kombi long and super long (wheelbase-4.325)
STEP 3
Remove
20mm
Remove this section
and stud from tracking
see pg 9
Cut away opening for rear idler
Cut away opening for roller chain
23
Having marked out template
draw around this piece of plastic in
situation .To ensure that there is
enough room for fitting
24
Page 10. Rear Idler Installation.
CRAFTER
Mercedes Sprinter
Automatic Sliding Door
PowerDoorAndStep.com
888.928.8000
Kombi long and super long (wheelbase-4.325)
STEP 4
Side window
Rear idler location
Loosen tracking bolts
to remove end cap
Drill 7mm
Discard original cover
12
7
This end slips in behind
track & body in side of
the vehicle
15
16
17
27
m
15m
Cut away opening for roller chain
26
15
This end mounts on outside
of body panel
7
FRONT
17
7
15
14
Socket button head screw M6X16 - 1
Washer 6
- 2
Lock nut M6
-2
12
Hex head screw M6X30
- 1
14
Nut M6
-1
26
Nut’s Plastic Cover
-1
Page 11. Rear Idler Installation
CRAFTER
Mercedes Sprinter
Automatic Sliding Door
PowerDoorAndStep.com
888.928.8000
Only Kombi long and super long (wheelbase-4.325)
8
28
7
25
Original bolt
Drill
8mm
Drill
7mm
35mm
Original holes
Reinstall the door stoppers in new location
5
7
28
25
Original bolt
28
Flange nut M8
-2
8
Flange nut M6
-4
25
Hex head screw M6X25 - 4
7
Page 12. Door Stopper Installation
Washer 6
-4
CRAFTER
Mercedes Sprinter
Automatic Sliding Door
PowerDoorAndStep.com
888.928.8000
Kombi long and super long (wheelbase-4.325)
Do not separate the cart from the door
Drill the hole on the spot
OPTION 2
OPTION 1
Drill 5
Template
19
20
22
21
Chain Support
PN:128-15-030
18
Note
Number of chain links is 189
For vehicle: Kombi wheelbase (4325mm) long and super long
7
02.10.11
6 5
4
3
2
1
2mm
303
cut
Link
189
(196 standard)
21
22
Socket button head screw M6X16 - 2
Lock nut M6
Page 13. Roller Chain Installation
-2
CRAFTER
Mercedes Sprinter
Automatic Sliding Door
PowerDoorAndStep.com
888.928.8000
Do not separate the cart from the door
Drill the hole on the spot
8mm
m
11m
18mm
5.5mm
Page 14. Roller Chain Installation
CRAFTER
Mercedes Sprinter
Automatic Sliding Door
PowerDoorAndStep.com
888.928.8000
46
Insert the emergency handle 45 . Move the handle to left
for manual operating
Chain Sealing Rubber
113-15-001
9
19
10
Page 15. Roller Chain Installation
16
CRAFTER
Mercedes Sprinter
Automatic Sliding Door
PowerDoorAndStep.com
888.928.8000
Drill
12
30
850mm
Door Limit Switch
PN:124-00-039 29
13mm
Pneumatic Switch Set
PN:160-10-042
Page 16. Door Limit Switch Installation
CRAFTER
Mercedes Sprinter
Automatic Sliding Door
PowerDoorAndStep.com
888.928.8000
R
PE
SU
SU
UE
60 sec
E
GL
LU
R
G
PE
15
Close
Safety Switch
Clean surface carefully with alcohol to insure
good contact of the pneumatic safety strip.
Pneumatic Safety Strip
31
33
PN: 112-06-109
SU
PE
R
GL
UE
Rubber tube
34
Drill hole for rubber tube
Page 17. Pneumatic Safety Strip & Pneumatic Switch Installation
CRAFTER
Mercedes Sprinter
Automatic Sliding Door
PowerDoorAndStep.com
888.928.8000
PLUG K1
White
18 pins
pin N9
blue/red
Whi
te
Solder and isolate:
Black
(”-” Body)
5 4 3 2 1
Green
(ACC”+” )
Light (+)
Solder
Drill
6
Cut
37
DO
OR
Discard
Original cover
35
Page 18. Electrical Connections
CRAFTER
Mercedes Sprinter
Automatic Sliding Door
PowerDoorAndStep.com
888.928.8000
PLUG K1
White
18 pins
Page 19. VSS Connection
pin N9
blue/red
CRAFTER
Mercedes Sprinter
Automatic Sliding Door
PowerDoorAndStep.com
888.928.8000
37
AUTO
COOL
38
Page 20. Gear-Motor Cover Installation
CRAFTER
Mercedes Sprinter
Automatic Sliding Door
PowerDoorAndStep.com
888.928.8000
Parts list of ASD system
No
Designation
1
2
3
4
5
6
7
8
9
10
11
12
13
14
15
16
17
18
19
20
21
22
23
24
25
26
27
28
Chain Slide strip
Flat Head Screw M4X20
Lock Nut M4
Gear-Motor Support
Thick Washer 6
Bolt M6X16
Washer 6
Hex flange nut M6
Gear-Motor ASSY
Front Idler
Front Idler Support
Bolt M6X30
Idler Wheel
Nut M6
Lock Nut M6
Rear Idler
Socket button bolt M6x16
Chain Holder
Roller Chain
Connecting link
Socket button bolt M5X16
Lock Nut M5
Cover
Philips Screw 8X5/8
Bolt M6X25
Nut Plastic Cover
Rear Idler Cover
Hex flange nut M8
29
30
31
32
33
34
Limit Door Switch
Self Drill Screw 8-1/2”
Pneumatic Safety Switch
Rubber Grommet #12
Pneumatic Safety Strip
Rubber Tube
Operating Switch
Signal Light
Gear-Motor Cover
Flat Head Screw M6X20
Emergency Handle
35
36
37
38
39
Part No
134-00-0081
613-04-020
602-02-004
111-00-0081
600-32-061
632-06-016
600-12-080
601-06-006
111-00-013
111-02-017
128-00-008C
632-06-030
107-11-004-1
601-02-006
602-02-006
111-02-013
614-06-016
128-00-008D or 128-15-030
178-00-0081
900-01-072
614-05-016
602-02-005
151-20-003
646-08-058
632-06-025
112-10-002
151-10-003
601-08-008
124-00-039
647-08-003
122-10-047 (160-10-042)
112-04-000
112-06-109
113-06-067
124-00-026-1
124-10-069
153-00-0081
632-06-020-1
128-05-012
Page 21. Parts List
Quantity
1
1
1
1
4
10
9
16
1
1
1
2
1
2
3
1
2
1
1
3
1
1
1
4
5
1
1
2
1
1
1
3
2m
1
1
1
1
2
1
CRAFTER
Mercedes Sprinter
Automatic Sliding Door
PowerDoorAndStep.com
888.928.8000
Internal door handle cables
External door handle cable
Lower release cable
Cancel the lower latch
Page 22. Cable Diagram
CRAFTER
Mercedes Sprinter
Automatic Sliding Door
PowerDoorAndStep.com
888.928.8000
Figure 1.
Remove original step
Figure 3.
Figure 2.
Figure 4.
Figure 5.
Make marks position lower roller ASSY screws
before disassembling
Figure 6.
Page 23. Lock Actuator ASSY installation.
CRAFTER
Mercedes Sprinter
Automatic Sliding Door
PowerDoorAndStep.com
888.928.8000
Figure 1.
Disconnect the cable and move him to a new location
Figure 2.
Figure 3.
Cable strap 150mm
125-10-014
Figure 4.
Cancel the lower latch
Page 24. Lock Actuator ASSY installation.
CRAFTER
Mercedes Sprinter
Automatic Sliding Door
PowerDoorAndStep.com
888.928.8000
ASD MB Sprinter Original Door latches
mechanism & operation with handles
160-15-301
6
7
5
1
3
7
3
2
ITEM NO.
4
DESCRIPTION
PART NUMBER
QTY.
1
111-15-301
MB Sprinter locker bracket ASSY
1
2
646-08-020
Phillips screw 6x3/8"
1
3
125-10-016
Cable strap 100mm
3
4
125-10-014
Cable strap 150mm
2
5
125-10-005
Plastic clamp UC-2 3/8"
1
6
601-06-006
Hex flange nut M6 DIN 6923
2
7
632-06-016
Hex cap screw M6x15
2
MB Sprinter lockers ASSY
6
111-15-301
8
5
1
5
9
4
7
2
3
ITEM NO.
PART NUMBER
1
128-15-301
2
110-01-006-10
3
128-15-203
4
128-36-309
DESCRIPTION
Actuator bracket
Lock actuator ASSY
Cables adapter
V363: V408 Lock Actuator arm
QTY.
1
1
1
1
5
Philips cross Screw 4.2
6
110-11-006
Actuator ASSY
7
647-11-046
Philips cross screw 4-5/8"
1
8
632-04-016
Hex bolt M4x16 , DIN933
1
9
602-02-004
Lock nut M4 DIN985
1
3
Page 25. Lock Actuator ASSY installation.
1
CRAFTER
Mercedes Sprinter
Automatic Sliding Door
PowerDoorAndStep.com
888.928.8000
Pull off door latch mechanism
Figure 1.
Disconnect inner door handle cable
Figure 2.
Template
Connect inner door handle cable
to the new position
Figure 3.
Figure 5.
Drill 6.5 mm two holes
Figure 4.
Figure 6.
Figure 7.
Page 26. Lock Actuator ASSY installation.
CRAFTER
Mercedes Sprinter
Automatic Sliding Door
PowerDoorAndStep.com
888.928.8000
6
8
13
1
5
2
3
2
4
7
ITEM NO.
1
2
3
4
5
6
7
8
PART NUMBER
128-17-116
A-K-101
124-00-032
124-02-006
124-10-052
123-06-004
124-12-902
124-R2A4
Page 27. Wiring
DESCRIPTION
Bracket
Control module
CONNECTOR
Latch RelayDS12V -60A 250VAC
QTY.
1
3
2
1
2
1
1
1
CRAFTER
Mercedes Sprinter
Automatic Sliding Door
PowerDoorAndStep.com
888.928.8000
Front
Door Limit Switch
C-Pillar
Sliding Door
B-Pillar
Lockers ASSY
ite
en
Wh
Gre
Bla
ck
e
Blu
Cut off
Discard
1234
2
Blue
Safety Pressure Switch
1234
White
Black
Green
Brown
Cut off
O.E. Blue
Pink/White
Pink/Black
43 21
4321
CUT OFF
Red
Black
O.E.Blue/Red
4321
Black
Blue
Blue/Red
Blue
Green
Gray
h
itc
ite
n
Wh
ee
2
Gr
3
4
a
lL
a
ign
AA
C+
d
Re
Connect to VSS pulse
C
12 V D
S
Fuse 30A
e
Blu
mp
5
O
1
n
ati
r
pe
w
gS
Page 28. Wiring
- Solder and isolate:
CRAFTER
Mercedes Sprinter
Automatic Sliding Door
PowerDoorAndStep.com
888.928.8000
Sliding door
Pressure switch
Blue
White
Buzzer
Black
Red
White
Green
Brown
Black
8
7
6
4
3
2
1
Black
Black
White
Green
Red
Red 1.5 mm
87
30
5A
Blue
Green
Black
Red
Remote Control
(receiver)
1
Red
30A
Page 29. Wiring
Red 1.5 mm
AK-105L
Gray(Orange)
6
Relay 12V
7
Red
8
86
9
D1
87a
10
Battery
12V
85
1
30
latch Relay 12 V
2
Blue
87
3
Green
85
4
Green
Black
Red
Green
30
+ACC
Page 3 pin1
Connect to VSS
Yellow
86
Signal Lamp
Blue
87
VSS
Buzzer Black
MOTOR 12V DC
White
Door limit switch
Brown
Gray(Orange)
Green
85
VSS
Pulse Detector
Black
D1
Green
Timer 1.5 s. 12 V
OE blue wire- plug sliding door
9
Con 5
5
OE red/blue wire- plug sliding door
10
5
Plug
86
White/Blue
Green
Plug
Black
Plug
Operating switch
Internal micro switch
Black
Green
Blue
Black
locker
Main lock
SLIDING DOOR
max
Automatic Sliding Door
CHECK
1
C-PILLAR
Central Roller fix
B-PILLAR
PowerDoorAndStep.com
888.928.8000
B
Upper lock
Sliding Side Door Guides
2
CRAFTER
Mercedes Sprinter
3
B
Adjustment
1. Adjust the sliding door.
a. Loosen the 4 screws. see Picture 1.
b. Move the door max c-pillar direction, relatively to the central roller.
A
Central Roller
Picture1.
2. Check Main lock and Upper lock
Upper lock
=
Main lock
=
Page.30
CRAFTER
Mercedes Sprinter
Automatic Sliding Door
PowerDoorAndStep.com
888.928.8000
3. Adjust the sliding door
guides (parts on the sliding door). See pictures.
B
B
B
Page. 31
ai
M
E-
l:
@
fo
in
a
il
o.
.l c
oo
oc
t
u
8
7
PowerDoorAndStep.com
27
49
L
888.928.8000
AE
ox
.B
O
P.
09
46
ch
ta
e
P
a
ikv
-T
R
IS
ASD
Automatic Sliding Door
Emergency door opening kit
PN: 111-03-013
Page 32
CRAFTER
Mercedes Sprinter
Automatic Sliding Door
PowerDoorAndStep.com
888.928.8000
min 1000mm
Front
max 50
0mm
Page 33
CRAFTER
Mercedes Sprinter
Automatic Sliding Door
PowerDoorAndStep.com
888.928.8000
Gear-motor ASSY.
Nut 6 ST
Nut 6 ST
Internal emergency handle
Emergency door KIT
111-03-013
Spring
Bracket
128-03-013A
Emergency door handle
111-03-0131
Emergency handle cover
151-03-131
Socket head M5X16
Page 34
CRAFTER
Mercedes Sprinter
Automatic Sliding Door
PowerDoorAndStep.com
888.928.8000
Sikaflex-221
Figure1
cut
Install the external handle for emergency door
Figure2
Nut M6
Nut M6
To install the cable:
Insert the cable into the hole (see figure 2) fasten nuts M6
Page 35
CRAFTER
Mercedes Sprinter
Automatic Sliding Door
PowerDoorAndStep.com
888.928.8000
1
Insert the emergency handle 1 . Move the handle to right
for automatic operating
10
mm
Install of the connection cable
Clamping lug
Nylock Nut M5
Spring
Washer 4
Washer 4
Bolt M4X8
Page 36.
CRAFTER
Mercedes Sprinter
Automatic Sliding Door
PowerDoorAndStep.com
888.928.8000
EMERCENCY
E
M
E
R
G
E
N
C
Y
Emergency handle bracket
Emergency handle
39
FRONT
AUTO
COOL
EMERCE
N CY
1
Insert the emergency handle 1 . Move the handle to left
for manual operating
EMERGENCY OPENING
Page 37.
Pressure Safety Switch
Sensitivity adjustment
Allen
N4
Increase Sens
Decrease Sens
Page 38
CRAFTER
Mercedes Sprinter
Automatic Sliding Door
PowerDoorAndStep.com
888.928.8000
RECOMMENDED TORQUE FIGURES
(In newton metres )
8.8
TORQUE
TORQUE
Nm
mm
Nm
M5
6.3
M5
8
M6
10.3
M6
10
M8
25.4
M8
13
Page. 39
CRAFTER
Mercedes Sprinter
Automatic Sliding Door
PowerDoorAndStep.com
888.928.8000
Automatic Sliding Door user’s Manual
The Automatic Sliding Door system (ASD) manufactured by Auto Cool Ltd
conforms with the requirements of the European regulations.
The ASD is approved by the German TUV in Munich, it complies with the
EEC DIRECTIVE 72/245EC and obtained the certificate of compliance No
2004/104/EC.
Operation Instructions
The door is operated by a switch located on the dashboard:
To open–press the switch shortly, door opens to the end of its range.
To close - press the switch shortly, door closes and locks.
To change its direction while in motion - press the switch shortly,
the door will change direction.
To control the opening range – continuous pressure on the control switch will
set the door in motion upon its release, the door will stop.
Visual status indications – when the vehicle’s main ignition switch is “on”,
the indication control light is visible.
Dim light – the door is closed.
Bright light – the door is open.
Audio status indicators – independently of the vehicle’s main switch –
the vehicle’s buzzer is always functioning whenever the door is in closing motion.
Safety measures
The system includes safety features to protect the passengers.
Closing – when encountering an obstruction, the controller automatically reverses
the door direction to open all the way .
In addition, a pneumatic switch is attached to the front side of door pillar, which
upon sensing pressure performs the same function and retracts immediately.
Opening - when encountering an obstruction, th e controller stops the door.
ASD system is connected to the OE VSS device. The door operates only at speed
of less than 5 km/h.
Emergency facility
The system has inside and outside (optional) emergency releasing handle.
Operating one of them will result in disconnecting the ASD mechanism device
and the door will function manually immediately.
Please note:
The system performs automatic reset after the ASD has been disconnected from the power
either when replacing the fuse or by disconnecting the Battery.
The system resets itself within two minutes. Please be patient.
Page 40
CRAFTER
Mercedes Sprinter
Automatic Sliding Door
PowerDoorAndStep.com
888.928.8000
ASD: Basic Troubleshooting
1. Door does not function.
• Check main fuse.
• Check connections of power terminals to the control unit, motor and operating switch.
• Check Control units AK-105L
• Check motor.
2. Door does not operate upon commencing the closing mode or when reaching the fully
closed positions it reverses.
• Check the safety pneumatic pressure tube; disconnect the plugs of pressure
switch and close the door.
• If the issue is not solved, try to regulate the sensitivity of the pressure switch.
• Check safety switch.
• Reset the system by extracting the fuse and returning it to its place.
• Check control unit – AK105.
3.
Door does not close completely.
• Check voltage of battery, if low, start the engine.
4.
Door does not open, although the electrical motor is engaged.
• Check position of the locker unit, which annuls the OEM locking system of the door.
5. Door does not automatically reverse when encountering an obstruction during
the closing mode.
• Check safety pneumatic switch.
• Check pressure tube & switch.
• Check control unit.
6. Noise from the door's chain during opening and or closing modes.
• Check installation and alignment of all wheel supports, front and rear,
as well as the gear motor support.
• Very loose chain may also jump over and cause damage to the sprocket’s main motor.
• Check chain tension and if needed shorten it by removing one or two “ links”.
7. Remote control unit does not function.
• Check connection of power terminals.
• Check battery of the key unit transmitter.
It issue still persist replace remote control receiver with two transmitters
8. If equipped with VSS, the door operates although the vehicle is in motion over 5Km/h.
• Check connections to the VSS unit.
• Check VSS unit.
9. Buzzer does not operate during the closing mode.
• Check buzzer or replace it.
Please note:
The system performs automatic reset after the ASD has been disconnected from the power
either when replacing the fuse or by disconnecting the Battery.
The system resets itself within two minutes. Please be patient.
Page. 41