1
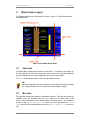
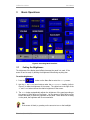
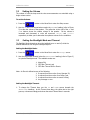
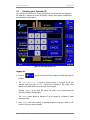
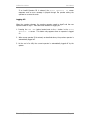
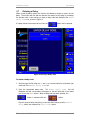
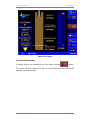
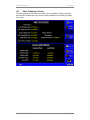
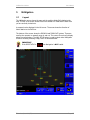
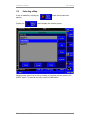
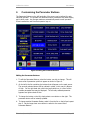
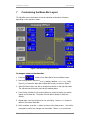
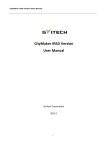
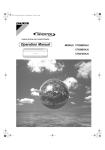
DrillNav Plus Display Panel User
Manual
DrillNav Plus Monitor
User Manual
Table of Contents
1
INTRODUCTION ........................................................................................................... 3
2
MAIN SCREEN LAYOUT............................................................................................. 4
2.1
2.2
2.3
3
BASIC OPERATIONS ................................................................................................... 6
3.1
3.2
3.3
3.4
3.5
3.6
3.7
4
SETTING THE BRIGHTNESS ........................................................................................ 6
SETTING THE VOLUME............................................................................................... 7
SETTING THE BACKLIGHT MODE AND TIMEOUT ....................................................... 7
NAVIGATION SETTINGS ............................................................................................ 8
ZEROING A HOLE ....................................................................................................... 8
ENTERING YOUR OPERATOR ID................................................................................. 9
ENTERING A DELAY ..................................................................................................11
STATS AND STATS SUMMARY SCREENS ............................................................13
4.1
4.2
5
STATUS BAR .............................................................................................................. 4
MENU BAR ................................................................................................................. 4
MAIN VIEWING AREA ................................................................................................ 5
STATS SCREEN ..........................................................................................................13
STATS SUMMARY SCREEN ........................................................................................14
NAVIGATION................................................................................................................15
5.1
5.2
LAYOUT ....................................................................................................................15
SELECTING A MAP ....................................................................................................16
6
CUSTOMISING THE PARAMETER BUTTONS .....................................................17
7
CUSTOMISING THE MENU BAR LAYOUT ...........................................................19
Tritronics (Australia) P/L
Page 2
DrillNav Plus Monitor
1
User Manual
Introduction
The purpose of this manual is to provide an explanation of the operation of the
Tritronics DrillNav Plus Monitor.
The Tritronics DrillNav Plus Operator Display displays the real-time information
collected by the Monitor to the operator. The Operator Display has a 10.4 inch (26.4
cm) viewable area with InfraRed (IR) touch control. The display backlight has a
brightness range from 1600 nits, allowing full sun readability, to <10 nits, allowing a
flicker-free low brightness setting for night time operation. The Operators Display is
designed for rugged conditions such is experienced on Drills.
Tritronics (Australia) P/L
Page 3
DrillNav Plus Monitor
2
User Manual
Main Screen Layout
The Display contains three main areas, as shown in Figure 1. These three areas are
discussed below.
Figure 1: Three Main Screen Areas
2.1
Status Bar
The Status Bar is located at the bottom of the screen. It contains a help button on
the left hand side, a clock which shows the current time on the right hand side and
a place to diaply the currently selected delay code in the centre section.
The Help button displays help for the currently selected screen.
TIP
Other than displaying the time, pressing the clock turns the display backlight
off. Pressing anywhere on the screen turns the backlight on again.
2.2
Menu Bar
The Menu Bar contains the buttons to navigate the system. There are two menu bars
available, which are accessed using the Next button on the lower right of the
screen. Any menu button can be selected while on another screen. For example if
you are in the Enter Operator ID screen, you can simply select the Delay
Code button, which will automatically close the Enter Operator ID screen for
you.
Tritronics (Australia) P/L
Page 4
DrillNav Plus Monitor
User Manual
ADVANCED TIP
The number and positions of the buttons is customisable by each individual
operator, which is covered further in the section Customising the Menu Bar
Layout.
2.3
Main Viewing Area
The Main Viewing Area displays the screens that contain the feedback for the
operator. These include the Setup screen, Stats screen, the Stats summary screen
and the NAVigation screen.
Tritronics (Australia) P/L
Page 5
DrillNav Plus Monitor
3
User Manual
Basic Operations
Figure 2: Accessing Basic Functions
3.1
Setting the Brightness
The brightness of the display panel affects how easy the panel is to read. If the
screen is hard to read, try altering the brightness before doing anything else.
To set the brightness:
1. Press the
button on the Menu Bar to enter the Setup screen.
2. Use the UP and DOWN arrow buttons under the BRIGHTNESS heading (refer to
Figure 2) to alter the brightness of the screen. The yellow bar to the right of the
UP and DOWN buttons shows the relative brightness of the screen.
3. The AUTO button automatically adjusts the brightness of the panel according to
the amount of light falling on the screen. As the amount of light falling on the
screen decreases, so does the brightness of the panel. When direct sun is falling
on the panel, the brightness will be near maximum.
TIP
If the screen is black, try pressing on the screen to turn on the backlight.
Tritronics (Australia) P/L
Page 6
DrillNav Plus Monitor
3.2
User Manual
Setting the Volume
The volume of both the beep and the voice announcements are controlled using a
single volume control.
To set the Volume:
1. Press the
button on the Menu Bar to enter the Setup screen.
2. Use the UP and DOWN arrow buttons under the VOLUME heading (refer to Figure
2) to alter the volume of the speaker. The yellow bar to the right of the UP and
DOWN buttons shows the relative volume of the speaker. As the volume is
increased and decreased, a voice will announce “Raise” and “Lower”
respectively to allow you to determine the optimum volume for the conditions.
3.3
Setting the Backlight Mode and Timeout
The Backlight Mode determines when the backlight turns on and off, while the
timeout determines how long the backlight stays on.
Setting the Backlight Mode:
1. Press the
button on the Menu Bar to enter the Setup screen.
2. Use the large button directly below the BACKLIGHT heading (refer to Figure 2)
to cycle the Backlight mode. The available modes are:
1. Always ON,
2. OFF After Timeout, and
3. OFF After Timeout ON for Events.
Note: An Event is defined as any of the following:
1. A request from the monitor for an Operator ID,
2. A request from the monitor for a Delay Code,
3. A request from the monitor to cancel a Delay,
4. Any message or error.
Setting the Backlight Timeout:
1. To change the Timeout time, use the UP and DOWN arrows beneath the
BACKLIGHT headings. As the Timeout time alters, the yellow bar to the right
goes up or down accordingly and shows the actual Timeout time in seconds.
Tritronics (Australia) P/L
Page 7
DrillNav Plus Monitor
3.4
User Manual
NAVigation Settings
The zoom settings determine the behaviour of the NAVigation screen. The 10m
Zoom at setting sets the distance away from the hole at which the NAVigation
screen zooms to a 10x10 meter zoom. The 2m Zoom at setting sets the distance
away from the hole at which the NAVigation screen zooms to a 2x2 meter zoom.
The Compass setting determines whether the compass is displayed on the
NAVigation screen or not.
3.5
Zeroing a Hole
Under normal operationing conditions (Good GPS), pressing the ZERO HOLE button
just displays the Stats screen.
If the GPS is BAD or a hole that is not on the map is being drilled, then this screen
allows the operator to select the details of the hole. This screen automatically
appears if either of these conditions exist.
TIP
The Stats screen is automatically displayed once the ZERO HOLE button has
been pressed.
Tritronics (Australia) P/L
Page 8
DrillNav Plus Monitor
3.6
User Manual
Entering your Operator ID
Your Operator ID restores the screen settings that you set last time you logged in.
For example, it restores the screen brightness, volume, menu button configuration
and parameter configurations.
Figure 3: Entering Operator ID
Logging On:
1. Press the
button on the Menu Bar to display the ‘Enter Operator ID’
window.
2. The Enter Operator ID screen is shown in Figure 3. To logon, key in your
operator code and press ENTER. As keys are pressed on the screen, they
appear in the small black box to the right of the keypad.
Pressing CANCEL at any time will return the screen to the state before the
Operator ID button was pressed.
The CLEAR button allows an Operator ID to be retyped if a mistake is made
during entering.
3. After ENTER has been pressed, a message appears along the bottom of the
screen if the log on was successful.
Tritronics (Australia) P/L
Page 9
DrillNav Plus Monitor
User Manual
If an invalid Operator ID is entered, the Enter Operator ID screen
reappears and an error message is played through the speaker asking the
operator to re-enter the code.
Logging Off:
When the operator changes, the previous operator needs to logoff and the new
operator needs to logon. There are three methods of logging off:
1. Pressing the LOG OFF button located next to the 0 button in the Enter
Operator ID screen. This button only appears when an operator is logged
on.
2. When a new operator ID is entered, as described above, the previous operator is
automatically logged off.
3. At the end of a shift, the current operator is automatically logged off by the
system.
Tritronics (Australia) P/L
Page 10
DrillNav Plus Monitor
3.7
User Manual
Entering a Delay
When normal operation stops, the monitor will attempt to assign a reason for the
delay. The monitor will first ask the operator the reason for the delay by prompting
the operator with a voice warning to enter a delay code and displaying the Enter
Delay Code box, as seen in Figure 4.
If a delay needs to be entered at any time, the
button can be pressed.
Figure 4: Entering a Delay Code
To Select a Delay Code:
1. Scroll through the list using the UP and DOWN arrows located in the bottom right
hand side of the Enter Delay Code box.
2. Press the appropriate delay code. The Enter Delay Code box will
disappear and the current delay will appear on the left hand side of the status
bar, next to the HELP button. When a delay code has been selected, the
button is replaced with the
button.
Figure 5 shows a delay code string, in this case Shift Change, and the Cancel
Delay button has replaced the Delay Code button.
Tritronics (Australia) P/L
Page 11
DrillNav Plus Monitor
User Manual
Figure 5: In a Delay
To Cancel a Delay Code:
If a delay needs to be cancelled at any time, simply press the
button.
The monitor will also request for a delay to be cancelled if it thinks that normal
operation has been resumed.
Tritronics (Australia) P/L
Page 12
DrillNav Plus Monitor
4
4.1
User Manual
Stats and Stats Summary Screens
Stats Screen
The Stats Screen shows the drilling details while drilling. The centre of the screen
shows the bit with respect to the target depth. The right hand side of the screen
displays the current penetration rate achieved. The left side of the screen shows the
parameter buttons.
Using the Parameter Buttons
The Parameter Buttons are situated on the left hand side of the
Stats screen, accessed by pressing the Stats button on Menu
Bar. These buttons display useful statistics about productivity and
times. There are two lists available, each list containing five
parameters. Use the large down arrow to switch between the two
lists.
All of the ten buttons are customisable to suit the individual
operators needs (see Section 4, Error! Not a valid bookmark
self-reference.).
TIP
This screen is automatically displayed once the ZERO HOLE button has been
pressed.
Tritronics (Australia) P/L
Page 13
DrillNav Plus Monitor
4.2
User Manual
Stats Summary Screen
The Stats summary screen shows a summary of the statistics for the Current Hole
and Last Hole (bottom half of the screen) and the statistics for the Shift (top half of
the screen).
Tritronics (Australia) P/L
Page 14
DrillNav Plus Monitor
5
5.1
User Manual
NAVigation
Layout
The NAVigation screen shows the map and the position of the Drill relative to the
map. The top of the screen shows the current slected PATTERN and the HOLE that
you are currently locked onto.
A compass is also displayed in the left corner. The arrow shows the direction of
North relative to the Drill Icon.
The bottom of the screen shows the ZOOM IN and ZOOM OUT buttons. These are
used by the operator to manually zoom in and out. The current Zoom level is display
above the zoom buttons. The NAV SETUP button is used to select other NAVigation
functions including selecting a map, which is discussed below.
IMPORTANT
If the GPS STATUS is
Tritronics (Australia) P/L
then Navigation is NOT usable.
Page 15
DrillNav Plus Monitor
5.2
User Manual
Selecting a Map
A map is selected by pressing the
appears.
Pressing the
button and a small menu
button displays the following screen:
Select the map name from the list by pressing on the name and then pressing the
ACCEPT button. To cancel at any time, press the CLOSE button.
Tritronics (Australia) P/L
Page 16
DrillNav Plus Monitor
6
User Manual
Customising the Parameter Buttons
The Parameter Buttons on the left hand side of the screen can be tailored for each
individual operator. The operator can determine which parameters they want display
and in which order. Any changes made are automatically saved to each operators’
ID and recalled the next time that operator logs on.
Figure 6: Editing the Parameter Buttons
Editing the Parameter Buttons:
1. To edit the Parameter Buttons, select the button you wish to change. This will
cause a list of parameter options to appear as shown in Figure 6.
2. On the left is the list containing the buttons that will appear on the main screen.
The currently selected button will be outlined in yellow, in this case it is Bottom
of Hole. On the right hand side, within the large yellow box, is a list of all the
possible parameter that may be displayed. The currently selected parameter
appears as a lighter shade of blue.
3. To change the button on the left, simply select a new button on the right. The
parameter button will be instantly updated.
4. To change another Parameter Button, select it from the list on the left and repeat
step 3. Use the large down arrow button to switch to the second list of
Parameter Buttons.
Tritronics (Australia) P/L
Page 17
DrillNav Plus Monitor
User Manual
5. To finish and return to the main screen, select the OK button.
To ignore all the changes and return to the main screen select the CANCEL button.
TIP
Select the SET TO DEFAULT button if you want to reset the Parameter
Buttons to the default operator configuration.
Tritronics (Australia) P/L
Page 18
DrillNav Plus Monitor
7
User Manual
Customising the Menu Bar Layout
The Menu Bar can be customised to hold an individual combination of buttons,
depending on the operator’s needs.
Figure 7: Menu Bar Configuration Screen
To change a button on the Menu Bar:
1. Press the
button on the Menu Bar to enter the Setup screen.
2. Use the large button below the MENUS heading, labelled CONFIGURE, (refer
Figure 2), to access the Menu Bar Configuration screen, as shown in Figure 7.
3. Select the Menu button you wish to change from the list on the right hand side.
The yellow arrow will move to point at the selected button.
4. From the list of buttons in the central yellow box, select the button you wish to
appear on the Menu Bar. The button icon will alter instantly to reflect the
change.
5. Repeat steps 3 and 4 until the menu is to your liking. Use the NEXT button to
switch to the second Menu Bar.
6. When complete, press the OK button to return to the Setup screen. You will be
prompted to confirm any changes you have made. Select YES to confirm the
Tritronics (Australia) P/L
Page 19
DrillNav Plus Monitor
User Manual
changes and go to the Setup screen. Select NO to return to the Menu Bar
Configuration Screen.
Select CANCEL to exit to the Setup screen without saving any changes that have
been made. You will be prompted about discarding the changes you have made.
Select YES to discard the changes and go to the Setup screen. Select NO to
return to the Menu Bar Configuration Screen.
The SET TO DEFAULT button resets the menu to the default operators
configuration. You are prompted before the change is made. Select YES to
continue and set to the default configuration and select NO to return to the Menu
Bar Configuration Screen.
Any changes made are saved to the operators’ ID and will be loaded automatically
the next time that the operator logs on.
Tritronics (Australia) P/L
Page 20