1
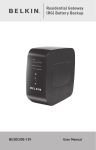
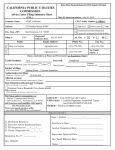
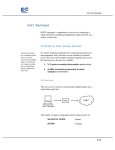
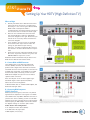
AT&T U-verse TV
Setting Up Your HDTV (High-Definition TV)
Where to Begin
1.
Review your HDTV’s User’s Manual to determine
which type of TV connection is recommended.
Generally, it is one of three types: HDMI to HDMI,
HDMI to DVI or Component. HDMI is
recommended for the highest-quality video and is
the easiest because it includes the audio signal.
2. Based on the recommended connection from
your TV manufacturer, locate the appropriate
connection diagram on the right. Ensure that you
have all of the necessary cables and follow the
connection diagram.
3. Once complete, you will need to set the AT&T
U-verseSM receiver aspect ratio to match the
settings of your HDTV and your viewing
preference. (see page 2) Generally, HD content is
best viewed in its native 16x9 widescreen aspect
ratio.
4. Ensure that you have subscribed to AT&T U-verse
HD service. If you have not done this, please call
800-ATT-2020 to request this service.
Additional detailed information may be found in the
AT&T Receiver Manual and Features Guide.
A – Connect With an HDMI Connector
Some HDTVs have a high-definition multimedia
Interface (HDMI) connector. The HDMI connector
provides both a digital video and audio connection.
The HDMI connector can also provide a connection to
an HDTV with a DVI input. If your HDTV has a Digital
Visual Interface (DVI) connector, you will need an
HDMI-to-DVI adaptor and you will need to make a
separate audio connection.
Note: The DVI port on the TV must support highbandwidth digital content protection (HDCP).
Cables Used in This Configuration
1 HDMI-to-HDMI cable or 1 HDMI-to-DVI Adaptor, and
RCA audio left/right cables
B – Connecting With Component
(PrPbY) Connectors
PrPbY (red, blue and green) connectors can provide
high-definition component video signals to an HDTV.
Some HDTVs have only RGB or RGB-HV connectors. If
you have one of these HDTVs, you will need an RGB
adaptor. Check with your AT&T U-verse representative
about acquiring an RGB adaptor. You can also obtain
the adaptor through an electronic parts retailer.
Cables Used in This Configuration
1 set component video cables (PrPbY)
1 set RCA audio left/right cables
1 RGB adaptor (if necessary)
AT&T U-verse TV
Changing the Aspect Ratio
on Your AT&T U-verse TV
Change the Aspect Settings to Fit Your TV
When you purchase a new television, such as an HDTV, you’ll want to match the output of the
AT&T U-verseSM receiver to your new TV. Review your HDTV’s User’s Manual to determine which
aspect ratio is recommended for your TV.
1
3
4
5
Press menu, select options, then system settings, and then aspect ratio. 2 Use the arrows
to select 4:3 Standard Definition, Widescreen Standard Definition, 720p on High Definition
screen, or 1080i on High Definition screen.
Use the arrows to select continue and press OK.
If you choose one of the two High Definition settings, you will be prompted to test the new
aspect ratio. Use the arrows to select Start Test and press OK.
An on-screen message will appear and ask you to confirm that you can view the screen
using the new aspect ratio setting.
a. If you are able to see the screen, use the arrows to select Keep setting and press OK. The
AT&T U-verse receiver will keep the new setting.
b. If you do not select Keep setting, or if you see a black screen, the new setting will time
out. The AT&T U-verse receiver will revert back to the previous setting and will give you
the option to choose another setting or start the test again.
Enlarge or Shrink the Image You See on Your HDTV
If you watch non-HD (standard-definition) programming in widescreen mode (Widescreen
Standard Definition, 720p on High Definition screen, or 1080i on High Definition screen) on a
widescreen HDTV, black bars may appear on the sides of the program. To remove/ minimize the
bars, press enter on your remote.
1
2
3
Tune in to any channel on your TV and press enter on your remote to see the current zoom
setting on-screen.
Before the zoom symbol disappears, press enter repeatedly to change from one setting to
the next until you reach the zoom you want. There are five settings:
> Normal displays the normal image.
> Zoom 1 to 3 increases the zoom (720p on High Definition screen and 1080i on High
Definition screen ratios only).
> Stretch expands the image to fill the screen (may cause distortion of picture).
Wait for the zoom symbol to disappear. Note: Zoom will affect all channels, not just the one
you’ve changed the settings on.