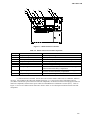
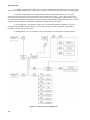
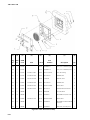
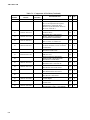
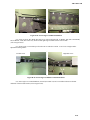
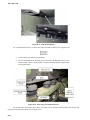
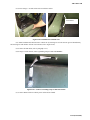
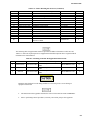
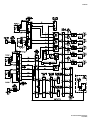
1
TM 11862A-OR
U.S. MARINE CORPS TECHNICAL MANUAL
OPERATOR/CREW MAINTENANCE MANUAL
WITH COMPONENTS LIST AND REPAIR PARTS LIST
FOR
SHELTER EXPANDABLE
(MOBILE TACTICAL SHELTER)
AN/TSQ-272
NSN 5411-01-581-2654
DISTRIBUTION NOTICE: THIS PUBLICATION IS REQUIRED FOR OFFICIAL USE OR FOR ADMINISTRATIVE OR
OPERATIONAL PURPOSES. DISTRIBUTION IS LIMITED TO US GOVERNMENT AGENCIES ONLY. OTHER
REQUESTS FOR THIS DOCUMENT MUST BE REFERRED TO: DIGITAL FIRES SITUATION AWARENESS (DFSA)
PROGRAM MANAGER, (PMM 114), MAGTF COMMAND AND CONTROL, WEAPONS, AND SENSORS
DEVELOPMENT INTEGRATION (MC2I), MARINE CORPS SYSTEMS COMMAND, 2200 LESTER STREET,
QUANTICO, VIRGINIA 22134-5010.
DESTRUCTION NOTICE: DESTROY BY ANY METHOD THAT WILL PREVENT DISCLOSURE OF CONTENTS OR
RECONSTRUCTION OF DOCUMENTS.
FOR OFFICIAL USE ONLY
DECEMBER 2011
PCN 184 118620 00
Warning Page
Indicates possible electrical hazard; electricity is emitted that can harm or kill personnel.
Indicates ESD is present that can damage equipment.
Indicates potentially flammable material that can ignite and burn.
LASER RADIATION
EYE HAZARD
Indicates laser radiation is emitted that can injure eyes and damage sight.
Indicates material is poisonous or a danger to life.
Indicates material requires at least a two-person lift.
Record of Changes
Change No.
Date
Title or Brief Description
Entered by
TM 11862A-OR
LIST OF EFFECTIVE PAGES
INSERT LATEST CHANGED PAGES. DESTROY SUPERCEDED PAGES.
NOTE: The portion of the text affected by the changes is indicated by a vertical line in the outer margin of the
page. Changes to illustrations are indicated by miniature pointing heads. Change to wiring diagrams are
indicated by shading.
Dates of issue for original and changed pages are:
Original Revision
0
September 2011
TOTAL NUMBER OF PAGES IN THIS PUBLICATION IS 274 CONSISTING OF THE FOLLOWING:
Page No.
Title
Warning Page
1
2 blank
A
B blank
i-xix
xx blank
1-1 – 1-28
2-1 – 2-8
3-1 – 3-17
3-18 blank
4-1 – 4-7
4-8 blank
5-1 – 5-22
6-1 – 6-12
7-1 – 7-43
7-44 blank
8-1 – 8-32
A-1 – A-4
B-1 – B-2
C-1 – C-6
D-1 – D-35
D-36 blank
E-1 – E -10
F-1 – F-3
F-4 blank
*Change No.
0
0
0
0
0
0
0
0
0
0
0
0
0
0
0
0
0
0
0
0
0
0
0
0
0
0
0
Page No.
FP-1
FP-2 blank
FP-3
FP-4 blank
FP-5
FP-6 blank
FP-7
FP-8 blank
FP-9
FP-10 blank
FP-11
FP-12 blank
FP-13
FP-14 blank
*Change No.
0
0
0
0
0
0
0
0
0
0
0
0
0
0
* Zero in this column indicates an original page.
USMC
A/(B blank)
TM 11862A-OR
TABLE OF CONTENTS
TITLE
PAGE
CHAPTER 1 GENERAL INFORMATION.............................................................................................................. 1-1
1-1. INTRODUCTION......................................................................................................................................... 1-1
1-2. DESCRIPTION OF TECHNICAL MANUAL. ............................................................................................ 1-1
1-3. PHYSICAL ARRANGEMENT.................................................................................................................... 1-2
1-4. SHELTER EXTERIOR. ............................................................................................................................... 1-3
1-5. SHELTER INTERIOR.................................................................................................................................. 1-7
1-6. SYSTEM EQUIPMENT. ............................................................................................................................ 1-14
1-7. SPECIFICATIONS. .................................................................................................................................... 1-27
1-8. REFERENCE DATA. ................................................................................................................................. 1-27
CHAPTER 2 SAFETY PRECAUTIONS .................................................................................................................. 2-1
2-1. INTRODUCTION......................................................................................................................................... 2-1
2-2. SAFETY PRECAUTIONS. .......................................................................................................................... 2-1
2-3. ELECTROMAGNETIC RADIATION HAZARDS AND PRECAUTIONS ............................................... 2-2
2-4. SYSTEM HAZARDS AND PRECAUTIONS. ............................................................................................ 2-3
2-5. OPERATIONAL AND MAINTENANCE SAFETY SUMMARY. ............................................................ 2-4
2-6. HAZARDOUS COMPONENTS. ................................................................................................................. 2-7
CHAPTER 3 INSTALLATION ................................................................................................................................. 3-1
3-1. INTRODUCTION......................................................................................................................................... 3-1
3-2. SITE SELECTION........................................................................................................................................ 3-1
3-3. SYSTEM GROUNDING .............................................................................................................................. 3-1
3-4. INSTALLING SHELTER SYSTEMS.......................................................................................................... 3-2
3-5. MTS OPERATIONAL STATE. ................................................................................................................. 3-12
3-6. EMERGENCY POWERING DOWN. ....................................................................................................... 3-14
3-7. STOWED MODE. ...................................................................................................................................... 3-14
CHAPTER 4 FUNCTIONAL DESCRIPTION......................................................................................................... 4-1
4-1. INTRODUCTION......................................................................................................................................... 4-1
4-2. SYSTEM FUNCTION DIRECTORY .......................................................................................................... 4-1
CHAPTER 5 OPERATIONS ..................................................................................................................................... 5-1
5-1. INTRODUCTION......................................................................................................................................... 5-1
5-2. CONTROLS, INDICATORS, AND CONNECTIONS. ............................................................................... 5-1
5-3. OPERATING MODES. .............................................................................................................................. 5-18
5-4. NORMAL OPERATION, POWER UP SUBSYSTEMS. .......................................................................... 5-19
5-5. NORMAL OPERATIONS, POWER DOWN AND SECURE SUBSYSTEMS. ....................................... 5-21
5-6. DEGRADED OPERATIONS. .................................................................................................................... 5-22
i
TM 11862A-OR
CHAPTER 6 PREVENTIVE MAINTENANCE CHECKS AND SERVICES ...................................................... 6-1
6-1. PURPOSE. .................................................................................................................................................... 6-1
6-2. SCOPE. ......................................................................................................................................................... 6-1
6-3. INSPECTION. .............................................................................................................................................. 6-1
6-4. SCHEDULED MAINTENANCE ACTION INDEX, TABLE COLUMN EXPLANATION..................... 6-2
6-5. HIGH MOBILITY MULTI-PURPOSE WHEELED VEHICLE PREVENTIVE MAINTENANCE
CHECKS AND SERVICES PROCEDURES. ............................................................................................. 6-3
6-6. LIGHTWEIGHT MULTIPURPOSE SHELTER PREVENTIVE MAINTENANCE CHECKS AND
SERVICES PROCEDURES. ....................................................................................................................... 6-3
6-7. ADVANCED FIELD ARTILLERY TACTICAL DATA SYSTEM COMPUTERS PREVENTIVE
MAINTENANCE CHECKS AND SERVICES PROCEDURES. ............................................................... 6-3
6-8. DISPLAY UNITS PREVENTIVE MAINTENANCE CHECKS AND SERVICES PROCEDURES. ....... 6-3
6-9. POWER SUPPLY (INVERTER) AND DIGITAL DISPLAY INDICATOR PREVENTIVE
MAINTENANCE CHECKS AND SERVICES PROCEDURES. ............................................................... 6-3
6-10. ENHANCED POSITION LOCATION AND REPORTING SYSTEM PREVENTIVE
MAINTENANCE CHECKS AND SERVICES PROCEDURES. ............................................................... 6-4
6-11. RADIO SYSTEMS PREVENTIVE MAINTENANCE CHECKS AND SERVICES PROCEDURES. ..... 6-4
6-12. RADIO HANDSETS PREVENTIVE MAINTENANCE CHECKS AND SERVICES PROCEDURES. .. 6-4
6-13. ANTENNA SYSTEMS PREVENTIVE MAINTENANCE CHECKS AND SERVICES
PROCEDURES. ........................................................................................................................................... 6-4
6-14. POWER CONVERTER AND CONDITIONER PREVENTIVE MAINTENANCE CHECKS AND
SERVICES PROCEDURES. ....................................................................................................................... 6-4
6-15. AIR CONDITIONER UNIT PREVENTIVE MAINTENANCE CHECKS AND SERVICES
PROCEDURES. ........................................................................................................................................... 6-4
6-16. GROUNDING KIT PREVENTIVE MAINTENANCE CHECKS AND SERVICES PROCEDURES...... 6-4
6-17. SCHEDULED PREVENTIVE MAINTENANCE TEST PROCEDURES ................................................. 6-4
6-18. SCHEDULED TEST PROCEDURES. ...................................................................................................... 6-12
CHAPTER 7 ALIGNMENT/MAINTENANCE PROCEDURES .......................................................................... 7-1
7-1. INTRODUCTION ........................................................................................................................................ 7-1
7-2. FAULT ISOLATION PROCEDURES ........................................................................................................ 7-1
7-3. TROUBLESHOOTING POWER DISTRIBUTION SUBSYSTEM. .......................................................... 7-2
7-4. TROUBLESHOOTING ADVANCED FIELD ARTILLERY TACTICAL DATA SYSTEM. .................. 7-6
7-5. TROUBLESHOOTING AIR CONDITIONER AND VENTILATION FANS. ........................................ 7-11
7-6. CORRECTIVE MAINTENANCE ............................................................................................................. 7-12
7-7. REMOVE AND REPLACE ANTENNA AND ANTENNA BRACKET. ................................................ 7-12
7-8. REMOVE AND REPLACE AIR CONDITIONER. .................................................................................. 7-14
7-9. REMOVE AND REPLACE FAN ASSEMBLIES. .................................................................................... 7-18
7-10. REMOVE AND REPLACE OVERHEAD LIGHTING. ........................................................................... 7-24
7-11. REMOVE AND REPLACE RELAY, ELECTROMAGNETIC. ............................................................... 7-25
7-12. REMOVE AND REPLACE DIPLEXER. .................................................................................................. 7-26
7-13. REMOVE AND REPLACE BATTERIES................................................................................................. 7-27
ii
TM 11862A-OR
7-14. REMOVE AND REPLACE BATTERY CHARGER CONTROL. ........................................................... 7-29
7-15. REMOVE AND REPLACE POWER SUPPLY (INVERTER). ................................................................ 7-31
7-16. REMOVE AND REPLACE KEYBOARD DISPLAY UNIT. ................................................................... 7-34
7-17. REMOVE AND REPLACE AFATDS POWER CONDITIONER/CONVERTER. .................................. 7-34
7-18. REMOVE AND REPLACE ENHANCED POSITION LOCATION AND REPORTING SYSTEM
RADIO SYSTEM. ...................................................................................................................................... 7-35
7-19. REMOVE AND REPLACE EPLRS USER READ-OUT. ......................................................................... 7-35
7-20. REMOVE AND REPLACE AN/VRC-110 RADIO SYSTEM. ................................................................. 7-36
7-21. REMOVE AND REPLACE LOUDSPEAKER CONTROL UNIT. .......................................................... 7-36
7-22. REMOVE AND REPLACE 4-PORT USB HUB. ...................................................................................... 7-37
7-23. REMOVE AND REPLACE ADP INTERFACE UNIT. ............................................................................ 7-38
7-24. REMOVE AND REPLACE AFATDS COMPUTERS. ............................................................................. 7-39
7-25. REMOVE AND REPLACE DISPLAY UNIT. .......................................................................................... 7-40
7-26. REMOVE AND REPLACE RADIO FREQUENCY POWER DIVIDERS. ............................................. 7-42
7-27. REMOVE AND REPLACE PERSONNEL DOOR LATCH. .................................................................... 7-43
CHAPTER 8 REPAIR PARTS LIST ......................................................................................................................... 8-1
8-1. INTRODUCTION......................................................................................................................................... 8-1
8-2. GENERAL. ................................................................................................................................................... 8-1
8-3. EXPLANATION OF COLUMNS. ............................................................................................................... 8-1
APPENDIX A ACRONYMS AND ABBREVIATIONS .......................................................................................... A-1
APPENDIX B EXPENDABLE-DURABLE SUPPLIES AND MATERIAL LIST ............................................... B-1
B-1. GENERAL INFORMATION. ..................................................................................................................... B-1
B-2. EXPLANATION OF COLUMNS. .............................................................................................................. B-1
APPENDIX C COMPONENTS OF END ITEM LIST ........................................................................................... C-1
C-1. SCOPE. ........................................................................................................................................................ C-1
C-2. GENERAL. .................................................................................................................................................. C-1
C-3. LIST OF COMPONENTS. .......................................................................................................................... C-1
C-4. SUPPLY SUPPORT CATEGORIES........................................................................................................... C-2
C-5. EXPLANATION OF COLUMNS. .............................................................................................................. C-2
C-6. COMPONENTS OF END ITEM LIST. ...................................................................................................... C-3
APPENDIX D MOBILE TACTICAL SHELTER INSTALLATION TO VEHICLE .......................................... D-1
D-1. INTRODUCTION........................................................................................................................................ D-1
D-2. PRE-INSTALLATION REQUIREMENTS. ............................................................................................... D-1
D-3. VEHICLE PREPARATION. ....................................................................................................................... D-3
D-4. PREPARING THE M1152. ......................................................................................................................... D-4
D-5. REMOVING REAR TAILLIGHTS. ........................................................................................................... D-8
D-6. INSTALLING THE PINTLE EXTENSION. .............................................................................................. D-9
D-7. MOUNTING MTS TO VEHICLE. ........................................................................................................... D-14
iii
TM 11862A-OR
APPENDIX E MOBILE TACTICAL SHELTER REMOVAL FROM VEHICLE .............................................. E-1
E-1. INTRODUCTION. ....................................................................................................................................... E-1
E-2. PREPARATION REQUIREMENTS. .......................................................................................................... E-1
E-3. REMOVAL OF MTS FROM VEHICLE. .................................................................................................... E-5
APPENDIX F MOBILE TACTICAL SHELTER OPERTATING RESTRICTIONS ......................................... F-1
iv
TM 11862A-OR
LIST OF FIGURES
FIGURE
Figure 1-1.
Figure 1-2.
Figure 1-3.
Figure 1-4.
Figure 1-5.
Figure 1-6.
Figure 1-7.
Figure 1-8.
Figure 1-9.
Figure 1-10.
Figure 1-11.
Figure 1-12.
Figure 1-13.
Figure 1-14.
Figure 1-15.
Figure 1-16.
Figure 1-17.
Figure 1-18.
Figure 1-19.
Figure 1-20.
Figure 1-21.
Figure 1-22.
Figure 1-23.
Figure 1-24.
Figure 1-25.
Figure 1-26.
Figure 1-27.
Figure 1-28.
Figure 1-29.
Figure 1-30.
Figure 1-31.
Figure 1-32.
Figure 1-33.
Figure 3-1.
Figure 3-2.
Figure 3-3.
Figure 3-4.
Figure 3-5.
Figure 3-6.
Figure 3-7.
Figure 3-8.
Figure 3-9.
Figure 3-10.
Figure 4-1.
Figure 4-2.
Figure 4-3.
Figure 4-4.
Figure 5-1.
Figure 5-2.
Figure 5-3.
Figure 5-4.
TITLE
PAGE
Shelter Exterior ....................................................................................................................................... 1-3
Shelter Exterior Front Wall .................................................................................................................... 1-4
Shelter Exterior Rear Wall...................................................................................................................... 1-5
Shelter Exterior Curbside Wall Components ......................................................................................... 1-6
Shelter Exterior Roadside Wall Components ......................................................................................... 1-7
Shelter Interior ........................................................................................................................................ 1-8
Shelter Interior Front Wall...................................................................................................................... 1-9
Shelter Interior Rear Wall and Doors ................................................................................................... 1-10
Shelter Interior Curbside Wall Components......................................................................................... 1-11
Shelter Interior Roadside Wall Components ........................................................................................ 1-12
Shelter Interior Radio Rack .................................................................................................................. 1-13
RF-390A/VRC Multi-band Vehicular Antenna.................................................................................... 1-14
AS-3449/VSQ-1 Omni-directional Antenna ........................................................................................ 1-15
Air Conditioner ..................................................................................................................................... 1-15
Impeller Fan.......................................................................................................................................... 1-16
Fire Extinguisher .................................................................................................................................. 1-16
Power Distribution Unit (Side View) ................................................................................................... 1-17
Power Distribution Unit (Front View) .................................................................................................. 1-18
Circuit Breaker 19 ................................................................................................................................ 1-18
Mobile Tactical Shelter Battery ............................................................................................................ 1-19
Battery Charger Control ....................................................................................................................... 1-20
Power Supply (Inverter) ....................................................................................................................... 1-20
Digital Display Indicator ...................................................................................................................... 1-21
Enhanced Position Location and Reporting System Receiver/Transmitter .......................................... 1-22
Enhanced Position Location and Reporting System User Read Out .................................................... 1-22
AN/PRC-152 Radio Handset ................................................................................................................ 1-23
Keyboard Display Unit ......................................................................................................................... 1-23
Automated Data Processing Interface Unit .......................................................................................... 1-24
Display Unit.......................................................................................................................................... 1-25
Mounting Bracket ................................................................................................................................. 1-25
2-Port Radio Frequency Power Divider ............................................................................................... 1-26
4-Port Radio Frequency Power Divider ............................................................................................... 1-26
Keyboard and Mouse ............................................................................................................................ 1-26
Shelter Antenna Locations...................................................................................................................... 3-2
RF-390A/VRC Multi-band Antenna ...................................................................................................... 3-3
AS-3449/VSQ-1 Omni-directional Antenna .......................................................................................... 3-5
Closing Battery Compartment Door ....................................................................................................... 3-7
Enhanced Position Location and Reporting System ............................................................................... 3-8
AN/VRC-110 .......................................................................................................................................... 3-9
Keyboard and Mouse ............................................................................................................................ 3-11
Vehicle Interface Panel Diagram and Vehicle Interface Panel............................................................. 3-12
Vehicle Boot ......................................................................................................................................... 3-13
Vehicle Boot with Ridge Poles ............................................................................................................. 3-14
Shelter Power Circuit Diagram............................................................................................................... 4-2
Mobile Tactical Shelter Direct Current Circuit Diagram ....................................................................... 4-4
Shelter Alternating Current Circuit Diagram.......................................................................................... 4-5
Shelter Radio Block Diagram ................................................................................................................. 4-6
Keyboard Display Unit Controls and Indicators..................................................................................... 5-1
Air Conditioner ....................................................................................................................................... 5-2
Air Conditioner Control Panel Controls and Indicators ......................................................................... 5-2
Power Supply (Inverter) ......................................................................................................................... 5-3
v
TM 11862A-OR
Figure 5-5.
Figure 5-6.
Figure 5-7.
Figure 5-8.
Figure 5-9.
Figure 5-10.
Figure 5-11.
Figure 5-12.
Figure 5-13.
Figure 5-14.
Figure 5-15.
Figure 5-16.
Figure 5-17.
Figure 7-1.
Figure 8-1.
Figure 8-2.
Figure 8-3.
Figure 8-4.
Figure 8-5.
Figure 8-6.
Figure 8-7.
Figure 8-8.
Figure 8-9.
Figure 8-10.
Figure 8-11.
Figure 8-12.
Figure 8-13.
Figure 8-14.
Figure 8-15.
Figure 8-16.
Figure 8-17.
Figure 8-18.
Figure 8-19.
Figure 8-20.
Figure 8-21.
Figure 8-22.
Figure 8-23.
Figure 8-24.
Figure 8-25.
Figure 8-26.
Figure D-1.
Figure D-2.
Figure D-3.
Figure D-4.
Figure D-5.
Figure D-6.
Figure D-7.
Figure D-8.
Figure D-9.
Figure D-10.
Figure D-11.
Figure D-12.
Figure D-13.
Figure D-14.
vi
Power Supply (Inverter) Terminal Block Controls and Indicators ........................................................ 5-4
Digital Display Indicator Controls and Indicators ................................................................................. 5-6
Automated Data Processing (ADP) Interface Unit Front Panel Controls, Indicators, and Connectors . 5-7
Display Unit ........................................................................................................................................... 5-8
Display Unit On-Screen Menu (OSM) Controls and Indicators ............................................................ 5-8
Power Distribution Unit (Front View) ................................................................................................ 5-10
Circuit Breaker 19 ................................................................................................................................ 5-11
Battery Charger Control Indicators and Connectors ............................................................................ 5-12
Battery Charger Control Remote Panel Controls and Indicators ......................................................... 5-12
Loudspeaker Control Unit Components ............................................................................................... 5-14
Panel, Light Controls, Indicators, and Connectors............................................................................... 5-16
Overhead Light Controls and Indicators .............................................................................................. 5-16
Carbon Monoxide Detector Controls and Indicators ........................................................................... 5-17
Circuit Breaker Troubleshooting............................................................................................................ 7-3
Enhanced Position Location and Reporting System Antenna Assembly ............................................... 8-5
Single Channel Ground-to-Air Radio System Antenna Assembly ........................................................ 8-6
Antenna Mounting Bracket .................................................................................................................... 8-7
Battery Tray Assembly .......................................................................................................................... 8-8
Battery Assembly ................................................................................................................................... 8-9
Rear Door Fan Assembly ..................................................................................................................... 8-10
Shelter Door Fan Assembly (Sheet 1 of 2) .......................................................................................... 8-11
Vent Fan Assembly .............................................................................................................................. 8-13
Radio Rack Fan Assembly ................................................................................................................... 8-14
Air Conditioner (Bottom Assembly) .................................................................................................... 8-15
Air Conditioner Assembly ................................................................................................................... 8-16
Power Supply (Inverter) Assembly ...................................................................................................... 8-17
Diplexer Assembly ............................................................................................................................... 8-18
Enhanced Position Location and Reporting System Mounting Assembly........................................... 8-19
Automated Data Processing Interface Unit Assembly ......................................................................... 8-20
Single Ground-to-Air Radio System Channel Mounting Assembly .................................................... 8-21
Single Ground-to-Air Radio System Channel User Read Out Mount Assembly ................................ 8-22
Relay, Electromagnetic ........................................................................................................................ 8-23
Battery Charger Control ....................................................................................................................... 8-24
Radio Frequency Power Dividers (Sheet 1 of 2).................................................................................. 8-25
Overhead Lights ................................................................................................................................... 8-27
Keyboard Display Unit Mounting Bracket .......................................................................................... 8-28
Loud Speaker Unit ............................................................................................................................... 8-29
Display Unit Mounting Bracket to Shelter ........................................................................................... 8-30
Display Unit with Mounting Bracket ................................................................................................... 8-31
4-Port USB Hub ................................................................................................................................... 8-32
Batteries Under Curbside Seat .............................................................................................................. D-4
Connector Flush with Grommet ............................................................................................................ D-5
Rear Mudflaps ....................................................................................................................................... D-5
Roadside Upper Troop Seat Bracket ..................................................................................................... D-6
Floor Panel Quick Release Knobs......................................................................................................... D-7
Armor Access Panels ............................................................................................................................ D-7
Armor Panel Mounting Frame .............................................................................................................. D-8
Taillight Removal.................................................................................................................................. D-8
Cable Guard .......................................................................................................................................... D-9
Removing Pintle from Bracket.............................................................................................................D-10
Pintle Bracket and Receptacle Cover Removed ...................................................................................D-10
Extension Arm and Hardware ..............................................................................................................D-11
Pintle Bracket Assembly Attached to Pintle Extension .......................................................................D-11
Pintle Plate ...........................................................................................................................................D-12
TM 11862A-OR
Figure D-15.
Figure D-16.
Figure D-17.
Figure D-18.
Figure D-19.
Figure D-20.
Figure D-21.
Figure D-22.
Figure D-23.
Figure D-24.
Figure D-25.
Figure D-26.
Figure D-27.
Figure D-28.
Figure D-29.
Figure D-30.
Figure D-31.
Figure D-32.
Figure D-33.
Figure D-34.
Figure D-35.
Figure D-36.
Figure D-37.
Figure D-38.
Figure D-39.
Figure D-40.
Figure D-41.
Figure D-42.
Figure D-43.
Figure D-44.
Figure D-45.
Figure D-46.
Figure D-47.
Figure D-48.
Figure D-49.
Figure D-50.
Figure D-51.
Figure D-52.
Figure D-53.
Figure D-54.
Figure D-55.
Figure D-56.
Figure D-57.
Figure E-1.
Figure E-2.
Figure E-3.
Figure E-4.
Figure E-5.
Figure E-6.
Figure E-7.
Figure E-8.
Figure E-9.
Figure E-10.
Figure E-1.
Pintle Inserted in Bracket..................................................................................................................... D-12
Power Receptacle and Cover on New Receptacle Bracket.................................................................. D-13
Receptacle Cable Secured to Clamp Bracket ...................................................................................... D-13
Pintle Extension Secured to Bumper ................................................................................................... D-14
Taillight and Rear Mounting Hardware ............................................................................................... D-15
Taillight, Grounding Plate, and Clamping Bracket ............................................................................. D-15
Wire Routing through Rear Mounting Bracket ................................................................................... D-16
Taillight Mounted to Mounting Bracket .............................................................................................. D-16
Grommet Installed in Rear Mounting Bracket .................................................................................... D-17
Clamp Bracket Installed on Mounting Bracket ................................................................................... D-18
Attaching Left and Right Rear Mount Brackets to Bumper ................................................................ D-18
Securing Rear Bracket to Bumper ....................................................................................................... D-19
Connection of Taillight and Vehicle Ground Wires ............................................................................ D-19
Reinstallation of Inboard Cable Clamp to Cable Guard ...................................................................... D-20
MTS Prepared for Installation on Vehicle ........................................................................................... D-21
Left and Right rear Mounting Brackets ............................................................................................... D-21
Installation of Rear Mounting Screws into Rear Mounting Bracket ................................................... D-22
Rear MTS Thread Protectors ............................................................................................................... D-22
Upper Side Mounting Bracket Hardware Location ............................................................................. D-23
Lower Side Mounting Bracket Hardware Location............................................................................. D-23
Rear Mounting Bracket Underside Installation Location .................................................................... D-24
Isolation Mount Washer Placement ..................................................................................................... D-24
Rear Installation Mounting Isolator Placement ................................................................................... D-25
Front Angle Assemblies and Placement Location ............................................................................... D-25
Removal of Turn-lock Fasteners ......................................................................................................... D-26
Positioning Front Angle Assemblies ................................................................................................... D-26
Positioning Rear Mount Screws over Bracket Holes........................................................................... D-27
Inserting Front Angle Assemblies between MTS and Armor Plate .................................................... D-27
Installation of Spacer Sleeve ............................................................................................................... D-28
Installation of Upper Isolator Washer.................................................................................................. D-28
Inserting Spacer into Lower Isolation Washer .................................................................................... D-29
Installation of Lower Isolation Washer with Spacer ........................................................................... D-29
Installation of Isolation Flat Washer.................................................................................................... D-30
Rear Mounting Parts Breakdown......................................................................................................... D-30
Front Angle Assemblies Installation ................................................................................................... D-31
Front Angle Assemblies Underside Hardware .................................................................................... D-31
MTS Mounting Bolts ........................................................................................................................... D-32
Front Angle Assemblies Hardware ...................................................................................................... D-32
Front Angle Assemblies Resting on Hardware.................................................................................... D-33
Mounting Kit Bar Installation.............................................................................................................. D-34
Tightening Front Angle Assemblies Hardware ................................................................................... D-34
Installation of Curbside Seat................................................................................................................ D-35
Connect Grounding straps to MTS and Vehicle .................................................................................. D-35
Positioning of Vehicle and Equipment .................................................................................................. E-5
Ground Strap Removal .......................................................................................................................... E-6
Curbside Seat Removal ......................................................................................................................... E-7
Removal of Armor Plating..................................................................................................................... E-7
Removal of Front Mounting Bracket Upper Hardware ......................................................................... E-8
Front Mount Bracket Underside Hardware ........................................................................................... E-8
Removal of Front Mounting Hardware from Vehicle Beam ................................................................. E-9
Removal of Front Mounting Bracket Hardware .................................................................................... E-9
Curbside Reinstallation........................................................................................................................ E-10
Removal of Mounting Screws ............................................................................................................. E-11
Positioning of Vehicle and Equipment .................................................................................................. E-5
vii
TM 11862A-OR
Figure E-2.
Figure E-3.
Figure E-4.
Figure E-5.
Figure E-6.
Figure E-7.
Figure E-8.
Figure E-9.
Figure E-10.
Ground Strap Removal ........................................................................................................................... E-6
Curbside Seat Removal .......................................................................................................................... E-7
Removal of Armor Plating ..................................................................................................................... E-7
Removal of Front Mounting Bracket Upper Hardware.......................................................................... E-8
Front Mount Bracket Underside Hardware ............................................................................................ E-8
Removal of Front Mounting Hardware from Vehicle Beam ................................................................. E-9
Removal of Front Mounting Bracket Hardware .................................................................................... E-9
Curbside Reinstallation ........................................................................................................................ E-10
Removal of Mounting Screws .............................................................................................................. E-11
FO-1
FO-2
FO-3
FO-3
FO-3
FO-3
FO-3
AFATDS - MTS Digital, Computer Interconnect Diagram ................................................................. FP-1
AFATDS - MTS Radio Interconnect Diagram .................................................................................... FP-3
AFATDS - MTS Power Interconnect Diagram Sheet 1 of 5 ............................................................... FP-5
AFATDS - MTS Power Interconnect Diagram Sheet 2 of 5 ............................................................... FP-7
AFATDS - MTS Power Interconnect Diagram Sheet 3 of 5 ............................................................... FP-9
AFATDS - MTS Power Interconnect Diagram Sheet 4 of 5 ............................................................. FP-11
AFATDS - MTS Power Interconnect Diagram Sheet 5 of 5 ............................................................. FP-13
viii
TM 11862A-OR
LIST OF TABLES
TABLE
Table 1-1.
Table 1-2.
Table 1-3.
Table 1-4.
Table 1-5.
Table 1-6.
Table 1-7.
Table 1-8.
Table 1-9.
Table 1-10.
Table 1-11.
Table 1-12.
Table 1-13.
Table 3-1.
Table 5-1.
Table 5-2.
Table 5-3.
Table 5-4.
Table 5-5.
Table 5-6.
Table 5-7.
Table 5-8.
Table 5-9.
Table 5-10.
Table 5-11.
Table 5-12.
Table 5-13.
Table 5-14.
Table 5-15.
Table 5-16.
Table 6-1.
Table 6-2.
Table 6-3.
Table 6-4.
Table 6-5.
Table 6-6.
Table 6-7.
Table 6-8.
Table 6-9.
Table 6-10.
Table 6-11.
Table 6-12.
Table 6-13.
Table 6-14.
Table 6-15.
Table 6-16.
Table 6-17.
Table 6-18.
Table 7-1.
Table 7-2.
TITLE
PAGE
Shelter Exterior Components ................................................................................................................... 1-3
Shelter Exterior Front Wall Components ................................................................................................. 1-4
Shelter Exterior Rear Wall Components .................................................................................................. 1-5
Shelter Exterior Curbside Wall Components ........................................................................................... 1-6
Shelter Exterior Roadside Wall Components........................................................................................... 1-7
Shelter Interior Front Wall Components .................................................................................................. 1-9
Shelter Interior Rear Wall and Doors Components................................................................................ 1-10
Shelter Interior Curbside Wall Components .......................................................................................... 1-11
Shelter Interior Roadside Wall Components .......................................................................................... 1-12
Shelter Interior Radio Rack Equipment ................................................................................................. 1-13
Power Distribution Subsystem Circuit Breakers .................................................................................... 1-19
Shelter Specifications ............................................................................................................................. 1-27
Reference Documents ............................................................................................................................ 1-27
Shelter Antenna Descriptions ................................................................................................................... 3-3
Keyboard Display Unit Controls and Indicators ...................................................................................... 5-1
Air Conditioner Control Panel Controls and Indicators ........................................................................... 5-2
Power Supply (Inverter) Controls and Indicators..................................................................................... 5-4
Power Supply (Inverter) Status Indicators ............................................................................................... 5-5
Power Supply (Inverter) Battery Status Indicators................................................................................... 5-5
Digital Display Indicator Descriptions Controls and Indicators .............................................................. 5-6
Digital Display Indicator Screens............................................................................................................. 5-6
Automated Data Processing Interface Unit Front Panel Controls, Indicators, and Connectors ............... 5-7
Display Unit OSM Controls and Indicators ............................................................................................. 5-9
Power Distribution Unit Circuit Breakers .............................................................................................. 5-11
Battery Charger Control Indicators and Connectors .............................................................................. 5-12
Battery Charger Control Remote Panel Controls and Indicators ........................................................... 5-13
Loudspeaker Control Unit Components ................................................................................................. 5-15
Panel, Light Controls, Indicators, and Connectors ................................................................................. 5-16
Overhead Light Components Controls and Indicators ........................................................................... 5-16
Carbon Monoxide Detector Components Controls and Indicators ........................................................ 5-17
Sample Scheduled Maintenance Action Table......................................................................................... 6-2
Interval Symbols Explanation .................................................................................................................. 6-2
Shelter Exterior Preventive Maintenance Checks and Services Procedures ............................................ 6-5
Shelter Interior Preventive Maintenance Checks and Services Procedures ............................................. 6-6
Power Entry Panel Preventive Maintenance Checks and Services Procedures........................................ 6-6
Radio Frequency Power Divider Preventive Maintenance Checks and Services Procedures .................. 6-7
Signal Entry Panel Preventive Maintenance Checks and Services Procedures........................................ 6-7
Battery Compartment Door and Latch Assembly Preventive Maintenance Checks and Services
Procedures ................................................................................................................................................ 6-8
Shelter Vent and Fan Assemblies Preventive Maintenance Checks and Services Procedures ................ 6-8
Radio Rack Preventive Maintenance Checks and Services Procedures ................................................... 6-9
Diplexer Preventive Maintenance Checks and Services Procedures...................................................... 6-10
Power Distribution Unit Preventive Maintenance Checks and Services Procedures ............................. 6-10
Mobile Tactical Shelter Batteries Preventive Maintenance Checks and Services Procedures............... 6-10
Battery Charger Control Preventive Maintenance Checks and Services Procedures ............................. 6-11
Keyboard Display Unit Preventive Maintenance Checks and Services Procedures .............................. 6-11
4-Port USB Hub Preventive Maintenance Checks and Services Procedures ......................................... 6-11
Automated Data Processing Interface Unit Preventive Maintenance Checks and Services Procedures 6-11
Keyboards and Mouse Devices Preventive Maintenance Checks and Services Procedures .................. 6-11
Shelter Troubleshooting ........................................................................................................................... 7-1
Mobile Tactical Shelter Battery Troubleshooting .................................................................................... 7-2
ix
TM 11862A-OR
Table 7-3.
Table 7-4.
Table 7-5.
Table 7-6.
Table 7-7.
Table 7-8.
Table 7-9.
Table 7-10.
Table 7-11.
Table 7-12.
Table 7-13.
Table 7-14.
Table 7-15.
Table 7-16.
Table B-1.
Table C-1.
Table D-1.
Table D-2.
Table D-3.
Table D-4.
Table D-5.
Table D-6.
Table D-7.
Table E-1.
Table E-2.
Table E-3.
Table E-4.
Table E-5.
x
Mobile Tactical Shelter Circuit Breakers ................................................................................................ 7-2
Power Supply (Inverter) Troubleshooting ............................................................................................... 7-4
Advanced Field Artillery Tactical Data System Power Conditioner/Converter Troubleshooting........... 7-5
Antenna Mast/Mount Troubleshooting.................................................................................................... 7-5
AN/VRC 110 System Troubleshooting ................................................................................................... 7-6
Computer Troubleshooting ...................................................................................................................... 7-7
Display Unit Troubleshooting ................................................................................................................. 7-8
Lighting Troubleshooting ........................................................................................................................ 7-9
Handset Troubleshooting ......................................................................................................................... 7-9
Keyboard Display Unit (KDU) Troubleshooting .................................................................................... 7-9
Loud Speaker Troubleshooting.............................................................................................................. 7-10
ADP Interface Unit Troubleshooting..................................................................................................... 7-10
Air Conditioner Troubleshooting........................................................................................................... 7-11
Ventilation Fan Troubleshooting ........................................................................................................... 7-11
Expendable-Durable Supplies and Materials List.................................................................................... B-1
Components of End Item ......................................................................................................................... C-3
Tool List, MTS Installation .................................................................................................................... D-1
Major Parts List, MTS Installation ......................................................................................................... D-1
Pintle Extension Kit Parts List ................................................................................................................ D-2
Shelter Mounting Kit Parts List .............................................................................................................. D-2
Mounting and Pintle Kit Supplemental Material List ............................................................................. D-3
Taillight Wire Numbers .......................................................................................................................... D-9
Taillight Wire Numbers .........................................................................................................................D-20
Tool List, MTS Removal ......................................................................................................................... E-1
Major Parts List, MTS Removal .............................................................................................................. E-1
Pintle Extension Kit Parts List ................................................................................................................. E-2
Shelter Mounting Kit Parts List ............................................................................................................... E-2
Mounting and Pintle Kit Supplemental Material List .............................................................................. E-3
TM 11862A-OR
SAFETY SUMMARY
The following WARNINGS and CAUTIONS appear on the page referenced and are listed here for emphasis.
DANGEROUS VOLTAGES EXIST IN SYSTEM EQUIPMENT. TO PREVENT PERSONNEL INJURY, DO NOT
ATTEMPT REPAIRS WHEN POWER FROM POWER SOURCES AND/OR BATTERY BACKUP IS APPLIED.
DISCONNECT ALL POWER WHEN REMOVING EQUIPMENT COVERS OR ACCESS PLATES. (PAGE 2-2)
ENSURE VEHICLE GROUNDING STRAPS LOCATED ROADSIDE AND CURBSIDE BENEATH SHELTER ARE
CONNECTED ANY TIME SHELTER IS IN USE. FAILURE TO CONNECT GROUNDING STRAPS COULD
RESULT IN PERSONNEL INJURY OR DEATH. (PAGE 2-2, 3-12)
TO PREVENT PERSONNEL INJURY, USE CARE WHEN INSTALLING AND/OR REMOVING PERIPHERAL AND
ASSOCIATED DEVICES. REMOVING EQUIPMENT COVERS AND ACCESS PLATES MAY EXPOSE SHARP
EDGES. (PAGE 2-2)
ENSURE WHEEL CHOCKS ARE PLACED BEHIND FRONT VEHICLE WHEELS ANY TIME VEHICLE IS
STOPPED AND SHELTER IS IN USE. FAILURE TO DO SO COULD RESULT IN PERSONNEL INJURY OR
DEATH FROM UNEXPECTED MOVEMENT OF VEHICLE. (PAGE 2-2)
ALWAYS OBSERVE PROPER LIFTING AND CARRYING WEIGHT LIMITS. REFER TO MIL-STD-1472 FOR
MAXIMUM WEIGHT LIMITS. (PAGE 2-4)
REPEATED AND/OR PROLONGED EXPOSURE MAY CAUSE DEFATTING OF SKIN WITH ITCHING, REDNESS,
OR RASH. CONTACT WITH VAPOR OR AEROSOL MAY CAUSE EYE IRRITATION WITH TEARING, PAIN, OR
BLURRED VISION. INCREASED SUSCEPTIBILITY TO EFFECTS OF THIS MATERIAL MAY BE OBSERVED IN
PERSONS WITH PRE-EXISTING DISEASE OF CENTRAL NERVOUS SYSTEM AND CARDIOVASCULAR
SYSTEM. (PAGE 2-7)
xi
TM 11862A-OR
REPEATED AND/OR PROLONGED EXPOSURE MAY CAUSE PERMANENT IMPARED VISION OR BLINDNESS.
TO AVOID INJURY TO PERSONNEL, AVOID LOOKING DIRECTLY INTO PATH OF LASER BEAM. (PAGE 2-8)
THE BATTERY IS A TWO-MAN LIFT. THE BATTERY IS DIFFICULT TO PICK UP AND MOVE. ENSURE THAT
YOU HAVE GOOD FOOTING AND A CLEAR PATH TO BATTERY COMPARTMENT. INJURY TO PERSONNEL
OR DAMAGE TO EQUIPMENT CAN OCCUR. (PAGE 3-6)
TO PREVENT PERSONNEL INJURY OR DEATH, ENSURE ALL CIRCUIT BREAKERS ARE OPEN (OFF) PRIOR
TO CONNECTING MTS BATTERY CABLES. (PAGE 3-12)
SERIOUS ELECTRICAL HAZARDS EXIST WHEN WORKING WITH VEHICLE/ SHELTER BATTERY SYSTEM.
TO PREVENT INJURY TO PERSONNEL OR DAMAGE TO EQUIPMENT, TAKE APPROPRIATE PRECAUTIONS.
(PAGE 5-12)
ENSURE SHELTER GROUNDING HAS BEEN COMPLETED PRIOR TO APPLYING POWER. FAILURE COULD
RESULT IN SEVERE PERSONNEL INJURY OR DEATH. (PAGE 5-18, 5-19)
SPINNING BLADES ON VENT FANS CAN CAUSE SEVERE INJURY OR AMPUTATION. USE EXTREME CARE
TO PREVENT INJURY TO PERSONNEL. (PAGE 5-20)
TO AVOID SERIOUS INJURY OR DEATH, ENSURE SYSTEM IS POWERED DOWN PRIOR TO PERFORMING
MAINTENANCE. USE PROPER SAFETY EQUIPMENT (SAFETY GOGGLES AND GLOVES) WHEN
PERFORMING MAINTENANCE TASKS. (PAGE 6-3)
xii
TM 11862A-OR
TO PREVENT INJURY TO PERSONNEL OR DAMAGE TO EQUIPMENT, TROUBLESHOOTING MUST BE
PERFORMED BY QUALIFIED PERSONNEL. (PAGE 7-1)
TO PREVENT INJURY TO PERSONNEL OR DAMAGE TO EQUIPMENT, ENSURE POWER IS REMOVED FROM
SHELTER BEFORE REPLACING ELECTRICAL COMPONENTS. SERIOUS INJURY OR DEATH CAN OCCUR.
(PAGE 7-13, 7-15, 7-18, 7-20, 7-22, 7-25, 7-26, 7-34, 7-37, 7-41, 7-42)
ALCOHOL SOLVENTS ARE FLAMMABLE. TO PREVENT INJURY TO PERSONNEL OR DAMAGE TO
EQUIPMENT, KEEP AWAY FROM HEAT, SPARKS, AND OPEN FLAME. KEEP CONTAINERS CLOSED WHEN
NOT IN USE. USE ONLY IN WELL-VENTILATED AREAS. AVOID PROLONGED BREATHING OF VAPORS OR
REPEATED CONTACT WITH SKIN. (PAGE 7-14)
TO PREVENT INJURY TO PERSONNEL, CHEMICAL PROTECTIVE GLOVES MUST BE WORN WHEN
WORKING WITH SEALING COMPOUND, POLYSULFIDE. INJURY TO PERSONNEL MAY RESULT IF
CHEMICALS CONTACT UNPROTECTED SKIN. SMOKING IS PROHIBITED WHEN WORKING WITH
FLAMMABLE MATERIALS. (PAGE 7-14, 7-16, 7-17)
TO PREVENT INJURY TO PERSONNEL OR DAMAGE TO EQUIPMENT, AIR CONDITIONER IS A
MANDATORY 4-MAN LIFT. IF FOUR MALE PERSONNEL ARE NOT AVAILABLE, AIR CONDITIONER MUST
BE MOVED WITH MECHANICAL LIFT TO AVOID INJURY TO PERSONNEL. (PAGE 7-16, 7-17)
TO PREVENT INJURY TO PERSONNEL AND DAMAGE TO EQUIPMENT, CONFIRM THAT POWER IS
REMOVED BEFORE SLIDING OUT RADIO SHELVES. (PAGE 7-21)
SERIOUS ELECTRICAL HAZARDS EXIST WHEN WORKING WITH VEHICLE/MTS BATTERY SYSTEM AND
BATTERY CHARGER CONTROL. TO PREVENT INJURY TO PERSONNEL OR DAMAGE TO EQUIPMENT,
TAKE APPROPRIATE PRECAUTIONS. (PAGE 7-27)
xiii
TM 11862A-OR
TO PREVENT INJURY TO PERSONNEL OR DAMAGE TO EQUIPMENT, ALWAYS HANDLE BATTERIES WITH
RUBBER GLOVES AND SAFETY GLASSES DUE TO HIGHLY ACIDIC ELECTROLYTE SOLUTION WITHIN
BATTERIES. DAMAGE TO EQUIPMENT AND SERIOUS INJURY COULD RESULT FROM SPILLAGE.
(PAGE 7-27)
THE BATTERY IS A TWO-PERSON LIFT. THE BATTERY IS DIFFICULT TO PICK UP AND MOVE. TO
PREVENT INJURY TO PERSONNEL OR DAMAGE TO EQUIPMENT, ENSURE THAT YOU HAVE GOOD
FOOTING AND A CLEAR PATH TO BATTERY COMPARTMENT. (PAGE 7-27)
TO PREVENT INJURY TO PERSONNEL OR DAMAGE TO EQUIPMENT, ENSURE ALL POWER IS REMOVED
AND ALL CIRCUIT BREAKERS ARE OPEN BEFORE CONNECTING BATTERIES. (PAGE 7-27)
FOR SAFETY, IT IS RECOMMENDED THAT BATTERY CABLES BE LABELED PRIOR TO DISCONNECTION IN
ORDER TO ENSURE CABLES ARE RECONNECTED CORRECTLY. (PAGE 7-28)
TO PREVENT INJURY TO PERSONNEL AND DAMAGE TO EQUIPMENT, ALWAYS REMOVE NEGATIVE (-)
CABLE FIRST WHEN DISCONNECTING THE BATTERIES. (PAGE 7-28)
SERIOUS ELECTRICAL HAZARDS EXIST WHEN WORKING WITH VEHICLE/MTS BATTERY SYSTEM AND
BATTERY CHARGER CONTROL. TO PREVENT INJURY TO PERSONNEL OR DAMAGE TO EQUIPMENT,
TAKE APPROPRIATE PRECAUTIONS. (PAGE 7-29)
ALWAYS HANDLE BATTERIES WITH RUBBER GLOVES AND SAFETY GLASSES DUE TO HIGHLY ACIDIC
ELECTROLYTE SOLUTION WITHIN BATTERIES. DAMAGE TO EQUIPMENT AND SERIOUS INJURY COULD
RESULT FROM SPILLAGE. (PAGE 7-29)
xiv
TM 11862A-OR
HAZARDOUS VOLTAGES EXIST IN SHELTER ALTERNATING CURRENT (AC)/DC ELECTRICAL POWER
SYSTEMS. TO PREVENT INJURY TO PERSONNEL OR DAMAGE TO EQUIPMENT, ENSURE ALL
ELECTRICAL POWER TO SHELTER IS OFF PRIOR TO BEGINNING. REMOVE ALL INCOMING ELECTRICAL
POWER FROM ALL SOURCES, INCLUDING GENERATOR OR VEHICLE BATTERY. (PAGE 7-29, 7-30)
CHEMICAL PROTECTIVE GLOVES MUST BE WORN WHEN WORKING WITH SEALING COMPOUND,
POLYSULFIDE. INJURY TO PERSONNEL MAY RESULT IF CHEMICALS CONTACT UNPROTECTED SKIN.
SMOKING IS PROHIBITED WHEN WORKING WITH FLAMMABLE MATERIALS. (PAGE 7-30)
TO AVOID SERIOUS INJURY OR DEATH TO PERSONNEL, ENSURE SHELTER MAIN BREAKER IS IN THE
OFF POSITION AND ALL POWER IS REMOVED FROM POWER SUPPLY (INVERTER). (PAGE 7-32)
TO PREVENT INJURY TO PERSONNEL, POWER SUPPLY (INVERTER) REQUIRES A TWO-PERSON LIFT.
(PAGE 7-32, 7-33)
ENSURE THAT MTS IS PROPERLY POSITIONED ON A SUPPORT STRUCTURE CAPABLE OF SUPPORTING
2200 LBS. ENSURE THAT LOAD TEST INSPECTION DATE ON STAND IS CURRENT. FAILURE TO OBSERVE
SAFETY PROCEDURES WHEN WORKING UNDER THE MTS COULD RESULT IN INJURY OR DEATH.
(PAGE D-21, E-4, E-10)
TO PREVENT INJURY OR DEATH TO PERSONNEL, ENSURE HOOKS OF THE LIFTING DEVICE ARE
INSPECTED AND SECURELY ATTACHED BEFORE LIFTING MTS. SLINGS AND HOISTS MUST BE
PROPERLY CERTIFIED. USE OF AN UNCERTIFIED SLING OR A SLING THAT IS NOT CURRENTLY
CERTIFIED MAY RESULT IN EQUIPMENT DAMAGE OR SEVERE INJURY OR DEATH TO PERSONNEL.
(PAGE D-26, E-4)
xv
TM 11862A-OR
To prevent damage to equipment, always follow appropriate equipment shutdown procedures. If not followed,
operational software can be corrupted and system may not reboot. (Page 2-2)
System equipment contains Electrostatic Discharge (ESD)-sensitive circuit components. To prevent damage to equipment,
use proper procedures in accordance with (IAW) MIL-STD-1686 when handling, removing, or replacing equipment to
prevent ESD damage. (Page 2-2)
To prevent equipment damage, do not attempt repairs when power from power sources and/or battery backup is applied.
Disconnect all power when removing equipment covers or access plates. (Page 2-2)
To prevent damage to equipment, remove exterior canvas covers and all items from the exterior rack prior to air
conditioner operation. (Page 2-2)
To prevent damage to equipment adhere to a 350 pound (lb) weight limit on the exterior shelf. (Page2-2)
Mast can easily be cross threaded if correct procedures are not followed. (Page 3-4)
To prevent damage to equipment, perform the procedures below to close and open the battery compartment door.
(Page 3-6)
Prior to closing the battery compartment door, ensure the latch pawl, on the inside of the door, is in the 12 o’clock position
and door is fully seated to its frame by applying mild pressure to door with free hand. (Page 3-6)
xvi
TM 11862A-OR
To avoid possible damage to adapter or computer when disconnecting AC adapter, disconnect from electrical outlet first
and then from computer. When unplugging connector, always hold plug head to avoid possible damage to adapter or
computer. Never pull on cord. (Page 3-10)
To prevent damage to equipment, do not pull out shelves four and five simultaneously. (Page 3-10)
To prevent damage to equipment, remove all stowage from the air conditioner shelf before powering on the air
conditioner. (Page 3-13)
If primary and secondary door brace assemblies are released to extend doors fully, ensure cable assemblies at RF 1 and 2
are not crimped or pinched between the exterior door and shelter surfaces. (Page 3-13)
Ensure wall fabric on shelter has been staked down before pulling vehicle away or boot will not fit properly. (Page 3-14)
Ensure CB-1, CB-2, CB-3, CB-12, and CB-19 inside shelter are in open position. Do not apply power to MTS with these
CBs in closed position. Doing so could damage CBs and electronic components in shelter. (Page 5-18, 5-19)
To avoid damage to equipment, vehicle should not be in operational mode and engine should be switched off.
(Page 5-18, 5-19)
To avoid damage to equipment, remove all items from the exterior shelf before operating the air conditioner.
(Page 5-18, 5-19)
xvii
TM 11862A-OR
To prevent damage to equipment, roll up and secure all ventilation fan covers before operating fans (CB-11). (Page 5-20)
Vent assemblies are crucial to ventilation and cooling of batteries, power systems, data, and voice communications systems
in shelter. These vent assemblies must be free of obstructions in order to allow for free flow of air to prevent damage to
equipment. (Page 6-3)
To avoid damage to equipment, do not clean with benzene, thinner, alkaline detergent, alcoholic system detergent, glass
cleaner, wax, polish cleaner, soap powder, or insecticide. Do not place rubber or vinyl against cabinet for long periods.
These types of fluids and fabrics can cause paint to deteriorate, crack, or peel. (Page 6-3)
Systems and subsystems may not be mission-capable if they do not pass maintenance requirements specified. (Page 6-3)
To prevent damage to equipment, do not over-tighten bracket against shelter wall. (Page 7-18)
To prevent damage to equipment, do not install adhesive in temperatures above 80 degrees F. (Page 7-18)
To prevent damage to equipment, maintain a distance of .41 inches (13/32 inches) between the rain guard and the shelter
wall. (Page 7-18)
To prevent damage to equipment in the unlikely event that the primary personnel door latch assembly fails and access to
the MTS is not possible, refer to TM 10-5411-235-13&P and Addendum and the procedure below. (Page 7-43)
xviii
TM 11862A-OR
Pneumatic tools shall not be used during installation or removal process. Severe damage to equipment could result.
(Page D-3)
To prevent damage to equipment, lubricate all screws and bolts prior to installation and removal. (Page D-4, E-4)
xix/(xx blank)
TM 11862A-OR
CHAPTER 1
GENERAL INFORMATION
1-1. INTRODUCTION.
This SHELTER EXPANDABLE Technical Manual (TM) describes the operations, equipment, and basic equipment
installation and configuration to operate the SHELTER EXPANDABLE (Mobile Tactical Shelter (MTS)), AN/TSQ-272,
hereafter referred to as MTS or shelter, to operate equipment safely and efficiently. This manual also addresses
maintenance and troubleshooting procedures.
Read this manual thoroughly before system operation. Careful observation of enclosed instructions
and procedures ensures maximum equipment employment and minimizes possibility of damage to
equipment and system operability deficiencies.
This TM does not address operations of AFATDS.
The MTS is capable of utilizing the Advanced Field Artillery Tactical Data System (AFATDS). The AFATDS is a field
artillery tactical data system incorporating Commercial Off-The-Shelf (COTS) computer systems, tactical radio systems,
and a software program for tactical operations integrated into a MTS.
AFATDS is an integrated fire support Command and Control (C2) system that processes fire missions and related
information to coordinate and optimize all fire support assets, including mortars, field artillery, cannon, missiles, air
support, and naval gunfire. It automates and facilitates fire support planning and current operations. AFATDS provides
real-time battlefield information, target analysis, and unit status while coordinating target damage assessment and sensor
operations.
Corrosion prevention and control is a continuing concern. Immediately report corrosion problems with
the shelter to organizational maintenance to correct the issue and prevent future problems.
1-2. DESCRIPTION OF TECHNICAL MANUAL.
This manual presents system-wide functional data on MTS and details specific systems and pieces of equipment that
comprise each functional unit.
•
•
•
•
•
•
•
Chapter 1 – General Information: Introduction to shelter, systems, equipment, and associated system
equipment.
Chapter 2 – Safety Precautions: Vital information designed to preserve personnel safety and prevent damage or
destruction of equipment.
Chapter 3 – Installation: Methods and correct order of installing equipment from stowed or transport mode to
operational mode.
Chapter 4 – Functional Description: Functional areas within the shelter and specific equipment that performs
those functions.
Chapter 5 – Operation: Proper instructions for operations, including power up and power down.
Chapter 6 – Scheduled Maintenance: Required and recommended maintenance schedules to keep equipment
performing properly.
Chapter 7 – Alignment Procedures/Corrective Maintenance: Troubleshooting procedures. Remove and replace
procedures.
1-1
TM 11862A-OR
•
•
•
•
•
•
•
Chapter 8 – Repair Parts List: Illustrations, descriptions, and stock numbers for replacement parts.
Appendix A – Acronyms and Abbreviations: List of acronyms and abbreviations used throughout the TM.
Appendix B – Expendable/Durable Supplies and Materials List: Lists all expendable supplies and materials
within subsystems.
Appendix C – Components of End Item: Identifies every system component item used in MTS.
Appendix D – Mobile Tactical Shelter Installation to Vehicle: Provides procedures for installation of the MTS
onto the High Mobility Multipurpose Wheeled Vehicle (HMMWV).
Appendix E – Mobile Tactical Shelter Removal from Vehicle: Provides procedures for the removal of the MTS
from the HMMWV.
Appendix F – Mobile Tactical Shelter Operating Restrictions: Lists operating restrictions to ensure force
protection.
1-3. PHYSICAL ARRANGEMENT.
The MTS is mounted on a HMMWV and houses the AFATDS and communications equipment components in order to
conduct fire support operations. All systems inside the shelter are powered by two batteries accessed through the battery
door on the curbside exterior wall of shelter.
The MTS has five antennas, four RF-390A/VRC and one AS-3449/VSQ-1, mounted on outside walls. The air
conditioner is mounted on a shelf on the front wall above the HMMWV cab. All other equipment is located and
accessed inside the shelter.
1-2
TM 11862A-OR
1-4. SHELTER EXTERIOR.
Figure 1-1. Shelter Exterior
Table 1-1. Shelter Exterior Components
Key
Components
1
2
Roof handhold
Lifting rings
3
4
5
Roof access steps
Personnel door
Personnel ladder
Function
Used to assist operator when accessing shelter roof.
Used to raise shelter when mounting or dismounting from
vehicle.
Used by operator to gain access to shelter roof.
Used to enter and exit shelter during normal operation.
Used to access shelter when installed on HMMWV.
Shelter. MTS is a lightweight transportable shelter used to house AFATDS support equipment. Refer to
Figure 1-1 and Table 1-1 for shelter exterior components.
1-3
TM 11862A-OR
5
2
4
3
6
1
7
Figure 1-2. Shelter Exterior Front Wall
Table 1-2. Shelter Exterior Front Wall Components
Key
1
2
3
4
5
6
7
Components
RF pass through
RF-390A/VRC antenna
Air conditioner
AS-3449/VSQ-1 antenna
RF-390A/VRC antenna
RF pass through
RF pass through
Function
Provides a pass through for the antenna.
UHF/VHF antenna.
Supplies heating and cooling to the MTS.
EPLRS Omni-directional antenna.
UHF/VHF antenna.
Provides a pass through for the antenna.
Provides a pass through for the antenna.
(1) Shelter Exterior Front Wall. Front wall of shelter features air conditioner, two RF-390A/VRC antennas,
and one AS-3449/VSQ-1 antenna. Refer to Figure 1-2 for a view of shelter exterior front wall. Refer to Table 1-2 for a
description of shelter exterior front wall components.
1-4
TM 11862A-OR
Figure 1-3. Shelter Exterior Rear Wall
Table 1-3. Shelter Exterior Rear Wall Components
Key
Components
1
2
RF pass through
Ladder assembly
3
4
5
Personnel door
RF pass through
TIP
6
Vent fan
Function
Provides a pass through for the antenna.
Entry means to shelter when mounted on High Mobility
Multipurpose Wheeled Vehicle (HMMWV).
Access to shelter interior.
Provides a pass through for the antenna.
Provides three AC power connections and two Ethernet
connections.
Exchanges air inside shelter with air from outside.
(2) Shelter Exterior Rear Wall. Rear exterior wall of shelter features, primary and secondary personnel
doors, two vent fans that exchange air inside shelter with outside air (on the secondary door), a personnel ladder (on the
primary door), Tent Interface Panel (TIP), and two RF-390A/VRC antennas. Refer to Figure 1-3 for a view of shelter
exterior rear wall. Refer to Table 1-3 for a description of shelter exterior rear wall components.
1-5
TM 11862A-OR
2
3
1
6
Figure 1-4. Shelter Exterior Curbside Wall Components
Table 1-4. Shelter Exterior Curbside Wall Components
Key
Components
1
2
3
4
Lifting ring
RF-390A/VRC
Lifting ring
Power Entry Panel
5
6
Battery compartment
Shelter step assembly
Function
Used to crane lift shelter onto or off of HMMWV.
UHF/VHF antenna.
Used to crane lift shelter onto or off of HMMWV.
Provides one J1 connector and one E1 connector for optional
external generator.
Provides access to MTS batteries.
Provides access to shelter roof.
(3) Shelter Exterior Curbside Wall. Curbside exterior wall of shelter features battery access, Power Entry
Panel, RF-390A/VRC antenna, and fold-down roof access ladder. Refer to Figure 1-4 for a view of shelter exterior
curbside wall. Refer to Table 1-4 for a description of shelter exterior curbside wall components.
1-6
TM 11862A-OR
4
Figure 1-5. Shelter Exterior Roadside Wall Components
Table 1-5. Shelter Exterior Roadside Wall Components
Key
1
2
3
4
Components
Lifting ring
RF-390A/VRC antenna
Lifting ring
Signal Entry Panel
Function
Used to crane-lift shelter onto or off of HMMWV.
UHF/VHF antenna.
Used to crane lift shelter onto or off of HMMWV.
Provides five RF connectors and two Ethernet connectors.
(4) Shelter Exterior Roadside Wall. Roadside exterior wall of shelter features a RF-390A/VRC antenna and a
Signal Entry Panel that provides RF and Ethernet connectors for external equipment to interface with shelter equipment.
Refer to Figure 1-5 for a view of shelter exterior roadside wall. Refer to Table 1-5 for a description of shelter exterior
roadside wall components.
1-7
TM 11862A-OR
1-5. SHELTER INTERIOR.
Figure 1-6. Shelter Interior
Shelter Interior. Refer to Figure 1-6 for a view of shelter interior. Refer to Figure 1-7 through Figure 1-11 for
additional information on this view.
1-8
TM 11862A-OR
8
3
2
1
5
4
6
7
9
Figure 1-7. Shelter Interior Front Wall
Table 1-6. Shelter Interior Front Wall Components
Key
Control or Indicator
1
2
3
4
5
6
7
RF pass through
Power raceway
AC/DC power raceway
RF pass through
LAN raceway
Air conditioner
Battery charger remote control
8
Digital Display Indicator
9
RF pass through
Function
Provides a pass through for the antenna cable.
Houses power cables for PCC.
Houses AC/DC power cables for radio rack components.
Provides a pass through for the antenna.
Houses LAN cables for radio rack components.
Provides heating and cooling for shelter interior.
Allows the user visibility and control of the battery charger
control located in the battery compartment.
Allows the user visibility and control of the power supply
(inverter) located in the battery compartment.
Provides a pass through for the antenna.
(1) Shelter Interior Front Wall. Interior front wall of shelter features radio rack, air conditioner, and three
raceways. Also included is the radio rack, illustrated in Figure 1-11. One raceway houses Alternating Current
(AC)/Direct Current (DC) power cables for radio rack components, one houses Local Area Network (LAN) cables for
radio rack components, and one houses power cables for AFATDS Power Conditioner/Converter (PCC). Refer to
Figure 1-7 for a view of shelter interior front wall. Refer to Table 1-6 for a description of shelter interior front wall
components.
1-9
TM 11862A-OR
2
1
3
4
5
6
Figure 1-8. Shelter Interior Rear Wall and Doors
Table 1-7. Shelter Interior Rear Wall and Doors Components
Key
Components
1
2
3
RF connection point
AC power raceway
Toggle switch
4
Display unit
5
6
7
Vent fans
RF connection point
Handset , Speakers
8
Display unit
Function
Connection point for curbside RF-390A/VRC antenna.
Provides two AC power receptacles.
When in ON position, illuminates white with personnel door
closed and red with personnel door open.
Displays same information as display unit #1. See Table 1-8 for
more detail.
Exchange air inside shelter with air from outside.
Connection point for roadside RF-390A/VRC antenna.
Telephone-style handset and speakers for use with AN/VRC110 radios located in HMMWV cab.
Displays same information as display unit #2. See Table 1-8 for
more detail.
(2) Shelter Interior Rear Wall. Interior rear shelter wall features two vent fans (on secondary door), radio
handset, two display units (on primary door), interior light switch, and AC power raceway. Refer to Figure 1-8 for a
view of shelter rear wall and doors. Refer to Table 1-7 for a description of shelter interior rear wall and doors
components.
1-10
TM 11862A-OR
Figure 1-9. Shelter Interior Curbside Wall Components
Table 1-8. Shelter Interior Curbside Wall Components
Key
Components
1
2
3
4
PDU
Power raceway
RF power divider
CS display unit #1
5
CS display unit #2
6
Upper Cabinets
7
Lower cabinet
8
9
Battery compartment
Circuit breaker 19
Function
Shelter CB panel.
Used to route cables throughout the MTS.
Splits signal from one computer to two different display units.
Works in conjunction with top computer and door display unit
#1.
Works in conjunction with bottom computer and door display
unit #2.
Provides storage space. Keyboard mounts are located on front
of cabinet.
Provides storage space. The mouse brackets are located on side
of cabinet.
Battery storage area.
Provides power from the vehicle batteries.
(3) Shelter Interior Curbside Wall. Interior curbside shelter wall includes two display units, two keyboards,
two mouse devices, two RF power dividers, Power Distribution Unit (PDU), and AFATDS printer shelf. Refer to Figure
1-9. Shelter Interior Curbside Wall Components
(4) Table 1-8. Shelter Interior Curbside Wall Components
Key
Components
1
2
3
4
PDU
Power raceway
RF power divider
CS display unit #1
5
CS display unit #2
6
Upper Cabinets
7
Lower cabinet
8
9
Battery compartment
Circuit breaker 19
Function
Shelter CB panel.
Used to route cables throughout the MTS.
Splits signal from one computer to two different display units.
Works in conjunction with top computer and door display unit
#1.
Works in conjunction with bottom computer and door display
unit #2.
Provides storage space. Keyboard mounts are located on front
of cabinet.
Provides storage space. The mouse brackets are located on side
of cabinet.
Battery storage area.
Provides power from the vehicle batteries.
1-11
TM 11862A-OR
(5) for a view of shelter interior curbside wall. Refer to Table 1-8 for a description of shelter interior
curbside wall components.
1
11
10
9
Figure 1-10. Shelter Interior Roadside Wall Components
Table 1-9. Shelter Interior Roadside Wall Components
Key
Components
1
2
3
4
5
6
7
8
9
Power raceway
Plotting board
Light fixture
Power raceway
2-port RF power divider
4-port RF power divider
RF power divider power supply
Signal entry panel
Loud speaker control unit
10
11
KDUs
Fire extinguisher
Function
AC power raceway with two AC receptacles.
Standard plotting board.
Lights for interior shelter.
AC power raceway with two AC receptacles.
Splits the signal from the computer to the display units.
Splits the signal from the computer to the display units.
Supplies power from the AC raceway to the RF power dividers
Interior of roadside signal entry panel.
Allows personnel in the rear of the MTS to communicate with the
radios in the cab of the vehicle.
Remote radio keypad display units.
Standard fire extinguisher for type B and C fires.
(6) Shelter Interior Roadside Wall. Equipment located on interior roadside of shelter includes plotting board,
fire extinguisher, AC power raceway, signal entry panel, Keyboard Display Units (KDUs), loud speaker control unit, and
cable raceway. An overhead light is located above the plotting board. Refer to Figure 1-10 for a view of the shelter
interior roadside wall. Refer to Table 1-9 for a description of shelter interior roadside components.
1-12
TM 11862A-OR
2
1
7
6
5
4
Figure 1-11. Shelter Interior Radio Rack
Table 1-10. Shelter Interior Radio Rack Equipment
Key
Equipment
1
2
3
4
5
6
7
ADP interface unit shelf
EPLRS shelf
EPLRS URO bracket
PCC shelf
Bottom computer shelf
Top computer shelf
AN/VRC-110 shelf
Function
Contains mount for ADP interface unit.
Contains EPLRS mounting tray.
Bracket for EPLRS user read-out.
Contains mount for unit-supplied PCC.
Contains bracket for AFATDS computer.
Contains bracket for AFATDS computer.
Contains mount for AN/VRC-110 radio.
•
All equipment located on radio rack is unit supplied with exception of radio shock mounts,
ADP interface unit, and EPLRS User Read Out (URO).
•
AFATDS computers are unit supplied. The computer described in this section represents
typical installation and may vary between units.
(7) Radio Rack. Radio rack components include Automated Data Processing (ADP) interface unit and
mounts for the following: Enhanced Position Location and Reporting System (EPLRS) radio assembly, one AN/VRC110 radio with Single Channel Ground-to-Air Radio Systems (SINCGARS), EPLRS URO with bracket, two computers,
and AFATDS PCC. Refer to Figure 1-11 for a view of the shelter radio rack. Refer to Table 1-10 for a description of
shelter radio rack components.
1-13
TM 11862A-OR
1-6. SYSTEM EQUIPMENT.
Listed below are descriptions of major systems and subsystems integrated into the shelter.
a. Shelter. MTS uses a Type V Lightweight Multipurpose Shelter (LMS) mounted on the HMMWV. The shelter
features a double-rear personnel door, exterior battery compartment, roof ladder access, and ladder.
(1) Antennas. MTS uses five antennas with antenna mounts: four RF-390A/VRC Multi-band (M-B)
vehicular antennas and one AS-3449/VSQ-1 Omni-directional antenna.
Figure 1-12. RF-390A/VRC Multi-band Vehicular Antenna
(a) RF-390A/VRC Multi-band Vehicular Antenna. RF-390A/VRC MB Antenna is designed to provide
exceptional gain and instantaneous bandwidth performance over 30 Megahertz (MHz) to 512 MHz spectrum. It includes
Mean Time Between Failure (MTBF) of more than 100,000 hours, capability of operation in 55 knot winds with gusts up
to 85 knots, and capability of operation with 4.5 pounds per square inch (psi) of ice coating on antenna. Refer to Figure
1-12 for a view of the RF-390A/VRC M-B vehicular antenna.
1-14
TM 11862A-OR
Figure 1-13. AS-3449/VSQ-1 Omni-directional Antenna
(b) AS-3449/VSQ-1 Antenna. Designed for use with the Enhanced Position Location Reporting System
(EPLRS) Vehicle Radio Set AN/VSQ-1. Antenna includes a MTBF of more than 100,000 hours, capability of operation
in 55 knot winds with gusts up to 85 knots, and capability of operation with 4.5 pounds of per square inch of ice coating
on the antenna. Refer to Figure 1-13 for a view of the AS-3449/VSQ-1 Omni-directional antenna.
Figure 1-14. Air Conditioner
1-15
TM 11862A-OR
(2) Air Conditioner. Provides climate-controlled air in shelter. It operates using 120 volts AC single-phase
50/60 Hertz (Hz) power. Refer to TM 11453A/11453B-OI for additional information on air conditioner. Refer to Figure
1-14 for a view of the shelter air conditioner.
Shelters may be furnished with one of two models of air conditioners: Model GSQ346ZABNW00G1 that uses R-22
refrigerant, which is being phased out to model GSQ386ZABNW0011 that uses R-407 refrigerant.
Figure 1-15. Impeller Fan
(3) Axial Impeller Fans. Shelter contains six impeller fans that exchange inside air with outside air for
continuous circulation. There are two on rear personnel door and two on battery compartment door. There are also two
axial impeller fans on third and fourth shelf of radio rack behind AFATDS computers. These fans prevent AFATDS
computers from overheating. Refer to Figure 1-15 for a view of the impeller fan.
(4) Lighting. Shelter features overhead lights controlled by a light switch beside rear door. Default setting
automatically switches overhead lights from white light to red light when door is opened to maintain light discipline.
MTS also provides two panel, lights at each workstation on curbside wall. Panel, lights automatically power on when
Circuit Breaker (CB) 10 is placed in the closed (ON) position. Panel, lights also feature the automatic red light function.
Figure 1-16. Fire Extinguisher
(5) Fire Extinguisher. Shelter provides a residue-free carbon dioxide hand-held fire extinguisher for Type B
(flammable and combustible liquids) and Type C (involving energized electrical equipment) fires. Extinguisher is
mounted on roadside wall near personnel door. Refer to Figure 1-16 for a view of shelter fire extinguisher.
(6) Plotting Board. A standard plotting board is provided on interior roadside of shelter. Plotting board
cannot be removed or repositioned. Use standard plotting board markers and cleaners to prevent damage to plotting
board.
1-16
TM 11862A-OR
b. Power Distribution Subsystem. Controls the distribution of AC & DC power throughout the shelter. Shelter is
supplied AC power from external generator or DC power from on-board batteries or HMMWV alternator.
Figure 1-17. Power Distribution Unit (Side View)
1-17
TM 11862A-OR
Figure 1-18. Power Distribution Unit (Front View)
(1) Power Distribution Unit. The PDU features the main CB that applies power to entire shelter and
individual CBs that apply power to system equipment. Refer to Figure 1-17 and Figure 1-18 for front and side views of
the PDU.
Figure 1-19. Circuit Breaker 19
1-18
TM 11862A-OR
(a) Power Disconnect Breakers. Disconnect CBs are located in upper right corner of PDU front panel.
CB-1 (200 ampere (amp)) isolates power supply (inverter) from shelter battery bank when open. CB-19 (150 amp)
isolates the shelter battery bank from HMMWV battery bank when open CB-19 is located below the PDU on the side of
the battery box. Refer to Figure 1-19 for a depiction of CB-19.
Table 1-11. Power Distribution Subsystem Circuit Breakers
CB
CB-1
Description
SOURCE OUTBACK
CB-2
DC BUS
CB-3
CB-4
CB-5
CB-6
CB-7
CB-8
CB-9
CB-10
CB-11
CB-12
CB-13
CB-14
CB-15
CB-16
CB-17
CB-18
CB-19
PCC IN-DC
SINGCARS 1
SINGCARS 2
SINGCARS 3
SINGCARS 4
EPLRS 1
EPLRS 2
LIGHTS
FANS
EXT. AC INPUT
MAIN AC
PCC IN AC
PCC OUTLETS
AC 1 OUTLETS
AC 2 OUTLETS
AIR COND
VEHICLE 24 VDC
Function
Main DC CB. Removes all power from shelter when open. DC source for the
power supply (inverter)
Removes all DC power from shelter interior when open. Power is still present
at power supply (inverter).
DC power source for PCC.
Provides DC power to SINCGARS outlets, one per outlet.
Provides DC power to SINCGARS outlets, one per outlet.
Provides DC power to SINCGARS outlets, one per outlet.
Provides DC power to SINCGARS outlets, one per outlet.
Provides DC power to the EPLRS 1.
Provides DC power to the EPLRS 2.
Provides DC power to the lighting system.
Provides DC power to the fans.
Provides AC from an external source.
Provides AC power from power supply (inverter).
Provides AC power to PCC.
Provides AC power from PCC.
Powers AC 1 outlets in shelter.
Powers AC 2 outlets in shelter.
Powers AC to air conditioner.
Provides DC power from the vehicle batteries.
(b) Individual Breakers. MTS uses two types of CBs, AC and DC. DC CBs control voltage from MTS
batteries. AC CBs control voltage from the power supply (inverter). Refer to Table 1-11 for a list of individual CBs and
their function and description.
Figure 1-20. Mobile Tactical Shelter Battery
1-19
TM 11862A-OR
(2) MTS Battery. MTS uses two 12 V storage batteries connected in series to provide 24 V power and are
designed for virtually maintenance-free operation. Batteries provide reserve capacity of 240 minutes, a shelf life of 30
months, and a cradle-to-grave life of at least 48 months. Refer to Figure 1-20 for a view of MTS battery.
Figure 1-21. Battery Charger Control
(3) Battery Charger Control. Automatically combines multiple batteries when charging sources are available.
Automatically disconnects the starting battery from system loads when there are no active charging sources. This
ensures that the starting battery is always full. Refer to Figure 1-21 for a view of MTS battery charger control.
Figure 1-22. Power Supply (Inverter)
(4) Power Supply (Inverter). Provides utility-supplied electricity that is generated, monitored, and controlled
by external systems. Refer to Figure 1-22 for a view of shelter power supply (inverter).
1-20
TM 11862A-OR
Figure 1-23. Digital Display Indicator
(5) Digital Display Indicator. Manages the power supply (inverter) and allows setting each component for
best and most efficient usage according to power needs. The digital display indicator is located on shelter interior front
wall to the upper right of the air conditioner. Refer to Figure 1-23 for a view of shelter digital display indicator.
AFATDS PCC is unit supplied.
(6) AFATDS Power Conditioner/Converter. AFATDS PCC continually conditions AC power supplied from
power supply (inverter). When power supply (inverter) is not functional, the AFATDS PCC acts as backup to power
supply (inverter). It converts DC power to AC, conditions the power, and supplies it to AC equipment in shelter as
specified by outlet labels.
All radio subsystem equipment is unit supplied with exception of KDUs.
c. Radio Subsystem. AFATDS radio components are located on radio rack and mounted to front roadside wall of
the MTS. All shelves, with exception of bottom shelf, pull out for easy access.
1-21
TM 11862A-OR
Figure 1-24. Enhanced Position Location and Reporting System Receiver/Transmitter
(1) Enhanced Position Location and Reporting System. Provides secure, jam-resistant digital
communications and accurate position location capabilities. Radio set consists of a Receiver/Transmitter (R/T) and URO
device. Refer to Figure 1-24 for a view of EPLRS R/T.
(a) Receiver/Transmitter. Transmits over-the-air message data, including data from host, and receives
over-the-air message data and may send it to host.
Figure 1-25. Enhanced Position Location and Reporting System User Read Out
(b) User Read-Out. The URO is an input and output device for EPLRS R/T. Allows user to input
messages to be transmitted and displays received messages. Refer to Figure 1-25 for a view of EPLRS URO.
1-22
TM 11862A-OR
(2) AN/VRC-110. AN/VRC-110 radio system is comprised of two AN/PRC-152 radio handsets, two vehicle
amplifier adapters, and a SINCGARS shock mount.
Figure 1-26. AN/PRC-152 Radio Handset
(a) AN/PRC-152 Radio. MTS is configured with two AN/PRC-152 tactical radios. This single-channel
M-B, multi-mission radio covers the 30 MHz to 512 MHz frequency range with adjustable transmit output power. MTS
configuration filters operating spectrum of radios on Very High Frequency (VHF) between 30 MHz to 88 MHz. Refer to
Figure 1-26 for a view of the AN/PRC-152 radio handset.
Figure 1-27. Keyboard Display Unit
(b) Keyboard Display Unit. The AN/VRC 110 radio uses a KDU to access radio information remotely.
The KDU is connected to the cab mounted AN/VRC-110 radios and is mounted on roadside wall near personnel door.
1-23
TM 11862A-OR
d. Computer Subsystem. Shelter computer network components include an ADP interface unit, two unit-supplied
AFATDS computers, four display units, two keyboards, and two mouse devices.
Figure 1-28. Automated Data Processing Interface Unit
(1) Automated Data Processing Interface Unit. Provides eight, 10/100 ports with Power-over-Ethernet (PoE),
and one, dual-purpose 10/100/1000 and small form-factor pluggable port for maximum productivity. Identity-based
networking services provide authentication, access control, and security policy administration to secure network
connectivity and resources. Refer to Figure 1-28 for a view of the ADP interface unit.
AFATDS computers are unit supplied.
(2) Advanced Field Artillery Tactical Data System Computers. The AFATDS Computer is an integrated fire
support Command and Control (C2) system that allows for the planning, coordination, and execution of fire support
assets.
1-24
TM 11862A-OR
Figure 1-29. Display Unit
(3) Display Units. MTS incorporates four, 20-inch display units, two on interior curbside wall and two on
interior curbside rear personnel door. Two display units connect to each AFATDS computer through a Radio Frequency
(RF) power divider Video Graphics Array (VGA). Left display unit on curbside wall and top display unit on curbside
rear personnel door display the same information. Right display unit on curbside wall and bottom display unit on
curbside rear personnel door display the same information. Display units feature easy, on-screen menu adjustments and
technology that automatically adjusts backlight to ambient brightness. Refer to Figure 1-29 for a view of the display
unit.
Figure 1-30. Mounting Bracket
1-25
TM 11862A-OR
(4) Mounting Bracket. Display units in shelter are mounted on shock-resistant brackets that secure them to
the MTS while on the move. Brackets tilt vertically and horizontally to allow display units to be repositioned at
optimum viewing angles for operator. Refer to Figure 1-30 for a view of the mounting bracket.
Figure 1-31. 2-Port Radio Frequency Power Divider
Figure 1-32. 4-Port Radio Frequency Power Divider
(5) Radio Frequency Power Divider. MTS includes two compact RF power dividers, one 2-port and one
4-port, that broadcast and boost VGA signal source from one AFATDS computer to two display units. Refer to
Figure 1-31 and Figure 1-32 for views of the shelter RF power dividers.
Figure 1-33. Keyboard and Mouse
1-26
TM 11862A-OR
(6) Keyboards and Mouse Devices. MTS uses two standard keyboards and two optical zoom mouse devices
to operate user workstations. Keyboards feature user-selectable, zero-degree slope for wrist-posture improvement and a
spill-drain feature to minimize damage from accidental fluid spill. A two-button optical mouse features a scroll wheel
providing speed and accuracy of optical tracking. Both keyboard and mouse connect to standard Universal Serial Bus
(USB) ports on curbside raceway. Refer to Figure 1-33 for a view of a typical shelter keyboard and mouse.
1-7. SPECIFICATIONS.
This section lists physical specifications of MTS systems and equipment. Refer to manufacturer documentation for
specifications of COTS equipment.
Table 1-12. Shelter Specifications
Description
Specification w/o Unit Supplied
Equipment
2200 lbs.
64.5 inches
71 inches
98 inches
137 inches
-65 to 125° F (-54 to 52°C)
-70 to 160° F (-57 to 71°C)
Ambient
Weight
Interior Height
Exterior
Width
Length
Operational Mode
Stowed Mode
Humidity
Specification with Unit Supplied
Equipment (Mounted on M1152)
13,000 lbs.
64.5 inches
105 inches
123 inches
208 inches
-65 to 125° F (-54 to 52°C)
-70 to 160° F (-57 to 71°C)
Ambient
1-8. REFERENCE DATA.
The following documents were used in compiling this TM. The referenced documents are available on a supplemental
disc provided with this system. Refer to Table 1-13.
Reference documents with no PCN should be maintained at the unit or user level because this type of
material is not loaded or maintained in the Marine Corps Technical Publications System.
Table 1-13. Reference Documents
Equipment
Carbon Monoxide
Alarm
Loudspeaker Control
Unit
Multiband Vehicular
Antenna
Display Unit
Publication Number
PN 820-1305 Rev. C 10/07
TB 11-5820-890-10-14
Mounting Bracket
Shelter Batteries
AFATDS Computers
EPLRS
TM 10901A-OR/1
TM 10901A-OR/2
Omni–Directional
Antenna
Description
Kidde Carbon Monoxide Alarm Users
Manual
Operation of LS-671 Loudspeaker with
SINCGARS Radio Sets, 1 April 1993
RF-390 Multiband Vehicular Antenna Series
Specifications, 2005
NEC MultiSync®
LCD2090UXi™/LCD2190UXi™ User’s
Manual
OmniMount 4N1-S Small VESA Wallmount Instruction Manual, Version H
EnerSys™/Hawker™ 12-Volt MIL PC Line
of Batteries for Defense Applications
Specifications
Getac M230 User’s Manual, May 2009
Enhanced Position Location Reporting
System Operator’s Manual, Marine Corps,
15 December 2004
Operator's Manual, dated 1 March 1999
AS-3449/VSQ-1 RAMI Antenna Data Sheet
PCN
351 109011 00
351 109011 00
1-27
TM 11862A-OR
Table 1-13. Reference Documents (Continued)
Equipment
Multi-band Handheld
Radio
Publication Number
TM 11496A-OI/3
Multi-band Vehicular
Radio System
Publication No.
10515-0359-4200
AFATDS PCC
0029-CHS3-A016
TM-1KWPCC-001A
TM 11033-OR
HMMWV
TM 11033-IN Vol 1
TM 11033-IN Vol 2
TM 11033-INP
TB 9-2320-335-13&P
Air Conditioner
TM 11453A/11453B-OI
Shelter, Electrical
Equipment Lightweight
TM 10-5411-235-13&P
and Addendum
Grounding Kit
TM 11-5820-1118-12&P
First Aid
MCRP 3-02G
Power Supply (Inverter)
Digital Display Indicator
1-28
Description
AN/PRC-152 Multiband Handheld Radio
Operation Manual, Rev. E., December
2007
RF-300M Multi-band Vehicular Radio
System Installation and Maintenance
Manual, December 2008
V2 1 KW Power Converter and
Conditioner Hardware, April 2009
Operator’s Manual for Truck, Utility: S250
Shelter Carrier, 4X4, M1152
Unit, Direct Support, and General Support
Maintenance for Truck, Utility: S250
Shelter Carrier, 4X4, M1152
Unit, Direct Support, and General Support
Maintenance Repair Parts and Special Tools
List For Truck, Utility: Shelter Carrier,
4x4, M1152
Unit, Direct Support, and General Support
Maintenance Repair Parts and Special
Tools List for Truck, Utility: S250 Shelter
Carrier, 4X4, M1152
Technical Bulletin Operator and Field
Maintenance and Repair Parts and Special
Tools List Instructions
Environmental Control Unit .75-Ton, 9,000
BTU/Hr Operation/Maintenance Manual
with Repair Parts List, August 2010
Operational, Unit, and Direct Support
Maintenance Manual (including RPSTL)
for LMS Type I and III, 15 August 2007
Operator’s and Unit Maintenance Manual,
MK-2551A/U, May 1994
Marine Corps Reference Publication
(MCRP) First Aid, 23 Dec. 2002
OutBack Power Systems™ FX Series
Inverter/Charger Installation Manual, 2008
OutBack Power Systems™ Extreme
Rugged Inverter/Charger Power Systems
Installation and User Manual
OutBack Mate Systems™ Controller and
Display Installation and User Manual, 2007
OutBack Power Systems™ Mate Serial
Communication Guide, 2007
OutBack Power Systems™ MATE2M
System Controller and Display Installation
and User Manual, 2003
PCN
500 114963 00
184 110330 00
184 110331 00
184 110332 00
184 100333 00
500 114530 00
144 000037 00
TM 11862A-OR
CHAPTER 2
SAFETY PRECAUTIONS
2-1. INTRODUCTION.
The following general precautions are recommended safety measures that do not relate to any specific procedure.
Personnel must understand and apply these precautions during all phases of operation, test, and maintenance. Strict
adherence to safety procedures in this chapter will prevent injury to personnel and damage to equipment. Specific
WARNINGS and CAUTIONS appear throughout the text as they apply. Read all safety instructions prior to utilizing
system.
a. Purpose, Scope, and Organization of System Safety Instructions. The purpose of this chapter is to provide
safety information and precautions for installation, operation, and maintenance of Mobile Tactical Shelter (MTS) and
equipment. This chapter provides safety precautions and instructions that must be followed during operation and
maintenance to ensure personnel safety and health and protection of government property. This chapter discusses
electromagnetic Radiation Hazards (RADHAZ), system hazards and precautions, operational and maintenance safety,
and handling hazardous components.
b. Basic Safety Concept. Individuals are responsible for their own safety and the safety of others working on or
near equipment.
c. Basic Responsibilities for Safety. Processes and procedures described in this Technical Manual (TM) require
compliance with standard safety precautions. Users must adhere to procedures, recommendations, WARNINGS, and
CAUTIONS provided to ensure safe use, handling, storage, and disposal of equipment.
d. Warnings, Cautions, and Notes. WARNINGS and CAUTIONS highlight statements considered essential to
protection of personnel or equipment. WARNINGS and CAUTIONS immediately precede procedure to which they
apply. Notes highlight statements not essential to protection of personnel or equipment. Notes may precede or follow a
step or procedure. Symbols used and their definitions are as follows:
HIGHLIGHTS AN ESSENTIAL OPERATING OR MAINTENANCE PROCEDURE,
PRACTICE, CONDITION, STATEMENT, ETC. THAT COULD RESULT IN INJURY TO OR
DEATH OF PERSONNEL OR LONG-TERM HEALTH HAZARDS IF NOT STRICTLY
OBSERVED.
Highlights an essential operating or maintenance procedure, practice, condition, statement, etc., that
could result in damage to or destruction of equipment or loss of mission effectiveness if not strictly
observed.
Highlights an essential operating or maintenance procedure, condition, or statement.
2-1
TM 11862A-OR
2-2. SAFETY PRECAUTIONS.
Observe the following warnings and cautions at all times.
2-2
•
DANGEROUS VOLTAGES EXIST IN SYSTEM EQUIPMENT. TO PREVENT
PERSONNEL INJURY, DO NOT ATTEMPT REPAIRS WHEN POWER FROM
POWER SOURCES AND/OR BATTERY BACKUP IS APPLIED. DISCONNECT
ALL POWER WHEN REMOVING EQUIPMENT COVERS OR ACCESS PLATES.
•
ENSURE VEHICLE GROUNDING STRAPS LOCATED ROADSIDE AND
CURBSIDE BENEATH SHELTER ARE CONNECTED ANY TIME SHELTER IS IN
USE. FAILURE TO CONNECT GROUNDING STRAPS COULD RESULT IN
PERSONNEL INJURY OR DEATH.
•
TO PREVENT PERSONNEL INJURY, USE CARE WHEN INSTALLING AND/OR
REMOVING PERIPHERAL AND ASSOCIATED DEVICES. REMOVING
EQUIPMENT COVERS AND ACCESS PLATES MAY EXPOSE SHARP EDGES.
•
ENSURE WHEEL CHOCKS ARE PLACED BEHIND FRONT VEHICLE WHEELS
ANY TIME VEHICLE IS STOPPED AND SHELTER IS IN USE. FAILURE TO DO
SO COULD RESULT IN PERSONNEL INJURY OR DEATH FROM UNEXPECTED
MOVEMENT OF VEHICLE.
•
To prevent damage to equipment, always follow appropriate equipment shutdown procedures.
If not followed, operational software can be corrupted and system may not reboot.
•
System equipment contains Electrostatic Discharge (ESD)-sensitive circuit components. To
prevent damage to equipment, use proper procedures in accordance with (IAW) MIL-STD1686 when handling, removing, or replacing equipment to prevent ESD damage.
•
To prevent equipment damage, do not attempt repairs when power from power sources and/or
battery backup is applied. Disconnect all power when removing equipment covers or access
plates.
•
To prevent damage to equipment, remove exterior canvas covers and all items from the
exterior rack prior to air conditioner operation.
•
To prevent damage to equipment adhere to a 350 pound (lb) weight limit on the exterior shelf.
TM 11862A-OR
2-3. ELECTROMAGNETIC RADIATION HAZARDS AND PRECAUTIONS.
The maximum possible radiation that could be emitted from either the RF-390/VRC UHF/VHF or the AS-3440/VSQ-1
antenna would be at the tip of either antenna mast and while the power amplifier is radiating. Because of the length of
the masts, and the Standard Operating Procedure (SOP) for any of the emplacement or displacement tasks not requiring
operators to be on top of the shelter, the operational risk as a RADHAZ is minimal. The only tasks that a maintainer
would perform that require access to and near the antenna structure would be in the install or remove and replace
procedures. Only in the event that a maintainer neglected to turn off primary power at the PDU, and at the antenna
circuit breaker switch while he/she is replacing or repairing the mast or mount could there be a safety hazard. Even then
the power amplifier would need to be on and radiating for there to be a RADHAZ.
2-4. SYSTEM HAZARDS AND PRECAUTIONS.
a. Safety Equipment. Safety equipment associated with MTS includes:
•
One fire extinguisher.
•
One carbon monoxide detector.
b. General Safety Precautions. The following general safety precautions are not unique to any specific
procedures and therefore do not appear elsewhere in this TM. These are general recommended precautions that all
personnel should know and understand. These precautions should be applied during all phases of operation and
maintenance.
(1) To prevent possible shock or death, ensure all power switches/Circuit Breakers (CBs) are set to the open
position before connecting grounding strap to power entry panels.
(2) Electrical currents sufficient to cause death or injury to personnel are present throughout MTS. All
personnel must be aware of measures required to prevent and treat electrocution. Personnel working with or near high
voltages should be familiar with emergency resuscitation methods. Marine Corps Reference Publication (MCRP) 3-02G
is included with this manual. MCRP 3-02G provides the procedures for performing emergency resuscitation.
(3) Never work on electronic equipment unless there is another person nearby who is familiar with operation
and hazards of equipment and who is competent in administering first aid. All personnel must be warned about
dangerous areas. Whenever possible, power supply to equipment must be shut off before beginning work on equipment.
When working inside equipment after power has been turned off, always ground every part before touching.
(4) High voltage is used in this equipment. Use care when working near Alternating Current (AC) or Direct
Current (DC) power source. Observe warning notes in this TM and warning decals on equipment. Death on contact can
result if safety precautions are not observed.
(5) Do not replace components or make adjustments inside equipment with high voltage supply turned on.
Dangerous potentials may exist even when power control is in the open (OFF) position due to charges retained by
capacitors. To avoid casualties always remove power and ground circuit before touching.
(6) Do not be misled by the term low voltage. Voltages as low as 50 Volts Alternating Current (VAC) can
cause death under adverse conditions. Voltages as high as 56 VAC may be present at ends of signal cables. Use extreme
care when connecting or disconnecting wires.
(7) Voltages as high as 130 VAC may be present at AC power cable ends. Use extreme care when
connecting or disconnecting cables. To prevent personnel injury or death, ensure power unit is off, switches/CBs are set
to open (OFF) and air conditioner and MTS equipment have been properly grounded.
(8) Ensure all system elements have been properly grounded before connecting AC power cables. Electrical
defects in load lines or load equipment can cause death to personnel on contact with an ungrounded system.
(9) If a CB does not stay in the closed (ON) position when closed, do not attempt to close CB repeatedly.
Repeated unsuccessful attempts to close CB can create an overload situation hazardous to personnel and equipment.
Instead, investigate cause of problem and correct situation before attempting to close CB again.
2-3
TM 11862A-OR
ALWAYS OBSERVE PROPER LIFTING AND CARRYING WEIGHT LIMITS. REFER TO
MIL-STD-1472 FOR MAXIMUM WEIGHT LIMITS.
c. Lifting and Carrying Heavy Equipment. Two-person lift icons are used throughout this TM to signal a
warning when required.
d. Heat and Cold. Thermally insulated gloves must be worn whenever extremely hot or cold parts are handled.
e. Electrostatic Discharge Items. Use the following precautionary procedures when touching, removing, or
installing parts and ESD-sensitive assemblies:
•
•
•
•
•
•
Use wrist strap or manual grounding procedures.
Keep ESD items in protective covering when not in use.
Ground all electrical tools and test equipment.
Periodically check continuity and resistance of grounding systems.
Use only metallic solder suckers.
Handle ESD items only in protected areas.
2-5. OPERATIONAL AND MAINTENANCE SAFETY SUMMARY.
The following operational safety guidelines apply to all levels of shelter operation.
a. General Operational Safety Guidelines. Prior to energizing system or any subsystem element, comply with all
safety considerations listed below:
•
•
•
•
Ensure all personnel are aware of possibility of electrical hazards.
Verify fire extinguisher is properly charged and easily accessible.
Ensure system start-up procedures are strictly followed.
Ensure proper operation of the carbon monoxide detector.
Field protective mask for chemical/biological/radiological protection will not protect users
from carbon monoxide poisoning. The best defense against carbon monoxide poisoning is
good ventilation.
b. Carbon Monoxide Considerations. Carbon monoxide is colorless and odorless. Breathing air with carbon
monoxide produces symptoms of headache, dizziness, loss of muscular control, fatigue, coma, and death. Brain damage
or death can result from prolonged exposure. Carbon monoxide occurs in exhaust fumes of fuel-burning heaters and
internal combustion engines. Carbon monoxide can become dangerously concentrated under conditions of no air
movement. Precautions must be followed to ensure crew safety when personal heater or main or auxiliary engine of any
vehicle is operated for any purpose. Use the following guidelines:
2-4
•
Do not operate gas-powered personal heater or engine in a closed area unless area has adequate
ventilation.
•
If generator is used for power source, ensure exhaust fumes are not vented into work area.
•
Do not idle engine without ensuring shelter ventilation.
TM 11862A-OR
•
Be alert at all times during vehicle operation for exhaust odors and exposure symptoms. If symptoms
occur, immediately ventilate personnel compartments. If symptoms persist, remove affected crew to
fresh air, keep warm, and seek first aid.
c. Precautions for Victims of Electric Shock. If someone becomes a victim of electrical shock, be aware of the
following precautions:
•
Do not try to pull or grab the individual as severe injury or death could result.
•
If possible, turn off electrical power.
•
If power cannot be turned off, use a dry wooden pole, dry rope, or other insulating material to push, pull,
or lift person to safety.
•
Send for help as soon as possible.
•
After person is free of contact with source of electrical hazard, move person a short distance away and
treat for shock.
•
If person has stopped breathing or does not have a pulse, immediately start artificial resuscitation. Refer
to Marine Corps Reference Publication (MCRP) 3-02G for detailed instructions on performing artificial
resuscitation.
d. General Maintenance Safety Guidelines. The following guidelines apply to all levels of general maintenance
on MTS:
•
Allow only qualified maintenance personnel to perform corrective maintenance actions on electronic
equipment.
•
Ensure at least two people are present during corrective maintenance actions on electronic equipment.
•
Ensure all internal and external grounds are properly connected before energizing equipment.
•
Do not wear loose clothing, rings, wrist watches, or any other conductive material.
•
Contact of metal objects with battery terminals can cause severe burns. Remove all jewelry and metal
objects before replacing batteries.
e. Hand Tool and Test Equipment Safety Guidelines. The following personnel guidelines apply specifically to use
of hand tools and test equipment and to all levels of shelter maintenance:
•
Use tools with insulated handles, grips, or bodies when working on electronic equipment.
•
Use only AC grounding type, three-prong test equipment or extension cords.
•
Use tools and equipment as they were designed. Do not use tools to pry or move equipment if they were
not designed for that purpose. Doing so could cause injury to personnel or to damage equipment.
f. Cleaning Agent Safety Guidelines. The following guidelines apply to the use of cleaning agents for all levels
of general maintenance on shelter:
•
There are no ozone depleting substances (cleaning solvents) recommended for use during maintenance of
any shelter equipment. Cleaning solvents, fuels, oil, adhesives, and catalysts must be used in wellventilated areas. Vapor concentrations and skin contact can be harmful. Death may result if vapors are
inhaled for lengthy periods. Protective glasses should be worn and skin contact avoided. Body surfaces
that contact fluids must be washed in hot water. Eyes must be rinsed with water and examined by a
doctor.
2-5
TM 11862A-OR
•
Compressed air is dangerous and can cause serious bodily harm if protective methods are not observed to
prevent a chip or particle from being blown into eyes or unbroken skin of operator or other personnel.
Compressed air shall not be used for cleaning purposes except where reduced to less than 30 pounds per
square inch and then only with effective chip guarding and personal protective equipment (i.e., industrial
safety glasses and full face shield).
g. Vehicle Operating Restrictions (VOR).
The following vehicle operating restrictions, in accordance with Appendix F, shall be observed in order to ensure
personnel safety, survivability and maintain equipment performance for the integrated AFATDS MTS system. These
restrictions apply to the integrated AFATDS MTS on an armored M1152A1 with B2 kit and FRAG 5 only, configured
with or without a trailer.
2-6
•
The integrated HMMWV speed should not exceed 40 miles per hour (mph) over primary road surfaces,
35 mph over secondary surfaces and 20 mph over any off-road cross country surfaces, the standard
armored Expanded Capacity Vehicle (ECV) speeds on terrain are 45/35/20 mph.
•
The integrated HMMWV should not operate or be parked on grades greater than 30%.
•
The integrated HMMWV should not operate on side slopes greater than 30%, the standard armored
HMMWV ECV side slope specification.
•
Braking distances are increased on all terrain types due to overweight front axle and GVW conditions.
Operators should maintain greater following distances and begin to stop vehicle earlier than normal to
maintain safety.
•
Users should increase all inspections and preventative maintenance checks of the HMMWV due to
overweight front axle. Frequency of checks will be based on the AFATDS MTS fielding requirement and
will be heavily influenced by system usage.
TM 11862A-OR
2-6. HAZARDOUS COMPONENTS.
Hazardous components are those components with significant hazards that require further explanation or that remain
classified as potentially critical or catastrophic in severity.
REPEATED AND/OR PROLONGED EXPOSURE MAY CAUSE DEFATTING OF SKIN
WITH ITCHING, REDNESS, OR RASH. CONTACT WITH VAPOR OR AEROSOL MAY
CAUSE EYE IRRITATION WITH TEARING, PAIN, OR BLURRED VISION. INCREASED
SUSCEPTIBILITY TO EFFECTS OF THIS MATERIAL MAY BE OBSERVED IN PERSONS
WITH PRE-EXISTING DISEASE OF CENTRAL NERVOUS SYSTEM AND
CARDIOVASCULAR SYSTEM.
a. Polyvinyl Chloride. Shelter contains a number of Polyvinyl Chloride (PVC) insulated cables and wires. PVC
is preferred material used by wiring manufacturers. Thermal decomposition products of PVC can include carcinogens
such as ethylene, benzene, toluene, and poisons including hydrogen chloride gas, carbon monoxide, and phosgene gas.
Small quantities of hydrogen chloride gas and phosgene gas can incapacitate a person. In case of fire, personnel should
evacuate unless a protective air breathing apparatus is in use.
REPEATED AND/OR PROLONGED EXPOSURE MAY CAUSE DEFATTING OF SKIN
WITH ITCHING, REDNESS, OR RASH. CONTACT WITH VAPOR OR AEROSOL MAY
CAUSE EYE IRRITATION WITH TEARING, PAIN, OR BLURRED VISION. INCREASED
SUSCEPTIBILITY TO EFFECTS OF THIS MATERIAL MAY BE OBSERVED IN PERSONS
WITH PRE-EXISTING DISEASE OF CENTRAL NERVOUS SYSTEM AND
CARDIOVASCULAR SYSTEM.
b. Refrigerant. Air conditioner attached to exterior of shelter may contain R22 (HCFC-22) refrigerant. There is a
possibility of R22 (Hydro chlorofluorocarbon (HCFC) -22) vapors escaping from unit. Inhalation of high concentrations
of this vapor is harmful and may cause heart irregularities, unconsciousness, or death. Intentional or unintentional
misuse or deliberate or inadvertent inhalation can be fatal. Vapors are heavier than air and pose a threat of suffocation if
trapped in enclosed or low places.
Immediate effects of overexposure by inhalation may include central nervous system depression with dizziness,
confusion, loss of coordination, or drowsiness. Gross overexposure may cause irregular heartbeat, heart palpitations,
apprehension, lightheadedness, feeling of fainting, weakness sometimes progressing to loss of consciousness, and death.
Short-term overexposure by skin contact may cause frostbite if liquid or escaping vapor contacts skin.
2-7
TM 11862A-OR
With the phase-out of R-22, R-407C has emerged as the preferred working fluid for the majority of cooling applications.
R-407C, while similar to R-22 in many of its physical properties, is a zeotropic mixture of HFCs which does impose
certain application restrictions and specific handling and equipment design requirements.
LASER RADIATION
EYE HAZARD
REPEATED AND/OR PROLONGED EXPOSURE MAY CAUSE PERMANENT IMPARED
VISION OR BLINDNESS. TO AVOID INJURY TO PERSONNEL, AVOID LOOKING
DIRECTLY INTO PATH OF LASER BEAM.
c. Lasers. Shelter contains equipment that uses lasers and fiber-optic cables. Do not examine, look directly at, or
stare into broken, severed, or disconnected fiber-optic cables. A laser-warning label is affixed to outside of device
package where dangerous optical energy may be transmitted.
Compact Disc (CD) drives used in shelter use laser diode sources with sufficient energy to cause permanent eye damage.
Diodes are completely encased within drive housing. Manufacturers of CD drives attach a laser-warning label to outside
of device package.
(1) Class 1 Laser. A Class 1 laser is safe under all conditions of normal use, which means Maximum
Permissible Exposure (MPE) cannot be exceeded. This class includes high-power lasers within an enclosure that
prevents exposure to radiation and that cannot be opened without shutting down laser.
(2) Class 3b Laser. A Class 3b laser is hazardous if eye is directly exposed, but diffuses reflections such as
from paper or other matte surfaces are not harmful.
2-8
TM 11862A-OR
CHAPTER 3
INSTALLATION
3-1. INTRODUCTION.
This chapter details procedures for installing components to bring shelter from non-operational or stowed mode to
operational mode.
The Mobile Tactical Shelter (MTS) is mounted on a High Mobility Multipurpose Wheeled Vehicle
(HMMWV), and houses the Advanced Field Artillery Tactical Data System (AFATDS) and
communications equipment components in order to conduct fire support operations. All systems inside
the shelter are powered by two batteries accessed through the battery door on the curbside exterior wall
of shelter.
3-2. SITE SELECTION.
Shelter operating site is determined by terrain, system planning, and security requirements. General site layout should be
free from natural and man-made obstructions. Use the following criteria to select ground site:
3-3.
•
Ensure the HMMWV is not on an incline greater than 30 degrees from side to side to prevent possible
rollover.
•
Ensure that there are no overhead or underground hazards or other obstructions.
•
Ensure terrain is free from water and provides adequate drainage.
•
Avoid areas that might contain power cables or cabling systems.
•
Check for overhead power lines prior to installing the antenna mast.
SYSTEM GROUNDING.
System grounding is essential for proper operation as well as for personnel and equipment safety. Refer to
TM 11-5820-1118-12&P.
3-1
TM 11862A-OR
3-4. INSTALLING SHELTER SYSTEMS.
Shelter is shipped and preinstalled with power system, Keypad Display Units (KDUs), radio mount, Automatic Data
Processing (ADP) interface unit, antenna mounts, display units, and an air conditioner. In the event any of these system
components must be removed for maintenance, repair, or replacement, refer to Chapter 6 for maintenance procedures
and Chapter 7 for Lowest Replaceable Unit (LRU) repair and replacement instructions.
a. Shelter Subsystem
Figure 3-1. Shelter Antenna Locations
3-2
TM 11862A-OR
Table 3-1. Shelter Antenna Descriptions
Item No.
1
2
3
4
5
Description
RF-390A/VRC Multi-band (M-B) antenna, rear curbside
RF-390A/VRC M-B antenna, rear roadside
RF-390A/VRC M-B antenna, front roadside
AS-3449/VSQ-1 Omni-directional antenna, front center
RF-390A/VRC M-B antenna, front curbside
(1) Antennas. There are four RF-390A/VRC Multi-band (M-B) antennas and one AS-3449/VSQ-1 Omnidirectional antenna located on shelter. Refer to Figure 3-1 and for location of shelter antennas.
RF-390A/VRC M-B antennas and AS-3449/VSQ-1 Omni-directional antenna are not interchangeable.
Antennas can only be installed on their respective brackets. RF-390A/VRC M-B antennas can be
installed on any RF-390A/VRC M-B antenna bracket.
Figure 3-2. RF-390A/VRC Multi-band Antenna
(a) RF-390A/VRC M-B Antenna. Refer to Figure 3-1 for antenna locations. Refer to Figure 3-2 for
RF-390A/VRC M-B antenna.
3-3
TM 11862A-OR
Mast can easily be cross threaded if correct procedures are not followed.
Do not remove end caps at this time.
1 Separate the antenna mast at middle joint prior to installing on base. The shorter overall length
makes for an easier thread alignment between antenna and base.
2 Mount bottom section of antenna mast to pre-installed antenna base by screwing antenna mast to
antenna base in the following locations:
•
•
•
•
Curbside front wall
Roadside front wall
Curbside wall
Roadside wall
Do not over-tighten. Over-tightening can damage antenna connector and/or mount.
3 Thread onto base by spinning clockwise.
4 Tighten antenna to hand-tight.
5 Once bottom section of mast is firmly seated on base, attach the top section by threading on
clockwise.
End cap should remain installed while in transit.
6 Remove end caps and attach BNC connector to W4-1 (qty 2) and W4-3 (qty 2).
7 Connect W4-1 and W4-3 to antenna base and RF pass-through panel.
3-4
TM 11862A-OR
Figure 3-3. AS-3449/VSQ-1 Omni-directional Antenna
(b) AS-3449/VSQ-1 Omni-directional Antenna. Refer to Figure 3-1 for antenna locations. Refer to
Figure 3-3 for the Omni-directional antenna.
1 Mount antenna mast to antenna mounting bracket on front shelter wall by screwing antenna mast to
antenna base.
Do not over-tighten. Over-tightening could damage antenna connector and/or mount.
End cap should remain installed while in transit.
2 Remove end cap and attach “N” type connector (W5).
3 Connect W4-1 and W4-3 to antenna base and RF pass-through panel.
3-5
TM 11862A-OR
AFATDS Power Conditioner/Converter (PCC) is unit supplied.
(2) Power Conditioner/Converter. Install AFATDS PCC on bottom shelf of radio rack using the following
procedure:
(a) Position AFATDS PCC on tray and slide it into place.
(b) Connect grounding wire (W246) to AFATDS PCC and use supplied wing nuts to tighten securely in
place.
(c) Connect W228 to AC OUT, W229 to DC IN, and W227 to AC IN.
(d) Secure with retention strap.
THE BATTERY IS A TWO-MAN LIFT. THE BATTERY IS DIFFICULT TO PICK UP AND
MOVE. ENSURE THAT YOU HAVE GOOD FOOTING AND A CLEAR PATH TO
BATTERY COMPARTMENT. INJURY TO PERSONNEL OR DAMAGE TO EQUIPMENT
CAN OCCUR.
•
To prevent damage to equipment, perform the procedures below to close and open the battery
compartment door.
•
Prior to closing the battery compartment door, ensure the latch pawl, on the inside of the door,
is in the 12 o’clock position and door is fully seated to its frame by applying mild pressure to
door with free hand.
(3) Battery Compartment Door. Perform the following procedures to close and open the battery compartment
door.
3-6
TM 11862A-OR
Figure 3-4. Closing Battery Compartment Door
MTS does not use lock and key.
(4) As shown in Figure 3-4, when closing the doors perform the following steps:
(a) Rotate T-handle clockwise to closed position.
(b) Continue turning T-handle to apply compression.
(c) Fold T-handle down into recessed position.
(5) When opening the door, perform the reverse process as indicated in Figure 3-4:
(a) Rotate T-handle counter-clockwise to open position.
(b) Continue turning T-handle to release compression.
(c) T-handle remains in operable position.
(6) Batteries. To install the batteries, perform the following steps:
(a) Remove plastic protection caps from battery posts.
Ensure that the positive (+) battery posts are positioned toward roadside.
(b) Loosen straps on battery tray and move to one side so as not to interfere with battery installation.
(c) Lift battery and position on the battery tray.
(d) Position strap over battery and adjust tension on battery strap using strap ratchet.
(e) Repeat steps (a) through (d) for second battery.
3-7
TM 11862A-OR
(7) Battery cables. To connect the battery cables to the Power Distribution Unit (PDU) perform the following
steps:
(a) Connect CB1 LINE (red) from PDU to the POSITIVE (+) post on Battery #1.
(b) Connect jumper cable to the batteries as follows:
1 W219 P1 (labeled BT1 -) to NEGATIVE (-) post on Battery #1.
2 W219 P2 (labeled BT 2 +) to POSITIVE (+) post on Battery #2.
(c) Connect W220 P1 (labeled BT2 -) to NEGATIVE (-) post on Battery #2.
(d) Tighten cable connections using a 1/2 inch wrench.
b. Radio Subsystem
•
All radio subsystems except KDUs and Automated Data Processing (ADP) interface unit are
unit supplied.
•
Shelves one through five slide for easy access of EPLRS, SINCGARS, ADP interface unit,
and AFATDS computers; shelf six containing the PCC is fixed.
Figure 3-5. Enhanced Position Location and Reporting System
3-8
TM 11862A-OR
(1) Enhanced Position Location and Reporting System. Enhanced Position Location and Reporting System
(EPLRS) radio mount is installed on top shelf of radio rack. Refer to Figure 3-5 while performing this procedure.
(a) Mount power block onto EPLRS Receiver/Transmitter (R/T).
(b) Install EPLRS R/T into mount located on top shelf of radio rack.
(c) Lock R/T into mount by tightening clamp located on front of mounting base.
(d) Attach W1-3 to J2 of EPLRS radio.
(e) Attach unit-supplied cable PN 80063-A3109227 to J3.
(f) Reconnect ground wire (W217-4).
(g) Connect unit-supplied cable (PN 80063-A3109227) from User Read Out (URO) to EPLRS mounting
base.
Figure 3-6. AN/VRC-110
(2) AN/VRC-110. AN/VRC-110 radio systems includes two AN/PRC-152 radio handsets, Vehicle Adapter
Unit (VAU), two VAAs, and a shock mount. AN/VRC-110 radio system is installed on third shelf of radio rack. Refer
to Figure 3-6 to install the radio system.
(a) Install shock mount interface assembly.
(b) Install and connect W65 cable (P1 to AC/DC power raceway, P2 to shock mount interface assembly).
(c) Install two VAAs onto shock mount assembly. Lock in place with thumb screws on front of shock
mount.
3-9
TM 11862A-OR
(d) Connect ground straps (W217-3 from mount to back of VAA) and secure with supplied screw.
(e) Connect RF 1/2 LOW to J3 Very High Frequency (VHF) connector and RF 1/2 HI to J4 Ultra High
Frequency (UHF) connector of the VAA.
If AN/PRC-152 is not properly seated, fault warning light will illuminate.
(f) Install AN/PRC-152 radio in VAA. Ensure that it is locked in place.
(g) Attach VAA data block into AN/PRC-152.
(h) Using the unit-supplied, 6-inch jumper (PN 12053-1420-A2 and PN 12049-0500-01) connect
AN/PRC-152 to VAA J5.
(i) Connect AN/PRC-152 handsets to Speakers #1(W222-1) and #2 (W222-2), located by rear door of
MTS.
c. Advanced Field Artillery Tactical Data System Computer Subsystem
•
To avoid possible damage to adapter or computer when disconnecting AC adapter, disconnect
from electrical outlet first and then from computer. When unplugging connector, always hold
plug head to avoid possible damage to adapter or computer. Never pull on cord.
•
To prevent damage to equipment, do not pull out shelves four and five simultaneously.
(1) AFATDS Computers. The AFATDS Computer is an integrated fire support Command and Control (C2)
system that allows for the planning, coordination, and execution of fire support assets.
AFATDS computers are unit supplied.
(a) Ensure computer is powered OFF.
(b) Unlock brackets on front of shock mount.
(c) Lift the shock mount cover and place the computer in the shock mount.
(d) Stow AFATDS computer power converter in power supply bracket on side of radio rack AN/VRC 110
shelf.
(e) Connect grounding cable to GETAC computer (Note: most GETACs will require the grounding bolt to
be changed from the right side of the computer to the left side).
(f) Connect Alternating Current (AC) power adapter to computer’s power connector.
(g) Connect AC power adapter to PCC outlet on raceway.
3-10
TM 11862A-OR
When AC adapter is connected, it also charges battery pack.
(h) Connect single USB 1 and USB 2 (W83-1 and W83-2) cables from USB 1 and USB 2 ports of computer
on shelf four. Connect USB 3 and USB 4 cables (W83-3 and W83-4) from USB 3 and USB 4 to network hub adjacent
to shelf three and connect W95 to computer on shelf four.
(i) Connect RF power divider Video Graphics Accelerator (VGA) cable (W81-2 for computer on shelf four
and W81-1 for computer on shelf five) to computer.
(j) Connect Ethernet cables from the ADP IU ports 7 and 8 to GETAC computers in shelves 4 and 5. Cable
W7-9 connects to computer on shelf four to Port 7, and cable W7-10 connects computer on shelf five to Port 8.
(k) Install communications modem (TacLink) into computer.
(l) Connect data cable from radio to the AFATDS TacLink.
(m) Power on the computer.
(n) Lock the brackets to secure the computer cover.
.
Figure 3-7. Keyboard and Mouse
(2) Keyboard and Mouse. Each AFATDS computer is operated with a standard keyboard and mouse. These
devices connect to USB ports in raceways next to each monitor at user workstations. Refer to Figure 3-7 for a view of
typical keyboard and mouse.
(a) Remove keyboards from brackets on overhead cabinet doors and place on desktop in front of each
curbside display unit.
(b) Remove mouse devices from storage on side of lower cabinet and place in front of each curbside display
unit.
(c) Connect keyboard and mouse cables (USB 1, USB 2, USB 3 and USB 4) to operator optional USB ports
on curbside wall of shelter.
(3) AFATDS Printer
AFATDS printer is unit supplied.
(a) Install AFATDS printer on curbside shelf and secure with straps.
3-11
TM 11862A-OR
(b) Connect power cable (unit supplied) and network (W7-11) cable.
3-5. MTS OPERATIONAL STATE.
Follow the steps below to bring MTS to fully operational state.
•
ENSURE VEHICLE GROUNDING STRAPS LOCATED ROADSIDE AND CURBSIDE
BENEATH SHELTER ARE CONNECTED ANY TIME SHELTER IS IN USE. FAILURE TO
CONNECT GROUNDING STRAPS COULD RESULT IN PERSONNEL INJURY OR DEATH.
•
TO PREVENT PERSONNEL INJURY OR DEATH, ENSURE ALL CIRCUIT BREAKERS
ARE OPEN (OFF) PRIOR TO CONNECTING MTS BATTERY CABLES.
•
These procedures assume shelter has been mounted on HMMWV.
•
Vehicle Interface Panel (VIP) is located beneath battery compartment on curbside of shelter.
Figure 3-8. Vehicle Interface Panel Diagram and Vehicle Interface Panel
3-12
TM 11862A-OR
a. Refer to Figure 3-8 for validation of cables from VIP to vehicle cab.
•
Four RF cables (RF 3 Hi, RF 3 Lo, RF 5 Hi, RF 5 Lo)
•
Two KDU cables.
•
Two speaker cables (Speaker #1 W224-1 and Speaker #2 W224-2)
To prevent damage to equipment, remove all stowage from the air conditioner shelf before powering
on the air conditioner.
b. Roll up and secure air conditioner cover. Remove all stowage from the air conditioner shelf.
c. Close Circuit Breaker (CB) 1 to apply onboard AC power to shelter systems.
d. Refer to Chapter 5 for instructions on powering on individual systems.
Figure 3-9. Vehicle Boot
If primary and secondary door brace assemblies are released to extend doors fully, ensure cable
assemblies at RF 1 and 2 are not crimped or pinched between the exterior door and shelter surfaces.
e. Install boot on rear of MTS to permit MTS mounting to soft shelter structure. Refer to Figure 3-9 for vehicle
boot.
(1) Center the boot approximately four feet away from rear of shelter.
(2) Determine vehicle connection end by the antenna slots closest to edge. This end is to be placed on vehicle
with slots at each corner of vehicle.
(3) After attaching the boot completely around the vehicle, use the bungee cord to tighten.
3-13
TM 11862A-OR
(4) Locate center label on opposite end and use hook-and-loop tape to attach boot to shelter door. Start in
center and continue around door, sealing both top and bottom of flange.
Figure 3-10. Vehicle Boot with Ridge Poles
(5) Insert two telescoping poles into sides and grommets. Insert ridge pole across center to lift material up and
allow use of shelter door. Refer to Figure 3-10 for pole assembly.
(6) Attach floor to tent.
Ensure wall fabric on shelter has been staked down before pulling vehicle away or boot will not fit
properly.
(7) Pull vehicle away to desired location.
(8) Use ropes to pull out telescoping poles and stake poles down into proper location.
(9) Install liner seal between liner and outer door. Attach hook-and-loop tape on back of doors to attach seal.
f. Remove ladder from storage bracket and hook to rear of MTS.
g. Roll up vent fan covers on battery compartment door and shelter personnel door.
h. Roll up display unit covers and secure with loop. Disconnect display unit strap.
3-6. EMERGENCY POWERING DOWN.Follow the steps below to remove power from all shelter systems in an
emergency situation.
a. Open CB-1, CB-2, CB-3, CB-12, and CB-19.
b. Turn off and remove external power source.
c. Remove negative battery cable from battery #2 (W220).
3-14
TM 11862A-OR
3-7. STOWED MODE.Follow the steps below to remove power from all systems and secure system from operations to
stowed mode.
a. Powering Down the System
(1) Refer to Chapter 5 of this manual for complete instructions on powering down individual systems.
(2) Confirm that breakers CB-1, CB-2, CB-3, CB-12, and CB-19 are in the open position.
(3) Turn off and then remove external power source connected to W201 J1 at power entry panel.
b. Securing the Display Units and Cooling Fans
(1) Connect tie down straps to secure all display units.
(2) Unroll display unit covers on rear door and secure with hook and loop strapping.
(3) Unroll cooling fan covers on battery compartment door and shelter personnel door and secure with
magnetic seal.
c. Securing Shelter Ladder and Boot
(1) Remove shelter ladder from the rear of MTS and mount on ladder storage bracket on rear curbside
personnel door.
(2) Remove boot from rear of shelter and store. Perform the following procedures:
(a) Remove liner seal between liner and outer door.
(b) Remove staked down telescoping poles.
(c) Detach floor from tent.
(d) Remove two telescoping poles from sides and grommets. Remove ridge pole across center.
(e) Disconnect hook-and-loop tape from shelter door and unseal both top and bottom of flange.
(f) Loosen bungee cord and detach boot from shelter.
d. Secure the Air Conditioner. Unroll the air conditioner cover and secure.
e. Enhanced Position Location and Reporting System. EPLRS radio mount is installed on top shelf of radio rack.
Refer to Figure 3-5 while performing this procedure.
(1) Ensure Receiver/Transmitter (R/T) power knob is in the OFF position.
(2) Remove unit-supplied URO cable (PN 80063-A3109227) from the shock mount.
(3) Remove LAN cable (W1-3) from the EPLRS.
(4) Remove grounding wire.
(5) Remove the power cables (W262-5 and W262-6) from the EPLRS.
(6) Unlock R/T from mount by loosening clamp located on front of mounting base.
(7) Remove EPLRS R/T from mount located on top shelf of radio rack.
3-15
TM 11862A-OR
f. AN/VRC-110 Radio System. To remove the radio system, perform the following steps:
(1) Disconnect AN/PRC-152 handsets from Speakers #1(W222-1) and #2 (W222-2), located by rear door of
MTS.
(2) Power off the VAA power amplifier and the AN/PRC-152 radio.
(3) Disconnect 6-inch jumper (PN 12053-1420-A2 and PN 12049-0500-01) from AN/PRC-152 to VAA J5.
(4) Remove VAA data block from AN/PRC-152.
(5) Remove AN/PRC-152 radio from VAA.
(6) Disconnect ground straps (W217-3) from shock mount to back of VAA.
(7) Disconnect RF 1/2 LOW from J3 (VHF) connector and RF 1/2 HI from J4 (UHF) connector of the VAA.
(8) Remove two VAAs from shock mount assembly.
(9) Remove W65 cable (P1 from AC/DC power raceway, P2 from shock mount interface assembly).
(10) Remove ground from shock mount assembly
(11) Remove shock mount interface assembly.
(12) Retain all items and place in storage.
g. Secure Antenna Components
Using a counter-clockwise motion, unscrew all antenna elements from MTS and reinstall antenna caps.
h. AFATDS Keyboard, Mouse, and Printer
(1) Disconnect keyboard and mouse from USB ports on curbside wall of shelter.
(2) Store keyboards in brackets mounted on upper curbside cabinet doors.
(3) Store mouse devices in the brackets located on side of lower cabinet.
(4) Disconnect power and network cables (W7-11) from the AFATDS printer.
i. AFATDS Computer #1
(1) Slide out shelf four.
(2) Disconnect W7-9 Ethernet cable.
(3) Disconnect VGA cable (W81-2).
(4) Disconnect USB cables.
(5) Disconnect data cable.
(6) Disconnect grounding strap
(7) Disconnect power cable and store cable and power adapter in bracket on side of VAA shelf.
3-16
TM 11862A-OR
(8) Unlock brackets on the shock mount, lift computer cover and remove computer from bracket.
(9) Close the cover and relock the brackets on the shock mount.
(10) Slide in shelf four.
j. AFATDS Computer #2
(1) Slide out shelf five.
(2) Disconnect W7-10 Ethernet cable.
(3) Disconnect VGA cable (W81-1).
(4) Disconnect USB cables.
(5) Disconnect data cable
(6) Disconnect grounding strap
(7) Disconnect power cable and store cable and power adapter in bracket on side of VAA shelf Unlock brackets
on the shock mount.
(8) Lift computer cover and remove computer from bracket.
(9) Close the cover and relock the brackets on the shock mount.
(10) Slide in shelf five.
k. Power Conditioner/Converter.
(1) Loosen the retention strap.
(2) Remove the wing nuts connecting grounding wire (W246) to AFATDS PCC.
(3) Disconnect W228, W229, and W227.
(4) Remove from tray and store.
(5) Replace wing nut back on PCC.
3-17/(3-18 blank)
TM 11862A-OR
CHAPTER 4
FUNCTIONAL DESCRIPTION
4-1. INTRODUCTION.
This chapter describes how the equipment comprising the Mobile Tactical Shelter (MTS) performs major operations and
functions and how associated systems contribute to its performance. MTS utilizes tactical radio systems, Advanced
Field Artillery Tactical Data System (AFATDS) computers, and external antennas that work in conjunction with each
other.
4-2. SYSTEM FUNCTION DIRECTORYMTS consists of four main subsystems: shelter, power distribution, radio,
and computer network.
a. Shelter Subsystem. MTS is a lightweight transportable shelter used to house various types of equipment as
specified by user. MTS is mounted on a High Mobility Multipurpose Wheeled Vehicle (HMMWV).
(1) Shelter. Ladder assembly is secured to personnel door during transit and storage, and is restrained by a
strap below door when shelter is in operation. Drain plug is loosened for air or rail transport. Step assembly on exterior
curbside wall and handhold on shelter roof provide easy access by personnel to shelter roof. Four lifting rings at top
corners of shelter provide attachment points for a sling assembly when shelter is lifted onto HMMWV and/or
transported.
(2) Antennas. MTS uses five antennas, one AS-3449/VSQ-1 Omni-directional and four RF-390A/VRC Multiband (M-B).
(a) RF-390A/VRC M-B Antenna works in conjunction with Single Channel Ground-to-Air Radio System
(SINCGARS) radio to provides exceptional gain and instantaneous bandwidth performance over 30 Megahertz (MHz)
to 512 MHz spectrum. It includes Mean Time Between Failure (MTBF) of more than 100,000 hours, capability of
operation in 55 knot winds with gusts up to 85 knots, and capability of operation with 4.5 pounds per square inch (psi) of
ice coating on antenna.
(b) AS-3449/VSQ-1 Antenna is an Omni-directional vehicular whip antenna designed for tactical
conditions using broadband technology. It works in conjunction with Enhanced Position Location Reporting System
(EPLRS) radio and provides exceptional gain and instantaneous bandwidth performance over a 30 MHz to 512 MHz
spectrum. Unique electrical design puts power pattern on horizon, allowing Line-of-Sight (LOS) and Beyond-Line-ofSight (BLOS) communications even in harsh conditions, and instantaneous bandwidth for Ethernet enhanced
communications manager waveforms.
(3) Radio Rack. Radio rack, mounted to front roadside wall of shelter, houses EPLRS radio, EPLRS User
Read-out (URO), AN/VRC-110 radio, two AFATDS computers, and AFATDS Power Conditioner/Converter (PCC).
Shelves 1 through 5 slide for easy access of EPLRS, SINCGARS, and AFATDS computers while shelf 6 containing the
PCC is fixed.
(4) Air Conditioner. Supplies cooled or heated air to provide a comfortable working environment inside MTS.
Communications, computer, and other equipment inside shelter generate heat when operational, elevating shelter internal
temperature. The air conditioner forces air through condenser coils and cools air before circulating throughout shelter.
(5) Vent Fans. MTS contains a total of six fans that provide air circulation and ventilation. Two vent fans are
located on roadside personnel door and two fans are located on battery compartment door. They exchange air inside
shelter with outside air. An additional two fans are mounted on the third and fourth shelves of radio rack. They provide
cool air as it passes over AFATDS computers to prevent overheating.
4-1
TM 11862A-OR
(6) Lighting. Overhead lights in shelter have a setting to illuminate red when shelter doors are opened. When
doors are closed, lights illuminate white. Panel, lights at each user workstation have the same feature as overhead lights.
(7) Cabinets. MTS features built-in upper and lower cabinets along curbside interior wall. Two upper
cabinets provide storage space. Keyboard mounts are located on the front of cabinet. Lower cabinet also provides
storage space. The mouse brackets are located on the sides of the cabinet. Fire Extinguisher. MTS includes a residuefree, carbon dioxide hand-held extinguisher for Type B (flammable and combustible liquids) and Type C fires involving
energized electrical equipment. Extinguisher is mounted on roadside wall near entry hatch.
(8) Fire Extinguisher. MTS includes a residue-free, carbon dioxide hand-held extinguisher for Type B
(flammable and combustible liquids) and Type C fires involving energized electrical equipment. Extinguisher is
mounted on roadside wall near entry hatch.
(9) Plotting Board. Use dry-erase markers only and periodically clean with approved cleaning material.
Figure 4-1. Shelter Power Circuit Diagram
4-2
TM 11862A-OR
b. Power Distribution Subsystem. The shelter is supplied AC power from external generator or DC power from
on-board batteries or HMMWV alternator. Batteries generate Voltage Direct Current (VDC), which powers Single
Channel Ground-to-Air Radio System (SINCGARS) tray, EPLRS, shelter lights, and vent fans. DC power is routed
through power supply (inverter), where it is converted to Alternating Current (AC) power. All power outlets on
raceways in shelter use AC power. Components that plug into these AC outlets are two AFATDS computers, four
display units, an ADP interface unit, and AFATDS printer. Refer to Figure 4-1 for shelter power circuit diagram.
(1) Power Entry Panel. The power entry panel is located on the curbside exterior of the shelter wall and
provides connection for AC input.
(2) Power Distribution Unit. Power Distribution Unit (PDU) contains Circuit Breakers (CBs) for all
subsystems within shelter. MTS uses two types of CBs: AC and DC. DC CBs control voltage from batteries. AC CBs
control voltage from power supply (inverter). There are three CBs that control power input to the shelter. CB-1 controls
on-board battery power, CB-12 controls external AC input, and CB-19 controls vehicle DC input.
This section describes the employment of on-board batteries.
(3) Batteries. MTS uses two 12-Volt (V) storage batteries wired in series to produce 24VDC power. These
batteries provide power to DC components.
MTS batteries may be charged by the vehicle batteries or an external generator. In addition to
automatic operation, battery charger control can be manually activated.
(4) Battery Charger Control. The battery charger controller manages MTS, vehicle, and external power
sources to ensure MTS batteries remain fully charged, and automatically disconnects MTS batteries from vehicle power
if required to prevent depletion of vehicle batteries. Charging sources include vehicle 24VDC and external AC power. A
start-assist button, located on remote panel, allows vehicle to be started from MTS batteries. When the battery charger
controller is activated, a green indicator light will illuminate.
(5) Power Supply (Inverter). Power supply (inverter) accommodates a wide range of time-based and voltagelevel functions and conditions for maximum control of power system. The power supply (inverter) offers a complete
power conversion system—DC to AC, battery charging, and an AC transfer switch—and can be used in a stand-alone or
mobile back-up application.
(6) Digital Display Indicator. Displays and configures system and components, coordinates system operation,
and maximizes performance.
AFATDS PCC is unit supplied.
4-3
TM 11862A-OR
(7) AFATDS Power Conditioner/Converter. The PCC keeps critical electronics running in severe conditions
by providing tightly-regulated AC output from a wide range of AC or DC inputs. It provides 115 Volts Alternating
Current (VAC) ± 5% output over an input voltage range of 80 to 265 VAC and a frequency range of 47 to 63 Hertz (Hz),
with full input to output isolation, line conditioning, and surge suppression. It operates from tactical AC generator or 24
VDC military vehicle power to power computer equipment loads at a maximum of 1000 Watts (W), or 1250 voltamperes.
+
12 V
Battery
-
+
12 V
Battery
24 V
SINCGARS
24 V
EPLRS
-
+
-
24 V
12 V
PDU
24 V
Lights
(2 each)
Lights
(2 each)
Inverter
PCC
24 V
Fans
(6 each)
Figure 4-2. Mobile Tactical Shelter Direct Current Circuit Diagram
(8) DC Circuit. Refer to Figure 4-2 for shelter DC circuit diagram. DC power generated by MTS batteries
owers the following subsystems:
•
•
•
•
•
•
4-4
Lighting
Fans
SINCGARS radios
EPLRS radios
AFATDS PCC
Power Supply Inverter
TM 11862A-OR
PCC Outlets
Computer
Computer
Display
Unit
Display
Unit
ADP Interface
Unit
RF Power
Divider
Display
Unit
Display
Unit
+
24 VDC Input
RF Power
Divider
-
115 AC Bus
24 V
External
Power
Power
Supply
(Inverter)
J1
Air
Conditioner
PCC
115 V
PDU
AC 1
115 AC Bus
Outlets
Printer
AC 2
Outlets
Figure 4-3. Shelter Alternating Current Circuit Diagram
(9) AC Circuit. Refer to Figure 4-3 for shelter AC circuit diagram. Within AC power system there are four
circuits, AC1, AC2, air conditioning, and PCC. All of the following components except for the air conditioner and
printer utilize the PCC circuit. AC circuits include the following systems:
•
•
•
•
•
•
•
•
AFATDS PCC
AFATDS Computers
ADP interface unit
Air conditioner
RF power dividers
AFATDS printer
Computer display units
AC power outlets
4-5
TM 11862A-OR
RF1
RF3
RF2
RF5
RF4
Antennas
30–512 MHz
Signal Entry Panel
Antenna
Bases
6
7
8
9 10
Antenna
Cable Extension
RF
Pass-through
1
3
2
5
4
6
7
8
9
10 RF Patch Panel
Battery Box
COM
COM
Diplexer
5
-88
Diplexer
1081000
Lo
Hi
Radio #1
In/Out
5
-88
Hi
Radio #2
In/Out
Diplexer
Diplexer
1081000
Lo
COM
COM
EPLRS In
5
-88
1081000
Lo
Hi
5
-88
1081000
Lo
Hi
Figure 4-4. Shelter Radio Block Diagram
c. Radio Subsystem. MTS utilizes EPLRS radio suite and AN/VRC-110 radio suite. Refer to Figure 4-4 for the
Shelter Radio Block Diagram.
All radio subsystem equipment with exception of Keypad Display Unit (KDU) is unit-supplied.
(1) Enhanced Position Location and Reporting System. EPLRS is a digital transmission system that provides
LOS radio frequency for accurate and timely computer-to-computer communications in the tactical battlefield. EPLRS
allows flexible, seamless communications between Marine Air Ground Task Force (MAGTF) Command, Control,
Communications, Computers, and Intelligence (C4I) tactical data systems. The EPLRS URO provides data/message
entry and display for radio set. It includes a display for displaying messages and keys for editing and composing
messages.
(2) AN/VRC-110 Radio. AN/VRC-110 radio assembly includes two AN/PRC-152 radio handsets, two
Vehicle Amplifier Adapters (VAAs), Vehicle Adapter Unit (VAU) and a shock mount. This single-channel M-B, multimission radio covers a 30 MHz to 512 MHz frequency range with adjustable transmit output power. User can switch
between ground, ground-to-air, or Satellite Communication (SATCOM) by selecting required net on radio.
(3) Handset Units. Two handset units, located in the shelter, can be used to transmit and receive through
AN/VRC-110 radios in the vehicle cab. Speaker units are mounted on back door and on roadside wall near rear wall.
Speaker does not interface with AN/VRC-110 radios in shelter.
4-6
TM 11862A-OR
d. AFATDS Computer Subsystem. MTS computer network consists of two AFATDS computers, four display
units, two RF power dividers, two keyboards, two mouse devices, and one ADP interface unit.
(1) ADP Interface Unit. Provides eight 10/100 ports with Power over Ethernet (PoE) and one dual-purpose
10/100/1000 and small form-factor pluggable port for maximum productivity. Identity-based networking service
provides authentication, access control, and security policy administration to secure network connectivity and resources.
•
•
Ethernet ports are located on front panel of switch. Port 1 supports 802.3af PoE PD standard that
supplies DC power to switch using twisted-pair cable. Any 802.3af-compliant PoE device attached to
port can directly supply power to switch over twisted-pair cable without requiring its own separate
power source.
Ports 1 through 8 support network speeds of 10 Megabits per second (Mbps), 100 Mbps, or 1000 Mbps
and can operate in half- and full-duplex modes. Auto-sensing technology enables each port to
automatically detect speed of connected device and adjust speed and duplex accordingly.
AFATDS computers and printer are unit supplied.
(2) AFATDS Computers. The AFATDS computer contains duo processor for the best wireless access and
performance in various applications. It comes equipped with 14.1-inch sunlight readable LCD screen. The computer is
adaptable to outdoors without interference by direct sunlight. It includes magnesium alloy case, shock-protected Hard
Disk Drive (HDD), and waterproof keyboard and touchpad.
(3) Display Units. MTS incorporates four, 20-inch display units, two on interior curbside wall and two on
interior curbside rear personnel door. Two display units connect to each AFATDS computer through a RF power
divider. Left display unit on curbside wall and top display unit on curbside rear personnel door display the same
information. Right display unit on curbside wall and bottom display unit on curbside rear personnel door display the
same information. Display units feature easy, on-screen menu adjustments and technology that automatically adjusts
backlight to ambient brightness.
(4) Mounting Brackets. MTS includes brackets that hold display units in place. Brackets are adjustable,
allowing display units to tilt and oscillate to provide optimum viewing angle for operator. Brackets and display units are
pre-installed before shelter is shipped to operational theater. Keyboard and Mouse. MTS uses two standard keyboards
and two optical zoom mouse devices to operate user workstations. Keyboards feature user-selectable, zero-degree slope
for wrist-posture improvement and comfort and a spill-drain feature to minimize damage from accidental fluid spill.
Two-button optical mouse features scroll wheel providing speed and accuracy of optical tracking. Both keyboard and
mouse connect to standard Universal Serial Bus (USB) ports.
(6) AFATDS Printer. MTS includes straps to hold the unit-supplied AFATDS printer in place.
4-7/(4-8 blank)
TM 11862A-OR
CHAPTER 5
OPERATIONS
5-1. INTRODUCTION.
This chapter details the components, controls, indicators, and connectors found on the Mobile Tactical Shelter (MTS).
Specific preoperational conditions presumed to be in effect prior to system operation shall also be discussed. It includes
the methods to operate systems located in MTS, including system operating situations, modes, and procedures.
5-2. CONTROLS, INDICATORS, AND CONNECTIONS.
Figure 5-1. Keyboard Display Unit Controls and Indicators
Table 5-1. Keyboard Display Unit Controls and Indicators
Key
1
2
3
4
5
Control or Indicator
Display
Preset button
Volume button
Extension connector
Keypad
Function
Liquid Crystal Display (LCD) allows the user to view the onscreen messages.
Allows the user to preset the radio.
Allows the user to control the volume.
Connects to the extension cable.
Allows the user to enter specific commands to the radio.
a. Keyboard Display Unit. Removable cable remote Keyboard Display Unit (KDU) including LCD with
adjustable backlight and contrast levels. Removal of KDU serves to protect complete access to loaded Communications
Security (COMSEC) keys. Refer to Figure 5-1 for a depiction of the KDU. Refer to Table 5-1 for KDU controls and
indicators.
5-1
TM 11862A-OR
Figure 5-2. Air Conditioner
1
2
HEAT
OFF
FAN
COOL
COOLER
WARMER
ON
OFF
CB1 MAIN BREAKER
P1 POWER
018-00343
4
3
Figure 5-3. Air Conditioner Control Panel Controls and Indicators
Table 5-2. Air Conditioner Control Panel Controls and Indicators
Key
1
2
3
4
Control or Indicator
Operation control switch
Temperature control knob
CB1 main breaker
Power connection
Function
Selects mode of operation.
Controls air temperature between 60° to 90° F.
Power protection for air conditioner.
Connection for power cord.
b. Air Conditioner. Air conditioner supplies cooled or heated air to provide a comfortable working environment
inside shelter. Refer to Figure 5-2 and Figure 5-3 for views of the air conditioning and the air conditioner control panel.
Refer to Table 5-2 for air conditioner controls and indicators.
5-2
TM 11862A-OR
Power supply (inverter) control terminal wiring block shown in Figure 5-5 is located on top in middle
of control panel of the power supply (inverter).
Figure 5-4. Power Supply (Inverter)
5-3
TM 11862A-OR
Figure 5-5. Power Supply (Inverter) Terminal Block Controls and Indicators
Table 5-3. Power Supply (Inverter) Controls and Indicators
Key
1
5-4
Control or Indicator
AC HOT OUT
2
3
AC NEUTRAL OUT
CHASSIS GROUND
4
NEU/GROUND BOND
5
6
AC NEUTRAL IN
AC HOT IN
7
8
RJ-11 jack
RJ-45 jack
Function
Supplies Alternating Current (AC) hot output conductors through a
30 Ampere maximum AC branch-rated CB.
Connects AC neutral input conductor to AC neutral out terminal.
Connects AC output neutral conductors to chassis ground terminal
while inverting.
Connects AC output neutral conductors neutral/ground bond
terminal while inverting.
Connects AC neutral input conductor to AC neutral in terminal.
AC hot input conductor (black) must be supplied through a 30
Ampere maximum AC branch-rated CB and connected to AC HOT
IN.
Connects optional external battery temperature sensor.
Connects digital display indicator to power supply (inverter).
TM 11862A-OR
Table 5-3. Power Supply (Inverter) Controls and Indicators (Continued)
Key
9
10
11
Control or Indicator
Inverter status indicators
Battery status indicators
INVERTER ON/OFF
12
AUX +/AUX –
13
XCT+/XCT-
Function
Refer to Table 5-4.
Refer to Table 5-5.
Allows manual or remote switch to control power supply (inverter)
(default is ON).
12 Volts Direct Current (VDC) at 0.7 amp (8.4 Watts (W))
maximum is available at these terminals; AUX output default mode
is to drive cooling fans.
These terminals are not operational at this time.
Table 5-4. Power Supply (Inverter) Status Indicators
LED Color
Green
(Inverter)
Yellow
(AC IN)
Red
(Error)
LED Action
Solid
Flashing
Off
Solid
Flashing
Off
Solid
Flashing
Indicator
Inverter ON.
Search mode of slave power.
Inverter OFF.
AC source connected.
AC input life—waiting to connect to power supply (inverter).
No AC input present.
Error—error message displays on digital display indicator.
Warning—non-critical fault occurred to power supply (inverter); digital
display indicator can access information.
Table 5-5. Power Supply (Inverter) Battery Status Indicators
LED Color
Green
Yellow
Red
Indicator
Full
OK
Low
24 VDC
> 24.8
23.0 to 24.8
< 23.0
c. Power Supply (Inverter). Power supply (inverter) control terminal wiring block is located on top in middle of
control panel of the power supply (inverter). It allows user to view, monitor, and establish all pertinent settings that
occur while system is running. Settings might be adjusted as components are added or upgraded, electrical loads
increase, or patterns of usage change. Refer to Figure 5-4 for a depiction of the MTS power supply (inverter) and
Figure 5-5 for a detailed view of the power supply (inverter) terminal block. Refer to Table 5-3, Table 5-4, and
Table 5-5 for descriptions of the power supply (inverter) functions.
5-5
TM 11862A-OR
Figure 5-6. Digital Display Indicator Controls and Indicators
Table 5-6. Digital Display Indicator Descriptions Controls and Indicators
Key
1
2
3
4
Control or Indicator
Liquid Crystal Display
(LCD)
Green LED
INV button
Soft keys (4)
5
6
AC IN button
Yellow LED
Function
Displays status and messages for power supply (inverter).
Inverter status indicator.
Inverter hot key.
Used to navigate through power supply (inverter) system commands
and menus.
AC input hot key.
AC input status indicator.
Table 5-7. Digital Display Indicator Screens
Screen
System Controller
Version
FX Device Found
CC Device Found
DC Device Found
Hub Device Found
Port Assignment
No Devices Found
5-6
Description
• Code indicates power supply (inverter) operation and features.
• Serial # matches bar code sticker inside power supply (inverter) on circuit board.
• Screen EE refers to power supply (inverter) menu system.
Indicates power supply (inverter) has found an FX series power supply (inverter).
Indicates power supply (inverter) has found a charge controller (CC).
Indicates power supply (inverter) has found Flexner DC.
Indicates power supply (inverter) has found the hub.
Each port used shows its connected component.
Indicates power supply (inverter) has not found any connected devices; refer to Chapter 7,
Troubleshooting.
TM 11862A-OR
d. Digital Display Indicator. Displays and configures system and components, coordinates system operation, and
maximizes performance. Refer to Figure 5-6 for a depiction of digital display indicator. Refer to Table 5-6 for a
description of digital display indicator functions. Refer to Table 5-7 for digital display indicator screens.
1
2 (8 PLACES)
3
4
Figure 5-7. Automated Data Processing (ADP) Interface Unit Front Panel Controls, Indicators, and Connectors
Table 5-8. Automated Data Processing Interface Unit Front Panel Controls, Indicators, and Connectors
Key
1
Control, Indicator, or
Connector
RJ-45 console port
2
3
Ports 1 – 8
RJ-45 auxiliary port
4
SFS port
Function
Provide local connectivity to the console (Network administrator
use only).
Provides Ethernet connection to indicated port.
Provides out of band or local connectivity to the console. (Network
administrator use only).
Not used for MTS configuration.
e. Automated Data Processing Switch. Provides one console port, eight 10/100 ports with Power over Ethernet
(PoE), one auxiliary 10/100 port, and one small form-factor pluggable (SFP) port that functions as a dual-purpose port.
The SFP is not used for MTS. The console and auxiliary ports are used to update ADP software and for ADP
configuration. Refer to Figure 5-7 for a view of ADP interface unit. Refer to Table 5-8 for a description of ADP
interface unit connectors and indicators.
5-7
TM 11862A-OR
Figure 5-8. Display Unit
91
82
RESET
UP
DOWN
SELECT
EXIT
RIGHT
LEFT
INPUT
1
9
3
82
7
46
6
55
4
Figure 5-9. Display Unit On-Screen Menu (OSM) Controls and Indicators
5-8
73
TM 11862A-OR
Table 5-9. Display Unit OSM Controls and Indicators
Key
1
Control or Indicator
Reset/Rotate OSM
2
3
4
5
6
Up/Down button
Key guide
Left/Right button
Exit
Input/Select button
7
Power Light Emitting Device
(LED)
Power button
AmbiBrightTM sensor
8
9
Function
Resets OSM to factory settings. Pressing when OSM is not displayed
rotates OSM control menu between portrait and landscape mode.
Navigates selection up or down through OSM control menu.
Key Guide appears on-screen when OSM control menu displays.
Navigates selection to left or right through OSM control menu.
Exits OSM submenu. Exits OSM control menu.
Enters OSM control menu or OSM submenu. Changes input source
when not in OSM control menu.
Indicates power is ON.
Turns monitor on and off.
Detects level of ambient light and automatically adjusts for a more
comfortable viewing. Do not cover this sensor.
f. Display Unit. Display units installed in MTS use OSM controls to adjust viewing settings. Refer to Figure 5-8
and Figure 5-9 for views of the display unit and the display unit controls. Refer to Table 5-9 for a description of the
controls and indicators. Refer to the NEC MultiSync LCD User’s Manual for more detailed instructions on adjusting
display unit image.
5-9
TM 11862A-OR
9
10
3
4
5
6
7
8
11
2
1
Figure 5-10. Power Distribution Unit (Front View)
5-10
TM 11862A-OR
CB-19 is located below the PDU on the side of the battery box.
Figure 5-11. Circuit Breaker 19
Table 5-10. Power Distribution Unit Circuit Breakers
Key
1
2
3
4
5
CB No.
CB-11
CB-10
CB-9
CB-8
CB-7
Description
FANS
LIGHTS
EPLRS 2
EPLRS 1
SINGCARS 4
6
CB-6
SINGCARS 3
7
CB-5
SINGCARS 2
8
CB-4
SINGCARS 1
9
CB-1
SOURCE OUTBACK
10
CB-2
DC BUS
11
12
14
13
15
16
17
18
CB-3
CB-17
CB-15
CB-16
CB-14
CB-13
CB-12
CB-18
PCC IN-DC
AC 2 OUTLETS
PCC OUTLETS
AC 1 OUTLETS
PCC IN AC
MAIN AC
EXT. AC INPUT
AIR COND
Function
Provides 24VDC power to the fans.
Provides 24VDC power to the lighting system.
Provides 24VDC power.
Provides 24VDC power.
Provides 24VDC power to SINCGARS outlets, one per
outlet.
Provides 24VDC power to SINCGARS outlets, one per
outlet.
Provides 24VDC power to SINCGARS outlets, one per
outlet.
Provides 24VDC power to SINCGARS outlets, one per
outlet.
Removes all power from shelter when pulled. DC source
for power supply (inverter).
Removes all DC power from shelter interior when pulled.
Power still present at power supply (inverter).
DC power source for PCC.
Powers AC 2 outlets in shelter.
Provides AC power from PCC.
Powers AC 1 outlets in shelter.
Provides AC power to PCC.
Provides AC power from power supply (inverter).
External AC power to power supply (inverter).
Powers air conditioner.
g. Power Distribution. The Power Distribution Unit (PDU) and Circuit Breaker 19 contains all Circuit Breakers
(CBs) for all subsystems within shelter. Shelter utilizes two types of CBs, AC and DC. DC CBs provide voltage from
batteries. AC CBs control voltage from power supply (inverter). They also provide overload protection to the
equipment. Refer to Figure 5-10 for a depiction of shelter PDU. Refer to Figure 5-11 for a depiction of CB-19. Refer to
Table 5-10 for PDU individual CB functionality.
5-11
TM 11862A-OR
SERIOUS ELECTRICAL HAZARDS EXIST WHEN WORKING WITH VEHICLE/
SHELTER BATTERY SYSTEM. TO PREVENT INJURY TO PERSONNEL OR DAMAGE
TO EQUIPMENT, TAKE APPROPRIATE PRECAUTIONS.
3
4
2
1
Figure 5-12. Battery Charger Control Indicators and Connectors
Table 5-11. Battery Charger Control Indicators and Connectors
Key
1
2
3
4
Indicator
Start Assist light
Battery - light
Bat 1 (P1)
Bat 2 (P2)
Function
Illuminates when an external power source is applied.
Illuminates when using MTS battery power.
Supplies power from CB-19 and vehicle batteries (W230).
Supplies power from MTS batteries (W214).
Figure 5-13. Battery Charger Control Remote Panel Controls and Indicators
5-12
TM 11862A-OR
Table 5-12. Battery Charger Control Remote Panel Controls and Indicators
Key
1
2
Indicator
Start Assist control and indicator
Contact closed indicator
Function
Press to connect MTS batteries to external source.
Illuminates when an external power source is applied.
h. Battery Charger Control. An onboard battery bank provides power to all systems used in MTS. Output voltage
of batteries is monitored by the battery charger control system. If output voltage falls below a preset value, battery
charger control connects vehicle batteries parallel to MTS batteries. Major components of the battery charger control
system include control module and remote panel. Remote panel is mounted on front wall and is connected to control
module by a cable. Remote panel provides convenient operation of battery charger control system. Refer to Figure 5-12
for a depiction of the battery charger control. Refer to Figure 5-13 for a depiction of the battery charger control remote
panel. Refer to Table 5-12 for a description of battery charger control remote panel controls and indicators.
Figure 5-14. Loudspeaker Control Unit Components
5-13
TM 11862A-OR
Table 5-13. Loudspeaker Control Unit Components
Key
1
2
3
4
5
Components
Power toggle switch
Power connector
Volume control
Handset
Extension connector
Function
Powers the speaker on and off.
Connects to power supply.
Allows the user to raise or lower the volume.
Used to communicate.
Attaches handset to the loudspeaker control unit.
i. Loudspeaker Control Unit. The two loud speakers, located in MTS, can be used to transmit and receive through
AN/VRC-110 radios in vehicle’s cab. Loud speaker units are mounted on back door and on roadside wall near rear wall.
Loud speaker does not interface with AN/VRC-110 radios in shelter. Refer to Figure 5-14 for a depiction of the
loudspeaker. Refer to Table 5-13 for loudspeaker components.
Figure 5-15. Panel, Light Controls, Indicators, and Connectors
Table 5-14. Panel, Light Controls, Indicators, and Connectors
Key
1
2
Control, Indicator, or Connector
Connector
Light function
Function
Connects to power supply.
Normal Operation—Light output is white when door is closed and
red when door is open.
j. Panel Lights. Panel, lights are controlled by CB-10 and the light switch beside the rear door. Both must be in
the on position for lights to operate. Refer to Figure 5-15 for a depiction of panel, lights. Refer to Table 5-14 for
descriptions of controls and indicators.
5-14
TM 11862A-OR
Figure 5-16. Overhead Light Controls and Indicators
Table 5-15. Overhead Light Components Controls and Indicators
Key
1
2
3
Controls, Indicators, or Connectors
Connector
Brightness control
Light Function Switch
Function
Connects to power supply.
Rotates to control the intensity of the light.
• Normal Operation—Set switch to center position. Light
output is white when door is closed and red when door is
open.
• White Override—Light output is white regardless of rear
door position.
• Red Override—Light output is red regardless of rear door
position.
k. Overhead Lights. Overhead lights are controlled by CB-10 and the light switch beside the rear door. Both
must be in the on position for light to operate. Overhead lights rotate for best viewing. Refer to Figure 5-16 for a
depiction of the overhead lights. Refer to Table 5-15 for descriptions of overhead light components.
5-15
TM 11862A-OR
Figure 5-17. Carbon Monoxide Detector Controls and Indicators
Table 5-16. Carbon Monoxide Detector Components Controls and Indicators
Key
1
2
3
Controls and Indicators
Alarm indicator (red)
Test/Reset button
Power On indicator (green)
Function
Illuminates red when carbon monoxide is detected.
Used to test or reset the detector.
Illuminates green when DC power is detected, normal operation.
l. Carbon Monoxide Detector. This battery-operated carbon monoxide detector provides detection and warning
against the dangers of carbon monoxide. Refer to Figure 5-17 for a depiction of the carbon monoxide detector. Refer to
Table 5-16 for carbon monoxide detector controls and indicators.
5-16
TM 11862A-OR
5-3. OPERATING MODES.
ENSURE SHELTER GROUNDING HAS BEEN COMPLETED PRIOR TO APPLYING
POWER. FAILURE COULD RESULT IN SEVERE PERSONNEL INJURY OR DEATH.
•
Ensure CB-1, CB-2, CB-3, CB-12, and CB-19 inside shelter are in open position. Do not
apply power to MTS with these CBs in closed position. Doing so could damage CBs and
electronic components in shelter.
•
To avoid damage to equipment, vehicle should not be in operational mode and engine should
be switched off.
•
To avoid damage to equipment, remove all items from the exterior shelf before operating the
air conditioner.
This procedure assumes all systems are installed in shelter and ready for operation.
a. Preparation. Prior to operating MTS, ensure the following conditions are met:
•
Vehicle parked on proper site selection. Refer to Chapter 3.
•
Vehicle wheel chocks in place.
•
System grounding and shelter connected.
•
One AS-3449/VSQ-1 and four RF-390A/VRC antennas installed.
•
Weather flaps for impeller fans rolled up and secure.
•
Cable W226 (shelter to vehicle power cable) is plugged into vehicle power outlet and into MTS DC power
input.
•
Remove air conditioner cover and ensure that all items are removed from exterior shelf before operating
the air conditioner.
b. Shelter Operating Modes. Normal operation which is standard usage and degraded operation which is usage in
crisis circumstances and allows a limited number of MTS components to operate under restricted power conditions.
5-17
TM 11862A-OR
5-4. NORMAL OPERATION, POWER UP SUBSYSTEMS.
ENSURE SHELTER GROUNDING HAS BEEN COMPLETED PRIOR TO APPLYING
POWER. FAILURE COULD RESULT IN SEVERE PERSONNEL INJURY OR DEATH.
•
Ensure CB-1, CB-2, CB-3, CB-12, and CB-19 inside shelter are in open position. Do not
apply power to MTS with these CBs in closed position. Doing so could damage CBs and
electronic components in shelter.
•
To avoid damage to equipment, vehicle should not be in operational mode and engine should
be switched off.
•
To avoid damage to equipment, remove all items from the exterior shelf before operating the
air conditioner.
a. Power Subsystem.
(1) Shelter Power Options. Shelter main power source is 24VDC, which can be supplied by MTS batteries or
vehicle batteries. Shelter can also be powered by 115 V external generator.
(2) Vehicular Power. Use this procedure to apply power to MTS using vehicle power from High Mobility
Multipurpose Wheeled Vehicle (HMMWV).
(a) With vehicle engine running, close CB-1, CB-2, CB-3, and CB-19 to apply power to shelter systems.
(b) Verify digital display inverter status indicator is green. If status indicator is not illuminated, refer to
Chapter 7 for fault isolation or replacement.
(c) Verify battery charger control indicator is illuminated which indicates power is present and MTS
batteries are charging. If indicator is not illuminated, refer to Chapter 7 for fault isolation or replacement.
(d) Close CB-12, CB-13, CB-14, CB-15, CB-16, and CB-17. Refer to Table 5-30 for a list of individual
CBs.
(e) Power on PCC and ensure ADP interface unit is powered on.
(f) Turn on air conditioner using the following steps.
1 Ensure AC power cord is plugged into unit at P1 and into outlet J17 (air conditioner) located on upper
front wall.
2 Ensure Operation Control switch is in the OFF position.
3 Close CB-18.
5-18
TM 11862A-OR
4 Close CB-1 Main Breaker on air conditioner front panel.
5 Select mode option as follows:
• In Cool mode, compressor runs continually and thermostat cycles system bypass for
temperature control.
• In Fan mode, fans run continually for air circulation.
• In OFF mode, no heating or cooling takes place.
• In Heat mode, thermostat cycles heater for temperature control.
6 Set temperature control knob.
• Turn control knob clockwise to increase temperature in shelter.
• Turn control knob counter-clockwise (CCW) to decrease temperature in shelter.
SPINNING BLADES ON VENT FANS CAN CAUSE SEVERE INJURY OR AMPUTATION.
USE EXTREME CARE TO PREVENT INJURY TO PERSONNEL.
To prevent damage to equipment, roll up and secure all ventilation fan covers before operating fans
(CB-11).
(g) Ventilation Fans. Four ventilation fans exchange air inside shelter with fresh outside air. Two are
located on the battery compartment door and two are located on the secondary personnel door. There are two additional
fans mounted on radio rack (to force air over computers for cooling).
1 Roll up and secure all ventilation fan covers.
2 Close CB-11 to start fans.
3 Ensure battery compartment ventilation fans are operational.
4 Ensure shelter door ventilation fans are operational.
5 Ensure radio rack ventilation fans are operational.
(h) Lights. Perform the following steps to turn on the lights:
1 Close CB-10.
2 Turn power switch, located on back wall just inside curbside door, to ON (up position). This switch
must be on for light operation.
3 Set overhead lighting function switch for desired operation. Function switch is located on end of
each light fixture.
• Normal Operation—Set switch to center position. Light output is white when door is closed
and red when door is open.
• White Override—Light output is white regardless of rear door position.
• Red Override—Light output is red regardless of rear door position.
5-19
TM 11862A-OR
4 Ensure two panel, lights are operational.
b. Radio Subsystems.
(1) Close CB-8 and CB-9.
(2) Power on EPLRS radio system.
(3) Close CB-4, CB-5, CB-6, and CB-7.
(a) Power on AN/VRC-110 radio system and verify green light is illuminated. If amber, refer to
TM 11496A-OI/3.
(b) Power on Loud Speaker. Pull volume knob out for speaker operation and adjust to desired level.
(c) Power on the four display units.
(d) Power on printer.
(e) Ensure AFATDS computers are operational including mouse devices, keyboards, and display units.
This procedure assumes all systems are installed and operation.
(4) Generator Power
(a) Properly ground generator and MTS.
(b) Connect W252 (generator pigtail cable) to load studs on generator.
(c) Connect W201 (shelter to generator power cable) to power entry panel on MTS and W252 cable
attached to generator.
(d) Start generator and apply load to provide AC power to the MTS.
(e) Verify power supply (inverter) digital display indicator AC input indicator is illuminated yellow. The
AC input indicator flashes yellow while initializing. When AC power is connected, the AC input indicator will remain
solid yellow and the power supply (inverter) DC status indicator will go off.
5-5. NORMAL OPERATIONS, POWER DOWN AND SECURE SUBSYSTEMS.
a. Power down AFATDS computer as per AFATDS Job Aids.
b. Power down printer.
c. Power down display units.
d. Stow keyboard and mouse.
e. Power down loud speaker.
f. Power down AN/VRC-110 radio system.
g. Power down EPLR radio system
h. Power down air conditioner using the following steps:
5-20
TM 11862A-OR
(1) Turn selector switch to OFF.
(2) Open CB1 Main Breaker on air conditioner front panel.
i. Power down PCC.
j. Open CBs 1 through 19 to remove all power to MTS.
k. Turn off light switch.
l. Secure all weather flaps for display units, impeller fans access panels, and air conditioner.
5-6. DEGRADED OPERATIONS.
Degraded shelter operations exist when one or more of the key MTS power components are inoperable or external power
sources are unavailable resulting in the MTS to be powered exclusively by the on-board batteries. The key power
components that affect the operational capability of the MTS are: MTS batteries, battery charger control, and power
supply (inverter).
The MTS batteries act as a supplemental power source when the MTS power demand exceeds the output of the external
power source. The MTS batteries also are a reserve power bank to operate the MTS without external power. The battery
charger control links the HMMWV charging system to the MTS to charge on-board batteries and power MTS. The
power supply (inverter) manages supplied electricity from external power sources and the MTS on-board batteries to
power the MTS. In addition, the power supply (inverter) automatically switches between HMMWV DC power and
generator AC power.
During degraded shelter operations, a limited number of MTS components should be operated in order to maximize
amount of operational time. The equipment that should remain operational includes: one AFATDS, two monitors, ADP
interface unit, lights, and communications equipment necessary to support operations. All remaining system components
not deemed mission critical, should be turned off, and appropriate CB opened. These components include the air
conditioner, second AFATDS computer, monitors, AFATDS printer, unnecessary communication equipment, and other
items being powered by an MTS outlet.
5-21
TM 11862A-OR
CHAPTER 6
PREVENTIVE MAINTENANCE CHECKS AND SERVICES
6-1. PURPOSE.This chapter provides personnel with the Preventive Maintenance Checks and Services (PMCS)
interval for the SHELTER EXPANDABLE (Mobile Tactical Shelter (MTS)), AN/TSQ-272, hereafter referred to as
MTS or shelter, and its associated equipment/components.
6-2. SCOPE.
This chapter covers equipment installed in the MTS. The absence of an item indicates no scheduled maintenance is
required. The information in Table 6-3 through Table 6-18 contain PMCS items which are exclusive to the MTS and are
not covered in another Technical Manual (TM). PMCS items for the MTS which are covered in a specific TM will have
the publication number or name of the PMCS procedures listed as reference.
If, at any point in the procedure, an operation cannot be performed for the desired indication or result, corrective
maintenance is required. Stop and correct deficiencies before continuing with PMCS. Contact unit maintenance if the
fault cannot be corrected. Before starting PMCS, review the general safety precautions in Chapter 2, which are just as
important as the specific checks. Always be sure the WARNINGS and CAUTIONS seen in the PMCS procedures are
understood. Keep these WARNINGS and CAUTIONS in mind while working. NOTES give information which add to
or emphasize the information in the procedure.
6-3. INSPECTION.
Constant inspection, good housekeeping, and the cleanliness and order of equipment are important for satisfactory
preventive maintenance. While performing PMCS, ensure items are clean and in good condition, correctly assembled or
stored, securely mounted, not excessively worn or corroded, not leaking, and adequately lubricated.
Visual inspection for damage beyond safe or serviceable limits includes:
•
Inspection of straps, tie downs, and cargo nets for rips, tears, and frays.
•
Inspection of flexible materials for hardness, cracks, or breaks.
•
Inspection for correct assembly and stowage of equipment.
•
Inspection for tightness of retaining hardware. Whenever tightening is required, always tighten with the
proper tool.
•
Inspection for item wear or corrosion beyond serviceable limits and illegible markings, data, caution plates,
and printed matter.
•
Inspection for loose or chipped paint and rust discoloration.
•
Inspection for gaps in weld spots or welded seams.
•
Inspection of connectors for broken, bent, or missing components.
•
Tighten all fittings and clamps.
6-1
TM 11862A-OR
6-4. SCHEDULED MAINTENANCE ACTION INDEX, TABLE COLUMN EXPLANATION.
The purpose of this section is to describe a series of inspections and performance tests which may reveal areas of trouble.
These actions are intended to prevent occurrence of trouble, reduce downtime, and ensure equipment serviceability.
Included are scheduled maintenance action index and preventive maintenance procedures for MTS items which are not
covered in an existing TM. Refer to Table 6-1 for a sample Scheduled Maintenance Action Table.
Table 6-1. Sample Scheduled Maintenance Action Table
Item
No.
1
Interval
M
Items to be
Inspected
Power divider
Procedure
Ensure there is no damage to unit such as missing
or damaged hardware or broken wires.
Corrective Action
Refer to Chapter 7 for
replacement procedures.
a. Column 1, Item Number. Column 1 numbers the checks and services to be performed in chronological order.
The asterisk (*) following the item number indicates this item may also be performed during operation, if necessary.
Table 6-2. Interval Symbols Explanation
Interval
Hourly
Daily
Weekly
Monthly
Quarterly (3 Months)
Semiannually (6 Months)
Annually (12 Months)
Overhaul cycle
As specified (explain circumstances)
Symbol
H
D
W
M
Q
S
A
C
R*
b. Column 2, Interval. Table 6-2 illustrates the symbols used in Column 2 and the intervals they represent for the
corresponding maintenance task. *Precede an as required (R) interval by a recommended calendar interval, e.g., Daily as
Required (DR), Weekly as Required (WR), etc.
c. Column 3, Items to be Inspected. This column identifies the portion of the system to be checked or serviced.
d. Column 4, Procedure. This column provides the general procedures for performing the check and lists
references for detailed procedures appearing elsewhere in this manual or lists the applicable TM.
e. Column 5, Corrective Action. This column provides corrective action if discrepancies are found when
performing preventive maintenance procedures.
Correct errors found during PMCS using the maintenance procedures and/or troubleshooting
procedures found in Chapter 7.
6-2
TM 11862A-OR
TO AVOID SERIOUS INJURY OR DEATH, ENSURE SYSTEM IS POWERED DOWN
PRIOR TO PERFORMING MAINTENANCE. USE PROPER SAFETY EQUIPMENT
(SAFETY GOGGLES AND GLOVES) WHEN PERFORMING MAINTENANCE TASKS.
•
Vent assemblies are crucial to ventilation and cooling of batteries, power systems, data, and
voice communications systems in shelter. These vent assemblies must be free of obstructions
in order to allow for free flow of air to prevent damage to equipment.
•
To avoid damage to equipment, do not clean with benzene, thinner, alkaline detergent,
alcoholic system detergent, glass cleaner, wax, polish cleaner, soap powder, or insecticide.
Do not place rubber or vinyl against cabinet for long periods. These types of fluids and
fabrics can cause paint to deteriorate, crack, or peel.
•
Systems and subsystems may not be mission-capable if they do not pass maintenance
requirements specified.
6-5. HIGH MOBILITY MULTI-PURPOSE WHEELED VEHICLE PREVENTIVE MAINTENANCE CHECKS
AND SERVICES PROCEDURES.
PMCS Procedures for the High Mobility Multi-Purpose Wheeled Vehicle (HMMWV) can be found in
TB 9-2320-335-13&P, TM 11033-OR, TM 11033-IN Vol 1, TM 11033-IN Vol 2, and TM 11033-INP.
6-6. LIGHTWEIGHT MULTIPURPOSE SHELTER PREVENTIVE MAINTENANCE CHECKS AND
SERVICES PROCEDURES.
PMCS procedures and lubrication points for the Lightweight Multipurpose Shelter (LMS) can be found in
TM 10-5411-235-13&P.
6-7. ADVANCED FIELD ARTILLERY TACTICAL DATA SYSTEM COMPUTERS PREVENTIVE
MAINTENANCE CHECKS AND SERVICES PROCEDURES.
PMCS procedures for the Advanced Field Artillery Tactical Data System (AFATDS) computers can be found in the
Getec M230 User’s Guide.
6-8. DISPLAY UNITS PREVENTIVE MAINTENANCE CHECKS AND SERVICES PROCEDURES.
PMCS procedures for the display units can be found in the NEC MultiSync LCD User’s Manual.
6-9. POWER SUPPLY (INVERTER) AND DIGITAL DISPLAY INDICATOR PREVENTIVE
MAINTENANCE CHECKS AND SERVICES PROCEDURES.
PMCS procedures for the power supply (inverter) can be found in the OutBack Extreme Rugged Inverter/Charger Power
Systems Installation and User Manual.
6-3
TM 11862A-OR
6-10. ENHANCED POSITION LOCATION AND REPORTING SYSTEM PREVENTIVE MAINTENANCE
CHECKS AND SERVICES PROCEDURES.
PMCS procedures for the Enhanced Position Location and Reporting System (EPLRS) can be found in the
TM 10901A-OR/1.
6-11. RADIO SYSTEMS PREVENTIVE MAINTENANCE CHECKS AND SERVICES PROCEDURES.
PMCS for the SINCGARS can be found in Publication Number 10515-0319-4500. PMCS procedures for Radio
Systems can be found in TM 10901A-OR/2 or TM 11496A-OI/3.
6-12. RADIO HANDSETS PREVENTIVE MAINTENANCE CHECKS AND SERVICES PROCEDURES.
PMCS procedures for Radio Handset can be found in the Publication Number 10515-283-4200.
6-13. ANTENNA SYSTEMS PREVENTIVE MAINTENANCE CHECKS AND SERVICES PROCEDURES.
PMCS procedures for whip antenna can be found in Publication Number 10515-0011-4300. PMCS for the antenna
couplers can be found in Publication Number 10515-0008-4300.
6-14. POWER CONVERTER AND CONDITIONER PREVENTIVE MAINTENANCE CHECKS AND
SERVICES PROCEDURES.
PMCS procedures for the AFATDS Power Converter and Conditioner (PCC) can be found in Publication Number
0029-CHS3-A016-TM-1KWPCC-001A.
6-15. AIR CONDITIONER UNIT PREVENTIVE MAINTENANCE CHECKS AND SERVICES
PROCEDURES.
PMCS procedures for air conditioner can be found in TM 11453A-OI/1.
6-16. GROUNDING KIT PREVENTIVE MAINTENANCE CHECKS AND SERVICES PROCEDURES.
PMCS procedures for the grounding kit can be found in TM 11-5820-1118-12&P.
6-17. SCHEDULED PREVENTIVE MAINTENANCE TEST PROCEDURES
Perform PMCS to keep equipment in operating condition and find, correct, or report problems. Perform these scheduled
maintenance tasks prior to operation.
Correct discrepancies found during PMCS using maintenance procedures and/or troubleshooting
procedures in Chapter 7.
6-4
TM 11862A-OR
Table 6-3. Shelter Exterior Preventive Maintenance Checks and Services Procedures
Item
No.
1
Interval
M
Items to be
Inspected
Exterior walls, floor,
and ceiling panels
Procedure
Inspect for evidence of punctures and
delaminating. Inspect exterior surfaces
for chips, scrapes, scratches, blisters,
bubbles, and other problems with paint.
Corrective Action
Ensure exterior surfaces of shelter
are coated and sealed with paint to
reduce possibility of rust or
corrosion.
If shelter has been damaged, report
damage in accordance with
referenced technical bulletin. If
shelter is crated or pallet mounted,
refer to end item technical manual
for unpacking instructions.
2
M
Door and locking
mechanism
Inspect for proper operation and no
loose or missing hardware.
Tighten loose hardware. Replace
missing hardware.
3
M
Ladder
Inspect for loose or missing hardware.
4
M
Personnel door
adjustment
Test by placing a piece of paper between
primary and secondary doors silicone
weather gasket and bearing surface on
door latch side. Close and latch doors
and withdraw paper. Perform this test at
top, middle, and lower sections of doors.
Tighten or replace hardware as
needed.
If there is resistance to withdrawal
at each test point, sufficient seal
pressure exists and no adjustments
are necessary. If there is no
resistance, adjustment is necessary.
5
M
6
M
Entry panel weather
sealants on all
panels.
Battery
compartment flaps.
Inspect for bent, broken, or cracked
metal parts that could impede
functionality of primary door and latch
assembly. Doors should open and close
easily and latch securely. Inspect s
hinges for proper operation.
Inspect for appropriate paint coverage
and for rust or corrosion.
Notify unit maintenance.
Inspect weather sealant for cracks or
damage.
Replace as necessary.
Inspect for excessive wear or damage.
Replace as necessary.
6-5
TM 11862A-OR
Table 6-4. Shelter Interior Preventive Maintenance Checks and Services Procedures
Item
No.
1
Interval
M
Items to be
Inspected
Interior walls, floor,
and ceiling panels.
Procedure
Inspect for evidence of punctures and
delaminating. Inspect interior surfaces
for chips, scrapes, scratches, blisters,
bubbles, and other problems with paint.
Corrective Action
Ensure interior surfaces of shelter
are coated and sealed with paint to
reduce possibility of rust or
corrosion.
If shelter has been damaged, report
damage IAW referenced technical
bulletin. If shelter is crated or pallet
mounted, refer to end item technical
manual for unpacking instructions.
2
M
Shelter interior
Inspect for evidence of moisture/water.
Clean spills as necessary. Notify
unit maintenance as needed.
Table 6-5. Power Entry Panel Preventive Maintenance Checks and Services Procedures
Item
No.
1
2
Interval
M
M
Items to be
Inspected
Power Entry Panel
hardware
Procedure
Inspect Power Entry Panel for loose, broken, or
missing hardware.
Power Entry Panel
power connector
Corrective Action
Tighten loose hardware.
Replace broken or
missing hardware.
If necessary, clean
connector using a clean
cotton cloth and isopropyl
alcohol or a soft bristle
brush. If broken, notify
unit maintenance.
TO AVOID SERIOUS INJURY OR
DEATH, ENSURE SYSTEM IS
POWERED DOWN PRIOR TO
PERFORMING THIS PROCEDURE.
Inspect for dust, dirt, or other debris that could
prevent connector from making a good, reliable
electrical connection. Inspect for damage that
could make connector unusable or unsafe for use.
3
6-6
M
Exterior surfaces
Inspect for appropriate paint coverage and for rust
or corrosion.
Ensure all surfaces are
coated and sealed to
reduce possibility of rust
or corrosion.
TM 11862A-OR
Table 6-5. Power Entry Panel Preventive Maintenance Checks and Services Procedures (Continued)
Item
No.
4
Interval
M
Items to be
Inspected
Magnetic canvas
cover
Procedure
Inspect for damage and wear that could impair
functionality. There should be no holes, rips,
tears, or frayed canvas in cover. Cover should
completely seal Power Entry Panel from damage
from weather and dust.
Corrective Action
Notify unit maintenance.
Table 6-6. Radio Frequency Power Divider Preventive Maintenance Checks and Services Procedures
Item
No.
1
Interval
M
Items to be
Inspected
Radio Frequency
(RF) power divider
Procedure
Ensure there is no obvious damage to unit such as
missing or damaged hardware or broken wires.
Corrective Action
Refer to Chapter 7 for
replacement procedures.
Table 6-7. Signal Entry Panel Preventive Maintenance Checks and Services Procedures
Item
No.
1
Interval
M
Items to be
Inspected
Signal Entry Panel
hardware
2
M
Signal Entry Panel
hardware
3
M
Voice, data, and
remote control
connectors
Procedure
Corrective Action
Inspect for bent, broken, cracked, or punctured
metal parts that could impede functionality or
structural integrity of Signal Entry Panel.
Repair or replace metal
parts as necessary.
Inspect for loose, broken, or missing hardware.
Tighten loose hardware.
Replace broken or
missing hardware.
If necessary, clean
connector using a clean
cotton cloth and isopropyl
alcohol or a soft bristle
brush.
TO AVOID SERIOUS INJURY OR
DEATH, ENSURE SYSTEM IS
POWERED DOWN PRIOR TO
PERFORMING THIS PROCEDURE.
Inspect for dust, dirt, or other debris that would
prevent connector from making a good, reliable
electrical/signal connection.
4
M
Magnetic canvas
cover
Inspect for damage and wear that could impair its
functionality. There should be no holes, rips,
tears, or frayed canvas in cover. Cover should
completely seal Signal Entry Panel from damage
from weather and dust.
Notify unit maintenance.
6-7
TM 11862A-OR
Table 6-8. Battery Compartment Door and Latch Assembly Preventive Maintenance Checks and Services
Procedures
Item
No.
1
2
Interval
M
M
Items to be
Inspected
Battery
compartment door
and latch assembly
Hardware
Procedure
Corrective Action
Inspect for bent, broken, or cracked metal parts
that could impede functionality of door and latch
assembly. Door should open and close easily and
latch securely. Inspect door hinges for proper
operation.
Ensure all door assembly
hardware is properly
covered with sealant.
Inspect for appropriate paint coverage and for rust
or corrosion.
Notify unit maintenance.
Inspect for loose, broken, or missing hardware.
Tighten loose hardware.
Replace broken or
missing hardware.
Table 6-9. Shelter Vent and Fan Assemblies Preventive Maintenance Checks and Services Procedures
Item
No.
1
Interval
M
Items to be
Inspected
Vent Assemblies
Procedure
VENT ASSEMBLIES ARE CRUCIAL
TO VENTILATION AND COOLING
OF BATTERIES, POWER SYSTEMS,
DATA, AND VOICE COMMUNICATIONS SYSTEMS IN SHELTER.
THESE VENT ASSEMBLIES MUST
BE FREE OF OBSTRUCTIONS IN
ORDER TO ALLOW FOR FREE
FLOW OF AIR. INJURY TO
PERSONNEL OR DAMAGE TO
EQUIPMENT MAY OCCUR.
Inspect for dirt and debris that could clog louvers
and fans and impede their operation and
efficiency.
6-8
Corrective Action
TO AVOID
SERIOUS INJURY
OR DEATH,
ENSURE SYSTEM
IS POWERED
DOWN PRIOR TO
REMOVAL OF
VENT LOUVERS.
If necessary, clean dirt,
debris, or other
obstructions from vent
louvers or vent fans. It
may be necessary to
remove vent louvers to
gain access to vent fans to
clear obstructions from
vent fan blades.
TM 11862A-OR
Table 6-9 Shelter Vent and Fan Assemblies Preventive Maintenance Checks and Services Procedures (Continued)
Item
No.
2
Interval
M
Items to be
Inspected
Shelter vent
assemblies
Procedure
Corrective Action
Replace as necessary.
TO AVOID SERIOUS INJURY OR
DEATH, ENSURE SYSTEM IS
POWERED DOWN PRIOR TO
REMOVAL OF VENT LOUVERS.
Inspect for mechanical soundness and
functionality. Inspect for bent, broken, or cracked
metal parts that could impede functionality of vent
louvers and vent fans.
3
M
Hardware
Inspect shelter vent assemblies for loose, broken,
or missing hardware.
Tighten loose hardware.
Replace broken or
missing hardware.
Table 6-10. Radio Rack Preventive Maintenance Checks and Services Procedures
Item
No.
1
M
Items to be
Inspected
Radio rack
2
M
3
Interval
Procedure
Corrective Action
Inspect for mechanical soundness and
functionality. Inspect for bent, broken, or cracked
metal parts that could impede functionality of
rollers and drawers.
Notify unit maintenance.
Vent fans
Inspect for dirt and debris that could impede
operation and efficiency.
If necessary, clean dirt,
debris, or other
obstructions from rack. It
may be necessary to
remove drawers to gain
access to vent fans to clear
obstructions from vent fan
blades.
M
Rollers, operation of
shelves
Inspect for fluid motion in the operation of shelves
and rollers.
Lubricate as necessary.
4
M
Radio mounts
Inspect for loose, broken, or missing hardware.
See chapter 7 for remove
and replace procedures.
5
M
Hardware
Inspect radio rack for loose, broken, missing, or
damaged hardware.
Repair or replace as
necessary.
6-9
TM 11862A-OR
Table 6-11. Diplexer Preventive Maintenance Checks and Services Procedures
Item
No.
1
Interval
M
Items to be
Inspected
Two diplexers
mounted on interior
curbside wall of
battery compartment
Procedure
Inspect for obvious signs of damage such as
cracked surfaces or broken wires.
Corrective Action
Refer to Chapter 7 for
replacement procedures.
Table 6-12. Power Distribution Unit Preventive Maintenance Checks and Services Procedures
Item
No.
1
Interval
M
Items to be
Inspected
PDU
Procedure
Inspect for obvious signs of damage, such as
broken, crimped, or burned wires and inoperative
lamps or CBs.
Corrective Action
Repair or replace as
necessary. Refer to
Chapter 7 for replacement
procedures.
Table 6-13. Mobile Tactical Shelter Batteries Preventive Maintenance Checks and Services Procedures
Item
No.
1
Interval
M
Items to be
Inspected
Batteries, battery
terminals, cables,
and covers
Procedure
Inspect for cracks or leaks in battery case or
corrosion on battery terminals, cables, or covers.
If obvious damage exists, replace batteries.
If corrosion exists on battery terminals or cables,
follow local unit automotive battery maintenance
policies and procedures for removal of battery
corrosion and treatment of battery terminals and
cables to prevent corrosion.
Test batteries periodically in accordance
with local unit policies regarding
maintenance and testing of automotive
batteries. See local unit guidelines and
policies for testing procedures and
frequency of testing.
6-10
Corrective Action
Refer to Chapter 7 for
replacement procedures.
TM 11862A-OR
Table 6-14. Battery Charger Control Preventive Maintenance Checks and Services Procedures
Item
No.
1
2
Items to be
Inspected
Battery charger
control
Interval
M
M
Battery charger
control remote
display and control
Procedure
Corrective Action
Inspect to ensure there is no obvious damage to
unit such as missing or damaged hardware or
broken wires.
Refer to Chapter 7 for
replacement procedures.
Inspect to ensure there is no obvious damage to
unit such as missing or damaged hardware or
broken wires.
Refer to Chapter 7 for
replacement procedures.
Table 6-15. Keyboard Display Unit Preventive Maintenance Checks and Services Procedures
Item
No.
1
Items to be
Inspected
KDU
Interval
M
Procedure
Inspect for obvious signs of physical damage that
could imply impaired operations or catastrophic
failure, including broken or damaged keypads;
cracked or broken displays; or cracked, bent,
punctured or broken housings.
Corrective Action
Refer to Chapter 7 for
replacement procedures.
Table 6-16. 4-Port USB Hub Preventive Maintenance Checks and Services Procedures
Item
No.
1
Items to be
Inspected
4-port USB hub
Interval
M
Procedure
Ensure there is no obvious damage to unit such as
missing or damaged hardware or broken wires.
Corrective Action
Refer to Chapter 7 for
replacement procedures.
Table 6-17. Automated Data Processing Interface Unit Preventive Maintenance Checks and Services Procedures
Item
No.
1
Items to be
Inspected
ADP interface unit
Interval
M
Procedure
Inspect interface unit for obvious signs of damage
such as missing or damaged hardware or broken
wires.
Corrective Action
Refer to Chapter 7 for
replacement procedures.
Table 6-18. Keyboards and Mouse Devices Preventive Maintenance Checks and Services Procedures
Item
No.
1
2
Interval
M
M
Items to be
Inspected
Keyboards and
mouse devices
Check for signs of physical damage that could
impair operation.
Refer to Chapter 7 for
replacement procedures.
Keyboards and
mouse devices
Inspect keyboards and mouse devices for dust and
dirt that could impair operation.
If needed, clean with a
soft brush, vacuum
cleaner, canned air, or a
soft cotton cloth.
Procedure
Corrective Action
.
6-11
TM 11862A-OR
6-18. SCHEDULED TEST PROCEDURES.
Scheduled test procedures are not required for the MTS. Refer to equipment TMs for appropriate scheduled test of
individual equipment.
6-12
TM 11862A-OR
CHAPTER 7
ALIGNMENT/MAINTENANCE PROCEDURES
7-1. INTRODUCTIONThis chapter lists troubleshooting procedures for all major components in Mobile Tactical
Shelter (MTS). It provides guidance for fault isolation of MTS and supported equipment. It is divided into primary fault
isolation tables and corrective maintenance. It also includes procedures for removal and replacement to the Lowest
Replaceable Unit (LRU). There are no special alignment procedures for the MTS.
7-2. FAULT ISOLATION PROCEDURESThe procedures included in this section direct the user how to determine
fault(s) in major systems and subsystems of MTS and how to correct most basic faults. The tables below describe basic
steps for performing specific troubleshooting and corrective action required.
TO PREVENT INJURY TO PERSONNEL OR DAMAGE TO EQUIPMENT,
TROUBLESHOOTING MUST BE PERFORMED BY QUALIFIED PERSONNEL.
Table 7-1. Shelter Troubleshooting
Malfunction
Excessive noise and
vibration
Test or Inspection
Inspect mounting hardware securing shelter to
vehicle.
Corrective Action
• Tighten loose hardware.
• Report missing hardware to unit
maintenance.
Excessive air/moisture in
shelter
Inspect exterior and interior for damage.
• Ensure drain plug is properly
seated.
• Notify unit maintenance.
Personnel door binds
• Inspect door jamb for obstruction or dirt.
• Inspect for broken door hinge or loose or
missing hardware.
• Clean door jamb of obstruction
and debris.
• Notify unit maintenance.
Personnel door does not
lock
Inspect roller latch assembly for missing
hardware or bent control rods.
Notify unit maintenance.
Roller latch assembly
fails to secure door
Inspect roller latch assembly for missing
hardware or bent control rods.
Notify unit maintenance.
Personnel door does not
close tightly
Inspect EMI and weather gasket for damage.
Notify unit maintenance.
Damage to shelter floor
Inspect for proper meeting of shelter walls and
floor and/or missing hardware.
Notify unit maintenance.
Troubleshooting Shelter. Shelter maintenance and repair primarily involves shelter exteriors or easily accessible
interior areas. Do not operate electronic equipment when floors, ceilings, or walls show evidence of water intrusion.
Refer to Table 7-1 to troubleshoot the shelter. Notify maintenance personnel if any of the following conditions
exist:
(1) Panel damage spans a structural member.
(2) Replacement of an entire wall, ceiling, or floor is required.
7-1
TM 11862A-OR
(3) Damage to a structural member is severe enough to cause distortion of a wall, especially an edge or corner
area.
(4) Lifting rings or corner castings are damaged severely enough to indicate possible damage to underlying
structure member.
7-3. TROUBLESHOOTING POWER DISTRIBUTION SUBSYSTEM.
Table 7-2. Mobile Tactical Shelter Battery Troubleshooting
Symptom
No power to equipment
Possible Cause
• Battery cables not connected.
Remedy
• Properly attach battery cables to
terminals.
• Damaged/faulty battery.
• Replace batteries.
• Dead batteries.
•
Replace batteries.
a. Troubleshooting Battery. Refer to Table 7-2 to troubleshoot batteries. Refer to paragraph 7-13 for remove and
replace procedures.
b. Troubleshooting Battery Charger Control. Battery charger control is internally protected against most faults. If
green light does not illuminate when power switch is held in the ON position, refer to the corrective maintenance
procedure. Refer to paragraphs 7-14 for remove and replace procedures.
Table 7-3. Mobile Tactical Shelter Circuit Breakers
CB
CB-1
Description
SOURCE OUTBACK
CB-2
DC BUS
CB-3
CB-4
CB-5
CB-6
CB-7
CB-8
CB-9
CB-10
CB-11
CB-12
CB-13
CB-14
CB-15
CB-16
CB-17
CB-18
CB-19
PCC IN-DC
SINGCARS 1
SINGCARS 2
SINGCARS 3
SINGCARS 4
EPLRS 1
EPLRS 2
LIGHTS
FANS
EXT. AC INPUT
MAIN AC
PCC IN AC
PCC OUTLETS
AC 1 OUTLETS
AC 2 OUTLETS
AIR COND
VEHICLE 24 VDC
7-2
Function
Main DC CB. Removes all power from shelter when open. DC source for the
power supply (inverter)
Removes all DC power from shelter interior when open. Power is still present
at power supply (inverter).
DC power source for PCC.
Provides DC power to SINCGARS outlets, one per outlet.
Provides DC power to SINCGARS outlets, one per outlet.
Provides DC power to SINCGARS outlets, one per outlet.
Provides DC power to SINCGARS outlets, one per outlet.
Provides DC power to the EPLRS 1.
Provides DC power to the EPLRS 2.
Provides DC power to the lighting system.
Provides DC power to the fans.
Provides AC from an external source.
Provides AC power from power supply (inverter).
Provides AC power to PCC.
Provides AC power from PCC.
Powers AC 1 outlets in shelter.
Powers AC 2 outlets in shelter.
Powers AC to air conditioner.
Provides DC power from the vehicle batteries.
TM 11862A-OR
Breaker
on?
Yes
Proceed with
normal operations
No
Power on
breaker
Breaker
trips?
No
Proceed with
normal operations
Yes
Remove
Authorized
Components one
at a time
Breaker
trips again?
No
Replace faulty
Authorized
Component(s)
No
Proceed with
normal operations
No
Replace faulty
Authorized
Component(s)
No
Proceed with
normal operations
Yes
Reinstall
Authorized
Components and
remove next
authorized item
Breaker
trips again?
Yes
Repeat until
faulty Authorized
Components
isolated
Breaker
trips again?
No
Proceed with
normal operations
Yes
Notify unit
maintenance
Figure 7-1. Circuit Breaker Troubleshooting
c. Troubleshooting Circuit Breakers. Refer to Table 7-3 for CB descriptions and Figure 7-1 for CB
troubleshooting.
7-3
TM 11862A-OR
Table 7-4. Power Supply (Inverter) Troubleshooting
Symptom
Power supply (inverter) does not
power up
No output power from power supply
(inverter)
Possible Cause
• CB-1 on PDU is open.
Remedy
• Close CB-1.
• Cables disconnected or damaged.
• Reseat all cable connections.
• Damaged/faulty battery.
• Replace batteries.
• Failed power supply (inverter).
• Notify unit maintenance.
• CB-13 on PDU is open.
• Close CB-13.
• Control wiring terminal block
screws are not tight and wires are
not secure.
• Tighten and secure terminal block
screws and wires.
• Damaged/failed AC output power
cable.
• Notify unit maintenance.
• Failed power supply (inverter).
• Notify unit maintenance.
d. Troubleshooting Power Supply (Inverter). Power supply (inverter) control terminal wiring block is located on
top in middle of control panel. Refer to Table 7-4 to troubleshoot the power supply (inverter). Refer to paragraph 7-15
for remove and replace procedures.
Advancing errors (increasing count on Debug screen) mean digital display indicator is
not finding a previously connected device. To resolve this issue, follow the steps below.
e. Troubleshooting Digital Display Indicator. Communication errors are often the result of loose, damaged, or
unplugged cables. They can also occur if Advanced Generator Start (AGS) mode is used and wrong port is designated
for generator, or if system is damaged by a lightning strike. When a communication error occurs, a “COMM ERR”
message appears. Refer to OutBack Extreme Rugged Inverter/Charger Power Systems Installation and User Manual.
The power supply inverter is operational in this configuration which allows mission to
continue until maintenance/ repair actions can be performed at a depot.
(1) Verify power supply (inverter) Direct Current (DC) breaker is closed and operating correctly, inverter is
powered on, and Category (Cat) 5 cable connecting inverter to hub is plugged in at both ends.
(2) If available, swap digital display indicator with a known good digital display indicator, each using its own
Cat 5 cable. Recheck system and check for errors on each port. If error moved, problem is with cable between port and
digital display indicator. If error remains on same port, problem is with digital display indicator. Refer to paragraph 7-15
for remove and replace procedures.
7-4
TM 11862A-OR
Table 7-5. Advanced Field Artillery Tactical Data System Power Conditioner/Converter Troubleshooting
Symptom
AFATDS PCC will not power on
from AC or external DC
No output power from AFATDS
PCC
AFATDS PCC Alarm sounds
Possible Cause
• AFATDS PCC On/Off switches
set to OFF.
Remedy
• Set On/Off switches on AFATDS
PCC front panel to ON.
• Verify circuit breakers (CB-1,
CB-2, CB-3, CB-13, and CB-14)
on PDU pushed in properly.
• Push in circuit breaker (CB-1,
CB-2, CB-3, CB-13, and CB-14).
• AC and/or DC input power
problem.
• Notify unit maintenance.
• Damaged/failed AC output power
cable.
• Notify unit maintenance.
• Failed AFATDS PCC.
• Notify unit maintenance.
• Excessive output load on
AFATDS PCC.
• Reduce output load on PCC.
• AC and/or DC input power
source failed.
• Restore external power source.
• AFATDS PCC temperature
exceeded internal temperature
limit.
• Allow AFATDS PCC to cool and
remove any external items
restricting airflow.
• Notify unit maintenance.
AFATDS PCC not powering output
load when powered from external
AC or DC source
• Excessive output load on
AFATDS PCC.
• Reduce output load on AFATDS
PCC.
• AFATDS PCC failed.
• Notify unit maintenance.
f. Troubleshooting Power Conditioner/Converter. Refer to Table 7-5 to troubleshoot the AFATDS PCC. Refer to
paragraph 7-17 for remove and replace procedures. Refer to TM 0029-CHS3-A016 TM-1KWPCC-001A for complete
fault isolation procedures.
Table 7-6. Antenna Mast/Mount Troubleshooting
Symptom
No data/radio transmission
Possible Cause
• Antenna/mount base damaged.
Remedy
• Replace antenna/mount base.
• Lose antenna or section.
• Tighten antenna or section.
• Antenna not installed.
• Install antenna whip.
• Failed antenna/mount base.
• Replace antenna/mount base.
• Notify unit maintenance.
g. Troubleshooting Antennas. Refer to Table 7-6 to troubleshoot the antennas. Refer to paragraph 7-7 for remove
and replace procedures.
7-5
TM 11862A-OR
7-4. TROUBLESHOOTING ADVANCED FIELD ARTILLERY TACTICAL DATA SYSTEM.
a. Troubleshooting Network. Operate on-board data network equipment to ensure system is operational. Verify
proper network connectivity to all nodes and that data traffic is moving across network by sending and receiving data
from computers from secure and non-secure networks. Operate AFATDS, send tactical data to Combat Operations
Center (COC), and confirm receipt. Operate computer systems, confirm network connectivity, and verify that computer
systems are passing data and working correctly as network nodes.
b. Troubleshooting EPLRS. Ensure Enhanced Position Location and Reporting System (EPLRS) radio system is
transmitting location data to COC. If COC is not receiving position locating signal or data, troubleshoot EPLRS using
TM 11-5825-299-10. Check cable and wiring connectivity issues and antenna functionality using EPLRS
TM 11-5825-299-10. Refer to TM 10901A-OR/2 for complete fault isolation procedures. Refer to paragraph 7-18 for
remove and replace procedures.
Table 7-7. AN/VRC 110 System Troubleshooting
Symptom
No power indication
Possible Cause
• Power is not switched to ON
position.
Remedy
• Toggle power switch located on
amplifier to the ON position.
• Circuit breakers (PDU) are not
pushed in properly (CB-1, CB-2,
CB-4, CB-5, CB-6, and CB-7).
• Push in circuit breaker (CB-1,
CB-2, CB-4, CB-5, CB-6, and
CB-7).
• Amplifiers not seated properly in
shock mount.
• Re-seat amplifiers in shock
mount.
• SINCGARS power cable not
fitted correctly.
• Properly plug in SINCGARS
power cable to shock mount.
• Notify unit maintenance.
No data transmission
• Radios not seated properly in
amplifier and data cables and/or
disconnected.
• Reseat radios and properly secure
data cables to side of 110 radio.
• Radio cables and antenna.
disconnected/mounted
improperly.
• Attach radio cables and mount
antenna to shelter/base.
• Radio not configured properly to
transmit/receive data.
• Configure radio(s) to correct
settings (channel data/frequency).
• Notify unit maintenance.
c. AN/VRC-110 Radio System. Operate Single Channel Ground-to-Air Radio System (SINCGARS)
AN/VRC-110 vehicular radio system, including AN/PRC-152 Receiver/Transmitters (R/Ts) IAW AN/VRC-110 (and
AN/PRC-152) TM 11496A-OI/3. Refer to TM 11-5825-299-10 to verify cable and wiring connectivity, antenna
functionality, troubleshooting, or removal and replacement of radio system. Refer to Table 7-7 to troubleshoot the
AN/VRC 110 radio system. Perform the following turn-on procedure to troubleshoot the AN/VRC-110.
(1) Maintenance Turn-on Procedure. Maintenance turn-on procedure guides the user through proper settings to
power up radio from de-energized state to fully-operational state. Observe radio for normal operating conditions. Faults
may be determined by using Built-in Test (BIT) or visual observation.
7-6
TM 11862A-OR
On some models, selection reads FP instead of F.
(a) Turn on radio by rotating cipher switch to PT or CT and turn function knob to F.
(b) Place Vehicle Amplifier Adapter (VAA) power switch to ON position. If radio does not power up,
verify power source is on.
(c) Radio completes Power-On Self-Test (POST); proceed to step (2) for operator-initiated BIT
troubleshooting. If radio fails POST, refer to Publication Number 10515-0359-4200 for additional details on
troubleshooting radio system.
(d) Press OPT.
(e) Use up/down arrow buttons to select Test Options.
While in TEST mode, radio cannot receive or transmit.
(f) Press ENT.
(2) To perform operator-initiated BIT, select SELF TEST and press ENT. Operator-initiated BIT performs
longer tests in addition to running data/loopback tests through crypto. Refer to Publication Number 10515-0359-4200
for additional details on troubleshooting radio system.
Table 7-8. Computer Troubleshooting
Symptom
Peripheral devices not operational
(keyboard, mouse, printer, ADP
switch, 4-port USB hub, hard drive,
display)
Possible Cause
• Devices not turned on.
Remedy
• Turn on devices.
• Cable connections loose or
disconnected.
• Ensure all connections are secure.
• Devices are incorrectly installed.
• Ensure all devices are installed
properly.
• Device failure.
• Remove and replace device.
d. Troubleshooting Computers. Operate computer to ensure systems are functioning properly. Refer to the
AFATDS Computer User’s Manual to verify cable and wiring connectivity, troubleshooting, or removal and replacement
of computer system. Refer to Table 7-8 for troubleshooting. Refer to paragraph 7-24 for remove and replace
procedures.
7-7
TM 11862A-OR
Table 7-9. Display Unit Troubleshooting
Symptom
No picture/video
Possible Cause
• Power not switched to ON
position
Remedy
• Toggle power switch located on
display and computer to ON
position.
• Signal cable not connected to
computer/display.
• Verify/connect signal cable to
computer/display.
• Signal cable connector damaged.
• Notify unit maintenance.
• Signal input not set to display
correct input.
• Switch display to proper input
and check status of Images Per
Minute (IPM) mode.
• Incorrect computer display
settings.
• Change computer output display
settings.
• Front LED is blinking amber.
• Verify computer is not in powersave mode.
• Notify unit maintenance.
No power
Image unstable or unfocused
• Power switch not in ON position.
• Toggle power switch located on
display and computer to ON
position.
• Circuit breakers (CB-16 and
CB-17) on the PDU are not
pushed in properly.
• Push in circuit breaker (CB-16
and CB-17).
• Power button does not respond.
• Unplug display unit power cord
from AC outlet to reset display
unit.
• Display AC power cable
damaged.
• Notify unit maintenance.
Signal cable not properly connected.
• Verify/connect signal cable to
computer/display.
• Use On Screen Menu (OSM)
controls to focus and adjust
display.
• Notify unit maintenance.
Text garbled on display
Improper refresh rate
Display image not sized properly
Images display at incorrect size
Change video mode from noninterlaced to 60 Hz refresh rate.
• Use OSM controls to increase or
decrease coarse total
• Ensure supported mode has been
selected on display card or system
• Notify unit maintenance
7-8
TM 11862A-OR
Table 7-9. Display Unit Troubleshooting (Continued)
Symptom
No video output
Possible Cause
• VGA cables not plugged in
properly.
Remedy
• Reseat all cable connections.
• Failed RF power divider.
• Notify unit maintenance.
• Failed RF power divider power
supply.
• Notify unit maintenance.
e. Troubleshooting Display Units and RF Power Dividers. MTS display units are equipped with the ability to self
diagnose abnormalities. When display unit detects a problem, the Light Emitting Diode (LED) on front flashes in a
pattern of long and short blinks, depending on problem detected. Refer to Table 7-9 to troubleshoot display units. Refer
to paragraph 7-25 for remove and replace display units. Refer to paragraph 7-26 for remove and replace RF power
dividers. Refer to NEC MultiSync LCD User’s Manual for complete fault isolation.
Table 7-10. Lighting Troubleshooting
Symptom
No light/power
Possible Cause
• Power is not switched to white,
red, or door select light position.
Remedy
• Toggle power switch to white,
red, or door select light position.
• Power cable(s) damaged.
• Notify unit maintenance.
• LED lights faulty.
• Notify unit maintenance.
• Circuit breakers (PDU) are not
pushed in properly (CB10).
• Push in circuit breaker (CB10).
• Relay, electromagnetic faulty.
• Notify unit maintenance.
f. Troubleshooting Lighting. Ensure overhead lights are on and working properly. Ensure blackout light function
is operational by opening and closing personnel door during operation. Refer to Table 7-10 to troubleshoot the lighting.
Refer to paragraph 7-10 for remove and replace procedures.
Table 7-11. Handset Troubleshooting
Symptom
Cannot hear or talk
Possible Cause
• Handset not connected.
Remedy
• Connect handset to speaker or
radio.
• Failed handset.
• Notify unit maintenance.
g. Troubleshooting Handset. Refer to Table 7-11 to troubleshoot handset.
Table 7-12. Keyboard Display Unit (KDU) Troubleshooting
Symptom
No power/display on unit
Possible Cause
• Cables not connected.
Remedy
• Reseat all cable connections.
• Radio not on.
• Turn PRC152 on.
• KDU not enabled.
• Enable KDU settings in PRC152
in radios option settings.
• Failed KDU.
• Notify unit maintenance.
7-9
TM 11862A-OR
h. Troubleshooting Keyboard Display Unit. Refer to Table 7-12 to troubleshoot KDU. Refer to paragraph 7-16
for remove and replace procedures.
Table 7-13. Loud Speaker Troubleshooting
Symptom
No audio
Possible Cause
• Loud speaker turned off.
Remedy
• Toggle power to ON position.
• Cables disconnected or damaged.
• Reseat all cable connections.
• Volume turned down too low.
• Twist volume knob to increase
volume.
• Failed speaker.
• Notify unit maintenance.
i. Troubleshooting Loudspeaker. Refer to Table 7-13 to troubleshoot speakers. Refer to paragraph 7-21 for
remove and replace procedures.
Table 7-14. ADP Interface Unit Troubleshooting
Symptom
ADP interface unit does not power
up.
No data from ADP interface unit.
Possible Cause
• Circuit breakers (PDU) are not
pushed in properly. (CB16 and
CB17).
Remedy
• Push in circuit breaker. (CB16
and CB17).
• Power cable disconnected or
damaged.
• Reseat power cable connection.
• Failed ADP interface unit.
• Refer to paragraph 7-24 for
replacement.
• PCC not powered on.
• Power on PCC
• Cat -5 cable(s) disconnected or
damaged.
• Reseat Cat-5 cable connections.
Inspect for damage.
• Failed ADP interface unit.
• Refer to paragraph 7-24 for
replacement.
j. Troubleshooting ADP Interface Unit. Refer to Table 7-14 to troubleshoot ADP interface unit. Refer to
paragraph 7-23 for remove and replace procedures.
7-10
TM 11862A-OR
7-5. TROUBLESHOOTING AIR CONDITIONER AND VENTILATION FANS.
Table 7-15. Air Conditioner Troubleshooting
Symptom
Air conditioner fails to
start
Possible Cause
• Incorrect voltage.
Remedy
• Correct voltage.
• Power failure.
• Check power source, power input,
and circuit breaker.
• Correct power connection not selected.
• Check control cables and
connections.
• Adjust to proper temperature
setting.
Air conditioner fails to
cool/heat
• Improper temperature control.
• Adjust to proper temperature
setting.
• Contact unit maintenance.
a. Troubleshooting Air Conditioner. Ensure air conditioner is operating properly. Refer to Table 7-15 to
troubleshoot air conditioner. If air conditioner is not operating properly, refer to paragraph 7-8 for remove and replace
procedures for air conditioner.
Table 7-16. Ventilation Fan Troubleshooting
Symptom
No power/low airflow
Possible Cause
Remedy
• Circuit breaker (CB-11) on PDU not pushed in • Push in circuit breaker (CB-11).
correctly.
• Loose or damaged cable.
• Check wiring for proper
connection and damage.
• Failed fan.
• Notify unit maintenance.
b. Troubleshooting Ventilation Fans. Ensure ventilation fans are operating properly. Refer to Table 7-16 to
troubleshoot fans. If ventilation fans are not operating properly, refer to paragraph 0 for ventilation fan removal and
replacement.
7-11
TM 11862A-OR
7-6. CORRECTIVE MAINTENANCE.
Corrective maintenance at Organizational (O) level (1st and 2nd echelon maintenance) consists of removal and
replacement of Lowest Replaceable Units (LRUs), cables, and LRU installation hardware.
a. Special Tools and Support Equipment. No special tools or test equipment are required to repair shelter.
TM 10-5411-235-13&P lists standard tools and test equipment needed for maintenance and repairs of shelter only.
b. Repair Parts. Refer to parts list in TM 10-5411-235-13&P for authorized repair parts used in repair of shelter
only. This list does not include parts for shelter furniture, equipment racks, equipment housed within shelter, or antenna
systems or other ancillary equipment mounted on exterior of shelter.
7-7. REMOVE AND REPLACE ANTENNA AND ANTENNA BRACKET.
TOOLS: Screwdriver, Cross-tip, #2
Socket, Drive 1/2 inch
Ratchet, Drive, 3/8 inch
Putty knife, Standard
Socket, Drive 7/16 inch
MATERIALS/PARTS: Antenna, EPLRS (Figure 8-1, Item 1)
Antenna, SINCGARS (Figure 8-2, Item 1)
Bracket, mount cover (Figure 8-1, Item 5 and Figure 8-2, Item 5)
Cloth, cotton, muslin (Appendix B, Item 21)
Isopropyl Alcohol, Technical (Appendix B, Item 3)
Sealing compound, polysulfide (Appendix B, Item 7)
Washers, lock (Figure 8-1, Item 3 and Figure 8-2, Item 3)
SAFETY EQUIPMENT: Goggles, industrial (Appendix B, Item 17)
Gloves, Chemical and Oil Protective (Appendix B, Item 19)
PERSONNEL REQUIRED: Two
MOS: Personnel for initial examination: 0844, 0848, or 0861.
Personnel for base replacement: 2841.
7-12
TM 11862A-OR
TO PREVENT INJURY TO PERSONNEL OR DAMAGE TO EQUIPMENT, ENSURE
POWER IS REMOVED FROM SHELTER BEFORE REPLACING ELECTRICAL
COMPONENTS. SERIOUS INJURY OR DEATH CAN OCCUR.
•
Refer to TM 11-5825-299-10 and Publication Number 10515-0359-4200 for
more detailed information on system operation, maintenance, troubleshooting,
and repair.
•
This section contains a general description of removal and replacement
procedures for the EPLRS and SINCGARs radio antenna systems that attach to
MTS. The mounts are slightly different in the two antenna systems.
a. Remove Antenna Base
(1) Remove antenna mast from antenna base.
(2) Disconnect Radio Frequency (RF) line from base bottom by rotating connector nut counter-clockwise.
(3) Using a #2 cross-tip screwdriver, remove ground wire.
(4) Using a 1/2 inch socket with 3/8 inch drive ratchet, remove four 5/16 inch-18 x 1-1/4 inch hex cap bolts,
four 5/16 inch lock washers, and four 5/16 inch x 11/16 inch flat washers. Retain hardware. Discard lock washers.
(5) Remove antenna and antenna base from antenna mounting bracket and set aside.
b. Remove Antenna Mounting Bracket
(1) With a putty knife, scrape away polysulfide sealant around perimeter of antenna mounting bracket.
(2) Using a 7/16 inch socket with 3/8 inch drive ratchet, remove 1/4 inch-20 x 3/4 inch (GR8) bolts, flat
washers, and lock washers securing antenna mounting bracket from shelter wall. Retain hardware. Discard lock
washers.
(3) Carefully remove antenna mounting bracket from wall and set aside.
7-13
TM 11862A-OR
ALCOHOL SOLVENTS ARE FLAMMABLE. TO PREVENT INJURY TO PERSONNEL
OR DAMAGE TO EQUIPMENT, KEEP AWAY FROM HEAT, SPARKS, AND OPEN
FLAME. KEEP CONTAINERS CLOSED WHEN NOT IN USE. USE ONLY IN WELLVENTILATED AREAS. AVOID PROLONGED BREATHING OF VAPORS OR
REPEATED CONTACT WITH SKIN.
(4) With clean cotton cloth and isopropyl alcohol, clean shelter surface area under antenna mounting bracket.
c. Replace Antenna and Mounting Bracket
(1) Position new antenna mounting bracket on the shelter. Ensure mounting holes in shelter wall align with
holes in antenna mounting bracket.
(2) Using a 7/16 inch drive socket with 3/8 inch drive ratchet, install 1/4 inch-20 x 3/4 inch (GR8) bolts, flat
washers, and new lock washers into holes in antenna mounting bracket and tighten securely.
(3) Place new antenna base on bracket placing ID plate towards outside.
(4) Using a 1/2 inch socket with 3/8 inch drive ratchet, insert four 5/16 -18 x 1-1/4 inch hex cap bolts, four 5/16
inch lock washers, and four 5/16 inch x 11/16 inch flat washers.
(5) Using a #2 cross-tip screwdriver, insert pan head cross-recessed #10-32 x 3/8 inch screw, attach unfastened
end of antenna ground wire to base of antenna base assembly.
(6) Reattach antenna coaxial cable and tighten securely.
TO PREVENT INJURY TO PERSONNEL, CHEMICAL PROTECTIVE GLOVES MUST
BE WORN WHEN WORKING WITH SEALING COMPOUND, POLYSULFIDE.
INJURY TO PERSONNEL MAY RESULT IF CHEMICALS CONTACT UNPROTECTED
SKIN. SMOKING IS PROHIBITED WHEN WORKING WITH FLAMMABLE
MATERIALS.
(7) Apply polysulfide sealant around perimeter of antenna mounting bracket.
(8) Once base is properly attached, reattach the antenna mast to base.
7-8. REMOVE AND REPLACE AIR CONDITIONER.
TOOLS: Socket, Drive, 7/16 inch
Ratchet, Drive, 3/8 inch
Wrench, 7/16 inch (Qty 2)
Socket, Drive, 9/16 inch
Putty knife, Standard
7-14
TM 11862A-OR
MATERIALS/PARTS: Adhesive (Appendix B, Item 2)
Adhesive (Appendix B, Item 23)
Air conditioner (Figure 8-10, Item 4; Figure 8-11, Item 9)
Cloth, cotton, muslin (Appendix B, Item 21)
Isopropyl Alcohol, Technical (Appendix B, Item 3)
Sealing Compound (Appendix B, Item 7)
Sealing Compound (Appendix B, Item 22)
Soap, lubricating (Appendix B, Item 24)
Washer, lock (Figure 8-10, Item 2; Figure 8-11, Item 3)
SAFETY EQUIPMENT: Gloves, chemical and oil protective (Appendix B, Item 19)
PERSONNEL REQUIRED: Four
MOS: Personnel for initial examination: 0861.
Personnel for troubleshooting and replacement: 0844 or 0848.
a. Remove
TO PREVENT INJURY TO PERSONNEL OR DAMAGE TO EQUIPMENT, ENSURE
POWER IS REMOVED FROM SHELTER BEFORE REPLACING ELECTRICAL
COMPONENTS. SERIOUS INJURY OR DEATH CAN OCCUR.
Before performing this procedure, ensure that the air conditioner power cable is
unplugged from the air conditioner inside the shelter.
(1) Using a 7/16 inch socket with 3/8 inch drive ratchet, remove 16 1/4 inch-20 x 1 inch hex cap screws, 16
1/4 inch split lock washers and 1/4 inch x 5/8 inch flat washers that are threaded through the bracket into the shelter wall
and air conditioner shelf.
(2) The two screws inserted into the air conditioner shelf are held in place via a 1/4-20 nut on the other side.
Using a 7/16 inch socket with 3/8 inch drive ratchet, loosen the nuts. An additional 7/16 inch wrench is needed for the
two bottom screws.
(3) Lift rain guard bracket from air conditioner. Retain bracket and hardware.
(4) On underside of shelf, use a 9/16 inch socket and 3/8 inch drive ratchet to remove four 3/8-24 x 1-1/2 inch
hex head bolts (GR8), four 3/8 inch x 7/16 inch flat washers (GR8), and four 3/8 inch lock washers (GR8). Retain
hardware for installation. Discard lock washers.
7-15
TM 11862A-OR
•
TO PREVENT INJURY TO PERSONNEL OR DAMAGE TO EQUIPMENT, AIR
CONDITIONER IS A MANDATORY 4-MAN LIFT. IF FOUR MALE
PERSONNEL ARE NOT AVAILABLE, AIR CONDITIONER MUST BE MOVED
WITH MECHANICAL LIFT TO AVOID INJURY TO PERSONNEL.
•
TO PREVENT INJURY TO PERSONNEL, CHEMICAL PROTECTIVE GLOVES
MUST BE WORN WHEN WORKING WITH SEALING COMPOUND,
POLYSULFIDE. INJURY TO PERSONNEL MAY RESULT IF CHEMICALS
CONTACT UNPROTECTED SKIN. SMOKING IS PROHIBITED WHEN
WORKING WITH FLAMMABLE MATERIALS.
Air conditioner may require a rocking motion to free it.
(5) Slide air conditioner backwards from shelter wall.
(6) Lift air conditioner from air conditioner mounting bracket and lower to ground.
Air conditioner bezel gasket should be inspected and replaced, if required. When
replacing gasket apply sealing compound, polysulfide between the gasket and the air
conditioner.
(7) Once air conditioner is removed, inspect gasket for any holes, tearing and/or damage. Replace as
necessary. If required, peel old gasket from bezel opening. Sections may require the use of a putty knife to separate the
material from bezel surface.
(8) Inspect foam weather seal on rain guard and remove if damaged.
b. Replace
(1) If required, obtain 85 inches of self-sticking gasket seal to fit air conditioner bezel perimeter.
(2) Cut four pieces, two 24 1/4 inch and two 16 1/4 inch pieces with a 45 degree cut on the ends, so when
mated together form a 90 degree bend in corners.
(3) Peel off wrapping and press gasket into place in bezel. Placement should be 1/4 inch inside outer rim of
bezel with joining ends centered along bottom bezel lip.
7-16
TM 11862A-OR
•
TO PREVENT INJURY TO PERSONNEL, CHEMICAL PROTECTIVE GLOVES
MUST BE WORN WHEN WORKING WITH SEALING COMPOUND,
POLYSULFIDE. INJURY TO PERSONNEL MAY RESULT IF CHEMICALS
CONTACT UNPROTECTED SKIN. SMOKING IS PROHIBITED WHEN
WORKING WITH FLAMMABLE MATERIALS.
•
TO PREVENT INJURY TO PERSONNEL OR DAMAGE TO EQUIPMENT, AIR
CONDITIONER IS A MANDATORY 4-MAN LIFT. IF FOUR MALE
PERSONNEL ARE NOT AVAILABLE, AIR CONDITIONER MUST BE MOVED
WITH MECHANICAL LIFT TO AVOID INJURY TO PERSONNEL.
(4) Seal the mating area between the self-sticking gasket seal and bezel, exterior only, using multi-purpose
polyurethane sealant adhesive.
(5) Using a 4-man lift, place air conditioner on support shelf and align fastener holes through access holes in
shelf.
(6) Seat the air conditioner onto the bottom rain guard and against air conditioner opening gasket and line up
with mounting holes in the air conditioner platform. Considerable pressure may be needed to line up fastener hole.
(7) Using a 9/16 inch socket and 3/8 inch drive ratchet, install, but do not tighten, four 3/8-24 x 1-1/2 inch hex
head bolt (GR8), four 3/8 x 7/8 inch flat washers (GR8) and four 3/8 inch medium split lock washers (GR8) through
shelf mount holes into threaded mounting hole on bottom of air conditioner.
Do not reuse lock washers. Always replace lock washers with new ones.
(8) Align the face of air conditioner in bezel opening, ensure it sits flush with gasket.
(9) Ensure air conditioner is centered over the skid plates.
(10) Using a 9/16 inch socket and 3/8 inch drive ratchet, tighten hardware.
(11) Replace foam weather seal on rain guard, if necessary.
7-17
TM 11862A-OR
•
To prevent damage to equipment, do not over-tighten bracket against shelter
wall.
•
To prevent damage to equipment, do not install adhesive in temperatures above
80 degrees F.
•
To prevent damage to equipment, maintain a distance of .41 inches
(13/32 inches) between the rain guard and the shelter wall.
(12) Reinstall rain guard bracket using the following steps:
Bracket is an extremely tight fit and may require some side to side movement to move it
into position. It may also require a mild liquid soap to lubricate gasket.
(a) Position rain guard bracket over air conditioner and push downward until guard is seated flush with
shelf bracket and forward wall of shelter. Maintain a .41 inch (13/32 inch) distance between the rain guard and shelter.
(b) Using a 7/16 inch socket with a 3/8 inch drive ratchet and a 7/16 inch wrench, secure rain guard to shelf
bracket with two 1/4 inch-20 x 1 inch hex cap screws, two 1/4 inch medium split lock washers, two 1/4 inch x 5/8 inch
flat washers. Rain guard must be pulled down with bottom screws to align the 14 front wall fastener holes. Do not fully
tighten bottom fasteners.
(c) Once forward holes are aligned by downward pressure, install 14 1/4 inch-20 x 1 inch hex cap screws,
14 1/4 inch medium split lock washers, and 14 1/4 inch x 5/8 inch flat washers.
(d) Using a 7/16 inch socket and 3/8 inch drive ratchet, tighten hardware using a “star” pattern.
(e) Return to bottom fasteners and, using a 7/16 inch socket and 3/8 inch drive ratchet with a 7/16 inch
wrench, fully tighten.
TO PREVENT INJURY TO PERSONNEL OR DAMAGE TO EQUIPMENT, ENSURE
POWER IS REMOVED FROM SHELTER BEFORE REPLACING ELECTRICAL
COMPONENTS. SERIOUS INJURY OR DEATH CAN OCCUR.
7-9. REMOVE AND REPLACE FAN ASSEMBLIES.
TOOLS: Wire cutters
Screwdriver, Cross-tip, #2
Ratchet, Drive, 1/4 inch
Socket, Drive, 11/32 inch
Wrench, 3/8 inch
Wrench, 11/32 inch
7-18
TM 11862A-OR
MATERIALS/PARTS: Lock nut, nylon insert (Figure 8-6, Item 7)
Nut, self-locking (Figure 8-8, Item 1)
Strap, tiedown, electrical components (Appendix B, Item 8)
Ventilation fan (Figure 8-8, Item 5)
MOS: Personnel for initial examination: 0844, 0848, or 0861.
Personnel for replacement: 1141.
a. Remove and Replace Battery Door Fans
Due to the harsh environment in which these fans operate, they require periodic
replacement.
(1) Remove
(a) Open CB-11 to remove power from fan circuit.
(b) Open battery door to gain access to both sides of fan fastener screws and power connector.
(c) Disconnect the Conex twistlock connector (W55-3 or W55-4) and, using wire cutters, cut any cable ties
holding the fan wire in place.
(d) Using a #2 cross-tip screwdriver and a 1/4 inch drive ratchet with an 11/32 inch socket, loosen
hardware and remove the four #8 32 x 1-1/4 inch pan head cross-recessed screws, eight #8 flat washers, four #8 spacers,
and four #8 nylon insert locking nuts. Screw heads will be to the outside of the door with nylon insert locking nuts on
the inside.
(e) Remove the fan assembly.
(2) Replace
•
Do not reuse nylon insert locking nuts. Always replace with new ones.
•
If new fan assembly does not come with a fan guard attached, the user can reuse
the guard from the old fan.
(a) Use the following procedure to reuse the guard from the old fan:
1 Using a #2 cross-tip screwdriver, 1/4 inch drive ratchet with 11/32 inch socket, remove the axial fan
guard (PN 4C657) from original fan assembly by removing four #8-32 x 5/8 inch pan head cross-recessed screws and
eight #8 x 3/8 inch flat washers, four #8 hex plain nuts.
2 Using a #2 cross-tip screwdriver, 1/4 inch drive ratchet with 11/32 inch socket, install axial fan
guard assembly onto new fan assembly using eight #8-32 x 5/8 inch pan head cross-recessed screws and eight #8 x 3/8
inch flat washers, four #8 hex plain nuts.
(b) Center new fan assembly over door vent bezel and vent holes.
(c) Position fan assembly, ensuring that wiring is in the bottom right hand corner, and airflow indicator is
oriented to exhaust from battery compartment.
7-19
TM 11862A-OR
(d) Secure using four #8 32 x 1-1/4 inch pan head cross-recessed screws, four #8 flat washers, four #8
spacers, and four #8 nylon insert locking nuts. Screw heads will be to the outside of the fan with nylon insert locking
nuts on the inside.
(e) Using a #2 cross-tip screwdriver and a 1/4 inch drive ratchet with 11/32 inch socket tighten the
hardware.
(f) Reconnect the Conex twistlock connector (W55-3 or W55-4) to DC source and cable tie wire to
appropriate tie mount.
(g) Repeat steps (a) through (f) for replacement of second fan assembly, if necessary.
TO PREVENT INJURY TO PERSONNEL OR DAMAGE TO EQUIPMENT, ENSURE
POWER IS REMOVED FROM SHELTER BEFORE REPLACING ELECTRICAL
COMPONENTS. SERIOUS INJURY OR DEATH CAN OCCUR.
b. Remove and Replace Radio Rack Computer Cooling Fan
(1) Remove
•
The two cooling fans are located behind the computer shelves on the radio rack.
•
The fans are attached to the left rear leg via a fan bracket. In the event that one
of the fans needs replacing, it is much easier to remove the entire assembly from
the leg and replace the fan on the bracket.
(a) Open CB-11 to remove power from fan circuit.
7-20
TM 11862A-OR
TO PREVENT INJURY TO PERSONNEL AND DAMAGE TO EQUIPMENT, CONFIRM
THAT POWER IS REMOVED BEFORE SLIDING OUT RADIO SHELVES.
(b) Pull out the radio shelf in the radio rack to the outward lock position. Pull out both computer shelves.
This creates the space necessary for removal of both fan brackets.
(c) Disconnect the Conexall connector (W55-5 or W55-6) on rear face of fan and allow DC supply cable
harness to hang in place.
(d) Using a #2 cross-tip screwdriver, 1/4 inch drive ratchet with 11/32 inch socket , remove the two 1/4
inch-20 x 3/4 inch hex head cap screws, four #1/4 inch x 5/8 inch flat washers, and two 1/4 inch-20 nylon insert locking
lock nuts.
(e) Remove fan assembly from radio rack.
(f) Using a #2 cross-tip screwdriver, 1/4 inch drive ratchet with 11/32 inch socket remove fan from bracket
by removing four #8-32 x 3/4 inch pan head cross-recessed screws, eight #8 x 3/8 inch flat washers, and four #8 32
nylon insert locking lock nuts.
(2) Replace
If new fan assembly does not come with a fan guard attached, the user can reuse the
guard from the old fan.
(a) Use the following procedure to reuse the guard from the old fan:
1 Using a #2 cross-tip screwdriver, 1/4 inch drive ratchet with 11/32 inch socket, remove the axial fan
guard from original fan assembly by removing four #8-32 x 5/8 inch pan head cross-recessed screws and eight #8 x 3/8
inch flat washers, four #8 hex plain nuts.
2 Using a #2 cross-tip screwdriver, 1/4 inch drive ratchet with 11/32 inch socket, install axial fan
guard assembly onto new fan assembly using eight #8-32 x 5/8 inch pan head cross-recessed screws and eight #8 x 3/8
inch flat washers, four #8 hex plain nuts.
(b) Using a #2 cross-tip screwdriver, 1/4 inch drive ratchet with 11/32 inch socket, attach grill to
replacement fan using four #8-32 x 5/8 inch pan head cross-recessed screws, eight #8 x 3/8 inch flat washers, and four #8
hex plain nuts.
(c) Assemble fan housing between grill and bracket.
(d) Orient grill so it stands away from fan housing.
(e) Orient bracket so angled section bends toward grill.
(f) Orient fan so air is forced through grill. (Air flow is indicated by an arrow on fan housing.) Ensure fan
wires are fed into channel and cannot interfere with spinning blades during operation.
7-21
TM 11862A-OR
(g) Using a #2 cross-tip screwdriver, 1/4 inch drive ratchet with 11/32 inch socket, fasten fan to bracket
using four #8-32 x 3/4 inch pan head cross-recessed screws, eight #8 x 3/8 inch flat washers, and four #8-32 Nylon insert
locking lock nuts.
(h) Position cable tie mount on rear of bracket and install mounting hardware through mount as fan is
installed on bracket.
(i) Secure connector to cable tie mount using 7-inch cable tie.
(j) Using a #2 cross-tip screwdriver and 3/8 inch wrench, tighten hardware.
(k) Mount fan assembly to rear left radio rack leg, between the third and fourth shelves (counting from
top).
(l) Use two 1/4 inch-20 x 3/4 inch hex head cross-recessed screws, four #1/4 inch x 5/8 inch flat washers,
and two 1/4 inch-20 nylon insert locking nuts. Adjust fan assembly vertically as needed.
Ensure fan assembly does not interfere with shelf movement when computer is mounted.
(m) Reconnect fan wire harness to the connector cable-tied to rear of grill fastener hole.
(n) Ensure that connector is on upper left rear corner of bracket.
c. Remove and Replace Rear Door Vent Fans
TO PREVENT INJURY TO PERSONNEL OR DAMAGE TO EQUIPMENT, ENSURE
POWER IS REMOVED FROM SHELTER BEFORE REPLACING ELECTRICAL
COMPONENTS. SERIOUS INJURY OR DEATH CAN OCCUR.
Due to the harsh environment in which these fans operate, they require periodic replacement.
(1) Remove
(a) Open CB-11 to remove power from fan circuit.
Air flow directional arrows of upper fan will be on the bottom of the fan assembly and
indicate flow toward exterior. Air flow directional arrows of lower fan will be on the top
of the fan assembly and indicate flow into interior.
7-22
TM 11862A-OR
(b) There are two fans on the Auxiliary door. The two fans are mounted 180 degrees from each other,
enabling the top fan to vent exhaust to the outside while the bottom fan draws fresh air inside.
(c) Open auxiliary door to gain access to both sides of fan fastener screws and power connector.
(d) Disconnect the Conexall twist-lock (W55-1 or W55-2) DC Power connector from the fan body.
(e) The top fan will have the blade side turned inward; the bottom fan will have the blade side turned
outward.
(f) To remove the top fan, first remove the shroud assembly from the fan assembly shroud adaptor tabs.
Using a #2 cross-tip screwdriver and 11/32 inch wrench, remove three #8-32 x 1/2 inch pan head cross-recessed screws
six #8 x 3/8 inch flat washers and three #8-32 nylon insert locking nuts.
(g) Remove shroud from adaptor plate.
(h) Using a #2 cross-tip screwdriver and 11/32 inch wrench, remove shroud adapter plate and grill from
fan body by removing four #8-32 x 5/8 inch pan head cross-recessed screws, eight #8 flat washers , four #8 nylon
locking nuts.
(i) Remove adapter plate and grill from fan.
The following step may require two personnel as screws are loose in bezel holes, which
causes them to tilt downward, allowing spacers to fall off screws if not held in place.
(j) Remove the four #8-32 x 1-1/4 inch pan head cross-recessed screws and four #8 flat washers, eight #8
nylon lock nuts from fan body through the door bezel. Remove the fan from screws while screws are still inserted
through bezel. Remove the four #8 spacers on each screw from interior side of screw. Now remove screws from bezel.
(k) To remove the bottom fan, remove the shroud assembly from the fan assembly shroud adaptor tabs.
Using a #2 cross-tip screwdriver and 11/32 inch wrench, remove three #8-32 x 1/2 inch pan head cross-recessed screws
six #8 x 3/8 inch flat washers and three #8-32 nylon insert locking nuts.
(l) Remove shroud from adaptor plate.
This step may require two personnel as screws are loose in bezel holes, which causes
them to tilt downward, allowing spacers to fall off screws if not held in place.
(m) Using a #2 cross-tip screwdriver and 11/32 inch wrench, remove shroud adapter plate and grill from
fan body by removing four #8-32 x 5/8 inch pan head cross-recessed screws, eight #8 flat washers , four #8 Nylon
locking nuts.
(n) Using a #2 cross-tip screwdriver, 1/4 inch drive ratchet with 11/32 inch socket, remove adapter plate
and grill from fan body by removing four #8-32 x 1-1/4 inch pan head cross-recessed screws and four #8 flat washers
into pre-drilled holes of Door Vent Fan bezel from outside pointing inward. On the interior side, position a spacer on
each screw.
7-23
TM 11862A-OR
(2) Replace
Air flow directional arrows of upper fan will be on the bottom of the fan assembly and
indicate flow toward exterior. Air flow directional arrows of lower fan will be on the top
of the fan assembly and indicate flow into interior.
(a) Install fan guard plate onto screws of lower fan assembly.
Upper fan assembly will not have fan guard installed.
(b) Orient upper fan assembly so wiring is in lower right hand corner and directional arrows indicate air
flow exhaust.
(c) Orient lower fan assembly so wiring is in upper right-hand corner and directional arrows indicate air
flow intake.
On the lower fan assembly the label will be facing away from the bezel opening.
(d) Using a #2 cross-tip screwdriver and 11/32 inch wrench, install four #8-32 x 1/4 inch pan head cross
recessed screws, four #8 x 3/8 inch flat washers and four #8 nylon insert locking nuts.
(e) Position shroud adaptor onto front of fan assembly using mounting tabs on top left and right.
(f) Install fan grill onto shroud adaptor and secure with four #8-32 x 5/8 inch pan head cross-recessed
screws, eight #8 x 3/8 inch flat washers, and four #8-32 nylon insert locking nuts.
(g) Using a #2 cross-tip screwdriver and 11/32 inch wrench, tighten the hardware.
(h) Position fan shroud assembly onto the front side of the fan assembly mating with shroud adaptor tabs
using three #8-32 x 1/2 inch pan head cross-recessed screws, six #8 x 3/8 inch flat washers, and three #8-32 nylon insert
locking nuts.
7-10. REMOVE AND REPLACE OVERHEAD LIGHTING.
TOOLS: Screwdriver, Cross-tip, #2
MATERIALS/PARTS: Lighting assembly (Figure 8-21, Item 1)
MOS: Personnel for initial examination: 0861.
Personnel for troubleshooting and replacement: 0844.
7-24
TM 11862A-OR
TO PREVENT INJURY TO PERSONNEL OR DAMAGE TO EQUIPMENT, ENSURE
POWER IS REMOVED FROM SHELTER BEFORE REPLACING ELECTRICAL
COMPONENTS. SERIOUS INJURY OR DEATH CAN OCCUR.
a. Remove
(1) Remove the overhead light connection by unscrewing the cable on the light (W67-1 or W67-2).
(2) Using a cross-tip #2 screwdriver, remove four 10-24 x 1 inch screws attaching light fixture to shelter
ceiling. Retain hardware for installation.
b. Replace
(1) Using a cross-tip #2 screwdriver, install overhead light assemblies to threaded holes in ceiling using four
#10-24 x 1 inch pan head cross-recessed screws, four #10 lock washers, and four #10 x 7/16 inch flat washers.
(2) Reattach the overhead light connection (W67-1 or W67-2).
7-11. REMOVE AND REPLACE RELAY, ELECTROMAGNETIC.MATERIALS/PARTS: Relay,
Electromagnetic, 24 Volts Direct Current (VDC) (Figure 8-17, Item 1)
MOS: Personnel for troubleshooting and replacement: 1141.
TO PREVENT INJURY TO PERSONNEL OR DAMAGE TO EQUIPMENT, ENSURE
POWER IS REMOVED FROM SHELTER BEFORE REPLACING ELECTRICAL
COMPONENTS. SERIOUS INJURY OR DEATH CAN OCCUR.
Electromagnetic relay supplies power to shelter lighting and is located in MTS battery
compartment.
a. Remove
(1) Open CB-10 to remove power.
(2) Open PDU door and locate relay in bottom right hand corner.
(3) Pull relay up in a motion 90 degrees (º) from socket base to unplug.
7-25
TM 11862A-OR
b. Replace
(1) Align new relay in socket key and press down in one smooth motion.
(2) Close PDU door and secure.
7-12. REMOVE AND REPLACE DIPLEXER.
TOOLS: Screwdriver, cross-tip, #2
Wrench, 1/4 inch
MATERIALS/PARTS: Diplexer (Figure 8-13, Item 5)
Nut, self-locking (Figure 8-13, Item 3)
MOS: Personnel for troubleshooting and replacement: 0844 or 0861.
TO PREVENT INJURY TO PERSONNEL OR DAMAGE TO EQUIPMENT, ENSURE
POWER IS REMOVED FROM SHELTER BEFORE REPLACING ELECTRICAL
COMPONENTS. SERIOUS INJURY OR DEATH CAN OCCUR.
When removing the diplexer inside the battery compartment, use the procedures in
paragraph 7-13 for battery removal.
a. Remove
(1) Remove RF cables from diplexer. On diplexer 1 and 2 these are W9 and W2-2. On diplexer 3 and 4 these
are W3-5 and W2-1.
(2) Ensure each cable is labeled for location, destination, and function.
(3) Using a #2 cross-tip screwdriver and 1/4 wrench, remove screws attaching diplexer to mounting bracket.
Retain hardware.
b. Replace
(1) Using a #2 cross-tip screwdriver and 1/4 wrench, attach new diplexer to mounting bracket using original
screws.
(2) Reattach RF cables to diplexer IAW labeling.
(3) If replacing diplexer in battery compartment, refer to paragraph 7-13 to replace batteries.
7-26
TM 11862A-OR
7-13. REMOVE AND REPLACE BATTERIES
This section does not include vehicle batteries. This section only addresses batteries
installed and used in MTS.
TOOLS: 1/2 inch wrench
MATERIALS/PARTS: Batteries, storage (Figure 8-5, Item 2)
SAFETY EQUIPMENT: Gloves, chemical and oil protective (Appendix B, Item 19)
Goggles, industrial (Appendix B, Item 17)
PERSONNEL REQUIRED: Two
MOS: Personnel for troubleshooting and replacement: Any MOS
•
SERIOUS ELECTRICAL HAZARDS EXIST WHEN WORKING WITH
VEHICLE/MTS BATTERY SYSTEM AND BATTERY CHARGER CONTROL.
TO PREVENT INJURY TO PERSONNEL OR DAMAGE TO EQUIPMENT,
TAKE APPROPRIATE PRECAUTIONS.
•
TO PREVENT INJURY TO PERSONNEL OR DAMAGE TO EQUIPMENT,
ALWAYS HANDLE BATTERIES WITH RUBBER GLOVES AND SAFETY
GLASSES DUE TO HIGHLY ACIDIC ELECTROLYTE SOLUTION WITHIN
BATTERIES. DAMAGE TO EQUIPMENT AND SERIOUS INJURY COULD
RESULT FROM SPILLAGE.
•
THE BATTERY IS A TWO-PERSON LIFT. THE BATTERY IS DIFFICULT TO
PICK UP AND MOVE. TO PREVENT INJURY TO PERSONNEL OR DAMAGE
TO EQUIPMENT, ENSURE THAT YOU HAVE GOOD FOOTING AND A
CLEAR PATH TO BATTERY COMPARTMENT.
•
TO PREVENT INJURY TO PERSONNEL OR DAMAGE TO EQUIPMENT,
ENSURE ALL POWER IS REMOVED AND ALL CIRCUIT BREAKERS ARE
OPEN BEFORE CONNECTING BATTERIES.
7-27
TM 11862A-OR
•
FOR SAFETY, IT IS RECOMMENDED THAT BATTERY CABLES BE
LABELED PRIOR TO DISCONNECTION IN ORDER TO ENSURE CABLES
ARE RECONNECTED CORRECTLY.
•
TO PREVENT INJURY TO PERSONNEL AND DAMAGE TO EQUIPMENT,
ALWAYS REMOVE NEGATIVE (-) CABLE FIRST WHEN DISCONNECTING
THE BATTERIES.
MTS batteries consist of two 24VDC batteries controlled by a battery charger control that
regulates charging and on-line battery use.
a. Remove
(1) Loosen straps on battery tray and move to one side so as not to interfere with battery removal.
(2) Remove terminal covers from battery posts.
(3) Using a 1/2 inch wrench, loosen battery cable connectors on battery terminals.
Battery cables are color-coded. Red denotes a positive cable or terminal and black
denotes a negative cable or terminal.
(4) Remove NEGATIVE (-) battery cable connector (W220); and then POSITIVE (+) battery cable connector
(W210) from battery terminals and slide battery connector covers back over connectors to insulate from metal objects.
(5) Remove battery jumper cable (W219).
(6) Remove battery from battery compartment and dispose IAW local Standard Operating Procedures (SOPs),
IAW local hazardous waste handling and disposal requirements, and Marine Corps orders.
(7) Repeat steps (1) through (6) for second battery.
b. Replace
Ensure that the positive (+) battery posts are positioned toward roadside.
(1) Lift battery and position on the battery tray.
(2) Pull battery terminal covers back to expose battery terminals and cable end connectors.
7-28
TM 11862A-OR
(3) Using a 1/2 inch wrench, connect W210 P1 to POSITIVE (+) post on Battery #1 from CB1 LINE in PDU.
Slide battery post cover back over terminals to insulate from metal objects.
(4) Using a 1/2 inch wrench, connect W219 P1 to NEGATIVE (-) post on Battery #1 then connect W219 P2 to
POSITIVE (+) post on Battery #2. Slide battery post covers back over terminals to insulate from metal objects.
(5) Using a 1/2 inch wrench, connect W220 P1 to NEGATIVE (-) post on Battery #2. Slide battery post covers
back over terminals to insulate from metal objects.
(6) Position strap over battery and adjust tension on battery strap using ratchet strap.
(7) Ensure battery security straps are reconnected and tightened to prevent battery movement in battery
compartment.
7-14. REMOVE AND REPLACE BATTERY CHARGER CONTROL.
TOOLS: Wrench, 1/2 inch
Socket, Drive, 1/2 inch
Ratchet, Drive, 3/8 inch
Screwdriver, Cross-tip, #2
Wrench, 11/16 inch
MATERIALS/PARTS: Control, battery charger (Figure 8-19, Item 1)
Sealing compound (Appendix B, Item 7)
Washer, lock (Figure 8-19, Item 3)
SAFETY EQUIPMENT: Goggles, industrial (Appendix B, Item 17)
MOS: Personnel for troubleshooting and replacement: 1141 or 1142.
•
SERIOUS ELECTRICAL HAZARDS EXIST WHEN WORKING WITH
VEHICLE/MTS BATTERY SYSTEM AND BATTERY CHARGER CONTROL.
TO PREVENT INJURY TO PERSONNEL OR DAMAGE TO EQUIPMENT,
TAKE APPROPRIATE PRECAUTIONS.
•
ALWAYS HANDLE BATTERIES WITH RUBBER GLOVES AND SAFETY
GLASSES DUE TO HIGHLY ACIDIC ELECTROLYTE SOLUTION WITHIN
BATTERIES. DAMAGE TO EQUIPMENT AND SERIOUS INJURY COULD
RESULT FROM SPILLAGE.
•
HAZARDOUS VOLTAGES EXIST IN SHELTER ALTERNATING CURRENT
(AC)/DC ELECTRICAL POWER SYSTEMS. TO PREVENT INJURY TO
PERSONNEL OR DAMAGE TO EQUIPMENT, ENSURE ALL ELECTRICAL
POWER TO SHELTER IS OFF PRIOR TO BEGINNING. REMOVE ALL
INCOMING ELECTRICAL POWER FROM ALL SOURCES, INCLUDING
GENERATOR OR VEHICLE BATTERY.
7-29
TM 11862A-OR
a. Remove
(1) Remove power from battery charger control by opening CB-1 (DC source for power supply (inverter)) and
CB-2 (DC Bus CB) on PDU.
(2) Position CB-19 on battery box cover inside MTS to the open position.
(3) Open battery compartment door on exterior curbside wall of shelter.
(4) Using a 1/2 inch wrench, remove battery cables from MTS batteries. Label cables as to
location/destination, slide rubber boots down over ends, and move aside so they do not touch battery terminals. Refer to
paragraph 7-13 for battery removal and replacement.
(5) Remove W233 P2, W254-1, W263, and W256 by pulling terminals from battery charger control.
(6) Using a 1/2 inch socket with a 3/8 inch drive ratchet, remove W214 P2 and W230 S1 from battery charger
control.
(7) Using a #2 cross-tip screwdriver, remove retaining screws and washers attaching battery charger control
assembly to battery compartment wall. Retain hardware for installation. Discard lock washers.
Do not reuse lock washers. Always replace lock washers with new ones.
(8) Remove battery charger control assembly from shelter.
(9) Using a #2 cross-tip screwdriver, remove battery charger control from bracket.
b. Replace
7-30
•
CHEMICAL PROTECTIVE GLOVES MUST BE WORN WHEN WORKING
WITH SEALING COMPOUND, POLYSULFIDE. INJURY TO PERSONNEL
MAY RESULT IF CHEMICALS CONTACT UNPROTECTED SKIN. SMOKING
IS PROHIBITED WHEN WORKING WITH FLAMMABLE MATERIALS.
•
HAZARDOUS VOLTAGES EXIST IN SHELTER ALTERNATING CURRENT
(AC)/DC ELECTRICAL POWER SYSTEMS. TO PREVENT INJURY TO
PERSONNEL OR DAMAGE TO EQUIPMENT, ENSURE ALL ELECTRICAL
POWER TO SHELTER IS OFF PRIOR TO BEGINNING. REMOVE ALL
INCOMING ELECTRICAL POWER FROM ALL SOURCES, INCLUDING
GENERATOR OR VEHICLE BATTERY.
TM 11862A-OR
(1) Position battery charger control over threaded inserts on battery charger control bracket.
(2) Using a #2 cross-tip screwdriver, install two #10-24 x 3/4-inch pan head cross-recessed screws (GR8), two
#10 x 1/2 inch flat washers (GR8), and two #10 lock washers (GR8).
(3) Connect wire W233 P2 to battery charger control (Batt -) connection.
(4) Connect W254-1 to Start Assist on battery charger control.
(5) Connect W254-2 to Common on micro-switch on battery charger control.
(6) Connect W256 to NO on micro-switch on battery charger control.
(7) Position battery charger control assembly over threaded inserts on front wall of MTS.
(8) Using a #2 cross-tip screwdriver, install the battery charger control using two #10-24 x 3/4 inch pan head
cross-recessed screws (GR8), two #10 x 1/2 inch flat washers (GR8), and two #10 lock washers (GR8).
(9) Connect wire W214 P2 to battery charger control VB1. Using an 11/16 inch socket and 3/8 inch drive
ratchet, tighten connection.
(10) Connect wire W230 S1 to battery charger control VB2. Route along bottom edge of power supply
(inverter) bracket.
(11) Refer to paragraph 7-13 to replace batteries.
7-15. REMOVE AND REPLACE POWER SUPPLY (INVERTER).
TOOLS: Screwdriver, Cross-tip, #2
Screwdriver, Flat Head, 3/32 inch wide
Screwdriver, Flat Head, 1/4 inch wide
Screwdriver, Flat Head, 3/16 inch wide
Wrench, 7/16 inch
Socket, Deep Well, 1/2 inch
Extension, 10 inch
Ratchet, Drive 3/8 inch
MATERIALS/PARTS: Power supply (inverter) (Figure 8-12, Item 9)
Washer, lock (Figure 8-12, Item 2)
PERSONNEL REQUIRED: Two
MOS: Personnel for troubleshooting and replacement: 0844 or 0861 and 1141 or 1142
7-31
TM 11862A-OR
•
TO AVOID SERIOUS INJURY OR DEATH TO PERSONNEL, ENSURE
SHELTER MAIN BREAKER IS IN THE OFF POSITION AND ALL POWER IS
REMOVED FROM POWER SUPPLY (INVERTER).
•
POWER SUPPLY (INVERTER) REQUIRES A TWO-PERSON LIFT.
Refer to OutBack Extreme Rugged Inverter/Charger Power Systems Installation and User
Manual for more detailed information on operations, maintenance, installation, and repair
of power supply (inverter).
a. Remove
(1) Remove power by opening all CBs on the PDU and CB-19.
(2) Gain access to power supply (inverter) through battery door.
(3) Remove batteries (refer to paragraph 7-13 to remove batteries).
Hold top cover after removing top cover hardware due to fan wires connected under clear
plastic cover.
(4) Using #2 cross-tip screwdriver, remove four cross-recessed screws from front cover of power supply
(inverter).
(5) Using a #2 cross-tip screwdriver, remove two #10 cross-recessed screws from clear plastic cover on front of
power supply (inverter). Retain hardware.
(6) Using a 3/32 screwdriver, remove entire green fan jack connected to the top of the power supply (inverter)
which are permanently attached to the front cover.
(7) Using a 1/4 inch flat screwdriver, remove all other wires connected to the power supply (inverter). (W203-3
from AC HOT OUT, W203-4 from AC NEU OUT, W205-2 from CHASSIS GROUND, W204 from AC NEUT IN, and
W203-2 from AC HOT IN). Retain jumper for future installation.
(8) Using a 3/16 inch flat screwdriver, loosen W-208 box lug cable from terminal board.
7-32
TM 11862A-OR
(9) Using a 1/2 inch wrench, loosen DC cables (W223-1 to NEG inverter post and W223-2 to POS inverter
post), remove hardware, then remove cables.
Remove the battery compartment access panel inside the MTS, if needed, to reach the top
left 5/16-18 mount bolt.
(10) Using 1/2 inch deep well socket, 10 inch extension, and 3/8 ratchet, remove the four 5/16-18 bolts
securing the power supply (inverter) to the mount shelf.
(11) Lift power supply (inverter) from battery compartment and remove from shelter.
TO PREVENT INJURY TO PERSONNEL, POWER SUPPLY (INVERTER) REQUIRES
A TWO-PERSON LIFT.
b. Replace.
(1) Using #2 cross-tip screwdriver, remove four cross-recessed screws from front cover of power supply
(inverter).
(2) Using a #2 cross-tip screwdriver, remove two #10 cross-recessed screws from clear plastic cover on front of
power supply (inverter). Set plastic cover to the side.
(3) Position power supply (inverter) onto power supply (inverter) support assembly oriented as unit removed.
(4) Using 1/2 inch deep well socket, 10 inch extension, and 3/8 ratchet, attach the four 5/16-18 x 1 inch hex cap
screws (GR8), four 5/16 inch lock washers (GR8), and four 5/8 inch flat washers (GR8) to the power supply (inverter) to
the mount shelf.
(5) Using a 1/2 inch wrench, place DC cables (W223-1 to NEG inverter post and W223-2 to POS inverter post)
on power supply (inverter) and tighten.
(6) Using a 1/4 inch flat screwdriver, tighten W-208 box lug cable to power supply (inverter).
(7) Using a 3/16 inch flat screwdriver, tighten all other wires previously removed to the inverter. (W203-3
from AC HOT OUT, W203-4 from AC NEU OUT, W205-2 from CHASSIS GROUND, W204 from AC NEUT IN, and
W203-2 from AC HOT IN). Install retained jumper.
(8) Using a 3/32 screwdriver, tighten the two wires, which are permanently attached to the front cover, to the
top of the power supply (inverter). Connect green jack into the power inverter.
(9) Using a #2 cross-tip screwdriver, tighten two #10 cross-recessed screws from clear plastic cover on front of
power supply (inverter).
(10) Using #2 cross-tip screwdriver, tighten four cross-recessed screws from front cover of power supply
(inverter).
7-33
TM 11862A-OR
(11) Replace batteries (refer to paragraph 7-13 for battery replacement).
7-16. REMOVE AND REPLACE KEYBOARD DISPLAY UNIT.
MATERIALS/PARTS: KDU (Figure 8-22, Item 2)
MOS: Personnel for troubleshooting and replacement: Any MOS.
a. Remove
(1) Disconnect interface cable (W80) from KDU.
(2) On the KDU mounting plate, slide locking bar to unlocked position.
(3) Remove the KDU from the locking bar.
b. Replace
(1) Insert KDU onto KDU mount plate by sliding locking bar to unlocked position and inserting the KDU onto
the mounting plate.
(2) Slide locking bar into the locked position.
(3) Connect interface cable to KDU.
7-17. REMOVE AND REPLACE AFATDS POWER CONDITIONER/CONVERTER.
MATERIALS/PARTS: Power conditioner/converter (unit supplied)
MOS: Personnel for troubleshooting and replacement: 0844 or 0861.
TO PREVENT INJURY TO PERSONNEL OR DAMAGE TO EQUIPMENT, ENSURE
POWER IS REMOVED FROM SHELTER BEFORE REPLACING ELECTRICAL
COMPONENTS. SERIOUS INJURY OR DEATH CAN OCCUR.
a. Remove
(1) Open CB-3 and CB-14.
(2) Disconnect all cables from front of AFATDS PCC: Grounding wire (W246), AC OUT (W228), DC IN
(W229), AC IN (W227).
(3) Remove wing-nut securing grounding wire and remove grounding wire from AFATDS PCC.
(4) Release retention strap.
(5) Slide AFATDS PCC from shelf and remove from shelter.
7-34
TM 11862A-OR
b. Replace
(1) Position new AFATDS PCC on shelf where previous AFATDS PCC was located. Slide AFATDS PCC
into place and tighten with retention strap.
(2) Connect grounding wire (W246) to AFATDS PCC and use original wing nuts to tighten securely in place.
(3) Connect W228 to AC OUT, W229 to DC IN, and W227 to AC IN.
7-18. REMOVE AND REPLACE ENHANCED POSITION LOCATION AND REPORTING SYSTEM RADIO
SYSTEM.
Reference TM 10901A-OR/2 for EPLRS and User Read Out (URO) details.
MATERIALS/PARTS: EPLRS radio system (unit supplied)
MOS: Personnel for troubleshooting and replacement: 0844, 0848, 0861, or 06XX
a. Remove
(1) Power down all equipment in shelter equipment rack (refer to radio rack power down procedures in
Chapter 5).
(2) Disconnect and remove cables (W1-3 to J2, A300528-1 to J3) from EPLRS R/T and set aside for
installation.
(3) Unlock and release EPLRS R/T and slide out from mounting base.
b. Replace
(1) Slide EPLRS into mounting slot in mounting base and lock into place.
(2) Reattach W1-3 to J2 of EPLRS radio.
(3) Reattach A3005328-1 to J3.
7-19. REMOVE AND REPLACE EPLRS USER READ-OUT.
Reference TM 10901A-OR/2 for EPLRS and URO details.
MATERIALS/PARTS: EPLRS URO (unit supplied)
MOS: Personnel for troubleshooting and replacement: 0844, 0861, or 06XX.
a. Remove
(1) Disconnect cable from URO to EPLRS mounting base (80063-A3005328-1 and 80063-A3109227) and set
aside.
(2) Remove URO from mounting bracket and set aside.
7-35
TM 11862A-OR
b. Replace
(1) Position new URO in same location in mounting bracket as original URO.
(2) Connect cable (80063-A3005328-1 and 80063-A3109227) from new URO to EPLRS mounting base.
7-20. REMOVE AND REPLACE AN/VRC-110 RADIO SYSTEM.
TOOLS: Wrench, 1/2 inch
Socket, Drive, 1/2 inch
Extension, 6 inch
Ratchet, Drive 3/8 inch
MATERIALS/PARTS: Radio system (unit supplied)
MOS: Personnel for troubleshooting and replacement: 0844, 0848, 0861, or 06XX.
a. Remove
(1) Ensure radio systems are switched OFF and appropriate CB to equipment rack is switched OFF (refer to
radio rack power down procedures in Chapter 5).
(2) Disconnect cables from AN/PRC-152 radios (12053-1420-A2 and 12049-0500-01) and remove from
mounts in AN/VRC-110 VAA. (Refer to Publication Number 10515-0283-4300)
(3) Disconnect all cables from SINCGARS AN/VRC-110 radio VAA (W65 and W9 (x 4)).
(4) Release and slide AN/VRC-110 VAA out of shock mount in shelter radio rack.
(5) If necessary, use a 1/2 inch wrench, 1/2 inch socket, 6 inch extension, and 3/8 inch ratchet to remove bolts
securing shock mount to equipment rack and remove shock mount from equipment rack. Retain hardware. Discard lock
washers.
b. Replace
(1) Reinstall shock mount into shelter equipment rack. Align holes in shock mount with original holes in
equipment rack, insert screws, and lock washers into rack.
(2) Use a 1/2 inch wrench, 1/2 inch socket, 6 inch extension, and 3/8 inch ratchet, tighten hardware.
(3) Slide AN/VRC-110 VAA into shock mount tray and lock into place.
(4) Reattach cables removed from AN/VRC-110 VAA.
(5) Reattach cables removed from AN/PRC-152 radios.
7-21. REMOVE AND REPLACE LOUDSPEAKER CONTROL UNIT.
TOOLS: Socket, 7/16 inch
Ratchet, Drive 3/8 inch
MATERIALS/PARTS: Loudspeaker control unit (Figure 8-23, Item 4)
Washer, lock (Figure 8-23, Item 2)
MOS: Personnel for troubleshooting and replacement: 0844, 0861, or 06XX.
7-36
TM 11862A-OR
Ensure SINCGARS AN/VRC-110 radio system (in vehicle) is powered down prior to
performing procedure.
a. Remove
(1) Remove radio handset from loudspeaker control unit.
(2) Remove remote control cable from loudspeaker control unit.
(3) Using a 7/16 inch socket with 3/8 inch drive ratchet, remove two 1/4 inch-20 x 4-1/2 inch hex cap screws,
two 1/4 inch x 5/8 inch flat washers, and two 1/4 inch medium split lock washers holding loudspeaker control unit to
shelter’s secondary personnel door. Retain hardware for installation. Discard lock washers.
Do not reuse lock washers. Always replace lock washers with new ones.
b. Replace
(1) Position new loudspeaker control unit on shelter roadside personnel door.
(2) Using a 7/16 inch socket with 3/8 inch drive ratchet, install two 1/4 inch-20 x 4-1/2 inch hex cap screws,
two 1/4 inch x 5/8 inch flat washers, and two 1/4 inch medium split lock washers to hold loudspeaker control unit to
shelter’s secondary personnel door.
(3) Reattach loudspeaker control unit remote cable to loudspeaker control unit’s connector.
(4) Reattach radio handset to loudspeaker control unit connector.
7-22. REMOVE AND REPLACE 4-PORT USB HUB.
MATERIALS/PARTS: Hub, USB (Figure 8-26, Item 1)
Fastener tape, hook and loop (Figure 8-26, Item 2)
Strap, tiedown, electrical components (Appendix B, Item 8)
MOS: Personnel for troubleshooting and replacement: 0844.
TO PREVENT INJURY TO PERSONNEL OR DAMAGE TO EQUIPMENT, ENSURE
POWER IS REMOVED FROM SHELTER BEFORE REPLACING ELECTRICAL
COMPONENTS. SERIOUS INJURY OR DEATH CAN OCCUR.
a. Remove
(1) Locate 4-port USB hub on radio rack.
7-37
TM 11862A-OR
(2) Remove three USB cables and remove from metal bracket.
b. Replace
(1) Position hook and loop fastener tape on radio rack.
(2) Position new USB hub on radio rack.
(3) Connect all USB cables IAW labeling.
7-23. REMOVE AND REPLACE ADP INTERFACE UNIT.
TOOLS: Wire Cutters
Screwdriver, Cross-tip, #2
MATERIALS/PARTS: Interface unit, auto data processor (Figure 8-15, Item 5)
Strap, tiedown, electrical components (Appendix B, Item 8)
Washer, lock (Figure 8-15, Item 2)
PERSONNEL REQUIRED: Two
MOS: Personnel for troubleshooting and replacement: 0651 or 0861.
a. Remove
(1) Open CB-15 on the PDU.
(2) Label all incoming and outgoing cables to ADP interface unit.
(3) Using wire cutters, remove cable ties or other retaining devices and disconnect all cables attached to ADP
interface unit (W7-1, W7-2, W7-3, W7-4, W7-5, W7-6, W7-7, and W7-8).
(4) Trace electrical power cable to ADP interface unit and remove cable ties.
(5) Contact communications personnel to check ADP interface unit software and configuration. The
replacement ADP interface unit may not have the latest SW updates or the proper configuration used by the artillery unit.
(6) Using a #2 cross-tip screwdriver, remove ground cable from ADP interface unit.
(7) Using a #2 cross-tip screwdriver, remove two 1/4 inch-20 x 1 inch pan head cross-recessed screws, two 1/4
inch x 11/16 inch flat washers, and two 1/4 inch medium split lock washers to remove brackets holding ADP interface
unit.
(8) Remove ADP interface unit.
b. Replace
(1) Place ADP interface unit on second radio rack shelf from top.
(2) Using a #2 cross-tip screwdriver, secure bracket with two 1/4 inch-20 x 1 inch pan head cross-recessed
screws, two 1/4 inch x 11/16 inch flat washers, and two 1/4 inch medium split lock washers.
(3) Using a #2 cross-tip screwdriver, install ground cable.
(4) Install incoming and outgoing cables to ADP interface unit (W7-1, W7-2, W7-3, W7-4, W7-5, W7-6,
W7-7, and W7-8).
7-38
TM 11862A-OR
(5) Contact Communications Personnel to check ADP interface unit software and configures. The replacement
ADP may not have the latest SW updates or the proper configuration used by the artillery unit.
7-24. REMOVE AND REPLACE AFATDS COMPUTERS.
MATERIALS/PARTS: AFATDS computer (unit supplied)
MOS: Personnel for troubleshooting and replacement: 0844 or 0848.
Refer to AFATDS computer system documentation for detailed instruction on operations
and maintenance of AFATDS computer system. Refer to Getac M230 User’s Manual for
operations, maintenance, and repair of system.
a. Remove Computer #1
(1) Shut down AFATDS computer #1.
(2) Slide out shelf number four.
(3) Unlock and lift lid on computer shock mount.
(4) Disconnect USB connectors on computer bracket to computer.
(5) Disconnect VGA cable (W81-2) to computer.
(6) Disconnect W7-9 from computer.
(7) Disconnect Alternating Current (AC) power adapter from computer’s power connector.
(8) Disconnect AC power adapter from outlet on raceway.
(9) Stow AFATDS computer power converter in power supply bracket on side of radio rack VAA shelf.
(10) Remove AFATDS computer.
b. Replace Computer #1
(1) Ensure computer is powered OFF.
(2) Connect Alternating Current (AC) power adapter to computer’s power connector.
(3) Connect AC power adapter to outlet on raceway.
(4) Stow AFATDS computer power converter in power supply bracket on side of radio rack VAA shelf.
(5) Connect USB connectors on computer bracket to computer.
(6) Connect VGA cable (W81-2) to computer.
(7) Connect W7-9 to computer.
c. Remove Computer #2
(1) Shut down AFATDS computer #2.
7-39
TM 11862A-OR
(2) Slide out shelf number five.
(3) Unlock and lift lid on computer shock mount.
(4) Disconnect USB connectors on computer bracket to computer.
(5) Disconnect VGA cable (W81-1) to computer.
(6) Disconnect W7-10 from computer.
(7) Disconnect Alternating Current (AC) power adapter from computer’s power connector.
(8) Disconnect AC power adapter from outlet on raceway.
(9) Stow AFATDS computer power converter in power supply bracket on side of radio rack VAA shelf.
(10) Remove AFATDS computer.
d. Replace Computer #2
(1) Ensure computer is powered OFF.
(2) Connect Alternating Current (AC) power adapter to computer’s power connector.
(3) Connect AC power adapter to outlet on raceway.
(4) Stow AFATDS computer power converter in power supply bracket on side of radio rack VAA shelf.
(5) Connect USB connectors on computer bracket to computer.
(6) Connect VGA cable (W81-1) to computer.
(7) Connect W7-10 to computer from ADP interface unit.
7-25. REMOVE AND REPLACE DISPLAY UNIT.
TOOLS: Screwdriver, Cross-tip #2
Wrench, Hex (kit provided)
MATERIALS/PARTS: Display unit (Figure 8- 25, Item 3)
Strap, tiedown, electrical components (Appendix B, Item 8)
PERSONNEL REQUIRED: Two
MOS: Personnel for troubleshooting and replacement: 0844, 0848, or 0861.
7-40
TM 11862A-OR
a. Remove
TO PREVENT INJURY TO PERSONNEL OR DAMAGE TO EQUIPMENT, ENSURE
POWER IS REMOVED FROM SHELTER BEFORE REPLACING ELECTRICAL
COMPONENTS. SERIOUS INJURY OR DEATH CAN OCCUR.
(1) Open CB-15.
(2) Pull display unit forward from mounting bracket and locate screws in rear holding display unit to bracket.
(3) Using a #2 cross-tip screwdriver, remove retaining screws and set aside for reuse.
The display units inside the shelter can be set down on work area to remove from
mounting bracket. However, the display units on the primary door will require two
personnel (one to hold the display unit and one to remove or replace display unit to the
mounting bracket).
(4) Lay display unit on shelter tabletop face down.
(5) Remove VGA (W47) cable from display unit.
(6) Disconnect and remove electrical power cable running to display unit.
Cable may be embedded within same flexible plastic cable conduit with AC power
raceway or simply plugged into a shelter tabletop outlet.
b. Replace
(1) Using a #2 cross-tip screwdriver, attach Omni mount to computer monitor with kit-provided hardware and
secure.
(2) Remove cap from base and save for later installation.
(3) Using kit-provided hex key, remove mount base with directional arrow from Omni-mount to remove
bottom screw.
(4) Using a #2 cross-tip screwdriver, install the mount base to monitor housing with arrow facing up using two
1/4-20 x 3/4 inch cross-recessed screws, two 1/4 inch flat washers, and two 1/4" lock washers.
(5) Attach monitor with the swing arm attached to mount base in monitor box by inserting swing arm upper
ring on to upper peg then swing arm downward to align the bottom screw hole on mount base.
(6) Using a #2 cross-tip screwdriver, tighten mount base screws.
7-41
TM 11862A-OR
(7) Using provided hex key, install mount fastening screw through mount base and into swing arm and tighten
fully.
Cap fits only one way.
(8) Using provided hex wrench, insert kit into cap and reinstall cap onto base of Omni-mount base by snapping
it into place.
7-26. REMOVE AND REPLACE RADIO FREQUENCY POWER DIVIDERS.
TOOLS: Screwdriver, Cross-tip #2
Wrench, 3/8 inch
Wire Cutters
MATERIALS/PARTS: Adhesive (Appendix B, Item 23)
Divider, power, radio frequency 2-port (Figure 8-20, Item 4)
Divider, power, radio frequency 4-port (Figure 8-20, Item 5)
Strap, tiedown, electrical components (Appendix B, Item 8)
MOS: Personnel for troubleshooting and replacement: 0844, 0848, 0861, or 06XX.
TO PREVENT INJURY TO PERSONNEL OR DAMAGE TO EQUIPMENT, ENSURE
POWER IS REMOVED FROM SHELTER BEFORE REPLACING ELECTRICAL
COMPONENTS. SERIOUS INJURY OR DEATH CAN OCCUR.
a. Remove
(1) Open CB-15.
(2) Label all cables to RF power divider.
(3) Remove VGA input cables (W81-1 and W81-2) and power supply cable from RF power divider.
(4) Remove VGA output cables (W47-1, W47-6, W47-3, and W47-5) from RF power divider.
(5) Using a #2 cross-tip screwdriver and 3/8 inch wrench, remove upper bracket of RF power divider assembly
from the printer shelf.
(6) Using a #2 cross-tip screwdriver, remove the upper bracket of the RF power divider assembly from the
bottom bracket.
(7) Remove RF power dividers.
7-42
TM 11862A-OR
(8) Using a #2 cross-tip screwdriver, remove RF power divider power supply mounting bracket from curbside
wall under PDU.
(9) Using a #2 cross-tip screwdriver, remove RF power divider power supplies from curbside wall under PDU.
(10) Using wire cutters, cut cable ties and remove RF power divider power supplies.
b. Replace
(1) Position 4-port RF power divider onto RF power divider bottom bracket.
(2) Place a piece of 1/16 inch self-adhesive foam between the two RF power dividers and insert 2-port RF
power divider on top of 4-port RF power divider. Trim the foam flush with the edges.
(3) Place the RF power dividers on the top bracket.
(4) Mount RF power divider bottom bracket onto RF power divider top bracket.
(5) Using a #2 cross-tip screwdriver, secure with two #10-32 x 1/2 inch pan head cross-recessed screws, two
#10 x 3/8 inch flat washers, and two #10 med lock washers.
(6) Position RF power divider top bracket over holes on underside of printer bracket.
(7) Using a #2 cross-tip screwdriver and 3/8 inch wrench, insert two #10-32 x 1/2 inch pan head cross-recessed
screws through the top side of printer bracket, through the RF power divider top bracket. Place two #10 x 3/8 inch flat
washers, two #10 x 3/8 inch flat washers, and two #10-32 lock nuts on screws and secure.
(8) Attach VGA input cables (W81-1 and W81-2), VGA output cables (W47-1, W47-6, W47-3, and W47-5),
and power cable (W47-4) to RF power divider IAW cable labeling.
(9) Using a #2 cross-tip screwdriver, replace RF power divider power supplies under PDU on curbside wall.
(10) Place cover (with notched end down) over RF power divider power supplies. Using a #2 cross-tip
screwdriver, install RF power divider power supply bracket to curbside wall using two #10-24 x 3/4 inch pan head crossrecessed screws, two #10 x 1/2 inch flat washers, and two #10 medium lock washers.
7-27. REMOVE AND REPLACE PERSONNEL DOOR LATCH.
To open MTS in the unlikely event that primary door handle is failing to engage the roller latch assembly and allow the
door to be opened, perform the following procedure:
To prevent damage to equipment in the unlikely event that the primary personnel door
latch assembly fails and access to the MTS is not possible, refer to
TM 10-5411-235-13&P and Addendum and the procedure below.
a. Remove
(1) Remove the door handle. Refer to TM 10-5411-235-13&P and Addendum.
(2) Remove shaft. Tap out square shaft centered on opening created by removed door handle.
(3) Open door.
b. Replace. Reassemble door hardware and mechanism. Refer to TM 10-4311-235-13&P and Addendum.
7-43/(7-44 blank)
TM 11862A-OR
CHAPTER 8
REPAIR PARTS LIST
8-1. INTRODUCTION.The spares and repair parts required for performance of organizational maintenance of the
Mobile Tactical Shelter (MTS) are defined in the Repair Parts and Special Tools List (RPSTL). They authorize the
requisitioning and issue of spares and repair parts as indicated by the Source Maintenance Recoverability (SMR) codes.
8-2. GENERAL.
This chapter contains indentured part listings and illustrations necessary for disassembly, repair, and assembly of
Advanced Field Artillery Tactical Data System (AFATDS) shelter and equipment. Parts lists are separated into figures
by main groups of assemblies and are keyed to illustrations by item numbers.
a. Repair Parts and Special Tools List. The RPSTL defines spares and repair parts authorized for use in the
performance of maintenance. The list also includes parts which must be removed for replacement of authorized parts.
Parts lists are composed of parts in each group listed in figure and number sequence.
When a stock number item is requisitioned, the item received may have a different PN than
the part being replaced.
b. National Stock Number. An index in National Stock Number (NSN) sequence appears in the back of this
manual. NSNs and Part Numbers (PNs) are cross-referenced to each illustration figure and item number.
Illustrations may have parts removed for clarity.
8-3. EXPLANATION OF COLUMNS.
a. (Column 1) Figure Number. The Figure Number indicates figure number of illustration in which the item is
shown.
b. (Column 2) Item Number. The Item Number is used to identify the item called out in the illustration. When a
figure has more than one illustration, an item may appear on several illustrations. Items which contain a dash before the
item number are no-illustrated parts which are contained in the assembly.
c. (Column 3) Source Maintenance Recoverability Codes. The SMR code is five-digit code (e.g., PAOZZ)
consisting of the paragraphs (1) through (3) below.
(1) Source Code. Source Codes indicate the manner of acquiring items for maintenance, repair, or overhaul of
end items. Source codes are entered in first and second position of SMR code format as follows.
8-1
TM 11862A-OR
Code
Definition
PA
Item procured and stocked for anticipated or known usage.
PB
Item procured and stocked for insurance purposes because essentiality dictates minimum quantity available
in supply systems.
PC
Item procured and stocked which otherwise would be code PA except that it is deteriorative in nature.
PD
Support item, excluding support equipment, procured for initial issue or outfitting and stocked only for
subsequent or additional initial issues or outfitting. Not subject to automatic replenishment.
PE
Support equipment which will not be stocked but which will be centrally procured on demand.
PF
Item which will not be stocked but which will be centrally procured on demand.
PG
Item procured and stocked to provide for sustained support for the life of the equipment. It is applied to an
item peculiar to equipment, that would prove uneconomical to reproduce at a later time due to probable
discontinuance or shutdown of production facilities.
KD
Item of depot overhaul/repair kit and not purchased separately. Depot kit defined as a kit that provides
items required at the time of overhaul or repair.
KF
Item of maintenance kit and not purchased separately. Maintenance kit is defined as a kit which provides
an item which can be replaced at the organizational or intermediate levels of maintenance.
KB
Items included in both a depot overhaul/repair kit and a maintenance kit.
MO
Item manufactured or fabricated at organizational level, 2nd echelon.
MF
Item manufactured or fabricated at intermediate maintenance levels, 3rd echelon.
MH
Item manufactured or fabricated at intermediate maintenance levels, 4th echelon.
MD
Item manufactured or fabricated at depot maintenance level, 5th echelon.
AO
Item assembled at organizational level 2nd echelon.
AF
Item assembled at intermediate maintenance levels 3rd echelon.
AH
Item assembled at intermediate maintenance levels 4th echelon.
AD
Item assembled at depot maintenance levels 5th echelon.
XA
Item not procured or stocked because requirements will result in replacement of next higher assembly.
XB
Item not procured or stocked. If not available through salvage, requisition.
XC
Installation drawing, diagram, instruction sheet, field service drawing identified by manufacturers' part
number.
XD
A support item is not stocked. When required, item will be procured through normal supply channels.
(2) Maintenance Code. Maintenance codes are assigned to indicate the levels of maintenance authorized to
remove and repair an item. The maintenance codes are entered in the third and fourth positions of the SMR Code:
8-2
TM 11862A-OR
(a) The maintenance code entered in the third position will indicate the lowest maintenance level authorized
to remove and replace the item. The maintenance code entered in the third position will indicate one of the following
levels of maintenance.
Code
Application/Explanation
O
The lowest maintenance level capable of complete repair of the item is at the organizational level (1st and 2nd
echelon).
F
The lowest maintenance level capable of complete repair of the item is at the intermediate support level (3rd
echelon).
H
The lowest maintenance level capable of complete repair of the item is at the intermediate support level (4th
echelon).
L
Item is removed, replaced, used at designated specialize Repair activity.
D
The lowest maintenance level capable of complete repair of the item is at depot (5th echelon).
Z
Item is not authorized to be removed or replaced at any maintenance level. This code assigned to items not
required for support in a specific application, and is identified for reference purposes only.
B
No repair is authorized. The item may be reconditioned by adjusting, lubricating, etc. at the user level. No
parts or special tools are procured for the maintenance of this item.
(b) The maintenance code entered in the fourth position indicates whether the item is to be repaired and
identifies the lowest maintenance level with the capability to perform complete repair (i.e., all authorized maintenance
functions). This position will contain one of the following maintenance codes:
Code
Application/Explanation
O
Organizational level (1st and 2nd echelon).
F
Field (3rd echelon).
H
Field (4th echelon).
K
Reparable item; repair, condemnation, and disposal to be performed at contractor facility.
D
Depot (5th echelon).
L
Repair restricted to designated Specialized Repair Activity.
Z
Non-repairable; no repair is authorized.
B
No repair authorized. Item may be reconditioned by adjusting, lubricating, etc., at user level. No parts or
special tools are procured for maintenance of this item.
(3) Recoverability Code. Recoverability codes are assigned to support items to indicate disposition action on
unserviceable items. Recoverability codes are entered in fifth position of uniform SMR code format as follows:
8-3
TM 11862A-OR
Code
Application/Explanation
Z
Non-repairable item. When unserviceable, condemn and dispose at level indicated in position 3.
O
Repairable item. When uneconomically repairable, condemn and dispose of at organizational level.
F
Repairable item. When uneconomically repairable, condemn and dispose of at field maintenance level (3rd
echelon).
H
Repairable item. When uneconomically repairable, condemn and dispose of at field maintenance level (4th
echelon).
D
Repairable item. When beyond lower level or repair capability, return to depot. Condemnation and disposal
not authorized below depot level.
L
Reparable item. Repair, condemnation, and disposal not authorized below depot level.
A
Item requires special handling or condemnation procedures because of specific reasons (i.e., precious metal
content, high dollar value, critical material). Refer to appropriate manuals/directives for specific instructions.
d. (Column 4) National Stock Number. This column lists the NSNs assigned to the item. Use assigned NSNs in
requests/requisitions.
e. (Column 5) Commercial and Government Entity. The Commercial and Government Entity (CAGE) codes are
five-digit codes assigned to manufacturers/non-manufacturers organizational entities and contractors. The primary use
of the CAGE coding system is in machine accounting operations related to support management programs, such as
cataloging and standardization. The CAGE code is used in conjunction with firm’s reference number relating firm with
item of supply, production, or designing cataloging and other supply record, as well as on engineering documentation.
These codes are essential to contract/purchase agreements and various activities’/agencies’ automated data processing
systems. Use CAGE code and reference number to screen item identifications against each other to detect duplication.
f. (Column 6) Part Number. The PN indicates primary number used by manufacturer (individual, company, firm,
corporation or government activity), which controls the design and characteristics of the item by means of engineering
drawings, specifications, standards, and inspection requirements to identify an item or range of items.
When NSN item is requisitioned, the item received may have a different part number than
part being replaced but is a suitable replacement.
g. (Column 7) Description. The Description indicates the federal item name and, if required, minimum
description to identify items. Items included in kits and sets are listed below name of kit or set with quantity of each
item in the kit or set indicated in the quantity incorporated in the unit column. When the part used differs between serial
numbers of same model, effective serial numbers are shown as last line of description.
h. (Column 8) Quantity. The Quantity (Qty) indicates basic unit of measure of listed item as used in performing
actual maintenance function. Measure is expressed by two-character alphabetical abbreviation (e.g., ea., in, pr, etc.).
When unit of measure differs from unit of issue, requisition lowest unit of issue that satisfies required units of measure.
8-4
TM 11862A-OR
(1)
(2)
(3)
(4)
(5)
(6)
(7)
(8)
Fig
No
Item
No
SMR
Code
NSN
CAGE
Part
Number
Description
Qty
8-1
1
PAOZZ
5820-01-183-9462
80063
A3005031
ANTENNA, EPLRS
1
8-1
2
PAOZZ
5305-00-226-4831
80204
B1821BH031C150N
SCREW, Cap, Hexagon Head,
5/16-18 X 1.50 ,YZ
4
8-1
3
PAOZZ
5310-00-012-0214
96906
MS35338-26
WASHER, Lock, 5/16 X .583, YZ
4
8-1
4
PAOZZ
5310-00-081-4219
96906
MS27183-12
WASHER, Flat, 5/16, YZ
4
8-1
5
PAOZZ
01365
08020E0001
ANTENNA MOUNTING
BRACKET
1
Figure 8-1. Enhanced Position Location and Reporting System Antenna Assembly
8-5
TM 11862A-OR
(1)
(2)
(3)
(4)
(5)
(6)
(7)
(8)
Fig
No
Item
No
SMR
Code
NSN
CAGE
Part
Number
Description
Qty
8-2
1
PAOZZ
5985-01-537-8837
80063
RF-390-AT005
ANTENNA, SINCGARS
1
8-2
2
PAOZZ
5306-00-226-4829
80204
B1821BH031C125N
SCREW, Cap, Hexagon
Head, 5/16-18 X 1.25 ,YZ
4
8-2
3
PAOZZ
5310-00-012-0214
96906
MS35338-26
WASHER, Lock, 5/16 X
.583, YZ
4
8-2
4
PAOZZ
5310-00-081-4219
96906
MS27183-12
WASHER, Flat, 5/16, YZ
4
8-2
5
PAOZZ
01365
08020E0001
ANTENNA MOUNTING
BRACKET
1
Figure 8-2. Single Channel Ground-to-Air Radio System Antenna Assembly
8-6
TM 11862A-OR
(1)
(2)
(3)
(4)
(5)
(6)
(7)
(8)
Fig
No
Item
No
SMR
Code
NSN
CAGE
Part
Number
Description
Qty
8-3
1
PAOZZ
8-3
2
PAOZZ
8-3
3
8-3
01365
08020G0003
ANTENNA
MOUNTING
ASSEMBLY
1
96906
MS27183-10
WASHER, Flat,
.25 X .625, YZ
3
PAOZZ
80205
AEW07X250000GY0AS1 WASHER, Lock, 1/4-20,
YZ
3
4
PAOZZ
80204
B1821BH025C100N
SCREW, Cap, Hexagon
Head, 1/4-20 X 1.00, YZ
3
8-3
5
PAOZZ
5305-00-207-8253
80205
MS35307-308
SCREW, Cap, Hexagon
Head, 1/4-20 X 1.00, SS
1
8-3
6
PAOZZ
5310-00-933-8121
80205
MS35338-139
WASHER, Lock, 1/4, SS
1
8-3
7
PAOZZ
5310-00-952-0309
80205
NAS620-C416
WASHER, Flat,
.25 X .438, SS
1
5310-00-809-4058
Figure 8-3. Antenna Mounting Bracket
8-7
TM 11862A-OR
(1)
(2)
(3)
(4)
(5)
(6)
(7)
(8)
Fig
No
Item
No
SMR
Code
NSN
CAGE
Part
Number
Description
Qty
8-4
1
XBFZZ
8-4
2
PAFZZ
8-4
3
8-4
01365
08020E0034
TIE DOWN STRAP
2
80204
B182BH025C100N
SCREW CAP, Hex Head
4
XBFZZ
01365
08020E0031
BUSHING
4
4
XBFZZ
01365
08020E0032
ELECTRICAL TRAY
COLLAR
4
8-4
5
PAFZZ
5310-01-531-7280
81349
M45913/1-4CG8Z
NUT, Self-Locking
4
8-4
6
PAFZZ
5310-00-809-4058
96906
MS27183-10
WASHER, Flat
4
8-4
7
XBFZZ
01365
08020E0033
BATTERY TRAY
1
8-4
8
PAFZZ
5310-00-809-4058
96906
MS27183-10
WASHER, Flat
4
8-4
9
PAFZZ
5310-01-588-1252
0Y3H3
AEW07X250000GY0AS1
WASHER, Lock
4
8-4
10
PAFZZ
5305-00-068-0515
80204
B182BH025F100N
SCREW CAP, Hex Head
4
5305-00-225-3843
Figure 8-4. Battery Tray Assembly
8-8
TM 11862A-OR
(1)
(2)
(3)
(4)
(5)
(6)
(7)
(8)
Fig
No
Item
No
SMR
Code
NSN
CAGE
Part
Number
Description
Qty
8-5
1
PAOZZ
8-5
2
PAOZZ
8-5
3
XBFZZ
6140-01-485-1472
01365
08020E0034
TIE DOWN STRAP
2
0WY95
9750N7025
BATTERY, Storage
2
01365
08020E0033
BATTERY TRAY
1
Figure 8-5. Battery Assembly
8-9
TM 11862A-OR
(1)
(2)
(3)
(4)
(5)
(6)
(7)
(8)
Fig
No
Item
No
SMR
Code
NSN
CAGE
Part
Number
Description
Qty
8-6
1
PAFZZ
01365
08020B0055-1
FAN, Axial – Modified (Upper)
1
8-6
2
PAFZZ
01365
08020B0055-2
FAN, Axial – Modified (Lower)
1
8-6
3
PAFZZ
5310-00-512-9061
96906
M45913/1-08CS6
NUT, Self-Locking
4
8-6
4
PAFZZ
5310-00-088-5978
96906
MS15795-807
WASHER, Flat
4
8-6
5
PADZZ
5365-01-546-6549
39428
92320A525
SPACER, Sleeve
4
8-6
6
PADZZ
5310-00-880-5978
96906
MS15795-807
WASHER, Flat
4
8-6
7
PADZZ
5320-00-420-2165
81349
M24243/7A604H
RIVET, Blind
12
8-6
8
PADZZ
5305-00-054-6675
96906
MS51957-50
SCREW, Machine Pan Head
4
8-6
9
XBDZZ
07918
40RLSSBB
LOUVER, Metal
1
8-6
10
XBDZZ
01365
08020E0051
WEATHER FLAP, Door Vent
1
8-6
11
PADZZ
81349
M24243/6A604H
RIVET, Blind
4
8-6
12
XBDZZ
01365
08020E0050
WEATHER FLAP RETAINER,
Door Vent
1
8-6
13
XBDZZ
01365
08020E0045
VENT PAN, Secondary Door
1
5320-00-956-7355
Figure 8-6. Rear Door Fan Assembly
8-10
TM 11862A-OR
(1)
(2)
(3)
(4)
(5)
(6)
(7)
(8)
Fig
No
Item
No
SMR
Code
NSN
CAGE
Part
Number
Description
Qty
8-7
1
PAFZZ
8-7
2
PAFZZ
8-7
3
PAFZZ
8-7
4
XBDZZ
07918
40RLSSBB
LOUVER, Metal
1
5310-00-088-5978
96906
MS15795-807
WASHER, Flat
4
5305-00-054-6675
96906
MS51957-50
SCREW, Machine, Pan
Head
4
01365
08020E0048
BASEPLATE, Upper Fan
1
Note: Not used with Upper
Door Fan Assembly
8-7
5
XBDZZ
01365
08020E0046
VENT BEZEL, Secondary
Door
1
8-7
6
PADZZ
5320-00-420-2165
81349
M24243/7A604H
RIVET, Blind
16
8-7
7
PAFZZ
5310-00-880-5978
96906
MS15795-807
WASHER, Flat
4
8-7
8
PAFZZ
5310-01-512-9061
96906
M45913/1-08CS6
NUT, Self-Locking
4
8-7
9
PAFZZ
5310-01-512-9061
96906
M45913/1-08CS6
NUT, Self-Locking
3
Figure 8-7. Shelter Door Fan Assembly (Sheet 1 of 2)
8-11
TM 11862A-OR
(1)
(2)
(3)
(4)
(5)
(6)
(7)
(8)
Fig
No
Item
No
SMR
Code
NSN
CAGE
Part
Number
Description
Qty
8-7
10
PAFZZ
5310-00-880-5978
96906
MS15795-807
WASHER, Flat
6
8-7
11
PAFZZ
4140-01-368-9091
25795
4C657
FAN GUARD
1
8-7
12
PAFZZ
5305-00-054-6670
96906
MS51957-45
SCREW, Machine Pan Head
3
8-7
13
XBDZZ
01365
08020E0049
FAN SHROUD
1
8-7
14
PAFZZ
5305-00-054-6672
96906
MS51957-47
SCREW, Machine, Pan
Head
4
8-7
15
PAFZZ
5310-00-880-5978
96906
MS15795-807
WASHER, Flat
8
8-7
16
XBDZZ
01365
08020E0047
BASE PLATE, Lower Fan
1
8-7
17
XAFZZ
01365
08020B0055-1
FAN, Axial - Modified
(Upper)
1
8-7
18
XAFZZ
01365
08020B0055-2
FAN, Axial - Modified
(Lower)
1
8-7
19
PAFZZ
96906
M45913/1-08CS6
NUT, Self-Locking
4
5310-01-512-9061
Figure 8-7. Shelter Door Fan Assembly (Sheet 2 of 2)
8-12
TM 11862A-OR
(1)
(2)
(3)
(4)
(5)
(6)
(7)
(8)
Fig
No
Item
No
SMR
Code
NSN
CAGE
Part
Number
Description
Qty
8-8
1
PAFZZ
5305-00-054-6672
96906
MS51957-47
SCREW, Machine, Pan
Head
4
8-8
2
PAFZZ
5310-00-880-5978
96906
MS15795-807
WASHER, Flat
8
8-8
3
PAFZZ
5975-01-036-7522
06383
TM3S10-CO
MOUNTING BASE, Tie
Down, Electrical
1
8-8
4
XBFZZ
01365
08020E0066
FAN BRACKET
1
8-8
5
PAFZZ
5310-01-512-9061
96906
M45913/1-010FS6
NUT, Self-Locking
4
8-8
6
PAFZZ
5310-00-880-5978
96906
MS15795-807
WASHER, Flat
8
8-8
7
PAFZZ
5305-00-054-6672
96906
MS51957-47
SCREW, Machine, Pan
Head
4
8-8
8
XBFZZ
01365
08020B0055-5
FAN, Axial - Modified
(Upper)
1
8-8
9
XBFZZ
01365
08020B0055-6
FAN, Axial - Modified
(Lower)
1
8-8
10
PAFZZ
4140-01-368-9091
25795
4C657
FAN GUARD
1
8-8
11
PAFZZ
5310-01-512-9061
96906
M45913/1-010FS6
NUT, Self-Locking
4
Figure 8-8. Vent Fan Assembly
8-13
TM 11862A-OR
(1)
(2)
(4)
(5)
(6)
(7)
(8)
Part
Number
Description
Qty
(3)
Fig
No
Item
No
SMR Code
NSN
CAGE
8-9
1
PAFZZ
5310-01-509-8656
1QNZ3
M45913/1-4CS6
LOCK NUT, Nylon Insert
4
8-9
2
PAFZZ
5310-00-582-5677
80205
MS15795-810
WASHER, Flat
8
8-9
3
XBFZZ
01365
08020B0055-5
FAN, Axial – Modified
(Upper)
1
8-9
4
XBFZZ
01365
08020B0055-6
FAN, Axial – Modified
(Lower)
1
8-9
5
PAFZZ
0Y3H3
MS35307-306
SCREW CAP, Hex Head
4
5305-01-564-5768
Figure 8-9. Radio Rack Fan Assembly
8-14
TM 11862A-OR
(1)
(2)
(3)
(4)
(5)
(6)
(7)
(10)
Fig
No
Item
No
SMR
Code
NSN
CAGE
Part
Number
Description
Qty
8-10
1
PAFFF
4120-01-581-2650
OWJEI
GSQ386ZABNW0011
AIR CONDITIONER
1
OR
8-10
2
PAFFF
8-10
3
8-10
8-10
4120-01-552-5223
OWJEI
GSQ346ZABNW00G1
AIR CONDITIONER
1
PAFZZ
80204
AES01F375A50WA6DG1
SCREW, Cap, Hexagon Head,
3/8-24 X 1-1/2, YZ
4
4
PAFZZ
80204
AEW07X375000GY0AS1
WASHER, Lock, 3/8 X .680,
YZ
4
5
PAFZZ
96906
MS27183-13
WASHER, Flat, .375 X .875,
YZ
4
5310-00-087-7493
Figure 8-10. Air Conditioner (Bottom Assembly)
8-15
TM 11862A-OR
(1)
(2)
(3)
(4)
(5)
(6)
(7)
(8)
Fig
No
Item
No
SMR
Code
NSN
CAGE
Part
Number
Description
Qty
8-11
1
PAFZZ
5305-00-225-3843
80204
B182BH025C100N
SCREW, Cap, Hexagon Head
14
8-11
2
PAFZZ
80204
AEW07X250000GY0AS1
WASHER, Lock
14
8-11
3
PAFZZ
96906
MS27183-10
WASHER, Flat
14
8-11
4
XBFZZ
01365
08020E0111
EXTERIOR BRACKET, Rain
Guard, AC
1
8-11
5
PAFZZ
5305-00-051-4078
80204
B1821BH031F125N
SCREW, Cap, Hexagon Head
2
8-11
6
PAFZZ
5310-00-081-4219
96906
MS27183-12
WASHER, Flat
2
8-11
7
PAFZZ
5310-00-081-4219
96906
MS27183-12
WASHER, Flat
2
8-11
8
PAFZZ
5310-01-551-9262
1QN23
M45913/1-5FG82
NUT, Locking
2
8-11
9
PAFFF
4120-01-581-2650
OWJEI
GSQ386ZABNW0011
AIR CONDITIONER
1
5310-00-809-4058
OR
8-11
10
PAFFF
4120-01-552-5223
OWJEI
GSQ346ZABNW00G1
Figure 8-11. Air Conditioner Assembly
8-16
AIR CONDITIONER
1
TM 11862A-OR
(1)
(2)
(3)
(4)
(5)
(6)
(7)
(10)
Fig
No
Item
No
SMR
Code
NSN
CAGE
Part
Number
Description
Qty
8-12
1
PAFZZ
5305-00-225-3843
80204
B1821BH025C100N
SCREW CAP, Hex Head
4
8-12
2
PAFZZ
0Y3H3
AEW07X250000GY0AS1
WASHER, Lock
4
8-12
3
PAFZZ
39428
AEW24X25N000WA6A81
WASHER, Flat
4
8-12
4
XBFZZ
01365
08020E0043
BATTERY BOX FRAME
1
8-12
5
XBFZZ
01365
08020E0044
INVERTER SUPPORT
1
8-12
6
PAFZZ
39428
AEW24X25N000WA6A81
WASHER, Flat
8
8-12
7
PAFZZ
39428
AEW07X250000GY0AS1
WASHER, Lock
8
8-12
8
PAFZZ
80204
B1821BH025C100N
SCREW CAP, Hex Head
8
8-12
9
PAFLL
POWER SUPPLY
1
5305-00-225-3843
3YMC5 OBX-GIC2524P-120/60
Figure 8-12. Power Supply (Inverter) Assembly
8-17
TM 11862A-OR
(1)
(2)
(3)
(4)
(5)
(6)
(7)
(8)
Fig
No
Item
No
SMR
Code
NSN
CAGE
Part
Number
Description
Qty
8-13
1
PAFZZ
5305-00-054-5651
39428
MS51957-17
SCREW, Machine, Pan Head
8
8-13
2
PAFZZ
5310-00-782-1349
80205
MS15795-804
WASHER, Flat
16
8-13
3
PAFZZ
5310-01-512-5085
81349
M45913/1-04CS6
NUT, Self-Locking
8
8-13
4
XBFZZ
01365
08020E0099
DIPLEXER BRACKET
1
8-13
5
PAFZZ
3AD70
LH7 88/108 N50
DIPLEXER
2
Figure 8-13. Diplexer Assembly
8-18
TM 11862A-OR
(1)
(2)
(3)
(4)
(5)
(6)
(7)
(8)
Fig
No
Item
No
SMR
Code
NSN
CAGE
Part
Number
Description
Qty
8-14
1
PAFZZ
5305-01-557-0870
0Y3H3
AES01C312A00WA6DG1
BOLT, Machine, Hex Head
4
8-14
2
PAFZZ
5310-00-012-0214
96906
MS35338-26
WASHER, Lock
4
8-14
3
PAFZZ
5310-00-081-4219
96906
MS27183-12
WASHER, Flat
4
8-14
4
PAFZZ
5340-01-167-8297
80063
SM-E-912525
MOUNTING BASE,
6146/VSQ-1
1
8-14
5
XBFZZ
01365
08020E0065
RADIO SHELF
1
Figure 8-14. Enhanced Position Location and Reporting System Mounting Assembly
8-19
TM 11862A-OR
(1)
(2)
(3)
(4)
(5)
(6)
(7)
(8)
Fig
No
Item
No
SMR
Code
NSN
CAGE
Part
Number
Description
Qty
8-15
1
PAOZZ
5305-00-071-1318
96906
MS51957-83
SCREW, Machine, Pan Head
4
8-15
2
PAOZZ
5310-00-933-8121
96906
MS35338-139
WASHER, Lock
4
8-15
3
PAOZZ
5310-00-582-5677
80205
MS15795-810
WASHER, Flat
4
8-15
4
XBOZZ
01365
08020E0098
SWITCH, Bracket
2
8-15
5
PAOZZ
0GX96
WS-C3560-8PC-S
INTERFACE UNIT, Automatic
Data Processing
1
8-15
6
XBOZZ
01365
08020E0117
SWITCH PLATE
2
8-15
7
XBFZZ
01365
08020E0062
COMPUTER SHELF
1
7025-01-564-9545
Figure 8-15. Automated Data Processing Interface Unit Assembly
8-20
TM 11862A-OR
(1)
(2)
(3)
(4)
(5)
(6)
(7)
(8)
Fig
No
Item
No
SMR
Code
NSN
CAGE
Part
Number
Description
Qty
8-16
1
PAFZZ
5305-01-557-0870
0Y3H3
AES01C312A00WA6DG1
BOLT, Machine, Hex Head
4
8-16
2
PAFZZ
5310-00-012-0214
96906
MS35338-26
WASHER, Lock
4
8-16
3
PAFZZ
5310-00-081-4219
96906
MS27183-12
WASHER, Flat
4
8-16
4
PAFZZ
5975-01-188-8873
80063
A3013367-1
MOUNTING BASE,
Electrical Equipment
MT-6352
1
8-16
5
XBFZZ
01365
08020E0065
RADIO SHELF
1
Figure 8-16. Single Ground-to-Air Radio System Channel Mounting Assembly
8-21
TM 11862A-OR
(1)
(2)
(3)
(4)
(5)
(6)
(7)
(8)
Fig
No
Item
No
SMR
Code
NSN
CAGE
Part
Number
Description
Qty
8-17
1
PAOZZ
5305-00-059-3659
39428
MS51958-65
SCREW, Machine, Pan Head
4
8-17
2
PAOZZ
5310-00-225-5328
80205
MS15795-841
WASHER, Flat
8
8-17
3
PAOZZ
5340-01-386-7841
80063
A3006206
BRACKET ASSEMBLY
MOUNTING
1
8-17
4
XBOZZ
01365
08020E0075
MOUNTING PLATE
1
8-17
5
PAOZZ
80205
M45913/1-010FS6
NUT, Self-Locking
4
5310-01-521-9560
Figure 8-17. Single Ground-to-Air Radio System Channel User Read Out Mount Assembly
8-22
TM 11862A-OR
(1)
(2)
(3)
(4)
(5)
(6)
(7)
(8)
Fig
No
Item
No
SMR
Code
NSN
CAGE
Part
Number
Description
Qty
8-18
1
PAFZZ
5945-00-163-3556
14799
8501KPD12V53
RELAY, Electromagnetic
1
8-18
2
PAFZZ
5305-00-054-6675
96906
MS51957-50
SCREW, Machine, Pan
Head
2
8-18
3
PAFZZ
5310-00-880-5978
39428
MS15795-807
WASHER, Flat
2
8-18
4
PAFZZ
5935-01-237-5227
56865
8501-NR-51
SOCKET, Plug-in
Electronic Components
1
8-18
5
PAFZZ
5310-00-880-5978
39428
MS15795-807
WASHER, Flat
2
8-18
6
PAFZZ
5310-01-512-9061
81349
M45913/1-08CS6
NUT, Self locking, Hexagon
2
Figure 8-18. Relay, Electromagnetic
8-23
TM 11862A-OR
(1)
(2)
(3)
(4)
(5)
(6)
(7)
(8)
Fig
No
Item
No
SMR
Code
NSN
CAGE
Part
Number
Description
Qty
8-19
1
PAFZZ
H0L31
CYRIX-I 24/48-400
CONTROL, Battery Charger
1
8-19
2
PAFZZ
80204
AESF5C250AGM7DG1
SCREW, Machine, Pan
Head, Cross Recessed
2
8-19
3
PAFZZ
80204
AEW07X250000GY0AS1
WASHER, Lock
2
8-19
4
PAFZZ
96906
MS27183-10
WASHER, Flat
2
8-19
5
XBDZZ
01365
08020E0106
MOUNTING BRACKET,
Battery Combiner
1
8-19
6
PAFZZ
1QNZ3
AEW24X190000GM7A81
WASHER, Flat
2
8-19
7
PAFZZ
80204
AEW7X190000GM7AS1
WASHER, Lock
2
8-19
8
PAFZZ
80204
AESF5C190750GM7DG1
SCREW, Machine, Pan
Head, Cross Recessed
2
5310-00-809-4058
Figure 8-19. Battery Charger Control
8-24
TM 11862A-OR
(1)
(2)
(3)
(4)
(5)
(6)
(7)
(8)
Fig
No
Item
No
SMR
Code
NSN
CAGE
Part
Number
Description
Qty
8-20
1
PAOZZ
5305-00-059-3659
80205
MS519858-63
SCREW, Machine Pan
Head
2
8-20
2
PAOZZ
5310-00-225-5328
80205
MS15795-841
WASHER, Flat
4
8-20
3
XBOZZ
01365
08020E0090
TOP BRACKET
1
Figure 8-20. Radio Frequency Power Dividers (Sheet 1 of 2)
8-25
TM 11862A-OR
(1)
(2)
(3)
(4)
(5)
(6)
(7)
(8)
Fig
No
Item
No
SMR
Code
NSN
CAGE
Part
Number
Description
Qty
8-20
4
PAOZZ
5310-01-521-9560
81349
M45913/1-010FS6
NUT, Self-locking
2
8-20
5
PAOZZ
5895-01-540-6169
59951
AC1056A-2
DIVIDER, Power Radio,
Frequency
1
8-20
6
PAOZZ
5836-01-584-9036
59951
AC1056A-4
DIVIDER, Power, Radio,
Frequency
1
8-20
7
XBOZZ
01365
08020E0091
BOTTOM BRACKET
1
8-20
8
PAOZZ
5310-00-225-5328
80205
MS15795-841
WASHER, Flat
2
8-20
9
PAOZZ
5310-01-398-1615
96906
MS35338-138
WASHER, Lock
2
8-20
10
PAOZZ
5310-00-059-3659
80205
MS519858-63
SCREW, Machine, Pan
Head
2
Figure 8-20. Radio Frequency Power Dividers (Sheet 2 of 2)
8-26
TM 11862A-OR
(1)
(2)
(3)
(4)
(5)
(6)
(7)
(8)
Fig
No
Item
No
SMR
Code
NSN
CAGE
Part
Number
Description
Qty
8-21
1
PAOZZ
LIGHTING ASSEMBLY
1
8-21
2
PAOZZ
01365
08020B0067-1
CABLE ASSEMBLY,
Special Purpose,
Electrical, W67-1
1
8-21
3
POAZZ
01365
08020B0067-2
CABLE ASSEMBLY,
Special Purpose,
Electrical, W67-2
1
8-21
4
PAOZZ
96906
MS27183-47
WASHER, Flat, No.
10 X .365, YZ
4
8-21
5
PAOZZ
80204
AEW07X190000GM7A
S1
WASHER, Lock, No.10,
YZ
4
8-21
6
PAOZZ
80205
MS35206-267
SCREW, Machine, Pan
Head, Cross Recessed,
No.10-24 X 1.00, YZ
4
00MW9 P2152-H-10S
5310-01-312-4959
5305-00-984-6214
Figure 8-21. Overhead Lights
8-27
TM 11862A-OR
(1)
(2)
(3)
(4)
(5)
(6)
(7)
(8)
Fig
No
Item
No
SMR
Code
NSN
CAGE
Part
Number
Description
Qty
8-22
1
PAOZZ
5310-00-880-5978
96906
MS15795-807
WASHER, Flat,
No.8 X .375, SS
3
8-22
2
PAOZZ
5310-01-512-9061
96906
M45913/1-08CS6
NUT, Self-Locking,
Hexagon, No.8-32,
3
8-22
3
PAOZZ
4ZDB6
RAM-B-101U
BRACKET, MOUNTING
1
8-22
4
PAOZZ
96906
MS27183-48
WASHER, Flat,
No.10 X .437, YZ
3
8-22
5
PAOZZ
80204
AEW07X190000GM7AS1
WASHER, Lock, No.10, YZ
3
8-22
6
PAOZZ
80205
MS35206-265
SCREW, Machine, Pan
Head, Cross Recessed,
No.10-24 X .750, YZ
3
8-22
7
XBOZZ
01365
08020E0101
BRACKET, Keypad Display
Unit
1
8-22
8
PAOZZ
5995-01-584-6108
14304
11071-0205-A020
CABLE ASSEMBLY,
Special Purpose, Electrical,
W80-1
1
8-22
9
PAOZZ
5995-01-584-6108
14304
11071-0205-A020
CABLE ASSEMBLY,
Special Purpose, Electrical,
W80-2
1
8-22
10
PAODD
7025-01-499-9143
14304
10511-1300-03
DISPLAY UNIT
1
8-22
11
XBOZZ
5305-00-764-0071
80205
MS51959-47
SCREW, Machine, CSK,
Cross Recessed,
No. 8-32 X .75, SS
3
5310-00-809-8546
5305-00-984-6212
Figure 8-22. Keyboard Display Unit Mounting Bracket
8-28
TM 11862A-OR
(1)
(2)
(3)
(4)
(5)
(6)
(7)
(8)
Fig
No
Item
No
SMR
Code
NSN
CAGE
Part
Number
Description
Qty
8-23
1
PAODD
5965-01-222-1420
80063
A3014065-1
LOUDSPEAKER
CONTROL UNIT
LS-671/VRC
1
8-23
2
XBDZZ
01365
08020D0222-1
CABLE ASSEMBLY,
Special Purpose,
Electrical, W222-1
1
8-23
3
XBDZZ
01365
08020D0222-2
CABLE ASSEMBLY,
Special Purpose,
Electrical, W222-2
1
8-23
4
PAOZZ
80063
SM-D-889337
HANDSET, H-250/U
1
8-23
5
PAOZZ
80204
AES01C250D50WA6DG1 SCREW, Cap, Hexagon
Head, 1/4-20 X 4.50, YZ
2
8-23
6
PAOZZ
80204
AEW07X250000GY0AS1 WASHER, Lock, 1/4-20,
YZ
2
8-23
7
PAOZZ
96906
MS27183-10
2
5965-00-043-3463
5310-00-809-4058
WASHER, Flat,
.25 X .625, YZ
Figure 8-23. Loud Speaker Unit
8-29
TM 11862A-OR
(1)
(2)
(3)
(4)
(5)
(6)
(7)
(8)
Fig
No
Item
No
SMR
Code
NSN
CAGE
Part
Number
Description
Qty
8-24
1
PAFZZ
5310-00-809-4058
96906
8-24
2
XBFZZ
1UXZ3 4N1-S200
8-24
3
XBFZZ
80204
AESF5C250A00GM7DG1 SCREW, Machine, Pan
Head, Cross Recessed,
1/4-20 X 1, YZ
2
8-24
4
PAFZZ
80204
AEW07X250000GY0AS1 WASHER, Lock, 1/4-20,
YZ
2
MS27183-10
WASHER, Flat,
.25 X .625, YZ
2
BRACKET, Mounting
1
Figure 8-24. Display Unit Mounting Bracket to Shelter
8-30
TM 11862A-OR
(1)
(2)
(3)
(4)
(5)
(6)
(7)
(8)
Fig
No
Item
No
SMR
Code
NSN
CAGE
Part
Number
Description
Qty
8-25
1
PAOZZ
7025-01-590-3082
4JC83
8-25
2
XBFZZ
8-25
3
XBFZZ
LCD2190UXP-BK
DISPLAY UNIT
1
1UXZ3 4N1-S200
BRACKET, Mounting
1
4JC83
SCREW, Assembled
with Lock and Flat
Washer
4
1D301001
NOTE: Supplied with
Display Unit
Figure 8-25. Display Unit with Mounting Bracket
8-31
TM 11862A-OR
(1)
(2)
(3)
(4)
(5)
(6)
(7)
(8)
Fig
No
Item
No
SMR
Code
NSN
CAGE
Part
Number
Description
Qty
8-26
1
XBOZZ
01365
08020E0064
POWER CONVERTER
BRACKET
1
8-26
2
PAOZZ
39428
94985K815
FASTENER TAPE,
Hook and Loop (SelfAdhesive)
8-26
3
PAOZZ
68167
F5U404-PBLK
HUB, Network
Figure 8-26. 4-Port USB Hub
8-32
AR
1
TM 11862A-OR
APPENDIX A
ACRONYMS AND ABBREVIATIONS
The following table lists acronyms and abbreviations used throughout the manual and their definitions.
Table A-1. Acronyms and Abbreviations
Acronym/
Abbreviation
Definition
AC
ADP
AFATDS
AGS
Amp
Alternating Current
Automated Data Processing
Advanced Field Artillery Tactical Data System
Advanced Generator Start
Ampere
BIT
BLOS
Built-in Test
Beyond-Line-of-Sight
C2
C4I
Cat
CB
CC
CCW
CD
COC
COMSEC
CONOPS
COTS
Command and Control
Command, Control, Communications, Computers, and Intelligence
Category
Circuit Breaker
Charge Controller
Counter-clockwise
Compact Disc
Combat Operations Center
Communications Security
Concept of Operations
Commercial Off-The-Shelf
DC
Direct Current
EMI
EPLRS
ESD
Electromagnetic Interference
Enhanced Position Location and Reporting System
Electrostatic Discharge
F
ft.
Fahrenheit
Foot/feet
GFE
GR
Government Furnished Equipment
Grade
HMMWV
HCFC
High Mobility Multipurpose Wheeled Vehicle
Hydrochlorofluorocarbon
A-1
TM 11862A-OR
Table A-1 Acronyms and Abbreviations (Continued)
Acronym/
Abbreviation
Definition
HDD
Hz
Hard Disk Drive
Hertz
IAW
ID
IP
In Accordance With
Identification
Internet Protocol
KDU
KVM
Keyboard Display Unit
Keyboard/Video/Mouse
LAN
lb.
LCD
LED
LMS
LOS
LRU
Local Area Network
Pound
Liquid Crystal Display
Light-Emitting Diode
Lightweight Multipurpose Shelter
Line-of-Sight
Lowest Replaceable Unit
MAC
MAGTF
M-B
Mbps
MCRP
MHz
mJ
MIL-SPEC
MIL-STD
MOS
MPE
MTBF
MTS
Media Access Control
Marine Air-Ground Task Force
Multi-band
Megabit(s) per second
Marine Corps Reference Publication
Megahertz
Millijoule
Military Specification
Military Standard
Military Occupation Specialties
Maximum Permissible Exposure
Mean Time Between Failure
Mobile Tactical Shelter
NCOIC
NSN
Network Centric Operations Industry Consortium
National Stock Number
O
OSHA
OSM
Organizational
Occupational Safety and Health Administration
On-screen Menu
A-2
TM 11862A-OR
Table A-1 Acronyms and Abbreviations (Continued)
Acronym/
Abbreviation
Definition
PCC
PDU
PMCS
PMS
P/N
PoE
POST
PSI
PVC
PWB
Power Conditioner/Converter
Power Distribution Unit
Preventative Maintenance Checks and Services
Planned Maintenance System
Part Number
Power over Ethernet
Power-On Self Test
Pounds per Square Inch
Polyvinyl Chloride
Printed Wiring Board
RADHAZ
RF
RFI
ROM
RPSTL
R/T
RTC
RTS
Radiation Hazard
Radio Frequency
Radio Frequency Interference
Read-Only Memory
Repair Parts and Special Tools List
Receiver/Transmitter
Real-time Clock
Request to Send (cable)
SATCOM
SFP
SIM
SINCGARS
SMIA
SMR
SOP
S/W
Satellite Communication
Small Form-Factor Pluggable
Subscriber Identity Management
Single Channel Ground-to-Air Radio System
Shock Mount Interface Assembly
Source, Maintenance, and Recovery
Standard Operating Procedure
Software
TIP
TM
TPM
Tent Interface Panel
Technical Manual
Trusted Platform Module
UHF
URO
US
USB
Ultra High Frequency
User Read Out
United States
Universal Serial Bus
V
VAA
Volt
Vehicular Amplifier Adapter
A-3
TM 11862A-OR
Table A-1 Acronyms and Abbreviations (Continued)
Acronym/
Abbreviation
Definition
VAC
VAU
VDC
VGA
VHF
VIP
Volts Alternating Current
Vehicle Adapter Unit
Volts Direct Current
Video Graphics Accelerator
Very High Frequency
Vehicle Interface Panel
W
Watt
A-4
TM 11862A-OR
APPENDIX B
EXPENDABLE-DURABLE SUPPLIES AND MATERIAL LIST
B-1. GENERAL INFORMATION.
This appendix lists expendable/durable supplies and materials needed to operate and maintain the system, shown in
Table B-1.
B-2. EXPLANATION OF COLUMNS.
a. Item Number (Column 1). This number is assigned to the entry in the listing and is referenced in the narrative
instructions to identify the material.
b. Maintenance Levels (Column 2). This column identifies the lowest level of maintenance that requires the listed
item.
• Operational/Crew
• Field Level
• Sustainment
c. National Stock Number (Column 3). The NSN assigned to the item is used to request or requisition the item.
d. Description (Column 4). This column indicates the Federal Item Name and, if required, a description to identify
the item. The last line for each item indicates the part number and CAGE code.
e. Unit of Measure (Column 5). The U/M indicates the measure used in performing the actual maintenance
function. This measure is expressed by a two-character alphabetic abbreviation (e.g., EA, in). If the U/M differs from
the unit of issue, requisition the lowest unit of issue that will satisfy the requirements.
Table B-1. Expendable-Durable Supplies and Materials List
Item
Number
1
Maintenance
Levels
Operator/Crew
NSN
7530-01-335-2623
2
3
Operator/Crew
Operator/Crew
8040-00-145-0020
6810-00-286-5435
4
5
6
7
8
Operator/Crew
Operator/Crew
Operator/Crew
Operator/Crew
Field Level
1005-00-494-6602
7045-01-470-3592
7930-01-398-2473
8030-01-388-5604
5975-01-526-8849
9
10
Operator/Crew
Operator/Crew
7510-01-546-6418
5920-01-548-5390
11
Operator/Crew
7930-01-424-4796
12
13
14
Operator/Crew
Operator/Crew
Operator/Crew
3610-00-810-0571
6510-01516-8714
9150-01-260-2534
Description
Paper, Copying,
Xerographic Process
Adhesive
Isopropyl Alcohol,
Technical
Brush, Cleaning
Disk, Nonflexible
Canned Air
Sealing Compound
Strap, Tiedown,
Electrical Components
Cartridge, Toner
Workstation Kit,
Electrostatic Control
Cleaner, Industrial, Multi
Purpose
Tissue, Lint Free
Swabs, Cleaning
Lubricant, Solid Film
Unit of
Measure
EA
EA
EA
EA
EA
EA
EA
EA
EA
EA
EA
EA
EA
EA
B-1
TM 11862A-OR
Table B-1. Expendable-Durable Supplies and Materials List (Continued)
Item
Number
15
16
17
18
B-2
Maintenance
Levels
Operator/Crew
Operator/Crew
Operator/Crew
Operator/Crew
NSN
9150-00-826-2740
6135-00-985-7845
4240-00-052-3776
7520-01-352-7321
19
Operator/Crew
8415-00-009-1900
20
Field Level
9150-01-197-7690
21
22
23
24
Field Level
Field Level
Field Level
Field Level
8305-00-962-2027
8030-00-753-5005
8040-01-562-8057
9150-00-281-1893
Description
Lubricant Oil
Battery, Nonrechargeable
Goggles, Industrial
Marker Assortment, Tube
Type
Gloves, Chemical and Oil
Protective
Grease, Automotive and
Artillery
Cloth, Cotton, Muslin
Sealing Compound
Adhesive
Soap, Lubricating
Unit of
Measure
EA
EA
EA
EA
EA
EA
EA
EA
EA
EA
TM 11862A-OR
APPENDIX C
COMPONENTS OF END ITEM LIST
C-1. SCOPE.
This Appendix lists the components of the end item (COEI) (Table C-1) for the SHELTER EXPANDABLE
(Mobile Tactical Shelter (MTS)), AN/TSQ-272 to help the operator inventory items required for safe and
efficient operation.
C-2. GENERAL.
This Appendix lists all components and accessories for collection-type supply items, such as major
combinations, systems, groups, outfits, kits, sets or assortments.
The components to be issued with the end item are identified under the heading of “SUPPLY SYSTEM
RESPONSIBILITY” and when required, under the heading “COLLATERAL MATERIEL.” End items
requiring collateral materiel are governed by whether the end item is an initial or replacement issue. After
initial issue, as directed by Commander, Marine Corps Systems Command, the Program Manager will direct
whether subsequent issue of the end item is with or without collateral materiel.
Those items listed under the “USING UNIT RESPONSIBILITY” heading, are to be requisitioned separately
through the supply system, when applicable. Using Units are also responsible for requisitioning the required
publications to support the end item identified by the ID number associated to the national stock number for
this item. The end item will be complete when the total quantity of items, as applicable shown in the
components of end item list are on hand.
C-3. LIST OF COMPONENTS.
This listing comprises the major portion of this publication. The data, arranged in columnar form, present the
information needed to identify the item and determine its type of issue.
a. Item Number (Column 1). This column specifies a number assigned to each item as it appears in
the list. Numbers are assigned in sequence and are for reference purposes only.
b. Stock Number (Column 2). This column furnishes the National Stock Number (NSN) assigned to
the item.
c. Reference Designator/Figure-Key (Column 3). This column contains alphabetical and/or
numerical designators for referencing individual component or item to an illustration. The absence of a
reference designator indicates there is no illustration for the item.
d. Item Identification (Column 4). This column provides the item name and description listed under
the heading of either “SUPPLY SYSTEM RESPONSIBILITY,” “COLLATERAL MATERIEL” or “USING
UNIT RESPONSIBILITY” in alphabetical order. If required, sub-headers can be inserted under the above
listed headers for arrangement of components, in alphabetical order under the sub-head, to allow for better
inventory (See paragraphs 12, 13, and 14).
e. Unit of Measure (Column 5). This column gives the measurement standard of each item. It may
or may not be the same as the unit of issue. For example, the unit of issue of a certain wire is coil but only
four (4) feet are required for the end item. Therefore, the unit of measure shown will not be used for
requisitioning purposes. For the proper unit of issue and other required management data, refer to the
applicable Management Data List (MDL) when requisitioning.
C-1
TM 11862A-OR
f. Quantity Used in Unit (Column 6). This column lists the total quantity of an item, according to the
unit of measure required, for full functional operation of the end item.
C-4. SUPPLY SUPPORT CATEGORIES.
a. Supply System Responsibility (SSR). A list, in alphabetical sequence, of items that are furnished
with and must be turned in with the end item. Any item requiring replacement is the responsibility of the
holding organization or using unit.
b. Collateral Materiel. A list, in alphabetical sequence, of items that are supplied with the initial
issue of the end item and are retained by the unit. The “9999-xx-xxx-xxxx” NSN shown under the heading of
“COLLATERAL MATERIEL” (if applicable) is for control within the distribution system only, and is not
authorized for requisitioning purposes.
c. Using Unit Responsibility (UUR). A list, in alphabetical sequence, of items that will not be issued
with the end item. They must be requisitioned, as required, through the supply system by the using unit or
holding organization.
C-5. EXPLANATION OF COLUMNS.
The following provides an explanation of columns found in the tabular list:
a. Item Number (Column 1). This column specifies a number assigned to each item as it appears in
the list. Numbers are assigned in sequence and are for reference purposes only.
b. Stock Number (Column 2). This column furnishes the National Stock Number (NSN) assigned to
the item.
c. Reference Designator/Figure-Key (Column 3). This column contains alphabetical and/or
numerical designators for referencing individual component or item to an illustration. The absence of a
reference designator indicates there is no illustration for the item.
d. Item Identification (Column 4). This column provides the item name and description listed under
the heading of either “SUPPLY SYSTEM RESPONSIBILITY,” “COLLATERAL MATERIEL” or “USING
UNIT RESPONSIBILITY” in alphabetical order. If required, sub-headers can be inserted under the above
listed headers for arrangement of components, in alphabetical order under the sub-head, to allow for better
inventory.
e. Unit of Measure U/M (Column 5). This column gives the measurement standard of each item. It
may or may not be the same as the unit of issue. For example, the unit of issue of a certain wire is coil but
only four (4) feet are required for the end item. Therefore, the unit of measure shown will not be used for
requisitioning purposes. For the proper unit of issue and other required management data, refer to the
applicable Management Data List (MDL) when requisitioning.
f. Quantity Used in Unit (Column 6). This column lists the total quantity of an item, according to the
unit of measure required, for full functional operation of the end item.
C-2
TM 11862A-OR
C-6. COMPONENTS OF END ITEM LIST.
Table C-1. Components of End Item
Item
Number
National Stock
Number
REF DESIG/
FIG-KEY
Item Identification
U/M
Qty
EA
1
SUPPLY SYSTEM
RESPONSIBILITY
1
4120-01-581-2650
2
6150-01-560-7170
3
4130-01-560-7173
4
4120-01-552-5223
5
6150-01-560-7170
6
4130-01-560-7173
7
5820-01-183-9462
8
5985-01-537-8837
9
10
11
12
AIR CONDITIONER:
PN GSQ386ZABNW0011
CAGE 0WJE1; c/o
1 – CABLE ASSEMBLY, Special
Purpose, Electrical, W68: (Air
Conditioner Power Cord 10 feet);
PN 108-00047 CAGE 0WJE1
1 – COVER, Air Conditioner:
PN 112-00014 CAGE 0WJE1
OR
AIR CONDITIONER:
PN GSQ346ZABNW00G1
CAGE 0WJE1; c/o
1 – CABLE ASSEMBLY, Special
Purpose, Electrical, W68: (Air
Conditioner Pwr Cord 10 feet);
PN 108-00047, CAGE 0WJE1
1 – COVER, Air Conditioner:
PN 112-00014 CAGE 0WJE1
ANTENNA, AS-3449/VSQ-1
(EPLRS): PN A3005031 CAGE 80063
ANTENNA VEHICULAR,
AS-390A/VRC (Multi-band):
PN RF-390-AT005 CAGE 14304
BRACKET, Mounting: (Display
Monitor); PN 4N1-S CAGE 1UXZ3
CABLE ASSEMBLY, Radio
Frequency, W4: (Frt. Ant, RF to
passthru); PN 08020C0004-1
CAGE 01365
CABLE ASSEMBLY, Radio
Frequency, W4: (Rear Ant., RF to
passthru); PN 08020C0004-3
CAGE 01365
CABLE ASSEMBLY, Radio
Frequency, W5: (EPLRS RF to
passthru); PN 08020C0005-1
CAGE 01365
EA
EA
EA
1
EA
EA
EA
1
EA
4
EA
4
EA
2
EA
2
EA
1
C-3
TM 11862A-OR
Table C-1. Components of End Item (Continued)
Item
Number
National Stock
Number
13
14
15
16
17
18
19
20
7025-01-590-3082
21
22
5895-01-540-6169
23
24
25
C-4
5836-01-584-9036
REF DESIG/
FIG-KEY
Item Identification
CABLE ASSEMBLY, Special Purpose,
Electrical, W201: (Shelter - Generator
Pwr Input); PN 08020D0201
CAGE 01365
CABLE ASSEMBLY, Special Purpose,
Electrical, W218: (Shelter Grd);
PN 08020D0218 CAGE 01365
CABLE ASSEMBLY, Special Purpose,
Electrical, W226: (Shelter to Veh.
Pwr.); PN 08020D0226 CAGE 01365
CABLE ASSEMBLY, Special Purpose,
Electrical, W232: (VIP to Veh. Radio);
PN 08020D0232-1 CAGE 01365
CABLE ASSEMBLY, Special Purpose,
Electrical, W232: (VIP to Veh. Radio);
PN 08020D0232-2 CAGE 01365
CABLE ASSEMBLY, Special Purpose,
Electrical, W252: (Generator Pigtail);
PN 08020D0252 CAGE 01365
CONTROL, Battery Charger:
PN CYRIX-i24/48-400
CAGE H0L31
DISPLAY UNIT: (Monitor);
PN LCD2190UXP-BK CAGE 4JC83;
c/o
4 – CABLE ASSEMBLY, Special
Purpose, Electrical, W63: (Pwr);
PN 7A083011 CAGE 4JC83
DIVIDER, Power, Radio Frequency:
PN AC1056A-2 CAGE 59951; c/o
1 – CABLE ASSEMBLY, Special
Purpose, Electrical, W61-2:
(Pwr); PN PW3-05020-B3A
CAGE 59951
DIVIDER, Power, Radio Frequency
W61-1: (Pwr); PN AC1056A-4
CAGE 59951; c/o
1 – CABLE ASSEMBLY, Special
Purpose, Electrical:
PN PW3-05020-B3A
CAGE 59951
U/M
Qty
EA
1
EA
1
EA
1
EA
1
EA
1
EA
1
EA
1
EA
4
EA
EA
1
EA
EA
EA
1
TM 11862A-OR
Table C-1. Components of End Item (Continued)
Item
Number
National Stock
Number
26
5965-00-043-3463
27
28
7025-01-564-9545
29
30
5965-01-222-1420
31
5340-01167-8297
32
5975-01-188-8873
33
REF DESIG/
FIG-KEY
Item Identification
HANDSET, H-250/U:
PN SM-D-889337 CAGE 80063
INDICATOR, Digital Display:
(Outback Inverter); PN MATE 2
CAGE 3YMC5; c/o
INTERFACE UNIT, Automatic Data
Processing: (Cisco Switch);
PN WS-C3560-8PC-S
CAGE 0GX96; c/o
1 – CABLE ASSEMBLY, Special
Purpose, Electrical: (Pwr);
PN CAB-RPS-2300
CAGE 0GX96
LOUDSPEAKER-CONTROL UNIT,
LS-671/VRC: PN A3014065-1
CAGE 54736
MOUNTING BASE,
MT 6146/VSQ-1: (EPLRS);
PN SM-E-912525 CAGE 80063
MOUNTING BASE, MT 6352/VRC:
(VRC-110); PN A3013367-1
CAGE 80063
POWER SUPPLY: (Outback Inverter);
PN OBXG-IC2524P-120/60
CAGE 3YMC5
U/M
Qty
EA
2
EA
1
EA
1
EA
EA
2
EA
1
EA
1
EA
1
EA
2
EA
2
COLLATERAL MATERIEL
34
35
7025-01-499-9143
SHOCK MOUNT: (AFATDS
Mounting Tray); PN 08020E0063
CAGE 01365
DISPLAY UNIT: (KDU DISPLAY);
PN 10511-1300-03 CAGE 14304
C-5
TM 11862A-OR
Table C-1. Components of End Item (Continued)
Item
Number
National Stock
Number
36
6140-01-485-1472
37
2530-01-553-3162
38
5411-01-499-5433
39
4020-00-908-6416
40
4210-00-270-4512
41
5820-012631-1760
42
43
5895-01-483-6347
44
5440-01-546-7763
45
46
47
7025-01-567-2409
48
49
C-6
3990-01-204-3009
REF DESIG/
FIG-KEY
Item Identification
USING UNIT RESPONSIBILITY
NOTE: Using units should refer to the
SL-1-2 and requisition the required
publications to support the Item
identified by the ID number shown on
the cover of this SL-3
BATTERY STORAGE: (Hawker
Armasafe Plus);
PN 9750N7025 CAGE 0WY95
BOOT, Vehicular Components:
PN 61B0050D CAGE 0JKN0
EXTENSION KIT, Pintle:
PN 17-1-8565-1 CAGE 81337
FIBER ROPE ASSEMBLY, Single Leg
(Antenna Tiedown): PN SC-C-208747
CAGE 80063
FIRE EXTINGUISHER:
PN 45100 CAGE 57658
GROUNDING KIT, Surface Wire,
MK-2551 A/U:
PN SC-D-681610 CAGE 80063
INDICATOR, Carbon Monoxide:
PN 900-0233 CAGE 0J0S5
KEYBOARD, Data Entry:
PN 434821-001 CAGE 3EVT6
LADDER, Extension:
PN 7041036-501 CAGE 29381
LIGHT, Panel (Flexible Neck):
PN 18XR-4-LED CAGE 64777
MOUNTING KIT, Shelter:
PN 7047143 CAGE 29381
MOUSE, Data Entry: PN DC172B
CAGE 1HQN9
PLOTTING BOARD: PN EP6036A
CAGE 76381
TIE-DOWN, Cargo, Vehicle:
PN MIL-PRF-71224-1 CAGE 0KHZ6
U/M
Qty
EA
2
EA
1
EA
1
EA
4
EA
1
KT
1
EA
1
EA
2
EA
1
EA
2
EA
1
EA
2
EA
1
EA
4
TM 11862A-OR
APPENDIX D
MOBILE TACTICAL SHELTER INSTALLATION TO VEHICLE
D-1. INTRODUCTION.
The primary reference for performing this action is TM 10-5411-235-13&P Addendum. The secondary references for
performing this action is TB 9-2320-335-13&P, TM 11033-OR, TM 9-2320-387-24, and TM 11033-INP. This
Appendix provides supplemental information not found in the primary and secondary references.
D-2. PRE-INSTALLATION REQUIREMENTS.
Mating the Mobile Tactical Shelter (MTS) to a M1152 prime mover requires tools and parts listed in Tables D-1 through
D-4. Before installing the MTS, assemble the following tools and materials:
Table D-1. Tool List, MTS Installation
Tool
Allen Socket Wrench
Standard Socket 1/4 ”
Standard Socket 3/8 “
Standard Socket 1/2"
Ratchet
Breaker Bar
Adapter
Extension 3/8” drive
Extension 1/2” drive
Wrench Combination
Drill
Drill Bit
Torque Wrench
Screwdriver
Description
5/16”
5/16”, 3/8”
3/8”, 7/16”, 1/2”, 9/16”, 5/8”, 3/4”
7/16”, 1/2”, 9/16”, 5/8”, 3/4”, 3/4” Deep well
1/4” Drive, 3/8” Drive, 1/2” Drive
1/2”
1/2” to 3/8”
6”, 12"
2.5”, 5”
5/16”, 3/8", 7/16", 9/16", 5/8”, 3/4"
Power, Adjustable Chuck
1/4"
10 ft-lbs, 90 ft-lbs
#2 Cross-tip
Table D-2. Major Parts List, MTS Installation
Item
No
1
NSN
CAGE
Part Number
5411-01-581-2654 01365 0820G0000
2
2320-01-540-2007
19207
87T0146
3
4
5411-01-499-5433
81337
29381
17-1-8565-1
7047143
Description
SHELTER EXPANDABLE,
(Mobile Tactical Shelter)
AN/TSQ-272
TRUCK, UTILITY, Expanded
Capacity Enhanced, IAP/Armor
Ready M1152A1 W/B2 Armor
Kit
EXTENSION KIT, Pintle
MOUNTING KIT, Shelter
Qty
1
1
1
1
D-1
TM 11862A-OR
Table D-3. Pintle Extension Kit Parts List
Item
1
2
3
4
5
6
7
8
9
10
11
12
13
14
15
16
17
18
19
NSN
5310-00-809-5998
5310-00-809-4058
5310-00-696-5173
5310-01-016-0720
5305-00-984-6193
5305-01-502-2638
5305-00-071-2078
5305-00-071-2067
5310-00-488-3889
5305-01-016-4344
5310-00-584-5272
5315-00-846-0126
5340-00-057-2906
5310-00-515-8776
5340-01-536-9852
5340-01-500-1208
5340-01-500-1251
5340-01-500-1205
2540-01-500-3206
Nomenclature or Description
WASHER
WASHER
NUT
NUT
SCREW
SCREW
SCREW
SCREW
NUT
SCREW
LOCKWASHER
COTTER PIN
CLAMP
WASHER
CLAMP BRACKET
CLAMP BRACKET
RECEPTACLE BRACKET
PINTLE PLATE
PINTLE EXTENSION
Part Number
MS27183-18
MS27183-10
17-1-6871-2
17-1-6871-1
MS35206-245
B1821BH050C575N
B1821BH050C375N
B1821BH050C125N
MS51943-39
MS51849-95
MS35338-48
MS24665-628
MS21333-73
MS20002-20
17-1-8579-1
17-1-8578-1
17-1-8577-1
17-1-8576-1
17-1-8568-1
Quantity
4
2
6
1
1
4
4
4
12
4
8
1
1
3
2
1
1
1
1
Table D-4. Shelter Mounting Kit Parts List
Item
1
2
3
4
5
6
7
8
9
10
11
12
13
14
15
16
17
18
19
20
21
22
23
24
25
D-2
NSN
5342-01-494-1414
5310-01-493-7690
5310-00-167-0806
5310-01-582-3170
5365-01-423-4059
5305-00-410-6957
5340-01-527-9794
5305-00-021-3620
5310-00-582-5677
5310-00-933-8121
5305-00-576-5417
5310-00-984-7042
5310-01-389-7976
5305-00-208-1429
5305-00-721-5665
5305-00-071-2069
5310-00-584-5272
5310-00-004-3099
5340-01-527-8908
Nomenclature or Description
BRACKET, Rear Mounting
BRACKET, Rear Mounting
ADAPTER, Mounting
ADAPTER, Mounting
ISOLATOR, Mounting Installation
WASHER, Isolator Mount
WASHER, Isolator Mount
WASHER, Flat
NUT, Hex, Self-Locking
SPACER
SCREW, Hex Head
MOUNTING KIT BAR ASSEMBLY
SCREW, Hex Head
WASHER, Flat
WASHER, Lock
SCREW, Hex Head
WASHER, Lock
WASHER, Flat
SCREW, Hex Head
SCREW, Hex Head
SCREW, Hex Head
WASHER, Lock
NUT
BRACKET, Clamping
Deleted
Part Number
7047997-501
7047997-502
7048008-501
7048008-502
17-1-3607-1
17-1-3605-2
17-4-3606-1
NAS1149C0863R
17-2-0488-1
NAS43HT8-156
B1821BH050F475N
17-1-3597-1
MS35307-307
MS15795-810
MS35338-139
MS35307-360
MS35338-141
MS15795-814
MS35307-363
MS35307-361
B1821BH050C150N
M535338-48
MS51967-14
17-1-8245-1
Quantity
1
1
1
1
20*
6
28
38
8
14
14
2
6
6
6
34
42
42
4
4
4
4
4
2
TM 11862A-OR
Table D-4. Shelter Mounting Kit Parts List (Continued)
Item
26
27
28
29
30
31
32
33
34
35
36
37
38
39
NSN
5365-01-527-9273
5310-00-913-8881
5340-01-494-0521
5325-01-493-7956
5305-00-071-2078
Nomenclature or Description
SPACER
NUT
BRACKET, Tail Light
GROMMET
SCREW, Hex Head
ANGLE ASSEMBLY
ANGLE ASSEMBLY
WASHER, Isolator Mount
WASHER, Lock
ADHESIVE, (LOCTITE), Not Provided
BOLT-Machine, Aircraft
SCREW, Hex Head
Deleted
Deleted
TAILLIGHT EXTENSION
INSTALLATION
5310-01-493-7694
5310-01-555-0024
5306-00-579-5702
5305-00-021-3806
40
Part Number
17-1-8243-1
MS51971-3
17-1-8246-1
17-1-6854-1
B1821BH050C375N
7047135-501
7047135-502
17-1-3605-1
MS35338-143
AN0321
AN8C7A
MS35307-413
Quantity
6
4
2
2
8
1
1
10
8
10
7040189-501
2
The following table of supplemental material is provided as additive information to Table D-3 and
Table D-4. Installation step descriptions use supplemental material descriptions where original
technical information was found deficient
Table D-5. Mounting and Pintle Kit Supplemental Material List
Item
Kit
NSN
1
MOUNTING
5305-00-071-2067
2
MOUNTING
5305-00-719-5273
3
PINTLE
5305-00-071-2070
Nomenclature or Description
SCREW, Cap, Hex Head .5 x 1.25
GR 8
SCREW, Cap, Hex Head .5 x 4.25
GR 8
SCREW, Cap, Hex Head .5 x 1.75
GR 8
Part Number
Quantity
B1821BH050C125N
10
B1821BH050F425N
2
B1821BH050C175N
4
Pneumatic tools shall not be used during installation or removal process. Severe damage
to equipment could result.
•
The instruction in this Appendix describes the installation of the MTS to an M1152
HMMWV.
•
Prior to performing installation procedures, inventory kits per this Appendix.
D-3. VEHICLE PREPARATION.
1.
Move vehicle to assigned integration work area.
2.
Ensure vehicle transmission is in park and parking brake is set.
3.
Turn off vehicle.
D-3
TM 11862A-OR
4.
Place wheel chocks in front of and behind vehicle wheel. 0.
D-4. PREPARING THE M1152.
Figure D-1. Batteries Under Curbside Seat
To prevent damage to equipment, lubricate all screws and bolts prior to installation and
removal.
a. Vehicle Preparation
(1) Refer to Figure D-1 to view batteries located under curbside seat.
(2) Remove curbside seat from vehicle by unlatching two front seat latches.
(3) Slide seat out of rear bracket groove and remove from vehicle.
(4) Using a 1/2 inch wrench, disconnect negative cable, then positive cable from battery posts.
(5) Cover cable terminals with a non-conductive material.
(6) Disconnect cable from Single Channel Ground-to-Air Radio System (SINCGARS) antenna located on
curbside wheel well.
(7) Using a 1/2 inch socket with 3/8 inch drive ratchet remove SINCGARS antenna assembly from curbside
wheel well.
D-4
TM 11862A-OR
Figure D-2. Connector Flush with Grommet
(8) Push excess antenna cable back into wheel well until connector is flush with grommet (refer to Figure D-2).
(9) Repeat steps (6) through (8) if antenna is installed on roadside wheel well.
(10) Using two 9/16 inch sockets, two 3/8 inch drive ratchets, and one 3/8 inch drive extension (12 inches),
remove tailgate by removing six 3/8 inch-16 x 1-3/4 inch hex cap screws from hinges.
(11) Retrieve hinge spacers, located between hinge and truck bed, when removing door.
Figure D-3. Rear Mudflaps
(12) Using a 3/4 inch wrench and 3/4 inch socket with 1/2 inch drive ratchet, remove both rear mudflaps (refer
to Figure D-3). Retain for reuse to install rear vehicle shelter mount. Refer to TB 9-2320-335-13&P.
D-5
TM 11862A-OR
(13) Using a 3/4 inch wrench and 3/4 inch socket with 1/2 inch drive ratchet, remove two outboard screws next
to bumper lift hooks. Retain for reuse to install rear vehicle shelter mount.
(14) Remove roadside troop door by lifting door out of hinges.
Figure D-4. Roadside Upper Troop Seat Bracket
(15) Using a 1/2 inch socket with 3/8 inch drive ratchet, remove roadside upper troop seat bracket
(refer to Figure D-4).
(16) Using a 1/2 inch socket, 7/16 inch socket, and 3/8 inch drive ratchet, remove roadside lower troop seat
bracket.
(17) Reinstall mounting hardware (it is used to support armor plating).
(18) Using a 9/16 inch socket with 1/2 inch drive ratchet, loosen top door hinge screw.
(19) Using a 9/16 inch socket with 1/2 inch drive ratchet, remove remaining four hinge screws and remove
hinge.
(20) Reinstall five mount screws.
(21) Repeat steps (10) through (15) for curbside vehicle preparation.
D-6
TM 11862A-OR
Figure D-5. Floor Panel Quick Release Knobs
(22) Remove roadside and curbside rear-cab floor panels by disconnecting quick release knobs on each panel
(refer to Figure D-5). Refer to TB 9-2320-335-13&P.
Figure D-6. Armor Access Panels
(23) From the interior of vehicle, use a 7/16 inch socket and 1/4 inch drive ratchet to remove armor access
panels located behind roadside and curbside seats (refer to Figure D-6).
(24) Bag and retain hardware for reinstallation.
D-7
TM 11862A-OR
Figure D-7. Armor Panel Mounting Frame
(25) Remove plastic insert caps in holes along frame where armor panels are installed (refer to Figure D-7).
(26) Using a 1/4 inch bit, drill out rivets to remove Zeus fasteners attached to frame (refer to Figure D-7).
Hex nuts are located in interior of vehicle under support beams behind roadside and curbside seats.
(27) Using a 5/16 inch hex socket and a 3/4 inch wrench, remove two D-rings in forward end of rear cab.
APPENDIX
D-5. REMOVING REAR TAILLIGHTS.
Figure D-8. Taillight Removal
D-8
TM 11862A-OR
a. Removing Rear Taillights
(1) From interior wheel well, using a 9/16 inch wrench with 3/8 inch drive ratchet, remove two hex cap screws
attaching taillights to cover (refer to Figure D-8).
Figure D-9. Cable Guard
(2) Using a 5/16 inch wrench and 5/16 socket with 1/4 drive ratchet, remove inboard P-clamp securing cables
to cable guard. (refer to Figure D- 9)
(3) Discard cover guard and associated hardware.
Table D-6. Taillight Wire Numbers
Left Rear
Wire #
Harness #
21C
P-1
Right Rear
Wire #
Harness #
21E
P-1
224/61B
23B
24B
224/60C
23D
24C
P-2
P-3
P-4
P-2
P-3
P-4
(4) When disconnecting taillight cables from cable harness, annotate wire numbers and retain information for
reconnection (refer to Table D-6).
(5) Disconnect taillight from wire harness and remove light assembly.
(6) Reinstall mount screws and grounding plate on back of light and set aside for later reinstallation.
APPENDIX
D-6. INSTALLING THE PINTLE EXTENSION.
a. Pintle Extension
(1) Remove cotter pin from pintle using needle-nose pliers.
D-9
TM 11862A-OR
Figure D-10. Removing Pintle from Bracket
(2) Remove castellated nut and slide pintle out of bracket (refer to Figure D-10).
Figure D-11. Pintle Bracket and Receptacle Cover Removed
(3) Using a 3/4 inch wrench and 3/4 inch socket with 1/2 inch drive ratchet, remove four hex cap screws
attaching pintle bracket to reinforcement plate (refer to Figure D-11).
(4) Using a 7/16 inch wrench and 7/16 inch socket with 1/4 inch drive ratchet, remove power receptacle cover
from bumper.
(5) Using a 3/4 inch wrench and 3/4 inch socket with 1/2 inch drive ratchet, remove four hex cap screws
attaching reinforcement plate to bumper.
(6) Leave two upper screws in place to prevent plate from dropping and remove two lower screws.
(7) Firmly hold plate and remove two upper screws.
All hardware for build-up of pintle extension will be provided in Extension Kit,
Pintle (PN 17-1-8565).
D-10
TM 11862A-OR
Figure D-12. Extension Arm and Hardware
(8) Install pintle on pintle extension from Extension Kit, Pintle (PN 17-1-8565) using the following hardware
(refer to Figure D-12):
•
•
•
•
•
•
•
Screw (4 ea) PN B1821BH050C375N
Washer (4 ea) PN MS 27183-18
Washer (4 ea) PN MS 35338-48
Nut (4 ea) PN MS 51943-39
Washer (3 ea) PN MS 20002-20
Pintle Plate(1 ea) PN 17-1-8576-1
Cotter Pin (1 ea) PN MS 24665-628
(9) Install four Washer (PN MS 27183-18) on screws.
(10) Insert screws through existing spacer plate and through existing safety chain bracket.
Existing safety
chain bracket
Existing spacer
plate
Figure D-13. Pintle Bracket Assembly Attached to Pintle Extension
(11) Attach pintle bracket assembly onto pintle extension (refer to Figure D-13).
D-11
TM 11862A-OR
Figure D-14. Pintle Plate
(12) On backside of Pintle Extension (PN 17-1-8586-1), install new Pintle Plate (PN 17-1-8576-1) (refer to
Figure D-14).
(13) Apply a thin coat of MIL-G-10924 grease to shank of towing pintle assembly.
Figure D-15. Pintle Inserted in Bracket
(14) Using three Washers (PN MS20002-20), original flat washer, original castellated nut, and new cotter pin,
insert pintle through bracket and hand tighten only (refer to Figure D-15).
(15) Using four Lock Washers (PN MS35338-48) and four Nuts (PN MS51943-39), secure bracket to pintle
extension.
(16) Using a 3/4 inch wrench and 3/4 inch socket with 1/2 inch drive ratchet, tighten four bracket screws.
(17) Using a 90 ft-lb torque wrench, torque the screws.
D-12
TM 11862A-OR
Figure D-16. Power Receptacle and Cover on New Receptacle Bracket
(18) Using four Screws (PN MS51849-95) and four 1/4 inch-20 Nuts (PN 17-1-6871-2), attach power
receptacle and cover to new Receptacle Bracket (PN 17-1-8577-1) (refer to Figure D-16).
(19) Using a 7/16 inch wrench and 7/16 inch socket with 1/4 inch drive ratchet, tighten hardware.
(20) Using two original mount screws, mount bracket to existing inboard receptacle mount holes. Do not
install hex nut at this time.
(21) Using two new Washers (PN MS27183-10) and Nuts (PN 501-250800-00), install Clamp Bracket
(PN 17-1-8578-1) on backside of two mount screws, and then secure both brackets.
Clamp Bracket
Figure D-17. Receptacle Cable Secured to Clamp Bracket
(22) Using one Clamp (PN MS21333-73), one Screw (PN MS35206-245), and one Nut (PN 17-1-6871-1),
secure receptacle cable to clamp bracket (refer to Figure D-17).
(23) Using #2 cross-tip screwdriver and 3/8 inch socket with 1/4 inch drive ratchet, tighten hardware.
(24) Align pintle extension with holes where reinforcement plate was installed.
D-13
TM 11862A-OR
Figure D-18. Pintle Extension Secured to Bumper
(25) Using four Screws (PN B1821BH050C575N), four Washers (PN MS 27183-18), four Washers (PN
MS35338-48), two Clamp Brackets (PN 17-18579-1), and four Nuts (PN MS51943-39), secure pintle extension to
bumper (refer to Figure D-18).
(26) Install clamp brackets on front side of pintle extension mount holes.
(27) Using a 3/4 inch wrench and 3/4 inch socket with 1/2 inch drive ratchet, tighten hardware, and then use a
torque wrench to torque screws to 90 ft-lbs.
(28) Install four Screws (PN B1821BH050C175N), original flat washers, and four Nuts
(PN MS51943-39) in original pintle mounting location.
(29) Using a 3/4 inch wrench and 3/4 inch socket with 1/2 inch drive ratchet, tighten hardware and, using a
torque wrench, torque screws to 90 ft-lbs. APPENDIX
D-7. MOUNTING MTS TO VEHICLE.
a. Mounting Taillight to Clamping Bracket
(1) Obtain parts required to mount taillight assembly to clamping bracket and mount bracket
(refer to Figure D-19).
D-14
TM 11862A-OR
Figure D-19. Taillight and Rear Mounting Hardware
(2) Orient taillight assembly so that wires are down (refer to Figure D-19).
(3) Using a 9/16 inch socket and 3/8 inch drive ratchet, remove two Screw, Hex Head (PN MS 35307-363)
from taillight assembly.
Figure D-20. Taillight, Grounding Plate, and Clamping Bracket
(4) Using two hex cap screws, attach Bracket, Clamping (PN 17-1-8245-1) to the back of taillight assembly on
top of ground plate (refer to Figure D-20).
D-15
TM 11862A-OR
Taillight
Wire
Routing
Attach Ground
Wire under Hex
Head
Figure D-21. Wire Routing through Rear Mounting Bracket
(5) Feed taillight assembly wires through hole in mounting bracket while feeding ground wire of Taillight
Extension Installation (PN 7040189-501) through hole in opposite direction (refer to Figure D-21).
(6) Remove hex cap screw from clamping bracket and insert through the eyelet of ground wire attaching it to
the taillight assembly through the clamping bracket.
(7) Using a 9/16 inch socket with 3/8 inch drive ratchet secure the assembly.
Figure D-22. Taillight Mounted to Mounting Bracket
(8) Using two Screw, Hex Head (PN MS35307-363), four Washer, Flat (PN MS15795-814), two Washer, Lock
(PN MS 35338-141), and two Nuts (PN 13218E0320-293), mount taillight assembly to mounting bracket (refer to Figure
D-22).
(9) Using a 9/16 inch wrench and 9/16 inch socket with 6-inch extension and 3/8 inch drive ratchet, tighten
taillight assembly.
D-16
TM 11862A-OR
Figure D-23. Grommet Installed in Rear Mounting Bracket
(10) Make a single cut in Grommet (PN 17-1-6854-1) and wrap around taillight assembly wires and ground
wire (refer to Figure D-23).
(11) Insert grommet into mounting bracket hole that wires are routed through (refer to Figure D-23).
b. Mounting Left and Right Rear Mounting Brackets to Bumper.
Install hex cap screws from rear to front. Do not tighten at this time
D-17
TM 11862A-OR
Figure D-24. Clamp Bracket Installed on Mounting Bracket
(1) Using two Screw, Hex Head (PN B1821BH050C150N), two Washer, Flat (PN NAS1149C0863R), two
Washer, Lock (PN MS35338-48), and Nuts (PN MS51967-14), install Bracket, Clamping (PN 17-1-8245-1) to mounting
bracket (refer to Figure D-24).
(2) Position left and right rear mount brackets toward the outside edge of rear bumper.
Left Side
Right Side
Figure D-25. Attaching Left and Right Rear Mount Brackets to Bumper
(3) Secure left and right rear mount brackets to vehicle bumper by inserting eight Screw, Hex Head
(PN B1821BH050C375N) through mount brackets into the bumper assembly (refer to Figure D-25). Reuse existing
eight washers and nuts previously removed.
(4) On left and right sides of reverse side of bumper, install eight previously removed flat washers and eight
plain nuts. Tighten hardware using 3/4 inch wrench and 3/4 inch socket with 1/2 inch drive.
D-18
TM 11862A-OR
Figure D-26. Securing Rear Bracket to Bumper
(5) Using a 3/4 inch socket, 3/8 inch drive ratchet, and a 3/4 inch wrench, secure clamp bracket to bumper
(refer to Figure D-26).
•
Electrically safe lubricant spray or silicone grease may be used to ease connection of taillight
wires to pigtail extension.
•
Ground wires are extremely long. After connection, ensure ground wires do not hang from
vehicle. (Secure to existing harness using tie straps).
Figure D-27. Connection of Taillight and Vehicle Ground Wires
D-19
TM 11862A-OR
Table D-7. Taillight Wire Numbers
Left Rear
Wire #
Harness #
21C
J-1
224/61B
J-2
23B
J-3
24B
95B
J-4
J-5
Right Rear
Wire #
Harness #
21E
J-1
224/60C
J-2
23D
J-3
24C
95F
J-4
J-5
(6) Connect taillight wiring to taillight extension pigtail (refer to Figure D-27 and Table D-7).
(7) Using a #3 cross-tip screwdriver and 9/16 inch wrench, connect taillight ground wires (labeled J5 GRD)
from taillight extension pigtail to vehicle ground wires (labeled 95B/95F) (refer to Figure D-27).
Figure D-28. Reinstallation of Inboard Cable Clamp to Cable Guard
(8) Using 5/16 wrench and 5/16 socket with 1/4 inch drive ratchet reinstall inboard cable clamp to cable guard
to secure wiring. Use tie straps to secure remaining slack to vehicle harness (refer to Figure D-28).
D-20
TM 11862A-OR
c. Installing Mounting Components to rear of MTS.
ENSURE THAT MTS IS PROPERLY POSITIONED ON A SUPPORT
STRUCTURE CAPABLE OF SUPPORTING 2200 LBS. ENSURE THAT
LOAD TEST INSPECTION DATE ON STAND IS CURRENT. FAILURE TO
OBSERVE SAFETY PROCEDURES WHEN WORKING UNDER THE MTS
COULD RESULT IN INJURY OR DEATH.
Figure D-29. MTS Prepared for Installation on Vehicle
(1) Refer to Figure D-29 to view MTS preparation for installation on vehicle.
Figure D-30. Left and Right rear Mounting Brackets
(2) Obtain Bracket, Rear Mounting (PN 7047997-501 and PN 7047997-502) required to mount rear end of
MTS to bumper (refer to Figure D-30).
D-21
TM 11862A-OR
Hex Head Screw
Flat Washer
Figure D-31. Installation of Rear Mounting Screws into Rear Mounting Bracket
(3) Insert one Screw, Hex Head (PN B1821BH050F475N) and one Washer, Flat (PN NAS1149C0863R)
through each round opening of the left and right rear mounting brackets (refer to Figure D-31).
(4) Insert one Washer, Isolator Mount (PN 17-1-3606-1) into middle of rear mounting bracket with each
previously installed hex cap screw going through it (refer to Figure D-31).
Figure D-32. Rear MTS Thread Protectors
(5) Remove thread protectors on left and right sides of MTS (refer to Figure D-32).
Remove all paint and sealer from any rivet head that may come into contact with rear mounting
bracket. Remove any hardware from bottom rear surface of the MTS.
D-22
TM 11862A-OR
Figure D-33. Upper Side Mounting Bracket Hardware Location
Figure D-34. Lower Side Mounting Bracket Hardware Location
(6) Using three Screw, Hex Head (PN MS35307-307), three Washer, Lock (PN MS35338-139), and three
Washer, Flat (PN MS15795-810), mount left and right rear mounting brackets to MTS (refer to Figure D-33 and Figure
D-34).
Lubricate each hex cap screw prior to inserting into shelter.
(7) Using a 7/16 inch socket and 3/8 inch drive ratchet, secure mounting brackets to MTS. Leave loose enough
for adjustments during install.
(8) Install three Screw, Hex Head (PN MS35307-360), three Washer, Flat (PN MS 15795-810), and three
Washer, Lock (PN MS35338-139) along bottom edge of mounting bracket (refer to Figure D-34).
D-23
TM 11862A-OR
(9) Using a 9/16 inch socket and 3/8 inch drive ratchet, secure hardware to mounting bracket. Leave loose
enough to make adjustments during install.
Figure D-35. Rear Mounting Bracket Underside Installation Location
(10) Install 14 Screw, Hex Head (PN MS35307-360), 14 Washer, Lock (PN MS35338-141), and 14 Washer,
Flat (PN MS 15795-814) into underside of rear mounting bracket (refer to Figure D-35). Leave loose enough to make
adjustments during install.
Figure D-36. Isolation Mount Washer Placement
(11) Insert one Washer, Isolator Mount (PN 17-1-3605-2) into the holes of the rear mount brackets
(refer to Figure D-36).
D-24
TM 11862A-OR
Figure D-37. Rear Installation Mounting Isolator Placement
(12) Position one Isolator, Mounting Installation (PN 17-1-3607-1) on top of each isolation mount washer
(refer to Figure D-37).
d. Installing Front Mounting Components
Figure D-38. Front Angle Assemblies and Placement Location
(1) Obtain left Angle Assembly (PN 704135-501) and right Angle Assembly (PN 704135-502). Refer to Figure
D-38.
(2) Clear area around vehicle mount beam in roadside compartment.
D-25
TM 11862A-OR
Figure D-39. Removal of Turn-lock Fasteners
(3) Using a drill with 1/4 inch drill bit, remove two turn-lock fasteners on left and right side of vehicle beam
assembly (refer to Figure D-39).
(4) Tap remainder out with ball peen hammer and center punch.
(5) Remove thread protectors from front of MTS and eight plugs from underneath.
Figure D-40. Positioning Front Angle Assemblies
(6) Position left and right angle assemblies on the vehicle beam with no hardware attached
(refer to Figure D-40).
TO PREVENT INJURY OR DEATH TO PERSONNEL, ENSURE HOOKS OF
THE LIFTING DEVICE ARE INSPECTED AND SECURELY ATTACHED
BEFORE LIFTING MTS. SLINGS AND HOISTS MUST BE PROPERLY
CERTIFIED. USE OF AN UNCERTIFIED SLING OR A SLING THAT IS
NOT CURRENTLY CERTIFIED MAY RESULT IN EQUIPMENT DAMAGE
OR SEVERE INJURY OR DEATH TO PERSONNEL.
(7) Raise MTS off applicable platform using approved lifting device.
D-26
TM 11862A-OR
(8) Using lifting device, adjust height of MTS to enable positioning of vehicle.
Figure D-41. Positioning Rear Mount Screws over Bracket Holes
(9) Position vehicle so that rear MTS mount screws are located over their respective rear mount bracket holes
and mounting hardware (refer to Figure D-41).
Do not allow rear of MTS to fully rest on rear mount brackets.
(10) Lower MTS and guide rear mount screws into isolator and isolator washers and their respective rear
mount bracket holes.
Figure D-42. Inserting Front Angle Assemblies between MTS and Armor Plate
(11) Continue lowering MTS and make adjustments to allow front mount bracket to be inserted between armor
plate, bed of vehicle, and vehicle beam (refer to Figure D-42).
(12) Allow MTS to fully rest on rear mount brackets with mount screws going through mounting isolator,
washer and rear mounting bracket.
D-27
TM 11862A-OR
Figure D-43. Installation of Spacer Sleeve
(13) Insert Spacer (PN NAS43HT8-156) onto each mount screw and push up inside of isolator
(refer to Figure D-43).
Figure D-44. Installation of Upper Isolator Washer
(14) Position upper isolator washer onto mount screw and slide up onto isolator (refer to Figure D-44).
D-28
TM 11862A-OR
Spacer
Sleeve
Figure D-45. Inserting Spacer into Lower Isolation Washer
(15) Insert Spacer (PN 17-1-8243-1) into lower isolator washer (refer to Figure D-45).
Figure D-46. Installation of Lower Isolation Washer with Spacer
(16) Install second isolation washer with spacer onto mount screw (refer to Figure D-46).
D-29
TM 11862A-OR
Figure D-47. Installation of Isolation Flat Washer
(17) Install Washer, Isolator Mount (PN 17-1-3606-1) onto mount screw (refer to Figure D-47).
(18) Install Washer, Flat (PN NAS1149C0863R) and Nut, Hex, Self-Locking (PN 17-2-0488-1) onto mount
screw.
(19) Secure using a 3/4 inch socket with 3/8 drive ratchet and 3/4 inch wrench.
Figure D-48. Rear Mounting Parts Breakdown
(20) Inspect parts to ensure proper order of assembly upon completion (refer to Figure D-48).
(21) Adjust height of MTS to line up holes of mount bracket to holes of MTS.
D-30
TM 11862A-OR
Figure D-49. Front Angle Assemblies Installation
(22) Using 10 Screw, Hex Head (PN 35307-413) coated with lock tight, 10 Washer, Flat (PN 1149C0863R),
and 10 Washer, Lock (PN 35338-143), attach left and right angle assemblies to the front of MTS
(refer to Figure D-49).
(23) Secure using a 3/4 inch deep well socket and 1/2 inch drive ratchet. Leave loose enough to make
adjustments during install.
Left Side View
Right Side View
Figure D-50. Front Angle Assemblies Underside Hardware
(24) Insert eight 1/2 x 20 Bolt-Machine, Aircraft (PN AN8C7A) and 1/2 inch flat washers into bottom
underside of front mount bracket (refer to Figure D-50).
D-31
TM 11862A-OR
Figure D-51. MTS Mounting Bolts
(25) Tighten hardware using a 3/4 inch socket with 3/8 inch drive ratchet (refer to Figure D-51).
•
No flat washer goes under the inside isolator.
•
To assist in installation, the mounting screws can be inserted through the spacer sleeve,
isolator washer, isolator, and flat washer to keep the mounting hardware aligned while
lowering the bracket.
Figure D-52. Front Angle Assemblies Hardware
(26) Position three flat washers, four isolators, four spacer sleeves, and four isolation washers onto left side and
right side of forward vehicle beam (refer to Figure D-52).
D-32
TM 11862A-OR
Figure D-53. Front Angle Assemblies Resting on Hardware
(27) Adjust position and height of MTS allowing the angle assemblies to rest on the hardware installed in step
(16), ensuring that the edge of the isolation washers go through the round holes of the angle assemblies (refer to Figure
D-52).
(28) With left and right angle assemblies resting on mounting hardware, lower MTS to a point where there is
no tension left on the lifting device (refer to Figure D-53). MTS should now be resting on vehicle.
Do not disconnect lifting device at this time. Adjustments may need to be made to ensure that all
hardware is properly mounted.
(29) Ensure that bracket is fully resting on mounting hardware and that isolator washer edges are aligned in
bracket holes.
(30) If installed, remove mounting screws from mounting hardware.
(31) Install isolation mount washer through bracket hole onto male isolator.
(32) Install flat washer on top of isolation mount washer.
(33) Insert hex screw through upper and lower mounting hardware, bracket, and vehicle beam.
D-33
TM 11862A-OR
Figure D-54. Mounting Kit Bar Installation
(34) Back out left bolt on roadside in transmission control module compartment.
(35) Position mounting kit bar under vehicle beam with holes matching the three outermost hex screws
(refer to Figure D-54).
Figure D-55. Tightening Front Angle Assemblies Hardware
(36) Thread mounting hex screws into the mounting kit bar and tighten with a 3/4 inch socket and 3/8 inch
ratchet (refer to Figure D-55).
(37) Use a 3/4 inch wrench, 3/4 inch socket, and 1/2 inch drive ratchet to secure innermost hex screw with Nut,
Hex, Self-Locking (PN 17-2-0488-1) and 1/2 inch flat washer.
(38) Tighten the left bolt on roadside in transmission control module compartment that was loosened in step
(32).
(39) Make final adjustments to all mounting hardware and ensure that MTS is properly positioned.
(40) Tighten front and rear isolator mounting screws, 8 to 10 ft-lbs, using a certified torque wrench.
(41) Using a certified torque wrench, tighten machine screws on front and bottom side of front mounting
bracket 8 to 10 ft-lbs.
(42) Install armor plating behind roadside and curbside seats attaching four 1/4-20 bolts, four 1/4 inch flat
washers, and four 1/4 inch lock washers.
D-34
TM 11862A-OR
(43) Secure using a 7/16 inch socket and 1/4 inch drive ratchet
Seat Latches
Figure D-56. Installation of Curbside Seat
(44) Install roadside and curbside seats in vehicle cab by inserting rear of each seat into groove behind battery
and securing seat with latches on front of seat mount (refer to Figure D-56).
(45) Connect all VIP cables (refer to paragraph 3-5 a.)
(46) Using a 5/8 inch wrench, connect grounding straps to MTS and HMMWV.
Figure D-57. Connect Grounding straps to MTS and Vehicle
(47) Connect W226 cable into vehicle power outlet and J2 of MTS.
D-35/(D-36 blank)
TM 11862A-OR
APPENDIX E
MOBILE TACTICAL SHELTER REMOVAL FROM VEHICLE
E-1. INTRODUCTION.
The primary reference for performing this action is TM 10-5411-235-13&P Addendum. The secondary references for
performing this action are TB 9-2320-335-13&P, TM 11033-OR, TM 9-2320-387-24, and TM 11033-INP. This
Appendix provides supplemental information not found in the primary and secondary references.
E-2. PREPARATION REQUIREMENTS.
Removing the Mobile Tactical Shelter (MTS) from a M1123 vehicle requires tools and parts listed in Tables D-1 through
D-4. Before removing the MTS, assemble the following tools and be prepared to bag and tag kit materials:
Table E-1. Tool List, MTS Removal
Tool
Allen Socket Wrench
Standard Socket 1/4 ”
Standard Socket 3/8 “
Standard Socket 1/2"
Ratchet
Extension 3/8” drive
Breaker Bar
Adapter
Extension 1/2” drive
Wrench Combination
Drill
Drill Bit
Torque Wrench
Screwdriver
Description
5/16”
5/16”, 3/8”
3/8”, 7/16”, 1/2”, 9/16”, 5/8”, 3/4”
7/16”, 1/2”, 9/16”, 5/8”, 3/4”, 3/4” Deep well
1/4” Drive, 3/8” Drive, 1/2” Drive
6”, 12"
1/2 ”
1/2” to 3/8”
2.5”, 5”
5/16”, 3/8", 7/16", 9/16", 5/8”, 3/4"
Power, Adjustable Chuck
1/4"
10 ft-lbs, 90 ft-lbs
#2 Cross-tip
Table E-2. Major Parts List, MTS Removal
Item
No
1
NSN
CAGE
Part Number
5411-01-581-2654 01365 0820G0000
2
2320-01-540-2007
19207
87T0146
3
4
5411-01-499-5433
81337
29381
17-1-8565-1
7047143
Description
SHELTER
EXPANDABLE, (Mobile
Tactical Shelter)
AN/TSQ-272
TRUCK, UTILITY,
Expanded Capacity
Enhanced, IAP/Armor
Ready M1152A1 W/B2
Armor Kit
EXTENSION KIT, Pintle
MOUNTING KIT, Shelter
Qty
1
1
1
1
E-1
TM 11862A-OR
Table E-3. Pintle Extension Kit Parts List
Item
1
2
3
4
5
6
7
8
9
10
11
12
13
14
15
16
17
18
19
NSN
5310-00-809-5998
5310-00-809-4058
5310-00-696-5173
5310-01-016-0720
5305-00-984-6193
5305-01-502-2638
5305-00-071-2078
5305-00-071-2067
5310-00-488-3889
5305-01-016-4344
5310-00-584-5272
5315-00-846-0126
5340-00-057-2906
5310-00-515-8776
5340-01-536-9852
5340-01-500-1208
5340-01-500-1251
5340-01-500-1205
2540-01-500-3206
Nomenclature or Description
WASHER
WASHER
NUT
NUT
SCREW
SCREW
SCREW
SCREW
NUT
SCREW
LOCKWASHER
COTTER PIN
CLAMP
WASHER
CLAMP BRACKET
CLAMP BRACKET
RECEPTACLE BRACKET
PINTLE PLATE
PINTLE EXTENSION
Part Number
MS27183-18
MS27183-10
17-1-6871-2
17-1-6871-1
MS35206-245
B1821BH050C575N
B1821BH050C375N
B1821BH050C125N
MS51943-39
MS51849-95
MS35338-48
MS24665-628
MS21333-73
MS20002-20
17-1-8579-1
17-1-8578-1
17-1-8577-1
17-1-8576-1
17-1-8568-1
Quantity
4
2
6
1
1
4
4
4
12
4
8
1
1
3
2
1
1
1
1
Table E-4. Shelter Mounting Kit Parts List
Item
1
2
3
4
5
6
7
8
9
10
11
12
13
14
15
16
17
18
19
20
21
22
23
24
25
E-2
NSN
5342-01-494-1414
5310-01-493-7690
5310-00-167-0806
5310-01-582-3170
5365-01-423-4059
5305-00-410-6957
5340-01-527-9794
5305-00-021-3620
5310-00-582-5677
5310-00-933-8121
5305-00-576-5417
5310-00-984-7042
5310-01-389-7976
5305-00-208-1429
5305-00-721-5665
5305-00-071-2069
5310-00-584-5272
5310-00-004-3099
5340-01-527-8908
Nomenclature or Description
BRACKET, Rear Mounting
BRACKET, Rear Mounting
ADAPTER, Mounting
ADAPTER, Mounting
ISOLATOR, Mounting Installation
WASHER, Isolator Mount
WASHER, Isolator Mount
WASHER, Flat
NUT, Hex, Self-Locking
SPACER
SCREW, Hex Head
MOUNTING KIT BAR ASSEMBLY
SCREW, Hex Head
WASHER, Flat
WASHER, Lock
SCREW, Hex Head
WASHER, Lock
WASHER, Flat
SCREW, Hex Head
SCREW, Hex Head
SCREW, Hex Head
WASHER, Lock
NUT
BRACKET, Clamping
Deleted
Part Number
7047997-501
7047997-502
7048008-501
7048008-502
17-1-3607-1
17-1-3605-2
17-4-3606-1
NAS1149C0863R
17-2-0488-1
NAS43HT8-156
B1821BH050F475N
17-1-3597-1
MS35307-307
MS15795-810
MS35338-139
MS35307-360
MS35338-141
MS15795-814
MS35307-363
MS35307-361
B1821BH050C150N
M535338-48
MS51967-14
17-1-8245-1
Quantity
1
1
1
1
20*
6
28
38
8
14
14
2
6
6
6
34
42
42
4
4
4
4
4
2
TM 11862A-OR
Table E-4. Shelter Mounting Kit Parts List (Continued)
Item
26
27
28
29
30
31
32
33
34
35
36
37
38
39
NSN
5365-01-527-9273
5310-00-913-8881
5340-01-494-0521
5325-01-493-7956
5305-00-071-2078
5310-01-493-7694
5310-01-555-0024
5306-00-579-5702
5305-00-021-3806
40
Nomenclature or Description
SPACER
NUT
BRACKET, Tail Light
GROMMET
SCREW, Hex Head
ANGLE ASSEMBLY
ANGLE ASSEMBLY
WASHER, Isolator Mount
WASHER, Lock
ADHESIVE, (LOCTITE), Not Provided
BOLT-Machine, Aircraft
SCREW, Hex Head
Deleted
Deleted
TAILLIGHT EXTENSION
INSTALLATION
Part Number
17-1-8243-1
MS51971-3
17-1-8246-1
17-1-6854-1
B1821BH050C375N
7047135-501
7047135-502
17-1-3605-1
MS35338-143
AN0321
AN8C7A
MS35307-413
Quantity
6
4
2
2
8
1
1
7040189-501
10
8
10
2
The following table of supplemental material is provided as additive information to Table E-3 and
Table E-4. Removal step descriptions use supplemental material descriptions where original technical
information was found deficient
Table E-5. Mounting and Pintle Kit Supplemental Material List
Item
Kit
NSN
1
MOUNTING
5305-00-071-2067
2
MOUNTING
5305-00-719-5273
3
PINTLE
5305-00-071-2070
Nomenclature or Description
SCREW, Cap, Hex Head .5 x 1.25
GR 8
SCREW, Cap, Hex Head .5 x 4.25
GR 8
SCREW, Cap, Hex Head .5 x 1.75
GR 8
Part Number
Quantity
B1821BH050C125N
10
B1821BH050F425N
2
B1821BH050C175N
4
Pneumatic tools shall not be used during installation or removal process. Severe damage to
equipment could result.
•
The instruction in this Appendix describes the removal of the MTS to an M1152 HMMWV.
•
Prior to performing removal procedures, inventory removed kit parts per this Appendix.
E-3
TM 11862A-OR
E-3. REMOVAL OF MTS FROM VEHICLE.
a. Preparation for Removal of MTS
•
ENSURE THAT MTS IS PROPERLY POSITIONED TO A LIFTING
APPARATUS CAPABLE OF SUPPORTING 2200 LBS. ENSURE
THAT LOAD TEST INSPECTION DATE ON STAND IS CURRENT.
FAILURE TO OBSERVE SAFETY PROCEDURES COULD RESULT
IN INJURY OR DEATH.
•
TO PREVENT INJURY OR DEATH TO PERSONNEL, ENSURE
HOOKS OF LIFTING DEVICE ARE INSPECTED AND SECURELY
ATTACHED BEFORE LIFTING MTS. SLINGS AND HOISTS MUST
BE PROPERLY CERTIFIED. USE OF AN UNCERTIFIED SLING,
OR A SLING THAT IS NOT CURRENTLY CERTIFIED, MAY
RESULT IN EQUIPMENT DAMAGE OR SEVERE INJURY OR
DEATH TO PERSONNEL.
Figure E-1. Positioning of Vehicle and Equipment
E-4
TM 11862A-OR
To prevent damage to equipment, lubricate all screws and bolts prior to installation and
removal.
(1) Move vehicle to assigned integration work area.
(2) Ensure vehicle transmission is in neutral and parking brake is set.
(3) Turn off vehicle.
(4) Place wheel chocks in front of and behind vehicle wheel (refer to Figure E-1).
(5) Attach certified lifting device to MTS assembly (refer to Figure E-1).
(6) Ensure all cables are disconnected from the VIP.
Figure E-2. Ground Strap Removal
(7) Ensure W226 cable is disconnected from the MTS and HMMWV.
(8) Ensure grounding straps between vehicle and shelter are removed using a 5/8 inch wrench.
E-5
TM 11862A-OR
Figure E-3. Curbside Seat Removal
(9) Remove curbside seat from vehicle by unlatching two front seat latches (refer to Figure E-3).
(10) Lift and slide seats out of rear bracket groove and remove from vehicle.
Figure E-4. Removal of Armor Plating
(11) Using a 7/16 inch socket and 1/4 inch drive ratchet, remove armor plating behind roadside and curbside
seats (refer to Figure E-4).
(12) Bag and retain all kit hardware for later reinstallation.
(13) Using a 3/4 inch socket and 3/8 inch drive ratchet, remove mounting screws, flat washer, large flat
washer, and upper isolator on roadside and curbside front mounting brackets.
(14) Using a 3/4 inch wrench, 3/4 inch socket, and 1/2 inch drive ratchet, remove innermost hex screw with
Nut, Hex, Self-Locking (PN 17-2-0488-1) and1/2 inch flat washer.
E-6
TM 11862A-OR
Figure E-5. Removal of Front Mounting Bracket Upper Hardware
(15) Remove and retain machine screws from curbside and roadside front mounting brackets. Bracket
cannot be removed. (refer to Figure E-5).
Figure E-6. Front Mount Bracket Underside Hardware
E-7
TM 11862A-OR
Remove
Hardware
Figure E-7. Removal of Front Mounting Hardware from Vehicle Beam
(16) Remove mounting kit bar from under vehicle beam (refer to Figure E-6).
(17) Raise MTS sufficiently to remove remaining hardware on vehicle beam (refer to Figure E-7).
Figure E-8. Removal of Front Mounting Bracket Hardware
(18) Using 3/4 inch deep well socket, 3/8 inch drive ratchet, and 12-inch extension, lower MTS sufficiently
to gain access to upper machine screws to remove front mount brackets from front of MTS (refer to Figure E-8).
(19) Remove 10 Screw, Hex Head (PN 35307-413), 10 Washer, Flat (PN 1149C0863R) and 10 Washer,
Lock (PN 35338-143) to remove front mounting bracket and retain hardware.
(20) Use a 3/4 inch socket, 3/8 inch drive ratchet, and 3/4 inch wrench to remove nut, flat washer, large flat
washer, upper and lower isolators on bottom of roadside and curbside rear mounting adaptors.
E-8
TM 11862A-OR
Ensure MTS has been lifted off vehicle beam and rear mounting brackets prior to moving vehicle from
under MTS.
(21) Raise MTS as evenly as possible lifting weight off vehicle front beam and rear mounting brackets.
(22) Using a 7/16 inch socket and 1/4 inch drive ratchet, reinstall armor plating behind roadside and
curbside seats.
Figure E-9. Curbside Reinstallation
(23) Reinstall curbside seat by inserting rear of seat into groove and locking front section into place using
locking latches (refer to Figure E-9).
(24) Move vehicle from under MTS.
E-9
TM 11862A-OR
Figure E-10. Removal of Mounting Screws
(25) Using a 7/16 inch socket and 3/8 inch drive ratchet, remove rear-mounting bracket and three Screw,
Hex Head (PN MS35307-307), three Washer, Lock (PN MS35338-139), and three Washer, Flat
(PN MS15795-810) from vehicle. (refer to Figure E-10).
(26) Using a 9/16 inch socket and 3/8 inch drive ratchet, remove lower side mounting screws
(refer to Figure E-10).
(27) Using 3/4 inch socket, 3/8 inch drive socket, and 12-inch extension, remove underside mount screws
(refer to Figure E-10).
(28) Remove rear-mounting adaptor from MTS.
(29) Retain all pintle and mounting kit hardware. Mark piece part numbers per Tables E-3 and E-4,
package, and store for future use.
ENSURE THAT MTS IS PROPERLY POSITIONED ON A SUPPORT
STRUCTURE CAPABLE OF SUPPORTING 2200 LBS. ENSURE THAT
LOAD TEST INSPECTION DATE ON STAND IS CURRENT. FAILURE TO
OBSERVE SAFETY PROCEDURES WHEN WORKING UNDER THE MTS
COULD RESULT IN INJURY OR DEATH.
If available, use the shelter pallet provided during initial system delivery.
(30) Lower MTS onto support structure capable of supporting the system weight of 2200 lbs.
E-10
TM 11862A-OR
APPENDIX F
MOBILE TACTICAL SHELTER
VEHICLE OPERATING RESTRICTIONS
The following letter lists operational restrictions of the Mobile Tactical Shelter (MTS) necessary to ensure personnel
safety and protect equipment from damage.
F-1
TM 11862A-OR
F-2
TM 11862A-OR
F-3/(F-4 blank)
TM 11862A-OR
FO-1 AFATDS - MTS Digital, Computer Interconnect Diagram
FP-1/(FP-2 blank)
TM 11862A-OR
FO-2 AFATDS - MTS Radio Interconnect Diagram
FP-3/(FP-4 blank)
TM 11862A-OR
FO-3 AFATDS - MTS Power Interconnect Diagram Sheet 1 of 5
FP-5/(FP-6 blank)
TM 11862A-OR
FO-3 AFATDS - MTS Power Interconnect Diagram Sheet 2 of 5
FP-7/(FP-8 blank)
TM 11862A-OR
FO-3 AFATDS - MTS Power Interconnect Diagram Sheet 3 of 5
FP-9/(FP-10 blank)
TM 11862A-OR
J9
AC2
J10
AC2
J11
PCC
J12
PCC
J13
PCC
J14
PCC
J15
AC2
J16
PCC
J17
AC
J18
PCC
J19
AC2
FO-3 AFATDS - MTS Power Interconnect Diagram Sheet 4 of 5
FP-11/(FP-12 blank)
TM 11862A-OR
J20
PCC
J21
PCC
RACEWAY ASSEMBLY,
POWER, REAR
(A1A8A5)
RACEWAY ASSEMBLY,
POWER, CURBSIDE
(A1A7A2)
RACEWAY ASSEMBLY,
POWER, CURBSIDE
(A1A7A6)
J22
AC1
J23
AC1
J24
PCC
J25
PCC
J26
PCC
J27
PCC
DATA PLATE,
TENT INTERFACE PANEL
(A1A3A6)
J28
PCC
J29
AC1
J30
AC1
FO-3 AFATDS - MTS Power Interconnect Diagram Sheet 5 of 5
FP-13/(FP-14 blank)