1
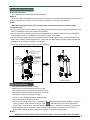
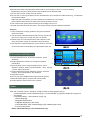
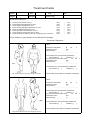
ETG30
Freeze Fat Dissolving Instrument
User manual
CE No: AGC05E110301-2E
Warning
Dear user:
Thanks for using our company's products, in order to fully make use of the products, we
sincerely suggests follow:
◆◆Please read the instruction in detail and keep it well for further reading and consulting.
◆◆Please follow the instruction to fit and operate the machine correctly.
◆◆Please do not remove and change any accessories of the machine.
◆◆It forbids others to open and remove the mainframe except the authorized people in
the company.
◆◆It forbids others to change and maintain the machine except the professional people.
◆◆Please contact us if there is any trouble during operation.
This product does not belong to medical, please don’t use for disease treatment!
Parts Introduction
14
15
2
1
3
4
5
6
7
8
1. Coolant inlet
2. Overflow
3. Coolant level window
4. 40K Fat cavitation head jack
5. Service brake jack
6. 8 polar RF revolving work head jack
7. F1 freeze fat dissolving board jack
8. F2 freeze fat dissolving board jack
9. Cooling work head jack
10.General power switch
11.Power supply line jack
12.Dust filter
13.Coolant discharge valve
14.USB outlet(for multimedia function)
15.Earphone jack
9
12
10
11
13
BACK
F1 freeze fat dissolving board
F2 freeze fat dissolving board
Cooling work head
40K Fat cavitation head
8 polar RF revolving work head
Service brake jack
1
Transportation & Installa tion
Before transportation:
The coolant should be cleared before transportation.
Method:
Open the coolant discharge valve[13] as the picture shows (turn anticlockwise and fasten the pull out the
stopper), discharge the coolant, move the machine to help the coolant get out completely.
Notice:
While discharging the coolant, the cooling handle should be placed at the handle support.
Installation steps:
1.Aim the screen at the screen module fixing pedestal, fasten with three M4 hexagonal screws tightly, and
then the installation of the screen module is completed.
2.Aim the support discreteness at the support discreteness fixing pedestal, fasten with a M4 hexagonal
screw tightly, and then the installation of the support module is completed.
3.Put the accessory bracket above the accessory bracket support block, aim the screw hole at the fixing
hole of the accessory bracket support block , fasten with four M8 hexagonal screws tightly, and then the
installation of the accessory bracket is completed.
4.Place the handle as the picture shows, finish installation.
Support discreteness
M8 hexagonal screw
Support discreteness
fixing pedestal
Screen
Screen module fixing pedestal
Accessory bracket
Accessory bracket support block
M4 hexagonal screw
Coolant discharge valve
Before installation
Installation finished
Add Coolant Steps
1.Use purified water(or special coolant);
2.Make sure the coolant discharge valve is closed;
3.Use special funnel to connect to coolant entrance[1];
4.Add purified water(or special coolant) from the funnel;
5.Add liquid until there is overflow from [2];
6.Check from the window[3] whether the liquid is full;
7.Add cooling fluid successfully first time;
8.Connect power supply line[11],turn on general power switch[10],input password"000000" in interface
as (Fig 1) shows, enter interface as (Fig 2), click "
" at the left lower corner, enter interface as
(Fig 3), Click "Liquid setting", enter interface as (Fig 4) shows, click"Start" to become counter down .
9.When stopped, please observe the status of liquid coolant window, if it doesn’t arrive at level 4.5,
please add cooling fluid again until the level is above 4.5,then take off the funnel.
NOTE:
Add about 1L pure water or special cooling fluid, change the water after 3 months.
2
(Fig 4)
3
Basal Operation
1.Please take out the bracket and accessories shelf,
install them to mainframe.
2.Connect the accessories to the host.
①Insert 40K fat cavitation head to [4];
②Insert service brake to [5];
③Insert 8 polar RF revolving work head to [6];
④Insert F1 freeze fat dissolving board to [7];
⑤Insert F1 freeze fat dissolving board to [8];
⑥Insert cooling work head to [9];
3.Insert power line to [11], turn on the General power
switch [10].
4.In interface as (Fig 1) shows, input default
(Fig 1)
password:"000000" to enter interface (Fig 2)
5.Click any place of the screen to enter interface
(Fig 5).
Freeze fat dissolving function
An innovative weight-loss method which in
contrast with the traditional heat therapy --freeze fat dissolving method is a revolutionary
new concept of weight loss. It is very suitable for
removing local fat , particularly aim at difficult
to get rid of waist and belly fat.
As triglyceride in fats will be converted into
solid in particular low temperatures. It uses
advanced cooling technology to selectively
target fat bulges and dissolve fat cells through a
gradual process that does not harm the
surrounding tissues, reduce unwanted fat,
When fat cells are exposed to precise cooling,
they trigger a process of natural removal that
gradually reduces the thickness of the fat layer.
And The fat cells in the treated area are gently
dissolved through the body's normal metabolism
process, to dissolve unwanted fat.
(Fig 2)
(Fig 3)
“Freeze” operation steps
★Please checking whether the numerical value
of the cooling fluid display window is above 4.5
before open the machine. If it less than 4.5,
please add coolant to avoid the bad effect on the
cooling system.
1.Check the thickness of the fat, with the help of
fat pliers testing.
2.Clean treatment area.
3.Mark the size of treatment area.
4.Open antifreeze and paste antifreeze membrane
on treatment area.
F1 indicator light
(Fig 5)
F2 indicator light
4
5. According treatment part to select suitable
bind ties and binding it well.
6.In interface as (Fig 5) shows, the indicator light of
F1,F2 freeze fat dissolving board is blue. It means
that the state is standby.
(A)When using F1 and F2 in the same time,
setting the temperatures and time separately,
then click the “start” button.
(B)When only using F1,click the indicator light of
F2 and the light turns red. It means closed.
Then click the “start” button, the picture of F1
is blue.
(C) When only using F2,click the indicator light of
F1 and the light turns red. It means closed.
Then click the “start” button, the picture of F2
Is blue.
7. Put fat dissolving board (F1 or F2) in bind ties that
binding well.
▲
8.Click “▲” “ ” to set temperature: the range is 5℃
to -2℃.
9.Click “▲” “
(Fig 6)
▲
” to set work time, the range is
1:00~60:00 minute, Each part should be within 60
minutes every time.
10.Click “start”,the machine began to work.
11.The machine will pause automatically if the
setting time is over. Beautician take the freeze fat
dissolving board out first, and put it well, then
loose the bind ties.
12.Cleaning the skin.
13 .Clean the leftovers with warm towel on the
freeze fat dissolving board.
(Fig 7)
“Cool” operation steps
1.Clean treatment area.
2. Click “Cool” in interface as (Fig 5) shows to enter (Fig 6) interface.
3 . S et temperature: the range is 5℃ to -5℃.Must use the antifreeze if the setting temperature is
below 2℃.
4.Click “Time” to enter interface (Fig 7), press numbers setting work time, click”OK” button after
input numbers. Each part operating time about 45 minutes, do not overrun 60 minutes every
time. If you put wrong number, please press the number above the clock picture, the wrong
number will be deleted.
5.Click “Cool” in interface (Fig 7),it will return to interface (Fig 6), Click “start”,the machine began to
work.
6. Beautician hold the cooling work head to move slowly on skin in circle repeatedly or location
frozen .
7.The machine will pause automatically if the setting time is over.
8.If you use the machine continuously, please click the screen according to hint, click needed
Function button in interface (Fig 7).
51
Freeze fat dissolving Treatment Setting
1.30-60 minutes for each part every treatment (depending on thickness of fat and health status).
2.You can only treat cellulite one or two parts every treatment, for example, to dissolve cellulite of the entire
waist, you need to complete several courses. (Please do not treat more than two parts of body in the
same cause of treatment).
3.Take another cooling procedure at the same position 2 months after the first course, which can reduce the
extra fat layer thickness, twice treatment, can enhance the effect of cryolipolysis, but not recommended to
accept treatment repeatedly at random.
4.The cryolipolysis treatment designed for localized hypertrophic fat accumulation area, physical healthy
people, but not suitable for overall obesity. Treatment mainly for a particular part, such as waist fat, belly
and back, and other local cellulite. Treatment is not omnipotent and can not cure obesity, it can not replace
liposuction or other invasive therapies. A Substantial weight loss should be through a balanced diet and do
regular exercise, cryoli-polysis treatment can only be carried out for extra fat.
5.Qualified antifreeze should be used during the treatment, that avoid frostbite when temperature lower to
The 0 to -40 degree. [Consumables, purchase on your own]
After Treatment
Damage, minor frostbite, skin pigment may occur at the treatment area, care properly.
Caution
1.The equipment must be operated by professionals.
2. Observe the status of cooling fluid display window before operating everyday, the level can’t less
than 4.5.
3.Banned in no case of anti-freeze membrane treatment, during the course of treatment must ensure
anti-freezing film completely cover the rapeutic part, otherwise can appear frostbite, etc.
4.Cautions especially:
The same people please do not treat a large area of body or treat the adjacent part of the body that
have been treated in the same course of treatment(in 1~2 months).As (Fig 8) shows: if you operate
of part ①, you can not operate the part ② or part ④, so you can only operate part ③. If you against
this regulation, Light will cause the metabolic disorders, Heavy then cause metabolic acidosis and
the toxins from the body doesn't stranded.
Left
Right
5 .Patients using the following medical electrical
equipment can not use the equipment.
―Implanted cardiac pacemakers or other
implanted electronic devices;
― L ife-sustaining artificial heart-lung
machines and other equipment;
―Portable ECG measurement equipment;
6 .The following patients should be agreed by the
professional doctors before using the equipment.
― P atients with acute disease;
―Malignancy;
― P atients with Infectious diseases;
― P regnant women;
― P atients with heart diseases;
― P atients with fever;
― P atients are receiving treatment or those
(Fig 8)
with abnormal body phenomenon;
7 .The following patients using this device should be taken care of .
―Sensory or physically impaired persons;
6
2
3
1
4
Contraindications
― Liver problems;
― The Raynaud’s disease;
―Severe cold urticaria;
― Cryoglobulinemia;
―Cold fiber hypoproteinemia;
― Severe frostbite;
―Severe diabetes and the elderly, young children, frail and so intolerant of cryotherapy.
8 polar RF revolving function
Via the constantly changing high-frequency
current bring along Electronic fast-moving in
body tissues, resulting in heat and to make deep
tissue warming and enhanced cell active
function, improve lymphatic circulation, which
can effectively burn fat, eliminate cellulite, to
attain with lifting and tightening skin ,slimming
and shaping effect.
1.Click “RF” in interface as (Fig 5) shows to
enter (Fig 9) interface.
2.R egulate output intensity of RF:
(Fig 9)
1( weak) ~ 10 ( strong).
3.Set work time(20 minutes every part).
4.Click “start”,the machine began to work.
5.Applied gel on treatment part, b eautician hold
the 8 polar RF revolving work head to move
slowly on skin, in circle or beeline repeatedly.
Eight electrode probes must be fully in
contact with skin, Do not stay on any part
without moving.
6 .The machine will pause automatically if the
setting time is over.
7 .Clean the leftovers with hot towel, use warm
towel to clean the RF work head.
(Fig 10)
Caution:
1.Beautician should wear insulated gloves during operation.
2.Do not wear any aglet, both for the beautician and the users.
3.The electrode probe must be fully in contact with skin.
4.Do not make the RF electrode stay on any part without moving. keep it moving on skin slowly.
5.8 polar RF work head only apply for body treatment, Do not use for facial.
40K fat cavitation head
40K ultrasound fat cavitation work head applies the cavitation theory, uses the 40KHz ultrasound
to make intense vibration, which causes a inner explosion in the fat tissues, thus get rid of lipocyte.
It can effectively break down stubborn and deep fat, decrease lipocyte quantity and its size. The
diathermal can promote lipocyte and tissues liquid flow, which help drainage of fatty acid, waste
and toxin through lymph system. The vacuum function will promote liquid flow of f lipocyte and fat
tissues, then speed up excretion of toxins and waste, achieve effect of fat elimination, slimming,
skin tightening and enhancing muscle flexibility.
1.Click “40K” in interface as (Fig 5) shows to enter (Fig 10) interface.
2.Applied gel on fleshy parts(eg.abdomen,hip,thigh), The amount depends on moving flexibility of
the fat cavitation work head.
3.Regulate output intensity:(5W, 15W, 30W, 40W, 50W).
4.Set work time(15 minutes every part).
5.Click “start”,put the service brake under your feet, step on to start working, move away for pause.
7
6.Beautician hold the fat cavitation work head to move slowly on skin, in circle or beeline
Repeatedly, the other hand push the fat towards the ultrasound head.
7.Do not use on back, avoid using on bones.
8.Do not use on uterus part when women do abdomen care. Abdomen treatment during menstruate
should be avoided.
★Enough gel are needed, you may feel painful if medium is not enough.
★The total treatment time for daily care should be within 30 min.
9.The machine will pause automatically if the setting time is over.
10.Clean the leftovers with hot towel, use warm towel to clean the ultrasound head.
Caution:
1.There should be enough gel when using fat cavitation
explosion head.
2. Fat cavitation explode head should not stay still at one
part for too long time, and do not use It on bones.
3.Please step on service brake then there will be sound
wave exist when using fat cavitation explode head.
4.Fat cavitation explode head can not be used on the back,
avoid on the bones, and daily care should be within 30
RF& fat cavitation headForbidden group
(Fig 11)
3
1
1.People who has fever, infectious diseases, acute
2
diseases.
2.People with heart disease or configured cardiac
pacemaker.
4
3.Patients with severe high blood pressure, tumor
disease, asthma, deep vein thrombosis, varix, thyroid
,cancer, falling sickness.
4.People with hemorrhagic disease, trauma, vascular
rupture, skin inflammation, skin disease.
5.Pregnant women.
6.Do not use at the abdomen during menstrual period.
7.Medical Plastic parts, or parts with metal inside.
8.People with an abnormal immune system.
5
(Fig 12)
Other
(Fig 13)
Click “set” in the left corner in interface as (Fig 2) shows to enter interface (Fig 3)
①Click“multimedia” to enter interface as (Fig 11), insert USB disk to [14],insert earphone to [15] if use
the function.
②Click“basic setting”, enter interface as (Fig 12).
1–Select language
2–Regulate date and time
3–Regulate brightness of the screen
4–Click"calibration" enter interface as(fig13),for calibrating the screen
5– keys recovery back
Notes “advanced setting” is for manufacturer only.
8
Maintenance
1.Appliances and medical equipment close to the equipment may be resulting in operational failure due to
Interference.
2.Prohibit use of the equipment in the following environment
―Hot and humid environment
―Dusty environment
―Environmental with much smoke or stream
3.If there comes a failure, please shut down the power immediately, and send it to the distributor or
manufacturer for maintenance. Do not repair by yourself.
4.The cooling fluid is pure water or special cooling fluid, keep it clean during transportation or long time no
use. And should be filled properly before use.
5.Exclusion of liability.
The Company is not responsible for the following circumstances:
(1)If fire, earthquake, war occurred;
(2)The fault of the user, operator error;
(3)Damage caused by using other method(not included in the use manual).
(4)Operate without the manual's guide.
6.After using the machine for over 40 hours, please take off the dust filter[12] and clean it.
7.Do not make the machine close to the wall, keeping a 30CM space around for cooling.
Simple Troubleshooting
When the instrument appear s fault during the operation, the user could diagnose and rule out
some simple questions through the following guides. If still not resolved, please call our Customer
Service Department for consulting as soon as possible.
1.Nothing happens when turning on the general power switch.
(1)Ensure that the AC power is normal or not.
(2)Ensure that the power supply line is broken or not.
(3)Ensure that the power plug is plugged in tight or not.
(4)Ensure that the fuse is normal or not.
2.The touch screen failure.
(1)Touch screen click on invalid:
May be the touch screen is pressed, please gently press the four corners and the center of
The screen, then turn off the instrument , wait for one minute ,then restarts it.
(2)Positioning error of touch screen:
Turn on the instrument, enter interface of calibration. If the problem still exists, please call
the Customer Service Department.
(3)If the touch screen is broken, please call the Customer Service Department.
3.Touch screen display error:
Please turn the power off, wait one minute after a reboot, If the problem still exists, please call
the Customer Service Department.
4.After starting ten seconds, the screen shows that " Flow sensor fault! To add water or not "
(1)Check wether the connection of the equipment to handle is being pressed or folded please.
(2)Check the level window display[3] of the instrument back panel, if lower than 4.5,add water
please.
(3) If the problem still exists, please call the Customer Service Department.
9
Technical Parameters
1.Input: 220V/50Hz
□
110V/ 60Hz □
2.Power: < 350 VA
3.Cryo: 5℃to- 5℃
4.Cooling liquid: Pure water or special coolant
5.Volume: 65cmX55cmX150cm
6.Fuse: T3.15AL250V
7.Ambient temperature: 5℃ ~40℃
8.Relative Humidity: ≤80%
Accessories List
1.Host
2.Power supply line
3.User manual
4.8 polar RF revolving work head
5.40K fat cavitation work head
6.F1 freeze fat dissolving board
7.F2 freeze fat dissolving board
8.Cooling work head
9.Service brake
10.Accessory bracket
11.Support pipe
12.Two pieces of liquid addition accessory
13.Band ties
14.White fast connection sealing ring
15.M7 hexagonal screw driven
16.M3 hexagonal screw driven
17.M8 hexagonal screw
18.M4 hexagonal screw
1set
1pc
1copy
1pc
1pc
1pc
1pc
1pc
1pc
1pc
1pc
1set
4pcs
20pc
1pc
1pc
4pcs
4pcs
10
Safety and Environmental Considerations
Names and contents of Toxic and hazardous substances or elements
Hazardous Substances
Part Name
Pb
Hg
Cd
Plastic parts
Metal structures /
decorations
×
Circuit board
Components
×
Power Line
×
Power cord
×
PBB
PBDE
×
×
NOTE
×
Relay
Buzzer
Cr(VI)
×
Remarks said that the content of hazardous substance in all materials in the parts below the standard of SJ/T113632006 limit requirement.
× Indicates that the content of toxic or hazardous substance in at least one of the homogeneous materials for this part
exceeding the SJ/T11363-2006 limit requirement.1363-2006.
Technical note:
Hardware structure of the machine parts, injection molded parts,and the majority of electronic components,
connectors meet the requirements of the EU and China RoHS directives.
Only a few parts as the global technology limitations that may affect product reliability, and not find a substitute for the
toxic and hazardous substances, please be assured to use, use under normal conditions will not cause health effects
on users.
Products to be discarded after use, Please treat in accordance with electronic and information products recovery, reuse legal regulations.
11
Treatment table
Name
Sex
Age
Height
Weight
Heart rate
NO:
Ask before treatment:
1.
2.
3.
4.
5.
6.
7.
8.
Have liver disease or not?
Have Raynaud's disease or not?
Have severe diabetes or not?
Have cold hyperfibrinogenemia or not?
Have cryoglobulinemia or not?
Have serious cold urticaria or not?
Have surgery during the year or not?
Have done more than 2 parts of cryotherapy in a month ?
Yes[
Yes[
Yes[
Yes[
Yes[
Yes[
Yes[
Yes[
]
]
]
]
]
]
]
]
]
]
]
]
]
]
]
]
No[
No[
No[
No[
No[
No[
No[
No[
If any answer is yes, please do not accept this therapy.
Customer Signature:
Part 1
Treatment start date :
Treatment time:
Temperature:
D
min
M
Y
℃
- ---- - - - ------ - - - - ----- - -
Countercheck 2 months after treatment:
Good effect [
]
Ordinary [
]
The second course start date:
D
M
Treatment time:
min
℃
Temperature:
Y
- ---- - - - ------ - - - - ----- - -
Left
Countercheck 3-6 months after treatment:
Good effect [
]
Ordinary [
]
Mark the treatment area and assign a number
Please take photos before and after treatment
Part 2
Treatment start date :
Treatment time:
Temperature:
D
min
M
Y
℃
- ---- - - - ------ - - - - ----- - -
Countercheck 2 months after treatment:
Good effect [
]
Ordinary [
]
The second course start date:
D
M
Treatment time:
min
℃
Temperature:
Y
- ---- - - - ------ - - - - ----- - right
Countercheck 3-6 months after treatment:
Good effect [
]
Ordinary [
]
Please take photos before and after treatment
Mark the treatment area and assign a number
Use this form please copy