1
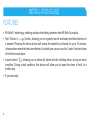
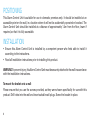
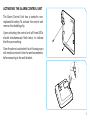
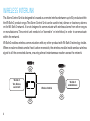
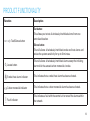
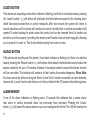
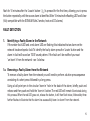
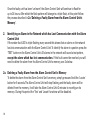
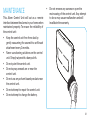
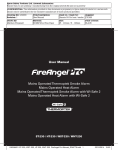
WTSL-SN-1 Alarm Control Unit with Wi-Safe 2®
Installation and User Guide
"sona control unit install"
For use with Wi-Safe 2 Smoke, Heat and Carbon Monoxide Alarms
1
PLEASE READ THIS
CONTROL UNIT!
GUIDE
IN
FULL
BEFORE
USING YOUR WTSL-SN-1 ALARM
This user guide is also available in large text and other formats. Please
call 0800 171 2009 for further information.
Battery powered Alarm Control Unit with Test, Silence, Locate function. Non-replaceable 3 V
DC battery.
W2 module contained within product independently tested to RF standard ETSI EN 300 220-2 V2.3.2
(2010-02) by TRaC Global Ltd.
A Sprue Brand
Sprue Safety Products Ltd. Vanguard Centre, Coventry CV4 7EZ UK
2
GN3019R2
Email: [email protected] / Web: www.sonasafety.com
Technical Support Line: 0800 171 2009
INSTALLATION GUIDE
USER GUIDE
Features . . . . . . . . . . . . . . . . . 4
Testing the Alarm System . . . . . . 12
Positioning . . . . . . . . . . . . . . . 6
Product Functionality . . . . . . . . .13
Installation . . . . . . . . . . . . . . . 6
When an Alarm Sounds . . . . . . . 17
Wireless Interlink . . . . . . . . . . . 8
LED Indicators . . . . . . . . . . . . 18
Making the Alarm Control Unit
Tamper Proof . . . . . . . . . . . . . 10
Troubleshooting . . . . . . . . . . . 20
Maintenance . . . . . . . . . . . . . 21
Disposal . . . . . . . . . . . . . . . . 22
Warranty . . . . . . . . . . . . . . . 23
3
INSTALLATION GUIDE
FEATURES
• Wi-Safe 2® technology, enabling wireless interlinking between other Wi-Safe 2 products.
) button, allowing you to regularly test all wirelessly interlinked alarms on
• Test / Silence (
a network. Pressing the silence button will reduce the sensitivity of alarms for up to 10 minutes,
unless carbon monoxide has been detected, in which case you can use the 'Locate' function below
to find the source alarm.
), allowing you to silence all alarms but the initiating alarm, during an alarm
• Locate button (
condition. During a fault condition, this feature will allow you to locate the alarm in fault, in a
similar way.
• 5 year warranty.
4
Fault indicator
Carbon monoxide
alarm indicator
Test / Silence button
Smoke / Heat
alarm indicator
Locate button
5
POSITIONING
This Alarm Control Unit is suitable for use in domestic premises only. It should be installed at an
accessible point on the wall, in a location where it will not be accidentally operated or knocked. The
Alarm Control Unit should be installed at a distance of approximately 1.4 m from the floor, lower if
required, so that it is fully accessible.
INSTALLATION
• Ensure this Alarm Control Unit is installed by a competent person who feels able to install it
according to the instructions.
• Read all installation instructions prior to installing this product.
WARNING:To prevent injury, this Alarm Control Unit must be securely attached to the wall in accordance
with the installation instructions.
To mount the bracket onto a wall:
Please ensure that you use the screws provided, as they were chosen specifically for use with this
product. Drill holes into the wall and insert suitable wall plugs. Screw the bracket in place.
6
ACTIVATING THE ALARM CONTROL UNIT
The Alarm Control Unit has a sealed-in nonreplaceable battery. To activate the control unit
remove the disabling clip.
Upon activating the control unit all three LED's
should simultaneously flash twice, to indicate
that they are working.
Once the alarm is activated it is at this stage you
will need to connect it into the wireless network,
before securing to the wall bracket.
7
WIRELESS INTERLINK
The Alarm Control Unit is designed to be used as a remote interface between up to 50 products within
the Wi-Safe 2 product range. The Alarm Control Unit can be used to test, silence or locate any alarms
on the Wi-Safe 2 network. It is not designed to communicate with wireless alarms from other ranges
or manufacturers. The control unit needs to be ‘learned-in’ or interlinked, in order to communicate
within the network.
Wi-Safe 2 enables wireless communication with any other product with Wi-Safe 2 technology inside.
When one alarm detects smoke / heat / carbon monoxide, the wireless module inside sends a wireless
signal to all the connected alarms, ensuring almost instantaneous reaction across the network.
Wi-Safe 2
Test, Silence,
Locate Unit
8
Wireless Interlink
Wi-Safe 2
enabled device
HOW TO ‘LEARN-IN’ THE ALARM CONTROL
UNIT TO A WIRELESS NETWORK:
1. Using a ballpoint pen, briefly push and
release the 'learn button' on the back of the
control unit.The red LED next to the learn
button will flash briefly then light up for
approximately 5 seconds.
2. During these 5 seconds you need to briefly
press the test button on an alarm already
in the network, to wirelessly interlink the
two. The alarm will give an audible sound
consisting of two cycles of three loud beeps.
Learn button
LED
3. The red LED on the back of the control
unit will flash to indicate that it has been
‘learned-in’ successfully. If the test button
is not pressed quickly enough, the ‘learnin’ process will fail. If this happens, repeat
the process.
9
4. To complete the installation simply slide the
control unit onto the bracket until it clicks
into place. The control unit is now part of the
whole network.
The method above assumes you have already
installed your alarm network, prior to installing
your Alarm Control Unit. If you want to install
your Alarm Control Unit first, you can learn your
smoke, heat and CO alarm into it by following
the instructions in your alarm manual, using the
Alarm Control Unit as alarm 1 and holding the
Test button of the Alarm Control Unit for at least
2 seconds.
MAKING THE ALARM
CONTROL UNIT TAMPER
PROOF
Do not complete this action until you have
wirelessly interlinked all of your alarms.
10
The Alarm Control Unit is provided with an
anti-tamper feature, ensuring, where needed it
cannot be removed from the wall.
To make use of this feature you will need to tap
out the two blanking plates on the top right-hand
side of the bracket, using a small screwdriver,
being careful to support the bracket fully whilst
doing so.
Once the rest of the installation is complete, and
the control unit is fixed to the bracket it can only
be removed using the following method:
Insert a small screwdriver into the hole on the
top right-hand corner of the control unit, until it
stops, this will disengage the lock, then gently
ease the control unit up to release it from the
11
USER GUIDE
TESTING THE ALARM
SYSTEM
Press the Test / Silence (
) button to
confirm that the control unit is operating
properly. This will instigate a three minute test.
All networked alarms should sound. To stop the
test (earlier than 3 minutes), simply press the
Test / Silence (
) button again. This test
should be performed on a weekly basis.
12
PRODUCT FUNCTIONALITY
Function
Test/Silence button
Description
Test button:
This allows you to test all wirelessly interlinked alarms from one
centralised location.
Silence button:
This will silence all wirelessly interlinked smoke and heat alarms and
reduce the system sensitivity for up to 10 minutes.
Locate button
This will silence all wirelessly interlinked alarms except the initiating
alarm which has sensed carbon monoxide / smoke.
Smoke / heat alarm indicator
This indicates that a smoke / heat alarm has been activated.
Carbon monoxide indicator
This indicates that a carbon monoxide alarm has been activated.
Fault indicator
This indicates a fault with the control unit or one of the alarms within
the network.
13
LOCATE BUTTON
If the alarms are sounding and an alarm indicator is flashing, but there's no obvious hazard, pressing
) will silence all wirelessly interlinked alarms except for the initiating alarm
the 'Locate' button (
which has sensed smoke / heat or carbon monoxide. After two minutes the system will return to
normal operation and the alarms will continue to sound if smoke / heat or carbon monoxide is still
present. To make locating the alarm easier, the control unit can be removed from it's bracket and
carried around the property (providing the tamper proof function has not been engaged), allowing
you to press the 'Locate' or 'Test' button whilst moving from room to room.
SILENCE BUTTON
If the alarms are sounding and the smoke / heat alarm indicator is flashing, but there's no obvious
) will silence all wirelessly interlinked alarms and reduce the
hazard, pressing the 'Silence' button (
system sensitivity for up to 10 minutes. However if excessive smoke is sensed the silence function
will be overridden. The indicator will continue to flash unless the smoke disappears. Please Note:
An alarm cannot be silenced using the Alarm Control Unit if carbon monoxide has been detected,
however the 'Locate' function will allow you to find out which of the CO alarms is the initiating alarm.
ALARM MEMORY
If one of the alarm indicators is flashing every 10 seconds this indicates that a smoke alarm,
heat alarm or carbon monoxide alarm has previously been activated. Pressing the 'Locate'
) will sound the source alarm so you can investigate this further. The LED will continue to
button (
14
flash for 10 minutes after the 'Locate' button (
) is pressed for the first time, allowing you to press
the button repeatedly until the source alarm is identified. After 10 minutes the flashing LED's will clear
(fully compatible with the SONA Wi-Safe 2 smoke, heat and CO alarms).
FAULT DETECTION
1.
Identifying a Faulty Alarm in the Network
If the amber fault LED and a red alarm LED are flashing this indicates that an alarm on the
network has developed a fault. To identify the faulty alarm press the 'Locate' button and the
alarm in fault will sound an ‘SOS’ sound pattern. If the fault can’t be rectified you must
‘un-learn’ it from the network - see 1a below.
1a. Removing a Faulty Alarm from the Network
To remove a faulty alarm from the network you will need to perform a button press sequence
consisting of a short press followed by a long press.
Using a ball point pen in the circular 'learn-in' hole in the back of the alarm, briefly push and
release and then push and hold the 'learn-in' button. The red LED will remain illuminated during
this process. When the red LED goes out, release the button, it will then flash twice, followed by three
further flashes to illustrate that the alarm has successfully been 'un-learnt' from the network.
15
Once the faulty unit has been ‘un-learnt’ the Alarm Control Unit will continue to flash for
up to 24 hours. After which the flash pattern will change to a triple flash, at this point follow
the process described in 2a 'Deleting a Faulty Alarm from the Alarm Control Unit's
Memory'.
2.
Identifying an Alarm in the Network which has Lost Communication with the Alarm
Control Unit
If the amber fault LED is triple flashing every second this shows that an alarm on the network
has lost communication with the Alarm Control Unit. To identify the alarm in question press the
'TEST' button on the Alarm Control Unit. All alarms in the network will sound a test pattern,
except the alarm which has lost communication. If this fault cannot be resolved you will
need to delete the alarm from the Alarm Control Unit's memory, see 2a below.
2a. Deleting a Faulty Alarm from the Alarm Control Unit's Memory
To delete the alarm from the Alarm Control Unit's memory, simply press and hold the 'Locate'
button for 5 seconds. The Alarm Control Unit will stop flashing and the faulty alarm will be
deleted from the memory. It will take the Alarm Control Unit 2 minutes to reconfigure its
memory. During this period the 'Test' and 'Locate' functions will be disabled.
16
WHEN AN ALARM SOUNDS
Never ignore an alarm.
If there is a fire evacuate the premises and call the fire brigade. If the source of the alarm is not
immediately apparent check which indicator is flashing on the control unit.
If the CO indicator is flashing:
•
Keep calm and open the doors and windows to ventilate the property.
•
Stop using all fuel burning appliances and ensure, if possible, that they are
turned off.
•
Evacuate the property leaving the doors and windows open.
•
Ring your gas or other fuel supplier on their emergency number; keep the
number in a prominent place.
17
LED INDICATORS
Red CO LED
Red Smoke /
Heat LED
Flashing for 10
seconds, every
hour
Flashing for 10
seconds, every
hour
Amber Fault LED
Action required
The Alarm Control Unit is
not part of a network.
Please refer to the 'Wireless
Interlink' section to 'learnin' the control unit to the
network.
Alarm: A carbon
monoxide leak has been
detected.
Keep calm and open the
doors and windows to
ventilate the property.
Alarm: Smoke / heat has
been detected.
Keep calm and evacuate the
property.
Flashing once
every 5 seconds
Low battery condition or
the end of the product
life.
The control unit should be
replaced as soon as possible.
Flashing rapidly
This indicates an internal
fatal radio failure.
Please contact Technical
Support on: 0800 171 2009 or
technicalsupport@sonasafety.
com.
Flashing for 10
seconds, every
hour
Flashing rapidly
every second
Flashing rapidly
every second
18
Status
Either the carbon monoxide
indicator or the smoke / heat
indicator is flashing every 10
seconds
This indicates that one of
the alarms has previously
been activated.
Please refer to the 'Locate'
section of this manual.
Either the carbon monoxide
indicator or the smoke / heat
indicator is flashing
Triple flashing
every second
An alarm on the network
has lost communication
with the Alarm Control
Unit.
Please refer to 'Identifying an
Alarm in the Network which
has Lost Communication with
the Alarm Control Unit'.
Either the carbon monoxide
indicator or the smoke / heat
indicator is flashing
Double flashing
every second
An alarm on the network
has developed a fault.
Please refer to 'Identifying a
Faulty Alarm in the Network'.
19
TROUBLESHOOTING
Issue
Indication
No lights come on when I press any of
the buttons on the Alarm Control Unit
Nothing will happen if you are pressing the 'Locate' button when there's no
alarm or fault condition. This may indicate that the control unit has not been
successfully activated, see section 'Activating the Alarm Control Unit'.
When pressing the test button nothing
is happening
This indicates that the control unit has not been successfully activated, see
section 'Activating the Alarm Control Unit'.
Unable to remove the control unit
from its bracket
You need to disengage the locking pins. Refer to the 'Making the Alarm Control
Unit Tamper proof' section.
20
MAINTENANCE
This Alarm Control Unit will act as a remote
interface between the alarms in your home when
maintained properly. To ensure the reliability of
the control unit:
•
•
•
•
•
•
•
•
Do not remove any screws or open the
main casing of the control unit. Any attempt
to do so may cause malfunction and will
invalidate the warranty.
Keep the control unit free from dust by
gently vacuuming the case with a soft brush
attachment every 3 months.
Never use cleaning solutions on the control
unit. Simply wipe with a damp cloth.
Do not paint the control unit.
Do not spray aerosols on or near the
control unit.
Do not use any solvent based products near
the control unit.
Do not attempt to repair the control unit.
Do not attempt to change the battery.
21
DISPOSAL
Waste electrical products should not be disposed of with your other household waste.The Alarm Control Unit is ideally suited for
disposal within the waste electronic and electrical equipment (WEEE) recycling scheme. Please recycle where facilities exist. Check
with your local authority, retailer or contact ourTechnical Support team for recycling / disposal advice, as regional variations apply.
WARNING: Do not burn or dispose of in fire. WARNING: If your Alarm Control Unit is dropped or damaged, as a
precaution, it should be removed from the building and you should contact Technical Support on 0800 171 2009 or
[email protected].
22
WARRANTY
Sprue Safety Products Ltd warrants to the original purchaser that the enclosed WTSL-SN-1 Alarm Control Unit be free from
defects in materials and workmanship under normal residential use and service for a period of five years from the date of
purchase. Provided it is returned with postage prepaid and proof of purchase date, Sprue Safety Products Ltd hereby warrants
that during the five year period commencing from the date of purchase Sprue Safety Products Ltd, at its discretion, agrees
to replace the unit free of charge. The warranty on any replacement WTSL-SN-1 control unit, will last for the remainder of the
period of the original warranty in respect of the unit originally purchased – that is from the date of original purchase and not
from the date of receipt of the replacement product. Sprue Safety Products Ltd reserves the right to offer an alternative product
similar to that being replaced if the original model is no longer available or in stock. This warranty applies to the original retail
purchaser from the date of original retail purchase and is not transferable. Proof of purchase is required. This warranty does not
cover damage resulting from accident, misuse, disassembly, abuse or lack of reasonable care of the product, or applications
not in accordance with the user guide. It does not cover events and conditions outside of Sprue Safety Products Ltd’s control,
such as Acts of God (fire, severe weather etc.). It does not apply to retail stores, service centres or any distributors or agents.
Sprue Safety Products Ltd will not recognise any changes to this warranty by third parties. Sprue Safety Products Ltd shall not
be liable for any incidental or consequential damages caused by the breach of any expressed or implied warranty. Except to
the extent prohibited by applicable law, any implied warranty of merchantability or fitness for a particular purpose is limited
in duration for five years. This warranty does not affect your statutory rights. Except for death or personal injury, Sprue Safety
Products Ltd shall not be liable for any loss of use, damage, cost or expense relating to this product or for any indirect or
consequential loss, damages or costs incurred by you or any other user of this product.
23
Heat Alarm
Wireless: WHM-SN-1
Non-Wireless: HM-SN-1
Carbon Monoxide Alarm
Wireless: WCOB-SN-1
Smoke Alarm
Wireless: WSM-SN-1
Non-Wireless: SM-SN-1
Available on all wireless products
Alarm Control Unit
Wireless: WTSL-SN-1