1
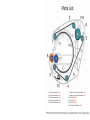
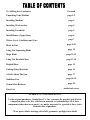
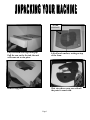
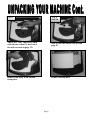
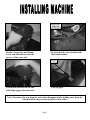
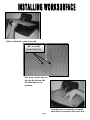
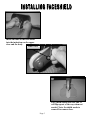
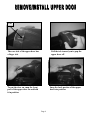
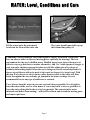
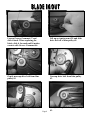
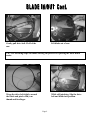
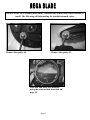
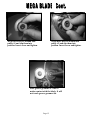
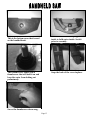
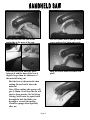
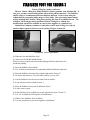
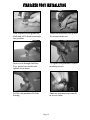
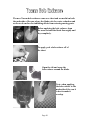
Gemini Saw Company, Inc.
3300 Kashiwa Street, Torrance, CA 90505
Phone (310) 891-0288
Fax (310) 891-0265
www.geminisaw.com
Rev. 1/10
1.
2.
3.
4.
5.
Blue
Blue
Blue
Blue
Blue
Pulley Assembly
Pulley Assembly
Pulley Assembly
Pulley Assembly
Pulley Assembly
#1067
#1067
#1067
#1036
#1067
6. Orange Grove Grommet Assembly #1070
7. Orange Grove Grommet Assembly #1070
8. Drive Pulley #0035
9. Drive Belt #0070
10. Tension Arm #1031
13. Foot Assembly Stabilizer #1034
To All Ring Saw Customers
Forward
Unpacking Your Machine
page 1-2
Installing Machine
page 3
Installing Work surface
page 4
Installing Faceshield
page 5
Install/Remove Upper Door
page 6
Water: Level, Conditions and Care
page 7
page 8-10
Blade In/Out
Using The Separating Blade
page 10
Mega Blade
page 11-12
Using The Handheld Saw
page 13-14
Helpful Hints
page 15
Cutting Other Materials
page 16
A Little About The Saw
page 17
page 18-19
Stabilizer Foot
page 20
Taurus Hole Reducers
inside back cover
Parts List
WARRANTY INFORMATION
To the original purchaser, Gemini Saw Co., Inc. warrants the product and all of its
component parts to be free of defects in material or workmanship. All of these
components other than wear parts*, are under warranty for a period of three years
from the date of purchase.
*Wear parts: blade, bearings, drive belt, grommets, spotlight, face shield.
M I S S I O N S TAT E M E N T
To provide machines to the industry which are efficient, dependable, long
lasting, attractive and innovative beyond the state of the art. To listen to our
customers and provide the best possible customer service and to treat all
persons with whom we come in contact with dignity, integrity and respect.
To all Taurus 3 owners,
We want to thank you for choosing Gemini Saw Co Inc. makers of the most advanced shape
cutting machinery today. We believe that you will find the all new patented Taurus 3 “Ring Saw”
the most important key to unlocking your imagination and speeding you on your way to creating
new and wonderful shapes never before possible.
The Taurus 3 incorporates many new capabilities most of which have come from listening to
you, our customers. We believe you will find these machines easy and fun to work with. To further
develop confidence in your new machine we would like to suggest that you familiarize yourself
with the manual. Please take the time to read about the machines basic operations and functions.
Please feel free to call us if you have any questions or grey areas concerning your new saw and
its operation. And also if you have time to send us a picture of what you have done with the saw
both functional and artistic photos are welcome. We have an annual newspaper called “The Bull
Sheet” which often portrays our favorite pictures for the year. We also have a contest for the best
picture, which wins a free blade and gets your picture in the paper.
Thank you. We appreciate your business.
Respectfully yours,
Jesse G. Cogswell
President
Gemini Saw Co Inc.,
3300 Kashiwa St., Torrance Ca 90505
Phone (310) 891-0288 • Fax (310) 891-0265
www.GeminiSaw.com
WORK
SURFACE
Lay box down with logo facing up.
Pull the saw out by the tub, the unit
will come out as one piece.
Lift off work surface, resting on top
of the foam.
Remove top piece.
This view shows your saw with all
the parts it comes with.
Page 1
FOOT
FACE
SHIELD
This is the “foot” that also is used
with the saw when it’s used out of
the tub (covered on page 12).
This is your face shield (covered on
page 5).
Remove saw body from bottom
foam piece.
Remove bottom piece.
Page2
BOTTOM
MOUNT
Remove lower door and thumb
screw and slide the saw into the
groove of the water tub.
Be sure that the saw sits flush with
the bottom mount.
CLIP
Push down and back on the saw
until clip engages the water tub.
Clip engaged.
Note: To remove the saw from the water tub, disengage clip by pulling away from the
tub then follow the previous steps in reverse order.
Page 3
Slide work surface onto water tub.
PINS
(BOTTOM SIDE
WORK SURFACE)
The work surface has two
pins on the bottom side
that hold the saw in
position.
Page 4
Push down on work surface to make
sure that it is seated on the water tub.
Insert the tabs on the face shield
into the indentions on the upper
door and the body.
INDENTION
Face shield should look like this. It
will flip up out of the way when not
needed. Note: the shield needs to
come off to remove door.
Page 5
TAB
The rear side of the upper door has
a finger tab.
Pull the tab toward you to pop the
upper door off.
To put the door on, snap the front
part of the upper door on and hold
it in position.
Snap the back portion of the upper
door into position.
Page 6
Fill the water up to the watermark
located on the front of the water tub.
The water should come half way up
the bottom blue pulley #4.
Conditions: Water conditions vary from region to region. Areas with “hard water” will
have an adverse affect on the saws moving parts, especially the bearings. The best
environment for the saw is distilled water. Distilled water is not always the most cost
effective way to go but there is another alternative, Add 2 to 3 table spoons of vinegar to
your tap water, further steps can be taken as well, like adding just a few drops of
ordinary dishwashing liquid. When the saw is being used for an extended period it is
always a good idea to add an ice pack to the water/or change it, to keep it cool. With
this saw it is better to use the ice packs rather than ice cubes as the cubes will float
freely throughout the saw and may get jammed in the inner workings. It is not
recommended to use any type of antifreeze or coolants.
Care: Always keep the water in your saw cool and clean as possible. It is all right to
leave the water in the saw for a few hours of even a day but it is never a good idea to
leave the water sitting idol in the saw for long periods. The contents in the water
(minerals and debris from cutting ) , will tend to settle in and around the moving parts
and cause rapid wear.
Page 7
Loosen Groove Grommet #7 and
slide it back. When replacing the
blade, slide it forward until it makes
contact with Groove Grommet #6.
Lift up on tension arm #10 and slide
drive belt off of blue pulley #4.
Gently unwrap drive belt from blue
pulley #5.
Unwrap drive belt from blue pulley
#3.
Unwrap belt from blue pulley #2
Gently unwrap belt from blue pulley
#1.
Page 8
Gently pull drive belt #9 off of the
saw.
Lift blade out of saw.
TIP: The following steps will make starting the process of replacing the blade much
easier.
Wrap the drive belt tightly around
the blade and pinch with your
thumb and forefinger.
While still pinching, Slip the drive
belt and blade into position.
Page 9
Slip drive belt and blade past blue
pulley #5, then wrap the drive belt
around it. From this point just
follow the previous steps in reverse
order.
The GOLDEN RULE when replacing
any parts in the saw is to rotate the
drive gear counter-clockwise by hand
several times to make sure everything
is rotating smoothly.
COUPLING
Find the coupling.
Open the coupling and slide the
material with pre-drilled hole
through the gap. NOTE: When a
separating blade is installed, the
female side should always face
up. Put the blade back together
and slip the belt back on the
drive pulley #8.
Lift the belt off of the drive pulley #8.
MALE
FEMALE
Page 10
Because of the MEGA blades more sturdy construction you may find it more difficult to
install. The following will help making the installation much easier.
Remove blue pulley #5.
Remove blue pulley #1.
Slide belt and blade into machine
using the same method described on
page 10.
Page11
Wrap drive belt #9 around blue
pulley #1 and slip them into
position. Insert screw and tighten.
Wrap drive belt #9 around blue
pulley #5 and slip them into
position. Insert screw and tighten.
Slide groove grommet #7 until it
makes contact with the blade. It will
not touch groove grommet #6.
Page 12
The inside has a die cut sponge
inside to hold water inside. Soak it
prior to assembly.
This is the bottom cover that is used
on the handheld unit.
The bottom cover comes with a
thumbscrew that will hold it on and
keep the water from leaking out
prematurely.
Snap the back of the cover in place.
Screw the thumbscrew down snug.
Page 13
Slide the foot onto the tab on the
underside of the nose of the saw.
The foot comes with a phillips head
screw and nut. Put them on loosely.
Slide the foot down until the space
between it and the base of the saw is
slightly larger than the thickness of
the material being cut.
Snug the screw down to secure it in
place.
Rest the foot on the material when
cutting. Do not hold it above the
material.
Note: When cutting, the sponge will
give 5-10min. of use then the cut will
start to show powder. Do Not Keep
Cutting! Add water by squirt bottle
through the hole the blade goes
through or re-soak the sponge.
Clean the sponge often especially
after use.
Page 14
1. To apply patterns onto your work piece a copying machine is helpful. The print can
be sprayed with Scotchguard fabric protector, covered with a film of rubber cement,
or simply copied onto Mylar which makes the print waterproof. The print can then
be affixed to the material with the use of rubber cement.
2. Although cutting stacked glass can be accomplished better with the Gemini Saw
than any other saw, we want to discourage people from thinking this is faster. Blade
life is severely hampered by this process and it should not be done unless it is imperative that all the pieces be exactly the same shape. Cutting is actually faster one
at a time.
3. Straight lines can be cut by placing a straight edge across the work table and clamping
it at the ends. The Ring Saw will give you a straight line at any angle. Diagonal is
best.
4. When cutting intricate shapes it is best to begin the cut with the most intricate part and
end the cut on the thickest part. This will greatly reduce the chances of the piece
breaking.
5. When doing lots of tiny little pieces that would be difficult to pick up and keep track of
it is sometimes best to leave them attached to the main piece by a small section that you
can break off and grind later.
6. When guiding the saw around a fine point it is usually better to cut past the end of the
point on the side and then come back as though you wanted a longer point than you
actually need. This will help develop your skill.
7. When you are first starting to cut out shapes do not try to cut right on the line as this
will come with a little practice. At first stay away from the exact line by a hair and
come back afterwards and lightly grind it with the saw blade.
8. When you want to grind off a bump, go right to the bump and grind it right in the middle
and slowly move side to side.
Pg. 15
The Taurus will cut all kinds of materials. These materials will not load
the blade, they include but are not limited to tile, gold (which can be refined
out of the water bath), silver, brass, bronze, aluminum, stainless steel, copper
and plastics such as lucite, plexiglass, composites and all types of stone.
The Taurus can be used as a high speed coping saw and will greatly reduce
you metal cutting time. Slight loading can occur with aluminum over a
period of time. Periodic cutting on a piece of brick will remove it from the
blade.
When cutting thin metals it is best to put a backing under the metal so that
the burrs created by the saw action will not catch on the work surface. This
material can be the kind of cardboard found on the back of a writing pad.
Another backing that works well is foam core (white), which can be found at
artists supply stores everywhere. The blade of the Taurus will not be
effected by any material you choose as a backing because it cuts plastics as
well as metals and will not load on these either.
When removing the blade from a cut where you are not separating two
pieces so that you must find your way out of a maze it is sometimes a good
idea to leave the saw running, as this will help it slip through easier.
Pg. 16
The ring saw is a completely unique machine and its operation is very
different than any other machine. For this reason persons who have been
using band saws tend to lead the material into the front of the saw blade
and rotate the material to make a curved cut. All cuts on the Taurus Ring
Saw can be made by moving the material forward, backward, left and right
so rotation is not necessary. Diagonal directions are the strongest.
Ice can be used with the Taurus, ice packs or “blue ice” is safer and also
lasts much longer. This is useful as cold-water works wonders for blade
life and cutting speed, but is not necessary unless the saw is being used for
periods of fifteen minutes or more. Sporadic use for one minute or less for
example will not build up enough heat to warrant ice.
Coolant is not necessary for the Taurus as it moves enough water
through the cut to make it the coolest cutting saw on the market today.
Page 17
Taurus 3 Ring Saw made even better!
The new Taurus 3 Ring Saw Blade Stabilizer reduces grommet wear dramatically. It
also gives you more control and stability when cutting thicker material. The Stabilizer
adjusts easily to accommodate different thickness material. Perfect when using the
standard blade, separating blade, mega or slicer blade. The spectacular improvement
will be included in all Taurus 3 Ring Saws starting this June at no additional cost. The
Stabilizer will fit all previously purchased Taurus 3 Ring Saws without any
modifications and will be available at your favorite supplier at a nominal cost.
Gemini Saw Company continues to add value to the Taurus 3 Ring Saw with yet
another improvement to the best saw for cutting all types of material.
Frequently Asked Questions
Q: When do I use the Stabilizer Foot?
A: Always use it with the hand held unit.
When ever more control is desired in the shaping of thicker materials or for
production cutting.
Q: Does the Stabilizer Foot adjust?
A: Yes, it slides up and down to accommodate different thickness materials.
Q: Does the Stabilizer Foot interfere with the light on the Taurus 3?
A: No it does not interfere. You will still be able to see very well.
Q: Can the Stabilizer Foot be used on other Taurus models?
A: It can only be used on with the Taurus 3.
Q: Does the Stabilizer Foot come in different colors?
A: It only comes in gray.
Q: Is the Stabilizer Foot available for people who already own a Taurus 3?
A: Yes, it is available and will require no modification.
Q: Where is the Stabilizer Foot available?
A: You can purchase it at your local supplier or distributor.
Page 18
Push Stabilizer Foot against the
blade and roll it down at an angle
into position.
Rotate the Stabilizer foot up into
the mount on the saw.
Insert screw through Stabilizer
Foot, position as needed and
tighten screw down.
To replace red grommets, remove
mounting screws.
Peel the red grommet off of the
bearing.
Snap new grommet and reinstall
in reverse order.
Page 19
The new Taurus hole reducers come on a sheet and are useful on both
the underside of the saw where the blade exits for water reduction and
on the work surface for inhibiting debris from entering moving parts.
Before applying the hole reducer, clean
the areas around the blade thoroughly and
dry completely.
To apply, peel a hole reducer off of
the sheet.
Open the slit and wrap the
hole reducer around the blade.
Note: when applying
the hole reducer to the
underside of the saw it
is best to make it
overlap.
Page 20
The Magnificent 7 Blades of the Taurus 3
What Are They All About?
There are 7 blades available for the Taurus 3 ring saws and there are often questions arising
as to what they are for, how long they last, and how to use them. So we are writing this article
to ive a summary of all of them and their many uses. There are now seven blades to choose
from.
There are universal truths about all of the blades that hold true for all of them.
1) All blades cut the same materials: glass, tile, stone, shell, nonferrous metals, hard plastics
such as acrylic and lexan, and anything that has a similar density to these materials.
2) All blades use the same belt and grommets. Blades are interchangeable with the same belt
and grommets and do not need to be changed unless they are excessively worn.
3) Always let the blade do the cutting. Forcing the blade through the material in a hurry will not
only cause a slower cut but can also shorten the blade life. There is an optimum speed for
each blade in each material; you can feel it while you are cutting. Sensitivity to this causes
extremely long blade life Defined it is that point at which you get maximum cutting speed for
minimal pressure.
The Magnificent Seven Serious Blades
Note: When describing blade abilities it is wise not to confuse the ability of a blade to cut a
certain material greater thickness once in awhile as opposed to that same blade being used to
cut only that thickness all the time. For this description we will refer to blade capacity vs.
normal use. When we speak of blade shape it is what is called a cross section which is like
snipping off a piece of the blade and looking directly at its end.
Standard Blade - (part# 1042) Stained glass pattern and all around multi purpose cutting
blade. Its action is omni-directional. This is to say that it cuts the same speed and kerf, (swath
left by the blade), in any direction. This blade was the first blade to be put on saws and makes
pattern cutting very easy because the user does not have to turn the piece while cutting but
simply move it in any direction.
Blade Shape: Round .072 Diameter (note 1/16" equals .063 and 1mm equals .0394) Grit is aggressive.
Material Thickness Capacity: 3/8", normal use is 1/8" art glass, 1/4" soft wall tile.
What to Avoid: Do not use for ceramic tile, 3/8" fused glass pieces, or thick material in general.
Average Blade Life: 40-60 hours
Separating Blade - (part# 1043) This blade is the same as above but t comes apart or
cutting out the center of something without using an entrance cut. You must first drill a hole.
Consult your DVD for hole drilling instructions.
Blade Shape: Round .072 Diameter (note 1/16" equals .063 and 1mm equals .0394) Grit is aggressive.
Material Thickness Capacity: 3/8", normal use is 1/8" art glass, 1/4" soft wall tile.
What to Avoid: Do not use for ceramic tile, 3/8" fused glass pieces, or thick material in general.
Average Blade Life: 40-60 hours
Mega Blade - (part# 1045) This heavy duty blade is hungry for whatever you can feed it. It is
almost unbreakable so it is great for class settings. It has an opinion about which way it likes to
cut because of its shape which is basically tear dropped. The round part of the tear drop faces
outward and the pointed part faces inward. This means it cuts faster when pulling towards
yourself and slower pushing away and slowest sideways. Its kerf is the same as a standard
blade when pushing and pulling but it leaves a wide swath the same as a standard blade when
pushing and pulling but it leaves a wide swath sideways. That said you can cut whatever you
can fit into the mouth of the saw and the shape allows for creative shaping.
Cutting action is Omni-directional in thin material like stained glass but more forward and backward
cutting for
thicker harder materials. Leaves a smooth edge.
Blade Shape: Tear Drop .072 Diameter (front) x .150 (front to back), inside is pointed. Grit is aggressive.
Material Thickness Capacity: 3/4", normal use is fused glass, stained glass, ceramic tile, or stone. You may
have to remove the stabilizer foot to use the full 3/4" capacity.
What to Avoid: Do not cut thin dichroic glass as it will chip easily, demonstrate to students its action prior to
letting them use it, explaining the tear drop shape and its unique action.
Average Blade Life: 50-100 hours
Slicer Blade - (part# 1046) This is our thinnest blade and only cuts forward and backward. It
can grind slightly left and right, but take your time and it will turn on a dime or smaller. Its
action is just like that of a band saw but infinitely better in that you rotate the material into the
blade as you are cutting but you can in the middle of the cut without binding and head off in
any direction either backwards or forwards. This blade was developed for slicing material
quickly with a thin kerf (.040, 1mm) and it is the blade we recommend for use with the Super
Slicer, (a jig for slicing pattern bars and rods into thin repeatable wafers). Also it has finer
diamond so the cut is even smoother than all the other blades except for the dichro blade. Use
this blade with the heavy duty flocked belt to avoid splitting. This blade can turn on a dime and
do very intricate designs once you get used to it. Glass fusers love it.
Blade Shape: Flat .040 width x .150 length. Grit is fine.
Material Thickness Capacity: 3/4", normal use is for slicing thin wafers in rods and pattern bars, and scroll
cutting of fused glass up to 3/8" thickness.
Average Blade Life: 50-100 hours
Slim Blade - (part# 1043) Originally developed for the Taurus I thru II.2 series as a thinner
version of the standard blade. It has the same dimension as a standard or separating blade
front to back but is thinner as you look at it straight on. For this reason it i just as strong as a
Standard Blade but can cut quicker front to back and leave a slightly smaller kerf, (.062). It
cuts the same as a standard blade left o right and its action is omni-directional.
Blade Shape: Oval .062 x .072 (front to back). Grit is aggressive
Material Thickness Capacity: 3/8", normal use is 1/8" art glass, 1/4" wall tile.
What to Avoid: Do not use for ceramic tile, 3/8" fused glass pieces, or thick material in general.
Average Blade Life: 40-60 hours
Dichroic Blade - (part# 1049) NEW! This is the slim blade but coated it in super fine grit so
that it does not chip even the thinnest of dichroic glass. Its cut is super quick and leaves the
smoothest edge of all of the blades allows the use of lower firing temperatures in the
manufacture of jewelry and the like. Neat crisp edges add a note of professionalism with this
blade. Its action is omni-directional.
Blade Shape: Oval .058 x .072 (front to back). Grit is finest.
Material Thickness Capacity: 1/4", normal use is thinner than normal dichroic or iridized glass.
What to Avoid: Do not use for ceramic tile, 1/4" fused glass pieces, or thick material in general.
Average Blade Life: 40-60 hours
Speed Blade - (part# ....) Sometimes known as the inverted Mega blade we turned a mega
inside out and made it thinner. The result is a tear dropped shaped blade that is almost
unbreakable with the round part on the inside and the point on the outside. Its thinner profile
makes it our fastest most aggressive blade yet. When pushing forward into this blade it glides
through the thickest toughest materials with ease. It comes with a "Flocked belt" only as this is
the only belt that can handle its aggressive nature. Its action is omni-directional in stained
glass or soft wall tile and forward and backward for thicker or harder materials. When pushing
or pulling the material through with this blade it has a thinner kerf than a Standard, Mega, or
Slim blade. (.055).
Blade Shape: Tear Drop .055 inside x .150 (front to back). Grit is aggressive.
Material Thickness Capacity: 3/4", normal use is fused glass, stained glass, ceramic tile and stone. Note:
you will have to remove the stabilizer foot to use the full 3/4" capacity.
What to Avoid: Do not cut thin dichroic glass as it will chip easily. Demonstrate to students its action prior to
letting them use it, explaining the tear drop shape and its uniqueness.
Average Blade Life: 50-100 hours
TAURUS I, II AND II.2
These saws can use 4 of the previously mentioned blades. They have different part numbers
because the grommets are different. Please note the chart below for reference numbers. The
description and action of these blades is the same for all saws.
Standard Blade (Part# 1039)
Separating Blade (Part# 1041)
Slim Blade (Part# 1040)
Dichro Blade (Part# 1038)
TAURUS 3 EXTRAS
Slicer Blade & Belt Kit (Part# 1051)
Speed Blade and Belt Kit (Part# 1052)
Flocked Belt (Part# 0108) (Made especially for slicer blade and speed blade), this belt is
probably overkill for all other blades and it costs a little more. It has a Kevlar flocking or criss
crossed webbing that holds the rubber together so that it can't easily split.
ALL NEW TITAN TABLE SAW
Note: We have a new saw called the Titan. It was developed for those persons who could use
a small table saw along with the ability to cut curves. This saw will cut up to 12" long with very
straight cuts. It is great for glass tile, fused glass, slicing bottles, porcelain objects or bowls. It
utilizes a mega blade which leaves a great edge and is sturdy enough to that it can cut
intricate curves also. It is a great advantage to have this saw as it takes up little space,
(2"x18"), and gives you an extra ring saw if your partner is using the other one. This saw gives
the user the ability to use a full 3" of blade exposure for the working of hot glass projects.
Mega Blade Titan - (Part# 1048)
*Note: Always be sure to order genuine Gemini Saw parts as this assures your warranty and
that you will get maximum life out of the parts you purchase.
Thank you for choosing Gemini Saw Company, Inc. and allowing us the pleasure of helping to
unleash your imaginations.
Sincerely,
Jesse Cogswell
President