1
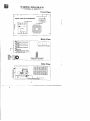
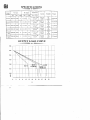
ELIXIR POWER CONVERTER / CHARGER
MODELS : ELX-12
ELX-20
ELX-25
ELX-30
ELX-20-240
ELX-25-240
640 Collins Road Elkhart, IN 46516 USA
SAFETY PRECAUTIONS
When operating your Elixir power converter, basic safety precautions should
always be followed to reduce the potential risk of ?re, electric shock and/or
injury to persons, including the following :
1. Read this owners manual thorouglily before operating your convertec
2. Do not allow any objects or liquid into the openings of your converter.
3. Do not place any flanullable materials such as gasoline near your convelter.
4. Do not cover or obstruct vei~tilati~ig
opening of YOLII.co11vertel:
Overheating may result.
5. To reduce the risk of fire or electric shock, do not remove any service
covers. No user's serviceable parts are inside. Repair shonld be done by
your dealer's authorized personnel only.
6. If you have any questions or commcnts about this product, please contact
your local dealer for assistance.
--B
FEATURES --
Your Elixir power convelter installed in your RV is the heart of the DC
electrical system. The power converter system carries full ETL, ETL-C
approval and bas been FCC Class B Certified. We are confident that it will
provide you outstaliding performance for many years. Features of your Elixir
power converter are:
1. Stable DC Power
Your converter provides stable DC power to operate the 12 volt DC lights
and motor in your RV whether a battery is installed or not.
2. Variable Speed Control Cooling Fan
Variable speed control cooling fan operates only when your converter is at
high load. The cooling fan will stop or just turn at low speed when power
demand is low (especially during sleeping hours).
3. Overload Protection
If your power demand ( including lights, motor and battery charge j
exceeds your converter output rating and voltage drops to 1 2 3 , the
audible alann will sound. Siinply reduce your power demand by turning
off the last item that triggered the alarm, the alarm will stop and your
converter will function again.
L
1
4. Low Reverse Current
Battery installed in your RV will not exhaust quickly during storage.
S. Short Circuit Protection
Your converter will shut down autotilatically if a sllort circuit is detected.
Once short circuit is corrected, the unit will function agaiu.
6. Reverse Polarity Protection
Your converter is equipped with a reverse polarity protection fuse ( DC
output fuse OUT4 ) that will be blown if the battely is not connected
correctly.
7. Constant Voltage
Your converter is designed with constant voltage of 13.5-13.6 volts at no-load
and >13.1 volts at full-load to ensure tronble-free service of all I2 volt DC
appliances.
8. Fast Battery Charging
For faster charging, turn the converter on and reduce the DC appliance
load on the unit.
9.Durable Performance
Your converter will provide you outstanding performance for inany years.
INSTALLATION
.*
1. Horizontal inount only in a vertical plane with the bottom edge of the front
face plate one inch above the floor (for door opening clearance). lnstall
your converter finnly on the mounting surface by using standard fasteners.
2. Do not tnoutit the converter in the same conlpartment as batteries or
flammable materials such as gasoline. Avoid high levels of dust, dirt or
moisture.
3. If the reverse polarity protection fuse ( DC output fuse OUT4 ) is blown
during installation, check to see that the battery has been connected
properly before replacing the fuses. Replace the fuses only with the same
type and rating as original fuses. Using other or larger fuses could result
in darnage to the converter.
4. Connect DC output red wire to positive lead of battery only.
5 . DC fuse holders for replaceable automotive-type fi~sesare located on the
upper right corner of the converter front face plate. Maximum fuse size
and circuit identification are provided to the left of the fuse holder.
6. For proper operation, your converter must be grounded to the chassis or
frame. A ground lug is provided on the back side of your converter.
WIRING DIAGRAM
Front View
I
1
(FRONT FACE PLATE REMOVED)
ACdLlnc) Breaker base
--
Back View
I
DC appliances (circuit #1)
BROWN
DC appliances (circu~t#2)
YELLOW:
DC appliances (circuit #3)
Access Hole For AC Input
Battery positive only
WHITE:
Negative(Ground) for battery
I Ground Lug To RV Chassis I
1
Side View
DC OUTPUT WIRING TO RV CIRCUIT
BLUE WIRE
BROWN WlRE
.:* YELLOW WIRE
+ RED WIRE
WHITE WIRE
*:
: Positive 12 volts for DC appliances (Circuit H1)
: Positive 12 volts for DC appliances (Circuit #2)
: Positive 12 volts for DC appliances (Circuit H3)
.:.
: Positive lead of 12 volts battery only
: Negative ofbattery and DC appliances
Q
OPERATION
(Ou
I
1. When 120VAC (240VAC for ELX-20-240 and ELX-25-240) is connected
to your converter via commercial power generation, your converter will
automatically provide power to operate 12VDC appliances (lights, motors)
in your RV. When 120VAC (240VAC for ELX-20-240 and ELX-25-240)
disconnects from your converter, the battery installed in your RV will
auton~aticallyprovide necessary power to operate DC appliances.
2. When 120VAC (240VAC for ELX-20-240 and ELX-25-240) is connected,
your converter will sense and provide primary power to the DC demand
source, while providing remaining current to the battery charge. Once the
RV battery is fully charged, your converter will reduce battery charge to a
maintenance rate until it falls below " f ~ ~chargeMagain.
ll
3. For faster batlery charge, turn on the converter and reduce DC appliance
load.
4. If your power demand ( lights, motors and battery charge ) exceeds your
converter amperage, and voltage drops to 12.5V, the audible alarm will
sound. Sinlply reduce the DC demand by turning off the last item of DC
appliance which triggered the alann, the alann will stop and your
converter will function again.
5. AC distribution panel contains the AC breakers for each of the 120VAC
(240VAC for ELX-20-240 a11d ELX-25-240) branch circuit of the RV. To
turn AC breaker ON or OFF, switch breaker-handle position as indicated
by visual ONIOFF. To reset a tripped breaker, switch breaker-handle to
OFF then ON.
6. DC distribution panel contains the 12VDC fuses for each of the 12VDC
Fosd circuits of the RV. The DC distributior. panel is dzsigned far b!ade
type fuses. If a fuse blows, do not replace with a fuse larger than indicated
on the label.
SPECIFICATIONS
ELX-25 100-120 50-60
10
13.1-13.5
25
7.13"X 11.87"
Xs,(17u
6.25" X
10.58"
ELX-30 100-120 50-60
10
13.1-13.5
30
7.13"X 11.87"
X5.h7,,
h.25"X
10.58"
13,1-13,5
20
7.13"x 11.87"
X 5.67"
6.25"X
10.58"
13.1- 13.5
25
7.13"X 11.87"
X 5.67"
6.25"X
10.58"
ELX-20 2oo-240 50-60
-240
ELX-25 200-240 50.60
-240
5
OUTPUT LOAD CURVE
*-am
7.13"
X
6.7 pounrls
1 1.87"
7-13"
6.8 pounds
X
l l , ~ 7 ~
7.&3"
6.6 pounds
11.87"
7-13"
X
6.7 pounds
11.87"
DIMENSIONS
WARRANTY
--Elixir Industries warrants this converter to be free ii-om defects in materials
or work~nanshipunder normal use and service for two years fiom thc date of
retail purchase and limits t l ~ eremedies to repair or replacement, at its
discretion, of any defective part or assembly. This warranty is limited to
original owner only and within the continental limits of the United States and
Canada. This warranty is extended specifically for and is limited to
recreational vehicle application.
If a problem should occur with your converter within the first 24 months of
purchase, please contact a dealer that handles warranties on your brand of RV.
Any i~npliedwarranties of n~crchantabilityand fitness for intended use are
limited in duration unless applicable Statc Law provides otherwise. You inay
have other rights as specified by each individual state.
This warranty does not apply to the following:
Any damage of convcrter causcd by misuse, improper installation or
accident .
Installation of converter in a commercial vehicle.
-3 Any converter whose serial number has been defaced, altered or removed.
*: Any converter that has been repaired or altered by an unauthorized person.
*:
.:.
WARRANTY REFERENCE RECORD
.-
For future Warranty reference, record the followmg:
Date of RV Purchase:
Converter Serial Number: