1
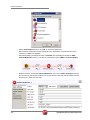
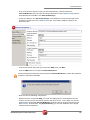
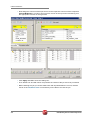
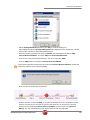
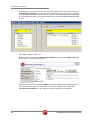
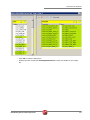
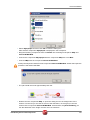
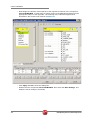
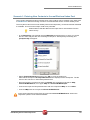
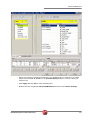
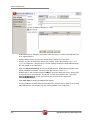
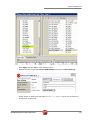
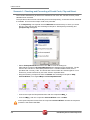
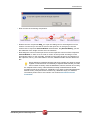
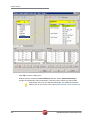
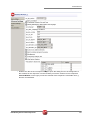
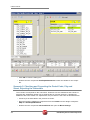
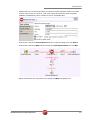
tUniservBTGeneric
tUniservBTGeneric
This component will be available in the Palette (Group Data Quality) of the studio on the
condition that you have subscribed to the relevant edition of Data Quality Service Hub Studio.
tUniservBTGeneric Properties
Component family
Data Quality
Function
tUniservBTGeneric enables the execution of a processing created
with the Uniserv product DQ Batch Suite
Purpose
Basic settings
Advanced settings
Schema and Edit
Schema
A schema is a row description, i.e., it defines
the number of fields that will be processed and
passed on to the next component. The
schema is either built-in or remote in the
Repository.
Click Retrieve Schema, to create a schema
for the components that matches the input and
output fields that are created in the job of the
DQ Batch Suite.
Hostname
Host, on which the Master Server of the DQ
Batch Suite runs, between double quotation
marks.
Port
Port number under which the DQ Batch Suite
server runs, between double quotation marks.
Client Server
Name of the client server of the DQ Batch
Suite between double quotation marks.
User name
User name for the registration on the DQ
Batch Suite server. The stated user must
have the right to execute the DQ Batch Suite
job.
Password
Password of the stated user.
Job directory
Directory in the DQ Batch Suite, in which the
job has been saved.
Job name
Name of the DQ Batch Suite job which is to be
executed.
Job file path
File name under which the job definition of the
DQ Batch Suite job which is to be executed is
to be saved. The path to the file must be stated
absolutely.
Temporary
directory
Directory in which the temporary files created
during job execution are to be filed.
Data Quality Service Hub Components
281
tUniservBTGeneric
Input Parameters
These parameters must correspond to the
parameters in the function Input (tab
"Format") of the job in the DQ Batch Suite.
File location: State whether the input file is
saved in the pool or the local job directory.
Directory: Is the File location = Pool, state the
directory relatively to the pool directory. Is the
File location = Job, "input" must be specified
here.
File name: Name of the delimiter file which
has been generated by tUniservBTGeneric
and is to be transferred to the DQ Batch Suite.
The file name must correspond to the file
name which is defined in the function Input of
the DQ Batch Suite job.
No. of header rec.: 0 = no header record, 1 =
header record in the input file
Field separator: Field separator as defined in
the function Input of the DQ Batch Suite job.
Output Parameters These parameters must correspond to the
parameters in the function Output (tab
"Format") of the job in the DQ Batch Suite.
File location: State whether the output file is to
be saved in the pool or the local job directory.
Directory: Is the File location = Pool, state the
directory relatively to the pool directory. Is the
File location = Job, "output" must be specified
here.
File name: Name of the output file in the
delimiter format, which is created by the DQ
Batch Suite job. The file name must
correspond to the file name which is defined in
the function Output of the DQ Batch Suite job.
No. of header rec.: 0 = no header record,
1 = header record in the output file.
Field separator: Field separator as defined in
the function Output of the DQ Batch Suite job.
Usage
282
The component tUniservBTGeneric transmits the data to the DQ
Batch Suite and starts the specified DQ Batch Suite job. When the
DQ Batch Suite is finished the output data of the job is retransmitted
to the Data Quality Service Hub Studio and can be processed with
any components.
Data Quality Service Hub Components
tUniservBTGeneric
Limitation/Prerequisites To be able to use the tUniservBTGeneric component the Uniserv
software DQ Batch Suite must be installed.
Please observe the following notes:
• The job must be configured executably in the DQ
Batch Suite.
• The user must have the authorization to carry out the
DQ Batch Suite job.
• The DQ Batch Suite job may only have one line.
• The files defined in the functions Input and Output
must posses the record format delimiter.
• Input and output data must be provided in the UTF-8
character set.
Scenario: Execution of a Job in the DQ Batch Suite
This scenario describes a batch job with which the input source for a DQ Batch Suite job is
provided by the Data Quality Service Hub Studio, the job is started and executed and the
results can then be processed in the Data Quality Service Hub Studio.
The job was completely defined in the DQ Batch Suite and saved under the name
"BTGeneric_Sample". In the function Input the file "btinput.csv" was specified as the input file
saved in the job directory and all fields were assigned. The file is not yet existent physically as
it will only be provided by the Data Quality Service Hub Studio, so that the job cannot yet run.
In the Data Quality Service Hub Studio the input source (here a table from an Oracle data base)
for this scenario was already saved in the Repository, so that all schema meta data is available.
Of course other steps could have preceded.
• In the Repository view expand the tree Meta data and the directory in which you saved
the source. Then drag this source into the design workspace. Subsequently the dialog
box [Components] will appear.
Data Quality Service Hub Components
283
tUniservBTGeneric
• Select tOracleInput and then click OK to close the dialog box.
After that the component will be displayed in the workspace. The table used in this
scenario is called LOCATIONS.
• Drag the following components from the Palette into the design workspace: tMap,
tUniservBTGeneric and e.g. for further processing another tMap and tOracleOutput.
• Double click the component tUniservBTGeneric, then select Basic Settings and enter
the connection data to the DQ Batch Suite job. Observe that the absolute path must be
entered in the field Job File Path.
284
Data Quality Service Hub Components
tUniservBTGeneric
• Then click Retrieve Schema. Doing so will automatically create a schema for
tUniservBTGeneric from the input and output definitions of the DQ Batch Suite job and
automatically fill the fields in the Advanced Settings.
• Check the details in the Advanced Settings. The definitions for input and output must
be defined exactly as in the DQ Batch Suite job. If necessary adapt the path for the
temporary files.
• Connect the Oracle input with the component tMap via a row Main.
• Connect tMap with the component tUniservBTGeneric.
At this point adopt the schema from the component tUniservBTGeneric. Answer the respective
question in the window with Yes.
• Now connect the following components.
• Double click the component tMap_1 to open the dialog box for the assignment of the
schema. On the left you see the structure of the input source, on the right you see the
schema of the component tUniservBTGeneric (and thus also of the input into the job DQ
Batch Suite). At the bottom, the [Schema Editor], you see the attributes of the single
columns and can edit them.
Data Quality Service Hub Components
285
tUniservBTGeneric
• Now assign the columns of the input source to the respective columns of the component
tUniservBTGeneric. In order to do so mark a column of the input source and drag it on
the appropriate column on the right side.
• Click Apply and OK to close the dialog box.
• Then define how and with which components the results of the job are to be processed.
• Before starting the job you should make sure that all path details are correct, that the
server of the DQ Batch Suite runs and that you are able to access the job.
286
Data Quality Service Hub Components
tUniservRTConvertName
tUniservRTConvertName
This component will be available in the Palette (Group Data Quality) of the studio on the
condition that you have subscribed to the relevant edition of Data Quality Service Hub Studio.
tUniservRTConvertName Properties
Component family
Data Quality
Function
tUniservRTConvertName analyzes the name line in a context
sensitive way, for private persons it divides the name line into
segments (name, first name, title, name prefixes, name suffixes,...)
and establishes the address key.
The component recognizes company or institution addresses and is
able to provide the form of the organization separately. It also
divides lines that contain information on several persons to single
persons and is also able to recognize certain patterns in that do not
belong to the name information in the name line (customer number,
handling notes etc.) and remove them or defer them to special
memo fields.
Purpose
Provides the basis for a uniform structuring and filing of person and
company names in the data base as well as the personalized
salutation
Basic settings
Schema and Edit
Schema
A schema is a row description, i.e., it defines
the number of fields that will be processed and
passed on to the next component. The
schema is either built-in or remote in the
Repository.
Hostname
Server host name between double quotation
marks.
Port
Listening port number of the server between
double quotation marks.
Service
The service type/name is "cname_d", by
default. Enter a new name if necessary (e.g.
due to service suffix), between double
quotation marks. Available services:
Germany
Italy
Austria
Netherlands
Switzerland
Belgium
France
Spain
Data Quality Service Hub Components
"cname_d"
"cname_i"
"cname_a"
"cname_nl"
"cname_ch"
"cname_b"
"cname_f"
"cname_e"
287
tUniservRTConvertName
Advanced settings
Use rejects
Select this option to separately output data
sets from a certain result class of the name
analysis onward. Then enter the respective
result class in the field if result class is greater
or equal to.
If this option is not active, the sets are still
output on the main connection even if the
analysis failed.
If the option Use rejects is active, the rejects
connection however not connected, the sets
are simply sorted out when the analysis failed.
Analysis
Configuration
For detailed information please refer to the
Uniserv user manual convert-name.
Output
Configuration
For detailed information please refer to the
Uniserv user manual convert-name.
Configuration of
not recognized
input
For detailed information please refer to the
Uniserv user manual convert-name.
Configuration of
free fields
For detailed information please refer to the
Uniserv user manual convert-name.
Cache
Configuration
For detailed information please refer to the
Uniserv user manual convert-name.
Usage
Limitation/Prerequisites To be able to use the tUniservRTConvertName component the
Uniserv software convert-name must be installed.
Scenario: Analysis of a Name Line and Assignment of the Salutation
This scenario describes a batch job with which the personal names from a file are analyzed and
assigned to a salutation.
The input file for this scenario was already saved in the Repository, so that all schema meta data
is available. Of course other steps could have preceded.
Please observe that the data from the input source must all stem from the
same country.
• In the Repository view expand the tree Meta data and the directory in which you saved
the file. Then drag this file into the design workspace. Subsequently the dialog box
[Components] will appear.
288
Data Quality Service Hub Components
tUniservRTConvertName
• Select tFileInputDelimited and then click OK to close the dialog box.
After that the component tFileInputDelimited will be displayed in the workspace. The file
used in this scenario is called SampleAddresses.
• Drag the following components from the Palette into the design workspace: tMap,
tUniservRTConvertName, and again tMap and tFileOutputDelimited.
• Connect the input file SampleAddresses with the component tMap.
• Connect tMap with the component tUniservRTConvertName.
At this point adopt the schema from the component tUniservRTConvertName. Answer the
respective question in the window with Yes.
• Now connect the remaining components.
• Double click the component tMap_1, to open the dialog box for the assignment of the
schema. On the left you see the structure of the input file, on the right you see the
schema of the component tUniservRTConvertName. At the bottom, the [Schema
Editor], you see the attributes of the single columns and can edit them.
Data Quality Service Hub Components
289
tUniservRTConvertName
• Now assign the columns of the input source to the respective columns of the component
tUniservRTConvertName. In order to do so mark a column of the input source and drag
it on the appropriate column on the right side. If fields from the input file are to be passed
on to the output file, like e.g. the address fields or IDs, you have to define additional fields
for this.
• Click OK to close the dialog box.
• Double click the component tUniservRTConvertName and then select Basic Settings,
to specify the country-specific service.
• Double click the second component tMap to open the dialog box for the assignment of
the schema for the output file. On the left you see the schema of the component
tUniservRTConvertName, on the right you see the schema of the output file.
290
Data Quality Service Hub Components
tUniservRTConvertName
• Click OK to close the dialog box.
• Double click the component tFileOutputDelimited and enter the details for the output
file.
Data Quality Service Hub Components
291
tUniservRTMailBulk
tUniservRTMailBulk
This component will be available in the Palette (Group Data Quality) of the studio on the
condition that you have subscribed to the relevant edition of Data Quality Service Hub Studio.
tUniservRTMailBulk Properties
Component family
Data Quality
Function
Creates an index pool for mailRetrieval with predefined input
data.
Purpose
Prepares the index pool for duplicate search.
Basic settings
Schema and Edit
Schema
A schema is a row description, i.e., it
defines the number of fields that will be
processed and passed on to the next
component. The schema is either built-in or
remote in the Repository.
Hostname
Server host name between double
quotation marks.
Port
Listening port number of the server
between double quotation marks.
Service
The service type/name is "mail", by
default. Enter a new name if necessary
(e.g. due to service suffix), between double
quotation marks.
Uniserv
Parameters
For detailed information please refer to the
Uniserv user manual mailRetrieval.
tStatCatcher
Statistics
Select this check box to collect log data at
the Job and the component levels.
Advanced settings
Usage
An input component and a map is needed to read the address
from the data base or the file. The component does not have an
output connections,
Limitation
To be able to use the tUniservRTMailBulk component the
Uniserv software mailRetrieval must be installed.
Scenario: Creating an Index Pool
This scenario describes a batch job, with which the address list of an SQL data base is loaded
into the index pool.
The data base for this scenario was already saved in the Repository, so that all schema meta
data is available.
• In the Repository view expand the tree Meta data and the directory in which you saved
the data base. Then drag this data base into the design workspace. Subsequently the
dialog box [Components] will appear.
292
Data Quality Service Hub Components
tUniservRTMailBulk
• Select tMysqlInput and then click OK to close the dialog box.
After that the component tMysqlInput is displayed in the workspace.
• Drag the following components from the Palette into the design workspace: tMap and
tUniservRTMailBulk.
• Connect the component tMysqlInput with the component tMap via a row Main.
• Connect tMap with the component tUniservRTMailBulk.
At this point adopt the schema from the component tUniservRTMailBulk. Answer the respective
question in the window with Yes.
• The job should then look approximately like this:
• Double click the component tMap, to open the dialog box for the assignment of the
schema. On the left you see the structure of the data base, on the right you see the
schema of the component tUniservRTMailBulk. At the bottom, the [Schema Editor], you
see the attributes of the single columns and can edit them.
Data Quality Service Hub Components
293
tUniservRTMailBulk
• Now assign the columns of the input file to the respective columns of the component
tUniservRTMailBulk. In order to do so mark a column of the data base and drag it on the
appropriate column on the right side. The meaning of the individual arguments is
described in the Uniserv user manual mailRetrieval.
• Click Apply and OK to close the dialog box.
• Double click the component tUniservRTMailBulk, then select the Basic Settings, and
adapt the server settings if necessary.
294
Data Quality Service Hub Components
tUniservRTMailBulk
• Then select Advanced Settings to adapt the server parameters.
Data Quality Service Hub Components
295
tUniservRTMailOutput
tUniservRTMailOutput
This component will be available in the Palette (Group Data Quality) of the studio on the
condition that you have subscribed to the relevant edition of Data Quality Service Hub Studio.
tUniservRTMailOutput Properties
Component family
Data Quality
Function
Updates the index pool which is used for duplicate search.
Purpose
Keeps the index pool synchronous.
Basic settings
Schema and Edit
Schema
A schema is a row description, i.e., it
defines the number of fields that will be
processed and passed on to the next
component. The schema is either built-in or
remote in the Repository.
Hostname
Server host name between double
quotation marks.
Port
Listening port number of the server
between double quotation marks.
Service
The service type/name is "mail", by
default. Enter a new name if necessary
(e.g. due to service suffix), between double
quotation marks.
Action on data
Select the operation you want to carry out
on the index pool. Either:
Insert: inserts a new record in the index
pool; this request fails, if the record with the
given reference already exist in the index
pool
Update: updates an existing record in the
index pool; this request fails, if the record
with the given reference doesn't exist in the
index pool
Insert or update: inserts a new record in
the index pool; if the record with the given
reference already exists, an update would
be made
Update or insert: updates the record with
the given reference; if the record doesn't
exist in the index pool, a new record would
be inserted
Delete: delete the record with the given
reference from the index pool.
Uniserv
Parameters
For detailed information please refer to the
Uniserv user manual mailRetrieval.
tStatCatcher
Statistics
Select this check box to collect log data at
the Job and the component levels.
Advanced settings
296
Data Quality Service Hub Components
tUniservRTMailOutput
Usage
This component updates the index pool and passes the input
set on. The output is amended by the status of the operation.
If the operation has not been carried out successfully an error
message supplies additional information.
Limitation
To be able to use the tUniservRTMailOutput component the
uniserv software mailRetrieval must be installed.
Before the first use of tUniservRTMailOutput an index
pool has to be created. You can create the index pool with
tUniservRTMailBulk.
Related scenarios
For a related scenario, see Scenario 1: Entering New Contacts in the mailRetrieval Index Pool
on page 299.
Data Quality Service Hub Components
297
tUniservRTMailSearch
tUniservRTMailSearch
This component will be available in the Palette (Group Data Quality) of the studio on the
condition that you have subscribed to the relevant edition of Data Quality Service Hub Studio.
tUniservRTMailSearch Properties
Component family
Data Quality
Function
Searches for similar data based on the given input record.
Purpose
Searches for duplicate values and can apply additional data to
each record.
Basic settings
Schema and Edit
Schema
A schema is a row description, i.e., it
defines the number of fields that will be
processed and passed on to the next
component. The schema is either built-in or
remote in the Repository.
Hostname
Server host name between double
quotation marks.
Port
Listening port number of the server
between double quotation marks.
Service
The service type/name is "mail", by
default. Enter a new name if necessary
(e.g. due to service suffix), between double
quotation marks.
Maximum of
displayed
duplicates
(0 = All)
Enter the maximum number of duplicates
to be displayed in the Run view. The
default value is 0, which means that all
duplicates will be displayed (max. 1000
duplicates can be displayed).
Use rejects
Select this check box to set parameters
based on which duplicate records should
be added to the reject flow. Then set the:
Element: Duplicate count.
Operator: Either <; <=; =; >= ; >.
Value: Enter the number manually.
Uniserv
parameters
For detailed information please refer to the
Uniserv user manual mailRetrieval.
tStatcatcher
Statistics
Select this check box to collect log data at
the Job and the component levels.
Advanced Settings
298
Usage
This component requires an input component and one or more
output components.
Limitation
To be able to use the tUniservRTMailSearch component the
Uniserv software mailRetrieval must be installed.
Before the first use of tUniservRTMailSearch an index
pool has to be created. You can create the index pool with
tUniservRTMailBulk.
Data Quality Service Hub Components
tUniservRTMailSearch
Scenario 1: Entering New Contacts in the mailRetrieval Index Pool
This scenario describes a batch job with which new contacts can be entered in the index pool
of mailRetrieval. Before entering it must be checked whether these contacts already exist.
The entry file for this scenario was already saved in the Repository, so that all schema meta data
is available. Of course other steps could have preceded.
Please observe that the data from the input source must all stem from the
same country.
• In the Repository view expand the tree Meta data and the directory in which you saved
the file. Then drag this file into the design workspace. Subsequently the dialog box
[Components] will appear.
• Select tFileInputDelimited and then click OK to close the dialog box.
After that the component tFileInputDelimited will be displayed in the workspace. The file
used in this scenario is called SampleAddresses.
• Drag the following components from the Palette into the design workspace: tMap,
tUniservRTMailSearch, once again tMap and tUniservRTMailOutput.
• Connect the input file SampleAddresses with the component tMap via a row Main.
• Connect tMap with the component tUniservRTMailSearch.
At this point adopt the schema from the component tUniservRTMailSearch. Answer the
respective question in the window with Yes.
Data Quality Service Hub Components
299
tUniservRTMailSearch
• Now connect the remaining components with a row Main and adopt the schema of the
target component also in the connection to tUniservRTMailOutput.
• Double click the component tMap_1 to open the dialog box for the assignment of the
schema. On the left you see the structure of the input source, on the right you see the
schema of the component tUniservRTMailSearch. At the bottom, the [Schema Editor],
you see the attributes of the single columns and can edit them.
• Now assign the columns of the input file to the respective columns of the component
tUniservRTMailSearch. In order to do so mark a column of the input source and drag it
on the appropriate column on the right side.
300
Data Quality Service Hub Components
tUniservRTMailSearch
• When your input list contains a reference ID, you should adopt it. In order to do so create
a new column called IN_DBREF in the [Schema Editor] and then connect it with your
reference ID.
• Click Apply and than OK to close the dialog box.
• Double click the component tUniservRTMailSearch and then select Basic Settings.
Data Quality Service Hub Components
301
tUniservRTMailSearch
• Under Maximum of displayed "duplicates" enter the figure 0, because all duplicates are
to be registered here.
• Activate Define rejects to open the window for the definition of the reject.
• Insert a new line in the window above the + Button. Select the Element Duplicate
count, the Operator > with the Value 0. So all existing contacts are disqualified and only
the new added to the index pool.
• Open the Advanced Settings and check the parameters. Reasonable parameters are
preset. Detailed information can be found in the manual mailRetrieval.
• Double click on the second component tMap to open the dialog box for the assignment
of the schema for the output file. On the left you see the schema of the component
tUniservRTMailSearch, on the right you see the schema of the component
tUniservRTMailOutput.
• Click Auto map! to assign the fields automatically.
• The only field that must be assigned manually is the reference ID. In order to do so drag
OUT-DBREF from the left side onto the field IN_DBREF on the right side.
302
Data Quality Service Hub Components
tUniservRTMailSearch
• Click Apply and then OK to close the dialog box.
• Double click the component tUniservRTMailOutput and open the Basic Settings.
• Under Action on Data select the option Insert or update. So all new contacts are
entered in the index pool.
Data Quality Service Hub Components
303
tUniservRTPost
tUniservRTPost
This component will be available in the Palette (Group Data Quality) of the studio on the
condition that you have subscribed to the relevant edition of Data Quality Service Hub Studio.
tUniservRTPost Properties
Component family
Data Quality
Function
The Uniserv postal validation and correction of addresses is an
optimal instrument to improve the quality of your addresses.
You will immediately become more successful in your
personalized 1:1 marketing, reduce your costs and increase
the efficiency and cost-effectiveness of your address
management in all of the applications you use.
Purpose
Faultless postal addresses are of key importance when
conducting efficient CRM and carrying on successful
e-business. They are an absolute necessity for reducing
postage and advertising costs and receiving more favorable
postage rates. Faultless addresses are also necessary for
improving the results of address comparisons and interactive
address searches.
Furthermore, correct postal addresses are a good prerequisite
for increasing the quality of duplicate recognition, data
clustering or of micromarketing.
Basic settings
304
Schema and Edit
Schema
A schema is a row description, i.e., it
defines the number of fields that will be
processed and passed on to the next
component. The schema is either built-in or
remote in the Repository.
Hostname
Server host name between double
quotation marks.
Port
Listening port number of the server
between double quotation marks.
Service
The service type/name is "post", by
default. Enter a new name if necessary
(e.g. due to service suffix), between double
quotation marks.
Data Quality Service Hub Components
tUniservRTPost
Use rejects
Select this check box, to collect faulty
addresses on the rejects connection.
Usually those are the addresses with the
post result class 5. Valid values for the
result class are 1-5. The value must be
written between double quotation marks.
If this check box is not selected the faulty
addresses are output on the main
connection.
When the check box Use rejects is
selected, the rejects connection, however,
not connected, the faulty addresses are
simply rejected.
Advanced Settings
Use File for
ambiguous
results
When an address cannot be corrected
unambiguously, a selection list is created.
This list can be further processed via the
AMBIGUITY connection. All potential
result candidates then run via this
connection. The schema of this connection
is preinitialized with the arguments of the
dissolved selection list of the service 'post'.
Select the check box, to additionally write
the selection list into a file. The file name
can be defined using the browse button.
Uniserv
Parameters
Select this check box to define the
corresponding parameters. For detailed
information please refer to the Uniserv
user manual International Postal
Framework.
tStatcatcher
Statistics
Select this check box to collect log data at
the Job and the component levels.
“Full address”
selection list
Select the check box next to Display to
select all of the columns. Otherwise, select
the check box next to the particular
columns you want to display.
Controls the content of the file for
ambiguous addresses, if this is configured
(Basic settings, File for amb. results). Only
selected columns would be written into the
file.
Usage
The component requires an input set. Its postal validation will
then be checked. In case of an unambiguous result the
corrected set will be output via the MAIN connection. If the
address has been ambiguous the potential candidates will be
output via the AMBIGUITY connection. If an address was not
found it will be passed on via the REJECT connection.
Limitation
To be able to use the tUniservRTPost component the Uniserv
software International Postal Framework as well as the
required post servers must be installed.
Data Quality Service Hub Components
305
tUniservRTPost
Scenario 1: Checking and Correcting of Postal Code, City and Street
This scenario describes a job with which addresses from a file are checked for their postal
validation and corrected.
The input file for this scenario was already saved in the Repository, so that all schema meta data
is available. Of course other steps could have preceded.
• In the Repository view expand the tree Meta data and the directory in which you saved
the file. Then drag this file into the design workspace. Subsequently the dialog box
[Components] will appear.
• Select tFileInputDelimited and then click OK to close the dialog box.
After that the component tFileInputDelimited will be displayed in the workspace. The file
used in this scenario is called SampleAddresses. It contains address data, that is
provided with a country code. The street and house number are saved together in one
street line, postal code and city are each saved in separate fields.
• Drag the following components from the Palette into the design workspace: tMap,
tUniservRTPost, once again tMap and tFileOutputDelimited.
• Connect the input file SampleAddresses with the component tMap_1.
• Connect tMap_1 with the component tUniservRTPost via a row Main.
At this point adopt the schema from the component tUniservRTPost. Answer the respective
question in the window with Yes.
306
Data Quality Service Hub Components
tUniservRTPost
• Now connect the remaining components.
• Double click the component tMap_1 to open the dialog box for the assignment of the
schema. On the left you see the structure of the input file, on the right you see the
schema of the component tUniservRTPost. At the bottom, the [Schema Editor], you see
the attributes of the single columns and can edit them.
• Now assign the columns of the input source to the respective columns of the component
tUniservRTPost. In order to do so mark a column of the input file and drag it on the
appropriate column on the right side. If fields from the input file are to be passed on to
the output file, like e.g. the name fields or the IDs, additional fields must be defined for
this.
When assigning consider that street and house number can either be saved
together in one street line of individually in separate fields. Should your data
list not contain a country code, the addresses, however, are from one country,
the respective ISO-country code should be manually entered between double
quotation marks in the column IN_COUNTRY. If you have an international data list
without country code just leave the column IN_COUNTRY empty. For detailed
information please refer to the Uniserv user manual International Postal
Framework.
Data Quality Service Hub Components
307
tUniservRTPost
• Click OK to close the dialog box.
• Double click the component tUniservRTPost and then select Advanced Settings to
change the parameters and field lengths if necessary and to select the output fields.
Please take care to have a sufficient field length. For detailed information
please refer to the Uniserv user manual International Postal Framework.
308
Data Quality Service Hub Components
tUniservRTPost
• Double click the second component tMap to open the dialog box for the assignment of
the schema for the output file. On the left side you see the schema of the component
tUniservRTPost, on the right you see the schema of the output file. Here fields can e.g.
also be concatenated.
Data Quality Service Hub Components
309
tUniservRTPost
• Click OK to close the dialog box.
• Double click the component tFileOutputDelimited and enter the details for the output
file.
Scenario 2: Checking and Correcting the Postal Code, City and
Street, Rejecting the Unfeasible
This scenario corresponds to the one before. However here the addresses that cannot be
assigned are additionally written into a separate file for manual checking. If ambiguous
addresses are to be written in a separate file, the procedure is the same as described here.
• Create a job as described in the previous scenario.
• Drag the following additional components from the Palette into the design workspace:
tMap and tFileOutputDelimited.
• Double click the component tUniservRTPost and open the Basic Settings.
310
Data Quality Service Hub Components
tUniservRTPost
• Activate the box Use rejects and enter "5" between double quotation marks in the field
if result class greater or equals to. This is the result class from the check for postal
validation for addresses, which contain too few or unfeasible data.
• Connect the component tUniservRTPost with the component tMap via a row Rejects.
• Connect the component tMap with the component tFileOutputDelimited via a row Main.
• Select the fields for the output file in the component tMap and assign them.
Data Quality Service Hub Components
311
tUniservRTPost
312
Data Quality Service Hub Components