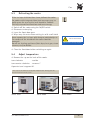
1
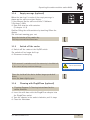
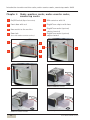
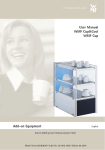
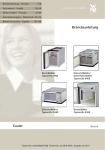
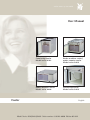
coffee wakes up the world User Manual Countertop cooler Model series 9192 Under-machine cooler / under-counter cooler Model series 9469 Under-machine cooler Model series 9468 Countertop cooler Model series 9469 Cooler Model Series 9192 / 9468 / 9469 Order number 33 0916 8000 Edition 05.2011 English Introduction and General information Congratulations on choosing your WMF cooler You will be impressed by its technical design and durability. Keep these instructions near the coffee machine so that you and your operating staff have the right information handy and can take the correct action in the event of any technical problems that may arise. Caution. Please read the user manual prior to using the device. Ensure that the staff have access to the User Manual. Important. Chapter 1 Introduction Follow the User Manual Signs and Symbols. Observe the Safety chapter. 30 User Manual WMF Cooler Table of Contents Chapter 1 1.1 Under-machine cooler Under-machine cooler, under-counter cooler, countertop cooler Care 35 35 35 36 36 37 37 39 39 39 40 40 40 41 41 41 42 43 43 43 44 44 44 45 45 45 46 46 46 47 47 Safety 48 Hazard to the operator Hazard to the device Directives Duties of the owner /operator Warranty claims User Manual WMF Cooler 35 35 38 Cleaning the milk container / milk hose Cleaning the inside of the cooler Defrosting the cooler Adjust temperature Chapter 6 6.1 6.2 6.3 6.4 6.5 34 Operating the under-machine cooler, under-counter cooler, countertop cooler 9469 4.1.1 Starting up the cooler. . . . . . . . . . . . . . . . . . . . . . . . . . . . . . . . . . . . . . . . . . . . . . . . 4.1.2 Switch on the cooler . . . . . . . . . . . . . . . . . . . . . . . . . . . . . . . . . . . . . . . . . . . . . . . . . 4.1.3 Filling the milk container. . . . . . . . . . . . . . . . . . . . . . . . . . . . . . . . . . . . . . . . . . . . . . One milk type . . . . . . . . . . . . . . . . . . . . . . . . . . . . . . . . . . . . . . . . . . . . . . . . . . . . . Two milk types . . . . . . . . . . . . . . . . . . . . . . . . . . . . . . . . . . . . . . . . . . . . . . . . . . . . 4.1.4 Empty message (optional). . . . . . . . . . . . . . . . . . . . . . . . . . . . . . . . . . . . . . . . . . . . . 4.1.5 Switch off the cooler. . . . . . . . . . . . . . . . . . . . . . . . . . . . . . . . . . . . . . . . . . . . . . . . . 4.1.6 Cleaning with Plug&Clean (optional) . . . . . . . . . . . . . . . . . . . . . . . . . . . . . . . . . . . . Chapter 5 5.1 5.2 5.3 5.4 Countertop cooler Operating the Under-machine cooler 9468 3.1.1 Starting up the cooler. . . . . . . . . . . . . . . . . . . . . . . . . . . . . . . . . . . . . . . . . . . . . . . . 3.1.2 Switch on the cooler . . . . . . . . . . . . . . . . . . . . . . . . . . . . . . . . . . . . . . . . . . . . . . . . . 3.1.3 Filling the milk container. . . . . . . . . . . . . . . . . . . . . . . . . . . . . . . . . . . . . . . . . . . . . . One milk type . . . . . . . . . . . . . . . . . . . . . . . . . . . . . . . . . . . . . . . . . . . . . . . . . . . . . Two milk types . . . . . . . . . . . . . . . . . . . . . . . . . . . . . . . . . . . . . . . . . . . . . . . . . . . . 3.1.4 Empty message (optional). . . . . . . . . . . . . . . . . . . . . . . . . . . . . . . . . . . . . . . . . . . . . 3.1.5 Switch off the cooler. . . . . . . . . . . . . . . . . . . . . . . . . . . . . . . . . . . . . . . . . . . . . . . . . 3.1.6 Cleaning with Plug&Clean (optional) . . . . . . . . . . . . . . . . . . . . . . . . . . . . . . . . . . . . Chapter 4 4.1 33 Operating the countertop cooler 9192 2.1.1 Starting up the cooler. . . . . . . . . . . . . . . . . . . . . . . . . . . . . . . . . . . . . . . . . . . . . . . . Countertop cooler next to the coffee machine (prestolino!, presto!, 1800 S, 2000 S). . . . . . . . . . . . . . . . . . . . . . . . . . . . . . . . . . Countertop cooler next to the coffee machine (bistro!) . . . . . . . . . . . . . . . . . . . 2.1.2 Switch on the cooler . . . . . . . . . . . . . . . . . . . . . . . . . . . . . . . . . . . . . . . . . . . . . . . . . 2.1.3 Filling the milk container. . . . . . . . . . . . . . . . . . . . . . . . . . . . . . . . . . . . . . . . . . . . . . 2.1.4 Empty message (optional). . . . . . . . . . . . . . . . . . . . . . . . . . . . . . . . . . . . . . . . . . . . . 2.1.5 Switch off the cooler. . . . . . . . . . . . . . . . . . . . . . . . . . . . . . . . . . . . . . . . . . . . . . . . . 2.1.6 Cleaning with Plug&Clean (optional) . . . . . . . . . . . . . . . . . . . . . . . . . . . . . . . . . . . . Chapter 3 3.1 33 User Manual Signs and Symbols Chapter 2 2.1 Introduction and General information 48 49 50 50 51 31 Table of Contents Chapter 7 7.1 7.2 Technical data Cooler technical data Conditions for usage and installation 52 52 53 Chapter 8 Malfunctions 54 Chapter 9 Accessories and spare parts 54 Spare parts for countertop coolers 9192 Spare parts for Under-machine cooler 9468 Spare parts for under-machine cooler, under-counter cooler, countertop cooler 9469 9.1 9.2 9.3 32 54 55 55 User Manual WMF Cooler Introduction and General information Chapter 1 Introduction and General information 1.1 User Manual Signs and Symbols For a detailed description of the warnings, see the "Safety" chapter. Caution. Risk to the machine. Follow the manual. Caution. Risk to the user. Observe the Safety chapter. Caution. Bruising or crushing hazard. Observe the Safety chapter. Tip Instructions User Manual WMF Cooler Cross reference 33 Introduction to Countertop coolers 9192 Chapter 2 Countertop cooler 1 On/Off switch 5 Milk container with lid 2 Front door with seal 6 Plug&Clean adapter with hose 3 Hose outlet to the machine 7 Plug&Clean adapter inserted 4 Door lock (optional, not shown) 8 Plug&Clean adapter locked 1 3 6 5 2 7 8 34 User Manual WMF Cooler Operating the countertop cooler 9192 2.1 2.1.1 Operating the countertop cooler 9192 Starting up the cooler If it cannot be guaranteed that the cooler was transported in a standing position, it must be given at least 2 hours to stand in a vertical position before switching on. Follow the manual. Observe the Safety chapter. Countertop cooler next to the coffee machine (prestolino!, presto!, 1800 S, 2000 S). Remove the hose guide spout and insert it through the hole in the cooler from the outside Cut off the spout on the inside if necessary Connect the milk hose (see illustration) Countertop cooler next to the coffee machine (bistro!) Place the cooler next to the bistro!, so that the hose guide spout extends through the hole in the cooler and through the bistro! inlet Connect milk hose as shown in the illustration 2.1.2 Switch on the cooler Plug in the mains plug Switch on the cooler at the On/Off switch The switch lights up in green. The cooler reaches operating temperature after about 60 minutes. • The cooler keeps the milk cool but cannot cool down warm milk. • Always use milk that is already cool. User Manual WMF Cooler 35 Operating the countertop cooler 9192 2.1.3 Filling the milk container Open the front door Pull out the milk container Push the lid of the milk container back The milk hose remains attached. Pour milk into the milk container Place the lid back on the container Push the milk container back in carefully Close the front door • The milk nozzle is placed on the milk foamer on the machine. • Do not kink the milk hose. Connect milk w User manual coffee machine 2.1.4 Empty message (optional) Refill milk When the low-level is reached, the empty message is shown on the coffee machine display. w User Manual for the coffee machine w S oftware w S ettings w Milk. Filling the milk container w Chapter 2.1.3 Confirm filling the milk container by pressing OK on the display The low-level warning goes out. Keep the interior of the cooler dry. This helps to avoid malfunctions. 36 User Manual WMF Cooler Operating the countertop cooler 9192 2.1.5 Switch off the cooler Switch off the cooler at the On/Off switch The switch will no longer be lit up. Disconnect mains plug If this manual is not observed, the warranty is invalidated in the event of any resultant damage. Follow the manual. Observe the Safety chapter. Clean the inside of the device before longer periods of disuse. Leave the door slightly open. 2.1.6 Cleaning with Plug&Clean (optional) Cleaning Program w Cleaning instructions for the coffee machine. Insert the milk hose with the Plug&Clean adapter into the Plug&Clean socket Turn the adapter in the socket clockwise, until it stops Close the front door User Manual WMF Cooler 37 Introduction to under-machine cooler 9468 Chapter 3 Under-machine cooler 1 On/Off switch (Open front door) 5 Milk container with lid 2 Front door with seal 6 Plug&Clean adapter with hose 3 Hose outlet to the machine 7 Plug&Clean socket (optional) adapter inserted 4 Door lock (optional) 8 Plug&Clean socket (optional) adapter locked 1 6 2 5 3 8 7 4 38 User Manual WMF Cooler Operating the under-machine cooler 9468 3.1 3.1.1 Operating the Under-machine cooler 9468 Starting up the cooler If it cannot be guaranteed that the cooler was transported in a standing position, it must be given at least 2 hours to stand in a vertical position before switching on. Follow the manual. Observe the Safety chapter. Connect the milk hoses (see illustration) The blue milk hose is for milk type 2 (e.g., skim milk). Do not kink the milk hoses. Hose routing for one type of milk Hose routing for two types of milk 3.1.2 Switch on the cooler Plug in the mains plug Switch on the cooler at the On/Off switch The switch lights up in green. The cooler reaches operating temperature after about 60 minutes. • The cooler keeps the milk cool but cannot cool down warm milk. • Always use milk that is already cool. User Manual WMF Cooler 39 Operating the under-machine cooler 9468 3.1.3 Filling the milk container Connect milk w User manual coffee machine One milk type Open the front door Pull out the milk container Push the lid of the milk container back The milk hose remains attached. Pour milk into the milk container Place the lid back on the container Push the milk container back in carefully Close the front door The milk nozzle is placed on the milk foamer on the machine. Do not kink the milk hose. Two milk types Open the front door Pull out the milk container Push the lid of the milk container back The milk hoses remain attached. Pour milk into each milk container Push the lid back on the container Push the milk container back in carefully Close the front door • Milk type 1 is always on the right. • The shift button on the display of the machine switches to milk type 2 (left). • Do not kink the milk hoses. 40 User Manual WMF Cooler Operating the under-machine cooler 9468 3.1.4 Empty message (optional) Refill milk When the low-level is reached, the empty message is shown on the coffee machine display. w User Manual for the coffee machine w S oftware w S ettings w Milk. Pour milk into the milk container (w chapter 3.1.3) Confirm filling the milk container by touching OK on the display The low-level warning goes out. Keep the interior of the cooler dry. This helps to avoid malfunctions. 3.1.5 Switch off the cooler Switch off the cooler at the On/Off switch The switch will no longer be lit up. Disconnect mains plug If this manual is not observed, the warranty is invalidated in the event of any resultant damage. Follow the manual. Observe the Safety chapter. Clean the inside of the device before longer periods of disuse. Leave the door slightly open. 3.1.6 Cleaning with Plug&Clean (optional) • Cleaning Program w Cleaning instructions for the coffee machine. Insert the milk hose with the Plug&Clean adapter into the Plug&Clean socket Turn the adapter in the socket clockwise, until it stops Close the front door User Manual WMF Cooler 41 Introduction to under-machine cooler, under-counter cooler, countertop cooler 9469 Chapter 4 Under-machine cooler, under-counter cooler, countertop cooler 1 On/Off switch (Open front door) 5 Milk container with lid 2 Front door with seal 6 Plug&Clean adapter with hose 3 Hose outlet to the machine 7 Door lock 8 Plug&Clean socket (optional) adapter inserted Plug&Clean socket (optional) adapter locked 4 (not with under-counter coolers) 1 3 7 4 6 2 5 8 Under-machine cooler Under-counter cooler 42 Countertop cooler User Manual WMF Cooler Operating the under-machine cooler, under-counter cooler, countertop cooler 9469 4.1 4.1.1 Operating the under-machine cooler, under-counter cooler, countertop cooler 9469 Starting up the cooler If it cannot be guaranteed that the cooler was transported in a standing position, it must be given at least 2 hours to stand in a vertical position before switching on. Follow the manual. Observe the Safety chapter. Connect the milk hoses (see illustration) The blue milk hose is for milk type 2 (e.g., skim milk). Do not kink the milk hoses. Hose routing for two types of milk 4.1.2 Switch on the cooler Plug in the mains plug Switch on the cooler at the On/Off switch The switch lights up in green. The cooler reaches operating temperature after about 60 minutes. • The cooler keeps the milk cool but cannot cool down warm milk. • Always use milk that is already cool. User Manual WMF Cooler 43 Operating the under-machine cooler, under-counter cooler, countertop cooler 9469 4.1.3 Filling the milk container Connect milk w User manual coffee machine One milk type Open the front door Pull out the milk container Push the lid of the milk container back Pour milk into the milk container Place the lid back on the container Push the milk container back in carefully Close the front door The milk nozzle is placed on the milk foamer on the machine. Do not kink the milk hose. Two milk types Open the front door Pull out the milk container Push the lid of the milk container back The milk hoses remain attached. Pour milk into each milk container Push the lid back on the container Push the milk container back in carefully Close the front door • Milk type 1 is always on the right. • The shift button on the display of the machine switches to milk type 2 (left). • Do not kink the milk hoses. 44 User Manual WMF Cooler Operating the under-machine cooler, under-counter cooler, countertop cooler 9469 4.1.4 Empty message (optional) Refill milk When the low-level is reached, the empty message is shown on the coffee machine display. w User Manual for the coffee machine w S oftware w S ettings w Milk. Pour milk into the milk container (w chapter 4.1.3) Confirm filling the milk container by pressing OK on the display The low-level warning goes out. Keep the interior of the cooler dry. This helps to avoid malfunctions. 4.1.5 Switch off the cooler Switch off the cooler at the On/Off switch The switch will no longer be lit up. Disconnect mains plug If this manual is not observed, the warranty is invalidated in the event of any resultant damage. Follow the manual. Observe the Safety chapter. Clean the inside of the device before longer periods of disuse. Leave the door slightly open. 4.1.6 Cleaning with Plug&Clean (optional) • Cleaning Program w Cleaning instructions for the coffee machine. Insert the milk hose with the Plug&Clean adapter into the Plug&Clean socket Turn the adapter in the socket clockwise, until it stops Close the front door User Manual WMF Cooler 45 Care Chapter 5 Care • Do not clean with scouring powders or the like. There is a risk of causing scratches or scores. • Do not use any caustic cleaning materials. • Use soft cloths for cleaning and subsequent drying. 5.1 Follow the manual. Observe the Safety chapter. Cleaning the milk container / milk hose The milk container and the milk hose, with all parts, must be cleaned daily. Switch off the cooler using the On/Off switch Disconnect mains plug Open the cooler door Remove the milk hoses with the adapter from the lid of the milk container Pull out the milk containers, with the lid and standpipe, and empty it completely Clean the milk containers, with the lid and standpipe, in the dishwasher Allow the milk containers to fully dry after cleaning Clean the milk hoses with the adapter, as described in the user manual for the coffee machine Replace the milk containers and insert the milk hoses Do not kink the milk hoses. Close the door Caution. Take care to work hygienically. Observe the Care chapter. Follow the manual. Observe the Safety chapter. 5.2 Cleaning the inside of the cooler Stir 5 ml of the WMF special cleaner (order no. 33 0683 6000) from the measuring bottle into a bucket containing 0.5 l of lukewarm water Use this stirred cleaning solution to wipe out the inside of the cooler Wipe again using clean water Wipe dry using a soft cloth Replace the milk containers Close the door 46 Caution. Health hazard. Follow the instructions of the label on the cleaning agents. User Manual WMF Cooler Care 5.3 Defrosting the cooler If the ice layer is thicker than 3 mm, defrost the cooler. For coolers with integrated low-level messages, any ice build-up on the rear vertical wall should be avoided. This helps to avoid malfunctions and saves energy. Switch off the cooler using the On/Off switch Disconnect mains plug Leave the front door open Wipe away the water from melting ice with a soft cloth Never remove the ice layer with sharp or pointed objects. The surface of the interior of the cooler could be damaged. Do not use heating appliances (hair dryer, heat gun, steam cleaners, etc.) to defrost. Follow the manual. Observe the Safety chapter. Close the front door before switching on again 5.4 Adjust temperature Remove the cap on the back of the cooler turn clockwise g c older turn counter clockwise g warmer * A quarter turn is approx. 2K. * The stop for the warmest setting has a slight detent. Turning past the detent will switch off the cooler. Series 9192 User Manual WMF Cooler Series 9469 Series 9468 47 Safety Chapter 6 Safety 6.1 Hazard to the operator At WMF, safety is one of the most essential product features. The effectiveness of safety devices can only be ensured if the following points are observed: • Read the User Manual carefully prior to use. • Do not touch hot machine components. • Do not use the device if it is not working properly or if it is damaged. • Built-in safety devices must never be altered. • This device is not designed for persons (including children) with limited physical, sensory or mental capabilities or who lack the required experience and / or knowledge, unless they are supervised by a person responsible for their safety or have received instructions from them about how the device should be used. • Children should be supervised to ensure that they do not play with the device. Failure to observe hazard instructions can lead to serious injury. Follow the safety instructions. Despite safety devices, every machine poses numerous hazards if incorrectly used. Please observe the following instructions when using the device so as to prevent injury and health hazards: Health hazard. The cooler may be used to cool milk only in the containers provided. The milk containers may be used only for milk that is safe to drink. Caution. Health hazard. Only use as intended. Caution. Bruising or crushing hazard. Closing the door can cause a crushing hazard. 48 User Manual WMF Cooler Safety Health hazard. When handling special cleaners for the milk foamer, please observe the protective measures on the packaging. The special cleaner for the milk foamer is an irritant. Scalding hazard. When cleaning, hot water and steam flow through the hoses and the hose adapter. 6.2 Caution. Health hazard. Follow the instructions of the label on the cleaning agents. Caution. Health hazard. Milk-carrying parts can cause a scalding hazard. Hazard to the device Please observe the following points so as to prevent problems with and damage to the device: • For insurance reasons always ensure that, at the end of operation, the mains power is switched off or the device is unplugged. • We recommend damage prevention measures such as: - e.g. Installation of smoke alarms. • After a break in operation of several weeks we recommend thorough cleaning. • If it cannot be guaranteed that the cooler was transported in a standing position, it must be given at least 2 hours to stand in a vertical position before switching on. User Manual WMF Cooler 49 Safety 6.3 Directives The machine fulfils the requirements of the Regulation on Commodities (and counterparts in the European Plastics Directives) and the EC regulation No. 1935 / 2004 in the currently valid edition. When used properly, the machine does not present a hazard to health or other unjustifiable hazard. The materials and products used comply with the Regulation on Commodities (and counterparts in the European Plastics Directive 2002 / 72 / EG ff.) The machine fulfils the requirements of all applicable regulations in the directives MD (MR) 2006 / 42 / EC (EG), EMCD (EMV) 2004 / 108 / EC (EG), Directive 2002 / 95 / EC (ROHS), Directive 2002 / 96 / EC (WEEE). The declaration of conformity is included with the machine. The machine bears the CE mark. Any modifications that are not approved by WMF will cause this declaration to become invalid. Currently valid national rules apply in countries outside of the European Union. This device is subject to the directive on waste electrical and electronic equipment (WEEE / EU directive) and may not be disposed of as domestic waste. 6.4 Duties of the owner / operator The operator of such equipment must ensure regular maintenance by WMF Service technicians, their agents or other authorised persons, and checking of safety devices. Access to the service area is permitted only for persons with knowledge and practical experience with the unit, especially regarding safety and hygiene. The coffee machine must be set up by the operator such that care and maintenance can be performed without hindrance. In office / floor supply or similar self-service applications, only staff instructed in operation of the machine should supervise the machine. Trained personnel should carry out maintenance and be available for questions regarding use. The operator shall ensure that electrical equipment and operating facilities are in a fit state (e.g. to BGV A3) [German Accident Prevention Association or equivalent]. In order to ensure operational safety of your device regular inspection is necessary. These measures are conducted by the WMF Service or by WMF authorised service personnel as part of the maintenance work. The manufacturer‘s specifications regarding maintenance cycles and frequency of maintenance are to be observed. For disposal please contact the WMF Service. 50 User Manual WMF Cooler Warranty 6.5 Warranty claims During the warranty period of 12 months from transfer of risk, the purchaser has statutory warranty entitlements. The vendor should always be afforded the opportunity to rectify errors within an appropriate period. Claims above and beyond the above, in particular damage claims as a result of consequential damage, are excluded, to the extent that this is legally permissible. Material defects shall be reported to the vendor immediately and in writing. Warranty period 12 months No warranty is provided: • On any parts subject to natural wear and tear. These include the milk container, the parts carrying milk, seals as well as the front door with seal. • For malfunctions due to the effect of the weather, chemical, physical, electrochemical or electrical effects, unless attributable to a fault on the part of WMF. • With respect to faults which occur as a result of failure to follow handling instructions and regulations, maintenance and care of the unit (e.g. User Manual and servicing instructions). • With respect to faults which occur as the result of failure to use original WMF replacement parts or incorrect assembly by the purchaser or by third parties or by faulty or negligent treatment. • With respect to the consequences of improper modifications undertaken without our consent or by repair or reconditioning work on the part of the purchaser or by third parties. • With respect to faults caused by inappropriate or improper use. User Manual WMF Cooler 51 Technical data Chapter 7 Technical data 9192 Countertop cooler 9468 Under-machine cooler 9469.1xxx Under-machine cooler (USK) 9469.2xxx Under-counter cooler (UTK) 9469.3xxx Countertop cooler (BSK) 7.1 Cooler technical data Versions Coffee machines that can be used with the cooler 9192 9468 9469 USK prestolino! presto! 1800 S 2000 S bistro! bistro! presto! 1800 S 2000 S On-site power connection presto! prestolino! 1800 S presto! 2000 S 1800 S bistro! 2000 S combiNation bistro! 3 x 1.5² Plug Low-temperature plug 0.64 A 0.63 A On-site fuses 0.63 A 0.63 A 0.63 A max. 16 A Coolant Amount of coolant 9469 BSK 1 / N / PE 50 / 6 0 Hz / 220-240 V ~ Mains power connection Rated current 9469 UTK R134a Class N (CFC-free) 30 g 45 g 40 g 6.5 litres 2 x 3.8 litres or 1 x 9.5 litres 1x 9.5 litres USK UTK BSK 231 mm 462 mm 345 mm 333 mm 333 mm Height 350 mm 254 mm 299 mm 281 mm 281 mm Depth 534 mm 537 mm 533 mm 524 mm 524 mm Weight empty approx. 16.5 kg approx. 22 kg approx. 22 kg approx. 22 kg approx. 22 kg Milk capacity External dimensions Width 40 g 40 g 2 x 3.8 litres or 1 x 9.5 litres We reserve the right to make technical modifications. 52 User Manual WMF Cooler Technical data 7.2 Conditions for usage and installation Necessary preparatory work at the customer‘s premises are to be arranged by the machine operator. The work must be carried out by authorised installation technicians in compliance with general, country-specific and local regulations. The WMF service engineers may only connect the machine to existing prepared connection points. WMF Service is neither authorised nor responsible for carrying out any work on-site prior to connection. Mains voltage tolerance range Ambient temperature Maximum humidity Degree of protection Installing surface Installation clearances Ventilation 230 V +10% and -10%, Mains voltage interruption < 50 ms: no interruption of function +16 °C to max. +32 °C 80% relative humidity without condensation. Do not use unit outdoors. IP X0 The unit must be placed on a level, flat, and sturdy surface. The unit is not intended to be located on a surface that is sprayed or cleaned with a water hose, steam jets, steam cleaner, or similar devices. For operating, service and safety reasons the machine should be installed with a clearance of no less than 50 mm between the back of the machine and the wall. If possible, there should be a clearance of 50 mm to the sides. (Lateral connection WMF coffee machine and WMF cooler not taken into account.) If the possibility of ventilation is limited, adequate ventilation must be provided. Ventilation must be designed according to the installation situation. (e.g. machine on legs, active ventilation, additional air vents / openings in counter area, etc.). Ventilation openings must not be covered. These specifications for the electrical connection and the standards quoted apply for connecting the machine in EU countries. It may be necessary to also observe additional country-specific regulations. Outside the EU countries acceptance of the standards quoted is to be checked by the legal entity or natural person who wishes to use the machine. The local power supply must be constructed according to IEC 364. To improve safety, the coffee machine should be fitted with an FI 30 mA earth leakage current circuit breaker complying with EN 61008. Near the device or about 30 cm below the counter top there should be a shockproof socket as a single-phase connection installed locally on the rear or side wall of the counter substructure or a country-specific single-phase socket. The socket is part of the customer‘s on-site installation. The mains cable must not come into contact with hot surfaces. If the mains cable for this device is damaged then it must be replaced by our service personnel or a similarly qualified person, in order to prevent hazards. User Manual WMF Cooler 53 Malfunctions / Accessories and spare parts Chapter 8 Malfunctions This list is not exhaustive. Error pattern Action instructions Cooler interior iced over • Check: is the door always closed? • Check: is the seal OK? • Check: is the cooling set too low? The mains switch is not lit up • Check: cooler switched on? • Check: is the mains plug plugged in? • Check: is the local fuse defective? The cooler does not cool See the mains switch is not lit up. • Check: have you not waited for the required cooling time? • Check: is the door seal defective? • Check: has warm milk been poured in? Chapter 9 Accessories and spare parts 9.1 Spare parts for countertop coolers 9192 Number Unit Designation Order No. Countertop cooler 9192 1 Pcs Plug&Clean adapter 1 Pcs Milk container 33 2427 3000 1 Pcs Milk container lid 33 2427 4000 1 Pcs Milk hose routing 33 2445 0000 1 Pcs Universal standpipe for Plug&Clean connection 33 9520 2000 1 meter Milk hose (transparent) 00 0048 4948 1 bottle Milk cleaner 33 0683 6000 54 33 2427 5000 User Manual WMF Cooler Malfunctions / Accessories and spare parts 9.2 Spare parts for Under-machine cooler 9468 Number Unit Designation Order No. Under-machine cooler 9468 1 Pcs Plug&Clean adapter 33 2427 5000 1 Pcs Milk container, 1 type 33 2418 4000 1 Pcs Milk container lid, 1 type 33 2388 8000 1 Pcs Milk container, 2 types 33 9520 0000 1 Pcs Milk container lid, 2 types 33 9520 1100 1 Pcs Standpipe for cover for 2 types 33 9520 2100 1 Pcs Hose guide nut 33 2142 2200 1 Pcs Hose guide nut 33 9510 0000 1 meter Milk hose (transparent) 00 0048 4948 1 meter Milk hose (blue), milk type 2 00 0048 4946 1 bottle Milk cleaner 33 0683 6000 9.3 Spare parts for under-machine cooler, under-counter cooler, countertop cooler 9469 Number Unit Designation Order No. Under-counter cooler 9469 1 Pcs Plug&Clean adapter 33 2427 5000 1 Pcs Milk container, 1 type 33 2418 4000 1 Pcs Milk container lid, 1 type 33 2388 8000 1 Pcs Milk container lid wide, left and right (only BSK) 33 2388 8300 1 Pcs Milk container, 2 types 33 9520 0000 1 Pcs Milk container lid, 2 types 33 9520 1100 1 Pcs Standpipe for cover for 2 types 33 9520 2100 1 Pcs Hose guide screw under-counter cooler 33 2527 8000 1 Pcs Hose guide screw under-machine cooler 33 9510 1000 1 Pcs Hose guide nut 33 9510 0000 1 meter Teflon hose for hose guide 00 0048 4957 1 meter Milk hose (transparent) 00 0048 4948 1 meter Milk hose (blue), milk type 2 00 0048 4946 1 bottle Milk cleaner 33 0683 6000 User Manual WMF Cooler 55 Your nearest WMF Service: © 2008-2011 WMF AG All rights reserved, in particular duplication, distribution and translation rights. No part of this manual may be reproduced in any form or processed, duplicated or distributed using electronic systems without written consent. Design and production / typesetting and print presentation: TecDoc GmbH; Geislingen, [email protected] Original User Manual. Printed in Germany. We reserve the right to make technical modifications. 31.05.2011