1
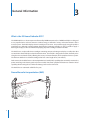
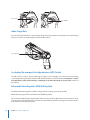
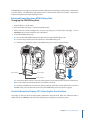
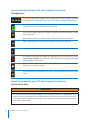
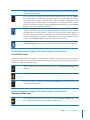
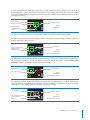
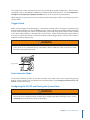
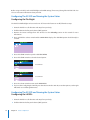
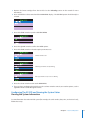
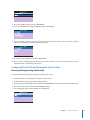
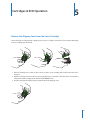
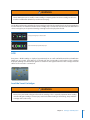
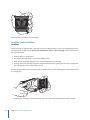
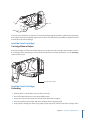
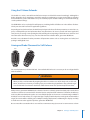
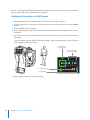
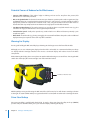
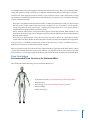
TASER® X3®
Home Defender ECD
User Manual
Models 33230, 33231, 33232, 33233
IMPORTANT SAFETY INSTRUCTIONS.
Read all warnings and instructions in this manual. Save
these instructions.
MMU0032 Rev: A
Contents
4
4
Chapter 1: Warnings
Important ECD Product Safety and Health Information
5
Chapter 2: Ownership
6
6
6
7
7
Chapter 3: General Information
What is the X3 Home Defender ECD?
Neuro Muscular Incapacitation (NMI)
Secondary Injuries
Basic X3 ECD Electrical Theory
9
9
9
10
10
10
11
11
12
12
13
13
14
14
16
16
16
16
16
17
17
17
18
18
19
20
2
Chapter 4: Features & Operation
X3 ECD and Cartridge Features
CAM-Lock™ Safety
Index Finger Rest
Arc display/Re-energize/Cartridge advance (ARC) Switch
Enhanced Power Magazine (EPM) Battery Pack
Changing the EPM Battery Pack
Central Information Display (CID) Color Graphic User Interface
Cartridge Icons
System Status Icons
Circuit Status Icons
Operating Mode Icons
Battery Capacity
Spark Duration
Top LASER
Dual LASER Sight
Mechanical Sights
Focused Beam LED Flashlight
Selector Switch
Trigger Switch
Semi-Automatic Mode
Configuring the X3 ECD and Viewing the System Status
Configuring the Flashlight
Configuring the LASERs
Viewing the System Information
Viewing the Battery Information
21
23
23
24
25
25
26
27
27
28
29
29
30
32
32
32
33
Chapter 5: Cartridges & ECD Operation
Remove the Shipping Cover from the Smart Cartridge
Standard-Range (25 ft/7.62 m) Smart Cartridges
AFID
Load the Smart Cartridges
Loading
Cartridge Release Button
Unloading
Practicing with the X3 Home Defender
Using the X3 Home Defender
Aiming and Probe Placement for Self-Defense
Deployment Instructions for Self-Defense
Potential Causes of Reduced or No Effectiveness
Warning Arc Display
Drive-Stun Backup
Recommended Drive-Stun Areas for Maximum Effect
35
35
36
36
37
37
Chapter 6: Maintenance/Troubleshooting
Function Test
X3 ECD Maintenance and Care
Dropped or Wet X3 ECD
TASER Online Troubleshooting Guide
Product Returns
38
38
38
38
38
Chapter 7: Additional Items
Legality
Medical Research
Warranty
Warnings
Viewing the Engineering Information
Contents
3
1
Warnings
Important ECD Product Safety and Health Information
These safety warnings are for your protection as well as the safety of others. Disregarding this information
could result in death or serious injury.
WARNING
Electronic Control Device
• Can temporarily incapacitate target.
• Can cause death or serious injury.
• Obey warnings, instructions and all laws.
• Comply with current training materials and requirements.
• See www.TASER.com.
Complete Training First
Significant differences exist between each of the TASER International, Inc. (“TASER”) Electronic Control Device (“ECD”)
models. Do not Use or attempt to Use any ECD model unless you have read and understand all instructions and have viewed
any applicable training DVD in its entirety.
Read and Obey
Read, study, understand, and follow all instructions, training materials, product manuals, and warnings, before using the
TASER® ECD. Failure to comply with the instructions, training materials, product manuals, and warnings could result in death
or serious injury to the user, force recipient, and others.
Obey Applicable Laws
Use the ECD only in accordance with applicable federal, state, local laws and other regulations or legal requirements. Any use
of an ECD must be legally justifiable.
Store In A Secure Location
Store ECDs, cartridges, and accessories in secure locations inaccessible to children and other unauthorized persons to prevent
inappropriate use, which may result in death or serious injury to the user, other persons, or animals. ECDs, cartridges, and
accessories are weapons and are not toys.
For a complete list of product warnings, go to www.TASER.com.
4
Ownership
2
Do not give a TASER ECD away as a gift or sell it without completing the transfer notice at www.TASER.com. Do
not give or sell a TASER ECD to anyone not authorized to own it. For more information, see the Legality section
of this manual.
Taking a TASER brand ECD out of the United States (U.S.) without the proper export license is prohibited by U.S.
law (similar prohibitions may exist in other countries).
DO NOT carry a TASER ECD, battery pack, or cartridge on a commercial aircraft. According to the 2012 IATA
Dangerous Goods Regulations for commercial airplanes, TASER ECDs, battery packs, and cartridges ARE NOT
ALLOWED on your person, in your carry-on baggage, or in your checked baggage aboard commercial aircraft.
Do not point the ECD at any law enforcement officer or do anything that would cause law enforcement
officers to feel threatened by your use of the ECD. Because the TASER ECD is able to incapacitate a person, law
enforcement officers may be justified to use lethal force to protect themselves.
5
General Information
3
What is the X3 Home Defender ECD?
The TASER X3 ECD is a 3-shot weapon manufactured by TASER International, Inc. TASER brand ECDs are designed
to use propelled wires or direct contact to conduct energy to affect the sensory and motor functions of the
nervous system. The X3 ECD deploys Smart™ cartridges one at a time. It is possible to apply energy beyond the
initial burst to a deployed cartridge without deploying the remaining cartridges. It also is possible to apply a
Warning Arc display or drive-stun without deploying any of the cartridges loaded in the ECD.
The X3 ECD uses 3 replaceable Smart cartridges containing compressed nitrogen to deploy 2 small probes that
are attached to the X3 ECD by insulated conductive wires. The X3 ECD is designed to transmit electrical pulses
along the wires and into the body affecting the sensory and motor functions of the peripheral nervous system.
The X3 Home Defender is sold with cartridges that have a wire length of 25' (7.62 meters).
Furthermore, the X3 ECD features a Power Optimization Control (POC) capability that continually monitors the
power remaining in the battery pack and, when needed, shuts down peripheral functions to maintain critical
capability while warning the user when the battery power reaches low levels.
The X3 ECD has an estimated useful life of 5 years.
Neuro Muscular Incapacitation (NMI)
6
TASER technology is designed to use electrical impulses similar to those in your body’s nervous system to cause
stimulation of the sensory and motor nerves. Neuro Muscular Incapacitation (NMI) occurs when an ECD is
able to cause involuntary stimulation of both the sensory nerves and the motor nerves. It is not dependent
on pain and is effective on subjects with a high level of pain tolerance. NMI is designed to render an attacker
temporarily unable to control movement.
Previous generations of stun guns primarily affected the sensory nerves only, resulting in pain compliance.
A subject with a very high tolerance to pain (e.g., a drug abuser, person in serious psychological distress, or
a trained, focused fighter) may not be affected by the pain or might be able to fight through the pain of a
traditional stun gun.
An ECD may cause NMI if probes are within sufficient proximity to complete a circuit, the probes have a sufficient
spread, and an adequate circuit is completed and maintained.
Secondary Injuries
ECD use may cause a fall or startle response. This loss of control or startle may increase risk of death or serious
injury resulting from loss of balance or fall. Especially at risk is a person who:
• could fall and suffer impact injury to the head or other sensitive area;
• is on an elevated or unstable surface (e.g., tree, roof, ladder, ledge, balcony, porch, bridge, crane, dock,
chair, bunk bed, or stair);
• is less able to catch or protect self in a fall (e.g., restrained, incapacitated, or immobilized);
• could fall on a sharp object (e.g., holding a knife or other edged weapon or sharp object on ground);
• is running in motion, or moving under momentum;
• is operating or riding in or on any mode of transportation (e.g., vehicle, bus, bicycle, motorcycle,
cart, train, or airplane), conveyance (e.g., escalator, moving walkway, elevator, skateboard, skates, or
rollerblades), or machinery;
• is located in water, mud, or marsh environment if the ability to move is restricted; or
• is physically infirm, elderly, or pregnant.
Basic X3 ECD Electrical Theory
• Electricity must be able to flow between the probes or the electrodes to deliver an electrical charge
and will generally follow the path of least resistance.
• The greater the spread between the probes on the attacker, generally the greater the effectiveness.
• Electricity will generally not pass to others in contact with the attacker unless contact is made directly
between or on the probes, or the wires are touched.
• Exposure to water will not increase the power to the attacker (the delivered electrical charge is fixed
inside the TASER ECD, and will not increase significantly even with environmental changes).
• The X3 ECD’s Rotational-Pulse Drive™ technology rotates discharges across the 3 cartridge bays. This
alternation of pulsed output across multiple cartridges allows a single X3 ECD to incapacitate up to 3
people simultaneously with the same effectiveness previously only possible with 3 separate ECDs.
• The Rotational Pulse Drive technology supports cross connection, or X-Connect™ technology, which
can make the X3 ECD effective even if some probes from multiple cartridges do not hit the attacker. As
long as one top probe and one bottom probe hit the person, the circuit can be completed, even if the
probes were deployed from different cartridges.
Chapter 3
General Information
7
• The Precision Shaped Pulse™ Pulse Calibration System (PCS) technology is designed to adjust current
to meet situational requirements. If two probes strike an attacker and one contact is weak, the ECD will
adapt to enhance the weaker contact’s effectiveness. If all probes from two or more cartridges strike
the same person, the PCS is designed to adjust so the effect on the person is same as that of a solid
contact from a single cartridge.
• Medical studies have found that modern pacemakers and implanted cardiac defibrillators withstand
external electrical defibrillators many orders of magnitude stronger than the TASER conducted energy
pulses.
8
Chapter 3
General Information
Features & Operation
4
X3 ECD and Cartridge Features
Get to know the X3 ECD:
Mechanical Sight
Selector Switch
CAM-Lock Safety
Mechanical Sight
Top LASER
Trigger Switch
Index Finger Rest
ARC Switch
EPM (Battery Pack)
Wire
LED Flashlight
Probe
Bottom LASER
AFIDs
Blast Door
CAM-Lock™ Safety
Ambidextrous safety can be operated from either side of the ECD.
• CAM-Lock safety down (SAFE).
• CAM-Lock safety up (ARMED) and ready to deploy.
• Do not block the safety on one side of the X3 ECD while attempting to move it on the other side. This can
break the safety and disable the ECD.
• With default settings, if the X3 safety is left in the up (ARMED) position for more than 20 minutes, the system
will shut down to preserve battery life. To re-arm the ECD, shift the safety to the down (SAFE) position, and
then shift it back to the up (ARMED) position.
9
Down (SAFE)
Up (ARMED)
Index Finger Rest
On each side of the X3 ECD is an ergonomically designed rest upon which to place the tip of your index finger
when you are not pressing the trigger switch or the ARC switch.
Index Finger Rest
Arc display/Re-energize/Cartridge advance (ARC) Switch
The ARC switch is used to employ a Warning Arc display, select cartridges, and select menu items during
system programming and option selection. ARC switch functions are described in the Arc display/Re-energize/
Cartridge advance (ARC) Switch Functions, Configuring the X3 ECD and viewing the System Status sections of
this manual.
Enhanced Power Magazine (EPM) Battery Pack
The Enhanced Power Magazine is a lithium energy cell power supply system for the X3 ECD.
NOTE: X3 battery packs will not work with other TASER brand ECDs.
Do not store the EPM anywhere that the gold contacts on the side of the EPM may touch metal objects. If you
cause an electrical short between these contacts, the short will drain the lithium energy cells and may cause the
pack itself to become dangerously hot.
10
Chapter 4
Features & Operation
The EPM battery has enough power for approximately 300 discharges depending on temperature, environment,
and other factors. The EPM battery will deplete faster in colder weather than warm weather. Likewise, the
battery will deplete faster with the flashlight active.
Enhanced Power Magazine (EPM) Battery Pack
Changing the EPM Battery Pack
1 Point the ECD in a safe direction.
2 Ensure the CAM-Lock safety is in the down (SAFE) position.
3 Safely remove the Smart cartridges (do not place any body parts in front of the cartridges). See the
Unloading section in this manual for more information.
4 To unload the EPM battery pack:
4a Press and hold the EPM lock button located on the back of the EPM battery pack.
4b Press the release buttons located on both sides of the EPM battery pack.
4c Pull firmly in a downward motion on the EPM battery pack to remove it from the ECD.
Release Button
Release Button
EPM Lock Button
4d Inspect the battery contacts. Ensure that they appear to be in working order and are free from dirt or other residue that may interrupt the battery connection to the ECD.
4e Install the new EPM and ensure that it is fully inserted into the X3 ECD. Apply sufficient force to ensure
the EPM is fully seated and the tabs on the sides of the EPM battery pack are properly engaged.
Central Information Display (CID) Color Graphic User Interface
The display on the back of the X3 ECD provides information about the ECD. When the CAM-Lock safety is
shifted into the up (ARMED) position, the CID will display the cartridge bays and battery status.
Chapter 4
Features & Operation
11
Central Information Display (CID) Color Graphic User Interface
Cartridge Icons
The ECD is loaded with 3 cartridges. These cartridges have not been deployed. Note that
the cartridge icons are displayed in the same color as those of cartridge shipping covers.
The currently selected cartridge will be surrounded by a green border. If you press the
trigger switch, this is the cartridge that will be deployed.
If you press the trigger switch, the cartridge energized icon will display while the energy
burst is in progress.
When the ARC switch is pressed, this symbol will appear below all 3 cartridge bays.
After a cartridge has been expended, the cartridge deployed icon is displayed.
If no cartridge is loaded in the cartridge bay, the cartridge bay empty icon is displayed.
!
If something is wrong with the cartridge, the cartridge bay error icon is displayed. See the
Load the Smart Cartridges section in this manual for instructions on loading and unloading
Smart cartridges from an X3 ECD.
When you shift the CAM-Lock safety to the down (SAFE) position, a TASER logo and the X3
ECD’s serial number display briefly.
090701007
The Home Defender icon identifies this X3 ECD as an X3 Home Defender electronic control
device.
Central Information Display (CID) Color Graphic User Interface
System Status Icons
WARNING
The system status icons are designed to inform you of a fault in the X3 ECD. It is a fault indicator only,
and it is the user’s responsibility to heed the fault indicators, obtain proper maintenance and repair, and
ensure that the ECD is working properly before any use. Failure to heed the system status icons could
cause serious injury or death.
12
Chapter 4
Features & Operation
When the CID shows nothing in the lower-left side, the diagnostic system is indicating that
no problems are detected.
If no icons of any kind display on the CID and the CAM-Lock safety is in the up (ARMED)
position, but there is a solid red light at the top edge of the CID, then the CID has failed.
The X3 ECD may be working—check the ECD to see if the LASERs and flashlight are still
operating, and press the ARC switch to see if the ECD still arcs; however, the CID is broken.
If the ECD is still under warranty, send it to TASER International for repair. See the Product
Returns section in this manual for instructions.
Battery Not Recognized. If you see a question mark within the battery icon of the battery
status icon this indicates that the ECD did not recognize the battery correctly. Remove
the EPM battery pack and reinsert it. If the error is still present, try another battery. If
the Battery Not Recognized icon still displays, this usually indicates that something has
happened to the battery connector inside the handle and the handle should be sent in for
service. See the Product Returns section in this manual for instructions.
Stealth. When the ECD is in the stealth mode, a letter S will display in the battery icon. (See
the Selector Switch section in this manual for more information about the stealth mode.)
Central Information Display (CID) Color Graphic User Interface
Circuit Status Icons
Circuit status icons indicate the degree of connection to the attacker. Circuit status icons are for reference
only; they are not intended to replace the need to look for visual indications or listen for other indications to
determine the subject’s connection status.
When the ECD has a good connection to the attacker, the good circuit completion icon is
displayed.
The partial/intermittent circuit completion icon indicates that the connection is marginal.
If the connection is not effective, the no circuit completion icon is displayed. The probes
may have missed the person.
Central Information Display (CID) Color Graphic User Interface
Operating Mode Icons
The X3 Home Defender’s method of operations is called the semi-automatic mode. This
icon is displayed on the CID, representing the operating mode.
Chapter 4
Features & Operation
13
Central Information Display (CID) Color Graphic User Interface
Battery Capacity
When the CAM-Lock safety is in the up (ARMED) position, the CID will display the percentage of power remaining.
Remaining capacity will display in 10 percent increments. When 30 percent is remaining, the capacity indicator
will turn from green to yellow. When the capacity drops to 10 percent, the indicator turns red.
When the battery level drops to 20 percent, TASER International recommends that the battery pack be replaced.
100%
90%
80%
70%
60%
50%
40%
30%
20%
10%
Central Information Display (CID) Color Graphic User Interface
Spark Duration
When the X3 ECD is deployed with the trigger switch, it delivers an automatic 5-second deployment cycle. The
CID displays a count from 1 to 5 indicating how many seconds the deployment cycle has lasted.
1
2
3
4
5
If you hold the trigger switch down continuously, for more than 5 seconds, the ECD will continue the deployment
cycle. The CID will display the number 6 (and sequential numbers), but the icon showing the count will be
replaced by the operating mode icon.
6
7
If you press the ARC switch, the CID will display the deployment cycle duration next to the operating mode icon.
1
2
3
4
5
In probe-deployment mode, the CID display shows the deployment cycle duration for the most recent cartridge
deployed. If you then deploy a second Smart cartridge a few seconds later (while the first cycle is running), the
CID will stop showing data for the first cartridge (though the first cartridge will still complete its deployment
cycle) and start displaying the deployment cycle duration for the second cartridge.
14
Chapter 4
Features & Operation
In the example below, the deployment cycle for the second cartridge has been cycling for two seconds. The
first cartridge also is cycling, but only the count for the second cartridge is displayed. (If the second cartridge
was activated while the first cartridge was still running, the first cartridge’s cycle should end before the second
cartridge’s cycle does.)
Selected Cartridge
Additional Cartridge
Cartridges Energized
Seconds Elapsed in
Selected Cartridge's
Burst (2)
Battery;
80% Remaining
2
The cycle can be stopped at any time by shifting the CAM-Lock safety to the down (SAFE) position.
The CID below shows the leftmost cartridge selected. (The leftmost, active cartridge is always selected by
default.) The battery is fully charged.
Cartridge Type
Cartridge Color Indicator
(Blast Door) Color
Selected Cartridge
Battery;
Fully Charged
Operating Mode (Semi-Auto)
The CID below shows an X3 ECD with a battery 80 percent full. The first and second cartridges should be ready
for use; the first cartridge is selected. The third has a problem, and will not deploy. See the Load the Smart
Cartridges section for instructions on how to unload an X3 ECD.
Selected Cartridge
!
25-Foot Cartridges
Cartridge Bay Error
Battery;
80% Remaining
Operating Mode (Semi-Auto)
The CID below shows an X3 ECD with a battery 80 percent full. The ARC switch is pressed for a Warning Arc
display or drive-stun, energizing all cartridge bays. The center cartridge is selected because pressing the ARC
switch advances the cartridge selection. The third cartridge bay is empty.
Selected Cartridge
All Cartridge Bays Energized
Seconds Elapsed in
Burst (2)
Empty Cartridge Bay
2
Battery;
80% Remaining
Operating Mode (Semi-Auto)
Chapter 4
Features & Operation
15
Top LASER
The LASER installed in the X3 ECD is oriented to the approximate position of a top probe’s trajectory at 15' (4.6
m).
Dual LASER Sight
This feature is designed to provide dart alignment.
Mechanical Sights
The mechanical sights on the X3 ECD are molded to provide manual aiming of the ECD. The mechanical sights
are set to coincide with a top probe’s trajectory at a 15' (4.6 m) distance.
Selector Switch
Front Mechanical Sight
Rear Mechanical Sight
Focused Beam LED Flashlight
The X3 ECD has a flashlight that projects most of its light energy as a focused beam, and the remaining light
energy as a diffused beam. The Focused Beam LED Flashlight is designed to illuminate a man-sized target
within the X3 ECD’s operating range.
Selector Switch
Ensure that the ECD is unloaded. See the Unloading section in this manual for more information. With the
CAM-Lock safety in the down (SAFE) position, press the selector switch on the top of the X3 ECD to configure
the system. See the Configuring the X3 ECD section in this manual for more information.
The selector switch is slightly recessed to ensure that it is not pressed unintentionally during normal operations.
Pressing the selector switch when the CAM-Lock safety is in the up (ARMED) position puts the X3 ECD in stealth
mode—the flashlight and LASER are turned off and "S" is shown in the battery image. Pressing and holding the
switch a second time will turn on the flashlight and LASER.
16
Chapter 4
Features & Operation
The stealth mode cannot activate features that were turned off during ECD configuration. If the X3 ECD is
configured to not use its flashlight or LASERs, the stealth mode will not turn them on. See the Configuring the
Flashlight and Configuring the Top/Bottom LASERs sections in this manual for more information.
NOTE: Using pens or paper clips to press the selector switch may damage it. Only use your finger to press the
selector switch.
Trigger Switch
Unlike a firearm trigger, the X3 ECD trigger is a momentary electrical switch. The trigger is operational only
when the CAM-Lock safety is in the up (ARMED) position. Pulling and releasing the trigger switch will deploy
the first selected cartridge and result in an approximately 5-second discharge cycle unless the safety is shifted
to the down (SAFE) position to discontinue the 5-second cycle. Pulling and holding the trigger switch for
more than 5 seconds will result in a continuous discharge until the trigger switch is released or the battery is
depleted—whichever happens first.
WARNING
In the event of an accidental discharge, immediately shift the CAM-Lock safety to the down (SAFE)
position to stop the discharge cycle.
Trigger Switch
Semi-Automatic Mode
The X3 Home Defender operates in the semi-automatic mode, which means each sequential trigger pull
deploys a Smart cartridge. For more information on how this works, see the Deployment Instructions for SelfDefense section in this manual.
Configuring the X3 ECD and Viewing the System Status
WARNING
Remove the Smart cartridges from the X3 ECD before configuring the ECD or viewing its status. See the
Unloading section in this manual for more information.
Chapter 4
Features & Operation
17
Before using an X3 ECD, set the LED flashlight and LASER settings (if necessary) through the X3 ECD’s CID. You
also can view status information about your ECD.
Configuring The X3 ECD and Viewing the System Status
Configuring the Flashlight
The X3 ECD’s LED flashlight can be turned on or off. To turn this feature on or off, follow these steps:
1 Point the X3 ECD in a safe direction and away from your body.
2 Shift the CAM-Lock safety to the down (SAFE) position.
3 Remove the Smart cartridges from the X3 ECD. See the Unloading section in this manual for more
information.
4 Press and hold the selector switch until the MAIN MENU displays. The SIGHTING option should already be
selected.
5 Press the left ARC switch to open the SIGHTING MENU.
6 Press the left ARC switch to select the desired option:
FLASHLIGHT ON
FLASHLIGHT OFF
7 Press the selector switch to return to the MAIN MENU.
8 If you are done configuring the X3 ECD, press the selector switch to exit. Or, to set other options, use the right
ARC switch to scroll through the menus.
Configuring The X3 ECD and Viewing the System Status
Configuring the LASERs
1 Point the X3 ECD in a safe direction and away from your body.
2 Shift the CAM-Lock safety to the down (SAFE) position.
18
Chapter 4
Features & Operation
3 Remove the Smart cartridges from the X3 ECD. See the Unloading section in this manual for more
information.
4 Press and hold the selector switch until the MAIN MENU displays. The SIGHTING option should already be
selected.
5 Press the left ARC switch to open the SIGHTING MENU.
6 Press the right ARC switch to scroll to the LASER options.
7 Press the left ARC switch to select the option you want to use.
OFF Both LASERs are OFF
SINGLE Upper LASER On Solid (No Blinking)
DUAL Upper LASER on Solid, Lower Laser Blinking
8 Press the selector switch to return to the MAIN MENU.
9 If you are done configuring the X3 ECD, press the selector switch to exit. Or, to set other options, use the
right ARC switch to scroll through the menus.
Configuring The X3 ECD and Viewing the System Status
Viewing the System Information
To view information about the X3 ECD system (for example, the serial number, date, time, and revision level),
follow these steps:
Chapter 4
Features & Operation
19
1 Point the X3 ECD in a safe direction and away from your body.
2 Shift the CAM-Lock safety to the down (SAFE) position.
3 Remove the Smart cartridges from the X3 ECD. See the Unloading section in this manual for more
information.
4 Press and hold the selector switch until the MAIN MENU displays.
5 Press the right ARC switch until the INFO option is highlighted.
6 Press the left ARC switch. The SYSTEM option should be highlighted by default.
7 Press the left ARC switch. From top to bottom the CID displays the X3 ECD’s serial number, and the system
firmware revision number.
8 Press the selector switch to return to the INFO MENU.
9 If you are done configuring the X3 ECD, press the selector switch to exit. Or, to set other options, use the
right ARC switch to scroll through the menus.
Configuring The X3 ECD and Viewing the System Status
Viewing the Battery Information
To view information about the battery pack (EPM), follow these steps:
1 Point the X3 ECD in a safe direction and away from your body.
2 Shift the CAM-Lock safety to the down (SAFE) position.
3 Remove the Smart cartridges from the X3 ECD. See the Unloading section in this manual for more
information.
4 Press and hold the selector switch until the MAIN MENU displays.
5 Press the right ARC switch until the INFO option is highlighted.
20
Chapter 4
Features & Operation
6 Press the left ARC switch to open the INFO MENU.
7 Press the right ARC switch until the BATTERY option is highlighted.
8 Press the left ARC switch. From top to bottom, the CID displays the battery pack serial number, battery
voltage, and percentage of battery capacity remaining.
9 Press the selector switch to return to the INFO MENU.
10 If you are done configuring the X3 ECD, press the selector switch to exit. Or, to set other options, use the
right ARC switch to scroll through the menus.
Configuring The X3 ECD and Viewing the System Status
Viewing the Engineering Information
To view information about the ECD’s engineering, follow these steps:
1 Point the X3 ECD in a safe direction and away from your body.
2 Shift the CAM-Lock safety to the down (SAFE) position.
3 Remove the Smart cartridges from the X3 ECD. See the Unloading section in this manual for more information.
4 Press and hold the selector switch until the MAIN MENU displays.
5 Press the right ARC switch until the INFO option is highlighted.
Chapter 4
Features & Operation
21
6 Press the left ARC switch to open the INFO MENU.
7 Press the right ARC switch until the ENGINEERING option is highlighted.
8 Press the left ARC switch. The ECD’s manufacturing date is displayed.
22
Chapter 4
Features & Operation
Cartridges & ECD Operation
5
Remove the Shipping Cover from the Smart Cartridge
Smart cartridges are shipped with a shipping cover in place. Carefully remove these covers before attempting
to load a cartridge into an X3 ECD.
1 Hold the cartridge over a table or other close by surface so the cartridge will not fall to the floor if it is
dropped.
2 Hold the cartridge so the blast doors are facing away from you and others. (The blast doors are behind the
solid portion of the cartridge cover with the word REMOVE on it.)
3 Find the cartridge tab sticking out the rounded side of the shipping cover.
23
4 Push against this tab while pulling the cartridge out. You might consider pushing on the cartridge with your thumbs
and holding the cover with your fingers. There should be an audible click when the cover releases the cartridge.
5
Pull the cartridge out of the cover.
Standard-Range (25 ft/7.62 m) Smart Cartridges
o
Blast Doors
24
Chapter 5
Cartridges & ECD Operation
BOTTOM PROBE POINTS 7 DOWN
WARNING
Never attempt to open or modify a Smart cartridge. Tampering with a live Smart cartridge could cause
it to fire or malfunction (which may result in serious injury).
The X3 ECD can determine whether the Smart cartridges loaded in the cartridge bays have been expended or
not. The ECD also can determine whether all the cartridge bays are loaded or not. This means the ECD will not
select an empty bay or an expended cartridge. Cartridge status is displayed on the CID.
Empty Cartridge Bay /Loaded/Loaded
Expended/Not Deployed/Not Deployed
AFID
Every time a TASER cartridge is deployed, approximately 20–30 small confetti-like Anti-Felon Identification
(AFID) tags are ejected. Each AFID tag is printed with the corresponding serial number of the cartridge
deployed, allowing law enforcement agencies to determine the registered owner of the cartridge and track
citizen use if ever used in a criminal act.
Load the Smart Cartridges
WARNING
Never place your hands or fingers in front of the cartridge. This is especially important when loading
and unloading the cartridge. Serious injury could result. When loading and unloading, always hold the
cartridge on the sides or top.
Chapter 5
Cartridges & ECD Operation
25
Always treat your X3 ECD as if it were loaded.
Load the Smart Cartridges
Loading
Smart cartridges are shipped with a shipping cover in place. Remove these covers before attempting to load a
cartridge into an X3 ECD. See the Remove the Shipping Cover from the Smart Cartridge section in this manual
for more information.
1 Point the ECD in a safe direction.
2 Ensure the CAM-Lock Safety is in the down (SAFE) position.
3 Make sure the protective shipping cover is removed from the Smart cartridge.
4 Keeping your hands and other body parts away from the blast doors, gently push the Smart cartridge into
the cartridge bay until an audible click is heard.
Note the position of the tab on the bottom of the cartridge; this side of the cartridge goes in the bottom of the
X3 cartridge bay.
5 Verify that the cartridge is secure by pulling on the tabs on the lower and upper part of the cartridge.
26
Chapter 5
Cartridges & ECD Operation
As shown in the illustrations, the left hand is loading cartridges beginning with the rightmost bay. By loading
from right to left (or left to right if the right hand is used) it is less likely the operator will place fingers in front of
the blast doors of loaded cartridges.
Load the Smart Cartridges
Cartridge Release Button
X3 Smart cartridges are held in the X3 ECD after they are loaded. Press the cartridge release button to release
the cartridges before attempting to remove them from the ECD. For further instructions, see the Unloading
section in this manual.
Cartridge Release Button
Load the Smart Cartridges
Unloading
1 Point the ECD in a safe direction and away from your body.
2 Ensure the CAM-Lock Safety is in the down (SAFE) position.
3 Keep your hands and other body parts away from the front of the cartridges.
4 Press the cartridge release button with the index finger of the supporting hand.
5 Firmly pull the cartridge out of the bay by pulling on the upper tab and lower tab of the cartridge. If the
Chapter 5
Cartridges & ECD Operation
27
expended cartridge won’t easily dislodge, try firmly pressing on the cartridge release button directly below
the individual cartridge that is difficult to remove.
Cartridge Release Button
NOTE: Use the left hand to unload cartridges beginning with the leftmost bay. By unloading from left to right
(or right to left if the right hand is being used), it is less likely you will place fingers in front of the blast doors of
loaded cartridges.
The Smart cartridges can be reloaded independently. That is, if one or two of the three cartridges have been
expended, you can replace either or both of the expended cartridges with new ones. You do not have to wait
until all 3 cartridges have been expended before reloading.
To replace the expended cartridge:
1 Point the ECD in a safe direction.
2 Ensure the CAM-Lock Safety is in the down (SAFE) position.
3 Press the cartridge release button.
4 Firmly pull the cartridge out of the bay by pulling on the upper tab and lower tab of the cartridge.
5 Keeping your hand away from the blast doors, gently push a new Smart cartridge into the cartridge bay
until an audible click is heard.
6 Verify that the cartridge is secure by pulling on the tabs on the lower and upper part of the cartridge.
7 Verify that the remaining Smart cartridges are secure by pulling on the tabs on the lower and upper parts
of the cartridges.
Practicing with the X3 Home Defender
TASER recommends practicing with your X3 ECD to become familiar with its functions and how it deploys.
Be aware of your surroundings when deciding where to place your training target. Ensure that the target has a
firm backing that will allow the probes to stick and not bounce off and strike an unintended person or object.
Do not place the target anywhere a probe that misses or penetrates the target could cause damage or injury.
Safety first! Always treat your X3 ECD as if it were loaded.
28
Chapter 5
Cartridges & ECD Operation
Using the X3 Home Defender
The X3 ECD is a serious, state-of-the-art defensive weapon and should be treated accordingly. Although the
ECD is designed to be as nonviolent as possible in stopping a combatant, its use can result in injuries, including
but not limited to, a probe embedded in an eye or secondary injuries related to falling. For a full list of warnings,
see the product warnings.
The TASER ECD is to be used only for lawful purposes, including lawful self-defense or in the defense of others.
Check your state and local laws for applicable regulations.
Depending on local and state laws, the X3 ECD may be kept in the house for home protection, or carried in a car,
purse, or backpack for personal protection when away from home. Be sure to research each state’s applicable
laws prior to possessing or transporting the ECD including the transporting of the ECD across state lines and
into other states where laws may vary. For a list of known laws related to ECDs, go to www.TASER.com.
An ECD is not a substitute for other preventive self-protection actions such as ensuring doors are locked, and
parking in well-lighted areas.
Aiming and Probe Placement for Self-Defense
Level
Tilted
For most deployments, hold the ECD level. Do not tilt the ECD unless it is necessary to do so to align the ECD
with the attacker.
WARNING
When possible, avoid intentionally targeting the ECD on sensitive areas of the body such as the head,
throat, chest/breast, or known pre-existing injury areas without legal justification. The preferred target
areas are below the neck area for back shots and the lower center mass (below chest) for front shots.
With previous-generation TASER ECDs, the electrical current is relatively quiet when both probes make direct
contact on a human or an animal and an electrical circuit is completed and maintained. Therefore, the ECD may
make very little sound when the probes are successfully deployed on a human or a conductive target. With the
X3 ECD, the noise level will vary. If a single cartridge is deployed and both probes make good contact with the
target, the current will be relatively quiet. Multiple cartridge deployments and Warning Arc displays are likely
to make more noise than typical of previous-generation TASER ECDs.
Be sure not to fire at an attacker who is over 25 feet or 7.62 meters away (measure 25' or 7.62 meters to see how
Chapter 5
Cartridges & ECD Operation
29
far this is – it will probably be further than you think). If you do deploy at someone more than 25' or 7.62 meters
away, the probes will not have sufficient wire to reach them.
Deployment Instructions for Self-Defense
1 Remove the X3 ECD from its holster and ensure that the Smart cartridge is installed.
2 If a person approaches in a suspicious or threatening manner, place the safety cover in the open (ARMED)
position.
3 Aim the LASER beam at the attacker.
4 Shout verbal commands to “get away,” if feasible. It is possible that the person will flee based on the noise
and LASER.
5 If you determine that you need to deploy the X3 ECD in self-defense, ensure that you are within 25 feet of
the attacker.
Sequential trigger pulls can deploy an X3 Smart cartridge. At the beginning of the event, the left most
active cartridge is selected by default.
First Available
Cartridge Selected
Two Other Cartridges
Are Loaded in the ECD
Semi-Automatc Mode
80% Remaining
6 Pull the trigger to deploy the selected cartridge.
30
Chapter 5
Cartridges & ECD Operation
Deployed Cartridge
Two Remaining, Un-Deployed Cartridges
Cartridge Not Yet Selected
The Next Cartridge is Selected
Automatically when You Remove
Your Finger from the Trigger
Cartridge Energized, Connection
Status Good
3
Seconds Elapsed in Cycle (3)
80% Remaining
The X3 ECD energizes the first cartridge. Releasing the trigger automatically selects the next unexpended
cartridge while the first cartridge is deploying.
If you have engaged an attacker and contact is good, pressing and holding the ARC switch will apply energy
to the person after the first 5-second cycle is complete. This allows you to apply cycles to a continually
threatening person, if needed, without expending the remaining cartridges. As necessary, press the ARC
switch until help arrives.
7 As soon as it is safe to do so, call 911 and report the specific location of the threat.
NOTE: Do not pull the trigger and press the ARC switch simultaneously. The trigger will override the ARC switch.
Chapter 5
Cartridges & ECD Operation
31
Potential Causes of Reduced or No Effectiveness
• Loose or Thick Clothing. If the probes lodge in clothing and are too far away from the person, ECD
effectiveness is reduced or prevented.
• Miss or Single Probe Hit. The electrical current must pass between a positive probe and a negative one (Top
and Bottom Probe) in a completed and maintained circuit. If 1 probe misses, a second cartridge should be
deployed if practical to complete the electrical circuit. Also, using the X3 ECD in the drive-stun mode as
described below may complete the circuit between the single probe and the ECD electrode.
• Low Nerve or Muscle Mass. If the probes impact in an area where there is very little muscle mass (e.g., the
side of the rib cage), the effectiveness can be significantly diminished.
• Limited Probe Spread. Small probe spreads may result in little or no effect and become primarily a pain
compliance option.
• Wires Break. If a wire breaks (e.g., during a struggle), the current will not flow to the probes and an additional
deployment may be required. Drive-stun may still be available.
Warning Arc Display
Pressing and holding the ARC switch displays a Warning Arc discharge across the front of the X3 ECD.
Although you can use a Warning Arc display when the ECD is unloaded, it is recommended that you always
arc display with the cartridges installed. This ensures a consistent display and reduces wear on the ECD’s
components.
With a Warning Arc display, the user may deter an attacker without having to use actual force. Pressing the ARC
switch does not deploy the Smart cartridges even if the X3 ECD is loaded.
Arc Deflector Metalized Labels
NOTE: Quickly pressing and releasing the ARC switch for a half-second or less will advance cartridge selection
to the right. A sustained ARC switch press (greater than half a second) will not advance the cartridge selection.
Drive-Stun Backup
Drive-stun capability is available with the X3 ECD. To apply a drive-stun, place the safety in the up (ARMED)
position and press the ARC switch, just as you would to employ a Warning Arc display.
32
Chapter 5
Cartridges & ECD Operation
Use the ARC switch instead of the trigger to activate the X3 ECD for a drive-stun. When you use the ARC switch,
energy will spark across all the electrodes or arc deflector metalized labels without deploying the cartridges.
The drive-stun mode generally becomes primarily a pain compliance option. Probe deployment is usually
considered more desirable if incapacitation is the desired objective, even at close range. Some of the advantages
of probe deployment include:
• Drive-stun is only effective while the ECD’s electrodes are within approximately one inch or in direct contact
with the person or when pushed against the person’s clothing. As soon as the ECD is moved away, the
energy being delivered to the person stops. Deploying the probes allows the user to separate from the
attacker while increasing the ability to maintain control.
• Due to automatic reflex actions, most people will struggle to separate from the ECD. When the ECD is used
in the drive-stun mode and the person struggles to get away it may be difficult to maintain contact between
the ECD and the attacker.
• If the probes are deployed, even at very close range, the user may be able to use a drive-stun to another
portion of the body that is further away from the probes, thereby increasing the probability of incapacitation.
If the drive-stun is not effective, evaluate the location of the drive-stun, consider an additional cycle to a
different pressure point, or consider alternative force options.
When using the drive-stun, push (drive) the front of the X3 ECD firmly against the body of the attacker. Simply
“touching” the X3 ECD against the attacker is not sufficient. The attacker is likely to recoil and try to get away
from the device. It is necessary to aggressively drive the front of the ECD into the attacker for maximum effect.
Drive-Stun Backup
Recommended Drive-Stun Areas for Maximum Effect
Drive the X3 ECD into the following areas for maximum effectiveness:
• Carotid (sides of neck) (see product warnings and warning below).
• Radial (forearm).
• Pelvic triangle (see product warnings and warning below).
• Outside of thigh.
• Tibialis (calf muscle).
Chapter 5
Cartridges & ECD Operation
33
WARNING
Use care when applying a drive-stun to the neck or groin. These areas are sensitive to mechanical injury
(such as crushing to the trachea or testicles if applied forcefully). However, these areas have proven
highly effective targets.
34
Chapter 5
Cartridges & ECD Operation
Maintenance/Troubleshooting
6
Function Test
TASER International recommends conducting a function test every 30–60 days for your X3 Home Defender. The
function test is done to verify that the ECD is working properly.
An X3 ECD can be function tested with the cartridges loaded. It is recommended to perform the function test
with cartridges installed to reduce stress on the ECD’s components.
To perform a function test:
1 Point the ECD in a safe direction and away from your body.
2 Shift the CAM-Lock safety to the up (ARMED) position. Keep all fingers away from the trigger and keep the
ECD pointed in a safe direction. While performing a function test, DO NOT touch the trigger at any time.
3 Press the ARC switch.
WARNING
Use the ARC switch, not the trigger, to perform a function test. If you pull the trigger, the cartridge
probes will deploy.
A 2- to 3-second sustained press of the ARC switch should activate the Warning Arc long enough to hear
and see the X3 ECD arc. It is not necessary to extend the duration.
WARNING
View the arc from the top or side of the ECD. Do not point the ECD at your face or have it near your
face.
4 Visually verify that there are three separate arcs.
5 Look at the display and verify the following:
35
•
The cartridge information is visible.
•
The battery icon displays a 20 percent or greater capacity.
6 Shift the CAM-Lock Safety to the down (SAFE) position.
X3 ECD Maintenance and Care
CAUTION
The X3 ECD product is a sensitive electronic piece of equipment, and should be handled with care.
Avoid dropping an X3 ECD. Do not use an X3 ECD that has a cracked handle.
• Check the EPM battery pack regularly. Replace it when the battery percentage reaches 20%.
• Secure the X3 ECD in protective holster when not in use.
• Function test the ECD regularly.
• Avoid exposing the X3 ECD to excessive moisture or water.
• See the troubleshooting guide at www.TASER.com for detailed instructions.
Dropped or Wet X3 ECD
WARNING
Do not immerse the ECD in water. Any ECD loaded with Smart cartridges that is submerged in water
may unexpectedly deploy the cartridges.
If your X3 ECD is dropped or gets wet, follow these instructions.
1 Point the ECD in a safe direction and away from your body.
2 Shift the CAM-Lock safety to the down (SAFE) position.
3 Point the ECD in a safe direction and safely remove all cartridges.
4 Remove the battery pack.
CAUTION
Dry the X3 ECD thoroughly (at least 24 hours). Do not use an external heat source such as a microwave
oven or hair dryer to dry the X3 ECD.
5 Safely reinstall the battery pack.
36
Chapter 6
Maintenance/Troubleshooting
6 Point the ECD in a safe direction and away from your body and ensure the safety switch is in the down
(SAFE) position.
7 Perform a function test. Go to Function Test in this manual for instructions.
TASER Online Troubleshooting Guide
A troubleshooting guide is available by visiting www.TASER.com. If you need product support on accessories
or have any other questions, please contact customer service at:
U.S.: 1.800.978.2737 or 1.480.905.2000
International: +1.800.978.2737 or +1.480.905.2000
Product Returns
To return a TASER product for service, go to www.TASER.com.
WARNING
If the TASER ECD has been exposed to bodily fluids or other bio-hazards, please contact the TASER
customer service department at +1.800.978.2737 or +1.480.905.2000 for specific instructions BEFORE
returning the X3 ECD.
Chapter 6
Maintenance/Troubleshooting
37
Additional Items
7
Legality
The BATFE has classified our TASER ECDs as non-firearms because they use compressed gas, rather than
explosives to launch the projectiles. Because TASER ECDs are not firearms, they may be carried without a permit
in certain jurisdictions (check state and local laws for requirements in your area). The TASER ECD is restricted
from possession by citizen users in the following states: Hawaii, Massachusetts, New Jersey, New York, Rhode
Island, , Washington DC, U.S. Virgin Islands, and certain cities and counties. Check our website at www.TASER.
com for a list of known state and local laws concerning TASER ECDs. Because state and local laws may change,
be sure to research the applicable laws in your area prior to using, possessing or transporting the ECD.
Medical Research
TASER ECDs are among the most extensively studied ECDs. Many ECD-related medical and field studies have
been published. For more information go to www.TASER.com.
Warranty
Please see the product warranty which came with your ECD. TASER’s product warranties are also available on
www.TASER.com.
Warnings
See the current product warnings, for more information about your TASER product.
38
Precision Shaped Pulse™, Smart™, Rotational Pulse Drive™, Trilogy™, X-Connect™, ‘Protect Life’ and ø are trademarks of TASER
International, Inc., and TASER® and X3® are registered trademarks of TASER International, Inc., registered in the U.S. © 2012 TASER
International, Inc. All rights reserved.
MMU0032 Rev: A