1
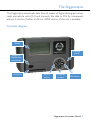
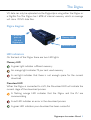
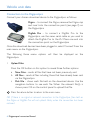
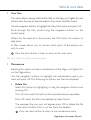
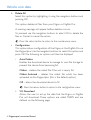
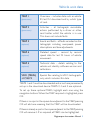
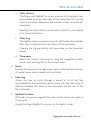
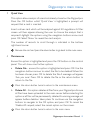
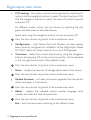
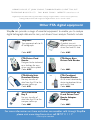
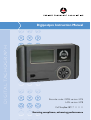
DIGITAL TACHOGRAPH
Digipostpro Instruction Manual
Re-order code: GPRS version 4476
LAN version 4478
Call Shopfta: 08717 11 11 11
Ensuring compliance, advancing performance
Digipostpro Instruction Manual 1
Contents
3 The Digipostpro
Control diagram
4 Driver card data
Uploading driver card data
Analysis
5 The Digivu
Digivu diagram
LED indicators
6 Vehicle unit data
Connection to the Digipostpro
12 Digipostpro main menu
Main menu options
15 Warranty
2 Digipostpro Instruction Manual
The Digipostpro
The Digipostpro downloads data from all makes of digital tachograph driver
cards and vehicle units (VU) and transmits the data to FTA for subsequent
analysis. A choice of either a LAN or GPRS version of the unit is available.
Controls diagram
Screen
Control
panel
Digivu or
Digifob Pro
connection
Card slot
Return
button
Navigation
buttons
OK button
Digipostpro Instruction Manual 3
Driver card data
Uploading driver card data
To upload a driver card ensure the Digipostpro is powered and that you are
prompted to ’Insert Card’.
Insert the driver card, chip side uppermost.
Leave the card inserted until requested to remove the card or press OK on
the control panel to analyse the card data.
If networks are busy, the card files will be held on the Digipostpro until they
can be uploaded. A small icon of a driver card in the bottom right of the
screen indicates there are files pending delivery to the server.
Analysis
Press OK to analyse the driver card data.
A progress bar will be displayed and then options will be made available.
Use the navigation buttons to select which data is to be viewed. Highlighting
the line and pressing OK will allow the user to select the areas to be viewed.
Scroll down to ‘show’ and press OK on the control panel.
Use the down navigation button to work through the various analysis screens.
Remove the card on completion.
NB Weekly rest will not be analysed.
4 Digipostpro Instruction Manual
The Digivu
VU data can only be uploaded via the Digipostpro using either the Digivu or
a Digifob Pro. The Digivu has 16MB of internal memory which on average
will store 120 VU data files.
Digivu diagram
Connection
point to
VU and
Digipostpro
Memory LED
Download LED
LED indicators
On the back of the Digivu there are two LED lights.
Memory LED
A green light indicates sufficient memory
An orange light indicates 75 per cent used memory
A red light indicates that there is not enough space for the current
download
Download LED
When the Digivu is connected to a VU, the Download LED will indicate the
current stage of the download process.
A flashing orange LED indicates that the Digivu and the VU are
communicating
A red LED indicates an error in the download process
A green LED indicates your download has been successful
Digipostpro Instruction Manual 5
Vehicle unit data
Connection to the Digipostpro
Connect your chosen download device to the Digipostpro as follows.
Digivu – to connect the Digivu, remove the Digivu cap
and insert into the connection point (see page 3) on
the Digipostpro
Digifob Pro – to connect a Digifob Pro to the
Digipostpro, use the same serial cable as you used to
attach the Digifob Pro to the VU. Place one end into
the connection point on the Digipostpro
Once the download devices have been plugged in, select ‘Connect’ from the
main menu on the Digipostpro.
The following three menu options will then be displayed on the
Digipostpro.
1 Upload Files
Press the OK button on this option to reveal three further options.
a New Files – sends all files that have not been previously sent
b All Files – sends all files including those that have already been sent
via the Digipostpro
c Pick File – shows each file held on the download device. Use the
navigation buttons to see each file. When the relevant file(s) is
shown press OK on the control panel to upload that file
Press the return button to return to the main menu.
NB If there is no signal or network connection to the Digipostpro, files held on
the Digivu or Digifob Pro will not upload. Retry when the connection has been
restored.
6 Digipostpro Instruction Manual
Vehicle unit data
2 View Files
This option allows viewing of all the files held on the Digivu or Digifob Pro and
will also allow the user to view the analysis of any driver card files stored.
Use the navigation buttons to highlight the ‘View Files’ option and press OK.
Scroll through the files stored using the navigation buttons on the
control panel.
When the file required is found, press the OK button for analysis to
take place.
A filter screen allows you to choose which parts of the analysis you
wish to view.
Press the return button 3 times to return to the main menu.
NB Only driver card files will be analysed.
3 Maintenance
Selecting this option will allow maintenance of the Digivu or Digifob Pro
via the Digipostpro.
Use the navigation buttons to highlight the maintenance option you
want and press OK. The following six options will then be displayed.
a Delete File
Select this option by highlighting it using the navigation buttons and
pressing OK.
This will show each file held on the download device separately.
Press OK when the file to be deleted has been found.
The message ‘Are you sure’ will appear, press OK to delete the file
or the return button if this is not the file to be deleted.
Press the return button to return to the maintenance menu.
Digipostpro Instruction Manual 7
Vehicle unit data
b Delete All
Select this option by highlighting it using the navigation buttons and
pressing OK.
This option deletes all files from your Digivu or Digifob Pro.
A warning message will appear before deletion occurs.
To proceed use the navigation buttons to select OK to delete the
files or Cancel to cancel the action.
Press the return button to return to the maintenance menu.
c Configuration
This option allows configuration of the Digivu or the Digifob Pro via
the Digipostpro. Use the navigation buttons to select this option and
press OK. The following six options will then be displayed.
i
Auto Delete
Enables the download device to manage its own file storage to
prevent the device from becoming full.
Oldest – deletes the oldest file if the unit is nearly full
Oldest Archived – deletes the oldest file which has been
uploaded via the Digipostpro (this is the default option)
Off – allows the download device to fill
Press the return button to return to the configuration menu.
ii
VU Download
Allows the user to set up the data that the Digivu or Digifob
Pro will download. These options are called TREPS and are
defined on the following page.
8 Digipostpro Instruction Manual
Vehicle unit data
TREP 1
(permanent)
TREP 2
(permanent)
TREP 3
(optional)
TREP 4
(optional)
TREP 5
Overview – includes data such as vehicle
ID, last VU download and by which type
of card.
Activities – all tachograph recordable
actions performed by a driver or other
card holder whilst the vehicle is in use.
This does not include faults.
Events and faults – all faults recorded on the
tachograph including overspeeds, power
interruptions and time adjustments.
Detailed speed – second by second
speed data for last 24 hours of vehicle
movement.
(optional)
Technical data – details relating to the
vehicle unit identity, software version and
calibration.
VDO (TREPs)
+17,18,19
Special files relating to VDO tachographs
only, which includes 4hz data.
TREPS 1 and 2 must be downloaded and as such are permanently
set up in the download device. TREPS 3, 4 and 5 are optional.
To set up these optional TREPs, highlight each one using the
navigation buttons. When the TREP required is highlighted press
OK.
If there is no spot in the square box adjacent to the TREP, pressing
OK will add one meaning that this TREP will be downloaded.
If there is already a spot in the square adjacent to theTREP, pressing
OK will remove it. If so required, all TREPs can be highlighted.
Digipostpro Instruction Manual 9
Vehicle unit data
TREP 2 on the Digipostpro allows set up of the number of days
to be downloaded. Scroll to the TREP 2 option and press OK.
Use the navigation buttons to increase or decrease the number
of days to be downloaded.
All Days – this option is obtained by scrolling one less than
000. All Days includes everything on the VU memory within the
constraints of the TREPs chosen.
Since Last – this option is obtained by scrolling two less than
000. Since Last only allows new data that has been written to
the VU since the last download to be downloaded. This allows
for a much faster download and is the recommended default.
NB Downloaded data will only include that which has been
specified in the TREPs menu as previously configured.
Press OK to accept the settings.
The VDO option relates to TREPs 17,18 and 19 as listed in the
table on the previous page, creating a separate ‘S’ prefixed file
on the Digivu or Digifob Pro. This file is only created for VDO
tachograph files.
Press the return button to return to the configuration menu
iii Speed of Download
Pressing OK will reveal two choices – Optimised or Standard.
Optimised – downloads data at the fastest possible rate
dependent on the tachograph type.This option is recommended
unless download issues are experienced.
Standard – runs as per the requirements of the digital tachograph
regulations, irrespective of the tachograph type.
Select a mode by using the navigation buttons and press OK,
then scroll to save and press OK.
10 Digipostpro Instruction Manual
Vehicle unit data
iv Clear History
The Digivu and Digifob Pro stores a record of all vehicles it has
downloaded from and the date of that download. This can be
used to accurately determine the number of days since the last
download.
Selecting the Clear History button allows the VU to be cleared
of its download history.
v Clear Log
The log file contains a summary record of all the files downloaded,
their basic content and success status of the download.
Clearing the log periodically will save space on the download
device.
vi Time-zone
Select the correct time-zone by using the navigation buttons
arrows and pressing OK on the correct zone.
d Status
Displays the amount of storage space used on the download device,
its model name, serial number and build date.
e View Log
Allows the user to scroll through a record of all of the files
downloaded by the download device, along with the date, type of
data downloaded, the status of the download and the size of the
file in kilobytes.
f
Update Firmware
Will seek a firmware upgrade from the central server and apply it
if one exists.
Unplug the Digivu/Digifob Pro to return to the default screen.
Digipostpro Instruction Manual 11
Digipostpro main menu
To access the main menu ensure the Digipostpro is powered and that you
are prompted to ‘Insert Card’.
Insert any valid Company Card and remove it when prompted to do so. The
main menu will now be displayed.
Main menu options
1 Upload Files
Ensure this option is highlighted and press the OK button on the control panel.
This will show three further options.
a New Files – uploads driver card files that have not previously been
sent
b All Files – uploads driver card files including those that have already
been sent
c Pick File – allows the user to select a driver card file from all the files
stored on the unit and upload it
Press the return button to return to the main menu.
2 View Files
This option allows the user to view the analysis of driver card files which
are stored on the Digipostpro.
Use the navigation bar to select this option and press OK. Scroll through
the files stored to find the file required and press the OK button. The
filter screen will then appear, allowing the user to choose the analysis
that is required. Highlight the options using the navigation buttons arrows
and press OK. Select ‘Show’ to reveal the card analysis.
The options selected can be revised by pressing the return button and
reselecting the analysis criteria. These options will be saved.
Press the return button 3 times to return to the main menu.
12 Digipostpro Instruction Manual
Digipostpro main menu
3 Quick View
This option allows analysis of a card not already stored on the Digipostpro.
Press the OK button whilst ‘Quick View’ is highlighted, a prompt will
request that a card is inserted.
Insert a driver card which will be analysed against EU regulations. A filter
screen will then appear allowing the user to choose the analysis that is
required. Highlight the options using the navigation buttons arrows and
press OK. Select ‘Show’ to reveal the card analysis.
The number of records to scroll through is indicated in the bottom
right-hand corner.
Remove the card and press the return button to go back to the main menu.
4 Maintenance
Ensure this option is highlighted and press the OK button on the control
panel. This will show nine further options.
a Delete File – ensure this option is highlighted and press OK. Use the
navigation buttons arrows to select the file to be deleted. When this
has been chosen press OK to delete the file. A message will appear
‘Are you sure’. Press OK to delete the file or the return button to
return to the file.
Press the return button twice to return to the maintenance menu.
b Delete All – this option deletes all files from your Digipostpro. Ensure
all files have been uploaded to the main server before selecting this
option as all files will be permanently deleted. A warning message will
appear before deletion takes place. To continue use the navigation
buttons to navigate to the OK option, and press OK. To cancel the
‘Delete All’ request, select the cancel option on the screen.
Press the return button twice to return to the main menu.
Digipostpro Instruction Manual 13
Digipostpro main menu
c LCD settings – the screen contrast can be adjusted by selecting this
option. Use the navigation buttons to select ‘Contrast’ and press OK.
Use the navigation buttons to select the level of contrast required
and press OK.
64 different screen colours can be chosen by adjusting the red,
green and blue levels as described above.
Select ‘save’ using the navigation buttons arrows and press OK.
Press the return button to go back to the maintenance menu.
d Configuration – Host Name, Port and Modem will have already
been correctly configured on installation of the Digipostpro. Please
DO NOT adjust this unless asked to do so by FTA Helpdesk.
e Time-zone – Select the correct time-zone by using the navigation
buttons and pressing OK on the correct zone. This will be displayed
in the top right-hand corner of the default screen.
Press the return button to go back to the maintenance menu.
f
Status – displays the amount of storage space used on the device.
Press the return button to go back to the maintenance menu.
g Update Firmware – will seek a firmware upgrade from the central
server and apply it if one exists.
Press the return button to go back to the maintenance menu.
h About – displays the software version number, language, serial
number and date and time of production.
Press the return button to go back to the maintenance menu.
i
Exit – exits the main menu returning to the default screen.
14 Digipostpro Instruction Manual
Warranty
Warranty
This product comes with a 12 month manufacturer’s warranty. The warranty provides
the following cover.
• Access to a technical helpdesk to diagnose any problem that may be encountered
• An automatic replacement of any faulty product by return mail if the issue cannot
be resolved by the helpdesk. Replacement will be made at no cost to you. Provision
of a replacement product is conditional upon the return of the complete faulty
product in the packaging provided. Return postage costs will be borne by FTA
The following costs are not covered by this warranty.
• Failure of the product to function because of inadequate wireless network
connectivity
• Repair costs due to breakdown caused by failure to follow the instructions for use
or by deliberate damage or neglect of the product
• Repair costs for cosmetic damage or non-functional parts which do not affect the
normal use of the product (including trim, scratches and rust)
• Any loss suffered as a result of not being able to use the product, or any loss other
than the repair or the replacement cost of the product
We reserve the right to charge for the expense of replacing the product when no fault
has been found with the product after we have inspected it.
In the case of a problem with the unit please contact
FTA technical support on 08700 11 57 15* or via email to [email protected]
For information on any other FTA digital tachograph service please call our
dedicated digital tachograph line on 08700 11 57 15* or email [email protected]
* Calls may be recorded
Digipostpro Instruction Manual 15
H ermes H ouse , S t J ohn ’ s R oad, T unbridge W ells , K ent T N 4 9 U Z
T elephone : 0 1 8 9 2 5 2 6 1 7 1
Fa x : 0 1 8 9 2 5 3 4 9 8 9
website : w w w. f t a . c o . u k
Freight Transport Association Limited (a private limited company) • Registered Office • Hermes House, St John’s Road,
Tunbridge Wells, Kent TN4 9UZ • Registered in England Number 391957 • © FTA 11.09/SP
Other FTA digital equipment
Shopfta can provide a range of essential equipment to enable you to analyse
digital tachograph data and to carry out drivers’ hours analysis. Products include:
Tally Rolls
Type approved rolls to fit
all tachographs
Digifob Pro
A pocket size unit
offering instant access to
driver card and VU data
Code: 4157
Code: 4105
FTA Driver Card
Reader
Designed to be stationed
on a desktop, for easy
driver card data upload
Code: 4155
FTA Heavy Base
Driver Card Reader
FTA Vehicle Unit
Download Device
For easy transfer of
data from the VU to the
transport office pc
Code: 4151
FTA Combined
Download Device
An ‘all in one’ downloading
device to download driver
card and VU data
Code: 4466
VDO Download
Key II
For easy transfer of
data from the VU to the
transport office pc
Code: 4801
VDO Download Key
II and Driver Card
Reader Adapter
Package
Code: 4803
Code: 4802
For more information on these and other consumables sold through Shopfta
please visit www.shop.fta.co.uk or call 08717 11 1 11*
* Calls may be recorded