1
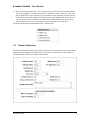
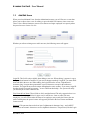
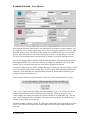
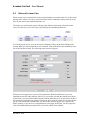
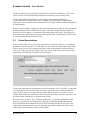
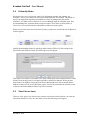
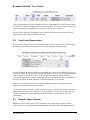
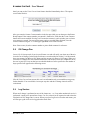
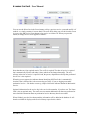
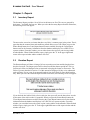
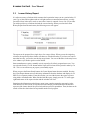
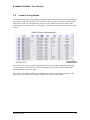
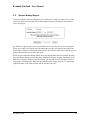
Loaner Car Net – User Manual
Index
Chapter 1 – Administration
1.0
1.1
1.2
1.3
1.4
1.5
1.6
Introduction
Administrator
Dealer Preferences
Add/Edit Users
Add/Edit Employees
Add/Edit Cars
Add/Edit Customers
Chapter 2 – Process Cars
2.1
2.2
2.3
2.4
2.5
2.6
2.7
2.8
2.9
Issue Loaner Cars
Return of Loaner Cars
Future Reservations
Follow-up Notes
View Cars on Loan
View Future Reservations
Reprint Loaner Contract
Oil Change Due
Log Service
Chapter 3 – Reports
3.1
3.2
3.3
3.4
3.5
Inventory Report
Duration Report
Loaner History Report
Loaner Car Log
Service History Report
Appendix
Hints, Tips and Suggestions
November, 2005 (Revised 2/06)
Loaner Car Net – User Manual
Chapter 1 - Administration
1.0
Introduction
Loaner Car Net is a Web based software program used to manage the loaner car fleet of an
automobile dealership. Its principal purpose is to save time in the process of issuing loaner
vehicles to customers that must leave their own car for service. Loaner Car Net maintains a list of
customers once they have been entered into the system so that the process of issuing a car and
printing a loaner contract can be accomplished with just a few clicks of the mouse.
Because Loaner Car Net is a Web based program, no software needs to be installed or maintained
at the dealership. All data is securely stored in a central location and is backed up on a regular
basis. The system is hosted by a firm specializing in web services and has a better than 99%
record of uptime.
Within a dealership, Loaner Car Net may be operated by as many users as needed. Some
dealerships have a single focus person for the issuing of loaner cars. For a little better customer
convenience, other dealerships set up each Service Advisor with the system. Either way, Loaner
Car Net can accommodate the preferences of the dealer.
Each user of Loaner Car Net must have a computer that is connected to the Internet by a high
speed, permanent connection. The computer must have browser access to the internet (Microsoft®
Internet Explorer 5.0 or higher is recommended.) Each computer must also have Adobe® Acrobat
Reader installed in order to view and print contracts and reports. (As of this writing, the current
version of Acrobat Reader was 7.0.)
1.1
Administrator
When a dealership initially signs up to use Loaner Car Net, one person must be designated as the
administrator for the system. This person will be assigned a user login name and password so that
they can then begin the process of setting up Loaner Car Net to suit their needs. A dealership is
not limited to one administrator. Any additional persons that the administrator sets up with user
logins can be designated as administrators too.
The assigned administrator is responsible for setting up the following items in Loaner Car Net for
the dealership:
•
Set Dealer Preferences – This means setting one-time, constant information like time zone,
daily rental rates, price per mile and some screen preferences.
•
Enter Additional Users – This means assigning login names and passwords for additional
people that will use the system.
•
Enter Employee Names – A list of employees that will appear in the reports and contracts
must be entered. This list consists of either Service Advisors or Loaner Agents.
•
Enter List of Loaner Cars – Initially, all cars that the dealership has available for loan must be
entered into the system. Make, model, VIN and license plate information is all that is
required. Each car must have a unique identification number or letter-number sequence.
November, 2005
1
Loaner Car Net – User Manual
•
Enter Customer List (Optional) – You may want to enter an initial list of customers into the
system. For example, if you know who may be scheduled for service in the next week, they
may be added. This is not a necessary step as customers can be entered in as loaner cars are
issued. Once entered, the customer list will stay in place until intentionally deleted. Note: If
you wish to have a list of customers pre-loaded from a download file from your business
system, contact Loaner Car Net by phone or email and arrange to have this done.
The menu that appears for administrators only is shown below:
1.2
Dealer Preferences
The Dealer Preferences must be set up before the process of issuing loaner cars can begin. Dealer
Preferences may change occasionally, but this is typically a one-time process. The screen for
maintaining Dealer Preferences looks is shown below.
November, 2005
2
Loaner Car Net – User Manual
The first 5 items represent monetary amounts that may or may not be used by your dealership. If
your contract is set up to utilize, for example, a Daily Rental Fee, then that fee should be entered
in this preferences screen so that it appears on the contract. If, on the other hand, you charge a
mileage rate for the use of a loaner car, then that amount should be entered. Leave a zero in any
of these 5 fields if you do not utilize that feature. Then, the amount will not print on the contract.
Default State: The Default State entry is simply a convenience when entering a new customer.
Typically, most customers of a dealership come from a single state, and entering that state
abbreviation in the preferences screen will automatically put it in the customer screen.
Time Zone: Your local time zone must be entered and maintained by you so that the times
assigned to loaner contracts are correct. You may need to go into this screen and change this entry
when the country switches back and forth from Daylight Savings Time.
Require Insurance: If you require that your customers provide the name, policy number and
expiration date of their automobile insurance in order to obtain a loaner car, and then make sure
that this checkbox is checked. Otherwise, loaner transactions can proceed without this
information.
Use All Caps: Some dealerships prefer to use all capital letters when entering customer
information. As a convenience to users, you can check this checkbox which will force the entry
fields to become capitalized without regard to the setting of the Caps Lock key on the individual
computers.
Show Last Fuel Level: If you do not fill the fuel tank on vehicles between loans, and you wish to
see what the fuel level was at last return, check this box and the level will show on the loaner
screen after a car is selected.
Require RO #: If you want to require loaner agents to put the Repair Order number into the loaner
screen so it appears on reports, you can check the Require RO # box and a loan cannot take place
unless the RO # is filled in.
Default Contract Note: There is a blank area on most contracts that allows for localized notes to
be entered. For example, you may wish to tell loaner customers that they may not smoke inside
the vehicle. This default note can be set up in the preferences screen. The note has a lot of space
in the preferences screen, but you need to be mindful of the actual space available on the contract
itself and tailor your note to fit.
Service Parameters: There are two parameters which will cause a loaner car to be identified as
needing an oil change. You must enter both a mileage amount and a days amount as specified by
your Service Manager. When either of these values is exceeded by any loaner car, it will appear
on the appropriate screen.
November, 2005
3
Loaner Car Net – User Manual
1.3
Add/Edit Users
When you select Maintain Users from the Administration menu, you will first see a screen that
allows you to either select a user for editing, or press the Add User button to insert a new user.
There is also a Delete function to remove users that are no longer employed in a capacity where
they need access to Loaner Car Net.
Whether you edit an existing user or add a new one, the following screen will appear:
Login ID: This field is only available when adding a new user. When editing, it appears in a gray
background and cannot be modified. If you need to change somebody’s login ID, you must delete
them and add in the new one. When adding, the login ID must be at least 5 alphanumeric
characters long. It cannot have punctuation or special characters except for the underscore
character. The login ID must also be unique throughout the entire country. If you enter a login ID
that has already been used by someone – even at a different dealership – the system will notify
you and ask you to enter a different one.
First Name & Last Name: These fields are fairly straight forward. The only suggestion here is to
follow your dealership guideline for upper case or mixed case. Later on when you enter
employees, you will want to make the name of an employee entry exactly the same as the user
name. In doing that, the person’s name will appear by default in the Issue Loaner and Return
Loaner screens.
Password: The password must also be at least 5 alphanumeric characters long – and it MUST
have at least one numeric character as well as alphabetic characters. The password, like the Login
November, 2005
4
Loaner Car Net – User Manual
ID, will automatically translate to all upper case. This avoids the issue of users trying to log in
with the Caps Lock key in the opposite setting. If you want help defining a password, just press
the Password Suggestion button and one will be made up for you.
You can change someone’s password in this screen as well.
User Access: There are two types of user access available to users. Administrators (which you
are) and Loaner Agent. The difference between the two is that only Administrators will see the
Administration menu which is show above on page 2. Loaner agents get all of the other features.
1.4
Add/Edit Employees
Just as with the user maintenance, when you select Maintain Employees, you first get a screen
that allows you to select and edit existing employees. You can also press the Add Employee
button to add a new employee. If an employee leaves or changes jobs and is no longer required by
Loaner Car Net then you can delete them using the Delete function.
You will notice that the selection screen shown has the additional feature of allowing your to
select the list alphabetically by last name – or you can enter a name in the search field and locate
an employee.
Whether you edit an existing employee or add a new one, the following screen will appear:
November, 2005
5
Loaner Car Net – User Manual
Employee ID: This is not a mandatory field, but if you have employee ID’s assigned by your
dealership, and wish to use them, they may be entered here.
First Name & Last Name: These fields are fairly straight forward. As mentioned in the
maintenance of Users above, if an employee is also a user of the system, you want to make sure
that their name is entered exactly the same in both places.
Department: You may enter the employee’s department if you wish. This is only for reference
and categorizing. It is not required.
Employee Function: Employees are entered into the system so that their names will appear in
relation to a loaner contract. Employees have three different function categories; Loaner Agent,
Service Advisor and Advisor/Agent. The third is a combination of both of the above. If, for
example, your Advisors actually issue the loaner cars, then they need to be identified as
Advisor/Agent so their name appears in both cases on the loaner screen.
Phone & Email: These two fields are optional and are only for your reference. If you wish to use
them, it is your choice.
Active: When an employee is not checked as being active, their name will not appear in the
dropdown list of the loaner car screen. You may wish to deactivate an employee, for example, if
they are on vacation or on an extended leave of absence. Then, when they return, you can simply
re-check the box and they will again appear in the forms.
1.5
Add/Edit Cars
As with other maintenance forms, when you select Maintain Cars, you first get a screen that
allows you to select and edit existing cars. When a car is removed from service as a loaner, you
first need to mark its status as Out Of Service. Then it can be deleted. To delete a car, you simply
press the Delete link on the rightmost column. When a car is deleted, all of its service records are
deleted as well. If you want a record of its service, you must print the service history for the car
before deleting.
To add a new car to the fleet, you press the Add Car button.
Whether you edit an existing car or add a new one, the following screen will appear:
November, 2005
6
Loaner Car Net – User Manual
Car ID: A dealership ID must be assigned to each car. This can be a format of your choosing with
either letters or numbers or both. A simple sequence like 0001, 0002, 0003 … is most commonly
used.
Stock No: You can optionally enter and maintain the car’s stock number. The stock number will
appear on the inventory report and on the Loaner History report sorted by Car ID.
VIN: The VIN of the car is required for quick access to it in the event a car is in a collision or is
stolen.
Retiring: When this check box is checked, then the next time this vehicle is returned from loan,
its status will switch to “Out of Service” rather than to “Available”. This feature is to prevent a
car that is due to be rotated out of the loaner fleet from being re-loaned.
License Plate: The license plate number is printed on the loaner contract so that the customer can
find the car in a parking lot.
Make, Model, Color & Model Year: These are obvious entries.
Current Status: A newly entered car will have a status of Available unless you change it. If a car
gets mis-identified, you can enter this screen via the edit and change its status.
Current Mileage: When a new car is entered, it is important to enter the current mileage so that it
appears on the first contract and so that the calculation of oil change intervals is correct. Loaner
Car Net continues to update the current mileage value as cars are loaned out and returned.
Date In Service: When entering a new car, this field will show today’s date. This date can be
changed if the appropriate date is different.
Date Out-of-Service: This field cannot be filled in manually. When a car’s status is set to Out Of
Service, this date is filled in automatically.
November, 2005
7
Loaner Car Net – User Manual
1.6
Add/Edit Customers
Adding customers can be done in two ways. You can use the Customer Maintain feature of the
main menu which will be described here - or, you can add customers ‘on-the-fly’ as you issue
loaner vehicles.
Similar to the employee maintain screen, you can select a customer to edit by using the alphabet
selector or you can enter a full or partial last name. The list of current customers will be refreshed
with a listing that matches your selection.
Whether you select a customer to edit or press the Add Customer button to add a new entry, the
following screen will appear:
November, 2005
8
Loaner Car Net – User Manual
Customer ID: If your dealership assigns customer numbers or customer ID’s to customers, you
may add it for your convenience in this field. It is not a required field and many dealerships do
not use it.
Name & Address: As you can see from the red asterisks, only first name, last name, city, state
and zip code are required entries. This is the minimum information that is needed to complete a
loaner contract. Some people do not want to give out their phone numbers or their street
addresses. If you wish to require these items on your own, simply make it your own working rule,
but the software program does not require it.
Drivers License: There is space to enter a customer’s driver’s license number as well as its
expiration date. These items are not required in this screen because you may be pre-entering
customers to the system and will not know this information. Both the license number and the
expiration date are required when issuing a loaner vehicle and, after entry, will be stored in this
database.
Insurance Company and Policy Number: Your dealership may or may not require insurance
information – either here on this form or on the loaner contract. (See Dealer Preferences in
section 1.2 above.) As with the driver’s license, you will not likely have that information when
filling out this form. If required for the loaner contract, though, it will be entered at the time of a
loaner transaction and will be stored in this database.
Alternate Driver Information: If the actual customer is not the person who brings their vehicle in
for service, there may be a need for saving the information about an alternate driver. The
alternate driver’s name, license number and expiration date are provided for here. As with the
primary license information, this data will most likely be entered at the time of a loner transaction
and will be stored in this database.
Active and No Loaners Check Boxes: If, for any reason, you don’t want a particular customer to
appear in the list during the loaner process, you can mark them as not active by un-checking the
Active checkbox on the customer screen. Sometimes because of an incident with a loaner car on a
previous visit, a customer needs to be indicated as not being allowed a loaner. To do this, check
the box marked No Loaners. This customer will still show up in the listings on the loaner screen,
but they will be identified as not being allowed a loaner.
Deleting a Customer: A customer can be deleted from the database if they are known to no longer
use the services of the dealership – either because they have moved to a different city or have
changed automobile makes. This is done in the grid screen for Maintain Customer. The rightmost
column in the grid has Delete links. It is a good practice to keep your database as lean as possible
to provide the most responsive operation.
Export to Excel: The button in the lower right side of the Maintain Customer screen provides a
method for you to download a full list of your customers in an Excel® format. Press the button,
and in a few seconds, a dialog box will appear in which you can tell the system where to place the
downloaded Excel file on your computer. This format is useful for reviewing your customer list
for possible duplicate entries and can also be used as a mail-merge file with a word processing
program to create mailing labels or form letters.
November, 2005
9
Loaner Car Net – User Manual
Chapter 2 – Process Cars
2.1
Issue Loaner Cars
The principal screen that will remain visible for most users of Loaner Car Net is the loaner screen
as shown here:
Note the Return Loaner Cars button in the lower right. This is a link to the second most common
screen used in the system – the Return Car screen. This is here just as a convenience so you do
not have to go back to the main menu before processing a return.
The first thing that must be done in the process of issuing a loaner car is to select or enter the
customer. By pressing the blue image of two people in the upper left-hand corner, the customer
selection screen is presented:
November, 2005
10
Loaner Car Net – User Manual
Just as with the maintain screens, you have several options on how to find the customer that is in
need of a loaner. You can press the first letter of the customer’s last name which will limit the
listing to only customers with that letter. You can further click on any of the column headers
(underlined in blue) to sort the list by that column. For example, if you have a lot of people
named Smith in your database, you could further sort them by city or zip code to help limit the
number you have to look through. Possibly a quicker way to get to the exact customer you want
to find is to enter all or part of their last name in the search box. Then, the list will be limited to
just customers who have those letters in their last name. Still another search feature is the
Reservations button – located right next to the alphabet search. When you click on the
Reservations button, the list will show you only those customers that have set up a reservation for
a loaner car for today. Reservations are set up using the Future Reservation form under the
process menu. If you have found the customer who needs the loaner car, press the blue Select link
immediately to the left of the last name. You will be returned to the loaner screen with the
customer filled in.
If, after searching, you do not find the customer who needs the loaner car, you will have to enter
them into the system manually. Please note, this will only have to be done this one time as the
system will maintain that customer from this point on, and the next time they need a loaner, their
name will be available. To enter a customer on their first loaner transaction, press the Add button
on the search screen. A customer entry screen will appear that is an abbreviated version of the one
shown in the Maintain Customer section (1.6). Between the abbreviated customer entry screen
and the loaner screen shown above, all necessary information can be entered and saved. Here is
the abbreviated customer entry screen:
As with the Customer Maintain screen, First Name, Last Name, City, State and Zip Code are
required in order to save this new customer entry. Once you have entered the required
information and pressed the save button, you will be returned to the loaner screen with the
customer identified.
November, 2005
11
Loaner Car Net – User Manual
The loaner screen after a customer has been selected or added looks like this:
Notice that once the customer information is filled in, the red car selection button appears. To
select an available car for this customer, press this car select button. The following screen appears
with a list of available loaner cars:
You may select one of the available cars and it will be reserved for you for the next 15 minutes.
This will prevent some other person using the Loaner Car Net program from selecting the same
car. If, however, you do not finish this transaction within 15 minutes, the car will be cycled back
into the list of available cars. As with the customer selection, you select a car by pressing on the
Select link immediately to the left of the Car ID column. When you do so, the loaner screen
appears again with the car information included:
November, 2005
12
Loaner Car Net – User Manual
Notice that the Process Loaner button is now enabled so the transaction is almost complete. You
are required to select a Loaner Agent and a Service Advisor using the dropdown lists on the righthand side of the car area. The mileage of the car that was recorded the last time it was returned
appears in the mileage box. If, for some reason, this isn’t correct, you may change it. Also, the
fuel level at last return will show after the mileage if you have set it up the dealer preferences.
You can also change the date and time if that would be appropriate. The current date and time is
automatically filled in. For convenience and cross-checking, you should fill in the repair order
number. This is not required, but may save some time with paperwork later on.
The special conditions box is filled in with the dealership’s default text. You may change it or add
to it. You must keep in mind the available space on your contract form when putting information
in this box. Each dealership has a somewhat different contract format and the amount of space
available for these comments varies.
When you press the Process Loaner button, the final screen in the loaner transaction appears:
This is a very simple screen that displays the contract number to you so you can fill it in on any
additional paperwork that may be required by your dealership. When you press the Create
Contract button, the contract will appear in a separate window as an Adobe PDF page. You can
view it and ultimately press the print button. After the print dialog appears, you must select the
number of copies that you want printed.
When the printing is complete, use the ‘X’ in the upper right-hand corner of the contract screen to
close it. You will now be returned to the blank loaner car screen to begin another transaction if
necessary.
November, 2005
13
Loaner Car Net – User Manual
2.2
Return of Loaner Cars
When a loaner car is returned to the lot, the only information you need to check it in is the current
mileage of the vehicle. Of course, you will need to be able to identify the vehicle either by its car
ID or by the name of the customer that had it out.
The loaner car return function can be called up either from the main menu or from the loaner
screen. In either case, you will first get a grid showing all outstanding loaned cars:
As with other grid screens, you can sort on any column by clicking on the blue heading of the
column. When you have located the car to be returned, click on the Select link immediately to the
left of the Out Date column. The following return screen will appear:
When this screen appears, the cursor will be positioned in the Return Miles box so you can
immediately enter the return mileage of the car. If you need to calculate the elapsed miles driven
by the loaner, you can click the button labeled Calculate Miles Driven. You may want to do this if
the customer is responsible for paying a mileage rate while using the loaner. If your name did not
pop up in the list labeled Checked In By, you will need to select an agent. This is required for
future reporting. Lastly, there is a representation of a fuel gage on the right. You are required to
click on the button that represents the fuel level of the vehicle when returned.
November, 2005
14
Loaner Car Net – User Manual
The date and time that you actually process this screen are filled in automatically. If, for some
reason, the date or time should be different than the current time, you can change them.
The box marked Return Exceptions is a place where you can indicate and damage or
inconsistencies that are noted when the car is returned. If you wish to have a report printed
showing the return exceptions and the returned fuel level, simply mark the checkbox labeled Print
Exception Report.
When the form is complete, simply press the Process Return button and the car will be checked in
and immediately be made available for loan again. If the Print Exception Report checkbox is
checked, you will be shown a screen that will allow the printing of the report. The mileage you
have entered in the Return Miles entry box will be entered as the current mileage for that car and
will be the starting mileage for the next loan.
2.3
Future Reservations
Loaner Car Net allows you to set up future reservations for customers who have, or are making
appointments for their cars to be serviced. When you select the Future Reservation item from the
Process menu, you will see a customer grid similar to the one that appears in the Issue Loaner
Cars screen. When you find the customer whom you wish to create a reservation for, and select
that customer, the following reservation screen will appear:
You have the opportunity to categorize the reservation using the “Type” field. This is a maximum
of 10 characters and is a free-form field. This can be used in the case of a multi-brand dealer
where you have loaner cars of more than one model. When you make a reservation, you can
indicate which model the customer has so that when you review the reservations, you will be able
to tell how many of which type are needed on a given day.
For convenience, the next 7 days – starting with tomorrow – are set up as pushbuttons. If the
reservation is planned for one of those days, simply press that button and then press the Set
Reservation button at the bottom of the screen. If the reservation needs to be set up for a date
further out than the buttons allow, you can manually enter a date in the date box. If you enter
both, the date entered manually will be used by default.
November, 2005
15
Loaner Car Net – User Manual
2.4
Follow-Up Notes
During the time a car is out on loan, some bit of information related to the customer, the
customer’s service or the loaner car itself may become important. For example: The loaned car
may be out longer than originally expected due to a delay in getting repair parts for the
customer’s car. When a Service Advisor or a Service Manager looks at a duration report, they
will undoubtedly have a question about a long term loaner. The Follow-Up Note feature of
Loaner Car Net is used to make this information available on certain reports.
When you select the menu item for Follow-Up Notes, a grid screen just like the one for Return of
Loaners appears:
Identify the outstanding loaner for which you want to make a Follow-Up Note and press the
Select link in the leftmost column. The following screen will appear:
This simple screen allows you to make a new entry related to the loaner contract shown. If a note
already exists for this loaner, it will appear and can be modified or added to. When you have
made a note or an addition, simply press the Save button and the note will be entered into the
database so that it will be seen in the loaner reports. You will be returned to the selection screen
so that you can make additional Follow-Up Notes if needed.
2.5
View Cars on Loan
There are a few ways to see what cars are currently out on loan, but the quickest is to select the
menu item named View Cars on Loan. When you do, the following screen appears:
November, 2005
16
Loaner Car Net – User Manual
This is an information only screen and does not go any further than this. You do have the ability
to sort on any column by clicking on the blue column headers. This can be useful if you have lots
of cars out and want to find all that were issued by a specific Service Advisor.
When you have found the information you are looking for, simply press the Return to Home
button and you will be returned to the main menu.
2.6
View Future Reservations
To find out how many cars are reserved for customers on any given day, select the View Future
Reservations selection in the Utility menu. This will bring up the following screen:
Just like with the Future Reservation screen described above, this one has a shortcut for the next
seven days. Simply pressing one of the day labeled buttons will show a list of customers that have
reserved loaner cars for that day. There is also an ‘All’ button that will display all future
reservations in date order. On the far right-hand side, there is a button that pops up a calendar so
that you can display any future date and see what customers have reservations.
When a reservation date passes, the reservation is dropped from the list permanently so you
cannot go back and view previous reservations.
If you wish to cancel a customer’s future reservation, locate it in this screen and press the cancel
button in the last column of the display. You will be asked to verify that this is really what you
intend to do and when you press the OK button, the selected reservation will be removed
permanently.
2.7
Reprint Loaner Contract
Sometimes, due to printer errors or lost paperwork, it may be necessary to reprint a loaner
contract. To do so, you only need the contract number. If you don’t know the number right off
November, 2005
17
Loaner Car Net – User Manual
hand, you can use the View Cars on Loan feature described immediately above. The reprint
screen looks like this:
After you enter the Loaner Contract number in the box provided, you can then press the Printer
Ready button. If the contract number you entered is found to be valid, then the Create Contract
button will become enabled. Pressing it will create the contract in a new window just as when a
new contract is created. You can print as many copies as needed. When finished, close the
contract window using the ‘X’ in the upper right-hand corner of the window.
Note: Enter a zero (0) as the contract number to print a blank contract for reference.
2.8
Oil Change Due
Loaner Car Net keeps track of service on all loaner cars and will notify you when one of them is
in need of an oil change. In the Dealer Preference screen described in section 1.2 of this manual,
there was an entry for Miles to Oil Change and also an entry for Days to Oil Change. When you
select the Oil Change Due item from the main menu, both of these values are compared to all of
the cars in your fleet. Any car that has exceeded the number of miles specified or the number of
days specified will appear on the following screen:
Like the View Cars on Loan screen, this one is an information only screen and does not go any
further than this. You can call this screen up at any time and the oil change intervals will be
recalculated.
2.9
Log Service
When an oil change is performed on one of the loaner cars – or, if any other mechanical service is
performed, it needs to be entered into Loaner Car Net so that it can be reported on and so that the
calculation of Oil Change Due is correct. When you select Log Service from the main menu, you
will first get a grid of all service logged on the whole fleet:
November, 2005
18
Loaner Car Net – User Manual
You can use the Select line in the first column to call up a previous service event and modify it if
needed – or, simply examine it in more detail. The more likely thing you will do from this screen
is to press the Add Service Event button to log service on a loaner car. When you press this
button, an empty service screen appears as follows:
Note that there are four required entries. The car ID is required. The date of service is required
but is automatically filled in with today’s date (which can be changed manually). The car’s
mileage at the time of service is required. And, the person, department or facility that performed
the service is also required.
When this screen appears, the indicator button identifying Oil/Filter/Lube is automatically
checked. That is because this is the most used type of entry. If you are logging some other
mechanical service – like brakes or tune-up, simple click on the indicator button for Mechanical
Service.
Optional information for the service log is the service ticket number, if you have one. The Notes
field is also an optional entry. The notes area can contain additional work that was performed or
more detailed information about any mechanical service that may have been needed.
When finished, press the Save button and the information will be added to the database. It will
then be available for display on the Service History report for this vehicle.
November, 2005
19
Loaner Car Net – User Manual
Chapter 3 - Reports
3.1
Inventory Report
The Inventory Report provides a list of all cars in the loaner car fleet. The cars are grouped by
their status – Available, On Loan etc. When you select the Inventory Report from the main menu,
the following screen will appear:
The note on the screen lets you know that there very likely is contract paper in the printer. That is,
paper that has the contract terms and conditions printed on the reverse side. When you press the
Printer Ready button, the Create Report button becomes enabled. Pressing the Create Report
button retrieves the inventory information from the database and displays it as a PDF file in a
separate window. From this window, you can either browse the report or print it using Adobe
Acrobat Reader. When finished with the report, simply press the ‘X’ in the upper right-hand
corner of the report window and the window will close.
3.2
Duration Report
The Duration Report will show a listing of all cars currently out on loan and the length of time
they have been out. The longest period will be show first and the shortest period last. This is a
favorite tool of Service Managers who are interested in keeping the loaner car fleet active. The
Follow-Up notes described in section 2.3 of this manual are displayed, if they exist, underneath
each car listing. If a car is out for an unusual length of time, the Follow-Up note should explain
why. When you select the Duration Report from the main menu, the following screen will appear:
If you check the box labeled List by Service Advisor, the report will sort the loaned cars in order
by the name of the Advisor who is responsible. When you press the Printer Ready button, the
Create Report button becomes enabled. Pressing the Create Report button retrieves the duration
information from the database and displays it as a PDF file in a separate window. From this
window, you can either browse the report or print it using Adobe Acrobat Reader. When finished
with the report, simply press the ‘X’ in the upper right-hand corner of the report window and the
window will close.
November, 2005
20
Loaner Car Net – User Manual
3.3
Loaner History Report
It is often necessary to find out which customer had a particular loaner car on a particular day. If
your City or State utilizes photo radar or red light cameras at controlled intersections, you may
get traffic tickets in the mail a week or more after a loaner is returned. Loaner Car Net provides
you with a quick way to find out who had the car on what day. When you select the Loaner
History Report from the main menu, the following screen will appear:
The report can be prepared for a single day or for a range of days. When you use the single day
selection, the report only shows loaner cars that were issued on that day. If you have cars out for
more than one day, you need to use the day range feature. You can set the dates in the entry boxes
to be whatever you need to get the results desired.
Some manufacturers require a monthly activity report for all of their program loaner cars. You
can select the Sort by Car I.D. button and the report will list loans for the period in order by Car
I.D. This is a convenient way to prepare your monthly report.
When you press the Printer Ready button, the Create Report button becomes enabled. Pressing
the Create Report button retrieves the history information from the database and displays it as a
PDF file in a separate window. From this window, you can either browse the report or print it
using Adobe Acrobat Reader. When finished with the report, simply press the ‘X’ in the upper
right-hand corner of the report window and the window will close.
Sometimes the information on the history report is not complete enough or may not be in the
order desired. For this reason, an Export to Excel® button is provided which will download a
superset of the loaner data for the period selected into an Excel spreadsheet. Then, the data can be
sorted or filtered as desired and even printed from the Excel program.
November, 2005
21
Loaner Car Net – User Manual
3.4
Loaner Car Log Report
It is sometimes necessary, when selling a car that has been in the loaner fleet, to have an historical
log of who used the car and when it was used. The Loaner Car Log will provide a printout of the
entire history of the car as maintained by Loaner Car Net. When you select this report in the
reports menu, a list of all of your cars will appear – similar to the list that appears when you select
a loaner:
Select the car for which you want a log printed and a screen will appear with a button that says
“Create Loaner Car Log”. When you press this button, the log will be created in Adobe PDF
format which you can view or print.
Note: This is also another method to see who had a car out on a particular day in history. This
may be necessary if you receive a traffic citation in the mail for a past offense.
November, 2005
22
Loaner Car Net – User Manual
3.5
Service History Report
The Service History Report will display a service history for a single car in the fleet, or of the
entire fleet. When you select the Service History Report from the main menu, the following
screen will appear:
By default, the report prepares service information for all cars in the fleet. If you wish to print
history for a single car, select the One Car button and a text box will appear to the right of the
button. Enter a single Car ID number in the text box. As with the Loaner History Report, you can
define a date range to be included in the report.
When you press the Printer Ready button, the Create Report button becomes enabled. Pressing
the Create Report button retrieves the history information from the database and displays it as a
PDF file in a separate window. From this window, you can either browse the report or print it
using Adobe Acrobat Reader. When finished with the report, simply press the ‘X’ in the upper
right-hand corner of the report window and the window will close.
November, 2005
23
Loaner Car Net – User Manual
Appendix
Hints, Tips and Suggestions
•
It is recommended that each person who uses Loaner Car Net has his or her own login
credentials (username and password). When a user is logged in using their own
credentials, then their name will automatically pop up in the dropdown lists of Service
Advisors or Loaner Agents depending on their job.
•
Like all web sites, Loaner Car Net has a timeout period. On most screens, after 20
minutes without any screen activity, you will be automatically logged off. If you leave a
screen unused for that length of time, the screen will not change, but if you press a button
on the screen or try to navigate to a different screen, you will be redirected to the login
page. The exception to this rule is the main menu page (or Home page). If you leave this
page up in your browser, it will not expire for one hour.
•
Because of the timeout mentioned above, it is helpful to have a password manager type of
software installed on your computer. There are a number of them available. They can be
purchased from some of the major software vendors like Symantec. There are also some
free password managers available for download. If you have a computer support person
or group in your dealership, they may be helpful in this. One disadvantage to these
password manager programs is that anyone who walks up to your computer can log on as
you.
•
When adding cars to Loaner Car Net, keep in mind that the Car ID number is an
alphabetic entry – not just a numeric entry. If you only use numbers and no letters in the
Car ID, you should precede the single digit numbers with a zero (0) so that when you
display the inventory, it will be in proper order. An alphabetic sort will order by numbers
first and then by the letters, if any.
•
Although Loaner Car Net tries to prevent one car from being assigned by more than one
person, it is possible for that to happen if you do not complete a loaner transaction within
15 minutes. After you select a car, it is reserved for you for 15 minutes. A safe way to
prevent duplication is to physically go to the key storage area or key locker and actually
have the keys for the loaner vehicle in your hand when you select the loaner car. If a
single person always issues loaners, then this is not an issue.
•
The first report or contract that is created for display or printing will take a few seconds
to appear on your screen. This is because an information channel needs to be opened to
your computer and also because the Adobe Acrobat program has to start up. After the
first report or contract is generated, this delay time is much shorter. You can help to
minimize the delay time by manually starting up the Adobe Acrobat program on your
computer and just minimize it into your taskbar. You can even set the Adobe program to
start up when your computer starts so it will always be available.
November, 2005
24
Loaner Car Net – User Manual
•
In the upper right-hand corner of every screen in Loaner Car Net, there are three active
buttons – Home, Logout and Help. These appear just above your dealership name. At any
time, from any screen, you can press the Home button and be returned to the main menu.
You can press the Logout button and your work session will end and you will be returned
to the login page. Lastly, you can press the Help button and this User Manual will display
in a new window on your desktop.
•
To print a blank copy of your loaner agreement, use the Reprint Loaner Contract screen
and enter a zero (0) as the contract number.
If You Need Help:
Loaner Car Net support can be obtained by calling 1-888-436-9776 during normal business hours
for PC Database Solutions. Normal business hours are between 8:30 A.M. and 4:30 P.M. Arizona
time. If your call cannot be answered immediately, leave your name, direct phone number and a
description of the difficulty you are having. We will make every attempt to get back to you on the
same day.
You can also get support information by email at [email protected].
November, 2005
25