1
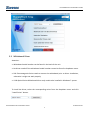
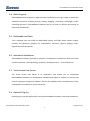
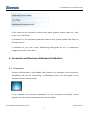
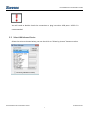
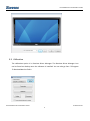
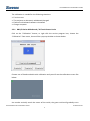
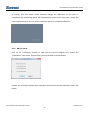
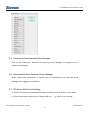
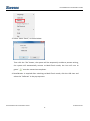
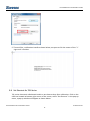
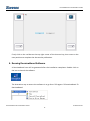
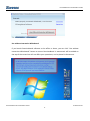
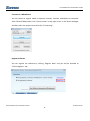
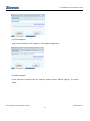
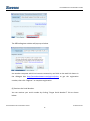
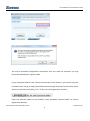
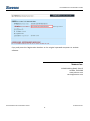
DonviewBoard v2.0 Installation Guide DonviewBoard SOFTWARE INSTALLATION GUIDE V2.0 Document Released 5.1.2015 DonviewBoard v2.0 Installation Guide © 2015 Sonnoc 1 DonviewBoard v2.0 Installation Guide Contents 1. HARDWARE INSTALLATION .............................................................................................. 3 2. SOFTWARE INSTALLATION ............................................................................................... 3 2.1 INSTALLATION CD ...................................................................................................................... 3 2.2 INSTALLATION INTERFACE ............................................................................................................ 3 2.3 WHITEBOARD DRIVER ................................................................................................................ 4 2.4 MAIN PROGRAM ....................................................................................................................... 5 2.5 MULTIMEDIA AND TOOLS ............................................................................................................ 5 2.6 INTERACTIVE SIMULATIONS.......................................................................................................... 5 2.7 TOUCH SCREEN CAST SERVER....................................................................................................... 5 2.8 OPTIONAL PLUG-INS .................................................................................................................. 5 3. CONNECTION AND ELECTRONIC WHITEBOARD CALIBRATION ........................................... 6 3.1 CONNECTION ............................................................................................................................ 6 3.2 SELECT WHITEBOARD SERIES ....................................................................................................... 7 3.3 CALIBRATION ............................................................................................................................ 8 3.3.1 DB-D/H Series Whiteboard / DS Touch Screen Series ...................................................9 3.3.2 DB-T01 Series ..............................................................................................................10 3.4 SHORTCUT KEYS SETTING .......................................................................................................... 11 3.5 DISCONNECT FROM DONVIEW DRIVER MANAGER .......................................................................... 12 3.6 AUTOMATICALLY START DONVIEW DRIVER MANAGER ..................................................................... 12 3.7 T01 SERIES MULTI-TOUCH SETTING............................................................................................ 12 3.8 SET SHORTCUT FOR T01 SERIES ................................................................................................. 14 4. RUNNING DONVIEWBOARD SOFTWARE ........................................................................ 15 4.1 RUNNING SOFTWARE WITH A CONNECTED WHITEBOARD ................................................................ 16 4.2 RUNNING SOFTWARE WITHOUT CONNECTING TO WHITEBOARD ....................................................... 16 DonviewBoard v2.0 Installation Guide © 2015 Sonnoc 2 DonviewBoard v2.0 Installation Guide 1. Hardware Installation For hardware installation, please refer to the Hardware Installation Guide. 2. Software Installation 2.1 Installation CD DonviewBoard software disc contains two discs. DonviewBoard Software (Primary Education) For Kindergarten and Primary School DonviewBoard Software (Secondary Education) For Middle School, High School, and University The following instruction uses Primary Education as an example, introduces the overall process of the software installation. 2.2 Installation Interface Insert the disc into DVD-ROM, the software will automatically run and pop up the following interface: DonviewBoard v2.0 Installation Guide © 2015 Sonnoc 3 DonviewBoard v2.0 Installation Guide 2.3 Whiteboard Driver Attention: Whiteboard model number can be found in the back of the unit. No driver needed if the whiteboard model number cannot be found in dropdown menu. S01 Electromagnetic Series need to connect the whiteboard prior to driver installation, otherwise it might not work properly Y100 Optical Series Whiteboard driver only needs to be installed in Windows 7 system. To install the driver, select the corresponding series from the dropdown menu and click "Install Driver" button. DonviewBoard v2.0 Installation Guide © 2015 Sonnoc 4 DonviewBoard v2.0 Installation Guide 2.4 Main Program DonviewBoard main program is required to be installed and running in order to launch the interactive functions including writing, erasing, dragging, screenshot, searchlight, screen recording and more. DonviewBoard software can be run with or without connecting an electronic whiteboards. 2.5 Multimedia and Tools This is optional. You can install the Multimedia Library and Tools which contain images, symbols and geometric graphics for mathematics, chemistry, physics, biology, music, English and more disciplines. 2.6 Interactive Simulations DonviewBoard software provides a collection of experiment simulations which are made by flash animation, covering biology, chemistry, and physics for K – 12 environments. 2.7 Touch Screen Cast Server The Touch Screen Cast Server is an application that allows you to manipulate DonviewBoard software via smartphones (Android and Apple) or tablets by scanning QR Code or typing the assigned IP address. You can also upload pictures and documents from smartphones and tablets for more interaction. 2.8 Optional Plug-ins Some plug-ins may be required for running DonviewBoard software, tools and simulations. DonviewBoard v2.0 Installation Guide © 2015 Sonnoc 5 DonviewBoard v2.0 Installation Guide If the resources and simulations cannot show words properly, please install the "Flash Player" and "Java Player". In Windows 8, if the simulation experiment doesn’t work, please update Flash Player to the latest version. In Windows XP, you must install "Handwriting Recognition for XP" or handwriting recognition function won’t work. 3. Connection and Electronic Whiteboard Calibration 3.1 Connection Connect USB and audio / video (HDMI, VGA) cables to the computer and the electronic whiteboard, and click on “Connecting”. A whiteboard service icon will appear on the windows taskbar as shown below: If the computer and electronic whiteboard are not connected successfully, service program icon will show an exclamation mark on the taskbar. DonviewBoard v2.0 Installation Guide © 2015 Sonnoc 6 DonviewBoard v2.0 Installation Guide You will need to double check the connection or plug into other USB ports. USB 2.0 is recommended. 3.2 Select Whiteboard Series Select the series as shown below, you can also click on “Select by picture” button to select. DonviewBoard v2.0 Installation Guide © 2015 Sonnoc 7 DonviewBoard v2.0 Installation Guide 3.3 Calibration The calibration option is in Donview Driver Manager. The Donview Driver Manager icon can be found on desktop once the software is installed. You can also go Start Program DonviewBoard to find it. DonviewBoard v2.0 Installation Guide © 2015 Sonnoc 8 DonviewBoard v2.0 Installation Guide The calibration is needed for the following situations: First time use The projector or electronic whiteboard changed Electronic whiteboard software reinstalled Change computer 3.3.1 DB-D/H Series Whiteboard / DS Touch Screen Series Click on the “Calibration” button, or right click the service program icon, choose the “Calibration” from menu, there will be a pop-up window as shown below. Choose one of listed methods to do calibration and you will see the calibration screen like below. Use marker vertically touch the center of the reticle, the green reticle will gradually turns DonviewBoard v2.0 Installation Guide © 2015 Sonnoc 9 DonviewBoard v2.0 Installation Guide to orange, once the whole reticle becomes orange the calibration of this point is completed, the positioning reticle will automatically move to the next point. Follow the same steps working on the rest of the calibration points to complete calibration. 3.3.2 DB-T01 Series Click on the “Calibration” button, or right click the service program icon, choose the “Calibration” from menu, there will be a pop-up window as shown below. Choose one of listed methods to do calibration and you will see the calibration screen like below. DonviewBoard v2.0 Installation Guide © 2015 Sonnoc 10 DonviewBoard v2.0 Installation Guide Starting from the top left corner, use the attached whiteboard pen to touch the red reticle, the red reticle will automatically jump to the next point. Follow the points showed on screen to complete the calibration. 3.4 Shortcut Keys Setting Click on the “Setting” button to edit shortcut key functions corresponding to the electronic whiteboard. DonviewBoard v2.0 Installation Guide © 2015 Sonnoc 11 DonviewBoard v2.0 Installation Guide 3.5 Disconnect from Donview Driver Manager Click on the "Disconnect" button to exit Donview Driver Manager, the program icon in taskbar will disappear. 3.6 Automatically Start Donview Driver Manager Check “Connecting whiteboard at startup” box to automatically start Donview Driver Manager after logging in to Windows. 3.7 T01 Series Multi-Touch Setting 1. Connect T01 electronic whiteboard and your computer, refer to Section 3.1 for detail. 2. Click on the bottom right corner of orange USB icon” DonviewBoard v2.0 Installation Guide ” and click on “Setting”. © 2015 Sonnoc 12 DonviewBoard v2.0 Installation Guide 3. Select "Multi-Touch", as shown below. Then click the "Set" button, the system will be temporarily unable to process writing, the system will automatically convert to Multi-Touch mode, the icon will turn to green ” ” once the conversion completes. 4. Recalibration is required after switching to Multi-Touch mode, click the USB icon and select the "Calibrate" in the pop-up menu. DonviewBoard v2.0 Installation Guide © 2015 Sonnoc 13 DonviewBoard v2.0 Installation Guide 5. There will be a calibration interface shown below, use pen to click the center of the "+" signs until it finishes. 3.8 Set Shortcut for T01 Series T01 series electronic whiteboard needs to set shortcut keys after calibration. Click on the USB icon located at bottom right corner of the screen, select "Set Shortcut” in the pop-up menu, a pop-up window will appear as shown below. DonviewBoard v2.0 Installation Guide © 2015 Sonnoc 14 DonviewBoard v2.0 Installation Guide Firstly click on the red dot on the top right corner of the shortcut key, then move to the next positions to complete the shortcut key calibration. 4. Running DonviewBoard Software A DonviewBoard icon will be generated after the installation completes. Double click on the icon to launch the software. The alternative way to access the software is to go Start Program DonviewBoard DonviewBoard. DonviewBoard v2.0 Installation Guide © 2015 Sonnoc 15 DonviewBoard v2.0 Installation Guide 4.1 Running Software with a Connected Whiteboard Connect computer and electronic whiteboard. Properly launch DonviewBoard software, you will be directed to menu bar to access all of the functions. 4.2 Running Software without Connecting to Whiteboard DonviewBoard software can still be launched without connecting to a whiteboard. However, a registration window will appear as shown below. DonviewBoard v2.0 Installation Guide © 2015 Sonnoc 16 DonviewBoard v2.0 Installation Guide Use without Interactive Whiteboard If you launch Donviewboard software at the office or home, you can click “Use without Interactive Whiteboard" button to access DonviewBoard. A watermark will be added on the top of the screen but will not affect your operations, nor be placed in documents. DonviewBoard v2.0 Installation Guide © 2015 Sonnoc 17 DonviewBoard v2.0 Installation Guide Connect to a Whiteboard You can switch to regular mode to operate normally. Connect whiteboard to computer with USB and HDMI cables, click "Connect Now" at top right corner. In the Driver Manager window, select the proper series and click “Connecting”. Register Software You can register the software by clicking "Register Now" and you will be directed to “Online Register” tab. DonviewBoard v2.0 Installation Guide © 2015 Sonnoc 18 DonviewBoard v2.0 Installation Guide (1) Online Register Type-in serial numbers, click “Register” to complete registration. (2) Offline Register If the computer cannot access the Internet, please choose "Offline register", as shown below. DonviewBoard v2.0 Installation Guide © 2015 Sonnoc 19 DonviewBoard v2.0 Installation Guide The Offline Register window will pop-up as below. Use another computer which has internet connectivity and click on the web link shown in the dialogue box http://www.donvieware.com/cgi-bin/snkey to get the registration number, then click “Register” to complete registration. (3) Retrieve the Serial Number You can retrieve your serial number by clicking "Forgot Serial Number?" link as shown below. DonviewBoard v2.0 Installation Guide © 2015 Sonnoc 20 DonviewBoard v2.0 Installation Guide You will be prompted "Registration Completed" once the code has retrieved, you may launch DonviewBoard in regular mode. If your computer doesn't have internet connectivity at the moment, you need to copy the Featured Code, and go to http://www.donvieware.com/cgi-bin/snkey from another device which has internet accessibility, click "2. Get ever used registration number". Paste the Featured Code into the textbox "Input Hardware Featured Code" to retrieve Registration Number. DonviewBoard v2.0 Installation Guide © 2015 Sonnoc 21 DonviewBoard v2.0 Installation Guide Copy and paste the Registration Number to the original operated computer to activate software. Sonnoc Inc. 11940 Goldring Road, Suite D Arcadia, CA 91006 www.sonnoc.com [email protected] DonviewBoard v2.0 Installation Guide © 2015 Sonnoc 22