1
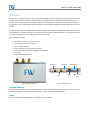
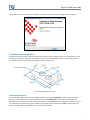
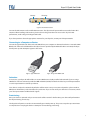
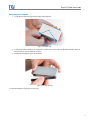
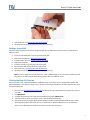
`
Skyus DS
TM
Quick Start Guide
Skyus DS Quick Start Guide
Preface
Copyright
© 2015 Feeney Wireless, LLC a Novatel Wireless Company. All rights reserved.
This document may not be copied in part or otherwise reproduced without prior written consent from Feeney
Wireless except where specifically permitted under US and International copyright law.
Disclaimer
The information in this document is subject to change without notice. Feeney Wireless (“FW”) assumes no
responsibility for inaccuracies or omissions and specifically disclaims any liabilities, losses, or risks, personal or
otherwise, incurred as a consequence, directly or indirectly, of the use or application of any of the contents of this
document. For the latest documentation, contact your local supplier or visit us online at www.feeneywireless.com.
This publication may contain examples of screen captures and reports used in daily operations. Examples may
include fictitious names or individuals and companies. Any similarity to names and addresses of actual businesses or
persons is entirely coincidental.
Patents and Trademarks
Feeney Wireless and the FW logo are trademarks of Feeney Wireless LLC. Skyus, Skyus 3G, Skyus 4G, Skyus Global,
Skyus DS, CIRA, CIRA X, CIRA X2, Crossroads, and Axiom are trademarks of Feeney Wireless LLC. VaraSight and the
VaraSight logo are trademarks of Feeney Wireless LLC.
Other trade names used in this document may be trademarks or registered trademarks of the manufacturers or
vendors of the respective products.
Intended Use
Use this product only for the purpose it was designed for; refer to the datasheet and user documentation. For the
latest product information, visit us online at www.feeneywireless.com.
Document Number: 25-52-020-01(Revision A)
1
Skyus DS Quick Start Guide
Contents
Overview .......................................................................................................................................................................................................................3
Intended Audience ..............................................................................................................................................................................................3
Scope.........................................................................................................................................................................................................................3
Specifications .........................................................................................................................................................................................................4
Installation ....................................................................................................................................................................................................................5
Installation Summary ..........................................................................................................................................................................................5
Package Contents ................................................................................................................................................................................................5
Installing the Sierra Wireless Driver...............................................................................................................................................................5
Installing the Mounting Bracket .....................................................................................................................................................................7
Connecting Antennas.........................................................................................................................................................................................7
Connecting to a Computer or Router...........................................................................................................................................................8
Activation ................................................................................................................................................................................................................8
Provisioning............................................................................................................................................................................................................8
Installing the Connection Manager ..............................................................................................................................................................9
FW Skyus Watcher ..........................................................................................................................................................................................9
Windows Mobile Broadband ......................................................................................................................................................................9
Sierra Wireless Skylight .................................................................................................................................................................................9
Accessing the SIM Slots ...........................................................................................................................................................................................9
Removing the Faceplate................................................................................................................................................................................. 10
Inserting and Ejecting SIMs ........................................................................................................................................................................... 11
Switching the Active SIM ..................................................................................................................................................................................... 11
If Two SIMs Are Already Installed ................................................................................................................................................................ 11
Adding a Second SIM ....................................................................................................................................................................................... 12
Flashing the Skyus DS Firmware ................................................................................................................................................................. 12
Contacting FW ......................................................................................................................................................................................................... 13
Online Library ..................................................................................................................................................................................................... 13
FCC Compliance ...................................................................................................................................................................................................... 14
2
Skyus DS Quick Start Guide
Overview
The Skyus DS is a rugged, low-cost, self-contained modem kit that gives you the ability to switch carriers in the field.
The Skyus DS platform simplifies the integration efforts of adding mobile connectivity in Internet of Things (IoT)
solutions and accelerates time-to market for creating connected devices. In contrast to standalone radio modules,
the Skyus DS uses a standard USB connection interface, making it readily compatible with the largest choice of host
devices.
Integration of the Skyus into a Windows based system requires at a minimum two high level components, the driver
and a mechanism to provide connection management. This document is intended to guide you through the process
of connecting the hardware and setting up these two components.
Skyus DS features include:
•
•
•
•
•
•
•
Operation on major US carrier networks
4G LTE support on major US carriers
Two accessible SIM slots
Carrier switching (reprogramming required)
Integration with Crossroads IoT application framework
GPS ready
External SMA antenna ports
Primary
Diversity
GPS
Figure 1: Skyus DS Top View
Activity LED
USB
Grounding
Jack
Figure 2: Skyus DS Ports
Intended Audience
This document is intended for users responsible for the initial setup of the Skyus DS and assumes the user has a basic
working knowledge of computer networking, wireless routing, and network administration.
Scope
This manual provides quick installation and configuration information.
3
Skyus DS Quick Start Guide
Specifications
Hardware
Power
USB powered, host must provide 5W continuously
Environmental
Dimensions
• Operating: -30°C to 60°C (-22°F to 140°F)
• Storage: -40°C to 85°C (-40°F to 185°F)
3.220” x 2.375” x 0.420”
Weight
1.96 oz.
Mounting
Optional mounting bracket
Data Interface
USB 2.0 Mini B Connector
Antenna Connections
Three SMA female – two cellular and one GPS
LEDs
One activity LED
Cellular
Carriers
T-Mobile
Chipset
MC7354
Bands
See the Skyus DS Specification Sheet for carrier-specific information
Data Rates
Peak download speeds of up to 100 Mbps and peak upload speeds of up to 50
Mbps (actual speeds depend on carrier network implementation)
FCC Part 15, Class B
Regulatory Approvals
GPS
Satellite Channels
16
Protocol
NMEA 0183 Version 3.0
Acquisition Time
• Hot Start: 1 second
• Warm Start: 29 seconds
• Cold Start: 32 seconds
• Horizontal: < 5m (90%)
• Altitude: < 8m (90%)
• Velocity: < 0.2 m/s
• Tracking: –161 dBm
• Acquisition (Assisted, non-LTE): –158 dBm
• Acquisition (Assisted, LTE): –153 dBm
• Acquisition (Standalone): –145 dBm
• Altitude < 600m, or
• Velocity < 100 m/s
Either limit may be exceeded, but not both.
Accuracy
Sensitivity
Operational Limits
Software
OS Support
Software Compatibility
•
•
•
•
•
•
Windows Vista 32 and 64 bit
Windows 7 32 and 64 bit
Windows 8 (Verizon and AT&T only)
Linux: SDK available, 2.6.32 or newer kernel required
AT Commands: Yes
QMI Interface: Yes
4
Skyus DS Quick Start Guide
Installation
The following sections describe the installation and initialization of the Skyus DS. This procedure assume that your
Skyus DS contains one or two activated SIMs.
Installation Summary
•
•
•
•
•
•
•
•
Inspect the package contents and compare against the packing list.
Install the Sierra Wireless driver.
(Optional) Install the Skyus DS mounting bracket and mount the unit to the bracket.
Connect the antenna(s).
Connect the Skyus DS to the computer or router using the USB cable.
Activate the SIM, if necessary.
Wait for Over-the-Air provisioning, if necessary.
Install the connection manager.
Package Contents
Package contents depend on the accessories ordered. Compare the contents with the packing list. If any items are
missing or damaged, contact FW support.
Item
Type
Description
Skyus DS
Included
Skyus DS LTE Device with one or two SIMs installed
Cable
Included
USB 2.0 Type A Male to Mini B Male
Mounting Bracket
Accessory
Skyus DS mounting bracket
Antenna(s)
Accessory
FW offers several antennas that meet the Skyus DS antenna specifications
Skyus DS Multipurpose Tool
Included
Used for grounding the SIM port and for SIM insertion and ejection
Installing the Sierra Wireless Driver
The Skyus DS uses an internal Sierra Wireless radio module. Drivers for Windows 7 and Windows 8 based platforms
are provided in binary form by Sierra Wireless and are available for download on the FW website. For quick
connection, download a driver only package directly from the FW Downloads page.
Under Skyus 4G Drivers click Download Files to begin downloading the driver file for installation.
If you are working on the device you intend to use the Skyus DS with, proceed with installation on the local drive. If
you are working on a separate device from the one you intend to use the Skyus DS with, save the file to a portable
media device and use it to install the drivers on the separate device.
Begin the installation of the Sierra Wireless drivers by clicking on the executable driver installation file. The setup
utility will start up.
5
Skyus DS Quick Start Guide
Figure 3: Sierra Wireless Driver Installation
A successful installation initialization should show a progress bar in the dialog box and display a message just above
the system tray.
Figure 4: Sierra Wireless Driver Install Initialization
Figure 5: Sierra Wireless Installing - System Tray
6
Skyus DS Quick Start Guide
Follow the necessary steps to finish the installation until the screenshot matches the image shown in Figure 6.
Figure 6: Sierra Wireless Installation Completed
Installing the Mounting Bracket
The Skyus DS attaches easily to the mounting bracket (sold separately). The figure below shows the dimensions and
mounting hole locations of the plate. The hardware used to secure the bracket depends on the mounting surface.
The Skyus DS slides into the bracket and is held in place by retention clips.
2x 0.14 in. diameter
0.95 in.
4.47 in.
3.11 in.
Figure 7: Mounting Bracket Dimensions
Connecting Antennas
Connect the first cellular antenna to the outermost SMA connector, labeled Primary in Figure 8. A second cellular
antenna can be attached to the innermost SMA connector labeled Diversity. This connector is used for Receive
Diversity for 3G connections or multiple-input and multiple-output (MIMO) for 4G LTE connections. Antennas should
be located at least 20 mm from any person. When using multiple separate antennas for MIMO or Receive Diversity,
they should optimally be separated from each other by at least 20 mm.
7
Skyus DS Quick Start Guide
Primary
Diversity
GPS
Figure 8: Antenna Connections
Connect the GPS antenna to the middle SMA connector. The Skyus DS will operate with most standard active GPS
antennas. When installing a GPS antenna, place it where it has greater than 90° access to the sky. For better
performance, avoid coiling or binding the GPS cable.
If you have questions about the appropriate antennas for your Skyus DS, contact your FW representative.
Connecting to a Computer or Router
Connect the Type A Male side of the enclosed USB cable to your computer or alternate host device. Connect the Mini
B Male side of the enclosed USB cable to the Skyus. Power is provided by the USB cable. Once connected, the Skyus
DS will power up and attempt to register to the carrier.
Figure 9: Type A Male USB
Figure 10: Type Mini B Male USB
Activation
In most cases, your Skyus DS will include one or two SIMs that are already installed and activated. If you are using a
SIM that has not been activated, provide the IMEI and SIM IC (ICCID) from the device label to your FW representative
or carrier representative to activate your device.
Your device is ready to be activated only after the cellular carrier sets up an account and provides a phone number,
APN (Access Point Name), and/or IP address for your device. If you are not sure if your device has an account, contact
your sales representative or FW technical support.
Provisioning
Once your device is activated and you connect to the cellular carrier for the first time, your device will perform Overthe-Air provisioning, if necessary.
The Skyus DS will provision over the air automatically upon initial power up. This process may take up to 45 minutes
to complete. Do not unplug the device or attempt to connect during provisioning.
8
Skyus DS Quick Start Guide
Installing the Connection Manager
Skyus DS customers using Windows operating systems have three choices for connection management.
FW Skyus Watcher
FW Skyus Watcher is designed to manage the connection to the cellular network and provides connection
watchdog, connection and GPS status reporting, and logging functionality appropriate for IoT applications where
24x7 connectivity is desired.
Skyus Watcher is available after signing an End User Licensing Agreement (EULA) with FW. Skyus Watcher can be
downloaded from the FW Downloads page. For information on the installation of the Skyus Watcher application,
please reference the Skyus Watcher User Guide.
Windows Mobile Broadband
The Skyus DS is compatible with the Windows Mobile Broadband connection management functionality built into
Windows 7 and Windows 8. Users can manage cellular connections in the Windows Network and Sharing Center.
This form of connection management is not recommended in applications demanding 24x7 connectivity.
Sierra Wireless Skylight
Sierra Wireless provides a connection utility compatible with Skyus devices that can manage connections and
display network coverage indication. For more information on Sierra Wireless Skylight go to the Sierra Wireless
website or contact your FW sales representative.
Accessing the SIM Slots
The SIM slots are located behind the Skyus DS faceplate, which you can remove by hand. The slots are numbered as
shown below. By default, SIM slot 1 is the active slot.
Chassis
Faceplate
Figure 11: Dual SIM Slots
9
Skyus DS Quick Start Guide
Removing the Faceplate
1.
Locate the two tabs along the bottom edge of the faceplate.
Tabs
Figure 12: Faceplate Tabs
2.
3.
Insert your thumbnail between one of the tabs and the chassis. Then slide your thumb toward the center of
the faceplate to separate it from the chassis.
Gently pull the faceplate off, as shown below.
Figure 13: Faceplate Removal
To install the faceplate, simply press it into place.
10
Skyus DS Quick Start Guide
Inserting and Ejecting SIMs
The Skyus DS comes with a multi-purpose tool that you can use to insert and eject SIMs, shown below. (The tool also
serves as a ground plug, which activates SIM slot 2.)
Ground Plug
SIM Insertion/Eject Tool
Figure 14: SIM Insertion/Eject and Ground Tool
To remove a SIM, gently push the SIM with the edge of the tool and pull it out by hand.
Figure 15: Removing a SIM
To install a SIM, insert it with the label side up and press the SIM with the edge of the tool or your thumbnail until it
latches into place.
Switching the Active SIM
If Two SIMs Are Already Installed
If your Skyus DS is already equipped with dual SIMs, you can switch from one active SIM to the other without
accessing the SIM slots; however, switching the active SIM requires that you reprogram, or “flash,” the firmware if the
second SIM is activated with a different carrier than the first. Follow the steps below to switch SIMs in a dual SIM
device.
1.
Insert the ground plug into the jack on the back panel, as shown below. This causes slot 2 to become the
active SIM slot.
11
Skyus DS Quick Start Guide
Figure 16: Inserting the Ground Plug
2.
3.
Flash the device (see Flashing the Skyus DS Firmware).
Allow time for the device to perform over-the-air provisioning.
Adding a Second SIM
Follow the steps below if your Skyus DS is equipped with only one SIM and you want to install a second SIM for a
different carrier.
1.
2.
3.
4.
5.
6.
7.
8.
Disconnect the USB cable to remove power from the unit.
Remove the faceplate (see Removing the Faceplate).
Insert the SIM in slot 2 (see Inserting and Ejecting SIMs).
Replace the faceplate.
Insert the ground plug in the jack on the back panel.
Reconnect the USB cable to the unit to apply power.
Flash the device (see Flashing the Skyus DS Firmware).
Allow time for the device to perform over-the-air provisioning.
Note: If you are simply replacing the SIM in slot 1 with a different SIM, you do not need to install the ground
plug, but you do still need to flash the firmware if the SIM is for a different carrier.
Flashing the Skyus DS Firmware
When you insert a new or replacement SIM for a different carrier in your Skyus DS, you must download and install
different firmware on the Skyus DS. This process is known as “flashing” the firmware. Follow the steps below to flash
the Skyus DS firmware.
1.
2.
3.
4.
5.
Browse to the FW Software Downloads page and identify the appropriate firmware image for the carrier of
your SIM.
Click Download.
Complete the End User License Agreement (EULA) form and click Submit Form.
Select the folder to which you want to save the download file and click Save.
Run the Skyus flash executable file by double-clicking it. A DOS Command Prompt window opens, which
will display the progress of the flash process, as shown below. When the flash process is complete, the
Skyus is reset. Allow time for the device to perform over-the-air provisioning.
12
Skyus DS Quick Start Guide
Figure 17: Flash Utility DOS Command Prompt Window
Contacting FW
For help with installing, operating, maintaining, and troubleshooting this product, refer to this document and any
other documentation provided. See the Skyus DS User Manual for troubleshooting tips
If you still have questions, contact us during business hours:
Monday through Friday, excluding holidays, between 8 a.m. and 5 p.m. Pacific Time.
Contact Us
Support E-Mail
Telephone
Website
Mailing Address
[email protected]
(800) 683-4818
www.feeneywireless.com
P.O. Box 2549, Eugene, OR 97402
When contacting technical support, please have the following information on-hand:
•
•
•
Serial number on product label
Date that you received your device
A brief description of the problem
Online Library
For other documentation, see our online document library at:
http://feeneywireless.com/documents
13
Skyus DS Quick Start Guide
FCC Compliance
This equipment has been tested and found to comply with the limits for a Class B digital device, pursuant to part 15
of the FCC rules. These limits are designed to provide reasonable protection against harmful interference when the
equipment is operated in a residential environment. This equipment generates, uses, and can radiate radio
frequency energy and, if not installed and used in accordance with the instruction manual, may cause harmful
interference to radio communication. FW does not guarantee that interference will not occur in a particular
installation.
Operation is subject to the following conditions:
a.
b.
This device may not cause harmful interference.
This device must accept any interference received, including interference that may cause undesired
operation.
Changes or modifications not expressly approved by the party responsible for compliance could void the user’s
authority to operate the equipment.
If this equipment does cause harmful interference to radio or television reception, which can be determined by
tuning the equipment off and on, the user is encouraged to try and correct the interference by one or more of the
following measures:
a.
b.
c.
d.
Reorient or relocate the receiving antenna.
Increase the distance between the equipment and the receiver.
Connect the equipment to outlet on a circuit different from that to which the receiver is connected.
Consult the dealer or an experienced radio/TV technician for help.
Exposure to RF radiation – To comply with FCC RF exposure compliance requirements, for mobile configurations, a
separation distance of at least 20 cm must be maintained between the antenna of this device and all persons. Do not
collocate or operate this device in conjunction with any other antenna or transmitter.
Contains TX module FCC ID: N7N-MC7354.
14