1
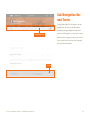
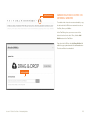
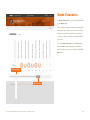
FULL SAIL
ONLINE 3.0
STUDENT USER MANUAL
Contents
Introduction������������������������������������������������������������������������������������ 1
Section 3
Activities������������������������������������������������������������������������������������������������ 17
Section 1
Types of Activities������������������������������������������������������������������������18
Getting Started with FSO 3.0������������������������������������������� 2
Assignments���������������������������������������������������������������������������������19
Signing In to FSO 3.0��������������������������������������������������������������������� 3
Discussions����������������������������������������������������������������������������������21
Your Account��������������������������������������������������������������������������������� 4
Tests ��������������������������������������������������������������������������������������������25
Managing Your Account����������������������������������������������������������������� 5
Resetting Your Password��������������������������������������������������������������� 7
Section 4
Logging Out����������������������������������������������������������������������������������� 8
FSO 3.0 Text Editor��������������������������������������������������������������������26
Introduction to the FSO 3.0 Text Editor����������������������������������������27
Section 2
Formatting Options���������������������������������������������������������������������� 28
Key Navigation Features����������������������������������������������������� 9
Embedding Graphic Elements����������������������������������������������������� 32
Main Navigation Bar���������������������������������������������������������������������10
Embedding Media����������������������������������������������������������������������� 36
Course Code���������������������������������������������������������������������������������11
Activities Link�������������������������������������������������������������������������������12
Section 5
People Link�����������������������������������������������������������������������������������13
Communications������������������������������������������������������������������������44
Course Banner������������������������������������������������������������������������������14
Messages ����������������������������������������������������������������������������������� 45
About This Course������������������������������������������������������������������������15
Viewing Your Messages and Announcements���������������������������� 46
Sub-Navigation Bar and Footer�����������������������������������������������������16
Composing a Message�����������������������������������������������������������������47
Activity Comments Section��������������������������������������������������������� 49
Notifications��������������������������������������������������������������������������������� 50

Global Alerts���������������������������������������������������������������������������������51
ii
Contents
Section 6
Checking Grades and Course Progress�������� 52
Activity Status Badges����������������������������������������������������������������� 53
Reviewing Grades������������������������������������������������������������������������ 54
Grades Page�������������������������������������������������������������������������������� 55
Grades Page Tour������������������������������������������������������������������������ 57
Grade Forecaster������������������������������������������������������������������������� 58
Appendix
Supported File Types������������������������������������������������������������60

Supported File Types��������������������������������������������������������������������61
iii
Introduction
Full Sail Online 3.0 (FSO 3.0) is Full Sail University’s Learning Management System (LMS), a
powerful online environment that serves as the primary means by which you participate in
your online courses. FSO 3.0 provides you with a way to access your course, participate in
activities, communicate with your instructor, interact with your peers, submit work, receive
feedback on your work, and track your progress and achievement. This Student User Manual
will walk you through the most important steps and information for navigating and using
this web-based application. If you have any questions about FSO 3.0 that are not addressed
in this manual, please contact FSO Support.
FSO Support Contact Information
Email
[email protected]
Toll-Free Number
877-437-6349 (8:00 a.m. to 2:00 a.m. EST, daily)
Student Knowledge Base and Chat
https://fso.zendesk.com/
Full Sail University Connect Page
https://orgsync.com/50452/chapter
Introduction1
Section 1
Getting Started
with FSO 3.0
This section shows you how to log in to the LMS, set up your
account information, manage your account, and log out of the
system.
Signing In to FSO 3.0
To access FSO 3.0, type or copy and paste the
following URL into your browser’s address bar:
https://course.fso.fullsail.edu
This will take you to the FSO 3.0 Sign In page. Enter
your user name and password and click the Login
button.
This will take you directly to the My Courses page
within FSO 3.0. Here you will be able to see all of
your available courses. Click on a course to view your
Activities page.
Section 1: Getting Started with FSO 3.0 | Signing In to FSO 3.0
3
Your Account
If you are signing in for the first time, you will be asked
to provide account information. This includes:
• Profile photo (JPG, PNG, or GIF)
• City
• Biography
• Contact information
This information will be displayed to your instructor
and peers within FSO 3.0.
When you have filled in all of the input fields with the
appropriate information, click the Submit button on
the top right corner of the page.
Section 1: Getting Started with FSO 3.0 | Your Account
4
Managing Your
Account
Drop-down menu
Username
Once you have filled out your profile, you can edit
your account whenever you wish.
To edit your account, click on your Username within
the main navigation bar. A drop-down menu will
appear with the ability to Log Out or to Manage
Account.
To manage your account, select Manage Account
from the drop-down menu.
Section 1: Getting Started with FSO 3.0 | Managing Your Account
5
UPDATING YOUR ACCOUNT
PROFILE
Go Back
When you arrive at your account, you have the
Profile Photo
ability to:
• Upload or delete your Profile Photo (JPG,
Floating Navigation
Student Number
City
Biography
Contact Info
PNG, or GIF)
• View your Student Number
• Update your City
• Input Biography information
• Input Contact information
• Select your Time Zone
• List Websites
• List Social Media sites
• Add Screen Names: To add a screen name,
select the + Add Screen Name button.
• Input Additional Information
The floating navigation menu on the left side of
the Account page provides shortcuts to sections,
including:
Time Zone
Websites
• Photo
• About
• Contact
• Password
Your changes will automatically update. When you are
Social Media
done updating your account, click Go Back at the top
of the page.
Screen Names
Section 1: Getting Started with FSO 3.0 | Managing Your Account
6
Resetting Your
Password
Clicking on the Password Reset Page link will
take you to a page that outlines the instructions for
changing your password.
Password Reset
Section 1: Getting Started with FSO 3.0 | Resetting Your Password
7
Logging Out
It is recommended that you log out of FSO 3.0 every
Log Out
time you have completed your session.
Username
To do so, simply click on your Username within the
main navigation bar, and a drop-down menu will
appear with the ability to Log Out or to Manage
Account.
Select Log Out.
A new page will appear to let you know that you have
successfully logged out of FSO 3.0.
Section 1: Getting Started with FSO 3.0 | Logging Out
8
Section 2
Key Navigation
Features
This section examines key navigation features within FSO 3.0,
such as the main navigation bar and the sub-navigation bar. It
also covers how to access information about your instructor and
course using utilities in the course banner.
Main Navigation Bar
Course Code
Activities
People
Messages
Notifications
Username
Once you have accessed a course, you will see a bar
across the top of your screen bearing the Full Sail
University logo. This bar is the main navigation bar
and includes:
• Your current course code
• A link to Activities
Main navigation bar
• A link to People
• Notification and Messages buttons, which are
covered in the Communications section of this
manual
• Your username
Section 2: Key Navigation Features | Main Navigation Bar
10
Course Code
The course code drop-down menu reveals a list of
your current courses and also provides the ability to
Course Code drop-down
view all of your available courses.
Clicking on a course from the drop-down menu will
View all
take you to that course. Clicking on View all will take
you to the main My Courses page, where you are first
taken when you log in to FSO 3.0.
Section 2: Key Navigation Features | Course Code
11
Activities Link
The Activities link will take you to a list of all
activities in your current course. When you access
a course, you will land on the Activities page by
default.
Section 2: Key Navigation Features | Activities Link
12
People Link
The People link will take you to the course roster,
which displays your instructor and peers. When you
click on a peer’s photo, a pop-up window appears that
allows you to send a message and check out his or her
profile. When you click on an instructor’s photo, a popup window appears that allows you to send a message
and access his or her contact information, office hours,
bio, and social media links.
Section 2: Key Navigation Features | People Link
13
Course Banner
The course banner contains links to important
information about your course and your instructor.
The course banner includes a photo of your instructor,
Message Instructor
Course banner
and a Message Instructor button. Clicking on the
Message Instructor button will open a Message
pop-up window, where you may send your instructor
a message and access his or her contact information,
office hours, bio, and social media.
Section 2: Key Navigation Features | Course Banner
14
About This Course
Next to your instructor’s photo, you will see the course
name, and below that, your instructor’s name. There
will also be a small information icon that will route you
About This Course
to the About This Course page.
The About This Course page displays the course
overview and course outline and offers any reference
materials your instructor has provided for download.
Section 2: Key Navigation Features | About This Course
15
Sub-Navigation Bar
and Footer
The gray bar beneath the course banner is the subnavigation bar. The content of this bar changes
depending on the page displayed. It may include
search tools, filtering options, or other tools or menus.
Sub-navigation bar
At the bottom of each page, you will see a footer. The
footer contains a link to the terms of use, important
links, and contact information.
Footer
Section 2: Key Navigation Features | Sub-Navigation Bar and Footer
16
Section 3
Activities
This section explores how to interact with each available activity
type within FSO 3.0. These include assignments, discussions,
and tests.
Types of Activities
There are three types of activities within FSO 3.0:
assignments, discussions, and tests. Activities are
listed on the Main Activities page for your course.
On this page, you have access to:
• A list of activities in the course
Options
• Activity status badges
• Activity weights
• Publish and due dates
By default, your instructor sets the order in which
activities appear in this list. However, you have the
Publish
Date
ability to filter your activity list using the search bar or
by clicking the Options button and selecting to filter
your activities by a filter option: All, Complete, or
Due Date
Incomplete.
TIP
Status badge
Weight
You also have the ability to export an ICS
file of all of your activities’ publish and due
dates by choosing Export to Calendar from
the Options drop-down menu. The ICS file
will save to the default downloads folder
designated by your web browser.
Section 3: Activities | Types of Activities
18
Assignments
In an assignment, the Overview section provides
instructions for completing your work and may
also include videos or other media to review. Your
instructor will place any files you need to download to
complete your assignment in the Downloads section.
Overview
Section 3: Activities | Assignments
19
SUBMITTING AN ASSIGNMENT
If an assignment does not require you to submit any
files to complete your activity, you will see a button
that reads “I’ve completed this activity” in the Submit
section. Click this button to finish the assignment.
If a file needs to be submitted to complete the
Downloads
assignment, you will see a Drag & Drop area for
providing your file. You can drag and drop your files
to the Drag & Drop area or click the Select Files
button to navigate to the file on your computer (see
Appendix: Supported File Types for file types that
Drag & Drop area
may be submitted to FSO 3.0). Check the box beneath
the files area to agree to the terms of the Academic
Dishonesty Policy and then click Submit to finish your
assignment.
Submit
Comments
At the bottom of the assignment page, you will see
a Comments section. This section is for private
communication that specifically pertains to the
assignment between you and your instructor.
Each activity in the course has its own comments
section, and your peers will not be able to see these
comments.
Use the Comments section to ask your instructor
questions, seek clarification, discuss your progress, or
provide general comments or ideas you have about
the assignment.
Section 3: Activities | Assignments
20
Discussions
In a discussion, the Overview section provides
instructions for completing the discussion. It may also
include videos or other media for your review. Your
instructor will place any files you need to download to
complete the discussion in the Downloads section.
Overview
Section 3: Activities | Discussions
21
DISCUSSION POSTS
The Posts section contains all of the threads and
comments in a discussion. Click in the “Your post...”
field to compose a post, and a new thread will be
created in the discussion. Create your initial post
Downloads
in response to your instructor’s instructions for the
discussion in this way.
Posts
Collapse All
Your post
To sort posts, click the Sort drop-down arrow. This
menu allows you to sort the posts on the basis of Most
Recent or Most Replies.
Sort
Clicking the Collapse All button minimizes all posts
within a thread. Clicking on a collapsed post expands
it.
BEST PRACTICE
While you are composing your post, it is
recommended to work in a separate text
application and then paste your content into
the “Your post...” field. If you compose your
post directly in the web-based editor, your
content could inadvertently be lost if the page
reloads.
Section 3: Activities | Discussions
22
INTERACTING WITH A DISCUSSION
POST
You can reply to your peers’ posts by clicking in the
“Your reply...” field.
To edit a post within a discussion:
1. Click the Edit button below the post’s text.
Your reply
2. Edit the existing text within the input field.
3. Click the Update button to update your post or
the Cancel button to retract your edit.
4. Once you have updated your post, a statement
will appear under the time stamp that reads,
“The author edited this post.”
TIP
A check-mark icon will be visible alongside
posts and replies submitted by you. This will
assist in identifying your interactions at a
glance.
Section 3: Activities | Discussions
23
COMMENTS SECTION
At the bottom of a discussion page, you will see
a Comments section. This section is for private
communication between you and your instructor
regarding the particular discussion. This thread will
not be visible to your peers.
Comments
Section 3: Activities | Discussions
24
Tests
Tests can be composed of multiple-choice or openended questions. For multiple-choice questions, select
the best option from the ones provided.
For open-ended questions, click in the “Enter your
response” field to provide an answer to the question.
This field provides options to format your response
and embed media as needed (see Appendix:
Supported File Types).
After you have completed a test, you will be able to
view your grade once your instructor evaluates all of
your open-ended responses. You will not be able to
review the test until after the due date has passed, as
other students may not have completed it yet.
Section 3: Activities | Tests 25
Section 4
FSO 3.0
Text Editor
In this section, you will learn how to format text, add graphic
elements, and embed media using the FSO 3.0 Text Editor. The
Text Editor is available for your use within your discussion posts
and replies, test responses, comments, and messages.
Introduction to the FSO 3.0 Text Editor
The FSO 3.0 Text Editor provides the ability to format text, add graphic elements, and embed
media within your discussion posts and replies, test responses, comments, messages, or
wherever the Text Editor feature is available within FSO 3.0. Most of these features will be
familiar to you, as they are commonly used in word-processing applications.
The following formatting styles, graphic elements, and media options are available within
the FSO 3.0 Text Editor:
Paragraph Styles
List Styles
• Normal Text
• Numbered List
• Quote
• Bulleted List
• Code
• Heading
Character Styles
• Bold
• Italic
• Strikethrough
• Underline
• Background Color
• Font Color
Available Graphic Elements
• Table
• Horizontal Rule
• Properly Formatted Math Formula
Embed Media Options
• Link
• Video
• Image
Text Alignment Styles
• Left Align
• Center Align
• Right Align
• Justify
Section 4: FSO 3.0 Text Editor | Introduction to the FSO 3.0 Text Editor
27
Paragraph Style button
Formatting Options
This section provides an overview of the textformatting options that are available when using the
Text Editor.
PARAGRAPH STYLES
Paragraph styles are paragraph-formatting
characteristics that are named and stored within FSO
3.0. To apply a paragraph style, select the text you
wish to format within the Text Editor and click the
Paragraph Style button, then select the paragraph
style of your choice. Doing this will apply the preset
formatting characteristics to your selection.
The available paragraph styles include:
• Normal Text
• Quote
• Code
• Heading
Section 4: FSO 3.0 Text Editor | Formatting Options
28
Character Styles
CHARACTER STYLES
Characters styles are named and stored characterformatting characteristics within FSO 3.0. You can
select text within the Text Editor and choose a
character style to apply all of the preset formatting
characteristics to your selected text.
The available character styles include:
• Bold
• Italic
• Strikethrough
• Underline
• Background Color
• Font Color
Individual buttons are available in the Text Editor for
each of these styles.
TIP
The Background Color character style will
highlight your selected text in the color of
your choice.
Section 4: FSO 3.0 Text Editor | Formatting Options
29
Text Alignment button
TEXT ALIGNMENT
You can select text or media within the Text Editor and
choose which alignment you would like to apply to it.
The text-alignment options include:
• Left Align
• Center Align
• Right Align
• Justify
To change the text alignment, select the text or media
you wish to format within the Text Editor. Click the
Text Alignment button and select your preferred
alignment from the drop-down menu.
Section 4: FSO 3.0 Text Editor | Formatting Options
30
List styles
LIST STYLES
List styles are named and stored list characteristics
within FSO 3.0. You can select text within the Text
Editor and choose a list style to apply all of the preset
formatting characteristics to your selected text.
The available list styles include:
• Numbered List
• Bulleted List
To apply a list style, select the text you wish to
format within the Text Editor and click the respective
List Style button. Individual buttons appear for the
Numbered List and the Bulleted List styles.
The Text Editor also offers the ability to adjust the
indent levels of your lists. Once a list item is created
and formatted using a list style, use the Increase
Indent button to increase the indent level of your
text (move your list item to the right), and use the
Decrease Indent button to decrease the indent level
of your text (move your list item to the left).
Section 4: FSO 3.0 Text Editor | Formatting Options
31
Embedding Graphic Elements
Graphic elements can be embedded wherever the Text Editor feature is available within FSO
3.0.
You have the ability to embed the following graphic elements:
• Tables
• Horizontal Rules
• Properly Formatted Math Formulas Supported by MathJax
NOTE
You can also embed media (links, images, and video). This process is explored in the
Embedding Media area within this section.
Section 4: FSO 3.0 Text Editor | Embedding Graphic Elements
32
Table button
TABLES
Tables allow you to organize data and illustrate
information in a simple and effective way.
To insert a table, place your mouse cursor at the
desired location within the Text Editor, then click the
Table button. Select Insert Table from the drop-down
menu.
You will then be requested to input the number of
columns and rows.
After your table is initially created, you can use the
Table button to modify your table in the following
ways:
• Add Row Above
• Add Row Below
• Add Column Left
• Add Column Right
• Add Head
• Delete Head
• Delete Column
• Delete Row
• Delete Table
A table may also be removed by simply placing your
mouse cursor after the table and using the Delete or
Backspace key on your keyboard.
Section 4: FSO 3.0 Text Editor | Embedding Graphic Elements
33
Horizontal Rule button
HORIZONTAL RULES
A horizontal rule is a horizontal line that allows you to
visually break up different sections of text. To insert a
horizontal rule, place your mouse cursor in the desired
location within your text and click the Horizontal
Rule button.
Section 4: FSO 3.0 Text Editor | Embedding Graphic Elements
34
Math Formula button
MATH FORMULAS
FSO 3.0 supports MathJax.
The Math Formula button provides the ability to
accurately represent fractions, rational expressions,
polynomials, integrals, summations, limits, radicals,
and matrices using LaTeX or MathML code.
To insert a MathJax formula, place your mouse cursor
in the desired location within your text and click the
Math Formula button. Type or copy and paste the
LaTeX or MathML formula into the Formula input
field.
The Preview section will display how the equation
will appear. For more information, FSO Support
recommends the following resources:
• For an example of formulas, including the
MathML Code, and TeX Commands:
http://www.mathjax.org/demos/tex-samples/
• For an example of LaTeX Symbols:
http://estudijas.lu.lv/pluginfile.php/14809
/mod_page/content/12/instrukcijas/matematika
_moodle/LaTeX_Symbols.pdf
Section 4: FSO 3.0 Text Editor | Embedding Graphic Elements
35
Embedding Media
Media can be embedded wherever the Text Editor feature is available within FSO 3.0.
You have the ability to embed the following media:
• Links
• Videos and images locally stored
• Videos and images hosted on a third-party website
Section 4: FSO 3.0 Text Editor | Embedding Media
36
Link button
LINKS
Links allow readers to easily access websites directly
from FSO 3.0. Links can be used for supporting
material, reference sites, external resources, and files.
Be sure to provide links to websites that are
educational, useful, meaningful, valuable, and college
level.
The Link button in the Text Editor is used to insert or
remove a link.
To create a link, highlight the desired text, click the
Link button, and select Insert link. The link pop-up
window will appear.
In the pop-up window, select the link type and paste
your link into the relevant URL or Email field. The
Text field indicates what text will be displayed as the
link.
To remove an active link, highlight the link, click the
Link button, and select Unlink.
TIP
Select the Open link in new tab check
box to prevent your instructor and peers
from navigating out of their working FSO 3.0
window.
Section 4: FSO 3.0 Text Editor | Embedding Media
37
Add Media button
IMAGES
Images can be embedded wherever the Text Editor
feature is available in FSO 3.0 (see Appendix:
Supported File Types). Images should be used to
illustrate a concept and/or visualize information.
There are two ways to embed images using the Text
Editor:
1. Embed uploaded images
2. Embed images hosted on external websites
EMBEDDING UPLOADED IMAGES
To upload an image file, first place your cursor at the
location you wish to embed an image. Then, click the
Add Media button from the Text Editor.
In the pop-up window, drag and drop your desired
image file into the Drag & Drop area or click the
+ Select File(s) button to select an image file to
upload using your default file manager.
The image file will instantly begin uploading. Once
uploaded, the image will display in the Text Editor.
Note: You may upload multiple files to the Text Editor
at the same time.
Section 4: FSO 3.0 Text Editor | Embedding Media
38
REUSING UPLOADED IMAGES
Once an image file is uploaded, you have the ability to
reuse the image multiple times within the same Text
Editor field without having to upload it again.
To embed a previously uploaded image multiple times,
place your cursor in the desired location and click the
Add Media button. You will see a list of previously
uploaded file(s) beneath the Drag & Drop area of the
Attached Media pop-up window. Click the Insert
Previously Uploaded
Section 4: FSO 3.0 Text Editor | Embedding Media
button alongside the image file you wish to embed
again.
39
Add Media button
EMBEDDING IMAGES HOSTED ON
EXTERNAL WEBSITES
You also have the ability to embed images that are
hosted on external image-hosting sites such as
imgur.com, Flickr, and Photobucket.
If you wish to embed an image that is hosted on an
external image-hosting site, place your mouse cursor
in the desired location and click the Add Media
button.
Copy and paste the image’s URL from the external
image-hosting site into the 3rd Party Media field in
the pop-up window that appears. Then click the Insert
button to embed the image. The image will then
appear within the Text Editor.
3rd Party Media
Section 4: FSO 3.0 Text Editor | Embedding Media
40
Add Media button
VIDEOS
Videos can be embedded wherever the Text Editor is
available in FSO 3.0.
There are two ways to embed videos using the Text
Editor:
1. Embed uploaded videos
2. Embed videos hosted on external websites
EMBEDDING UPLOADED VIDEOS
The process of uploading a video file is very similar
to uploading an image file within FSO 3.0. Only MP4
videos encoded with the H.264 codec will play in the
FSO 3.0 video player. Any other video file type will
simply display as a Link (see Appendix: Supported File
Types).
To upload a video file, place your cursor at the desired
location for the video. Then, click the Add Media
button from the Text Editor.
In the pop-up window, drag and drop your desired
video file into the Drag & Drop area or click the
+ Select File(s) button to select a video file to upload
using your default file manager.
The video file will instantly begin uploading. Once
uploaded, the video will display within the Text Editor.
Note: You may upload multiple media files to the Text
Editor at the same time.
Section 4: FSO 3.0 Text Editor | Embedding Media
41
REUSING UPLOADED VIDEOS
Once a video is uploaded, you have the ability to reuse
the video within the same Text Editor field without
having to upload it again.
To embed a previously uploaded video multiple times,
place your cursor in the desired location and click the
Add Media button. You will see a list of previously
uploaded file(s) beneath the Drag & Drop area of the
Attached Media pop-up window. Click the Insert
Previously Uploaded
Section 4: FSO 3.0 Text Editor | Embedding Media
button alongside the video file you wish to embed
again.
42
Add Media button
EMBEDDING VIDEOS HOSTED ON
EXTERNAL WEBSITES
To embed a video hosted on an external website, copy
the desired video’s URL from an external site such as
YouTube, Vimeo, and Viddler.
In the Text Editor, place your mouse cursor in the
desired location for the video. Then, click the Add
Media button in the Text Editor.
Paste the video’s URL into the 3rd Party Media field
within the pop-up window and click the Insert button.
The video will then be embedded.
3rd Party Media
Section 4: FSO 3.0 Text Editor | Embedding Media
43
Section 5
Communications
FSO 3.0 provides multiple ways to engage with your peers and
instructor, including messages and comments. These features
allow you to communicate quickly and directly.
In addition, FSO 3.0 provides you with a notifications feature
that alerts you when important updates or changes have been
made to your course.
In this section, you will learn how to use the messages
feature within FSO 3.0. You will also learn how to access
announcements, effectively use the comment sections in your
activities, and understand the notifications feature.
Messages
Messages are direct communications between
Messages icon
individual users within FSO 3.0.
The Messages icon is located in the upper right
corner of the main navigation bar on any page within
FSO 3.0.
New Messages are indicated by a counter tile,
which will appear in the upper right corner of your
Messages icon with a number. This number indicates
how many unread messages you have received.
Section 5: Communications | Messages 45
Viewing Your
Messages and
Announcements
Click the Messages icon in the main navigation bar to
activate a Messages drop-down menu. This menu will
preview the new messages in your inbox.
All unread Messages will be highlighted. To open a
View all messages
particular message, click on the message. To view all
messages, click View all messages at the bottom of
the menu frame.
From time to time, your instructor will send out
announcements to the entire class. These will also
appear in your Messages drop-down menu. Access
your announcements by clicking directly on the
announcement from the drop-down menu or by
clicking View all messages and then clicking on the
Announcements tab on your Messages page.
Section 5: Communications | Viewing Your Messages and Announcements
46
Composing a
Message
To compose a new message, click the Messages
icon in the main navigation bar and click View all
messages at the bottom of the menu frame. This will
take you to your Messages page.
New Message
From the Messages page, click the New Message
button. A New Message pop-up window will appear.
Section 5: Communications | Composing a Message
47
SELECTING A RECIPIENT AND
SENDING YOUR MESSAGE
Clicking or typing within the “to…” input field will
activate a drop-down listing of your current instructor
and peers. You can select an individual recipient or a
group of recipients from the list to send a message.
Once you have selected your message recipient(s),
compose your message within the “your message…”
field.
When you have completed typing the text of your
message, click the Send button to send your message
or the Close button to cancel it.
Section 5: Communications | Composing a Message
48
Activity Comments
Section
Each activity has a unique Comments section. This
area provides you the ability to communicate privately
with your instructor. Any communication in the
Comments section is embedded within the specific
activity. Your peers will not see this communication
thread.
Comments
Section 5: Communications | Activity Comments Section
49
Notifications icon
Notifications
Notifications can be accessed by clicking the
Notifications icon located in the main navigation bar
on any page within FSO 3.0. This icon is located to the
left of the Messages icon.
New Notifications are indicated by a counter tile,
which will appear in the upper right corner of the
Notification icon with a number. The number indicates
how many new notifications you have received.
View all notifications
Click the Notifications icon to activate a Recent
Notifications drop-down menu. This menu displays
a summary of the five most recent notifications
you have received and provides quick access to the
location of these events within FSO 3.0.
You will receive notifications for the following events:
• Your work has been graded
• Feedback or a comment or is submitted
regarding your work
• An extension has been granted to you for an
activity
• A reply is submitted to one of your discussion
posts
• A new activity or changes to an existing activity
are published by your instructor
To view all notifications, click the Notifications
icon and select View all notifications at the
bottom of the menu frame. This will take you to the
Notifications page, which organizes all notifications
by time received.
Section 5: Communications | Notifications
50
Global Alerts
From time to time, you may see a message appear
above the main navigation bar in FSO 3.0. These
messages are Global Alerts that contain important
information communicated by Full Sail University.
Normal alerts will be displayed in a yellow bar above
the top of the main navigation bar. Important Global
Alerts will be displayed in a red bar above the top of
the main navigation bar.
Section 5: Communications | Global Alerts
51
Section 6
Checking
Grades and
Course Progress
This section covers activity status badges, how to review your
grades, and how to forecast your final grade.
Activity Status Badges
There are five different rectangular Activity Status
badges within FSO 3.0. The Activity Status badges
are located to the right of an activity title on your
Activities page. These badges include the following:
1. A Completed badge indicates that you
completed an activity.
2. An Exception badge indicates that your
instructor extended the due date for your
Graded
activity.
3. A Late badge indicates that your activity is late,
Completed
and the due date has passed.
4. A Graded badge indicates that your instructor
has graded your activity. This badge will also
Late
display your letter grade.
5. A Locked badge indicates that an activity is not
available.
Exception
Locked
Section 6: Checking Grades and Course Progress | Activity Status Badges
53
Reviewing Grades
There are several ways to check the grades you have
earned for course activities.
On your Main Activities page, a Graded badge
will appear next to your activity indicating your letter
grade if it has been graded.
Click on the graded activity to be taken to the Activity
page; your letter grade will appear in the upper right
corner of the page. Hovering over your letter grade
will reveal the actual number of points you have
earned for the activity.
On this page, you will also see any files you have
submitted, feedback you have received from your
instructor, and comments sent between you and your
instructor. This page will also display any gradechange history if applicable.
Section 6: Checking Grades and Course Progress | Reviewing Grades
54
Grades Page
From your Main Activities page, you can access
your grades page by clicking the Grades tab. The
Grades page offers a snapshot view of all of your
grades for course activities.
At the top of the Grades page, the table displays the
activity titles. Use the left and right arrow buttons to
scroll through all of your course activities.
The Weight row shows the activity weights as a
percentage of your total course grade.
Activities
If your instructor has graded an activity, you will be
able to see your grade in the My Grades row. Your
Weight
course grade average will be displayed in the column
to the far right.
The Class Average row displays how your peers are
Class Average
Section 6: Checking Grades and Course Progress | Grades Page
performing as a whole on each activity.
55
EXPORTING YOUR GRADES
Options drop-down
Clicking on the Options drop-down menu provides
the option to export your grades into a PDF for your
records. Selecting Export from the Options dropdown menu will download the PDF to your system’s
Export
Section 6: Checking Grades and Course Progress | Grades Page
default download folder.
56
Grades Page Tour
Options drop-down
For help understanding the Grades page, click the
Options drop-down menu and select Show Tour.
An interactive set of pop-up windows will appear to
Show Tour
Section 6: Checking Grades and Course Progress | Grades Page Tour
explain each section of the Grades page.
57
Grade Forecaster
The Grade Forecaster is a tool located at the bottom
of your Grades page.
This tool helps you determine what your overall grade
will be if you earn certain scores on various activities.
It will also forecast how you would need to perform
on various activities to achieve a desired grade within
your course.
To use the Grade Forecaster, click the Grade dropdown arrow and select the grade you would like to
achieve by the end of your course, then click the Find
Out! button.
Grade drop-down
Find Out! button
Section 6: Checking Grades and Course Progress | Grade Forecaster
58
REVIEWING THE GRADE
FORECAST
The grades in highlighted table cels indicate the
minimum grades you need to achieve on the
remaining ungraded activities to reach your desired
final grade.
Click the Cancel button before you select a new
desired grade for calculation or to exit out of the
Grade Forecaster.
Cancel button
Section 6: Checking Grades and Course Progress | Grade Forecaster
59
Appendix
Supported File
Types
Video
Audio
Image
Document
Compression
Other
3gp
3gpp
asf
avi
band
divx
f4v
fcp
fcpx
flv
m1v
m4a
m4v
mod
mov
mp2
mp4
mpe
mpeg
mpg
mpv2
ptf
ptx
qt
swf
vob
wm
wmv
xlt
xltm
xltx
xml
rcproject
aac
ac3
aif
aiff
asx
flac
m3u
mp3
wav
wm
wma
wmx
caf
mid
mpa
ra
sib
ai
bmp
gif
hdp
jpeg
jpg
png
psd
raw
tif
tiff
wdp
dng
dds
esp
pspimage
raw
svg
targa
tga
thm
wdp
yuv
celtx
csv
doc
docx
dot
fdx
graffle
key
numbers
odt
pages
pdf
pot
potm
pps
ppsm
ppsx
ppt
pptm
pptx
pub
rtf
txt
vsd
wps
xls
xlsb
xlsm
xlsx
accdb
indd
rar
zip
7z
cbr
gz
pkg
tar.gz
sit
sitx
zpx
ma
mb
3ds
db
dbf
ics
max
mba
mdb
obj
pdb
ps
rpm
sql
sx
Appendix: Supported File Types | Supported File Types
Supported File Types
The following list of file types can be uploaded to FSO
3.0 using the new uploader without needing to be
zipped (compressed). If you are unable to upload your
file or the type of file you are attempting to upload
does not appear on this list, you will need to zip your
file before uploading.
Note: If you are uploading a folder that contains
multiple files, the folder will need to be zipped before
uploading.
Please see this video for a walk through on how to zip
(compress) files:
http://www.youtube.com/watch?v=5Qcdpmc6bTg&list
=PL186417DD376927E1&index=5&feature=plpp_video
61