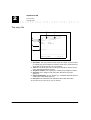
1
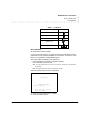
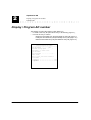
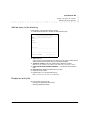
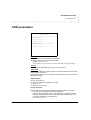
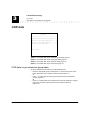
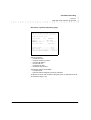
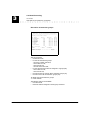
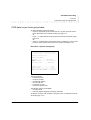
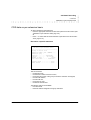
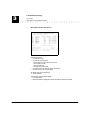
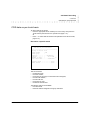
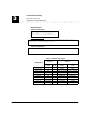
EuroGeneris
Version 600
User’s manual
Ref 21729A
108129388
December 1997
LUCENT TECHNOLOGIES WELCOMES YOUR FEEDBACK ON THIS DOCUMENT. YOUR COMMENTS CAN BE OF GREAT
VALUE IN HELPING US IMPROVE OUR DOCUMENTATION.
Title : User’s manual
Ref 21729A - Comcode 108129388- Date: December 1997
Please rate the effectiveness of this document in the following areas :
Excellent
Good
Fair
Poor
Ease of finding information
Clarity
Completeness
Accuracy
Organization
Appearance
Examples
Illustrations
Overall satisfaction
Please check the ways you feel we could improve this document :
❒
❒
❒
❒
❒
❒
Improve the overview/introduction
Improve the table of contents
Improve the organization
Add more figures
Add more examples
Add more detail
❒
❒
❒
❒
❒
Make it more concise
Add more step-by-step procedures/tutorials
Add more troubleshooting information
Make it less technical
Improve the index
Additional comments :_____________________________________________________________
_________________________________________________________________________________
_________________________________________________________________________________
If we may contact you concerning your comments, please complete the following :
Name :_______________________________________________________Tel:___________________
Company __________________________________________________Date ___________________
Address _________________________________________________________________________
THANK YOU VERY MUCH FOR YOUR PARTICIPATION IN THIS SURVEY. YOUR RESPONSES WILL BE VERY HELPFUL IN
OUR EFFORT TO PROVIDE YOU WITH A DOCUMENTATION TO MEET YOUR NEEDS.
When you have completed this form :
•
please fax to +33 (0)2 41 53 42 33
•
please mail to
Service Documentation Technique
Lucent Technologies BCS
Zone Industrielle de Saint Lambert
49412 SAUMUR CEDEX - FRANCE
Contents
1 : Establish the connection
Using a Minitel 1-1
Using GENECOM 1-2
PC emulation 1-2
Quit emulation 1-3
EuroGeneris menu 1-4
2 : Alphabetical AD
Introduction 2-1
Calling party identification 2-1
The entry file 2-2
AD administration menu 2-3
Label fields 2-4
Administer AD groups 2-5
Display / Program AD number 2-6
Add an entry in the directory 2-7
Display an entry file 2-7
Access an entry file by entering AD number 2-8
Access an entry file by entering related information 2-9
Examples 2-10
Modify an entry file 2-10
Delete an entry file 2-10
Dial AD number 2-11
AD printer output 2-12
Print an AD list 2-13
Print all the AD lists 2-13
Reset AD 2-14
i
User’s manual
3 : Call Detail Recording
Introduction 3-1
CDR administration menu 3-2
CDR parameters 3-3
CDR data 3-4
CDR data on per-extension group basis 3-4
Record for a specific extension group 3-5
Record for all extension groups 3-6
CDR data on per-trunk group basis 3-7
Record for a specific trunk group 3-7
Record for all trunk groups 3-8
CDR data on per-extension basis 3-9
Record for a specific extension 3-9
Record for all the extensions 3-10
CDR data on per-trunk basis 3-11
Record for a specific trunk 3-11
Record for all the trunks 3-12
Real-time CDR report 3-13
CDR administered group 3-14
Administer real-time CDR report 3-15
Output formats 3-16
Customized CDR report 3-17
Customized CDR data collection 3-18
Customized CDR printer output 3-19
Customized CDR reset 3-21
Customized CDR overload alarm 3-22
ii
User’s manual
1
Establish the connection
Using a Minitel
Applicable to France only.
1. Connect the Minitel VDU in parallel to an analog voice terminal (See Minitel
instructions for use).
2. Switch on the Minitel.
3. Dial 497 either on the analog voice terminal or the Minitel keypad.
- Listen for the specific Minitel tone.
4. Press «Local Line» on the Minitel keypad.
- The system welcome screen is displayed: :
EuroGeneris
GENERIS600 EUROA
Extension Capacity ....... :
Enter your login password
And Press ENTER
1-1
EuroGeneris User’s manual
Version 600
1
Establish the connection
Using GENECOM
PC emulation
Using GENECOM
1. Run the GENECOM software package (see GENECOM user’s manual).
2. Configure the GENECOM software:
- Select the appropriate system release
- Select the appropriate serial port
- Set the serial port parameters (The factory-settings for the GENERIS
serial port are : Data rate 9600 - Parity none - Number of stop bits 1 - Number of bits 8).
3. In GENECOM main menu, select option C “GENERIS configuration”
- The system welcome screen is displayed:
EuroGeneris
GENERIS600 EUROA
Extension Capacity ....... :
Enter your login password
And Press ENTER
PC emulation
Note : The keyboard of the PC must be in capital mode.
Table 1 : PC buttons
To do this
Press
Show / Hide Help
F2
Erase field contents
F3
Go back to previous screen
F4
Print screen
F7
Cancel printing
F8
Go back to previous field
Go to next field
1-2
EuroGeneris User’s manual
Version 600
Establish the connection
Using GENECOM
PC emulation
Table 1 : PC buttons
To do this
Press
Go back to previous column
Go to next column
Erase last character
Validate screen
Show / Hide Glossary
F2
Quit emulation
To quit emulation, press “Escape”.
For obvious security reasons, the system is password protected and a login
password has to be entered to establish the connection. It is made up of one
letter (I or E) followed by 4 administrable figures.
The system takes two different login passwords :
• Ixxxx intended for the Installer (equipment supplier).
• Exxxx intended for the End-user.
Note : The login passwords are in the form Ixxxx and Exxxx, irrespective of the administration language.
Note : The login passwords are factory-set as I0000 and E0000.
When the system welcome screen is displayed:
EuroGeneris
GENERIS600 EUROA
Extension Capacity ....... :
Enter your login password
And Press ENTER
1. Enter your login password (E + 4 digits)
2. Press the “Return” button.
Version 600
EuroGeneris User’s manual
1-3
1
Establish the connection
EuroGeneris menu
PC emulation
EuroGeneris menu
EuroGeneris
---------------------------------------Main menu ......................... 1
Alphabetical Abbreviated Dialing .. 2
Call detail recording ............. 3
Print configuration ............... 4
Maintenance ....................... 5
Select option :
.
Option 1 : Reserved for the equipment supplier.
Option 2 : See Alphabetical AD, page 2-1.
Option 3 : See Call Detail Recording, page 3-1.
Option 4 : Reserved for the equipment supplier.
Option 5 : Reserved for the equipment supplier.
1-4
EuroGeneris User’s manual
Version 600
2
Alphabetical AD
Introduction
Alphabetical AD (Abbreviated Dialing) is the best as far as system directories
are concerned. The telephone numbers that many people in the company use
on a regular basis are stored in the system directory.
Alphabetical AD stops endless dialing operations by providing easy access to
800 numbers. Instead of dialing a number, the user merely keys in the first letters of the person’s name at a Galilée 960 α / 930 α or Solaris α voice terminal.
The system then searches for the requested name and lets the user know
whether no/one/several entries match the request. When the correct entry is
displayed, the user just presses the OK button and the system automatically
places the call.
Note : The system directory may be limited to 200 numbers according to the system hardware configuration.
An outside party’s telephone number is stored in the alphabetical AD by filling
out an entry file.
Calling party identification
Call identification is provided if both the call is routed through all ISDN facilities
and the outgoing trunk is administered to send the calling party’s number.
If the calling party’s number is an entry in the system directory, the display will
show the data contained in the first field of the entry file (by default, the person’s
name) instead of the telephone number.
2-1
EuroGeneris User’s manual
Version 600
2
Alphabetical AD
Introduction
The entry file
The entry file
3
2
1
4
5
Display/Program AD number
---------------------------------------AD nb
Trunk Telephone number
8200 - 0
- 0241534222
AD group ... : 0.
NAME
: WALSH
COMPANY
: LUCENT-DR
:
:
6
Note pad:
........................................
---------------------------------------CANCEL AD NUMBER
---->Shift F3
Sample entry file
1. AD number: The entry number is used as the AD number. To place a call to
an outside party whose telephone number is stored in the system directory,
simply dial the AD number at your voice terminal.
2. Trunk: Use to specify the trunk or trunk group that will be used by the system to automatically dial the number.
3. Telephone number: Use to specify the outside party’s telephone number.
4. AD group: Use to assign an AD group (See Administer AD groups,
page 2-5.).
5. Administrable fields: An entry file has up to 4 administrable fields (search
criteria) (See Label fields, page 2-4.).
6. Note pad: A 40-character line is available to add further information.
To move the cursor, press the “2“ and “1” buttons.
2-2
EuroGeneris User’s manual
Version 600
Alphabetical AD
AD administration menu
The entry file
AD administration menu
Alphabetical AD
---------------------------------------Dialing AD number ................... 1
Display/Program AD number ........... 2
AD printer output ................... 3
Label fields ........................ 4
Administer AD group ................. 5
Reset AD ............................ 6
Select option :
.
Option 1 : See Dial AD number, page 2-11.
Option 2 : See Display / Program AD number, page 2-6.
Option 3 : See AD printer output, page 2-12.
Option 4 : See Label fields, page 2-4.
Option 5 : See Administer AD groups, page 2-5.
Option 6 : See Reset AD, page 2-14.
Version 600
EuroGeneris User’s manual
2-3
2
Alphabetical AD
Label fields
The entry file
Label fields
Label fields
---------------------------------------LABEL 1 : NAME
..........
LABEL 2 : COMPANY
..........
LABEL 3 : ..........
LABEL 4 : ..........
Labels 1 and 2 are factory-set as NAME and COMPANY.
The field labels are administrable. Several fields may have the same label (in
order to enter several names in a unique entry file).
Note: Up to10 characters are available to label a field.
2-4
EuroGeneris User’s manual
Version 600
Alphabetical AD
Administer AD groups
The entry file
Administer AD groups
Alphabetical AD supports up to 10 AD groups. Each AD group has access to a
list of entries. An AD group is assigned to each entry. Only the administered
members of an AD group have access to the associated list of entries.
1. Enter the group number and press the “Enter” button.
Administer AD group
---------------------------------------Group numbers are included
between 0 and 9
Enter group number .......... : .
2. To add a member to the group or remove a member from the group, place
the cursor on the group number and enter “Y” or “N” accordingly. The administered members are shown in reverse video.
1.
Administer AD group
---------------------------------------Administered members :
3000 3016 3032 3048 3064 3080 3096 3112
3001 3017 3033 3049 3065 3081 3097 3113
3002 3018 3034 3050 3066 3082 3098 3114
3003 3019 3035 3051 3067 3083 3099 3115
3004 3020 3036 3052 3068 3084 3100 3116
3005 3021 3037 3053 3069 3085 3101 3117
3006 3022 3038 3054 3070 3086 3102 3118
3007 3023 3039 3055 3071 3087 3103 3119
3008 3024 3040 3056 3072 3088 3104 3120
3009 3025 3041 3057 3073 3089 3105 3121
3010 3026 3042 3058 3074 3090 3106 3122
3011 3027 3043 3059 3075 3091 3107 3123
3012 3028 3044 3060 3076 3092 3108 3124
3013 3029 3045 3061 3077 3093 3109 3125
3014 3030 3046 3062 3078 3094 3110 3126
3015 3031 3047 3063 3079 3095 3111 3127
Use Y/N, to add/remove a member
3. Press the “Enter” button to validate.
Note: An extension may be a member of several AD groups.
On start-up, all the extensions within the system are members of AD group “0”.
Version 600
EuroGeneris User’s manual
2-5
2
Alphabetical AD
Display / Program AD number
The entry file
Display / Program AD number
The “Display / Program AD number” screen allows you:
• to create a new entry file (See Add an entry in the directory, page 2-7.),
• to access an entry in order to:
- display the associated entry file (See Display an entry file, page 2-7.)
- modify the associated entry file (See Modify an entry file, page 2-10.)
- delete the associated entry file (See Delete an entry file, page 2-10.).
Display/Program AD number
---------------------------------------Free AD numbers ......... : 800
.
Available storage space . : .
/.
Press Enter, to access first
free AD number
or
Enter
(....
8200
or
Enter
an AD
AD number ............. : 8...
- 8999
....)
at least one field related to
number :
- mandatory
- optional
- optional
2-6
EuroGeneris User’s manual
:.................... and
:.................... and
:....................
Version 600
Alphabetical AD
Display / Program AD number
Add an entry in the directory
Add an entry in the directory
In the “Display / Program AD number” screen:
1. Press the “Enter” button to access the first blank entry file
Display/Program AD number
---------------------------------------AD nb
Trunk Telephone number
8200 AD group ... : .
NAME
:
COMPANY
:
:
:
Note pad:
........................................
---------------------------------------CANCEL AD NUMBER
---->Shift F3
2. Trunk: Enter 0.
You may enter a trunk number (410 to 449) or a trunk group number (400 to
409) in special cases (Check with your equipment supplier).
3. Telephone number: Enter the outside party’s telephone number.
Note: If the system is behind a master PBX, add the outdial code to the telephone number.
4. Administrable fields (NAME, COMPANY, …): Enter data in at least one
field.
5. Note pad: Enter additional information if you wish.
6. Press the “Enter” button.
7. Repeat steps 1 to 6 to add another entry.
Note: To move the cursor, press the “2” and “1”buttons.
Display an entry file
You can access an entry file by:
• Entering the appropriate AD number.
• Entering related information.
Version 600
EuroGeneris User’s manual
2-7
2
Alphabetical AD
Display / Program AD number
Display an entry file
Access an entry file by entering AD number
In the “Display / Program AD number” screen:
Display/Program AD number
---------------------------------------Free AD numbers ......... : 800
.
Available storage space . : .
/.
Press Enter, to access first
free AD number
or
Enter
(....
8200
or
Enter
an AD
AD number ............. : 8...
- 8999
....)
at least one field related to
number :
- mandatory
- optional
- optional
:.................... and
:.................... and
:....................
1. Enter the appropriate AD number
2. Press the “Enter” button to access the entry file
Display/Program AD number
---------------------------------------AD nb
Trunk Telephone number
8200 - 0
- 0241534222
AD group ... : 0.
NAME
: WALSH
COMPANY
: LUCENT-DR
:
:
Note pad:
........................................
---------------------------------------CANCEL AD NUMBER
---->Shift F3
The entry file is displayed.
It may be:
• modified (See Modify an entry file, page 2-10.)
• deleted (See Delete an entry file, page 2-10.)
2-8
EuroGeneris User’s manual
Version 600
Alphabetical AD
Display / Program AD number
Display an entry file
Access an entry file by entering related information
The alphabetical search allows you to display an entry file without knowing the
associated AD number.
The search is done:
• on data contained in the administrable fields,
• according to one, two or three criteria.
In the “Display / Program AD number” screen:
Display/Program AD number
---------------------------------------Free AD numbers ......... : 800
.
Available storage space . : .
/.
Press Enter, to access first
free AD number
or
Enter
(....
8200
or
Enter
an AD
AD number ............. : 8...
- 8999
....)
at least one field related to
number :
- mandatory
- optional
- optional
:....................
and
CRITERION 1
:....................
and
CRITERION 2
:....................
CRITERION 3
1. Press the “1” button.
2. Enter the search criterion or criteria (See Examples, page 2-10.)
3. Press the “Enter” button.
One of the following will occur:
•
The message No match is displayed.
- Press the “F4” button to modify the request.
•
One match: the entry file is displayed.
It may be:
- modified (See Modify an entry file, page 2-10.)
- deleted (See Delete an entry file, page 2-10.)
The message More than one match is displayed.
- Press the “F4” button to modify the request.
or
- Press the “Enter” button to display the first entry file.
- Press the “1” button to display the next one and so on.
The entry file is displayed. It may be:
- modified (See Modify an entry file, page 2-10.)
- deleted (See Delete an entry file, page 2-10.)
•
Version 600
EuroGeneris User’s manual
2-9
2
Alphabetical AD
Display / Program AD number
Modify an entry file
Examples
One-criterion search
• The search criterion is “L”.
Several entry files match the request: “LUCENT” in the field labeled “COMPANY” and
“LEWIS” in the field labeled “NAME”.
•
The search criterion is “MUR”.
Several entry files match the request: “MURPHY” and “MURTHY” in the field labeled
“NAME”.
•
The search criterion is “LUCENT”.
Several entry files match the request: “LUCENT-UK”, “LUCENT-DR” and “LUCENT-MT” in the
field labeled “COMPANY”.
Multi-criterion search
• The search criteria are “MUR” and “LUCENT”.
Several entry files match the request: “MURPHY” and “MURTHY” both at the company
“LUCENT”.
Modify an entry file
When accessing the file by the AD number:
1. Display the appropriate file.
2. Modify the entry file.
3. Press the “Enter” button to store the entry.
When accessing the file by related information:
1. Display the appropriate file.
2. Press the “Enter” button.
3. Modify the entry file.
4. Press the “Enter” button to store the changes.
Delete an entry file
When accessing the file by the AD number:
1. Display the appropriate file.
2. Press the “Shift+F3” buttons to delete the file.
When accessing the file by related information:
1. Display the appropriate file.
2. Press the “Enter” button.
3. Press the “Shift+F3” buttons to delete the file.
2-10
EuroGeneris User’s manual
Version 600
Alphabetical AD
Dial AD number
Dial AD number
Applicable to France only.
Note: This option is not available on a PC equipped with the GENECOM software application.
Version 600
EuroGeneris User’s manual
2-11
2
Alphabetical AD
AD printer output
AD printer output
AD printer output
----------------------------------------
Print an AD list .................. 1
Print all the AD lists ............ 2
Select option :
.
Option 1 : See Print an AD list, page 2-13.
Option 2 : See Print all the AD lists, page 2-13.
2-12
EuroGeneris User’s manual
Version 600
Alphabetical AD
AD printer output
Print an AD list
Print an AD list
This feature is used to get a printout of specific AD lists.
Print an AD list
---------------------------------------Print an AD list
Assigned AD groups :
., 1
., 2
., 3
., 4
., 5
., 6
., 7
., 8., 9.,
0
Enter field labels :
.......... /..........
Use Y/N, to add/remove a member
Assigned AD groups
Use to select the requested AD group(s). To add or remove a group, place the
cursor on the required group number and enter “Y” or “N” accordingly. The
selected groups are shown in reverse video.
Enter field labels
Use to specify the field(s) which will appear on the printout.
To print specific AD lists:
1. Select the requested AD group(s).
2. Enter the field label(s) (maximum 2).
3. Press the “Enter” button to start printing.
Print all the AD lists
Use this feature to print all the entry files included in the system directory.
To print all the AD lists:
1. Select option 2 in the “AD printer output” menu.
2. Press the “Enter” button to start printing.
Version 600
EuroGeneris User’s manual
2-13
2
Alphabetical AD
Reset AD
Reset AD
This feature is used to delete all the entry files included in the system directory.
Reset AD
---------------------------------------Reset will delete all the data
contained in the alphabetical AD.
1. Press the “Enter” button.
To quit alphabetical AD without modifying, press the “F4” button.
Reset AD
----------------------------------------
Do you want to delete all the data
contained in the alphabetical AD
(Y/N) ? .................... : .
2. Enter “Y” then press the “Enter” button to confirm the deletion.
To quit alphabetical AD without modifying, press the “F4” button.
2-14
EuroGeneris User’s manual
Version 600
3
Call Detail Recording
Introduction
Call detail recording provides detailed call information. It is used to compute call
costs, allocate charges, analyse calling patterns, detect unauthorized calls and
keep track of unnecessary calls. Detailed call information may be displayed at
Galilée 960 α or Solaris α voice terminals, at a Minitel VDU or at a PC equipped
with GENECOM 1 software application.
The system supports a buffer providing storage for up to 8000 customized CDR
records. These records can be collected on a PC. The costs for calls are then
assigned to accounts within the company and reports may be generated to allocate telephone use charges.
3-1
EuroGeneris User’s manual
Version 600
3
Call Detail Recording
CDR administration menu
CDR administration menu
Call detail recording
---------------------------------------CDR Parameters ..................... 1
CDR data ........................... 2
Real-time CDR report ............... 3
Customized CDR report .............. 4
Select option :
.
Option 1 : See CDR parameters, page 3-3.
Option 2 : See CDR data, page 3-4.
Option 3 : See Real-time CDR report, page 3-13.
Option 4 : See Customized CDR report, page 3-17.
3-2
EuroGeneris User’s manual
Version 600
Call Detail Recording
CDR parameters
CDR parameters
CDR Parameters
---------------------------------------Change charge unit :
Current value ........ : ..,... ...
Enter new value ...... : ..,... ...
Enter currency .......... : ...
example : for Dollar --> USD or $
Account code (Y/N) ............. : .
Charge unit
The current value of the charge unit is displayed.
To modify the charge unit, enter the new value.
Example : Enter 00730 for 0.73.
When the value of the unit is modified, the totals are automatically recomputed accordingly.
Currency
Use to enter the appropriate currency (up to 3 characters).
Account code
Account codes allow the system manager to associate calling information with
projects and/or customers.
When administered, account codes are stored and printed on the customized
CDR printer outputs.
Implementation:
At your voice terminal,
1. Dial the outside party’s telephone number.
2. Enter “#” or “*”.
3. Enter the account code.
Charge allocation:
CDR records are used to allocate telephone charges within the company:
• Records can be printed and data sorted manually.
• Records can be collected on a PC and data sorted according to account
codes by designating the account code field as the sortkey (using a call
accounting application or a speadsheet).
Example : Search for “#150”
Version 600
EuroGeneris User’s manual
3-3
3
Call Detail Recording
CDR data
CDR data on per-extension group basis
CDR data
CDR data
---------------------------------------CDR data on per-extension group basis
1
CDR data on per-trunk group basis .... 2
CDR data on per-extension basis ...... 3
CDR data on per-trunk basis .......... 4
Select option :
.
Option 1 : See CDR data on per-extension group basis, page 3-4.
Option 2 : See CDR data on per-trunk group basis, page 3-7.
Option 3 : See CDR data on per-extension basis, page 3-9.
Option 4 : See CDR data on per-trunk basis, page 3-11.
CDR data on per-extension group basis
To collect call data for the extension groups (departments):
• Enter the appropriate group number (from 1 to 32) then press the “Enter”
button (See Record for a specific extension group, page 3-5.).
or
• Enter “*” to collect data for all the groups (See Record for all extension
groups, page 3-6.).
or
• Enter “H” to collect data for the extensions that are not assigned to a group,
then press the “Enter” button (See Record for all the extensions,
page 3-10.).
3-4
EuroGeneris User’s manual
Version 600
Call Detail Recording
CDR data
CDR data on per-extension group basis
Record for a specific extension group
CDR data on per-extension group basis
---------------------------------------.
Friday 17/10/1997 13:06
Group number
: 01
..
PURCHAS
............
10 01 50
Duration ....... : .....h..mn..s
Charges ........ : .......,..
...
227,76 USD
Number of units :
.......
312 Unit(s)
Last meter reset ..... : 01/10/1997
../../....
Printer output ..............(Y/N) : .
Reset meters ................(Y/N) : .
---------------------------------------DETAILED FOR EACH MEMBER ----> Enter D
This record shows:
• the date and time,
• the group number and name,
• the total call duration,
• the total call cost,
• the number of units,
• the date of the last reset.
The following options are available:
• Print the record.
• Reset the meters assigned to the group members.
To split the record for each member of the group, enter “D” (See Record for all
the extensions, page 3-10.).
Version 600
EuroGeneris User’s manual
3-5
3
Call Detail Recording
CDR data
CDR data on per-extension group basis
Record for all extension groups
CDR data on per-extension group basis
---------------------------------------.Friday 17/10/1997 13:06
Last
Nb Name
Units
Charges
reset
G..
........ .......
../..
01 PURCHAS
312 .......,..
227,76 01/10
G..
........ .......
../..
02 SALES
312 .......,..
227,76 01/10
G..
........ .......
../..
03 EXPORT
312 .......,..
227,76 01/10
G..
........ .......
../..
04 REPAIR
312 .......,..
227,76 01/10
G..
........ .......
../..
05 STORE
312 .......,..
227,76 01/10
G..
........ .......
../..
06 TEST
312 .......,..
227,76 01/10
G..
........ .......
../..
07 R&D
312 .......,..
227,76 01/10
G..
........ .......
../..
08 ACCOUNT
312 .......,..
227,76 01/10
NA
.......
../..
312 .......,..
227,76 01/10
NA = NOT ASSIGNED TO A GROUP.
2808 .......,..
2049,84
TOTAL
: .......
Printer output ..............(Y/N) : .
Reset meters ................(Y/N) : .
This record shows:
• the date and time,
• For the first 8 extension groups:
- the group number and name,
- the number of units,
- the total call cost,
- the date of the last reset,
• For the extensions that are not assigned to a group (NA):
- the number of units,
- the total call cost,
• the total number of units for all the extension groups (32),
• the total cost for all the extension groups (32).
To display the next 8 extension groups:
1. Press “Shift-1”.
The following options are available:
• Print the record.
• Reset the meters assigned to all the group members.
3-6
EuroGeneris User’s manual
Version 600
Call Detail Recording
CDR data
CDR data on per-trunk group basis
CDR data on per-trunk group basis
To collect call data for the trunk groups:
• Enter the appropriate group number (from 0 to 9), then press the “Enter”
button (See Record for a specific trunk group, page 3-7.).
or
• Enter “*” to collect data for all the groups (See Record for all trunk groups,
page 3-8.).
or
• Enter “H” to collect data for the trunks that are not assigned to a group, then
press the “Enter” button (See Record for a specific trunk, page 3-11.).
Record for a specific trunk group
CDR data on per-trunk group basis
---------------------------------------.
Friday 17/10/1997 13:06
Trunk group number: 1.
10 01 50
Duration ........ : .....h..mn..s
Charges ......... : .......,..
USD
227,76 ...
Number of units . :
........
312 Unit(s)
Last meter reset ...... : 01/10/1997
../../....
Printer output ..............(Y/N) : .
Reset meters ................(Y/N) : .
---------------------------------------DETAILED FOR EACH MEMBER ----> Enter D
This record shows:
• the date and time,
• the group number,
• the total call duration,
• the total call cost,
• the number of units,
• the date of the last reset.
The following options are available:
• Print the record,
• Reset the meters assigned to the group members.
To split the record for each member of the group, enter “D” (See Record for all
the trunks, page 3-12.).
Version 600
EuroGeneris User’s manual
3-7
3
Call Detail Recording
CDR data
CDR data on per-trunk group basis
Record for all trunk groups
CDR data on per-trunk group basis
---------------------------------------.
Friday 17/10/1997 13:06
Last
Nb
Units
Charges
reset
312 .......,..
227,76
TG 0
.......
../..
01/10
312 .......,..
227,76
TG 1
.......
../..
01/10
312 .......,..
227,76
TG 2
.......
../..
01/10
312 .......,..
227,76
TG 3
.......
../..
01/10
312 .......,..
227,76
TG 4
.......
../..
01/10
312 .......,..
227,76
TG 5
.......
../..
01/10
312 .......,..
227,76
TG 6
.......
../..
01/10
312 .......,..
227,76
TG 7
.......
../..
01/10
312 .......,..
227,76
TG 8
.......
../..
01/10
312 .......,..
227,76
TG 9
.......
../..
01/10
312 .......,..
227,76
NA
.......
../..
01/10
NA = NOT ASSIGNED TO A GROUP.
3120
2277,60
TOTAL : .......
.......,..
Printer output ..............(Y/N) : .
Reset meters ................(Y/N) : .
This record shows:
• the date and time,
• For each trunk group:
- the group number,
- the number of units,
- the total call cost,
- the date of the last reset,
• the total number of units for all the trunk groups (10),
• the total cost for all the trunk groups (10).
The trunks that are not assigned to a group appear under the label NA (Not Assigned).
The trunks that are assigned to several groups also appear under the label NA.
The following options are available:
• Print the record.
• Reset the meters assigned to the group members.
3-8
EuroGeneris User’s manual
Version 600
Call Detail Recording
CDR data
CDR data on per-extension basis
CDR data on per-extension basis
To collect call data for the extensions:
• Enter the appropriate extension number then press the “Enter” button (See
CDR data on per-extension basis, page 3-9.).
or
• Enter “*” to collect data for all the extensions (See Record for all the extensions, page 3-10.).
Record for a specific extension
CDR data on per-extension basis
---------------------------------------.
Friday 17/10/1997 13:06
Extension number : 300
...
Extension group : 01
..
............
BRENDA
PURCHAS
........
Duration ....... : .....h..mn..s
10 01 50
USD
Charges ........ : .......,..
227,76 ...
Number of units :
.......
312 Unit(s)
Last meter reset .... :
../../....
01/10/1997
Printer output ..............(Y/N) : .
Reset meters ................(Y/N) : .
This record shows:
• the date and time,
• the extension number and user’s name,
• the number and name of the group to which the extension is assigned,
• the total call duration,
• the total call cost,
• the number of units,
• the date of the last reset.
The following options are available:
• Print the record.
• Reset the meters assigned to the group members.
Version 600
EuroGeneris User’s manual
3-9
3
Call Detail Recording
CDR data
CDR data on per-extension basis
Record for all the extensions
CDR data on per-extension basis
---------------------------------------.Friday 17/10/1997 13:06
Last
Nb
Name
Units Charges
reset
01/10
227,76 ../..
312 .......,..
BRENDA
...
........
.......
300
01/10
227,76 ../..
312 .......,..
BOB
...
........
.......
301
01/10
227,76 ../..
312 .......,..
PETER
...
........
.......
302
01/10
227,76 ../..
312 .......,..
MARY
...
........
.......
303
01/10
227,76 ../..
312 .......,..
STEVE
...
........
.......
304
01/10
227,76 ../..
312 .......,..
HARVEY
...
........
.......
305
01/10
227,76 ../..
312 .......,..
DONNA
...
........
.......
306
01/10
227,76 ../..
312 .......,..
ANN
...
........
.......
307
TOTAL
:
2496 .......,..
.......
1822,08
Printer output ...............(Y/N) : .
Reset meters .................(Y/N) : .
---------------------------------------NEXT PAGE -----> Shift Down
This record shows:
• the date and time,
• For the first 8 extensions:
- the extension number and user’s name,
- the number of units,
- the total call cost,
- the date of the last reset,
• the total number of units for all the extensions,
• the total cost for all the extensions.
To display the next 8 extensions:
1. Press “Shift-1”.
The following options are available:
• Print the record.
• Reset the meters assigned to all the extensions within the system.
3-10
EuroGeneris User’s manual
Version 600
Call Detail Recording
CDR data
CDR data on per-trunk basis
CDR data on per-trunk basis
To collect data for the trunks:
• Enter the appropriate trunk number (from 410 to 449), then press the
“Enter” button (See Record for a specific trunk, page 3-11.).
or
• Enter “*” to collect data for all the trunks (See Record for all the trunks,
page 3-12.).
Record for a specific trunk
CDR data on per-trunk basis
---------------------------------------.
Friday 17/10/1997 13:06
Trunk number
Trunk group
: 410
..
: 01
..
Duration ........ : .....h..mn..s
10 01 50
Charges ......... : .......,..
227,76 ...
USD
Number of units . :
.......
312 Unit(s)
Last meter reset ..... : 01/10/1997
../../....
Printer output ..............(Y/N) : .
Reset meters ................(Y/N) : .
This record shows:
• the date and time,
• the trunk number,
• the number of the group to which the trunk is assigned,
• the total call duration,
• the total call cost,
• the number of units,
• the date of the last reset.
The following options are available:
• Print the record.
• Reset the meters assigned to the group members.
Version 600
EuroGeneris User’s manual
3-11
3
Call Detail Recording
CDR data
CDR data on per-trunk basis
Record for all the trunks
CDR data on per-trunk basis
---------------------------------------.
Friday 17/10/1997 13:06
.
Last
Nb
Units
Charges
reset
01/10
227,76 ../..
312 .......,..
T..
.......
10
01/10
227,76 ../..
312 .......,..
T..
.......
11
01/10
227,76 ../..
312 .......,..
T..
.......
12
01/10
227,76 ../..
312 .......,..
T..
.......
13
01/10
227,76 ../..
312 .......,..
T..
.......
14
01/10
227,76 ../..
312 .......,..
T..
.......
15
01/10
227,76 ../..
312 .......,..
T..
.......
16
01/10
227,76 ../..
312 .......,..
T..
.......
17
TOTAL
:
2496
.......
.......,..
1822,08
Printer output ...............(Y/N) : .
Reset meters .................(Y/N) : .
---------------------------------------NEXT PAGE
-----> Shift Down
This record shows:
• the date and time,
• For the first 8 trunks:
- the trunk number,
- the number of units,
- the total call cost,
- the date of the last reset,
• the total number of units for all the trunks,
• the total cost for all the trunks.
To display the next 8 trunks :
1. Press “Shift-1”.
The following options are available:
• Print the record.
• Reset the meters assigned to all the trunks within the system.
3-12
EuroGeneris User’s manual
Version 600
Call Detail Recording
Real-time CDR report
CDR data on per-trunk basis
Real-time CDR report
Real-time CDR report
----------------------------------------
CDR administered group ..........1
Administer CDR real-time report .2
Select option :
.
Option 1 : See CDR administered group, page 3-14.
Option 2 : See Administer real-time CDR report, page 3-15.
Version 600
EuroGeneris User’s manual
3-13
3
Call Detail Recording
Real-time CDR report
CDR administered group
CDR administered group
This feature allows the system manager to select a number of extensions for
supervision.
CDR administered group
---------------------------------------Administered members :
3000 3016 3032 3048 3064 3080 3096 3112
3001 3017 3033 3049 3065 3081 3097 3113
3002 3018 3034 3050 3066 3082 3098 3114
3003 3019 3035 3051 3067 3083 3099 3115
3004 3020 3036 3052 3068 3084 3100 3116
3005 3021 3037 3053 3069 3085 3101 3117
3006 3022 3038 3054 3070 3086 3102 3118
3007 3023 3039 3055 3071 3087 3103 3119
3008 3024 3040 3056 3072 3088 3104 3120
3009 3025 3041 3057 3073 3089 3105 3121
3010 3026 3042 3058 3074 3090 3106 3122
3011 3027 3043 3059 3075 3091 3107 3123
3012 3028 3044 3060 3076 3092 3108 3124
3013 3029 3045 3061 3077 3093 3109 3125
3014 3030 3046 3062 3078 3094 3110 3126
3015 3031 3047 3063 3079 3095 3111 3127
Use Y/N, to add/remove a member
To add or remove a member:
1. Place the cursor on the appropriate extension number.
2. Enter “Y” to add a member to the group or “N” to remove a member from the
group. The administered members are displayed in reverse video.
On start-up, all the extensions within the system are members of the CDR administered
group.
3-14
EuroGeneris User’s manual
Version 600
Call Detail Recording
Real-time CDR report
Administer real-time CDR report
Administer real-time CDR report
Administer real-time CDR report
---------------------------------------Display on Minitel/PC ........(Y/N) : .
Printer output ...............(Y/N) : .
Format 5 rows 40 columns
---> 1
Format 3 rows 80 columns
---> 2
Format 1 row 80 columns
---> 3
: .
Privacy : Blank last 4 digits of the
dialed number ................(Y/N) : .
Collect data for calls totalizing
at least :
---> ... Units
Collect data for the CDR administered
group only ........................ : .
Display on Minitel/PC
Use to display the real-time CDR report at a Minitel VDU or a PC.
The display format is the 5-line 40-column format (See Output formats, page 3-16.).
The connection with the system is automatically interrupted when requesting the display of
the real-time CDR report. To get back to system/CDR administration, press the “F4” button.
Printer output
Use to print the real-time CDR report.
Format
Use to select the appropriate printer format (See Output formats, page 3-16.).
Privacy: Blank last 4 digits of the dialed number
Use for privacy purposes.
Important: The selected setting for ‘privacy’ is used for both real-time and customized CDR
reports (See Customized CDR report, page 3-17.).
Collect data for calls totalizing at least
Use to specify a lower bound for data collection.
Note: Enter “1” to collect data for successful outgoing calls only.
Collect data for the CDR administered group only
Use to limit data collection to the CDR administered group (See CDR administered group, page 3-14.).
Version 600
EuroGeneris User’s manual
3-15
3
Call Detail Recording
Real-time CDR report
Administer real-time CDR report
Output formats
5-line 40-column format
*Ext : 1234 T:123 Date:22/04/1997 14:28
Name : ABCDEFGHIJKL
Units: 1234567
Time : 0h00mn12s Charges:12345,12 ABC.
Type of call........ : ABCDEFGHI
Dialed number: 123456789012345678901234
3-line 80-column format
* Ext :1234 T:123 Date:22/04/1997 14:28 Name:ABCDEFGHIJKL Units:1234567
Time: 0h00mn12s Charges: 12345,12 ABC Type of call..: ABCDEFGHI
Dialed number : 123456789012345678901234
U.T
1-line 80-column format
*E1234 T123 22/04/97 14:28 12345U
0h00m12s 12345,12A A Nb 12345678901234567890
Table 2 : CDR real-time report
Abbreviated
designation
Data field
Designation
3 or 5-line
format
1-line
format
3 or 5-line
format
1-line
format
Extension number
Ext
E
3 or 4 digits
3 or 4 digits
Trunk number
T
T
3 digits
3 digits
Date and time
Date
dd/mm/yyyy HH:MM
dd/mm/yy HH:MM
User’s name
Name
Number of units
Units
Call duration
Time
Call cost
Charges
12 characters
U
Currency
3-16
EuroGeneris User’s manual
Type of call
Type of call
Dialed number
Dialed number
Nb
7 digits
5 digits
HhMMmnSSs
HhMMmnSSs
5 + 2 digits
5 + 2 digits
3 characters
1 character
9 characters
1 character
24 digits
20 digits
Version 600
Call Detail Recording
Customized CDR report
Administer real-time CDR report
Customized CDR report
Note: The availability of the feature depends upon the system hardware. Check with your
equipment supplier to see if the feature is available to you.
Customized CDR is a database providing storage for up to 8000 CDR records.
CDR provides detailed call information for outgoing and incoming trunk calls.
Note: CDR records are not generated for internal calls.
Customized CDR output devices are:
• a printer,
• a PC equipped with a call accounting application or a speadsheet.
Customized CDR report
---------------------------------------Customized CDR data collection .... 1
Customized CDR printer output ..... 2
Customized CDR reset .............. 3
Customized CDR overload alarm ..... 4
Select option :
.
Option 1 : See Customized CDR data collection, page 3-18.
Option 2 : See Customized CDR printer output, page 3-19.
Option 3 : See Customized CDR reset, page 3-21.
Option 4 : See Customized CDR overload alarm, page 3-22.
Version 600
EuroGeneris User’s manual
3-17
3
Call Detail Recording
Customized CDR report
Customized CDR data collection
Customized CDR data collection
Customized CDR data collection
----------------------------------------
Data collection
(Y/N)
.
For calls totalizing
at least ..................... .. Units
Data collection
Use to allow CDR records to be generated.
For calls totalizing at least
Use to specify a lower bound for data collection.
Note: Enter “1” to collect data for successful outgoing calls only.
3-18
EuroGeneris User’s manual
Version 600
Call Detail Recording
Customized CDR report
Customized CDR printer output
Customized CDR printer output
Customized CDR printer output allows a search using several criteria over a
defined period.
Customized CDR printer output
---------------------------------------From ../../.... at..h..
to ../../.... at..h..
Extension number
or * for all extensions ...... : ....
Privacy : Blank last 4 digits of the
dialed number (Y/N) .......... : .
Collect data for calls totalizing
at least (seconds) ........... : ....
at least (units) ............. : ..
Type of call
(O,I,T,A,F,U or * for all types):.
From … to …
Use to specify the period.
By default, the period runs from the last reset to the current date.
Extension number
Use to specify a particular extension.
Privacy: Blank last 4 digits of the dialed number
Use for privacy purposes.
Important: The selected setting for ‘privacy’ is used for both real-time and customized CDR
reports (See Administer real-time CDR report, page 3-15.).
Collect data for calls totalizing at least
Use to specify two different lower bounds for data collection (seconds and
units).
Note: Enter “1” to collect data for successful outgoing calls only.
Version 600
EuroGeneris User’s manual
3-19
3
Call Detail Recording
Customized CDR report
Customized CDR printer output
Type of call
Use to select the types of calls submitted to CDR.
Table 3 : Types of calls
3-20
EuroGeneris User’s manual
Identifier
Call type
O
Outgoing call
I
Incoming call
T
Outgoing call resulting from an outside transfer
A
Attendant-handled incoming call
F
Outgoing call resulting from a call forward off-premises
U
Uncompleted incoming call attempt
*
All types
Version 600
Call Detail Recording
Customized CDR report
Customized CDR reset
Customized CDR reset
Customized CDR reset is used to delete the old CDR records and recover storage space.
Customized CDR reset
---------------------------------------Available storage space :
...../.....
Delete CDR data up to
../../....
included.
Warning, If you press ENTER,
CDR data is deleted.
Available storage space
Shows :
• the number of records already stored,
• the maximum number of records that may be stored.
Delete CDR data up to
Use to specify a date for the reset.
By default, the system proposes the current date minus one day.
Version 600
EuroGeneris User’s manual
3-21
3
Call Detail Recording
Customized CDR report
Customized CDR overload alarm
Customized CDR overload alarm
(Applicable to France only)
Customized CDR overload alarm
---------------------------------------PBX code ...... : ....
Automatic overload alarm when
available storage space not big
enough
(Y/N) .
Content of overload alarm file :
(40 characters)
........................................
PBX code
Use to specify the system identification number.
Automatic overload alarm
Use to automatically send an overload alarm to GENECOM2 software application when the available storage space does not exceed 500 records.
Press the “Enter” button. The following screen is displayed:
Access GENECOM2
---------------------------------------The command to access GENECOM2
may be :
- a Hayes command
(modem, ISDN adaptator)
- a X28 address
(PAD access)
Enter your command :
(up to 20 characters)
....................
---------------------------------------HELP
-----> F2
This page is intended for remote PC users only. It implies the use of a
GENECOM2 software application.
3-22
EuroGeneris User’s manual
Version 600
BCS
Service Documentation Technique
ZI Saint Lambert • 49412 SAUMUR CEDEX • FRANCE
Ce document n’est pas contractuel. Le constructeur se réserve le droit d’apporter toutes les modifications qu’il jugera utiles, sans préavis.
The information in this document is subject to change without notice. The manufacturer assumes no responsibility for any errors that may appear in this document.