1
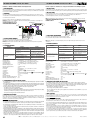
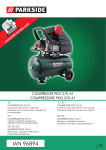
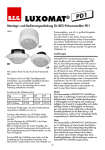
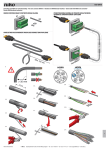
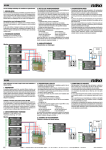
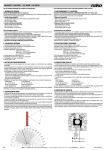
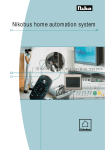
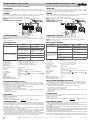
340-00048 LEDDIMMER 8-24 Vdc, max. 100 W 340-00048 VARIATEUR DE LED 8-24 Vdc, max. 100 W
Lees de volledige handleiding vóór installatie en ingebruikname.
Veuillez lire le mode d’emploi entièrement avant l’installation et la mise en service.
1. BESCHRIJVING
1. DESCRIPTION
2. MONTAGE
2. MONTAGE
De leddimmer wordt gebruikt om ledstrips met monochrome leds te dimmen. Deze leddimmer werkt op een
ingangsspanning van 8 tot 24 Vdc en heeft een maximaal vermogen van 100 W. Met een NO-drukknop dim
je de lichtsterkte lineair.
De ingangsspanning is afhankelijk van de gekozen ledoplossing en moet liggen tussen 8 en 24 Vdc. Afhankelijk
van de voeding die je gebruikt, mag je maximaal 100 W aan ledstrips aansluiten op de leddimmer.
Raadpleeg onderstaand schema voor de aansluiting van de leddimmer.
Opmerking: Deze leddimmer werkt NIET rechtstreeks op netspanning, maar op ingangsspanning
(8 tot 24 Vdc).
max. 25 W: 24 Vdc
PRINCIPESCHEMA MET 25W-VOEDING
N
230 Vac
L
SCHÉMA DE PRINCIPE AVEC UNE
N
ALIMENTATION DE 25 W
340-00048
340-00015
3. SCHAKELEN EN DIMMEN
Druk kort op de NO-drukknop om de leds aan en uit te schakelen.
Houd de NO-drukknop lang ingedrukt om de leds op en neer te dimmen.
Opmerking: Bij het inschakelen springen de leds aan op dezelfde lichtstand die ze hadden toen ze de laatste
keer werden uitgeschakeld.
4. PROBLEEMOPLOSSING
340-00048
3. COMMUTATION ET VARIATION
Pour allumer et éteindre les LED, appuyez brièvement sur le bouton-poussoir NO.
Pour augmenter et diminuer l’intensité des LED, maintenez le bouton-poussoir NO enfoncé.
Remarque: Lors de la mise sous tension, les LED s’allument au niveau d’intensité qu’ils possédaient avant
d’être éteints pour la dernière fois.
4. RÉSOLUTION DES PROBLÈMES
Probleem
De leddimmer reageert niet of
foutief als je op de drukknop drukt.
La tension d’entrée dépend de la solution LED choisie et doit se situer entre 8 et 24 Vdc. Selon l’alimentation
utilisée, vous pouvez raccorder jusqu’à 100 W de barrettes de LED au variateur de LED.
Consultez le schéma ci-dessous pour raccorder le variateur de LED.
Remarque: Ce variateur de LED ne fonctionne PAS directement sur la tension réseau mais sur la tension
d’entrée (8 à 24 Vdc).
max. 25 W: 24 Vdc
230 Vac
L
340-00015
De leds springen niet aan.
Le variateur de LED est utilisé pour faire varier des barrettes de LED avec des LED monochromes. Ce variateur
de LED fonctionne sur une tension d’entrée de 8 à 24 Vdc et possède une puissance maximale de 100 W. Un
bouton-poussoir NO permet de faire varier l’intensité lumineuse linéairement.
Oorzaak
Oplossing
Geen voedingsspanning.
Controleer de spanning.
Foute polariteit van de voeding.
Draai de polariteit om.
Te veel ledstrips aangesloten.
Gebruik een zwaardere voeding of
verminder het aantal aangesloten
ledstrips.
Slechte verbinding.
Controleer de verbinding.
Kortsluiting in het drukknopcircuit.
Controleer het drukknopcircuit.
Te lange verbinding tussen
leddimmer en drukknop.
Verkort de afstand (maximaal 20 m).
Problème
Les LED ne s’allument pas.
Cause
Solution
Pas de tension d’alimentation.
Contrôlez la tension.
Polarité erronée de l’alimentation.
Inversez la polarité.
Trop de barrettes de LED raccordées.
Utilisez une alimentation plus lourde
ou réduisez le nombre de barrettes de
LED raccordées.
Le variateur de LED ne réagit Mauvaise connexion.
Contrôlez la connexion.
pas ou réagit de manière Court-circuit dans le circuit du boutonContrôlez le circuit du bouton-poussoir.
erronée lorsque vous appuyez poussoir.
sur le bouton-poussoir.
Connexion trop longue entre le variateur
Réduisez la distance (maximum 20 m).
de LED et le bouton-poussoir.
5. CARACTÉRISTIQUES TECHNIQUES
5. TECHNISCHE GEGEVENS
Primaire aansluiting:
schroefklem – 2 x 1,5 mm² of 1 x 2,5 mm²
Ingangsspanning:
8 – 24 Vdc (afhankelijk van de gekozen ledoplossing)
Secundaire aansluiting:
schroefklem – 2 x 1,5 mm² of 1 x 2,5 mm²
Uitgangsspanning:
8 – 24 Vdc (afhankelijk van de ingangsspanning)
Maximale uitgangsstroom:
4,2 A
Maximaal uitgangsvermogen:
100 W (bij 24 Vdc)
Rendement:98%
Bediening:
schroefklem – 2 x 1,5 mm² of 1 x 2,5 mm²
NO-drukknop
Beschermklasse:
klasse III-toestellen ( III ); zeer lage veiligheidsspanning (ZLVS)
Beschermingsgraad:IP20
Beveiliging:
beveiligd tegen kortsluiting ( ), overbelasting en oververhitting (
Afmetingen:
100 x 48 x 28 mm (HxBxD)
Gewicht:
132 g
Bedrijfstemperatuur:
-10 – 40°C
Maximale omgevingstemperatuur (Ta):40°C
Maximale temperatuur van de behuizing (Tc):55°C
)
Connexion primaire:
borne à vis – 2 x 1,5 mm² ou 1 x 2,5 mm²
Tension d’entrée:
8 – 24 Vdc (selon la solution LED choisie)
Connexion secondaire:
borne à vis – 2 x 1,5 mm² ou 1 x 2,5 mm²
Tension de sortie:
8 – 24 Vdc (selon la tension d’entrée)
Courant de sortie maximal:
4,2 A
Puissance de sortie maximale:
100 W (à 24 Vdc)
Rendement:98%
Commande:
borne à vis – 2 x 1,5 mm² ou 1 x 2,5 mm²
bouton-poussoir NO
Classe de protection:
appareils de classe III ( III ); très basse tension de sécurité (TBTS)
Degré de protection:
IP20
Protection:
protégé contre les courts-circuits ( ), les surcharges et les surchauffes (
)
Dimensions:
100 x 48 x 28 mm (HxLxP)
Poids: 132 g
Température de fonctionnement:
-10 – 40°C
Température ambiante maximale (Ta): 40°C
Température maximale du boîtier (Tc): 55°C
6. WAARSCHUWINGEN VOOR INSTALLATIE
6. MISES EN GARDE CONCERNANT L’INSTALLATION
7. NIKO SUPPORT
7. SUPPORT DE NIKO
8. GARANTIEBEPALINGEN
8. DISPOSITIONS DE GARANTIE
-De installatie moet worden uitgevoerd door een erkend installateur en volgens de geldende voorschriften.
-Deze handleiding moet aan de gebruiker worden overhandigd. Het moet bij het dossier van de elektrische
installatie worden gevoegd en worden overgedragen aan eventuele nieuwe eigenaars. Bijkomende exemplaren
zijn verkrijgbaar via de website of supportdienst van Niko.
-Tijdens de installatie moet rekening gehouden worden met (niet-limitatieve lijst):
-de geldende wetten, normen en reglementen.
-de stand van de techniek op het moment van de installatie.
-deze handleiding die alleen algemene bepalingen vermeldt en moet worden gelezen in het kader van elke
specifieke installatie.
-de regels van goed vakmanschap.
Heb je twijfel? Of wil je het product omruilen in geval van een eventueel defect? Neem dan contact op met je
groothandel of de Niko supportdienst:
•België: +32 3 778 90 80
•Nederland: +31 183 64 06 60
Contactgegevens en meer informatie vind je op www.niko.eu onder de rubriek “Hulp en advies”.
-De garantietermijn bedraagt vier jaar vanaf leveringsdatum. Als leveringsdatum geldt de factuurdatum van
aankoop van het product door de consument. Als er geen factuur voorhanden is, geldt de productiedatum.
-De consument is verplicht Niko schriftelijk te informeren over het gebrek aan overeenstemming, en dit uiterlijk
binnen de twee maanden na vaststelling.
-In geval van een gebrek aan overeenstemming heeft de consument enkel recht op een kosteloze herstelling
of vervanging van het product, wat door Niko bepaald wordt.
-Niko is niet verantwoordelijk voor een defect of schade als gevolg van een foutieve installatie, oneigenlijk of
onachtzaam gebruik, een verkeerde bediening, transformatie van het product, onderhoud in strijd met de
onderhoudsvoorschriften of een externe oorzaak zoals vochtschade of schade door overspanning.
- De dwingende bepalingen in de nationale wetgeving over de verkoop van consumptiegoederen en de bescherming
van consumenten in landen waar Niko rechtstreeks of via zuster- of dochtervennootschappen, filialen, distributeurs,
agenten of vaste vertegenwoordigers verkoopt, hebben voorrang op bovenstaande bepalingen.
nv Niko sa
-L’installation doit être effectuée par un installateur agréé et dans le respect des prescriptions en vigueur.
-Ce mode d’emploi doit être remis à l’utilisateur. Il doit être joint au dossier de l’installation électrique et être
remis aux nouveaux propriétaires éventuels. Des exemplaires supplémentaires peuvent être obtenus sur le
site web ou auprès du service support de Niko.
-Il y a lieu de tenir compte des points suivants pendant l’installation (liste non limitative):
-les lois, les normes et les réglementations en vigueur.
-l’état de la technique au moment de l’installation.
-ce mode d’emploi qui stipule uniquement des dispositions générales et doit être lu dans le cadre de toute
installation spécifique.
-les règles de l’art.
En cas de doute ou si vous voulez échanger le produit en cas de défaut éventuel, veuillez prendre contact avec votre
grossiste ou avec le service support de Niko:
• Belgique: +32 3 778 90 80
• France: +33 820 20 66 25
Vous trouverez les coordonnées et de plus amples informations sur le site www.niko.eu, sous la rubrique “Aide et conseils”.
-Le délai de garantie est de quatre ans à partir de la date de livraison. La date de la facture d’achat par le consommateur est
considérée comme la date de livraison. En l’absence de facture, la date de fabrication est valable.
-Le consommateur est tenu de prévenir Niko par écrit de tout défaut de conformité, dans un délai maximum de deux mois
après constatation.
-En cas de défaut de conformité, le consommateur peut uniquement prétendre à la réparation gratuite ou au remplacement
gratuit du produit, selon l’avis de Niko.
-Niko ne peut être tenu pour responsable d’un défaut ou de dégâts résultant d’une installation fautive, d’une utilisation
impropre ou négligente, d’une commande erronée, d’une transformation du produit, d’un entretien contraire aux consignes
d’entretien ou d’une cause externe telle que de l’humidité ou une surtension.
-Les dispositions contraignantes de la législation nationale ayant trait à la vente de biens de consommation et à la protection
des consommateurs des différents pays où Niko procède à la vente directe ou par l’intermédiaire d’entreprises sœurs, de
filiales, de succursales, de distributeurs, d’agents ou de représentants fixes, prévalent sur les dispositions susmentionnées.
Industriepark West 40, BE-9100 Sint-Niklaas, Belgium — tel. +32 3 778 90 00 — fax +32 3 777 71 20 — e-mail: [email protected] — www.niko.be
PM340-00048R12131
340-00048 LED DIMMER 8-24 Vdc, max. 100 W 340-00048 LED-DIMMER 8-24 Vdc, max. 100 W
Handbuch vor Montage und Inbetriebnahme vollständig durchlesen.
Read the complete user manual before carrying out the installation and activating the system.
1. BESCHREIBUNG
1. DESCRIPTION
Mit diesem LED-Dimmer können Sie LED-Streifen mit monochromen LEDs dimmen. Dieser LED-Dimmer benötigt
eine Eingangsspannung von 8 bis 24 Vdc und besitzt eine maximale Leistung von 100 W. Mit einem Schließertaster
können Sie die Lichtstärke linear dimmen.
2. MONTAGE
Die Höhe der Eingangsspannung hängt von der gewählten LED-Lösung ab und muss sich zwischen 8 und
24 Vdc befinden. Je nach Netzteilausführung können Sie an den LED-Dimmer LED-Streifen einer Gesamtleistung
von maximal 100 W anschließen.
2. INSTALLATION
The input voltage depends on the selected LED solution and should be between 8 and 24 Vdc. Depending on the
power supply used, you may connect a maximum of 100 W of LED strips to the LED dimmer.
Consult the diagram below for the connection of the LED dimmer.
Note: This LED dimmer does NOT work directly on the mains voltage, but on the input voltage (8 to 24 Vdc).
Beachten Sie für den Anschluss des LED-Dimmers untenstehende Plan.
Hinweise: Sie dürfen diesen LED-Dimmer NICHT direkt an Netzspannung anschließen. Sie benötigen eine
Eingangsspannung von 8 bis 24 Vdc.
SCHALTSCHEMA MIT 25-WVERSORGUNGSSPANNUNG
The LED dimmer is used to dim LED strips with monochrome LEDs. This LED dimmer operates on an input voltage
from 8 to 24 Vdc and has a maximum power of 100 W. The light intensity is dimmed linearly with an NO push button.
SCHEMATIC DIAGRAM WITH A 25 W
POWER SUPPLY
max. 25 W: 24 Vdc
N
230 Vac
L
max. 25 W: 24 Vdc
N
230 Vac
L
340-00015
340-00015
3. SWITCHING AND DIMMING
340-00048
Press the NO push button briefly to switch the LEDs on and off.
Press and hold the NO push button to dim the LEDs up and down.
3. SCHALTEN UND DIMMEN
Zum An- und Ausschalten der LEDs Schließertaster nur kurz betätigen.
Zum Dimmen Schließertaster lang betätigen, um LEDs auf- bzw. abzudimmen.
Hinweise: Beim Einschalten leuchten die LEDs wieder mit der zuletzt vor dem Ausschalten eingestellten
Beleuchtungsstärke.
Note: When switching on, the LEDs will light up at the same light intensity they had when they were last
switched off.
4. TROUBLESHOOTING
4. STÖRUNGSABHILFE
Problem
Problem
Die LEDs leuchten nicht.
Ursache
Lösung
Keine Versorgungsspannung vorhanden. Überprüfen Sie die Spannung.
Die Polarität des Netzteils ist falsch
Tauschen Sie die Polarität.
angeschlossen.
Verwenden Sie ein stärkeres Netzteil
Es sind zu viele LED-Streifen
bzw. verringern Sie die Anzahl der
angeschlossen.
angeschlossenen LED-Streifen.
Der LED-Dimmer reagiert nicht Schlechte Verbindung.
Überprüfen Sie die Verbindung.
bzw. nicht funktionsgemäß auf Kurzschluss im Tasterstromkreis.
Überprüfen Sie den Tasterstromkreis.
Tastendruck.
Verbindung zwischen LED-Dimmer und Verringern Sie den Abstand (max.
Drucktaster ist zu lang.
20 m).
5. TECHNISCHE DATEN
Primäranschluss:
Schraubklemme – 2 x 1,5 mm² bzw. 1 x 2,5 mm²
Eingangsspannung:
8 – 24 Vdc (abhängig von der gewählten LED-Lösung)
Sekundäranschluss:
Schraubklemme – 2 x 1,5 mm² bzw. 1 x 2,5 mm²
Ausgangsspannung:
8 – 24 Vdc (abhängig von der Eingangsspannung)
Maximaler Ausgangsstrom:
4,2 A
Maximale Ausgangsleistung:
100 W (bei 24 Vdc)
Wirkungsgrad:98%
Bedienung:
Schraubklemme – 2 x 1,5 mm² bzw. 1 x 2,5 mm²
Schließertaster
Schutzklasse:
Geräteklasse III ( III ); Schutzkleinspannung
Schutzart:IP20
Schutzsystem:
Versehen mit Schutz gegen Kurzschluss ( ), Überlast und Überhitzung (
Abmessungen:
100 x 48 x 28 mm (HxBxT)
Gewicht:
132 g
Betriebstemperatur:
-10 – 40°C
Maximale Umgebungstemperatur (Ta): 40°C
Maximale Gehäusetemperatur (Tc):
55°C
)
-Die Installation darf ausschließlich von einer Elektrofachkraft unter Berücksichtigung der geltenden Vorschriften
ausgeführt werden.
-Diese Gebrauchsanleitung muss dem Benutzer ausgehändigt werden. Die Gebrauchsanleitung ist den Unterlagen
der elektrischen Anlage beizufügen und muss auch eventuellen neuen Besitzern ausgehändigt werden. Zusätzliche
Exemplare erhalten Sie über die Internetseiten von Niko oder über den Kundendienst von Niko.
-Beachten und berücksichtigen Sie bei der Installation unter anderem folgende Punkte:
-die gültigen Gesetze, Normen und Richtlinien.
-den Stand der Technik zum Zeitpunkt der Installation.
- die in dieser Gebrauchsanleitung aufgeführten Anweisungen, wobei diese Gebrauchsanleitung nur allgemein gültige
Bestimmungen enthält, die für jede Anlage spezifisch angewendet werden müssen.
-die allgemein anerkannten Regeln fachmännischer Arbeit.
7. NIKO UNTERSTÜTZUNG
Bei Zweifel oder falls Sie bei einem eventuellen Defekt des Produkts noch Fragen bezüglich des Umtausches
haben, dann nehmen Sie bitte Kontakt auf mit dem Kundendienst von Niko (Belgien: +32 3 778 90 80) oder
wenden Sie sich an Ihren Großhändler. Kontaktdaten und weitere Informationen erhalten Sie im Internet unter
www.niko.eu in der Rubrik “Unterstützung und Beratung”.
-Der Garantiezeitraum beträgt vier Jahre ab Lieferdatum. Als Lieferdatum gilt das Rechnungsdatum zum Zeitpunkt
des Kaufs durch den Endverbraucher. Falls keine Rechnung mehr vorhanden ist, gilt das Produktionsdatum.
-Der Endverbraucher ist verpflichtet, Niko schriftlich über einen Produktmangel innerhalb von zwei Monaten nach
dessen Feststellung zu informieren.
-Im Falle eines Mangels hat der Endverbraucher nur Recht auf kostenlose Reparatur oder Ersatz des Produkts. Eine
Entscheidung darüber obliegt allein Niko.
- Niko ist nicht für Mängel oder Schäden verantwortlich, die durch fehlerhafte Installation, nicht bestimmungsgemäßen
oder unsachgemäßen Gebrauch, durch falsche Bedienung,Anpassen/Ändern des Produktes, infolge von unsachgemäßer
Wartung entgegen den Wartungsvorschriften oder die sich aus äußeren Umständen, wie beispielsweise infolge
Feuchtigkeit oder Überspannung, ergeben.
-Zwingende Vorschriften der nationalen Gesetzgebung bezüglich des Verkaufs von Konsumgütern und zum
Verbraucherschutz haben vor den obigen Bestimmungen Vorrang in den Ländern, in denen Niko direkt oder über
seine Neben- oder Tochtergesellschaften, Filialen, Vertriebsstellen, Agenten oder über feste Vertreter verkauft.
nv Niko sa
The LEDs do not light up.
The LED dimmer does not react
or reacts incorrectly when you
press the push button.
Cause
Solution
No power supply voltage.
Check the voltage.
Incorrect polarity of the power supply.
Reverse the polarity.
Too many LED strips connected.
Use a heavier power supply or reduce
the number of LED strips connected.
Faulty connection.
Check the connection.
Short-circuit in the push-button circuit.
Check the push-button circuit.
Connection between the LED dimmer
and the push button too long.
Shorten the distance (maximum
20 m).
5. TECHNICAL DATA
6. WARNHINWEISE FÜR DIE INSTALLATION
8. GARANTIEBEDINGUNGEN
340-00048
Primary connection:
screw terminal – 2 x 1.5 mm² or 1 x 2.5 mm²
Input voltage:
8 – 24 Vdc (depending on the selected LED solution)
Secondary connection:
screw terminal – 2 x 1.5 mm² or 1 x 2.5 mm²
Output voltage:
8 – 24 Vdc (depending on the input voltage)
Maximum output current:
4.2 A
Maximum output power:
100 W (at 24 Vdc)
Efficiency:98%
Control:
screw terminal – 2 x 1.5 mm² or 1 x 2.5 mm²
NO push button
Protection class:
class III devices ( III ); safety extra-low voltage (SELV)
Protection degree:
IP20
Protection:
protected against short-circuit ( ), overload and overheating (
Dimensions:
100 x 48 x 28 mm (HxWxD)
Weight:
132 g
Operating temperature:
-10 – 40°C
Maximum ambient temperature (Ta): 40°C
Maximum housing temperature (Tc): 55°C
)
6. WARNINGS REGARDING INSTALLATION
-The installation should be carried out by a registered installer and in compliance with the statutory regulations.
-This user manual should be presented to the user. It should be included in the electrical installation file, and it should
be passed on to any new owners. Additional copies are available on the Niko website or via the Niko support service.
-During installation, the following should be taken into account (non-exhaustive list):
-the statutory laws, standards and regulations.
-the technology currently available at the time of installation.
-this user manual, which only states general regulations and should therefore be read within the scope of each
specific installation.
-the rules of proper workmanship.
7. NIKO SUPPORT
In case of doubt or for the specific exchange procedure in case of a possible defect, contact the Niko support
service in Belgium at +32 3 778 90 80 or your wholesaler/installer. Contact details and more information can
be found at www.niko.eu under the “Help and advice” section.
8. GUARANTEE PROVISIONS
- The period of guarantee is four years from the date of delivery. The delivery date is the invoice date of purchase of
the product by the consumer. If there is no invoice, the date of production applies.
- The consumer is obliged to inform Niko in writing about the non-conformity, within two months after stating the defect.
-In case of a non-conformity, the consumer only has the right to a product repair or replacement free of charge, which
shall be decided by Niko.
-Niko shall not be held liable for a defect or damage resulting from incorrect installation, improper or careless use,
incorrect operation, transformation of the product, maintenance that does not adhere to the maintenance instructions
or an external cause, such as damage due to moisture or overvoltage.
-The compulsory regulations of the national legislation concerning the sale of consumer goods and the protection of
the consumer in the countries where Niko sells, directly or via sister companies, subsidiaries, chain stores, distributors,
agents or permanent sales representatives, take priority over the above-mentioned rules and regulations.
Industriepark West 40, BE-9100 Sint-Niklaas, Belgium — tel. +32 3 778 90 00 — fax +32 3 777 71 20 — e-mail: [email protected] — www.niko.be
PM340-00048R12131