1
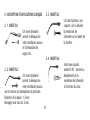
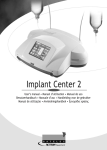
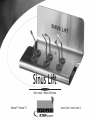
Sinus Lift
User's manual • Notice d'utilisation
PIEZOTOME™ - PIEZOTOME™ 2
IMPLANT CENTER - IMPLANT CENTER 2
2
3
CONTENTS
ENGLISH
I
IMPORTANT : Surgical tips designed for PIEZOTOME and
IMPLANT CENTER cannot be used with PIEZOTOME 2 and IMPLANT
CENTER 2 and vice versa.
Introduction
II Description and clinical applications
7-8
III Method of operation
8-9
V Sterilization
VI Replacing tips
Subsidiaries
4
6
9
10
52-53
I - INTRODUCTION
These tips guarantee a fine, clean and effortless
cut.
The SINUS LIFT Kit offers the practitioner a
straightforward and safe answer to the sinus lift
operation. Thanks to the ultrasonic frequency
modulation, there is no risk of damage to the
membrane.
The diamond-coated Sinus Lift tips for window
cutting and the three spatula tips for membrane
detachment are cooled by the sterile spray (thus
avoiding tissue damage from exposure to high
temperatures). The use of a manual instrument is
recommended to control detachment of the
membrane. Moreover, the cavitation effect
provides excellent visibility of the operating
field.
The PIEZOTOME tips and PIEZOTOME handpiece
are designed for use with the PIEZOTOME
generator or IMPLANT CENTER
combined
generator and bone surgery micro-motor,
manufactured by Satelec.
The PIEZOTOME 2 tips and PIEZOTOME 2 handpiece
are designed for use with the PIEZOTOME 2
generator or IMPLANT CENTER 2 combined
generator and bone surgery micro-motor,
manufactured by Satelec.
5
2. 3 SL3 TIP
II - DESCRIPTION AND CLINICAL APPLICATIONS
This flat-ended non
cutting tip is used for
detaching the Schneider
membrane from the
window edge.
2. 1 SL1 TIP
Diamond-coated tip for
cutting the buccal bone
flap and smoothing sharp
angles.
2. 4 SL4 TIP
2. 2 SL2 TIP
Non cutting, right-angled
tip, used for detaching
the Schneider membrane
inside the sinus.
Diamond-coated tip for
cutting the buccal bone
flap (very thin bone) and
precise osteoplasty.
Ball diameter: 1.5mm
Laser marking every 2 mm.
6
2. 5 SL5 TIP
3. 2 SETTING THE MODE
Non cutting tip angled at
±135°, used for detaching
the Schneider membrane
inside the sinus and for
removing anatomical
structures.
a) PIEZOTOME - IMPLANT CENTER
1 being the most powerful mode
Tips
III - METHOD OF OPERATION
Recommended
mode
Irrigation (ml/min)
SL1
40-50
SL2
40-50
SL3
35-40
SL4
35-40
SL5
35-40
3. 1 FITTING THE TIPS
Modes are set by the footswitch or on the front
- Screw the selected tip to the PIEZOTOME panel of the device.
handpiece with the dynamometric wrench*;
- Check that the spray is working properly.
*non delivered with the kit
7
IV - STERILIZATION
b) PIEZOTOME 2 - IMPLANT CENTER 2
D1 being the most powerful mode
Tips
Recommended
Fine
mode
adjustment
a) Lifetime
Tip shape and weight are the determining
characteristics for obtaining maximal efficiency
of the ultrasonic generator.
Careful monitoring of these two
characteristics by the user will ensure that
optimal performance of the device is maintained.
Consequently, you are strongly advised not to
alter the structure of the tips by filing or twisting
them or modifying them in any other way.
Similarly, through normal wear, tip aging
leads to alteration of its characteristics.
Always replace a tip that has been damaged by
wear or by accidental impact (dropped, bent,
etc.).
Irrigation
(ml/min)
SL1
60
SL2
60
SL3
50
SL4
30
SL5
30
Modes are set by the footswitch or on the front
panel of the device.
8
Replace routinely-used tips at least once a c) Mechanical / chemical cleaning
To be carried out immediately after preyear.
disinfection/chemical cleaning, wearing thick
gloves.
b) Pre-disinfection / chemical cleaning
To be carried out immediately after treatment, Scrub the products in a new bath of enzymatic,
quaternary ammonium base detergent /
wearing thick gloves.
Immerse in an ultrasonic bath (enzymatic, disinfectant solution, for at least 30 seconds, and
quaternary ammonium base detergent / in any case until all remaining traces of
disinfectant solution), carefully respecting the contamination have been removed.
concentration and contact time recommended by Rinse again under running water for at least 30
seconds.
the manufacturer of the solution.
Use a solution that bears the EC marking or that
is in compliance with any standard required by d) Drying
Dry with a clean, non-woven single-use cloth, so
the national regulations.
Rinse under running water for at least 30 as to remove any traces of liquid.
Pack in single-use sterilization pouches or bags in
seconds.
compliance with the specifications defined in
9
standard EN ISO 11607-1 or in any equivalent Before re-use, if the integrity of the packaging is
not certain, repackage then re-sterilize in
standard required by the national regulations.
accordance with the defined protocol.
If contamination is visible inside the bag, destroy
e) Sterilization
The tips must be sterilized individually in an the product.
autoclave, according to the following
g) Disposal of the product
parameters:
- autoclave: type B, compliant with standard Dispose of the product in receptacles for waste
materials of healthcare activities involving
EN 13060;
infectious risks.
- sterilization temperature: 134°C;
- sterilization stabilization time: 18 minutes;
CAUTION: Not all autoclaves can reach 134°C.
- pressure: 2 Bars min.
Not all autoclaves draw a pre-vacuum. Please
refer to your autoclave manufacturer for
f) Storage
Then, store the sterilized products in a dry place specific sterilization instructions.
protected from dust.
10
V - REPLACING TIPS
SL1 and SL2 tips
These tips must be replaced when the diamondcoated cutting part becomes smooth and shiny or
at least once a year.
SL3, SL4 and SL5 tips
These tips must be replaced when the cutting
part becomes blunt or at least once a year.
11
SOMMAIRE
FRANÇAIS
I
Introduction
14
II Description et applications cliniques 15-16
ATTENTION : Les inserts adaptés au PIEZOTOME 2 et à
IMPLANT CENTER 2 ne sont pas compatibles avec le PIEZOTOME
et l’IMPLANT CENTER, et vice versa.
III Mode opératoire
IV Stérilisation
17
V Remplacement des inserts
18
Adresse filiales
12
16-17
52-53
I - INTRODUCTION
Ces inserts sont un gage de réussite pour la
réalisation de coupes fines, précises et sans
Le KIT SINUS LIFT* confère aisance et sécurité aux effort.
praticiens lors d'une élévation du sinus. Grâce à
Les inserts PIEZOTOME associés à la pièce à
la modulation des fréquences ultrasonores, tout
risque de dégradation de la membrane est évité. main PIEZOTOME peuvent être utilisés avec le
L'insert diamanté de découpe du volet osseux PIEZOTOME ou l'IMPLANT CENTER : générateurs et
vestibulaire et les trois spatules destinées à moteur de chirurgie osseuse fabriqués par
l'élévation de la membrane sont refroidis par un Satelec.
spray stérile qui évite toute élévation thermique Les inserts PIEZOTOME 2 associés à la pièce à
susceptible d'entraîner une dégradation des main PIEZOTOME 2 peuvent être utilisés avec le
tissus. Il est conseillé de contrôler le PIEZOTOME 2 ou l'IMPLANT CENTER 2 : générateurs
décollement de la membrane à l'aide d'un et moteur de chirurgie osseuse fabriqués par
instrument manuel. Le phénomène de cavitation Satelec.
permet également de bénéficier d'une visibilité
optimale du champ opératoire.
* Elévation de sinus
13
II - DESCRIPTION ET APPLICATIONS CLINIQUES
2. 3 INSERT SL3
Cet insert plateau, non
coupant, sert à décoller
la membrane de
Schneider sur les bords de
la fenêtre.
2. 1 INSERT SL1
Cet insert diamanté
permet la découpe du
volet vestibulaire osseux
et l'atténuation des
angles vifs.
2. 4 INSERT SL4
Insert non coupant,
orienté à 90°, servant au
décollement de la
membrane de Schneider,
à l'intérieur du sinus.
2. 2 INSERT SL2
Cet insert diamanté
permet la découpe du
volet vestibulaire osseux
(os très mince) et l'ostéoplastie de précision.
Diamètre de la boule : 1,5 mm
Marquage laser tous les 2 mm.
14
2. 5 INSERT SL5
3. 2 SÉLECTION DU MODE
Insert non coupant,
orienté à ±135°, servant
a) PIEZOTOME - IMPLANT CENTER
au décollement de la
1 étant le mode le plus puissant
membrane de Schneider,
Inserts
Mode préconisé Irrigation (ml/min)
à l'intérieur du sinus et au
SL1
40-50
dégagement de structures
SL2
40-50
anatomiques.
III - MODE OPERATOIRE
SL3
35-40
SL4
35-40
SL5
35-40
3. 1 FIXATION DES INSERTS
Réglage des modes à la pédale ou en face avant
- Visser l'insert choisi sur la pièce à main de l'appareil.
PIEZOTOME, à l'aide de la clé dynamométrique*
- Vérifier la présence du spray
*non livrée avec le kit
15
IV - STERILISATION
b) PIEZOTOME 2 - IMPLANT CENTER 2
D1 étant le mode le plus puissant
Inserts
Mode
préconisé
Réglage fin
Irrigation
(ml/min)
SL1
60
SL2
60
SL3
50
SL4
30
SL5
30
Réglage des modes à la pédale ou en face avant
de l'appareil.
a) Durée de vie
La forme et la masse des inserts sont les
caractéristiques déterminantes pour obtenir le
rendement maximal du générateur à ultrasons.
La vigilance de l'utilisateur sur ces deux
caractéristiques permettra de conserver les
meilleures performances de l'appareil.
En conséquence, il est vivement déconseillé de
modifier la structure des inserts en les limant, en
les tordant ou en réalisant d'autres types de
modifications.
De même, le vieillissement d'un insert
entraîne une modification de ses caractéristiques
par phénomène d'usure normale.
16
Procéder systématiquement au remplacement
d'un insert qui a subi une détérioration par
l'usure ou par un choc accidentel (chute,
déformation…).
Renouveler au minimum une fois par an les
inserts couramment utilisés.
par une réglementation nationale.
Rincer à l'eau courante pendant 30 secondes
minimum.
c) Nettoyage mécanique / chimique
Cette opération doit être réalisée avec des gants
épais, immédiatement après la prédésinfection /
nettoyage chimique.
b) Prédésinfection / Nettoyage chimique
Cette opération doit être effectuée avec des gants Brosser les produits dans un bain neuf contenant
épais, immédiatement après la réalisation de l'acte. la même solution détergente / désinfectante
Immerger dans une cuve à ultrasons (solution enzymatique à base d'ammonium quaternaire, à
détergente / désinfectante enzymatique à base l'aide d'une brosse à poils métalliques pendant 30
d'ammonium quaternaire) en respectant la secondes minimum, dans tous les cas jusqu' à
concentration et le temps de contact prescrits disparition des éventuelles traces de
contamination encore présentes.
par le fabricant de la solution.
Utiliser une solution ayant le marquage CE ou Rincer à nouveau à l'eau courante pendant 30
conforme à toute norme éventuellement requise secondes minimum.
17
d) Séchage
Sécher à l'aide d'un support non tissé propre, à
usage unique, de manière à ne plus avoir de
traces liquides.
Conditionner dans des sachets ou gaines de
stérilisation à usage unique, conformes aux
spécifications définies dans la norme EN ISO
11607-1 ou dans toute norme équivalente
éventuellement requise par une réglementation
nationale.
- Autoclave : Type B conforme à la norme EN
13060.
- Température de stérilisation : 134°C.
- Durée du plateau de stérilisation : 18 minutes.
- Pression : 2 Bars minimum.
f) Stockage
Stocker ensuite les produits stérilisés dans un
endroit sec, à l'abri de la poussière.
Avant réutilisation, en cas de non conformité de
l'intégrité de l'emballage, reconditionner et
restériliser selon le protocole défini.
e) Stérilisation
Les
inserts
doivent
être
stérilisés En cas de contaminations visibles dans le sachet,
individuellement en autoclave selon les détruire le produit.
paramètres suivants :
18
g) Elimination du produit
V - REMPLACEMENT DES INSERTS
Eliminer le produit dans des réceptacles pour
déchets d'activités de soins à risques infectieux. Inserts SL1 et SL2
Ces inserts doivent être changés lorsque la partie
ATTENTION : Tous les autoclaves ne peuvent diamantée active devient lisse et brillante ou, au
pas atteindre 134°C et n'effectuent pas une minimum, une fois par an.
pré-dépressurisation. Pour connaître les
consignes de stérilisation applicables, Inserts SL3, SL4 et SL5
consulter le fabricant de l'autoclave.
Ces inserts doivent être changés lorsque leur
partie active est émoussée ou, au minimum, une
fois par an.
19
FRANCE
SATELEC ACTEON GROUP
17 av. Gustave Eiffel - B.P. 30216 – 33708 MERIGNAC cedex - France
Tel. +33 (0) 556 34 06 07
Fax. +33 (0) 556 34 92 92
e-mail : [email protected]
U.S.A.
ACTEON NORTH AMERICA
124 Gaither Drive, Suite 140
Mt Laurel, NJ 08054 - USA
Tel. +1 856 222 9988
Fax. +1 856 222 4726
e-mail : [email protected]
GERMANY
ACTEON GERMANY
Industriestrasse 9 – 40822 METTMANN - GERMANY
Tel. +49 21 04 95 65 10
Fax. +49 21 04 95 65 11
e-mail : [email protected]
SPAIN
ACTEON IBERICA
Avda Principal n°11 H - Poligono Industrial Can Clapers
08181 SENTMENAT (BARCELONA) - SPAIN
Tel. +34 93 715 45 20
Fax. +34 93 715 32 29
e-mail : [email protected]
U.K.
SATELEC (UK) LIMITED
Unit 1B - Steel Close – Eaton Socon, St Neots
CAMBS PE19 8TT - UK
Tel. +44 1480 477 307
Fax. +44 1480 477 381
e-mail : [email protected]
MIDDLE EAST
ACTEON MIDDLE EAST
Numan Center - 1st Floor N°111 - Gardens Street
PO Box 468 - AMMAN 11953 - JORDAN
Tel. +962 6 553 4401
Fax. +962 6 553 7833
e-mail : [email protected]
20
CHINA
ACTEON CHINA
Office 401 - 12 Xinyuanxili Zhong Street - Chaoyang District - BEIJING
100027 - CHINA
Tel. +86 10 646 570 11/2/3
Fax. +86 10 646 580 15
e-mail : [email protected]
PHILIPPINES
ACTEON PHILIPPINES
4th Floor Alco Building – No. 391 Sen. Gil Puyat Avenue
Makati City 1200 - PHILIPPINES
Tel. +632 899 78 66 or 67
Fax. +632 899 78 43
e-mail : [email protected]
THAILAND
ACTEON (THAILAND) LTD
23/45 Sorachai Building 16th floor - Sukumvit 63 Road, Klongton Nua
- Wattana, BANGKOK 10110 - THAILAND
Tel. +66 2 714 3295
Fax. +66 2 714 3296
e-mail : [email protected]
KOREA
ACTEON KOREA
8F Hanil B/D - 132-4 1Ga Bongrae-dong - JOONG-GU – SEOUL - KOREA
Tel. +82 2 753 41 91
Fax. +82 2 753 41 93
e-mail : [email protected]
INDIA
ACTEON INDIA
E-145, G.I.D.C. Electronic Estate - Sector 26 – GANDHINAGAR 382028
(Gujarat) - INDIA
Tel. +91-79-2328 7473
Fax. +91-79-2328 7480
e-mail : [email protected]
COSTA RICA
ACTEON LATIN AMERICA
Apdo. Postal 978/2070 - Sabanilla - COSTA RICA
Tel./Fax.: +506 2273 4033
Celular: +506 8981 5815
e-mail : [email protected]
21
RUSSIA
ACTEON RUSSIA
Valdajski Proezd 16 – Building 1 - office 253 - 125445 Moscow RUSSIA
Tel./Fax. +7 495 451 80 50
e-mail : [email protected]
AUSTRALIA/NEW ZEALAND
ACTEON AUTRALIA/NEW ZEALAND
L3, Suite 23, 6-8 Crewe Place, 2018 Rosebery, NSW Australia
Tel. +612 966 24400
Fax. +612 966 24600
e-mail : [email protected]
22
23
I 57390 - T2 - V1
(Q)
A Company of ACTEON Group
17 av. Gustave Eiffel • B.P. 30216
33708 MERIGNAC cedex • FRANCE
Tel. + 33 (0) 556 34 06 07
Fax. + 33 (0) 556 34 92 92
E.mail : [email protected]
www.acteongroup.com
www.piezotome.com