1
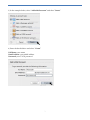
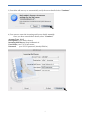
User Manual
uMail on a Mac
Version: 1.1
uMail
Date: 29-6-2016
This user manual shows you how to configure your mail application on your MacBook to make it
possible to use uMail. This manual was written on the basis of a Mac OS 10.8. If you have a lower
version of OS, you may have to access some of the options in a different way.
uMail configuration
1) Go to “System Preferences” and select “Mail, Contacts & Calendars”
2) Select “Add Other Account…”
2
3) In the example below, select “Add a Mail account” and then “Create”
4) Enter the details below and select “Create”
Full Name: your name
Email Address: your uMail address
Password: your ULCN password
3
5) Your Mac will now try to automatically verify the server details. Select “Continue”
6) You can now enter the incoming mail server details manually.
Once you have entered these details, select “Continue”
Account Type: IMAP
Description: (to be freely chosen)
Incoming Mail Server: imap.leidenuniv.nl
User Name: your ULCN user name
Password:
your ULCN password (already filled in)
4
7) You can now enter the details of the outgoing mail server manually.
Once you have entered these details, select “Continue”
Description: (to be freely chosen)
Outgoing Mail Server: smtp.leidenuniv.nl
Note: This outgoing mail server is only accessible if you are logged in to the wireless network of the
University (Eduroam or Leiden University).
Switch off the “Use only this server” option if you want to send email from another location, such as
home. In this case, you have to set the smtp server (outgoing mail) of your own internet provider.
These details can be obtained from your own provider.
Use Authentication (check)
User Name: your ULCN user name
Password:
your ULCN password
5
8) The last step shows you an overview of the uMail profile. Select “Create”.
You can now use uMail via your own application.
6