1
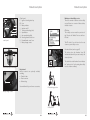
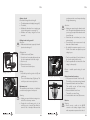
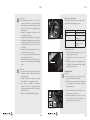
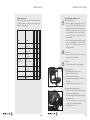
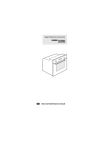
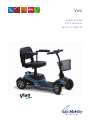
Vivo HANDLEIDING USER MANUAL MODE D’EMPLOI Preface Dear user, By choosing a Vivo mobility scooter you have chosen unequalled safety, quality and driving pleasure! We hope you will drive many comfortable and safe miles and trust that you will enjoy the freedom offered by the Vivo. In this user manual you will find everything you need to know about the Vivo, from safety instructions and operating functions to maintenance tips. Carefully read the user manual, so you can get the most out of your mobility scooter. We would like to keep you informed about updates, user experiences and other useful information. You can regularly read about the latest developments on the www.life-mobility.com website. Kind regards, Management and staff of Life & Mobility GB3 Contents Safety instructions 5 As the user of the mobility scooter, you are always responsible for complying with the locally applicable safety instructions and guidelines. It is important to first acquire driving experience under the supervision of an experienced instructor. Your dealer can advise you on this. Introduction11 Technical specifications 12 Product description 13 Settings and adjustments Life & Mobility accepts no liability for any loss or injury caused by negligence or by failure to comply with the safety instructions. 16 Use18 Attention: If you see this symbol in the manual, it indicates a supplementary instruction. Always follow this instruction. Negligence may adversely affect the operation of the mobility scooter and may cause physical injury or damage to the mobility scooter, the immediate vicinity or the environment. Maintenance22 Transport and storage 25 Warranty27 Disposal of product and packaging Safety instructions 28 General Warning: Never change the construction of the mobility scooter. Only use the mobility scooter for its intended purpose. Keep the mobility scooter away from open fire. Never allow children to play unsupervised near the mobility scooter. Be careful: Use the basket only to transport objects. Do not use your mobility scooter to pull vehicles, carts, etc. Remember that there are protruding parts, both fixed and loose, in and on the mobility scooter. These can cause damage to the surroundings and the mobility scooter. GB4 GB5 Safety instructions Attention: This mobility scooter is suitable for transporting a single person. Do not carry passengers. Only use original Life & Mobility parts and accessories. Never cover or remove the safety instructions and stickers. Always switch off the mobility scooter and take out the ignition key before leaving it. This prevents unwanted use and/or theft. Use in rain, mist, black ice, snow and on salted roads may have an adverse effect on the electrical system. This mobility scooter does not have lights; therefore, do not ride it in the dark. This mobility scooter does not have indicators, use hand-signals when changing direction. Safety instructions Please follow the relevant traffic rules that apply. Make sure that you can always be seen by other road users. As a user of a mobility scooter you are very vulnerable on the road. Avoid quiet routes. Make sure that help can be arranged in the event of an emergency. Switch off the mobility scooter if you are using your mobile telephone. Your mobility scooter may activate security gates in shops. Assembling and adjustment (see also the chapter ‘Settings and adjustments’) Warning: Before using the mobility scooter, check that all components of the mobility scooter are properly mounted and secured. Attention: Never remove the anti-tipping wheels. Personal requirements Warning: If you are under the influence of substances that may affect your ability to drive, you may not drive the mobility scooter. There are certain (medical) situations where it is desirable to first undergo drivercompetence training supervised by a suitably equipped dealer. Sitting in the mobility scooter Warning: Make sure that your fingers and limbs do not get trapped. Always be very careful: - When folding away armrests. - If you are not in full control of your arms or legs. Attention: Please contact your doctor if you are taking prescription medicines or if you have physical limitations. Some medicines or limitations may affect your driving ability. Your vision must be adequate to drive the mobility scooter safely in any situation that may occur during use. Driving the mobility scooter (see also the chapter ‘Use’) Warning: Never drive on public roads. Make sure that no loose clothing can get caught. These may become trapped in the wheels. Do not transport anything on the handlebars. GB6 GB7 Safety instructions 10° Maximum gradient Approaching a curb Safety instructions Do not let anyone stand on the rear of your mobility scooter. Transport the mobility scooter without passenger (see the ‘Transport and storage’ chapter) Attention: Before driving-off check that the mobility scooter is in the driving status and not in freewheel. Always remove the key before getting on or off. Never remove the key when the mobility scooter is still moving. You would stop very abruptly in that case. Extremely dangerous: When transporting the mobility scooter in a motor vehicle, always make sure you are seated in a fixed seat of the motor vehicle. Never use your mobility scooter as a seat in a motor vehicle. Never remain seated in the mobility scooter while it is suspended in a hoist or lifting system. The mobility scooter was not designed for this. Slopes and other obstacles Warning: Avoid slopes with a gradient greater than 10° (17.5%). Driving on slopes (forwards or in reverse) is always dangerous. Be careful you do not overturn when driving on a slope. Never freewheel down a slope. Always drive straight up/down a slope, never angle across it. Drive carefully along (pavement) edges. An uneven surface increases the risk of overturning. Warning: Make sure that your fingers do not get trapped when folding down the mobility scooter. Never carry the mobility scooter by the plastic parts of the housing. Attention: Make sure that the mobility scooter is fully assembled before use. Miscellaneous Warning: Do not put the mobility scooter in direct sunlight: the upholstery can become too hot, and cause burns or irritation to the skin. Attention: Your centre of gravity moves when you drive up or down a slope. Please beware. Turn around carefully on a steep slope as there is a greater risk of overturning. Always approach a curb from directly in front. Never reverse over a curb or obstacle. The maximum curb height you can drive over is 5 cm. Soft, slippery or uneven surfaces increase the risk of a dangerous situation. Be careful: Never attempt to resolve a fault yourself. Contact your dealer instead. Do not allow the mobility scooter to come into contact with seawater: seawater is corrosive and will damage the mobility scooter. GB8 GB9 Safety instructions Do not allow the mobility scooter to come into contact with sand: sand may penetrate to the moving parts of the mobility scooter, causing faster wear and tear. Introduction The Vivo is an electrically powered mobility scooter, suitable for both young and older people who have difficulty walking long distances. This manual only describes the default settings of your mobility scooter. You will find more information on our website: www.life-mobility.com Attention: A number of technical precautions have been implemented to further guarantee your safety: The immobiliser is activated whenever a battery charger is connected. In the event of an electronic fault, the mobility scooter will make a controlled stop. To avoid the risk of body parts becoming trapped, the necessary components have been guarded where possible. EMC-approved The mobility scooter is approved for EMC (Electro-Magnetic Compatibility). Tests have shown that mobility scooters are not sensitive or damaging to mobile communication equipment and electronically controlled equipment. Despite this, please be careful when using the mobility scooter and mobile or electronic equipment at the same time. GB10 GB11 Technical specifications * Depending on the set speed, outside temperature, weight of the user, etc. Product description Checking the delivery Before using the mobility scooter, check if the delivery matches the product description below. If you find any transport damage upon delivery, please inform your dealer. Life & Mobility trusts that the mobility scooter meets your expectations and hopes it brings you much convenience. Intended use: outdoors, between 25° C and + 50° C L x w x h: 107 x 58 x 91.5 cm Weight (incl. batteries): 58 kg Weight of battery box: 14 kg (5 kg per battery) Seat depth: 41 cm Seat width: 41 cm Seat height above footrest (adjustable): 40/42,5/ 45 cm Height between footrest and ground: 9 cm Max. driving distance with fullycharged batteries: 20 km* (12 miles approximately*) Max. (programmable) speed: 6 km/h* (4 mph*) Turning circle (radius): 135 cm Max. user weight: 120 kg (19 st) Battery capacity: 24 V (2x12V) / 22 Ah Max. load: 2A / 120/240 V / 50/60Hz Wheel size: 24 x 7.5 cm (9.4” x 3) Complies with: EN 12184 Class A Product description A O B Service and technical support Contact your dealer if you have any questions about specific settings, maintenance or repairs. Always have the serial number ready. You can find it on the CE sticker on the seat column on the mobility scooter (see p. 15 also). GB12 C D E F N M G H L Mobility scooter product description I A. B. J Folding backrest Folding armrests C. Seat lever D. Handle E. Reflector F. Antitipping wheels G. Freewheel lever H. Sprung rear wheels I. CE sticker K J. K. L. M. Battery box Footrest Front wheel Steering angle quick release N. Basket O. Handlebars with control panel GB13 Product description P Q S R T U V Product description control panel Product description Markings on the mobility scooter There are a number of stickers on the mobility scooter. Below is an overview of these stickers, with their location. Control panel P. Ignition lock with ignition key Q.Horn R. Battery indicator S. Indicator on/off T. Tortoise speed setting (slow) U. Speed button V. Hare speed setting (fast) W. Reversing thumb control lever X. Forward thumb control lever Y. Battery charger contact CE-sticker The mobility scooter meets the provisions of the Directive for Medical Devices and has a CE label. The CE sticker (l) can be found on the seat column on your mobility scooter. CE-sticker W Freewheel sticker (see also page 21) The sticker above the freewheel lever (G) indicates that the mobility scooter is ready to be electrically driven. X G Product description handlebars Y Freewheel lever Not pictured Various accessories are optionally available, including: Crutch holders Rear-view mirror Backrest bag See www.life-mobility.com for more accessories. The sticker below the freewheel lever indicates the “push position”. In this setting the mobility scooter can be moved freely. Electric driving position Battery charger contact Push position GB14 GB15 Settings and adjustments a Changing the seat width Adjust seat width 1. Loosen the socket screws (a) on the bottom rear of the seat. 2. Set the width to suit your personal requirements. 3. Retighten the socket screws. The arm rests are now locked in the current position. Armrests M Change handlebar angle Dismantling The mobility scooter can easily be dismantled for transport or storage (see the ‘Transport and Storage’ chapter also). Disassembled mobility scooter Armrests Fold the armrests (B) up to make gettingout easier. B Settings and adjustments D 1. Pull the unlocking lever (b) on the rear of mobility scooter vertically upwards. 2. At the same time press the handle (D) toward the ground. 3. Now, lift the front section away from the rear section (Z). b Adjusting the steering angle Attention: Do not adjust the angle of the steering column while driving. Unlocking Adjust the steering column so that you can easily reach the controls and the display. The steering column can be adjusted by a toothedwheel. 1. Loosen the quickrelease lever (M) at the bottom of the steering column 2. Lift the steering column slightly out of the toothedwheel and adjust the steering column to the required angle. Ensure that the teeth on the wheel engage. 3. Retighten the quickrelease lever. The steering column is now locked in place. Adjusting the seat height (3 positions) 1. Remove the seat. 2. Remove the battery box. 3. Loosen the bolt and adjust the seat column to the required seating height. 4. Replace the battery box. 5. Replace the seat. Z Determining the position Warning: Be very careful when dismantling the mobility scooter. Ensure that your hands and fingers do not get trapped in the hinge system. Assembling 1. Tilt the rear section (Z) of the mobility scooter at an angle of 45 degrees onto the antitipping wheels. Attention: Determine the hookin position accurately to prevent damage to the body shell. 2. Lift the front section of the mobility scooter and carefully hook it onto the frame tube of the lower rear section. 3. Allow the front section to lower gently, until both sections click together. Assembling GB16 GB17 Use Use Advance checks Check the following before driving off: The battery status on the display (see page 21), The brakes, Whether the freewheel lever is pointing up (electric driving position, see page 21), Whether the battery charger has been removed. you always use the correct low speed setting for tight manoeuvring. Attention: Adjust your speed using the thumb control lever. The speed setting determines how fast you can go if you squeeze the thumb control lever all the way. Check that the road behind you is clear when reversing. The mobility scooter reverses more slowly than when it drives forward. By default the maximum speed is set to 6 km/h. Your dealer can adjust the speed setting for you. Getting in and out by yourself Attention: Make sure that the seat is properly locked in place before driving off. Getting in/out 1. Push the seat lever (C) down. 2. Keep the seat lever pushed down and turn the seat a quarter turn to the left or right. 3. Get in or out. 4. Release the seat lever. The seat is now locked in place. C P S Starting U Starting 1. Insert the key into the ignition lock (P) and push home. The on/off indicator lamp (S) lights up. The mobility scooter is now ready to drive. Getting in and out 1. Turn the speed button (U) anticlockwise to the ‘tortoise setting’ to drive slowly. 2. Turn the speed button clockwise to the ‘hare setting’ to drive quickly. Maximum speed The maximum speed exfactory is 6 km/h but your dealer can program a lower speed. Choose a suitable speed setting for each situation. Adjusting the speed setting W Warning: Adjust your speed before steering into a bend. The scooter may overturn. Despite the small turning circle of the mobility scooter, it may still be difficult to turn into lifts or doorways. Make sure that X Product description handlebars GB18 Driving forward and reversing 1. Slowly squeeze the thumb control lever (X). The mobility scooter starts moving forwards. 2. Squeeze the thumb control lever further. The mobility scooter will start moving forward more quickly. 3. Release the thumb control lever. The mobility scooter will stop. 4. Use the thumb control lever (W) to reverse. Batteries Warning: Never connect a cable to the AC/DC converter or the battery charger. Contact with components may cause electric shock. GB19 Use Be careful: New batteries must be run in. The full capacity of batteries is only reached after they have been used and charged a couple of times. Take this into account during your first few trips. Charge the batteries every day, this will extend their service life. Always charge the batteries to full capacity. Avoid draining the batteries completely. The mobility scooter will lose power which will have a negative effect on the service life of the battery. Charge fully drained batteries as soon as possible using a 24-hour cycle. Do not keep your batteries fully drained for a prolonged period of time. Never put metal parts on the batteries: this may short-circuit the batteries and damage them. Attention: At lower temperatures the capacity of the batteries is reduced. This also reduces the operating range. Always connect the charger when putting the mobility scooter away for the night. You cannot overcharge the batteries supplied. Thanks to a voltage limiter, the charger automatically switches off when the batteries are full. Only use Life & Mobility battery chargers. Use Reading the battery status The battery indicator (R) on the control panels shows the remaining battery capacity: Battery status Green Amber R Battery indicator Red Indicator The batteries are full. You should start charging now. Recharge the mobility scooter as soon as possible. Charging the batteries 1. Insert the battery charger plug into the battery charger contact (Y). 2. Insert the plug of the mains cord in a wall socket. 3. Always fully complete the charging cycle of 8 - 10 hours. The batteries are fully charged when the green lamp is lit Y Battery charger contact G Freewheel lever Warning: Never use this function on a slope or while driving. It will disable the brakes. Always push the freewheel lever upwards to re-engage the brakes after using the freewheel function. 1. Push the freewheel lever (G) down to move the mobility scooter by hand. 2. Push the freewheel lever back up for the electric drive position. Teach yourself to do this each time you have used it. Freewheel lever GB20 GB21 Maintenance Cleaning Be careful: Do not use bleach or solvents. Do not use a high-pressure cleaner to clean the mobility scooter. Maintenance Be careful: Batteries can be dangerous. Only allow your batteries to be installed and maintained by a qualified scooter mechanic. They have the required qualifications and tools to perform the installation and maintenance safely and correctly. The scooter uses two batteries with a 24-volt series connection. Never use both batteries at the same time: - Batteries from different manufacturers - Batteries with different technologies - Batteries with different date codes Attention: Regularly clean the upholstery and the frame. Upholstery 1. Remove any light dirt with a solution of a mild cleaning agent and warm water. 2. Carefully scrub the upholstery with a soft brush if the dirt has been absorbed into the upholstery. Frame 1.Clean the housing with a non-abrasive cleaning product. 2. Apply non-abrasive car wax to the entire frame. Batteries (see also the chapter ‘Use’) Attention: Always fully charge batteries before using them for the first time. Charge the batteries continuously for 24 hours at least once a month. The battery connection method is illustrated on a diagram on the inside of the battery cover. Be careful with damaged batteries. Leave (environmentally-friendly) replacement of the batteries to your dealer. GB22 Service and technical support At least once a year have the mobility scooter checked and serviced by your dealer. Preventive maintenance ensures that the proper and correct functioning of all moving parts is checked, as well as the electronics and the condition of the batteries. Repairs should only be performed by your dealer or by Life & Mobility, and only original parts supplied by Life & Mobility should be used for this. GB23 Maintenance Transport and storage Action Battery charger Check functioning Housing Clean with damp cloth X Connections Check for breakages X Rotating mechanism Check functioning and play X Batteries 24hour charging cycle X Tyres Check wear and tear Mobility scooter Servicing Transporting the mobility scooter Extremely dangerous: When transporting the mobility scooter in a motor vehicle, always make sure you are seated in a fixed seat of the motor vehicle. Mobility scooters may never be used as seating support in a motor vehicle, even if the mobility scooter is secured with a taxi restraint system. Never remain seated in the mobility scooter while it is suspended in a hoist or lifting system. The mobility scooter was not designed for this. Annually Part Each quarter Monthly Weekly Daily Maintenance matrix The following matrix indicates which parts should be regularly checked. If a defect occurs, contact your dealer to resolve this issue. X Be careful: Never carry the mobility scooter by the plastic parts of the housing. Attention: The seat is heavy. Ask for help if required. X X C Removing the seat M Removing the seat 1. Stand next to the mobility scooter. 2. Push the backrest forward. 3. Turn the lever (C) downwards. 4. Rotate the seat a quarter turn to the left or to the right. 5. Lift the seat from the mobility scooter. Folding down the steering column 1. Loosen the quickrelease lever (M) at the bottom of the steering column 2. Move the steering column as far as possible towards the seat. Tip: if the seat is removed, the steering column can be folded down further. 3. Retighten the lever. Folding down the steering column GB24 GB25 Transport and storage Warranty Transport Once the seat has been removed you can transport the mobility scooter in the boot, for example. Warranty Your new mobility scooter is covered by a 12-month warranty. The batteries are covered by a 3-month warranty. If required, the mobility scooter can be further dismantled, see page 17: ‘Settings and adjustments’ chapter. The warranty does not apply to defects caused by: failure to observe the instructions for use and maintenance, use other than normal use, wear and tear, negligence, overloading, third-party accidents, non-original parts used and defects not caused by the product. Storage when not using the mobility scooter Attention: Always store batteries fully charged. Fully charged gel batteries and AGM batteries will retain their charge for up to six months, but they must always be charged before use. Avoid storage of batteries at extremely high or low temperatures. Sealed gel batteries and AGM batteries do not need to be topped up with water. Contact a qualified scooter mechanic if you have any performance issues. This warranty replaces any other warranty, either stipulated by law or communicated orally, except for anything guaranteed in writing by Life & Mobility. Warranties are only valid within the EU. Longer than a week: Connect the battery charger at least once a week to maintain the condition of the batteries or put the mobility scooter away for the night with the battery charger connected. Very long term (e.g. during winter or due to illness): Have your dealer disconnect the wiring of the batteries. GB26 GB27 Disposal of product and packaging Disposal of product and packaging All parts of your mobility scooter are recyclable. Your dealer will know the collection points for disposal of the mobility scooter. This manual has been prepared with the utmost care and is based on information known to Life & Mobility at the time of publication. Life & Mobility does not accept liability for any errors in the text or the consequences thereof. From an environmental perspective, we recommend that you dispose of the packaging and the mobility scooter by separating the waste as much as possible, allowing the waste materials to be recycled efficiently. The information in this manual applies to the standard version of the product. Life & Mobility does not accept responsibility for any damage that may occur due to changes or modifications to the product after selling it for the first time. Neither can Life & Mobility be held liable for any damage caused by third-party work. The information in this manual may not be reproduced and/or made public by any means without prior written permission from Life & Mobility. Pursuant to the Trade Names Act, the trade name and trademarks used by Life & Mobility may not be considered free. No rights can be derived from this text. Subject to changes. © Life & Mobility – All rights reserved GB28 GB29 Uw dealeradres: / Your dealer’s address:/ Adresse de votre revendeur: 07/2011 P.O. Box 304, NL - 7000 AH Doetinchem Logistiekweg 7, Doetinchem T +31 (0)314-328 000 F +31 (0)314-328 001 I www.life-mobility.com E [email protected]