1
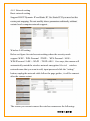
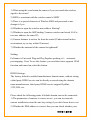
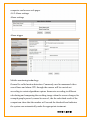
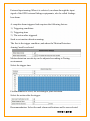
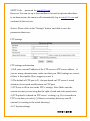
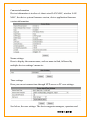
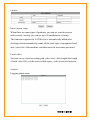
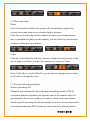
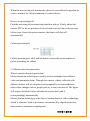
IP Camera NC400HD User Manual Version 1.0 2013 年 11 月 01 日 Catalogue Chapter 1:Introduce 1.1 Product Introduce 1.2 Product Applications 1.3 Environmental Requirements Chapter 2:Function Introduce 2.1 Basic Function Introduce 2.2 Advanced Function Introduce Chapter 3:IP Camera Installation Wizard Chapter 4:Detailed Interface Introduce 4.1 Login Interface 4.2 Login Interface Options 4.3 Monitoring Interface 4.4 Interface Settings 4.4.1 Network Setting 4.4.2 Alarm Setting 4.4.3 System Setting Chapter 5:The Use of IP Camera 5.1 Monitor、Talkback 5.2 Photograph、Video 5.3 Setting、Call Preset 5.4 Motion Detection Arming Chapter 6:FAQ Chapter 7:Port Mapping 2013 年 11 月 01 日 Chapter 1:Introduce 1.1 Product Introduce This product is one of integrated IP camera developed for network video surveillance. Using high-performance chip makes the media processor that can integrate audio and video capture, compression, transmission all-in-one. H.264 encoding algorithm ensures a clearer, smoother video transmission. Allow users through the IE and other browsers/centralized monitoring terminal and system platform to real-time monitor and remote control the front of camera easily. The product has good reliability and compatibility. Easy to install, easy to operate features make users do not need any skills can connect the camera to the broadband internet in a few minutes. 1.2 Product Applications IP Cameras can usually be used in large stores, schools, factories, and a series of public places. High-end IP cameras because of its powerful image processing capabilities more suitable for banks, traffic junctions that require a higher resolution image environment. 1.3 Environmental Requirements Software Environment IE 5.0 or above version DirectX8.0 above version TCP/IP protocols Minimum Hardware Configuration CPU: Pentium 1.6 GHz Memory: 256MB 2013 年 11 月 01 日 Sound Card: Needed voice monitor、Tow-way intercom necessary Hard Disk: If you need to record images, should not be less than 40GB Operating System:32, 64-bit Windows2000、Windows XP、 Windows2003、Windows Vista and other operating systems. Chapter 2:Function Introduce 2.1 Basic Function Introduce IP Cameras are mainly used for remote video image transmission based on IP networks. Products using JPEG hardware compression technology can transmit quality (HD or VGA) real-time video images at 30 frames/second on the LAN/WAN. IP Camera completely built on open using TCP/IP standard protocols, built-in WEB server, and support IE browser.,Product can be configured, started or firmware upgraded remotely over the network, equipment management and maintenance is very convenient. At any time and any place, you can easily by clicking on the network to monitor, control and zoom images. 2.2 Advanced Function Introduce Using high performance, powerful media processor 32BitRSIC High-resolution CMOS sensor chip, up to 30 frames per second in real time Optimized Motion-JPEG video compression algorithm to achieve the narrow-band high-definition image transmission. Supports up to four users to simultaneously browse, if you use the forwarding server function there is no limited. 2013 年 11 月 01 日 Built-in Web Server, users can achieve real time monitoring and setting management via standard browser. Support WIFI 802.11b/g/n wireless network Support remote system upgrading DDNS support, support for LAN and internet (dial-up Internet access, Internet routers, etc.) Support single/two-way voice intercom Motion detection alarm function, can set the sensitivity Dynamic alarm function, can set the alarm time Support E-mail sent, FTP pictures, external output function Support the mobile access Specifications Category Type Parameters Operation system Embedded Linux System Security 3 levels user rights management: Online Users Support 4 users simultaneously view online DDNS Comes with DDNS Image sensor 1/4inch 1.3MegaPixel Progressive CMOS sensor Sensor Performance Support AWB,AGC,AE Sensor size 3.888mm×2.430mm SNR ≥39dB Minimum Illumination 0.1Lux/F1.2(color mode),0.01Lux/F1.2(B&W mode) Lens 4.2mm/F2.0 Night Vision 11pcs 850nmΦ5mm IR LED: IR irradiation distance up to10m Encode format H.264 Basline Profile@Level 1-4.1 Resolution 720P/VGA/QVGA Image adjustment Brightness and Contrast can be adjusted Input 1 Channel built-in Microphone Output 1 Channel Line output System Night Vision Video Audio 2013 年 11 月 01 日 Network Sampling frequency/Bit wide 8KHz/16bit Encode format/Rate 32kbps/ADPCM Network Interface 10Base-T / 100Base-TX, RJ45 interface Wireless Network TCP/IP,HTTP,TCP,UDP,SMTP,FTP,DHCP,DNS,DDNS,NTP,UPnP, RTSP,PPPoE, P2P etc. WiFi802.11b/g/n Alarm Detection Support Motion detection/1 Channel input trigger Alarm Actions 1 way output / E-mail pictures / upload video by FTP / messages alarm(coordinate to server) Nominal Voltage DC5±0.3V Power consumption Rated power:3.5W(IR LED turn on)/Max:7W(P&T turn on) Working Environment Temperature:-10~70℃,humidity:10~90%non-condensing Weight 0.6KG Package Size 200×120×180mm(L×W×H) Protocols Alarm Physical Instructions Chapter 4:Detailed Interface Introduce 4.1 Login Interface To verify the current user permissions prompt box, need to enter the correct user name and password to enter the camera. You can find the default user name and password in the bottom of the device. 2013 年 11 月 01 日 4.2 Login Interface Options Product support IE、Firefox、Safari、google and other major browses/iPhone 、iPad and other IOS devices and smart mobile browse. According to your current way of opening the device to select the corresponding entrance to entry into interface. Wrong choice may prevent the entrance normal viewing screen. 4.3 Monitor Interface 2013 年 11 月 01 日 The camera will Left-right cruising automatically after select on, it will cruising about 1 hours if no manual stopped.Infrared light will be start work automatically in low-light condition. The number larger,the speed faster. Infrared light turn off in low-light condition. Image inversion: In selected, the image displaying will be upside down.Mirror image mode: In Selected, the displayed image will reversed left to right. Turn on the alarm terminal Turn off the alarm terminal Multiple screens setting Preset positions setting The first is a single screen, the second of four, the third of nine; IE browser supports up to 9 screens simultaneously watch Preset settings can set up to 15 preset positions . Setting process:Set the preset position first, then select to use. Audio(Listening and speaking)/Setting 1) Voice monitor:The voice around of the camera could be heard in turn-on condition. 2) Two way radio: Use the microphone on computer do a conversation with camera. 3) The video to the local: In selected ,Camera start to record, the videos will be stored in your own terminal equipment. 4) Parameter settings: Click into the IE settings interface. 4.4 Setting interface 2013 年 11 月 01 日 4.4.1 Network setting Basic network setting Support DHCP Dynamic IP and Static IP. Use Static IP If you need set the router port mapping. Do not modify above parameters arbitrarily without certain levels computer network support. Wireless LAN setting Below set figure for wireless networking,where the security mode support :WEP、WPA Personal(TKIP) 、WPA Personal(AES) 、 WPA2Personal(AES) 、WAP2 (TKIP+AES) five ways.,the camera will automatically match the wireless network encryption.Selected wireless network name that you want to add, input password click the “setting” button, unplug the network cable follow the page guides , it will be connect after the camera restart. The reason you can not connect the wireless camera are the following: 2013 年 11 月 01 日 1) When using the scan button,the camera if you can search the wireless signal to the router? 2) SSID is consistent with the wireless router's SSID? 3) There is a special character of Wireless SSID and password or not, change it if yes. 4) Whether to open the wireless mac address filtering? 5) Whether to open the ARP binding ?(camera wireless and wired LAN is two mac address, the same IP). 6) Camera distance is not too far from the router?(Under normal indoor environment, try to stay within 20 meters). 7) Whether the antennal of the camera be tightened? Setting: Full name is Universal Plug and Play,Popular speaking ,it’s automatic port mapping. Users To use this feature, you need the router supports UPnP function and turned on,select this button. DDNS Settings: The factory default is enabled manufacturers domain name, without setting a third party DDNS service can be directly accessed using the domain name manufacturers, third-party DDNS service support DynDns, 3322,9299, etc. Please check the following points if default domain can not be connected: 1) The parameters of cameras is correct or not , you can use network camera installation wizard do one key setting if you don’t know how to set. 2) Whether the DNS address is correct .then you can check whether your 2013 年 11 月 01 日 computer can browse web pages. 4.4.2 Alarm settings Alarm settings Alarm trigger Mobile monitoring technology: General be called motion detection. Commonly used in unmanned video surveillance and alarm.CPU through the camera will be carried out according to certain algorithms capture frame rate according to different calculating and comparing the resulting image when the screen changes,for example,people passed ,camera be moved , the the calculated result of the comparison show that the number will exceed the threshold and indicates the system can automatically make the appropriate treatment. 2013 年 11 月 01 日 External input arming:When it is selected ,can alarm through the input signal of the GPIO external linkage equipments, also be called Linkage box alarm. A complete alarm triggered task requires the following factors: 1) Triggering conditions 2) Triggering time 3) The action after triggered. Such as set motion detection arming: The first is the trigger condition ,and where the“Motion Detection Arming”need be selected. Motion detection sensitivity can be adjusted according to Testing environment. Select the trigger time Fifteen minutes of a cell, set according to your own need. Select the action after the trigger. Recommendation: Select the mail alarm notifications and be sure selected 2013 年 11 月 01 日 the alarm upload pictures, so that the camera can send alert message or photos to your email after camera triggered the alarm. Upload pictures interval(seconds) means the interval of sending pictures to FTP sever. Enable the mail notice after alarm, do not forget to set the Mail Settings. Mail settings Sender: The mailbox used to send email, make a example of NetEase 163 mail, eg:[email protected]; SMTP sever: server to send and receive mail, built-in mainstream mail. Server address, such as NetEase 163 mail,it’s “smtp.163.com”; SMTP Interface: default 25. Need to confirm: should be selected usually. SSL: An encryption protocol, some mail service providers to support such encrypted communications,eg.:gmail SMTP User: The sender's mailbox account login. 2013 年 11 月 01 日 SMTP Code: password for [email protected] Receiver: You can set up to four mailboxes for mail recipients.when there is an alarm action, the camera will automatically log in [email protected] and send mail to the receiver. Notice: Please click on the "Settings" button, and click to save the parameters then teste; FTP settings FTP settings and attention 1) Fill your current IP address of the FTP server in FTP server address , if you are using a domain name, make sure that your DNS settings are correct, if there is fixed public IP,we suggest you use it. 2) The default of FTP port is 21, the port based on FTP server’s actual situation, do not need modifications on FTP port; 3) FTP user to fill in user in the FTP’s settings, Note: Make sure the current account you are using has the right of read and write permissions 4) FTP upload it is based on FTP server ‘s setting, e.g. If it is recorder in FTP’s root,then you write [/] if there is secondary directory can fill / camera1(According to the actual directory). 4.4.3 System settings 2013 年 11 月 01 日 Camera information Device information is in above’s chart: wired LAN MAC, wireless LAN MAC, the device system firmware version, device application firmware version information. Name settings Here to display the camera name, such as name in find, followed by multiple devices settings’s name etc. Time settings Here you can set camera time through NTP server or PC user settings. See below, the user settings. The device supports managers, operators and 2013 年 11 月 01 日 visitors Multi-screen setup When there are same types of products, you can set your browser to multi-screen viewing, you can set up to 9 simultaneous viewing. This function supports the LAN device is automatically added after clicking refresh automatically scans all the same type of equipment local area, select list of the machine, and then enter the user name password. Local video You can set up a local recording path, video size, video length (the length of each video file), set the reserved disk space, video overwrite function; Journal Logging alarm status 2013 年 11 月 01 日 Maintain Click on "Restore Factory Settings", you can restore the factory default camera parameters. Click the "Restart camera", you can reboot the camera. Upgrade the system firmware: Click "Browse" to select the system firmware upgrade package file, click "Upgrade" Waiting camera system restart to complete the firmware upgrade is completed. Interface Firmware upgrade Click "Browse" to select the interface firmware upgrade package file, click the "upgrade" the restart waiting for the camera to complete the interface firmware upgrade. Chapter 5 Network Camera 5.1 Monitor-Intercom Monitor Click the left mouse button to enable the listener to listen, When the icon turns to the below picture(right) means it is in a listening state; Intercom Click the left mouse button to enable the intercom intercom function, When the icon turns to the below picture(right) means it is in a listening state; 2013 年 11 月 01 日 5.2 Photo and video Photo Left-click the photo button, the system will automatically capture the current screen and jump a new window display pictures; Note: If you do not jump out the window, because your current browser may is prohibited to jump out the window, you can check in your browser settings to allow pop-up windows; Video Click the video button by left key of mouse, when the icon becomes to the one of right icon below, it means the camera is in a state of video. Note: Video file is saved in Disc D, you can choose setting-system settinglocal video to change the route 5.3 Set and callout presetting bit What is presetting bit? When the user monitor the object through controlling monitor PTZ of equipment terminal operation, the operator can set the monitor object to presetting bit, he can set a window, a counter, a desk, enter and entrance and the park to presetting bit; the presetting bit can save its current position in terminal monitoring PTZ decoder by control device software operate. 2013 年 11 月 01 日 When the user need quick monitor the object, he can callout the position he want to monitor by callout command of control device. How to set presetting bit? Find the presetting bit in monitoring interface and set. Firstly, adjust the camera PTZ to the set position, click set button, preset form will pop up as follow icon, choose the preset number, the frame will shut off automatically. Callout presetting bit Callout presetting bit: click callout button, choose the preset number to realize presetting bit callout. 5.4 Motion detection protection What is motion detection protection? Motion detection technology,is usually used in unattended surveillance video and automatic alarm. Through the camera, videos collected with different frames will be calculated and compared by certain arithmetic, when video changes such as people pass by or lens was moved. The figure will surpass threshold value and indicate system deal with it correspondingly automatically. Motion diction technology is the base of motion detector video technology, which is extensive used in ip camera, car monitor key, digital protection, baby monitor, automatic sampling and 2013 年 11 月 01 日 Automatic identification of entrance guard. Set motion detection protection. Details please check alarm set. Chapter 6 Common questions Q: Forget user name and password A: Reset the camera, the user name and password is the value of restored factory settings. user:admin password is blank. Please connect with electricity before reset, then long press the reset button for 30 seconds to reach reset the camera. Q: Unable to connect with WIFI? A: Usually,if camera is unable to connect with WIFI, it is because of wrong set. please check it as following points 1) When use scan button, Can the camera search wireless signal of router? 2) Is SSID conformed with router wireless SSID? 3) Is wireless SSID and WIFI password set with specific symbol, if yes, please revise it. 4) Is wireless mac add filtering turned on? 5) Is APR binding turned on?Camera wireless and network cable have two different mac addresses but the same IP). 6) The camera is too far away from router? Normally please keep the distance in 20M indoor. 7) The antenna is tightened? Q:IP camera install wizard can’t find the IP? 2013 年 11 月 01 日 A:1) Make sure the camera is under normal work situation: check the state of the lights near internet interface, the reticle is available and connected well, electricity indoor is cruised automatically etc… 2) Confirm the computer and camera in the same local internet and they are not in two VLAN, firewall stopped etc… 3) Faulty reticle will caused IP unable searched. please try to find a workable cable for replacement. 4) Please try to change the router back interfaces. 5) If all above tried but still failure, please connect the camera with computer with cable directly, then check if IP camera install wizard can find the IP. Q: Under windows vista 7, IE cant find the video file. A: Open control payout—system and safety—change user account control setting----Set the level to never notice. Copyright© Shenzhen Rocam Technology Co.,Ltd. All Rights Reserved 2013 年 11 月 01 日