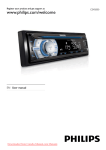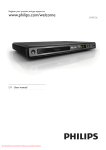
1
Register your product and get support at
www.philips.com/welcome
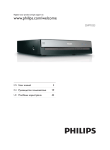
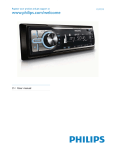
DVP1033
3
PL ,QVWUXNFMDREVãXJL
CS 3ŏtUXĈNDSURXçLYDWHOH
RO Manual de utilizare
66
EL ƆƣƷƥƩƱƟƤƩƯƷƱƞƳƧƲ
SK 3UtUXĈNDXçtYDWHĸD
HU )HOKDV]QiOyLNp]LN|Q\Y
TR .XOODQ×PN×ODYX]X
EN User manual
Downloaded From DvDPlayer-Manual.com Philips Manuals
SLOVAK REPUBLIC
.*+) &+'(62*+)'"(),"*$*)'-4%
(()*#%6!&*()0-&1%&!(,$!*(62*+)'"%
-)'/('),*+2%+'&0-'%%78'"2+#
&/(9&1%,'/06&2)'+'(62*+)'"/ ',
&'+-2)"+&!&*&2%"+" '#).+.#',#'$!
'()-,-5.*-:6+*(!$!/'-&1%,*)-!*,
Prístroj sa nesmie používat’ v mokrom a
vlhkom prostredí! Chránte pred striekajúcou
a kvapkajúcou vodou!
/(9262*"%,+2#).+7'"!3+:&2
/(9&'*+&2 *(2&97 )'/2&/(92&-!!+$
&1 '$*)'-1 '/06&2
/DVHUVSHFLÀFDWLRQ
Type: Semiconductor laser InGaAIP (DVD),
AIGaAs (CD)
Wave length: 658 nm (DVD), 790 nm (CD)
Output Power: 7.0 mW (DVD), 10.0 mW
(VCD/CD)
Beam divergence: 60 degrees
);+*(6(62%4%/0* %$*)'-1 '
(()*#,
0),#
'#,.*+/"#1 '#'$!7-',(62*+)'"
%'&+'-$!-5.&"62--.+0 &:+*!+'-',
/0*+)9#,
6SHFLÀNDFHODVHUX
7\S3RORYRGLĈRYîODVHU,Q*D$,3'9'
AIGaAs (CD)
Vlnová délka: 658 nm (DVD), 790 nm (CD)
9îVWXSQtYîNRQP:'9'P:
(VCD/CD)
'LYHUJHQFHSDSUVNţVWXSŀţ
MAGYARORSZÁG
Minőségtanúsítás
A garanciajegyen feltüntetett forgalombahozó
vállalat a 2/1984. (lll. 10.) BkM-lpM együttes
rendelet értelmében tanúsítja, hogy ezen készülék
megfelel a mûszaki adatokban megadott
értékeknek.
Figyelem! A meghibásodott készüleket beleértve a hálózati csatlakozót is - csak
szakember (szerviz) javíthatja. Ne tegye ki
készüléket esőnek vagy nedvesség hatásának!
Garancia
A forgalombahozó vállalat a termékre 12 hónap
garanciát vállal.
3URGXFHQW]DVWU]HJDPRůOLZRőĂZSURZDG]DQLD
zmian technicznych.
Downloaded From DvDPlayer-Manual.com Philips Manuals
This product is in compliance with the EEE
GLUHFWLYH
(((\|QHUJHVLQHX\JXQGXU
,PSRUWDQW
Safety and important notice
4
4
<RXU'9'SOD\HU
Region codes
Overview of the main unit
Overview of the remote control
5
5
5
5
3
6
6
6
6
Connect
Connect to scart jack
&RQQHFWWRGLJLWDODPSOLÀHUUHFHLYHU
Connect power
*HWVWDUWHG
Prepare the remote control
Find the correct viewing channel
Select the TV system
Change system menu language
6
6
7
7
7
3OD\
Play a disc
Play video
Play music
Play photo
Play mixed contents
7
7
7
8
9
9
$GMXVWVHWWLQJV
System setup
Language setup
Audio setup
Video setup
$GGLWLRQDOLQIRUPDWLRQ
Care
6SHFLÀFDWLRQV
13
13
13
7URXEOHVKRRWLQJ
14
English
Contents
10
10
11
12
13
EN
Downloaded From DvDPlayer-Manual.com Philips Manuals
3
,PSRUWDQW
6DIHW\DQGLPSRUWDQWQRWLFH
Warning
Risk of overheating! Never install the product in a
FRQÀQHGVSDFH$OZD\VOHDYHDVSDFHRIDWOHDVWLQFKHV
around the product for ventilation. Ensure curtains or
other objects never cover the ventilation slots on the
product.
Never place the product, remote control or batteries near
QDNHGÁDPHVRURWKHUKHDWVRXUFHVLQFOXGLQJGLUHFWVXQOLJKW
Only use this product indoors. Keep this product away
IURPZDWHUPRLVWXUHDQGOLTXLGÀOOHGREMHFWV
Never place this product on other electrical equipment.
Keep away from this product during lightning storms.
Where the mains plug or an appliance coupler is used as
the disconnect device, the disconnect device shall remain
readily operable.
Visible and invisible laser radiation when open. Avoid
exposure to beam.
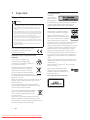
This product complies with the radio
interference requirements of the
European Community.
'LVSRVDORI\RXUROGSURGXFWDQG
EDWWHULHV
Your product is designed and
manufactured with high quality
materials and components, which can
be recycled and reused.
When this crossed-out wheeled bin
symbol is attached to a product it
means that the product is covered
by the European Directive 2002/96/
EC. Please inform yourself about the
local separate collection system for electrical and
electronic products.
Please act according to your local rules and do not
dispose of your old products with your normal
household waste.
Correct disposal of your old product helps to
prevent potential negative consequences for the
environment and human health.
Your product contains batteries covered
by the European Directive 2006/66/EC,
which cannot be disposed with normal
household waste.
Please inform yourself about the local rules on
separate collection of batteries because correct
disposal helps to prevent negative consequences for
the environmental and human health.
4
EN
Downloaded From DvDPlayer-Manual.com Philips Manuals
Copyright notice
This item
incorporates
copy protection
technology that
is protected by U.S. patents and other intellectual
property rights of Rovi Corporation. Reverse
engineering and disassembly are prohibited.
7UDGHPDUNQRWLFH
‘DVD Video’ is a trademark of DVD
Format/Logo Licensing Corporation.
ABOUT DIVX VIDEO: DivX® is a
digital video format created by DivX,
,QF7KLVLVDQRIÀFLDO'LY;&HUWLÀHG
device that plays DivX video. Visit
www.divx.com for more information and software
WRROVWRFRQYHUW\RXUÀOHVLQWR'LY;YLGHR
ABOUT DIVX VIDEO-ON-DEMAND: This DivX
&HUWLÀHG ® device must be registered in order to
play DivX Video-on-Demand (VOD) content.
To generate the registration code, locate the
DivX VOD section in the device setup menu. Go
to vod.divx.com with this code to complete the
registration process and learn more about DivX
VOD.
DivX®'LY;&HUWLÀHG® and associated logos are
registered trademarks of DivX, Inc. and are used
under license.
'LY;&HUWLÀHG® to play DivX® video, including
premium content.
Manufactured under license from
Dolby Laboratories. Dolby and the
double-D symbol are trademarks of
Dolby Laboratories.
7KLVDSSDUDWXVLQFOXGHVWKLVODEHO
2YHUYLHZRIWKHUHPRWHFRQWURO
English
<RXU'9'SOD\HU
Congratulations on your purchase, and welcome to
3KLOLSV7RIXOO\EHQHÀWIURPWKHVXSSRUWWKDW3KLOLSV
offers, register your product at www.philips.com/
welcome.
Region codes
You can play discs with the following region codes.
'9'UHJLRQFRGH
Countries
Europe
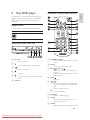
2YHUYLHZRIWKHPDLQXQLW
a IR sensor
Remote sensor.
b
Open or close the disc compartment.
Start or pause play.
Stop play.
Turn on the apparatus; switch to standby
mode.
c
d
e
f Indicators
a 67$1'%<21
Turn on the apparatus; switch to standby
mode.
b SETUP
Access or exit the setup menu.
c 35(9
/ NEXT
Skip to the previous/next track, title or
chapter.
Press and hold for fast-backward or fastforward search.
d STOP
Stop play.
e
/ / /
For menus: navigate up/down/left/right.
Move an enlarged picture up/down/left/
right.
Rotate or invert pictures.
OK
&RQÀUPDVHOHFWLRQ
f 68%7,7/(
Select a subtitle language.
g $8',2
Select an audio language(DVD) or an
audio channel(VCD).
h $1*/(
Selects a different viewing angle of a DVD.
EN
Downloaded From DvDPlayer-Manual.com Philips Manuals
5
i ZOOM
Zoom in or out a picture/video image on
the TV screen.
&RQQHFWWRGLJLWDODPSOLÀHUUHFHLYHU
j ',63/$<
Display play information on a connected
TV.
DIGITAL IN
k 5(3($7$%
5HSHDWDVSHFLÀFVHFWLRQZLWKLQDWUDFN
disc.
l 5(3($7
Select or turn off repeat mode.
m
Mute or restore the volume
n 1XPHULFNH\SDG
Select a title/chapter/track directly.
o 3/$<3$86(
Start or pause play.
p RTN TITLE
Returns to the previous menu.
For DVD, navigates to title menu.
For VCD version 2.0 or SVCD with PBC
turned on, returns to the menu.
q
Open or close the disc compartment.
r MENU
For DVD, access or exit the root menu
For VCD/SVCD, turn on/off PBC.
3 Connect
Connect a coaxial cable (not supplied) to:
the &2$;,$/ jack on this product.
the COAXIAL/DIGITAL input jack on
the device.
Connect power
Caution
Risk of product damage! Ensure that the power supply
voltage corresponds to the voltage printed on the back
of the product.
Before connecting the AC power cord, ensure you have
completed all other connections.
Note
The type plate is located on the back of the product.
&RQQHFWWRVFDUWMDFN
Connect the AC power cable to the wall socket.
» The product is ready to be set up for use.
*HWVWDUWHG
Prepare the remote control
3
Open the battery compartment.
Insert two R03 or AAA batteries with correct
polarity (+/-) as indicated.
Close the battery compartment.
Caution
Connect a scart cable (not supplied) to:
the 6&$57287$8',29,'(2 jack
on this product.
the scart input jack on the TV.
Risk of explosion! Keep batteries away from heat,
VXQVKLQHRUÀUH1HYHUGLVFDUGEDWWHULHVLQÀUH
Remove batteries if they are exhausted or if the remote
control is not to be used for a long time.
Do not mix batteries (old and new or carbon and
alkaline, etc.).
Batteries contain chemical substances, so they should be
disposed of properly.
6
EN
Downloaded From DvDPlayer-Manual.com Philips Manuals
Press to turn on this product.
Turn on the TV and switch to the correct
video-in channel. (Refer to the TV user manual
on how to select the correct channel.)
6HOHFWWKH79V\VWHP
This DVD player is compatible with both NTSC and
PAL. For the playback of a DVD disc on this DVD
player, the color systems of the TV set and DVD
player should match.
Press SETUP.
Select >9,'(26(783@ > >796<67(0@, and
then press .
3 3UHVVɾɼWRVHOHFWRQHRIWKHRSWLRQV
below and then press OK.
>176&@
>3$/@
>$872@
For TV with NTSC color system.
For TV with PAL color system.
For TV with multiple color systems.
3
Note
:LWKVRPHGLVFÀOHW\SHVSOD\PD\GLIIHU
Play a disc
Caution
Do not place any objects other than discs into the disc
compartment.
Do not touch the disc optical lens inside the disc
compartment.
3
Press to open the disc compartment.
Insert a disc with its label facing up.
Press to close the disc compartment and
start disc play.
To view disc play, turn on the TV to the
correct viewing channel for this product.
To stop disc play, press .
Press SETUP to exit.
Change system menu language
3OD\
English
)LQGWKHFRUUHFWYLHZLQJFKDQQHO
Press SETUP.
Press / keys to select >/$1*8$*(
6(783@WKHQSUHVVɾ
3UHVVɾɼNH\VWRKLJKOLJKWRQHRIWKH
options below, then press .
>26'/$1*8$*(@ Select this to
change the language of this DVD player
screen display menu.
>0(18/$1*@ Select this to change
the language of disc menu.
3UHVVɾɼNH\VWRVHOHFWDODQJXDJHDQG
press OK.
Press SETUP to exit the menu.
Note
Note
&KHFNWKHW\SHVRIGLVFVVXSSRUWHGVHH´6SHFLÀFDWLRQVµ
!´3OD\PHGLDµ
If the password entry menu is displayed, enter the
password before you can play the locked or restricted disc
VHH´$GMXVWVHWWLQJVµ!´6\VWHPVHWXSµ!>5$7,1*@).
If you pause or stop a disc, the screen saver appears after
5 minutes of inactivity. To deactivate the screen saver,
press MENU.
After you pause or stop a disc and no button is pressed
within 15 minutes, this product automatically switches
to standby.
3OD\YLGHR
Note
Some operations may not work with some discs. See the
information accompanying the disc for details.
Depending on the DVD or VIDEO CD, some operations
may be different or restricted.
If the >,19$/,'.(<@ appears on the TV screen when
a button is pressed, it means the function is not available
on the current disc or at the current time.
&RQWUROYLGHRSOD\
Play a title.
Use the remote control to control the play.
%XWWRQ
$FWLRQ
Start, pause or resume disc play.
Stop disc play.
EN
Downloaded From DvDPlayer-Manual.com Philips Manuals
7
%XWWRQ
/
,
$8',2
68%7,7/(
5(3($7
5(3($7
$%
ZOOM
$1*/(
',63/$<
$FWLRQ
Skip to a previous/next title or
chapter.
Search fast-backward or fastforward. Press repeatedly to change
the search speed.
Search slow-forward or slowbackward. Press repeatedly to
change the search speed.
For VCD/SVCD, slow-backward
search is not available.
Select an audio language or channel
available on a disc.
Select a subtitle language availabel
on a disc.
Select or turn off repeat mode.
Repeat options may vary from disc
type.
5HSHDWDVSHFLÀFVHFWLRQZLWKLQD
track/disc.
Fit the picture format to the TV
screen.
Press repeatedly until the image is
VFDOHGWRÀWWRWKH79VFUHHQ
Selects a different viewing angle of
a DVD.
Access the play options and display
the current disc status.
$FFHVV'9'PHQX
Press MENU to access the disc root menu
during play.
Select a play option, and then press OK.
In some menus, press the Numeric
EXWWRQV to input your selection.
$FFHVV9&'PHQX
The PBC (playback control) feature is available for
VCD/SVCD, which can display the contents menu
for you to select a play option. The PBC is on by
default in the factory.
Display the contents menu via one of the
following ways:
If PBC is on, load in a VCD/SVCD.
During play with PBC on, press RTN
TITLE.
Press the 1XPHULFEXWWRQV to select a play
option, then press OK to start play.
If PBC is turned off, it starts playing from
WKHÀUVWWUDFN
8
EN
Downloaded From DvDPlayer-Manual.com Philips Manuals
Tip
To turn on/off PBC, press MENU repeatedly during play.
'LVSOD\SOD\WLPH
During play, press ',63/$< repeatedly.
» The disc status is displayed.
9LHZ'9'SOD\IURPGLIIHUHQWDQJOHV
During play, press $1*/( repeatedly.
5HSHDWSOD\DVSHFLÀFVHFWLRQ
During play, press 5(3($7$% at the start
point.
Press 5(3($7$% again to set the end point.
» Repeat play starts.
3
To cancel repeat play, press 5(3($7$% again.
Note
The marked section for repeat play is only possible
within a track/title.
3OD\'LY;®YLGHR
DivX video is a digital media format that retains high
quality despite a high rate of compression. You can
HQMR\'LY;YLGHRRQWKLV'LY;FHUWLÀHGSURGXFW
Insert a disc that contains the DivX videos.
» A contents menu is displayed.
Select a title to play, then press OK.
You may select subtitle/audio language.
Note
You can only play DivX videos that were rented or
purchased with the DivX registration code of this player
VHH´$GMXVW6HWWLQJVµ!´/DQJXDJHVHWXSµ!>',9;>5@
92'@).
Play music
&RQWURODWUDFN
Play a track.
Use the remote control to control the play.
%XWWRQ
$FWLRQ
3/$<3$86(
Start, pause or resume disc play.
STOP
Stop disc play.
$FWLRQ
Press OK to start the slideshow from the
selected photo.
To preview the photos in thumbnail,
press
or RTN TITLE during the play.
To return to the menu, press
or
RTN TITLE repeatedly.
Skip to a previous/next track.
Searches fast-backward or fastforward. Press repeatedly to
change the search speed.
Select an item to play.
/
English
%XWWRQ
Note
It may require longer time to display the disc content
5(3($7
5(3($7$%
on the TV due to the large number of songs/photos
compiled onto one disc.
Select or turn off repeat mode.
Repeat options may vary from
disc type.
5HSHDWDVSHFLÀFVHFWLRQZLWKLQD
track/disc.
,IWKH-3(*SKRWRLVQRWUHFRUGHGZLWKDQ¶H[LI·W\SHÀOHWKH
3OD\03:0$PXVLF
03:0$LVDW\SHRIKLJKO\FRPSUHVVHGDXGLRÀOH
ÀOHVZLWKPSZPDH[WHQVLRQV
Insert a disc that contains the MP3/WMA
music.
» A contents menu is displayed.
If play does not automatically start, select a
track to play.
To select another track/folder, press
then press OK.
Note
actual thumbnail picture cannot be shown on the screen. It
is replaced by a ‘blue mountain’ thumbnail picture.
This player can only display digital camera pictures
according to the JPEG-EXIF format, typically used by
almost all digital cameras. It cannot display Motion JPEG,
or pictures in formats other than JPEG, or sound clips
associated with pictures.
)ROGHUVÀOHVWKDWH[FHHGWKHVXSSRUWHGOLPLWRIWKLV
player cannot be displayed or played.
,
Control photo play
Play a photo slideshow.
Use the remote control to control the play.
%XWWRQ
$FWLRQ
Rotate a photo anti-clockwise/clockwise.
/
/
ZOOM
)RUGLVFUHFRUGHGLQPXOWLSOHVHVVLRQVRQO\WKHÀUVW
session is played.
Rotate a photo horizontally/vertically.
Zoom in or out of a photo.
Play pauses in zoom mode.
Stop a play.
)RUD:0$ÀOHWKDWLVSURWHFWHGE\'LJLWDO5LJKWV
Management (DRM), it cannot be played on this product.
This product does not support MP3PRO audio format.
For any special character that is present in the MP3 track
name (ID3) or album name, it might not be displayed
correctly on the screen because these characters are not
supported.
)ROGHUVÀOHVWKDWH[FHHGWKHVXSSRUWHGOLPLWRIWKLV
product cannot be displayed or played.
Play photo
Play photo as slideshow
<RXFDQSOD\-3(*SKRWRVÀOHVZLWKMSHJRUMSJ
extensions).
Insert a disc that contains the JPEG photos.
» Slideshow begins (for Kodak disc), or a
contents menu (for JPEG disc) is displayed.
3
Play mixed contents
<RXFDQSOD\DGLVFFRQWDLQLQJ03ÀOHV-3(*SKRWRV
DQG03(*YLGHRÀOHV
Insert a disc.
Press / to navigate to a media type icon
(audio, photo, or video), and then press OK to
FRQÀUP
3 Press and then .
» 7KHÀUVWIROGHURIWKHVHOHFWHGPHGLDW\SH
is highlighted.
Press / to select a folder, and then press
OKWRFRQÀUP
» The content of the selected folder displays.
Press
and then
/ WRVHOHFWDÀOH
press / to select a photo folder, and then
press OKWRFRQÀUP
Press and then / to select a photo.
EN
Downloaded From DvDPlayer-Manual.com Philips Manuals
9
6
Start the play.
For photos, press
or OK to start the
sequential play.
)RUDQDXGLRÀOHWKHVHOHFWHGÀOHVWDUWV
to play automatically.
)RUDYLGHRÀOHSUHVV
or OK.
$GMXVWVHWWLQJV
Note
If the setup option is grayed out, it means the setting
cannot be changed at the current state.
Control the play
%XWWRQ
Option
Start, pause or resume play.
System setup
Stop play.
6NLSWRWKHSUHYLRXVQH[WÀOH
/
Play musical slideshow
Create a musical slideshow to play MP3/WMA
PXVLFÀOHVDQG-3(*SKRWRÀOHVVLPXOWDQHRXVO\
Note
To create a musical slideshow, the MP3/WMA and JPEG
ÀOHVPXVWEHVWRUHGRQWKHVDPHGLVF
3
6
Play MP3/WMA music.
Press / to navigate to the photo icon and
then press OKWRFRQÀUP
Press and then .
» 7KHÀUVWIROGHURIWKHVHOHFWHGPHGLDW\SH
is highlighted.
Press / to select a photo folder/album and
then press OKWRFRQÀUP
Press and then / to select a photo.
Press
or OK to start the sequential play.
To stop slideshow play, press .
To stop music play, press
repeatedly.
Note
This function can be disabled through changing the
VHWWLQJVRIWKLVSURGXFWVHH´$GMXVWVHWWLQJVµ!´6\VWHP
VHWXSµ!>3,&785(086,&@).
Press SETUP, and then press .
» The >6<67(06(783@ page is displayed.
Press
to select an option, and them press
.
Press
to select a setting, and then press
OKWRFRQÀUP
To exit the menu, press SETUP.
3
>9,'(2@
Set the video output according to the video
connection.
>79B5*%@ - If the SCART connection is used,
select this option.
>6&5((16$9(5@
Turn on or off the screen saver mode. It helps to
protect the TV screen from being damaged due to
over exposure to static image for being too long.
>21@@ - Enable the screen saver.
» The screen saver activates after inactivity for
a certain period of time.
>2))@@ -Disable the screen saver.
>3,&785(086,&@
Enable or disable the function of playing the slide
show of photos with the background music
>21@@ - Enable the function.
>2))@@ - Disable the function.
>3$66:25'@
The password is used for parental control. The
default password is ‘0000’.
To change the password,
10
EN
Downloaded From DvDPlayer-Manual.com Philips Manuals
3
Press
to select >3$66:25'@, and then
press .
Enter your existing 4-digit password with the
1XPHULF.H\SDG on the remote control.
If you forget the current password, you
can enter the default password, and then
press OKWRFRQÀUP7KHQ\RXFDQ
enter the new password.
Press OKWRFRQÀUP
Enter the new 4-digit password.
Press OKWRFRQÀUP
Note
The default password (0000) remains valid even if a new
password is set.
>5$7,1*@
With the Parental Control function, you can restrict
access to DVDs that are not suitable for your
children. The rating levels are country dependent.
To view DVDs that are rated higher than the set
level, you should enter a 4-digit password.
>.,'6$)(@@ - Suitable for children.
>*@ - Recommended as acceptable for
viewers of all ages.
>3*@ - Parental guidance suggested.
>3*@ - Parental guidance suggested.
>3*5@ - Parental Guidance; recommended
that parents restrict children under 17 from
viewing.
>5@ - Restricted; recommended only when
supervised by a parent or adult guardian.
>1&@ - Not recommended for children
under age 17.
>$'8/7@ - Viewed only by adults due to
graphic sexual scenes, violence, or language.
Note
This function is only available for DVDs that are coded
Language setup
English
3
Press SETUP.
Press
to navigate to the >/$1*8$*(
6(783@ page, and then press .
Press
to select an option, and them press
.
Press
to select a setting, and then press
OKWRFRQÀUP
To exit the menu, press SETUP.
>26'/$1*8$*(@
Select an on-screen menu language.
>0(18/$1*@
Select a language for disc menu.
>',9;/$1*@
Select a character set that supports the DivX
subtitle.
>&(175$/(8@ - Polish, Czech, Slovak,
Albanian, Hungarian, Slovene, Croatian,
Serbian (Latin script), Romanian
>&<5,//,&@ - Belarusian, Bulgarian, Ukrainian,
Macedonian, Russian, Serbian
>:(67(51(8@ - Albanian, Danish, Dutch,
English, Finnish, French, Gaelic, German, Italian,
Kurdish (Latin), Norwegian, Portuguese,
Spanish and Swedish
>*5((.@ - Greek
>785.,6+@ - Turkish
with rating levels.
Note
>32:(55(680(@
Enable or diable the function of resuming the play
from the point where it is last stopped.
>21@ - Enable this function.
>2))@ - Disable this function.
>'()$8/7@
Reset all the settings of this product to factory
default, except for >5$7,1*@ and >3$66:25'@
settings.
>5(6725(@ - Select it and press OK.
(QVXUHWKDWWKHVXEWLWOHÀOHKDVWKHH[DFWVDPHÀOHQDPH
DVWKHPRYLHÀOH,IIRUH[DPSOHWKHÀOHQDPHRIWKH
PRYLHLV¶0RYLHDYL·WKHQ\RXQHHGWRQDPHWKHWH[WÀOH
‘Movie.sub’ or ‘Movie.srt’.
>',9;>5@92'@
Display the DivX® registration code and
deactivation code (if any).
>5(*,67(5&2'(@ - A 10-character
registration code generated randomly.
EN
Downloaded From DvDPlayer-Manual.com Philips Manuals
11
>'($&7&2'(@ - An 8-character code
generated when the authorization to a certain
user is deactivated.
Tip
Use this player’s DivX registration code when you rent
or purchase video from www.divx.com/vod. The DivX
videos rented or purchased through the DivX® VOD
(Video On Demand) service can be played only on the
device to which it is registered.
>'($&7,9$7,21@
Deactivate the authorization to current user.
7RSHUIRUPWKHGHDFWLFDWLRQ
Navigate to >'($&7,9$7,21@, and then
press OK.
Select ><(6@, and then press OKWRFRQÀUP
3 Write down the deactivation code.
Select >'21(@, and then press OK to
FRQÀUP
» The authorization to current user is
deactivated.
Note
Visit www.divx.com/vod to know about how to activate
the device.
$XGLRVHWXS
>$8',2287@
Select a suitable setting if you have connected an
audio/video device to the COAXIAL (DIGITAL
AUDIO) socket on the unit.
>63',)2))@ - Select this option to turn off
digital output.
>63',)5$:@ - Select this option if the
connected device is a multi-channel decoder/
receiver.
>63',)3&0@ - Select this option if the
connected device cannot decode multichannel audio.
>'2:10,;@
Select a suitable audio downmix when you play a
DVD recorded in Dolby Digital format.
>/757@ - Select this if the unit is connected to
a Dolby Pro Logic decoder.
>67(5(2@ - Select this when output delivers
sound from only the two front speakers.
>966@ - Allow the DVD player to use virtual
surround sound effects.
>1,*+702'(@
Make loud sound level softer and soft sound level
louder so that you can watch the DVD movies at a
low volume, without disturbing others.
>21@ - Enjoy quiet viewing at night.
>2))@ - Enjoy surround sound with a full
dynamic range.
Note
Applicable only to Dolby Digital encoded DVD.
3
12
Press SETUP.
Press
to navigate to the >$8',26(783@
page, and then press .
Press
to select an option, and them press
.
Press
to select a setting, and then press
OKWRFRQÀUP
To exit the menu, press SETUP.
EN
Downloaded From DvDPlayer-Manual.com Philips Manuals
>'<1$0,&5$1*(@
6HOHFWWKH'\QDPLF5DQJWRÀWWKHLQGLYLGXDO
listening situation of the audience. The variable
range is from FULL, 6/8~2/8 or OFF.
>)8//@ - Audio with fully compressed
Dynamic Range.
>a@ - Audio with partially compressed
Dynamic Range.
>2))@ - Audio with uncompressed Dynamic
Range.
>'352&(66,1*@
Select a virtual surround sound mode from the
following modes:
>2))@
>&21&(57@
>&+85&+@
>3$66,9(@
>:,'(@
>/,9(@
$GGLWLRQDOLQIRUPDWLRQ
English
9LGHRVHWXS
Care
Caution
Never use solvents such as benzene, thinner, cleaners
available commercially, or anti-static sprays intended
for discs.
Clean discs
:LSHWKHGLVFZLWKDPLFURÀEUHFOHDQLQJFORWKIURP
the centre to the edge in a straight line movement.
3
Press SETUP.
Press
to navigate to the >9,'(26(783@
page, and then press .
Press
to select an option, and them press .
Press
to select a setting, and then press
OKWRFRQÀUP
To exit the menu, press SETUP.
>796<67(0@
Change this setting if the video does not appear
correctly. By default, this setting matches the most
common setting for TVs in your country.
>176&@ - For NTSC-system TV.
>3$/@ - For PAL-system TV.
>$872@ - For TV that is compatible with both
PAL and NTSC.
>797<3(@
The TV format determines the aspect ratio of display
according to the type of TV you have connected.
>36@ - For 4:3 screen TV: full-height display
with the trimmed sides.
>/%@ - For 4:3 screen TV: wide-screen
display with black bars on the top and bottom
of the screen.
>@ - For wide-screen TV: display ratio 16:9.
>3,&785(02'(@
6HOHFWDSUHGHÀQHGVHWRISLFWXUHFRORUVHWWLQJV
>67$1'$5'@ - Original color setting.
>/,9(/<@ - Brilliant color setting.
>%5,*+71(66@ - Vibrant color setting.
>0,/'@ - Soft color setting.
6SHFLÀFDWLRQV
Note
6SHFLÀFDWLRQDQGGHVLJQDUHVXEMHFWWRFKDQJHZLWKRXW
notice
$FFHVVRULHVVXSSOLHG
Remote control and batteries
User Manual
Play media
DVD-Video, Video CD/SVCD, Audio CD,
CD-R/CD-RW, DVD+R/+RW, DVD-R/-RW,
DivX-CD, Picture CD, MP3-CD, WMA-CD
79VWDQGDUG
Number of lines:
625 (PAL/50Hz); 525 (NTSC/60Hz)
Play: Multi-standard (PAL/NTSC)
9LGHRSHUIRUPDQFH
Video DAC: 12 bits, 108 MHz
Video output: 1 Vpp ~ 75 ohm
9LGHRIRUPDW
Digital compression:
DVD/SVCD/VCD/DivX
$XGLRSHUIRUPDQFH
DA converter: 24 bits, 192 kHz
Signal-Noise (1 kHz): > 90 dB (A-weighted)
Dynamic range (1 kHz): > 80 dB (A-weighted)
Crosstalk (1 kHz): > 90 dB
Distortion/noise (1 kHz): > 65 dB
MP3: MPEG L3
$XGLRIRUPDW
Digital:
MPEG/Dolby Digital: Compressed digital
(16, 20, 24 bits, fs 44.1, 48, 96 kHz)
MP3: 96, 112, 128, 256 kbps & variable bit
rate, fs 32, 44.1, 48 kHz
Analog sound stereo
EN
Downloaded From DvDPlayer-Manual.com Philips Manuals
13
Dolby surround compatible downmix from
Dolby Digital multi-channel sound
Connections
Scart output: Euroconnector
Digital output:
1 coaxial: IEC60958 for CDDA/LPCM;
IEC61937 for MPEG 1/2, Dolby Digital
Main unit
Dimensions (w x h x d): 249 x 247 x 54 (mm)
Net Weight: 1.2 kg
Power
Power supply rating: 230V, 50HZ
Power consumption: <10 W
Power consumption in standby mode: <1 W
/DVHUVSHFLÀFDWLRQ
Type: Semiconductor laser InGaAIP (DVD),
AIGaAs (CD)
Wave length: 658 nm (DVD), 790 nm (CD)
Output Power: 7.0 mW (DVD), 10.0 mW
(VCD/CD)
Beam divergence: 60 degrees
7URXEOHVKRRWLQJ
Warning
Risk of electric shock. Never remove the casing of the
product.
To keep the warranty valid, never try to repair the
product yourself.
If you have problems using this product, check the
following points before you request service. If you
still have a problem, register your product and get
support at www.philips.com/welcome.
If you contact Philips, you will be asked for the model
and serial number of your product. The model
number and serial number are on the back of your
product. Write the numbers here:
Model No. __________________________
Serial No. ___________________________
Main unit
7KHEXWWRQVRQWKLVXQLWGRQRWZRUN
Disconnect this product from the power
outlet for a few minutes, then connect again.
No reaction to the remote control.
Connect this product to the power outlet.
Point the remote control at the IR sensor
located on the front panel of this product.
Insert the batteries correctly.
Insert new batteries in the remote control.
14
EN
Downloaded From DvDPlayer-Manual.com Philips Manuals
Picture
No picture.
See the TVs user manual on how to select
the correct input on the TV. Change the TV
channel until you see the Philips screen.
Sound
1RDXGLRRXWSXWIURPWKH79
Ensure that the audio cables are connected to
the audio input of the TV.
Assign the audio input of the TV to the
corresponding video input. See the TV user
manual for details.
1RDXGLRRXWSXWIURPWKHORXGVSHDNHUVRIWKH
DXGLRGHYLFHVWHUHRV\VWHPDPSOLÀHUUHFHLYHU
Ensure that the audio cables are connected to
the audio input of the audio device.
Turn on the audio device to its correct audio
input source.
1RVRXQGGXULQJ'LY;YLGHRSOD\EDFN
The audio codec may not be supported by this
product.
Play
'LY;YLGHRÀOHVFDQQRWEHSOD\HG
(QVXUHWKDWWKH'LY;YLGHRÀOHLVFRPSOHWH
(QVXUHWKDWWKHÀOHQDPHH[WHQVLRQLVFRUUHFW
7KHDVSHFWUDWLRRIWKHVFUHHQLVQRWDOLJQHGZLWK
WKH79GLVSOD\VHWWLQJ
7KHDVSHFWUDWLRLVÀ[HGRQWKHGLVF
'LY;VXEWLWOHVDUHQRWGLVSOD\HGFRUUHFWO\
(QVXUHWKDWWKHVXEWLWOHÀOHQDPHLVWKHVDPH
DVWKHPRYLHÀOHQDPH
Select the correct character set.
Press SETUP.
Select >/$1*8$*(6(783@ > >',9;
/$1*@ in the menu.
Select the character set that supports the
subtitle.
© 2010 Koninklijke Philips Electronics N.V.
All rights reserved.
DVP1033_58_UM_V3.0_1021
Downloaded From DvDPlayer-Manual.com Philips Manuals