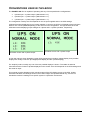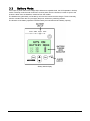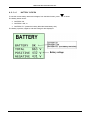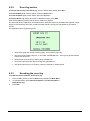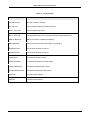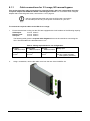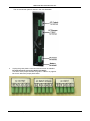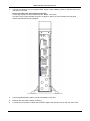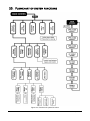
1
This user guide is for product numbers 101SSD11 101SSD41, and 101SSD61. POWER+ SA 10 KVA DOUBLE CONVERSION UPS WITH TRUE ON-LINE BATTERY User-configurable input and output voltage options: INPUT OUTPUT 3 X 400V 3 X 400V 1 X 230V 3 X 400V 1 X 230V 1 X 230V User Guide Release 3.0, August 2015 GAMATRONIC ELECTRONIC INDUSTRIES LTD. 17 Hartom St., P.O.B. 45029, Jerusalem 9777517, Israel Tel: 972-2-588-8222 Fax: 972-2-582-8875 Email: [email protected] Website: www.gamatronic.com 2MUM-PPSA/2 GAMATRONIC ELECTRONIC INDUSTRIES LTD. Har Hotzvim Industrial Park 17 Hartom St., P.O.B. 45029, Jerusalem 9777517, Israel Tel: 972-2-588-8222 Fax: 972-2-582-8875 Email: [email protected] Website: www.gamatronic.com The equipment described in this document is not intended to be used in connection with any application requiring fail-safe performance, unless the application design includes appropriate redundancy. This exclusion includes, but is not limited to, the direct operation of any life support system or any other system whose failure could lead to serious injury, death, environmental damage or mass destruction. Copyright 2015 by Gamatronic Electronic Industries Ltd. All rights reserved worldwide. Any representations in this document concerning the performance of Gamatronic's product(s) are for informational purposes only and are not warranties of future performance, either express or implied. Gamatronic's standard limited Warranty, which accompanies its sales contract or order confirmation form, is the only warranty offered by Gamatronic Electronic Industries Ltd. in relation thereto. Gamatronic Electronic Industries Ltd. ("Gamatronic") warrants the products it manufactures to be free from defect for a period of one calendar year from the date of invoice, including the date of invoice. Gamatronic's liability is limited to repairing or replacing any defective parts in the equipment under warranty. Gamatronic reserves the right to determine whether the repair work shall be performed at Gamatronic's factory, at the customer's premises, or at an alternate site. The customer must obtain authorization from Gamatronic before returning any parts or equipment to Gamatronic for repair or replacement. Any items returned to Gamatronic must be sent freight prepaid. Gamatronic’s liability and warranty to the product are according and subject to the fulfilment and implementation by the customer of all the terms and instructions in connection with “preventive maintenance” and “service and repair” as further detailed in the user guide which is attached to the product and forms an integral part of it.” Gamatronic is not responsible for any damage to the product due to unauthorized repair work, misuse or abuse of the product, or force majeure. If the product is delivered without batteries, Gamatronic is not responsible for any damage or malfunction due to incorrect wiring of the batteries. Gamatronic is not liable for and the Purchaser waives any right of action it has or may have against Gamatronic for any consequential or special damages arising out of any breach of warranty, and for any damages that the Purchaser may claim for damage to any property or injury or death to any person arising out of its purchase or the use, operation or maintenance of the subject product. This warranty includes parts and labor; however, Gamatronic shall not be responsible for any labor subcontracted or performed by the Purchaser to prepare the warranted item for return to Gamatronic or Gamatronic's agent. The information contained in this document is proprietary and is subject to all relevant copyright, patent and other laws protecting intellectual property, as well as any specific agreement protecting Gamatronic's rights in the aforesaid information. Neither this document nor the information contained herein may be published, reproduced or disclosed to third parties, in whole or in part, without the express, prior, written permission of Gamatronic. In addition, any use of this document or the information contained herein for any purposes other than those for which it was disclosed is strictly forbidden. Gamatronic reserves the right, without prior notice or liability, to make changes in equipment design or specifications. Information supplied by Gamatronic is believed to be accurate and reliable. However, no responsibility is assumed by Gamatronic for the use thereof nor for the rights of third parties which may be affected in any way by the use thereof. This document may contain flaws, omissions or typesetting errors; no warranty is granted nor liability assumed in relation thereto unless specifically undertaken in Gamatronic Electronic Industries Ltd. standard limited Warranty. Information contained herein is periodically updated and changes will be incorporated into subsequent editions. If you have encountered an error, please notify Gamatronic Electronic Industries Ltd. All specifications are subject to change without prior notice. The product described in this document may cause interference with radio communications if not installed and used according to the user guide and/or installation guide. Be aware that the product is intended for use in a commercial or industrial setting. Operation of the product in a residential area may cause harmful interference, in which case the user will be required to correct the interference at his own expense. ii Power+ SA User Guide, rel. 3.0 GAMATRONIC ELECTRONIC INDUSTRIES LTD. TABLE OF CONTENTS 1. 2. SAFETY PRECAUTIONS .................................................................................................................... 1 1.1 Do’s ...................................................................................................................................... 1 1.2 Don’ts ................................................................................................................................... 2 INTRODUCTION TO THE POWER+ SA ................................................................................................ 4 2.1 3. 4. 5. 6. 7. 8. 9. Major Parts of the POWER+ SA .......................................................................................... 5 OPERATING MODES ........................................................................................................................ 7 3.1 Normal Mode ........................................................................................................................ 7 3.2 Battery Mode ........................................................................................................................ 8 3.3 Bypass Mode ....................................................................................................................... 9 USER INTERFACE .......................................................................................................................... 10 4.1 Control Panel ..................................................................................................................... 10 4.1.1 On/Off Button ........................................................................................................ 11 4.1.2 Navigation Keypad ................................................................................................ 11 Indicators............................................................................................................... 11 4.2 The POWER+ Display Screen ........................................................................................... 12 4.2.1 The Main Screen ................................................................................................... 12 4.2.2 Status Screens ...................................................................................................... 21 DAILY OPERATION ........................................................................................................................ 27 5.1 Power + SA Start-up .......................................................................................................... 27 5.2 POWER + SA Shutdown ...................................................................................................... 28 THE EVENT LOG ........................................................................................................................... 29 6.1 Alarms ................................................................................................................................ 29 6.2 Navigating to the event log ................................................................................................ 29 6.2.1 Active Alarm display .............................................................................................. 29 6.2.2 Event log entries ................................................................................................... 30 6.2.3 Resetting the event log ......................................................................................... 30 BATTERY TESTS ........................................................................................................................... 34 7.1 Automatic battery test ........................................................................................................ 34 7.2 Manual battery test............................................................................................................. 34 FIRST-TIME SETUP ........................................................................................................................ 35 8.1 Cable connections.............................................................................................................. 35 8.1.1 Cable connections for 3-3 usage, NO manual bypass ......................................... 36 8.1.2 Cable connections for 3-3 usage, WITH manual bypass...................................... 39 8.1.3 Cable Connections for 3-1 Usage ......................................................................... 43 8.1.4 Cable Connections for 1-1 Usage ......................................................................... 46 8.2 Installation and Start-Up Sequence ................................................................................... 49 8.2.1 To start the UPS:................................................................................................... 49 8.2.2 Verify proper number of input and output phases ................................................. 49 8.2.3 Set the output voltage ........................................................................................... 49 8.2.4 Set the system clock ............................................................................................. 49 8.2.5 Modify the screen contrast (optional) .................................................................... 50 8.2.6 Set Automatic Restart mode (optional) ................................................................. 50 8.2.7 Operation .............................................................................................................. 50 SETTING SYSTEM PARAMETERS .................................................................................................... 51 9.1 Setting the system clock .................................................................................................... 51 9.2 Setting screen contrast ...................................................................................................... 52 9.3 Changing the nominal output voltage ................................................................................ 52 9.4 Fine-tune the output voltage .............................................................................................. 53 Power+ SA User Guide, rel. 3.0 iii 10. AUTOMATIC RESTART ................................................................................................................... 55 10.1 Determining the current automatic restart setting .............................................................. 55 10.2 Changing the automatic restart status ............................................................................... 55 11. MISCELLANEOUS FUNCTIONS ........................................................................................................ 57 11.1 Manually entering or leaving bypass mode........................................................................ 57 11.1.1 Entering bypass mode via the manual bypass switch .......................................... 57 11.1.2 Entering bypass mode via the system console..................................................... 58 12. IN THE EVENT OF AN AC POWER OUTAGE ....................................................................................... 60 13. USING THE UPS WITH A GENERATOR ............................................................................................. 63 13.1 The Automatic Transfer Switch (ATS) ............................................................................... 63 14. TROUBLESHOOTING ...................................................................................................................... 65 14.1 Alarm sounds and/or Alarm LED lights up ......................................................................... 65 14.2 Electricity returned but UPS remains in Battery Mode....................................................... 65 14.3 Battery Test failed .............................................................................................................. 65 14.4 The UPS remains in Bypass mode .................................................................................... 65 14.5 Sync Fault .......................................................................................................................... 65 15. ALARM DRY CONTACTS ................................................................................................................ 67 16. RS232 INTERFACE ....................................................................................................................... 69 17. SNMP AGENT (OPTIONAL) ............................................................................................................. 70 18. WIRELESS CONTROL (OPTIONAL) .................................................................................................. 71 19. CHANGING THE UPS LINE CONFIGURATION ................................................................................... 72 19.1 Note regarding battery connection on UPS ....................................................................... 72 19.2 Determining present phase setting .................................................................................... 73 19.3 A Summary Before Changing the Line Configuration ........................................................ 74 19.4 Switching to 3–3 operation ................................................................................................. 75 19.5 Switching to 3–1 operation (3x400 V input, 1x230 V output) ............................................ 81 19.6 Switching to 1–1 operation (1x230 V input, 1x230 V output) ............................................ 89 20. PREVENTIVE MAINTENANCE .......................................................................................................... 96 21. SERVICE AND REPAIRS .................................................................................................................. 96 22. POWER+ SA SPECIFICATIONS ..................................................................................................... 97 23. FLOWCHART OF SYSTEM FUNCTIONS .............................................................................................. 98 iv Power+ SA User Guide, rel. 3.0 GAMATRONIC ELECTRONIC INDUSTRIES LTD. LIST OF FIGURES Figure 1: The POWER+ SA ................................................................................................................ 5 Figure 2: Block diagram of the POWER+ SA ................................................................................... 6 Figure 3: Connections at the rear of the UPS ................................................................................ 38 Figure 4: UPS rear panel with protective cover ............................................................................ 40 Figure 5: UPS rear panel view, with protective cover removed .................................................. 41 Figure 6: Additional views of the UPS rear panel ......................................................................... 42 Figure 7: The manual bypass switch on the rear panel ............................................................... 57 Figure 8: Timing variables when using a generator and an ATS ................................................ 63 Figure 9: Example of an ATS control panel ................................................................................... 64 Figure 10: Block diagram of major components and connections .............................................. 66 Figure 11: Pin numbers in D9 connectors ..................................................................................... 67 Figure 12: Reconfiguring from 1-1 or 3-1 to 3-3 ............................................................................ 77 Figure 13: Remove the four screws from the rear panel .............................................................. 78 Figure 14: Accessing the dip switches (1) ..................................................................................... 79 Figure 15: Accessing the dip switches (2) ..................................................................................... 79 Figure 16: Location of the dip switches ......................................................................................... 80 Figure 17: Components of the terminal assembly ........................................................................ 84 Figure 18: Reconfiguring from 3-3 to 3-1 ....................................................................................... 85 Figure 19: Remove the four screws from the rear panel .............................................................. 86 Figure 20: Accessing the dip switches (1) ..................................................................................... 86 Figure 21: Accessing the dip switches (2) ..................................................................................... 87 Figure 22: Location of the dip switches ......................................................................................... 87 Figure 23: Components of the terminal assembly ........................................................................ 92 Figure 24: Reconfiguring from 3-3 to 3-1 ....................................................................................... 92 Figure 25: Remove the four screws from the rear panel .............................................................. 93 Figure 26: Accessing the dipswitches (1) ...................................................................................... 93 Figure 27: Accessing the dipswitches (2) ...................................................................................... 94 Figure 28: Location of the dipswitches .......................................................................................... 94 Figure 29: Flowchart of system functions ..................................................................................... 98 LIST OF TABLES Table 1: Table 2: Table 3: Table 4: Table 5: Table 6: Table 7: Table 8: Table 9: Outstanding alarm messages........................................................................................... 31 Log messages .................................................................................................................... 33 Line configuration options ............................................................................................... 35 Wiring requirements for 3-3 configuration...................................................................... 36 Wiring requirements for 3-3 configuration...................................................................... 39 Wiring requirements for 3-1 configuration...................................................................... 43 Wiring requirements for 1-1 configuration...................................................................... 46 Assignments for D9 connectors on rear of controller ................................................... 67 UPS line configuration options ........................................................................................ 72 Power+ SA User Guide, rel. 3.0 v CONVENTIONS USED IN THIS BOOK The POWER+ SA UPS is capable of operating with any of three possible line configurations: • 3-phase input – 3-phase output (abbreviated “3-3” ) • 3-phase input – 1-phase output (abbreviated “3-1”) • 1-phase input – 1-phase output (abbreviated “1-1”). The configuration used by the UPS depends on the ac input supplied and on the UPS settings. It follows that when displaying input or output voltages or currents, the UPS’s LCD display screen will show data for one or three phases depending on the UPS’s current configuration. The figures below show the UPS Main screen displaying output voltages in 3-phase and in 1-phase operation, respectively. UPS Main screen with 3-phase output UPS Main screen with 1-phase output In this user manual, when illustrating a given UPS function that includes a voltage display, both possible displays are usually not shown (the single-phase display and the 3-phase display). For simplicity’s sake, usually only one of the two possible displays is shown. The reader is asked to remember that the number of phases displayed on the screen of his UPS depends on the UPS settings and the actual ac input. This manual contains diagrams which include images of the LCD display screen of the UPS. Unless otherwise indicated, the readings shown in the screen images are representational only, and are not intended to match the readings on a specific system in a particular environment. vi Power+ SA User Guide, rel. 3.0 GAMATRONIC ELECTRONIC INDUSTRIES LTD. This page left blank deliberately. Power+ SA User Guide, rel. 3.0 vii ATTACHING THE POWER+ SA TO ITS BASE Attaching the POWER+ Stand-Alone to its base viii Power+ SA User Guide, rel. 3.0 GAMATRONIC ELECTRONIC INDUSTRIES LTD. 1. SAFETY PRECAUTIONS The POWER+ SA UPS system is designed for industrial applications and harsh environments. Nevertheless the POWER+ SA UPS system is a sophisticated power system and should be handled with appropriate care, following these guidelines. 1.1 Do’s WARNING! HIGH TOUCH CURRENT! EARTH CONNECTION ESSENTIAL BEFORE CONNECTING SUPPLY. • Read this manual carefully before starting installation and operation of the UPS. • Review the safety precautions described below to avoid injury to users and damage to the equipment. • This UPS is intended for installation in a temperature-controlled, indoor area that is free from conductive contaminants. • All power connections must be completed by a licensed electrician who is experienced in wiring this type of equipment, and who is familiar with the local electrical codes and regulations. Improper wiring may cause injury to personnel, or death, or damage to the equipment. • Ensure all power is disconnected before performing installation or maintenance. • Leave at least 20 cm of clearance space between the ventilation openings of the UPS and other objects or walls. • The UPS must be well grounded to the building’s grounding system with a conductor that has a current carrying capacity that matches the rating of the UPS. • Battery installation, battery maintenance, and battery replacement shall be performed only by authorized service personnel. • Pay attention to all DANGER, CAUTION, and WARNING notices affixed to the inside and outside of the UPS. • Keep the surroundings clean, uncluttered and free from excess moisture. • Keep the operating environment within the parameters stated in this document. • Allow only qualified technicians to service the UPS. There are no user-serviceable components. Do not try to repair it yourself! • Use the UPS only for its intended purpose. • The batteries should preferably be installed next to the UPS, or as close to it as is practically possible. WARNING! - ENERGIZED CIRCUITS DURING SERVICING: The electronic boards and the control panel circuits remain energized during servicing procedures. Take appropriate precautions! CAUTION - WARNING - RISK OF LETHAL ELECTRIC SHOCK: The battery drawer contains a series of 12-Volt batteries that provide high voltage and energy in the UPS body even when the UPS is not connected to the ac input. Appropriate precautions should be taken during installation, inspection and servicing. Power+ SA User Guide, rel. 3.0 1 CAUTION - WARNING - RISK OF LETHAL ELECTRIC SHOCK: The UPS receives power from more than one source. Disconnection of all of the ac sources and the dc source is required to de-energize this unit before servicing. 1.2 Don’ts • Do not open the cover of the UPS or the battery cabinets under any circumstances. All UPS panels and doors should be closed. • Do not insert any objects through the ventilation holes. • Do not put objects on the UPS. • Do not move the UPS while it is operating. • Do not use the UPS outdoors. • Do not turn the UPS upside down during transportation. • Do not connect or disconnect the cable to the battery cabinet before the battery circuit breaker is turned OFF. • Do not turn ON the battery circuit breaker when the battery cabinet is disconnected from the UPS. • Do not install the UPS next to gas or electrical heaters. A restricted location is recommended in order to prevent access by unauthorized personnel. CAUTION – GROUND CONNECTION ESSENTIAL BEFORE CONNECTING SUPPLY Connect the UPS to ground before connecting it to the ac supply. CAUTION - WARNING - RISK OF ELECTRIC SHOCK! DO NOT REMOVE COVER! Do not remove the UPS cover. There are no user serviceable parts inside. Refer servicing to qualified service personnel. CAUTION - WARNING - RISK OF ELECTRIC SHOCK! Attention service personnel: Capacitors store hazardous energy. Do not remove cover until 5 minutes after disconnecting all ac and dc sources of supply. Do not remove the UPS cover. There are no user serviceable parts inside. Refer servicing to qualified service personnel. WARNING: RISK OF SEVERE DAMAGE TO THE UPS!!! THIS SYSTEM USES THE NEUTRAL LINE FOR OPERATION. THEREFORE, IT IS STRICTLY FORBIDDEN TO CONNECT THIS SYSTEM TO THE AC POWER SOURCE WITHOUT A NEUTRAL (NULL) CONDUCTOR!! FAILURE TO USE A NEUTRAL CONDUCTOR MAY CAUSE PERMANENT DAMAGE TO THE SYSTEM. 2 Power+ SA User Guide, rel. 3.0 GAMATRONIC ELECTRONIC INDUSTRIES LTD. Power+ SA User Guide, rel. 3.0 3 2. INTRODUCTION TO THE POWER+ SA Thank you for purchasing a POWER+ SA UPS system. POWER+ SA is one of the most sophisticated UPSs on the market today. In general, an Uninterruptible Power Supply (UPS) provides backup power for use when the utility ac electric power mains fail or drop to an unacceptable voltage level. POWER+ SA answers this critical need, and more. POWER+ SA is designed to protect your data and equipment and minimize downtime and other adverse effects normally incurred by power irregularities and failures. POWER+ SA continually eliminates surges, spikes and sags that are inherent in commercial utility power. Over time, these irregularities shorten the life of equipment and components. The efficiency of POWER+ SA thus helps to extend the life of your equipment, even during normal use when the input power is constant and continuous. POWER+ SA IS UNIQUE BECAUSE IT • Is a true on-line battery design according to IEC 62040-31. • Is a "green" power solution thanks to THD of 5% at the input, and provides “clean” power to your loads. • Has an overall efficiency of up to 96% and backup efficiency of 98%. • Is relatively light and small. • Can operate in any of three line configurations: 3-3, 3-1, or 1-1 (see chapter 8 beginning on page 35 and chapter 19 beginning on page 72.). POWER+ SA requires little attention or intervention during normal operation; however, you should read and understand the procedures described in this manual to ensure trouble-free operation. 1 IEC 62040-3 is a standard for UPSs, authored by the International Electrotechnical Commission (IEC). The IEC is the leading global organization that prepares and publishes international standards for all electrical, electronic and related technologies. These serve as a basis for national standardization and as references when drafting international tenders and contracts. 4 Power+ SA User Guide, rel. 3.0 GAMATRONIC ELECTRONIC INDUSTRIES LTD. 2.1 Major Parts of the POWER+ SA The POWER+ SA includes the following sub-assemblies: Figure 1: The POWER+ SA CONTROL PANEL The POWER+ SA control panel allows the user to: • manage and control the POWER+ SA • monitor the parameters of all sections of the POWER+ SA CHARGER The UPS includes a 3-phase charger with PFC2. 2 PFC is a feature included that reduces the amount of generated reactive power. Reactive power operates at right angles to true power and energizes the magnetic field. Reactive power has no real value for an electronic device, but electric companies charge for both true and reactive power resulting in unnecessary charges. In power factor correction, the power factor (represented as "k") is the ratio of true power (kwatts) divided by reactive power (kvar). The power factor value is between 0.0 and 1.00. If the power factor is above 0.8, the device is using power efficiently. A standard power supply has a power factor of 0.70-0.75, and a power supply with PFC has a power factor of 0.95-0.99. 5 Power+ SA User Guide, rel. 3.0 INVERTER A 3-phase PWM inverter is connected to batteries by a classic dc link. STATIC SWITCH (ST/SW) The Static Switch enables an automatic transfer of the load from the output of the inverters to an alternate source whenever the inverter can no longer supply power to the load. The static switch transfers current at high speed. BATTERY The POWER+ SA battery bank is used as a backup in the event that the utility ac input fails. The batteries are housed in an external cabinet next to the POWER+ SA cabinet. Batteries are charged by the rectifier, which supplies both the inverter and the battery charger. Figure 2: Block diagram of the POWER+ SA 6 Power+ SA User Guide, rel. 3.0 GAMATRONIC ELECTRONIC INDUSTRIES LTD. 3. OPERATING MODES The POWER+ SA is installed between the power mains and your load devices, and supplies ac electrical power to your equipment. The POWER+ SA has three automatic modes of operation: • Normal mode • Battery mode • Bypass mode 3.1 Normal Mode POWER+ SA almost always operates in normal mode. In normal mode the load receives its power from the inverters that supply stabilized voltage, protected from spikes and irregularities in the ac input. The ac input system feeds the charger which supplies dc power to the inverter, while concurrently charging the batteries. Normal Mode display Power+ SA User Guide, rel. 3.0 7 3.2 Battery Mode If the input ac power fails or the voltage drops below an acceptable level, the UPS operates in backup mode. In backup mode the load continues to receive power from the inverters, but the dc input to the inverter is taken from the batteries, instead of from the rectifier. The batteries are galvanically connected by dc link to the inverter and the charger. The dc inherently remains constant when the ac input supply drops out, without any switching devices. The duration of the battery operation is determined by the load demand and battery capacity. Battery Mode display 8 Power+ SA User Guide, rel. 3.0 GAMATRONIC ELECTRONIC INDUSTRIES LTD. 3.3 Bypass Mode In bypass mode the load receives power directly from the ac input via the static switch. Whenever the inverters cannot provide power to the load, for example, due to an overload or a short-circuit in the load, the UPS supplies the load directly from the ac input, bypassing the inverter. As soon as the problem is corrected, the load is transferred back to the inverter automatically. Bypass Mode display Power+ SA User Guide, rel. 3.0 9 4. USER INTERFACE This section describes the buttons and indicators used to operate the POWER+ SA. 4.1 Control Panel The POWER+ SA Control Panel includes an LCD display, control buttons, and LED indicators. The control panel has three principle functions: • Shows the current operating mode • Lets you display other current readings • Lets you modify UPS settings and operating mode The control panel is for use by the end-user and the service technician. The POWER+ SA control panel 10 Power+ SA User Guide, rel. 3.0 GAMATRONIC ELECTRONIC INDUSTRIES LTD. 4.1.1 On/Off Button To turn the UPS on, press the button twice. To turn the UPS off, press the button twice. 4.1.2 Navigation Keypad The control panel’s keypad consists of three buttons. The UP/DOWN key is used to navigate through screens and browse the Event Log. The Ent (Enter) key is used to select an item or apply a change. The Esc (Escape) key returns you to the Main Screen. During an active alarm condition, pressing the Esc button from the Main Screen silences the audible alarm. Indicators The top of the control panel contains four LCD indicators. The status indicators show what is running and how the UPS is providing power to the load. The table shows the color and meaning of the LCD status indicators when lit. AC INPUT Green – ac input is present and within normal range. NORMAL Green – The UPS is in normal mode. BATTERY Yellow – The UPS is in Battery mode BYPASS Yellow – The UPS is in Bypass mode ALARM Red – Indicates an alarm condition. To determine the nature of the alarm: From the Main Screen press Ent to display the main menu, press Ent again to see the Alarm Status, press Ent once more to see the Event Log. Power+ SA User Guide, rel. 3.0 11 4.2 The POWER+ Display Screen The display screen on the POWER+ SA control panel shows the current operating mode and related critical data. There are several distinct data screens that can be shown on the POWER+ SA display screen. 4.2.1 The Main Screen The POWER+ SA Main Screen is the default display on the POWER+ SA screen. From any other screen, if the keyboard is not used for 45 seconds, the POWER+ SA returns to the Main Screen. The Main Screen shows the UPS’s current operating mode and other critical data. Other screens describing current operating conditions can be seen by navigating “upwards” or “downward” with the UP/DOWN key. The first line of the Main Screen shows whether the UPS is currently on or off. The second line tells you the most important information about the UPS’s current status. Most of the time it will read “NORMAL MODE”. The UPS can also automatically transfer to: • BATTERY MODE • BYPASS MODE • UPS OFF The L1, L2, and L3 numbers in the Main Screen show the current load rate as a percent of maximal ac load at each phase. 12 Power+ SA User Guide, rel. 3.0 GAMATRONIC ELECTRONIC INDUSTRIES LTD. 4.2.1.1 NORMAL MODE In Normal mode, the Main Screen displays the message: UPS ON, NORMAL MODE. The ac INPUT and NORMAL LEDs are lit. The following picture shows the Main Screen as you will see it most of the time, in Normal Mode. In the event of a battery test failure, an icon indicating this appears in the lower right quadrant of the screen, the alarm LED lights, and the audible alarm sounds. Power+ SA User Guide, rel. 3.0 13 In the event of an overload condition, an icon indicating this appears in the lower right quadrant of the Main Screen, the alarm LED ligits, and the audible alarm sounds. 14 Power+ SA User Guide, rel. 3.0 GAMATRONIC ELECTRONIC INDUSTRIES LTD. 4.2.1.2 BATTERY MODE When the UPS is operating in battery mode, the Main Screen first displays the message: UPS ON, BATTERY MODE. As the battery discharges, the number of “stripes” on the battery icon decreases. Power+ SA User Guide, rel. 3.0 15 When the “BATTERY LOW” message appears, there are only a few seconds before the battery is exhausted. To avoid losing information, you should at this time save your data and perform an orderly shutdown of any computers connected to the UPS, if you have not already done so. When the UPS battery is exhausted, the UPS does one of two things, depending on the setting of autorestart mode: • 16 When auto-restart is DISABLED, the UPS shuts off and remains off, even when ac power is restored. When ac power is restored you must press the OFF/ON button twice to turn on the UPS. Power+ SA User Guide, rel. 3.0 GAMATRONIC ELECTRONIC INDUSTRIES LTD. • When auto-restart is ENABLED, the Main Screen shows the UPS ON message. When ac power is restored, the UPS starts up automatically. Power+ SA User Guide, rel. 3.0 17 4.2.1.3 BYPASS MODE In Bypass mode, the Main Screen displays the message: UPS ON, BYPASS MODE. The ac INPUT∗, BYPASS, and ALARM LEDs are lit. After 60 seconds in Bypass Mode the audible alarm sounds. The UPS goes into bypass mode automatically in the case of an overload or if there is an inverter fault. Bypass mode can also be invoked manually. If the UPS was put in Bypass mode manually, the message “Manual Bypass” appears on the screen. When an overload condition occurs, the UPS moves to Bypass mode until the overload is resolved. ∗ If the UPS went to bypass mode due to a failure of the ac input, and the bypass input is still live, the ac Input LED will not be lit at this time. 18 Power+ SA User Guide, rel. 3.0 GAMATRONIC ELECTRONIC INDUSTRIES LTD. 4.2.1.4 UPS OFF OFF mode is invoked by pressing the On/Off button twice when the UPS is operating. The OFF screen displays the message: UPS OFF, NO OUTPUT. OFF mode can also be invoked automatically in the event of an extended ac power outage, if auto-restart is disabled. Power+ SA User Guide, rel. 3.0 19 OFF mode can also be invoked remotely, through the RS232 data connection. 20 Power+ SA User Guide, rel. 3.0 GAMATRONIC ELECTRONIC INDUSTRIES LTD. 4.2.2 Status Screens From the Main Screen, by means of the UPS status information: • UPS Profile screen • ac Output screen • ac Input screen • Bypass screen • Inverter screen • Battery screen 4.2.2.1 button, you can access several screens that provide current UPS PROFILE SCREENS To see the UPS Profile screens, from the Main Screen, press once. There are three UPS Profile screens. The first UPS Profile screen shows: • Current date according to the UPS’s clock (DD.MM.YYYY) • Current time according to the UPS’s clock (HH:MM:SS). See section 8.1 for instructions on setting the system clock. • Nominal output voltage • Nominal output frequency • Auto-restart status (ON or OFF). See chapters 9 and 11 for information about the Auto Restart feature. To see the second UPS Profile screen, press again. The second UPS Profile screen shows: • The software version on card PC705. • The software version on card PC701. • Current contrast setting of the display screen (see page 49 for information on the contrast setting). To see the third UPS Profile screen, press again. The third UPS Profile screen shows: • The status of the Bypass option: ON or OFF. • The phase shift between the output phases. • Whether the current in the input phases is symmetric (equal) or unsymmetric (unequal). Power+ SA User Guide, rel. 3.0 21 UPS Profile screen 1 UPS Profile screen 2 UPS Profile screen 3 4.2.2.2 AC OUTPUT SCREEN To see the current status of the UPS’s ac output, from the Main Screen, press twice. The checkmark indicates that the ac voltage of each output phase is within acceptable range; otherwise an “X” is displayed instead of the checkmark. The voltage and current for the three output phases is also displayed. 22 Power+ SA User Guide, rel. 3.0 GAMATRONIC ELECTRONIC INDUSTRIES LTD. 4.2.2.3 AC INPUT SCREEN To see the current status of the ac input to the UPS, from the Main Screen, press three times. The checkmark indicates that the ac voltage of each input phase is within an acceptable range; otherwise an “X” is displayed instead of the checkmark. The voltage and current for the three input phases is displayed. 4.2.2.4 BYPASS SCREEN To see the current status of the Bypass, from the Main Screen, press four times. The checkmark indicates that the voltage of all three phases at the Bypass Switch is within an acceptable range. If the voltage of any of the phases is out of range, an X is displayed instead of the checkmark. The voltage and current for the three Bypass phases is also displayed. Power+ SA User Guide, rel. 3.0 23 4.2.2.5 INVERTER SCREEN To display the current status of the inverter, from the Main Screen, press five times. One of three possible messages describes the status of the bypass input voltage: SYNC OK = The inverter output is phase-synchronized with the bypass input. SYNC ORD = The phase sequence of the bypass input is incorrect. SYNC FLT = The bypass input and the inverter output are not in sync. A checkmark indicates that the voltage of all three phases of the inverter output is within an acceptable range. If the voltage of any of the phases is out of range, an X is displayed instead of the checkmark. The output voltage and current for each inverter phase is also displayed. 24 Power+ SA User Guide, rel. 3.0 GAMATRONIC ELECTRONIC INDUSTRIES LTD. 4.2.2.6 BATTERY SCREEN To see the current battery status and voltages, from the Main Screen, press six times. The battery status can be: • BATTERY OK, • BATTERY LOW, or • BATTERY FLT (means the battery failed the latest battery test). The battery’s positive, negative, and total voltage is also displayed. Power+ SA User Guide, rel. 3.0 25 4.2.2.7 THE POWER+ SA MAIN MENU Through the use of the control panel buttons, the user can: • Modify UPS settings, • Perform a manual battery test, • Move the UPS to bypass mode or back to inverter mode, • View current alarms, • View the event history. The Main Menu is your point of access to a number of informational and control features. To display the Main Menu, from the Main Screen press Ent. . POWER+ SA Main Menu The Main Menu options are described elsewhere in this book: Event Log : The event log displays current alarm conditions and lists a history of significant events. See chapter 6. Set Clock : Sets the date and time used by the UPS. See section 8. Select Language : This feature not applicable for this model Battery Test : Shows you when the next automatic battery test is scheduled to occur; lets you perform a manual battery test. See page 31. Advanced Options : A sub-menu. See page 52 for an image of the “Advanced” submenu. 26 Power+ SA User Guide, rel. 3.0 GAMATRONIC ELECTRONIC INDUSTRIES LTD. 5. DAILY OPERATION 5.1 Power + SA Start-up This section explains how to start-up the POWER + SA after a shutdown. You are beginning the process from the UPS OFF NO OUTPUT screen. 1. Press the ON/OFF button twice. The BYPASS and ALARM LEDs light up for about 40 seconds. 2. After a short time the screen reads “UPS ON, NORMAL MODE”. The ac INPUT and NORMAL LEDs are lit. 3. You can now turn on the computers or other equipment connected to the UPS. POWER + SA start-up is now complete. Power+ SA User Guide, rel. 3.0 27 5.2 POWER + SA Shutdown This section describes the shutdown procedures for the UPS if you want to shut it down for a period of time during which the load devices will not be operating. Begin the process from the UPS ON, NORMAL MODE screen. 1. It is advisable to turn of all equipment connected to the POWER + SA. 2. Press the ON/OFF button twice. The ALARM LED lights up for a few seconds, then the screen reads “UPS OFF, NO OUTPUT”. The POWER + SA shutdown is now complete. 28 Power+ SA User Guide, rel. 3.0 GAMATRONIC ELECTRONIC INDUSTRIES LTD. 6. THE EVENT LOG The Event Log is really a combination of two functions: • A display of active alarms • A history of important events that occurred to the UPS. 6.1 Alarms In the event of an alarm (the audible alarm sounds or the red alarm light on the POWER+ SA console lights up), go to the Event Log to determine the nature of the problem. (Pressing the Esc key from the Main Screen silences the audible alarm.) 6.2 Navigating to the event log To see the event log: 1. From the Main Screen, press the Ent button to display the Main Menu. 2. On the Main Menu, press Ent again. 6.2.1 Active Alarm display The first thing you see upon entering the Event Log is the Active Alarm display. If there are any active alarms, a 1-line message is displayed for each alarm to indicate the nature of the alarm. For example, in the following illustration there are three active alarms: END OF BACKUP (i.e., the battery has been exhausted), AC INPUT FAIL, and BYPASS NOT READY. A list of all possible alarms can be seen in Table 1 on page 31. If there are no active alarms, the display indicates this. Power+ SA User Guide, rel. 3.0 29 6.2.2 Event log entries To see the latest entry in the Event Log, from the Active Alarm display press Ent. To scroll backwards to previous entries, press the Down button. To scroll forwards again to later entries, press the Up button. To exit the Event Log entirely and return to the Main Screen, press ESC. A list of all possible log entries can be seen in Table 2 on page 33. The event log has the capacity to record 200 events. When this number is exceeded, the logwriter “wraps around” to the beginning of the file, so that the oldest events in the log are overwritten by the newest events. The illustration shows a typical log entry. • The first line gives the number of the log entry. This is the 23rd log entry. • The second line gives the log text – in this case, “INVERTER OFF”. The log entry shows that the inverter was turned off. • The third line show the time of the log entry (HH:MM:SS). • The fourth lines shows the date of the log entry (DD.MM.YY). • The last line prompts you to scroll up or down to see later or earlier entries. 6.2.3 Resetting the event log To erase the current contents of the event log: 1. From the Main Screen, press the Ent button to display the Main Menu. 2. On the Main Menu, select Advanced Options > Technicians Menu > Reset Event Log. 3. Press Ent. 30 Power+ SA User Guide, rel. 3.0 GAMATRONIC ELECTRONIC INDUSTRIES LTD. Table 1: Outstanding alarm messages ALARM MESSAGE Explanation Meaning: The voltage of one or more of the input ac phases is out of range, or there is no ac input at all. The UPS is now in Battery Mode. Additional indications: The alarm LED lights up and the audible alarm sounds. AC INPUT FAIL The symbol appears on the Ac Input screen. Action: If there is a power outage, it is advisable to save any critical open files you are working on before the UPS battery is exhausted. See “In the event of an ac power outage” on page 57. If there is not a power outage, check the circuit breaker for the line supplying the UPS with power. The circuit breaker may be off. Meaning: The voltage of at least one of the output ac phases is out of range. Additional indications: The alarm LED lights up and the audible alarm sounds. AC OUTPUT FAULT The symbol appears on the Ac Output screen. Action: After a power outage, this message can be ignored. This message could also be the result of an overload. Reduce the load on the UPS; this may resolve the problem. If not, contact Technical Support. Meaning: The battery will soon be fully discharged. Additional indications: The alarm LED lights up and the audible alarm sounds. BATTERY LOW The symbol appears on the Main Screen. Action: Shut down your computer or other equipment connected to the UPS. Meaning: The most recent battery test has failed. Additional indications: The alarm LED lights up and the audible alarm sounds. BATTERY TEST FAIL The symbol appears on the Main Screen. Action: It is possible that the most recent battery test occurred after a power outage and before the battery had fully recharged. Wait until two hours have elapsed from the most recent battery test and perform a manual battery test. See “Manual battery test” on page 31. Meaning: The voltage of at least one of the Bypass phases is out of range, and a transfer to Bypass mode cannot be made at this time. Additional indications: The alarm LED lights up and the audible alarm sounds. BYPASS NOT READY The symbol appears on the Bypass screen. Action: This alarm can be the result of a power outage, in which case it can be ignored. Otherwise, check the circuit breaker for the line supplying the Bypass voltage. The circuit breaker may be off. Power+ SA User Guide, rel. 3.0 31 Meaning: The batteries have been exhausted, and the UPS has turned itself off. Additional indications: The UPS has turned itself OFF. END OF BACKUP 8kVA, 208V model: The symbol. appears on the Main Screen. 10kVA, 400V model: The UPS screen is blank. Action: Wait for ac power to return. Then, if the UPS is in Auto Restart mode it will start up automatically; otherwise, start the UPS manually by pressing the OFF/ON button twice. Meaning: The Inverter is not synchronized with the Bypass voltages. Additional indications: The alarm LED lights up and the audible alarm sounds. INV. SYNC. FAULT The symbol appears on the Inverter screen. Action: Check the voltage readings on the Inverter screen. If the readings are in range and the alarm persists, contact Customer Support. Meaning: The voltage of one or more of the Inverter output phases is out of range. INV. VOLT. FAULT Additional indications:The alarm LED lights up and the audible alarm sounds. The symbol appears on the Inverter screen. Action: Contact Customer Support. Meaning: The output voltage is the Bypass voltage. Additional indications: LOAD ON BYPASS Action: If the UPS was set to Bypass mode manually (“Manual Bypass” appears on the Main Screen), you can manually return it to inverter mode to end the alarm condition. If the UPS moved to Bypass mode automatically, an overload condition may have been the cause (“OVERLOAD” appears on the Main Screen). In this case, try reducing the load on the UPS. Meaning:One or more of the ac phases into the Charger is out of range. ONE PHASE FAULT Additional indications The alarm LED lights up and the audible alarm sounds. Action: This is likely to be due to a problem with the input ac supply. Meaning:There is an overload condition. OVERLOAD Additional indications The alarm LED lights up and the audible alarm sounds. If the output current is between 104 – 117%, for 10 minutes, or between 117 – 131% for one minute, or above 131% for 20 msec, the UPS shuts down. The symbol appears on the Main Screen. Action: Reduce the load to the UPS quickly, or the UPS will automatically move to Bypass mode. 32 Power+ SA User Guide, rel. 3.0 GAMATRONIC ELECTRONIC INDUSTRIES LTD. Table 2: Log messages LOG ENTRY EXPLANATION AC LINE FAULT No input voltage to charger. AC LINE OK Input voltage to charger has been restored BATT. TEST FAIL The last battery test failed. BATT. TEST.OK The last battery test was successful (following a failed battery test). END OF BACKUP Battery has been completely discharged. RECHARGING Mains power has returned and battery is recharging. INVERTER OFF The inverter has been turned off. INVERTER ON The inverter has been turned on. OVERLOAD An overload condition exists. LOAD IN RANGE The load has returned to normal range. LOAD ON BYPASS The load is bypassing the inverter. LOAD ON INVERTER The load has returned to the inverter. UPS OFF The UPS was turned off. UPS ON The UPS was turned on. Power+ SA User Guide, rel. 3.0 33 7. 7.1 BATTERY TESTS Automatic battery test The POWER+ SA is programmed to perform a battery test automatically every two weeks. 7.2 Manual battery test To perform a battery test outside of this schedule (a “manual” battery test): 1. From the Main Screen, press the Ent button to display the Main Menu. On the Main Menu select Battery Test and press Ent. The resulting screen tells you the time until the next scheduled automatic battery test. To perform a manual test, press Ent again. The battery test lasts for 60 seconds. The screen shows a countdown of the time remaining in the test. To end the test immediately, press Ent again. If the POWER+ SA batteries fail a battery test, the battery failure icon SA screen and remains there until a later battery test is passed. 34 appears on the POWER+ Power+ SA User Guide, rel. 3.0 GAMATRONIC ELECTRONIC INDUSTRIES LTD. 8. FIRST-TIME SETUP Your POWER+ SA UPS is capable of operating with any of three possible line configurations. The configuration used by the UPS depends on the AC input supplied and on the UPS settings. The permitted line configurations are shown in the following table. Table 3: Line configuration options INPUT OUTPUT SHORTHAND DESIGNATION 3 PHASES, 400V EA. 3 PHASES, 400V EA. 3-3 3 PHASES, 400V EA. 1 PHASE OF 230V 3-1 1 PHASE OF 230V 1 PHASE OF 230V 1-1 Your POWER+ SA UPS was probably already set at the factory or by your dealer to operate with the number of input and output phases appropriate for your requirements. 8.1 Cable connections. The cable connections for your POWER+ SA UPS vary depending on which line configuration is used. Refer to the appropriate section below. The cable connections on your unit may have a slightly different appearance from those shown in the diagrams in this section. The following sections describe installation of the Power+ in the following configurations: • 3-3, using an adaptor without a manual bypass switch (section 8.1.1 on page 36). • 3-3, using an adaptor that includes a manual bypass switch (section 8.1.2 on page 39). • 3-1 (section 8.1.3 on page 43). • 1-1 (section 8.1.4 on page 46). Power+ SA User Guide, rel. 3.0 35 8.1.1 Cable connections for 3-3 usage, NO manual bypass This section describes cable connections for using the Power+ SA in 3-3 configuration using the rear-panel adapter that DOES NOT HAVE a manual bypass switch. For connections when using the adapter with a manual bypass switch, see section 8.1.2 on page 39. Only an authorized electrician may wire the UPS power connections. Do not attempt to wire any of the power connections on your own. To connect the required cables to the UPS for 3-3 usage: 1. Ensure that the lines coming into the UPS are equipped with circuit breakers of the following capacity: UPS output: 3x16 A Class C Bypass input: 3x16 A Class C AC input: 3x16 A Class C The following table gives the required cable diameters that must be used when connecting the UPS. The table states the cable diameters in mm2. Table 4: Wiring requirements for 3-3 configuration AC output Gnd, N, L1, L2, L3 2.5 mm 2. 36 2 Bypass input Gnd, N, L1, L2, L3 2.5 mm 2 AC input Gnd, N, L1, L2, L3 4 mm 2 Battery input 4 mm2 (Use the 1.5 meter-long battery cable supplied by Gamatronic.) Using a screwdriver, remove the cable cover from the rear of the POWER+ SA. Power+ SA User Guide, rel. 3.0 GAMATRONIC ELECTRONIC INDUSTRIES LTD. The uncovered rear panel is shown in the next illustration. 3. Unplug the green plastic connectors and wire them as labelled. Be sure the wires are not live before you begin. Use wires of the proper diameter, as given in Table 4 on page 36. Be sure to follow the proper phase order. Power+ SA User Guide, rel. 3.0 37 Figure 3: Connections at the rear of the UPS 4. Connect the wired connectors to the rear of the UPS. 5. Use the supplied battery cable to connect the battery to the UPS. 6. Recheck the connections before continuing. 7. To conceal and protect the cables and terminals, replace the outside cover on the rear of the UPS. 38 Power+ SA User Guide, rel. 3.0 GAMATRONIC ELECTRONIC INDUSTRIES LTD. 8.1.2 Cable connections for 3-3 usage, WITH manual bypass Note: the Manual Bypass Switch is OPTIONAL EQUIPMENT, not standard. If the customer desires a Manual Bypass Switch it must be specifically ordered as a separate item. This section describes cable connections for using the Power+ SA in 3-3 configuration using the rear-panel adapter that HAS A MANUAL BYPASS SWITCH. The rear panel adaptor provides “single-feed” input, meaning that the bypass input is taken from the rectifier input lines. For 3-3 connections for the adapter without a manual bypass switch, see section 8.1.1 on page 36. To install the UPS and prepare it for initial start-up: 1. Verify that the external circuit breaker in the mains electrical cabinet for UPS input is OFF. No voltage should be present in the cables. 2. Verify that the battery cabinet circuit breaker is OFF. 3. Ensure that the lines coming into the UPS are equipped with circuit breakers of the following capacity: UPS output: 3x16 A Class C AC / bypass input: 3x16 A Class C 4. The following table gives the required cable diameters that must be used when connecting the 2 UPS. The table states the cable diameters in mm . Table 5: Wiring requirements for 3-3 configuration AC output Gnd, N, L1, L2, L3 2.5 mm Bypass input Gnd, N, L1, L2, L3 2 2.5 mm 2 AC input Gnd, N, L1, L2, L3 4 mm 2 Battery input 4 mm2 (Use the 1.5 meter-long battery cable supplied by Gamatronic.) 5. Remove the protective cover from the UPS rear panel. 6. Connect the UPS wiring according to the labeling on the unit, shown in Figure 5 on page 41. Power+ SA User Guide, rel. 3.0 39 Figure 4: UPS rear panel with protective cover Note: the Manual Bypass Switch is OPTIONAL EQUIPMENT, not standard. If the customer desires a Manual Bypass Switch it must be specifically ordered as a separate item. 40 Power+ SA User Guide, rel. 3.0 GAMATRONIC ELECTRONIC INDUSTRIES LTD. Figure 5: UPS rear panel view, with protective cover removed 7. Run the ac output cable through the cable holder labeled “ac output” in Figure 5. Connect the cable to the ac output terminals, also detailed in Figure 5. Use the appropriate grade of wire as specified in Table 5 on page 39, or according to local electrical codes. 8. Run the ac input cable through cable holder labeled “ac input” in Figure 5. Connect the cable to the ac input terminals, also shown in Figure 5. Use the appropriate grade of wire as specified in Table 5 on page 39, or according to local electrical codes. 9. Run the batteries cable through the cable holder labeled “Batteries” in Figure 5. Connect the cable to the ac input terminals, also shown in Figure 5. Use the appropriate grade of wire as specified in Table 5 on page 39, or according to local electrical codes. 10. Tighten all cable holders so that the cables are fastened securely. Power+ SA User Guide, rel. 3.0 41 11. Connect the PE-Ground cable to the PE-Ground pin, shown in Figure 5. Figure 6: Additional views of the UPS rear panel 42 Power+ SA User Guide, rel. 3.0 GAMATRONIC ELECTRONIC INDUSTRIES LTD. 8.1.3 Cable Connections for 3-1 Usage Only an authorized electrician may wire the UPS power connections. Do not attempt to wire any of the power connections on your own. To connect the required cables to the UPS: 1. Ensure that the lines coming into the UPS are equipped with circuit breakers of the following capacity: UPS output: 50 A Class C Bypass output: 50 A Class C AC input: 3x16 A Class C The following table gives the required cable diameters that must be used when connecting the UPS. The table states the cable diameters in mm2. Table 6: Wiring requirements for 3-1 configuration AC output Gnd, N, Ph 2 10 mm 2. Bypass input Gnd, N, Ph 2 10 mm AC input Gnd, N, L1, L2, L3 2.5 mm 2 Battery input 4 mm2 (Use the 1.5 meter-long battery cable supplied by Gamatronic.) Using a screwdriver, remove the cable cover from the rear of the POWER+ SA. The uncovered rear panel for the 3-1 configuration is shown in the next illustrations. Power+ SA User Guide, rel. 3.0 43 44 Power+ SA User Guide, rel. 3.0 GAMATRONIC ELECTRONIC INDUSTRIES LTD. 3. Connect the cables for Ac Input, Bypass Input, Output, and the Battery cables, to the terminals on the rear panel of the UPS. Ensure the cables are not live before you begin. For the Bypass input, use the R phase for the “Phase” connection. Use wires of the proper diameter, as given on page 43. When you have finished, the rear panel should resemble the following diagram. 4. Use the supplied battery cable to connect the battery to the UPS. 5. Recheck the connections before continuing. 6. To protect and conceal the cables and terminals, replace the outside cover on the rear of the UPS. Power+ SA User Guide, rel. 3.0 45 8.1.4 Cable Connections for 1-1 Usage Only an authorized electrician may wire the UPS power connections. Do not attempt to wire any of the power connections on your own. To connect the required cables to the UPS: 1. Ensure that the lines coming into the UPS are equipped with circuit breakers of the following capacity: UPS output: 50A Class C Bypass output: 50A Class C AC input: 50A Class C The following table gives the required cable diameters that must be used when connecting the UPS. The table states the cable diameters in mm2. Table 7: Wiring requirements for 1-1 configuration AC output Gnd, N, Ph 2 10 mm Bypass input Gnd, N, Ph 2 10 mm AC input Gnd, N, Ph 2 10 mm Battery input 4 mm2 (Use the 1.5 meter-long battery cable supplied by Gamatronic.) Using a screwdriver, remove the cable cover from the rear of the POWER+ SA. The uncovered rear panel is shown in the next illustration. 46 Power+ SA User Guide, rel. 3.0 GAMATRONIC ELECTRONIC INDUSTRIES LTD. Power+ SA User Guide, rel. 3.0 47 2. Connect the AC Input, Bypass Input, and Output cables to the terminals on the rear panel of the UPS. Ensure the cables are not live before you begin. Use wires of the proper diameter, as given on page 43. When you have finished, the rear panel should resemble the following diagram. 3. Use the supplied battery cable to connect the battery to the UPS. 4. Recheck the connections before continuing. 5. To protect and conceal the cables and terminals, replace the outside cover on the rear of the UPS. 48 Power+ SA User Guide, rel. 3.0 GAMATRONIC ELECTRONIC INDUSTRIES LTD. 8.2 8.2.1 Installation and Start-Up Sequence To start the UPS: 1. Attach the load device, if desired, but do not turn it on until you have set the UPS output voltage, as described below. 2. Turn on the circuit breakers for the AC input, the Bypass input, and the Battery. The UPS performs a self test; this takes about a minute. Afterwards, you should see the following screen. 8.2.2 Verify proper number of input and output phases Before turning the UPS on for the first time, verify that the UPS’s setting for number of input and output phases is correct for your requirements. The phase setting can be seen on the second page of the Profile screen, shown here with the phase setting highlighted. See page 18 for instructions on how to display the Profile screen. 8.2.3 Set the output voltage Before turning the UPS on, you must set the UPS nominal output voltage, if needed. See “Changing the nominal output voltage” on page 52. 8.2.4 Set the system clock Now set the system clock to the correct date and time. See “Setting the system clock” on page 51. Power+ SA User Guide, rel. 3.0 49 8.2.5 Modify the screen contrast (optional) You can modify the screen contrast, if necessary. See “Setting screen contrast” on page 52. 8.2.6 Set Automatic Restart mode (optional) You can enable automatic restart mode at this time, if desired. See “Automatic Restart” on page 55. 8.2.7 Operation To turn the UPS on, press the ON/OFF button twice and wait a few seconds. The following screen is displayed. The “AC Input” and “Normal” LEDs should be lit. Turn on the AC output circuit breaker. You can now operate the equipment attached to the POWER+ SA. 50 Power+ SA User Guide, rel. 3.0 GAMATRONIC ELECTRONIC INDUSTRIES LTD. 9. SETTING SYSTEM PARAMETERS There are several system parameters that can be modified as needed. In general, you only need set these parameters once, during the first-time setup of the POWER+ SA. 9.1 Setting the system clock The system clock is used in recording entries to the POWER+ event log. The clock should be set to the correct time so that the log entries will reflect the true time of events. To set the system clock: 1. From the Main Screen, press the Ent button to display the Main Menu. 2. On the Main Menu, select SET CLOCK and press Ent. This displays the CLOCK screen, which shows the current time and date according to the POWER+ SA clock. The information is displayed in the format HH:MM:SS DD:MM:YYYY 3. To change the time and date, press Ent. At any time in the following process you can press Esc to exit to the Main Screen. The changes you made before pressing Esc are saved. 4. The SET MINUTES screen is displayed. Use the UP/DOWN button to change the minutes setting. 5. Press Ent. The SET HOUR screen is displayed. Use the UP/DOWN button to change the hours setting. 6. Press Ent. The SET DAY screen is displayed. Use the UP/DOWN button to change the day setting. 7. Press Ent. The SET MONTH screen is displayed. Use the UP/DOWN button to change the month setting. 8. Press Ent. The SET YEAR screen is displayed. Use the UP/DOWN button to change the year setting. 9. Press Esc to exit to the Main Screen. Power+ SA User Guide, rel. 3.0 51 9.2 Setting screen contrast The screen contrast function controls the visibity of the message text against the screen background. The default setting of 144 is usually satisfactory, but you can modify the default setting between the values of 0 and about 210, if needed. To modify the console contrast: 1. From the Main Screen, press the Ent button to display the Main Menu. 2. From the Main Menu, select ADVANCED OPTIONS and press Ent. 3. From the ADVANCED menu select SCREEN CONTRAST and press Ent. The following screen is displayed. 4. Press the UP button repeatedly to make the screen “greener”. Press the DOWN button repeatedly to make the screen darker (blacker). 9.3 Changing the nominal output voltage Do not change the output voltage unless you are sure that this is required by your load devices and you are sure that the new output voltage will not damage the load devices. To change the nominal output voltage: 1. If the POWER + SA is not already in “off” mode, press the ON/OFF button twice to turn the UPS off. 2. From the Main Screen, press the Ent button to display the Main Menu. 3. On the Main Menu, choose ADVANCED OPTIONS and press Ent. 4. In the ADVANCED MENU, select TECHNICIAN MENU. 5. In the TECHNICIAN MENU select CHANGE VOLTAGE. 6. You are prompted to choose the type of voltage to change. Select OUTPUT VOLTAGE. 52 Power+ SA User Guide, rel. 3.0 GAMATRONIC ELECTRONIC INDUSTRIES LTD. 7. You are prompted to choose a change to the nominal value or an adjustment (fine-tuning). Choose NOMINAL VALUE. 8. Use the UP/DOWN button to change the output voltage. You can adjust it in a range from 220 to 240V. Press Ent to apply the change. After pressing Ent the screen looks like this: 9. The UPS fans may stop working for a moment. They will start up again by themselves after the voltage adjustment is complete. 10. Press Esc to return to the Main screen. 9.4 Fine-tune the output voltage You have the ability to “fine-tune” the UPS output voltage. You can adjust each phase of the output voltage up and down by one or more volts, if needed. To change the nominal output voltage: 1. From the Main Screen, press the Ent button to display the Main Menu. 2. On the Main Menu, choose ADVANCED OPTIONS and press Ent. 3. In the ADVANCED MENU, select TECHNICIAN MENU. 4. In the TECHNICIAN MENU select CHANGE VOLTAGE. 5. You are prompted to choose the type of voltage to change. Select OUTPUT VOLTAGE. 6. You are prompted to choose a change to the nominal value or an adjustment (fine-tuning). Choose DO ADJUSTMENT 7. You are prompted to choose the phase to be adjusted. Choose a phase. Power+ SA User Guide, rel. 3.0 53 8. Use the UP and DOWN buttons to specify the voltage adjustment value. The voltage can be adjusted up or down by up to 7 volts. 9. You can continue to adjust another phase, or press Esc to return to the main screen. 54 Power+ SA User Guide, rel. 3.0 GAMATRONIC ELECTRONIC INDUSTRIES LTD. 10. AUTOMATIC RESTART In the event of a prolonged power outage, the UPS turns itself off automatically after the batteries have been exhausted. You can instruct the POWER+ SA to start up automatically so that it will supply current to the load devices when the AC power is restored. This feature is called automatic restart. If you do not use the automatic restart procedure, when the AC power returns the recharging process begins automatically, but no power is supplied to the load. 10.1 Determining the current automatic restart setting To determine if the automatic restart mode is on or off, go to the PROFILE screen To see the UPS Profile screen, from the Main Screen, press the Down button once. The Profile screen shows the current Automatic Restart status. 10.2 Changing the automatic restart status 1. From the Main Screen, press the Ent button to display the Main Menu. 2. On the MAIN MENU, select ADVANCED MENU and press Ent. 3. On the ADVANCED MENU, select AUTOMATIC RESTART and press ENT. 4. Press Ent to change the automatic restart status. Power+ SA User Guide, rel. 3.0 55 5. 56 The new automatic restart status is displayed. Press Esc to return to the Main Screen. Power+ SA User Guide, rel. 3.0 GAMATRONIC ELECTRONIC INDUSTRIES LTD. 11. MISCELLANEOUS FUNCTIONS This section describes infrequently used but important features. 11.1 Manually entering or leaving bypass mode When the AC input power is normal, it is handled by the UPS in one of two ways: • The input AC power is sent to the inverter, where it is regulated and passed on to the load. This is called normal mode or inverter mode. • The input AC power bypasses the inverter entirely and goes directly to the load with no regulation. This is called Bypass Mode. Usually only a technician will need to manually switch the UPS to Bypass mode. THERE ARE TWO WAYS TO MANUALLY ENTER OR LEAVE BYPASS MODE: •Using the manual bypass switch on the UPS rear panel. •Using the system console. 11.1.1 Entering bypass mode via the manual bypass switch Note: the Manual Bypass Switch is OPTIONAL EQUIPMENT, not standard. If the customer desires a Manual Bypass Switch it must be specifically ordered as a separate item. The manual bypass switch on the Power+ rear panel can be used to move the system to bypass mode. Simply turn the switch from the “UPS” position to the “BYPASS” position. The “Bypass” LED on the system console lights. Figure 7: The manual bypass switch on the rear panel To end bypass mode and transfer the load back to the system inverter, simply turn the manual bypass switch from the “BYPASS” position to the “UPS” position. Power+ SA User Guide, rel. 3.0 57 11.1.2 Entering bypass mode via the system console 1. From the Main Screen, press the Ent button to display the Main Menu. 2. On the MAIN MENU, select ADVANCED MENU and press Ent. 3. On the ADVANCED MENU, select TRANSFER LOAD and press Ent. . The TRANSFER LOAD screen tells you if the load is currently on the INVERTER or if the UPS is in BYPASS MODE. 4. Press Ent to switch the load. 58 Power+ SA User Guide, rel. 3.0 GAMATRONIC ELECTRONIC INDUSTRIES LTD. On the Main Screen, the message “Manual Bypass” appears in the lower right quadrant. The audible alarm sounds after 60 seconds. Power+ SA User Guide, rel. 3.0 59 12. IN THE EVENT OF AN AC POWER OUTAGE If a power outage occurs: The Alarm LED lights up and the audible alarm sounds. The UPS continues operating, drawing its power from the batteries. The POWER + SA console looks like this: The Alarm and Battery LEDs are lit. As the battery discharges, the number of “stripes” in the battery icon on the screen decreases. 60 Power+ SA User Guide, rel. 3.0 GAMATRONIC ELECTRONIC INDUSTRIES LTD. When the “BATTERY LOW” message appears, there are only a few seconds before the battery is exhausted. Now is the time to shut down any computers connected to the UPS if you have not already done so. When the UPS battery is exhausted, the UPS does one of two things, depending on the setting of Autorestart mode: • If Auto-restart is DISABLED, the UPS shuts off and remains off, even when AC power is restored. When AC power is restored you must press the OFF/ON button twice to turn on the UPS. Power+ SA User Guide, rel. 3.0 61 • 62 If Auto-restart is ENABLED, the Main Screen shows the UPS ON message. When AC power is restored, the UPS starts up automatically. Power+ SA User Guide, rel. 3.0 GAMATRONIC ELECTRONIC INDUSTRIES LTD. 13. USING THE UPS WITH A GENERATOR 13.1 The Automatic Transfer Switch (ATS) At many sites a generator is used as a reserve source for feeding the UPS during mains power failure. In such cases, the switching between the two sources (the mains and the generator) is performed by an Automatic Transfer Switch (ATS). Because these two sources are not usually synchronized, switching between them requires an interval of at least 10 seconds. Figure 8 illustrates the timing factors involved when using an ATS. For proper functioning of the UPS, the values used for T3 and T4 must be greater than 10 seconds. The optimum delay times can be revealed with a little testing, and may vary from site to site, depending on the UPS, on the loads, and on the particular ATS being used. Figure 8: Timing variables when using a generator and an ATS Power+ SA User Guide, rel. 3.0 63 Figure 9 is an example of the control panel of an ATS. The upper part of the control panel consists of a mimic diagram showing the control flow. “NS = 0” means the normal source is not available. “NS = 1” means the normal source is available. “R” is the reserve source. The timing variables T1 through T5 are described in Figure 8. The knob at the bottom of the control panel controls the actions of the ATS: • The ATS can be set to use the normal source. • The ATS can be set to use the reserve source. • The ATS can be set to automatic mode, which will use the normal source and will automatically switch to the reserve source in the event of a failure of the normal source. • The “Stop” setting opens the ATS’s circuit breakers. Figure 9: Example of an ATS control panel 64 Power+ SA User Guide, rel. 3.0 GAMATRONIC ELECTRONIC INDUSTRIES LTD. 14. TROUBLESHOOTING This section explains what to do in the event of an alarm condition, or when any other “out of the ordinary” event occurs on the UPS. 14.1 Alarm sounds and/or Alarm LED lights up 1. Go to the Event Log and look at the Active Alarm Display to determine the nature of the alarm. See “Navigating to the event log” and “Active Alarm display” on page 26. 2. Look for the appropriate heading below according to the nature of the alarm, and follow the instructions. 14.2 Electricity returned but UPS remains in Battery Mode Check the external circuit breaker for the AC line. The circuit breaker may be off. 14.3 Battery Test failed It may be that an automatically scheduled battery test was executed shortly after the end of a power outage, when the battery was still charging. Wait until about two hours after the return of the AC power and perform a manual battery test. This should clear the alarm. 14.4 The UPS remains in Bypass mode The UPS may have been put in Bypass mode manually. In such a case, the lower left quadrant of the Main Screen says “Manual Bypass”. To manually return the UPS to Normal mode, see “Manually entering or leaving bypass mode” on page 57 14.5 Sync Fault Verify that the AC Input and the Bypass Input lines are connected to the UPS in proper phase sequence. Verify that AC of the proper frequency (Hz) is being used. (See on page 72.) Power+ SA User Guide, rel. 3.0 65 Figure 10: Block diagram of major components and connections 66 Power+ SA User Guide, rel. 3.0 GAMATRONIC ELECTRONIC INDUSTRIES LTD. 15. ALARM DRY CONTACTS The rear panel of the UPS contains a standard DB9 port labeled ALARM. This port is an interface to the Alarm Dry Contacts. The Alarm Dry Contact port is shown below. The Alarm Dry Contacts can be used to notify a computer or another system when certain events take place on the POWER+ SA UPS system. The dry contact circuits make use of opto-couplers. No more than 30 V and 100 mA should be applied to a dry contact. Figure 11: Pin numbers in D9 connectors Table 8: Assignments for D9 connectors on rear of controller ALARM CONNECTOR PIN # RS232 PINS FOR DRY CONTACTS PINS FOR CONNECTOR REMOTE PANEL 1 Input dry contact #5 (AUX5) - Not used 2 Reserved - RXD, Receive data 3 Output dry contact #2. Normally Open. (Default value when closed is line failure; can be reassigned) - TXD, Transmit data 4 COMMON (Ground) - Not used 5 Output dry contact #1. Normally Open. (Default value when closed is low battery; can be reassigned) - GND 6 - Remote clock Not used 7 - Remote data Not used 8 - Remote ground Not used 9 - Remote power Not used Power+ SA User Guide, rel. 3.0 67 The following figure is a schematic of the Dry Alarm Contacts. The triangles represent pins, the numerals in the triangles represent pin numbers. 68 Power+ SA User Guide, rel. 3.0 GAMATRONIC ELECTRONIC INDUSTRIES LTD. 16. RS232 INTERFACE The POWER+ SA may be connected to a computer or a modem using a shielded cable, with an RS232type 9-pin female connector. The cable should not exceed15 meters. The RS232 plug is located on the rear panel of the POWER+ SA. The connection allows the user to read data from the UPS, and to control it as well. There are two types of UPS connections: • Directly to a host computer with dedicated software. • Remote control through a SNMP/WEB management programs for communication with a computer network (optional). In order to use the RS232 connection to a computer, monitoring software must be installed on the user’s PC. The monitoring software can be ordered from Gamatronic. The PIN assignment for this 9-pin connector is shown in the diagram below. See also the column labeled “Pins for dry contacts” in Table 8 The communication is half-duplex, 9600 baud-rate, no-parity, 1-stop bit, Rx, Tx and COM lines, no-flow control (neither h/w nor s/w). RS232 COM Tx Rx 5 1 9 6 RS232 Connector Power+ SA User Guide, rel. 3.0 69 17. SNMP AGENT (OPTIONAL) The SNMP agent enables monitoring, management, control, and orderly shutdown of the UPS via the Internet protocol SNMP. There are two types of SNMP agents: • External Adaptor • Internal Card The SNMP agent communicates with the RS232 interface of the UPS which: • Supports standard UPS RFC1628 MIB • Supports the SNMP commands Trap, Set, and Get • Transfers UPS indicators such as voltage, frequency and current via the Internet browser or any management system (NMS). Use of an SNMP agent disables the RS232 interface of the UPS. Options: INTERNAL CARDS EXTERNAL ADAPTOR POWER+ PSM-AC lets you monitor and control your POWER+ SA UPS 70 Power+ SA User Guide, rel. 3.0 GAMATRONIC ELECTRONIC INDUSTRIES LTD. 18. WIRELESS CONTROL (OPTIONAL) The POWER+ SA system includes an option for wireless control and management, using the Gamatronic WING. The WING enables real-time detection of power system faults and immediately notifies selected recipients (control center, technician, etc.), detailing the faults. The WING includes the following elements: • WING board • SIM board • antenna. • D9 – D9 cable (for RS232 connection between the POWER+ SA and the WING. • ac-dc power adapter. For more information, request a copy of the Wing user guide. Power+ SA User Guide, rel. 3.0 71 19. CHANGING THE UPS LINE CONFIGURATION Your POWER+ SA UPS is capable of operating with one- or three-phase input, and can supply one- or three-phase output, depending on the AC input and on the UPS settings. The possible phase settings are shown in the following table. Table 9: UPS line configuration options INPUT OUTPUT SHORTHAND DESIGNATION 3X400V 3X400V 3-3 3X400V 1X230V 3-1 1X230V 1X230V 1-1 Your POWER+ SA UPS was probably already set at the factory or by your dealer to operate with the number of input and output phases appropriate for your requirements. If your requirements change, the POWER+ SA UPS can be adjusted to handle any of the combination of input and output voltages listed above. Gamatronic highly recommends that you enlist the services of a trained electrician if you need to adjust the number of input and/or output phases of your UPS! Changing the UPS settings for input and output phases is serious business that can result in damage to the UPS and to your load devices if you make a mistake. 19.1 Note regarding battery connection on UPS The battery connection on your UPS may differ in appearance from that shown in the following procedures. Regardless, the procedures are still applicable. Your UPS will have one of two possible types of battery connections: 72 • A plastic and metal terminal block on the “terminal panel” of the terminal assembly (see Figure 12 on page 77). In this case, there will be four terminal blocks on the terminal panel; the bottom terminal block is for the battery. • A three-segment Anderson-type connector on the UPS rear grille. In this case there will be only three terminal blocks on the terminal assembly terminal panel. There will be no terminal block for the battery; instead, the battery cable connects to the Anderson connectors on the UPS rear grille through an opening in the terminal assembly panel. Power+ SA User Guide, rel. 3.0 GAMATRONIC ELECTRONIC INDUSTRIES LTD. 19.2 Determining present phase setting The first step in changing the line configuration of the UPS is to verify its present line configuration. The phase setting can be seen on the second page of the Profile screen, shown here with the phase setting highlighted. See section 4.2.2.1 on page 21 for instructions on how to display the Profile screen. Power+ SA User Guide, rel. 3.0 73 19.3 A Summary Before Changing the Line Configuration Regardless of whether you are converting the UPS to 3–3, 3–1, or 1–1 operation, the procedure is basically the same for all three options, as summarized in the following points. • If reconfiguring to 3-1 or 1-1, obtain from Gamatronic the appropriate terminal assembly for the desired new configuration. If reconfiguring to 3-3, obtain from Gamatronic 3 green terminal connector plugs. • Turn the UPS off by pressing the On/Off button twice. The console should read: “UPS OFF, NO OUTPUT”. • Change the phase setting through the UPS console. • Deactivate the UPS completely by switching off the circuit breakers for Ac Input, Bypass Input, Battery Input, and Ac Output. • Disconnect all ac cables and the battery cable from the UPS • Change the “phases” dipswitch, if appropriate. • Attach the input and output wiring to the UPS as required for the new phase arrangement. This includes the replacement of the current terminal assembly (or for 3-3, 3 green connector plugs) with a new terminal assembly (or for 3-3, 3 green connector plugs). Also reattach the battery cable. • Turn the UPS on. At the time of the switch, be sure to follow the procedure below that is specific to the particular arrangement you need: • switching to 3–3 operation (section 19.4 on page 75), • switching to 3–1 operation (section 19.5 on page 81), or • switching to 1–1 operation (section 19.6 on page 89). Note: Gamatronic highly recommends that you enlist the services of a trained electrician if you need to reconfigure the number of input and/or output phases of your UPS. 74 Power+ SA User Guide, rel. 3.0 GAMATRONIC ELECTRONIC INDUSTRIES LTD. 19.4 Switching to 3–3 operation This section explains how to reconfigure your Power+ SA UPS for use with 3x400 V input and 3x400 V output. Note that at any point in the UPS console procedure you can exit by pressing the ESC key. 1. Verify that you have obtained from Gamatronic three green connector plugs, which will be needed later in the process. 2. Turn the UPS off by pressing the On/Off button twice. The screen should read “UPS OFF, NO OUTPUT”. 3. From the Main Menu, select Advanced Options and press Ent. 4. Select Technician Menu and press Ent. 5. On the Technician Menu choose Number of Phases. The UPS states the present line configuration. To continue the process of changing the current configuration, press Ent. 6. The UPS screen warns that attempting to change the input and output line configuration can damage the UPS if you are not a properly qualified technician. If you are a properly qualified technician, press Ent to continue. 7. The UPS screen warns that the unit must be off in order to change the line configuration. If you turned off the UPS as instructed in step 1 above, press Ent to continue. 8. The UPS prompts you to choose the new line configuration. Make your selection and press Ent. Power+ SA User Guide, rel. 3.0 75 9. The UPS screen advises that to work with a line configuration of 3-3, the UPS Input, Output, and Bypass connections must be properly fitted. This will be done below, after the UPS is disconnected from the input mains. Press Ent to continue. 10. The UPS screen instructs you to refer to this user manual for specific instructions. Press Ent to continue. 11. The UPS screen prompts you once again to press Ent if you want to continue. Press Ent to continue.. 76 Power+ SA User Guide, rel. 3.0 GAMATRONIC ELECTRONIC INDUSTRIES LTD. 12. The UPS screen informs you that the line configuration changes will be in effect only after all input and output voltages to the UPS have been disconnected and the wire connections and the dipswitches have been adjusted. 13. Disconnect the UPS from all voltages by turning OFF the circuit breakers for AC Input, Bypass Input, Output, and Battery. 14. Disconnect the battery cable from the UPS. 15. Use a screwdriver to remove the external protective cover from the rear of the UPS (refer to Figure 12). 16. Before continuing, verify with a multimeter that there is no voltage on any of the cables attached to the terminals. (For clarity’s sake the electrical cables are not shown in Figure 12.) 17. Disconnect the cables from the terminal panel. 18. Remove the screws from the right side of the internal protective cover. 19. Remove the terminal assembly from the UPS (refer to Figure 12). The terminal assembly consists of 3 parts: the terminal panel, the black metal internal protective cover behind it, and green connector plugs. The terminal assembly should be removed as a single unit, there is no need to disassemble it into its separate components. Figure 12: Reconfiguring from 1-1 or 3-1 to 3-3 Power+ SA User Guide, rel. 3.0 77 20. On the rear panel of the UPS, remove the screws that secure the internal UPS body to its external shell. (See Figure 13. Note - the number and location of the screws may differ from that shown in Figure 13.) Figure 13: Remove the four screws from the rear panel 21. 78 Grasp the top of the rear panel and pull the UPS body firmly so that it is most of the way out of the external shell. (See Figure 14 and Figure 15.) Power+ SA User Guide, rel. 3.0 GAMATRONIC ELECTRONIC INDUSTRIES LTD. Figure 14: Accessing the dip switches (1) Figure 15: Accessing the dip switches (2) 22. On the top front of the UPS body there is a set of three small dipswitches, as shown in the diagram. When looking at the dipswitches from the front of the UPS, the rightmost dipswitch controls the output line configuration. For three-phase output, the rightmost dipswitch should be switched towards the back of the UPS. Refer to Figure 16: Location of the dip switches on page 80. Power+ SA User Guide, rel. 3.0 79 Figure 16: Location of the dip switches 23. Push the UPS body back into the UPS shell and refasten the screws that you removed earlier from the UPS rear panel. 24. If you going to use the 3-3 rear panel adapter that includes a manual bypass switch, bring the adapter near the UPS rear panel and plug the adaptor panel’s bypass command connector (see Figure 6 on page 42) into the rear panel of the UPS. 25. Plug in the 3-3 terminal assembly and secure it by fastening the screws on its right side. 26. The UPS must now be wired. Depending on whether you are going to install the rear panel adaptor without the manual bypass switch or the rear panel adaptor with the bypass switch, follow the instructions in • section 8.1.1 “Cable connections for 3-3 usage, NO manual bypass”, starting on page 36 OR • section 8.1.2 “Cable connections for 3-3 usage, WITH manual bypass”, starting on page 39. Then continue with the next step below. 27. Turn the circuit breakers ON for ac input, bypass input, and output. You can now start up the UPS. If the UPS does not start up, it may be that the UPS’s line configuration setting does not match the dipswitch line configuration setting. In this case, go to the Profile screen and check that the line configuration setting matches the setting for the line configuration dipswitch. 80 Power+ SA User Guide, rel. 3.0 GAMATRONIC ELECTRONIC INDUSTRIES LTD. 19.5 Switching to 3–1 operation (3x400 V input, 1x230 V output) Note that at any point in the procedure you can exit by pressing the ESC key. 1. Turn the UPS off by pressing the On/Off button twice. The screen should read “UPS OFF, NO OUTPUT”. 2. From the Main Menu, select Advanced Options and press Ent. 3. Select Technician Menu and press Ent. 4. On the Technician Menu choose Number of Phases. The UPS states the present line configuration. To continue the process of changing the current configuration, press Ent. 5. The UPS screen warns that attempting to change the input and output line configuration can damage the UPS if you are not a properly qualified technician. If you are a properly qualified technician, press Ent to continue. 6. The UPS screen warns that the unit must be off in order to change the line configuration. If you turned off the UPS as instructed in step 1 above, press Ent to continue. Power+ SA User Guide, rel. 3.0 81 7. The UPS prompts you to choose the new line configuration. Make your selection and press Ent. 8. The UPS screen advises that to work with a line configuration of 3-1, the UPS Input, Output, and Bypass connections must be properly fitted. This will be done below, after the UPS is disconnected from the input mains. Press Ent to continue. 9. The UPS screen instructs you to refer to this user manual for specific instructions. Press Ent to continue. 10. The UPS screen prompts you once again to press Ent if you want to continue. Press Ent to continue.. 82 Power+ SA User Guide, rel. 3.0 GAMATRONIC ELECTRONIC INDUSTRIES LTD. 11. The UPS screen informs you that the line configuration changes will be in effect only after all input and output voltages to the UPS have been disconnected and the wire connections and the dip switches have been adjusted as required. 12. Disconnect the UPS from all voltages by turning OFF the circuit breakers for AC Input, Bypass Input, Output, and Battery. 13. Disconnect the battery cable from the UPS. 14. Use a screwdriver to remove the external protective cable cover on the rear of the UPS. Refer to Figure 17 or Figure 18 below. (For clarity’s sake the electrical cables are not shown in Figure 17 or Figure 18.) 15. Disconnect the battery cable from the rear of the UPS. 16. Before continuing, verify with a multimeter that there is no voltage on any of the cables attached to the terminals. 17. If you are reconfiguring from 1-1 to 3-1: • Disconnect the cables from the terminal assembly. • Remove the screws from the right side of the terminal assembly. • Remove the terminal assembly from the UPS (refer to Figure 17). The terminal assembly consists of 3 parts: the terminal panel, the black metal internal protective cover behind it, and green connector plugs. The terminal assembly should be removed as a single unit, there is no need to disassemble it into its separate components. Continue with step 0 on page 88. 18. If you are reconfiguring from 3-3 to 3-1: • Remove the protective cover that protects the green terminal plugs (see Figure 18 on page 85). • Unplug the green cable-connector plugs from the rear of the UPS. See Figure 18. Power+ SA User Guide, rel. 3.0 83 Figure 17: Components of the terminal assembly 84 Power+ SA User Guide, rel. 3.0 GAMATRONIC ELECTRONIC INDUSTRIES LTD. Figure 18: Reconfiguring from 3-3 to 3-1 19. On the rear panel of the UPS, remove the screws that secure the internal UPS body to its external shell. (See Figure 19. Note - the number and position of the screws may differ from that show in Figure 19.) Power+ SA User Guide, rel. 3.0 85 Figure 19: Remove the four screws from the rear panel 20. Grasp the top of the rear panel and pull the UPS body firmly so that it is most of the way out of the external shell (see Figure 20 and Figure 21 below). Figure 20: Accessing the dip switches (1) 86 Power+ SA User Guide, rel. 3.0 GAMATRONIC ELECTRONIC INDUSTRIES LTD. Figure 21: Accessing the dip switches (2) 21. On the top front of the UPS body there is a set of three small dipswitches, as shown in the diagram. When looking at the dipswitches from the front of the UPS, the rightmost dipswitch controls the output line configuration. For three-phase output, the rightmost dipswitch should be switched towards the back of the UPS. Refer to the diagram. Figure 22: Location of the dip switches Power+ SA User Guide, rel. 3.0 87 22. Push the UPS body back into the UPS shell and refasten the screws that you removed earlier from the UPS rear panel. 23. Plug in the 3-1 terminal assembly (which you should have ordered and obtained beforehand) and secure it by fastening the screws on its right side. 24. The UPS must now be wired. Follow the instructions in the section 8.1.3, “Cable Connections for 3-1 Usage”, then continue with the next below. 25. Turn the circuit breakers ON for AC Input, Bypass Input, Output, You can now start up the UPS. If the UPS does not start up, it may be that the UPS’s line configuration setting does not match the dipswitch line configuration setting. In this case, go to the Profile screen and check that the line configuration setting matches the setting for the line configuration dipswitch. 88 Power+ SA User Guide, rel. 3.0 GAMATRONIC ELECTRONIC INDUSTRIES LTD. 19.6 Switching to 1–1 operation (1x230 V input, 1x230 V output) Note that at any point in the procedure you can exit by pressing the ESC key. 1. Turn the UPS off by pressing the On/Off button twice. The screen should read “UPS OFF, NO OUTPUT”. 2. From the Main Menu, select Advanced Options and press Ent. 3. Select Technician Menu and press Ent. 4. On the Technician Menu choose Number of Phases. The UPS states the present line configuration. To continue the process of changing the current configuration, press Ent. 5. The UPS screen warns that attempting to change the input and output line configuration can damage the UPS if you are not a properly qualified technician. If you are a properly qualified technician, press Ent to continue. 6. The UPS screen warns that the unit must be off in order to change the line configuration. If you turned off the UPS as instructed in step 1 above, press Ent to continue. 7. The UPS prompts you to choose the new line configuration. Make your selection and press Ent. Power+ SA User Guide, rel. 3.0 89 8. The UPS screen advises that to work with a line configuration of 3-1, the UPS Input, Output, and Bypass connections must be properly fitted. This will be done below, after the UPS is disconnected from the input mains. Press Ent to continue. 9. The UPS screen instructs you to refer to this user manual for specific instructions. Press Ent to continue. 10. The UPS screen prompts you once again to press Ent if you want to continue. Press Ent to continue.. 11. The UPS screen informs you that the line configuration changes will be in effect only after all input and output voltages to the UPS have been disconnected and the wire connections and the dip switch has been adjusted as required. 90 Power+ SA User Guide, rel. 3.0 GAMATRONIC ELECTRONIC INDUSTRIES LTD. 12. Disconnect the UPS from all voltages by turning OFF the circuit breakers for AC Input, Bypass Input, Output, and Battery. 13. Disconnect the battery cable from the UPS. 14. Use a screwdriver to remove the external protective cable cover on the rear of the UPS. Refer to Figure 23 or Figure 24 below. (For clarity’s sake, the electrical cables are not shown in Figure 23 or Figure 24). 15. Disconnect the battery cable from the rear of the UPS. 16. Before continuing, verify with a multimeter that there is no voltage on any of the cables attached to the terminals. 17. If you are reconfiguring from 3-1 to 1-1: 17.1 Disconnect the cables from the terminal assembly. 17.2 Remove the screws from the right side of the terminal assembly. 17.3 Remove the terminal assembly from the UPS (refer to Figure 23 below). The terminal assembly consists of 3 parts: the terminal panel, the black metal internal protective cover behind it, and green connector plugs. The terminal assembly should be removed as a single unit, there is no need to disassemble it into its separate components. 17.4 Continue with step 23 on page 95. 18. If you are reconfiguring from 3-3 to 1-1: • Remove the protective cover that protects the green terminal plugs (see Figure 24 below). • Unplug the green cable-connector plugs from the rear of the UPS. See Figure 24. Power+ SA User Guide, rel. 3.0 91 Figure 23: Components of the terminal assembly Figure 24: Reconfiguring from 3-3 to 3-1 92 Power+ SA User Guide, rel. 3.0 GAMATRONIC ELECTRONIC INDUSTRIES LTD. 19. On the rear panel of the UPS, remove the screws that secure the internal UPS body to its external shell. (See Figure 25. Note – the number and position of the screws may differ from that shown in Figure 25.) Figure 25: Remove the four screws from the rear panel 20. Grasp the top of the rear panel and pull the UPS body firmly so that it is most of the way out of the external shell (see Figure 26 and Figure 27). Figure 26: Accessing the dipswitches (1) Power+ SA User Guide, rel. 3.0 93 Figure 27: Accessing the dipswitches (2) 21. On the top front of the UPS body there is a set of three small dipswitches, as shown in the diagram. When looking at the dipswitches from the front of the UPS, the rightmost dipswitch controls the output line configuration. For three-phase output, the rightmost dipswitch should be switched towards the back of the UPS. Refer to the diagram. Figure 28: Location of the dipswitches 22. 94 Push the UPS body back into the UPS shell and refasten the screws that you removed earlier from the UPS rear panel. Power+ SA User Guide, rel. 3.0 GAMATRONIC ELECTRONIC INDUSTRIES LTD. 23. Plug in the 1-1 terminal assembly (which you should have ordered and obtained beforehand) and secure it by fastening the screws on its right side. 24. The UPS must now be wired. Follow the instructions in the section “Cable Connections for 1-1 Usage”, then continue with the next step below. 25. Turn the circuit breakers ON for AC Input, Bypass Input, Output, You can now start up the UPS. If the UPS does not start up, it may be that the UPS’s line configuration setting does not match the dipswitch line configuration setting. In this case, go to the Profile screen and check that the line configuration setting matches the setting for the line configuration dipswitch. Power+ SA User Guide, rel. 3.0 95 20. PREVENTIVE MAINTENANCE Every Gamatronic UPS contains technologically advanced electronic systems. These electronic systems are sensitive to environmental conditions. It is important that the operating and storage environments of the UPS be clean and dust-free, free of dampness and excess humidity. The system's batteries provide back-up power to the UPS when needed. An environmental temperature of 20 °C (68 °F) is ideal for the batteries. Significantly higher temperatures shorten the batteries' lifespan. The UPS and its batteries both require periodic preventive maintenance inspections. At the least, these inspections should include a visual inspection of the UPS and its batteries, and the tightening of any screws and bolts that have over time become loosened. The owner of the UPS is responsible for ensuring that the preventive maintenance inspections take place. This is done by contacting Gamatronic's service department and arranging a mutually convenient time for a technician to perform the inspection. It is important that the UPS owner continue to arrange regular preventive maintenance inspections even after the expiration of the initial warrantee period. Gamatronic bears no liability for damage caused to the UPS due to improper maintenance by third parties, in particular after the expiration of the warrantee or service agreement. It is the responsibility of the UPS owner to uphold his responsibilities according to the warrantee or service agreement. This includes ensuring that the UPS's environment meets requirements. 21. SERVICE AND REPAIRS Gamatronic maintains a team of service technicians, repair laboratories, and an ample inventory of spare parts, dedicated to the service and repair of our products. When service is required, it will be performed either at the customer's site or in one of our laboratories, according to the judgment of our technician and the specifics of the service agreement between the customer and Gamatronic. In regards to service, oral agreements have no standing. Service shall be provided gratis during the warrantee period, on the condition that the UPS has been properly maintained and a written record has been kept of any maintenance performed on the system. The initial warrantee period can be extended by a written service agreement between Gamatronic and the customer. Without a written agreement, Gamatronic is under no obligation to provide service after expiration of the initial warrantee period. Gamatronic will not be responsible for maintenance or changes to the UPS that are performed by an agent without written authorization from Gamatronic. 96 Power+ SA User Guide, rel. 3.0 GAMATRONIC ELECTRONIC INDUSTRIES LTD. 22. POWER+ SA SPECIFICATIONS POWER+ SA TECHNICAL DATA Topology Unit size Dc/Ac efficiency (nominal) Ac/Ac efficiency (nominal) Input Voltage (V) Voltage range (%) Power walk-in (sec) Power factor THDI (%) Earth leakage current Output Rated power Nominal output frequency Frequency tracking range Slew rate Voltage (V) Static regulation % Regulation for unbalanced load % Dynamic response to 100% load step (%) Overload Waveform THD (%) Load CF (max) Inverter efficiency (nominal) % Static Switch Input connection General Maximum power dissipation (Po=8KW) Ambient temperature (÷C) Relative humidity (%) Altitude (m) Enclosure Cooling system Acoustic noise (full load) at 1.5m distance MTBF (hrs) Dimensions (H x W x D, cm.) Weight LCD display Input: voltage, current 230 / 3X400V True on-line battery, double conversion 10 kVa 98 % 96 % 3x400 V +N / 230 V; 45-65 Hz – 27% and + 20% > 60 0.99 5 3 mA max. 10 kVA / 8 kW 50 / 60 Hz ±3 Hz 1 Hz/sec 3x400 V + N / 230 V; 50 Hz ±1 ±1 for 100% unbalanced load 2 110% : 10 minutes; 125% : 60 seconds; 1000% : 1 cycle Sinusoidal Less than 2 for linear load 6:1 98 Dual input 384 W (1300 BTU) -10 to +40 (operating) -20 to +70 (storage) 95 max., non-condensing 1500 without derating IP20 Multi-fan with speed control (forced) 47 dBA 250,000 56 x 9 x 60 18 kg Output: voltage, frequency, current Batteries: voltage Log (events memory): last 200 events Communication RS232 port, Alarm and shutdown monitor SNMP link (optional) Standards EMC IEC 62040-2, under EMC 2004/108/EC Design IEC 62040-3 Safety IEC 62040-1, under LVD 2006/95/EC Low magnetic field radiation Batteries (external) Type Number Voltage Backup time (min.) Recharge time (hrs.) Battery cabinet Dimensions (H x W x D, in cm) Weight (kg) EMF as per ICNIRP Sealed, valve-regulated, lead-acid 64 12 V, 5 Ah 6 at 50 % load Appx. 1-2 45 x 26 x 60 110 All specifications subject to change without notice. Power+ SA User Guide, rel. 3.0 97 23. FLOWCHART OF SYSTEM FUNCTIONS Figure 29: Flowchart of system functions 98 Power+ SA User Guide, rel. 3.0 GAMATRONIC ELECTRONIC INDUSTRIES LTD. For a full company profile, please visit out website at www.gamatronic.com. Gamatronic Building, Jerusalem, Israel Gamatronic’s product range: UPS systems Power systems for the telecom industry Dc-to-ac inverters Dc-to-dc converters Frequency converters Battery chargers Power management solutions Headquarters and Factory 17 Hartom Street, Har Hotzvim Industrial Park, POB 45029, Jerusalem 9777517, Israel Gamatronic Singapore Sales Office email: [email protected] Gamatronic (UK) Ltd. Gamatronic House, Stephenson Court, Priory Business Park, Bedford MK44 3US, United Kingdom Tel: +44 (0)1234 831111 Fax: +44 (0)1234 831114 email: [email protected] Power+ SA User Guide, rel. 3.0 99